
There's been a bit of confusion about how to contribute to the EOS ICO with MyEtherWallet. I speculate this is an inadvertent result of Dan being spoiled by Graphene blockchains, and the inherent ease of building a web-interface on top of them. By using MetaMask, the EOS team could come close to meeting these high standards. The reality is likely a bit different, but I digress...
This ICO Contract was designed to be interacted with through the Official EOS Site. Using the official interface helps you understand various parameters and avoid potentially catastrophic validation mistakes and/or process omissions. On the other hand, MyEtherWallet aggregates interfaces rudimentarily at best, and so you are unnecessarily inflicting a great deal of usability constraints onto yourself when attempting to interact with the EOS Token Sale contract in this way.
All that aside, some people don't want to use the Official EOS Page because it requires MetaMask or they don't use Chrome. Some just insist on using MyEtherWallet (MEW). There's also the chance that the EOS site goes down or MetaMask causes you problems, in this situation, using MEW is one potential workaround. This article is directed towards this niche group of users and entirely possible situation.
Instructions start at Dancing Avocados
Due to the complexity and risks associated to this crowdsale I did not skimp on any details, and it will probably be the most tl;dr article you will (or will not) read today. For those of you who want me to just tell you how to participate without explaining the risks, you'll be sorely disappointed, because that's not going to happen here. It's a complex ICO that requires explanation, accept no less.
This guide is intended for ADVANCED USERS
If you are a novice, you should really just install the MetaMask Chrome extension and proceed over to the Official EOS Contribution MetaMask enabled Interace. For those that don't understand how to use MetaMask and the official interface here's a great tutorial that explains it..
That Said, You Assume All Risk
USE AT YOUR OWN RISK. I AM NOT RESPONSIBLE FOR TOKEN LOSS. THIS IS NOT LEGAL OR INVESTMENT ADVICE. IT IS HIGHLY SUGGESTED YOU READ THIS ARTICLE IN IT'S ENTIRETY AND UNDERSTAND THE IMPLICATIONS BEFORE CONDUCTING A TRANSACTION. IF YOU'RE A US CITIZEN OR RESIDENT YOU CANNOT PARTICIPATE IN EOS TOKEN SALE AND BY EXERCISING THIS CONTRACT YOU ARE AGREEING TO THOSE TERMS.
About the EOS Token Sale
It's probably a good idea to understand a higher level view of the EOS ICO, here's a wonderful article written by @trogdor. If you're more technical, read the whitepaper and if you don't know how to read instructions just scroll down to the comments and ask a question that was answered in the article you're commenting on ;)

Prerequisites
- Prior MyEtherWallet experience
- A funded Ethereum Wallet (for funding the contract, and paying the fees associated to transactions)
Useful Tools before you begin
If you want to be playing on the same level as contributors using the official MetaMask integration on the EOS site, you may consider using one or both of following tools that will provide insight into the current state of the EOSCrowdsale.
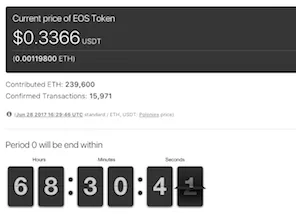
First up is EOSScan, it will show you the current rate, as well as time left in the current window and is very simple to use.
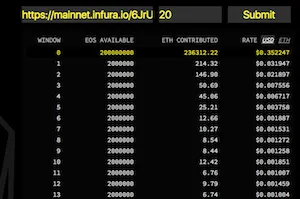
Next up is for people who want to see into future windows, here's a tool I made based on code originally written by Luke Stokes, it takes about 60 seconds of setup but allows you to peak into future windows. It also display both USD and ETH EOS rates. This is most useful if you're looking to contribute to future windows
Feel free to let me know of any other tools you may have come across in the comments below :)
Step 1: Fund EOS Contract (The Current Window, "Today")
This will fund the current window, if you're looking to fund a future window, click here
- Obtain the contract address from http://EOS.io or trust me when I say it is
0xd0a6E6C54DbC68Db5db3A091B171A77407Ff7ccf(It's always suggested to trust no one in these situations) - Go to https://www.myetherwallet.com/#send-transaction
- Load your wallet using any one of the methods listed, for this example I used the Keystore File. Enter the password to your wallet in the very likely event is is encrypted. If it's not encrypted, may Murphy's Law forever be in your favor.
- Click
Unlockbutton - In Address field, enter the contract address.
- In Amount to send field, enter the amount you would like to contribute.
- Allow the wallet to suggest a Gas Limit. If it does not autopopulate, enter
90000or more. If your TX fails, increase Gas Limit. If you would like your TX to go through more quickly, adjust your gas limit accordingly. - Click
Generate Transactionbutton - Check the details of the transaction, and if you are confident, click
Yes, I am sure! Make transaction - If all went well, a green bar will appear at the bottom of the page including a link to your transaction on the blockchain.
Step 2: Claim EOS Tokens
You can claim tokens at the end of any window you have contributed to. If you attempt to claim tokens before a window(s) you have contributed to has closed, the transaction will fail. This is intended functionality.
- Go to https://www.myetherwallet.com/#contracts
- Under heading Select Existing Contract is a dropdown, select EOS Contribution
- Click
Access - Under the "Read / Write Contract" heading, in the dropdown select
claimAll. - Load your wallet using any one of the methods listed, for this example I used the Keystore File. Enter the password to your wallet in the very likely event is is encrypted. If it's not encrypted, may Murphy's Law forever be in your favor.
- Click
Unlockbutton - Click
Writebutton - Set Amount to send to
0and allow the wallet to suggest a Gas Limit. If it does not autopopulate, enter90000or more. If your TX fails, increase Gas Limit. If you would like your TX to go through more quickly, adjust your gas limit accordingly. - Click
Generate Transactionbutton - Check the details of the transaction, and if you are confident with the details you have entered, click
Yes, I am sure! Make transaction - If all went well, a green bar will appear at the bottom of the page including a link to your transaction on the blockchain.
- After the transaction is confirmed the ERC20 tokens will be transferred to your wallet.
Note: You will not see your tokens immediately in MEW, you need to take a few extra steps. See instructions for seeing token balance and transferring tokens.
Step 3: EOS Public Key Mapping
This is the part of the process that confuses people the most. So please read every single word here very carefully. These steps can be completed at any time before the ERC20 tokens are frozen somewhere around June 3rd 2018.
Step 3.A: Generate EOS Key-pair
- Visit the EOS Token Generator created by @nadejde based off the official EOS Contribution Interface code, but with everything stripped out but the Key Generator. The original article about this code is here
- Click
Generate EOS key - CAREFULLY SAVE THE GENERATED KEY-PAIR
If for whatever reason you lose them, you can update your EOS keys at any time anytime between now and 48 hours after the token sale.
Step 3.B: Registering/Mapping your EOS Key
About EOS Key Mapping
Registering your EOS key will map the key-pair you generated earlier, the public key of your future EOS wallet, to the Ethereum Address this transaction is broadcasted from. It is very important to understand this, because 48 hours after the token sale ends, ERC20 tokens can no longer be transferred, and where they live at that moment in time will be where they die, only to be reborn on the EOS blockchain according to the mapping defined by this function.
(takes deep breath)
For example, if you move the EOS ERC20 tokens to an exchange, and fail to move your tokens back to an Ethereum address you posses the private keys for that is mapped/registered to an EOS address, you will not have access to those EOS tokens on the native chain after June 3rd 2018.
...But relax, you have time, there is no rush or need for anxiety yet, June 3rd is still a ways away
Does it matter when the EOS keys are mapped to an Ethereum Wallet?
What's most important about all this is that you have a valid EOS key-pair whose public key is mapped to an Ethereum wallet containing EOS ERC20 tokens BEFORE the end of the 48 hour grace period following the end of the EOS token sale on June 1, 2018 at 22:59:59 UTC
This means that registering a.k.a. "Mapping" your EOS key can be completed at your discretion, before or after funding the EOSCrowdsale Contract, at any time between now and the end of the ICO.
EOS Public Key Registration can be completed at your discretion, before or after funding the contract
How to Register your EOS Key
YOU ONLY NEED TO MAP AN EOS KEY TO AN ETHEREUM ADDRESS ONCE! DOING MORE THAN ONCE IS JUST WASTING MONEY! ... Unless of course you need to Update Your EOS Key Mapping
- Go to https://www.myetherwallet.com/#contracts
- Under heading Select Existing Contract is a dropdown, select EOS Contribution
- Click
Access - Under "Read / Write Contract" select
registerfrom dropdown. - In the field named Key enter the EOS Public Key you generated earlier. DO NOT, I repeat, DO NOT enter your Private key here.
- Load your wallet using any one of the methods listed, for this example I used the Keystore File. Enter the password to your wallet in the very likely event is is encrypted. If it's not encrypted, may Murphy's Law forever be in your favor.
- Click
Unlock - Click
Write - Set Amount to send to
0and allow the wallet to suggest a Gas Limit. If it does not autopopulate, enter90000or more. If your TX fails, increase Gas Limit. If you would like your TX to go through more quickly, adjust your gas limit accordingly. - Click "Generate Transaction"
- Check the details of the transaction, and if you are confident, click
Yes, I am sure! Make transaction - If all went well, a green bar will appear at the bottom of the page including a link to your transaction on the blockchain.
Unanswered Questions
- What happens if a single EOS public key is mapped to multiple Ethereum addresses?
Answered Questions
Can
register()be called from the Ethereum wallet to update its mapping to an EOS public key?
How does
buyWithLimit()work in practice? Are funds not meeting limit requirements returned when runningclaimAll()? If so, where is the code for this?
buyWithLimit() function will prevent you from sending the same contribution twice, for example, if a TX is stuck due to network congestion. I have provided a tutorial on this
Conclusion
I strongly suggest you use the official EOS contribution page with MetaMask integration, here's a good tutorial that explains how. It takes far less time, and the chances of making a mistake are many orders of magnitude lower.
For the advanced users, MEW fanatics, and paranoiac offline TX signers, you probably found this helpful. If you've found an error, please let me know!
Recap
- Fund Contract from Ethereum Wallet you have mapped with your EOS key (or be sure to send the ERC20 tokens there by end of Token Sale)
- Claim your tokens if you would like to transfer them
- Generate and save EOS key pair
- Register (map) your EOS public key to your Ethereum Wallet (technically anytime before end of Token Sale).
Remember that your EOS ERC20 tokens should be in a wallet mapped to an EOS public key that you posses the private keys for sometime before the end of the ICO.
If you have no specific reasoning for preferring MEW you should really visit this article by @trogdor that explains the EOS sale in its entirely, as well as the MetaMask contribution process.
Troubleshooting
- If you're getting "Window Blocked" errors in MEW, try the following
- Disable your adblocker
- If using brave, switch to chrome
- Visit
chrome://settings/content/popupsand turn off pop-up blocker (switch to "allowed")
More EOS MEW Guides
- How to contribute to a future window on EOSCrowdsale using MyEtherWallet (MEW)
- How to Transfer EOS ERC20 Tokens with MyEtherWallet
- How to Check Which EOS Public Key is mapped to your Ethereum Address
- How to update the EOS public key mapped/registered to your Ethereum Wallet with MyEtherWallet (MEW)
- EOS Sale Tracker Fork with Usability Improvements, Suitable For Novices
- Has MyEtherWallet's EOS Contribution instructions left you with more questions than answers?
- Dissecting the EOS ICO Distribution App, how does it interface with the EOSCrowdsale Contract?
Coming soon
- Instructions for adding EOS ERC20 token to MEW with "Add Custom Token"
- Videos for each step.
Again, USE AT YOUR OWN RISK ... I'm only a Sandwich.
Thanks for reading :)
Changelog
- Some wording has been improved and simplified, excess removed.
- I verified the instructions, You can view Registration TX and Funding TX on the blockchain. I will test the Claim instructions at end of first window.
- MyEtherWallet added contract to their interface, updated accordingly.
- Removed Technical Breakdown, moved it into it's own post.
- Changed step order to subdue chaos and confusion.