
Very recently we launched our new company website (craft-coders.de). It’s a simple website that showcases us and our work and describes the kind of services that we provide to customers. It requires no dynamic features except for the contact form.
Our decision quickly narrowed down to two options, a completely static website or WordPress.
To cut to the chase we decided to go with WordPress but to automatically generate a static copy of it and serve that to visitors. I will elaborate a bit more on the pros and cons of WordPress and static websites in the next section. Feel free to skip over it, if this is not of interest to you.
The ups and downs of WordPress and static websites
At craft-coders we value efficiency, and we try to choose the right tool for the job. WordPress is the leading CMS for small websites. It’s easy to set up and deploy. At the time of writing ~35% of all websites on the internet are build with it. Because of its popularity there are tons of useful plugins and great themes available. So you can build good-looking and feature rich websites really fast.
But WordPress has its downsides. Mainly it sucks at security. So famously, that ~1/5 of the Wikipedia article on it just focuses on its vulnerabilities. The plugin market for WordPress does not provide any quality checks and if you actually look at the code base of most plugins (even some popular ones), any self-respecting programmer will scream out in agony.
Because of this I’m very much against using WordPress for more than simple representational websites and blogs. Basically if your website is build on WordPress you must expect getting hacked. So make sure that your WordPress installation is running on a server that isn’t storing any sensible information about you or your customers and that you use passwords that are used nowhere else. If people really need to log into your website, then at best you use an external authentication service, so that no information about passwords is stored on your server.
Still, even if there is nothing of valuable to gain for a potential attacker, so that a targeted attack against your website is very unlikely and getting hacked is more a nuisance than an actual problem, you still need to take basic precautions. Due to the popularity of WordPress there are a lot of bots out there that just scan the web for known vulnerabilities. They try to hack as many web pages as possible and use them to spread SPAM emails, viruses and propaganda, or use your server to mine Bitcoins.
The most important thing that you must do to protect yourself from bots is to keep your WordPress installation and its plugins updated at all times. This can be very annoying because updates may break things. And for most small websites the goal is often to deploy and forget. You don’t want to spend time fostering your site, but just want it to continue to function as expected and be done with it. The ultimate goal of every person in operations is, to go unnoticed. If you have an admin that is constantly running around fixing stuff he/she is probably not doing a good job, or he/she has to compensate for the mistakes of the developers. You want things to just work without the need of thinking about it.
So as WordPress is the nightmare of every admin, in contrast to that, static web pages are the dream of every person working in operations. They’re super easy to deploy, work super fast, can be kept in RAM and requests can be distributed between as many servers as you like. Because there is no code running on the server involved, they are basically unhackable. Provided of course that your webserver is secure, but since you can just rent a managed server this isn’t really an issue that you need to concern yourself with. Yes attacks running in the clients browser exploiting flaws in JavaScript or CSS are still feasible, but since a truly static website by definition has no valuable cookies or private information to steal, there is little to be gained by performing an attack in this manner (talking to authenticated REST-Service can change that picture of course).
There are a few good static site generators out there, but as of now no one of them provides an easy-to-use GUI and as many plugins/themes as WordPress. If your goal is to build a simple website fast, WordPress should still be your first choice. Also if you decide to go with a static site generator there is no going back, your site will forever be static. Of course, you’re always free to use JavaScript to talk to REST-services and that is a good design choice, so this sounds more dramatic than it actually is.
To sum it up WordPress is great for editors and site-builders but it sucks in operations. In contrast, static web pages are hard to use by editors and usually require more development effort than WordPress, but they are great in operations. This is a classic development vs. operations issue.
Using WordPress to generate a static web page
But what if you could have both? Why not have a private non-accessible installation of WordPress and use that to generate a static copy from. Then you can deploy that copy to a public accessible web space. That way you have the best of both worlds. Of course you deprive yourself of all the dynamic features of WordPress, so no comment fields and no login sections, but if you don’t need any of that, this is a perfect solution for you. And if your requirements ever change you can always replace your static copy with the real thing and go on with it.
So that's the basic idea. The first thing I tried out was the WP2Static plugin which aims at solving this issue, but I couldn’t get it running. So I decided to build my own solution using my favorite automation tool GitLab CI/CD. I just used gitlab.com, at the time of writing they are offering 2000 free ci minutes to every customer, which is a really sweet deal. But any ci-tool should do. You should not have many issues porting this guide to Jenkins or any other tool that allows to execute bash scripts. Also, I’m assuming you are using Apache (with mod_rewrite) as web server and that you can use .htaccess files. But porting this concept to other web servers shouldn’t be too difficult.

You can find and fork the complete sample code here: https://gitlab.com/sgellweiler/demo-wordpress-static-copy.
This is the plan in detail. We’re going to use the same domain and web space to host both the private WordPress installation and the public accessible static copy. We’re going to install WordPress to a sub directory, that we will protect with basic auth using a .htaccess file. This is the directory that all your editors, admins and developers will access. The gitlab job will crawl this installation using wget and deploy the static copy via ssh+rsync into the directory /static on the web space. Then will use the .htaccess file in the root directory to rewrite all requests to the root path into the static directory. You can configure the gitlab job to run every day, hour or only manually depending on your needs.
To follow this guide you should have access to a *NIX shell and have the basic Apache tools (htpasswd), ssh tools (ssh-keygen, ssh-keyscan), find, sed and GNU Wget installed. Some distros ship with a minimal Wget installed, so make sure that you have the feature rich version of Wget installed (wget --version).
Setting up the web space
First install WordPress into a sub directory. For this guide I’m going with wp_2789218. You can go along with this name or choose your own, you should use a unique name tough, a string that you will use nowhere else. Best you add a few random generated chars in there. We’re not doing this for security but to make search+replace for urls easier in the next step. If you go with your own folder name remember to replace all occurrences of wp_2789218 in this guide with your folder name. We’ll also add a catchy alias /wp, for you and your coworkers to remember, so don't worry too much about the cryptic name.
Next we create a directory to store our static copy. We’ll just name that static/ and for now we’ll just add an index.html with <h1>Hello World</h1> in there.
Let’s configure Apache to password protect our WordPress installation and to redirect request to /static. First generate a .htpasswd file with user+password at the root-level (or at another place) of your web space using:
htpasswd -c /home/pwww/.htpasswd yourusernameNext create a .htaccess on the root level with the following. You need to reference the .htpasswd file with an absolute path in the AuthUserFile:
RewriteEngine On
RewriteBase /
Setup basic auth
AuthUserFile /var/www/httpdocs/.htpasswd
AuthType Basic
AuthName "Only for trusted employees"
Require a password for the wp installation.
<RequireAny>
Require expr %{REQUEST_URI} !~ m#^/wp_2789218#
Require valid-user
</RequireAny>
Add an easy to remember alias for the wp installation.
RewriteRule ^wp/(.*) wp_2789218/$1 [R=302,L]
RewriteRule ^wp$ wp_2789218/ [R=302,L]
Rewrite all request to the static directory.
Except for requests to the wp installation.
RewriteCond %{REQUEST_URI} !^/static.*
RewriteCond %{REQUEST_URI} !^/wp_2789218.*
RewriteRule ^(.*)$ static/$1 [L]
And that’s it for the server config part. If you go to your.domain.tld then you should see the Hello World from the index.html in the static directory. If you go to your.domain.tld/wp you should get redirected to your WordPress installation and be forced to enter a password.
Generating a static copy of your website
To make a static copy of your website you need a crawler that will start at your start page, follow all links to sub pages and download them as html including all CSS and JavaScript. I tried out several tools and the one that performed the best by far is the good old GNU Wget. It will reliably download all HTML, CSS, JS and IMG resources. But it will not execute JavaScript and therefore fail to detect links generated through JavaScript. So there you might run into problems. Most simple Wordpress sites should be fine tough from the get go.
Let’s have a look at the Wget cmd we will use to generate a static copy of our WordPress site:
wget \
-e robots=off \
--recursive \
-l inf \
--page-requisites \
--convert-links \
--restrict-file-names=windows \
--trust-server-names \
--adjust-extension \
--no-host-directories \
--http-user="${HTTP_USER}" \
--http-password="${HTTP_PASSWORD}" \
"https://yourdomain.tld/wp_2789218/" \
"https://yourdomain.tld/wp_2789218/robots.txt"
Here is an explanation of all the options in use:
- --e robots=off
Ignore instructions in the robots.txt.
This is fine since we’re crawling our own website.
- --recursive
Follow links to sub directories.
- -l inf
Sets the recursion level depth to infinite.
- --page-requisites
Download stuff like CSS, JS, images, etc.
- --convert-links
Change absolute links to relative links.
- --restrict-file-names=windows
Change filenames to be compatible with (old) Windows. This is a useful option even if you’re not running on Windows or you will get really ugly names that can cause issues with Apache.
- --trust-server-names
Uses the filenames of redirects instead of the source url.
- --no-host-directories
Download files directly into wp_2789218 and not into yourdomain.tld.
- --http-user
The username used for basic auth to access the wp installation. As defined in your .htpasswd.
- --http-password
The password used for basic auth to access the wp installation. As defined in your .htpasswd.
- "https://yourdomain.tld/wp_2789218/" "https://yourdomain.tld/wp_2789218/robots.txt"
Lists of urls to download. We set this to the start page, Wget will recursively follow all links from there.
We also copy the robots.txt along.
This will generate a static copy of your WordPress installation in wp_2789218. You can test if the crawling worked by opening the index.html in wp_2789218 with a browser.
Wget will try to rewrite urls in HTML and css, but for meta-tags, inside of JavaScript and in other places it will fail to do so. This is where the unique name of our directory comes into play. Because we named it wp_2789218 and not wordpress, we can now safely search and replace through all files in the dump and replace every occurrence of wp_2789218/, wp_2789218\/, wp_2789218%2F and wp_2789218 with an empty string ("") so that the links will be correct again in all places. We will use find + sed for that.
Here is the mac OSX variant of that:
LC_ALL=C find wp_2789218 -type f -exec sed -E -i '' 's/wp_2789218(\\\/|%2F|\/)?//g' {} \;
And here is the same for Linux with GNU sed:
find wp_2789218/ -type f -exec sed -i -E 's/wp_2789218(\\\/|%2F|\/)?//g' {} \;
To save you the headache (\\\/|%2F|\/)? will match /, \/, %2F and empty string ("").
Deploying the static copy to our web space
Now that we have generated a static copy of our website we want to deploy it to /static on the webspace. You can do this over rsync+ssh, if you have ssh access to your server.
The command to do so looks like this:
rsync -avh --delete --checksum wp_2789218 "webspaceuser@yourdomain.tld:static"
Remember to adjust the user, domain and path to the directory in webspaceuser@yourdomain.tld:static to your needs.
For our automated deployment with Gitlab you should create a new private/public ssh keypair using:
ssh-keygen -m PEM -N "" -C "Deploymentkey for yourdomain.tld" -f deploy
This will create deploy and deploy.pub files in your current directory. Copy the contents of deploy.pub to ~/.ssh/authorized_keys on your remote server to allow ssh-ing with it to your server. You can use this one-liner for that:
cat deploy.pub | ssh webspaceuser@yourdomain.tld -- 'mkdir -p ~/.ssh && chmod 700 ~/.ssh && cat - >> ~/.ssh/authorized_keys && chmod 600 ~/.ssh/authorized_keys'
Next test that you have setup everything correctly by ssh-ing with the new key to your webspace:
ssh -i deploy webspaceuser@yourdomain.tld
For Gitlab you will need the signature of your remote ssh server. You can generate it with ssh-keyscan. Copy the output of that, you will need in the next step:
ssh-keyscan yourdomain.tld
Putting it all together
Now that we have established all the basics it’s time to put it all together in one gitlab-ci.yml file. But first we need to configure a few variables. On your Gitlab project go to Settings → CI/CD → Variables and create the following variables:
- $SSH_ID_RSA
This is the private key that will be used for rsync to upload the static dir. Put the contents of the deploy file that you created in the step before in here.
This should be of type File and state Protected.
- $SSH_ID_RSA_PUB
This is the public key that will be used for rsync to upload the static dir. Put the contents of the deploy.pub file that you created in the step before in here.
This should be of type File.
- $SSH_KNOWN_HOSTS
The known host file contains the signature of your remote host.
This is the output that you generated with ssh-keyscan.
This should be of type File.
- $RSYNC_REMOTE
Example: webspaceuser@yourdomain.tld:static
The rsync remote to upload the static copy to. This is in the scheme of user@host:directory.
- $WORDPRESS_URL
The url to your wordpress installation. This is the starting point for wget.
This should be of type Variable.
- $HTTP_USER
The user used by wget to access your WordPress installation using basic auth. This is the user that you put in your .htpasswd file.
This should be of type Variable.
- $HTTP_PASSWORD
The password for HTTP_USER used by wget to access your WordPress installation using basic auth.
This should be of type Variable, state Protected and Masked.
d":1178,"sizeSlug":"large"} -->

Our Gitlab pipeline will have two phases for now: crawl and deploy. And they are going to run the commands that we discussed in the previous sections in different docker containers. This is the .gitlabci.yml:
stages:
- crawl
- deploy
before_script:
- echo "[INFO] setup credentials for ssh"
- mkdir ~/.ssh
- cp "${SSH_ID_RSA}" ~/.ssh/id_rsa
- cp "${SSH_ID_RSA_PUB}" ~/.ssh/id_rsa.pub
- cp "${SSH_KNOWN_HOSTS}" ~/.ssh/known_hosts
- chmod 600 ~/.ssh ~/.ssh/id_rsa ~/.ssh/id_rsa.pub
crawl:
image:
name: cirrusci/wget@sha256:3030b225419dc665e28fa2d9ad26f66d45c1cdcf270ffea7b8a80b36281e805a
entrypoint: [""]
stage: crawl
script:
- rm -rf wp_2789218 static
- |
wget \
-e robots=off \
--recursive \
--page-requisites \
--convert-links \
--restrict-file-names=windows \
--http-user="${HTTP_USER}" \
--http-password="${HTTP_PASSWORD}" \
--no-host-directories \
--trust-server-names \
--adjust-extension \
--content-on-error \
"${WORDPRESS_URL}/" \
"${WORDPRESS_URL}/robots.txt"
- find wp_2789218/ -type f -exec sed -i -E 's/wp_2789218(\\\/|%2F|\/)?//g' {} \;
- mv wp_2789218 static
artifacts:
paths:
- static/*
expire_in: 1 month
only:
- master
deploy:
image:
name: eeacms/rsync@sha256:de654d093f9dc62a7b15dcff6d19181ae37b4093d9bb6dd21545f6de6c905adb
entrypoint: [""]
stage: deploy
script:
- rsync -avh --delete --checksum static/ "${RSYNC_REMOTE}"
dependencies:
- crawl
only:
- master
And that's pretty much it, now you have a pipeline that will generate a static copy of your WordPress site and upload that back to your web space. You could set up a schedule for your pipeline to run automatically on a regular basis or you can use the Run Pipeline button to start the process manually.
I would like to add one more step to our pipeline. It's always good to do a little bit of testing. Especially if your executing stuff manually without supervision. If the crawler fails for whatever reason to download your complete website you probably want the pipeline to fail before going into the deploy phase and breaking your website for visitors. So lets perform some basic sanity checks on the static copy before starting the deploy phase. The following checks are all very basic and it's probably a good idea to add some more checks that are more specific to your installation. Just check for the existence of some sub pages, images, etc. and grep some strings. Also probably you want to make the existing rules a bit stricter.
stages:
- crawl - verify_crawl
- deploy
[...]
verify_crawl:
image: alpine:3.11.3
stage: verify_crawl
script:
- echo "[INFO] Check that dump is at least 1 mb in size"
- test "$(du -c -m static/ | tail -1 | cut -f1)" -gt 1
- echo "[INFO] Check that dump is less than 500 mb in size"
- test "$(du -c -m static/ | tail -1 | cut -f1)" -lt 500
- echo "[INFO] Check that there are at least 50 files"
- test "$(find static/ | wc -l)" -gt 50
- echo "[INFO] Check that there is a index.html"
- test -f static/index.html
- echo "[INFO] Look for 'wordpress' in index.html"
- grep -q 'wordpress' static/index.html
dependencies:
- crawl
only:
- master
[...]
Adding a Contact Form
Even the most basic web sites usually need a little bit of dynamic functionality, in our case we needed a contact form. We decided to go with Ninja Forms Contact Form. Ninja forms work by sending requests to "wp-admin/admin-ajax.php". This will obviously fail on our static website. To make it work, we will need to reroute requests to admin.ajax.php to our WordPress backend. The admin-ajax.php is used by all sorts of plugins, not only ninja forms and to increase security we want to only whitelist calls for Ninja Forms. Ninja form will make a POST request with "application/x-www-form-urlencoded" and the parameter action set to "nf_ajax_submit". Since there is no way (at least none that I know of) in Apache to filter for form parameters we will need to solve this in PHP. The idea is to create an alternative admin-ajax.php to call instead, that then in turn will call the "wp-admin/admin-ajax.php" in the WordPress backend, but only for Ninja Form requests. To further increase protection from bots we will also rename the "wp-admin/admin-ajax.php" to "admin-ajax-oAEhFc.php". This won't really help us against intelligent attackers, but it should stop most bots that try to use an exploit against "wp-admin/admin-ajax.php".
First we will need to modify the gitlab-ci.yml file to add an extra find & sed to the crawl step, to change all urls from "wp-admin/admin-ajax.php" to "admin-ajax-oAEhFc.php":
[...]
- find wp_2789218/ -type f -exec sed -i -E 's/wp_2789218(\\\/|%2F|\/)?//g' {} \;
- find wp_2789218/ -type f -exec sed -i -E 's/wp-admin(\\\/|%2F|\/)admin-ajax.php/admin-ajax-oAEhFc.php/g' {} \;
[...]
Then we will need to add the admin-ajax-oAEhFc.php to the root of our webspace. This file simply checks if this is indeed an Ninja Form call and then include the "wp-admin/admin-ajax.php" from the WordPress backend. After that we will fix any urls in the output that are still pointing to our WordPress site, so that they point to our static site instead.
<?php
/* Pass through some functions to the admin-ajax.php of the real wp backend. */
// Capture output, so that we can fix urls later.
ob_start();
// Pass through ninja forms
if ($_SERVER['REQUEST_METHOD'] === 'POST' && !empty($_POST) && $_POST['action'] == 'nf_ajax_submit') {
require (DIR . '/wp_2789218/wp-admin/admin-ajax.php');
}
// Everything else should fail.
else {
echo '0';
}
// Fix urls in output.
$contents = ob_get_contents();
ob_end_clean();
$search_replace = array(
'wp_2789218/' => '',
'wp_2789218\/' => '',
'wp_2789218%2F' => '',
'wp_2789218' => '',
'wp-admin/admin-ajax.php' => 'admin-ajax-oAEhFc.php',
'wp-admin\/admin-ajax.php' => 'admin-ajax-oAEhFc.php',
'wp-admin%2Fadmin-ajax.php' => 'admin-ajax-oAEhFc.php',
);
echo str_replace(array_keys($search_replace), array_values($search_replace), $contents);
Finally we will need to modify the .htaccess file to allow requests to "admin-ajax-oAEhFc.php" and to not rewrite them to static/.
[...]
# Rewrite all request to the static directory.
# Except for requests to the wp installation.
RewriteCond %{REQUEST_URI} !^/static.*
RewriteCond %{REQUEST_URI} !^/admin-ajax-oAEhFc.php$
RewriteCond %{REQUEST_URI} !^/wp_2789218.*
RewriteRule ^(.*)$ static/$1 [L]
And that's it. If you done everything correctly after running your pipeline again, Ninja Forms should work.
A similar procedure should work for many other plugins too. Tough keep in mind that with every plugin that you allow access to your backend, you will also increase the attack surface.
Adding a Custom 404 page
You may want to have a custom 404 page instead of the standard 404 error page that Apache will serve by default. Assuming that you have already created a nice looking 404 page in your WordPress installation, in theory we could just use Wget to make a request to an url that does not exists in the WordPress backend and use the output of that. Unfortuneately Wget does a terrible job dealing with non 200 status codes, there is a --content-on-error option that will let it download the contents of a 404 page, but it will refuse to download any images, stylesheets or other resources attached to it.
To deal with that situation we will simply create a normal page in our WordPress backend and use that as a 404 page. So create your page in WordPress and remember the url you gave it.

We can now just add that url to our list of files for Wget to download and then use the .htaccess file to redirect all 404 requests to that file.
Ok so lets add our 404 page to the wget cmd in the .gitlab-ci.yml file:
[...]
- |
wget \
-e robots=off \
--recursive \
--page-requisites \
--convert-links \
--restrict-file-names=windows \
--http-user="${HTTP_USER}" \
--http-password="${HTTP_PASSWORD}" \
--no-host-directories \
--trust-server-names \
--adjust-extension \
--content-on-error \
"${WORDPRESS_URL}/" \
"${WORDPRESS_URL}/robots.txt" \
"${WORDPRESS_URL}/notfound"
[...]
To redirect all 404 errors to notfound/index.html we will have to add one instruction to the .htaccess file:
ErrorDocument 404 /static/notfound/index.html
If you have done everything correctly after you run your pipeline and visit any non exisiting url you should get your custom error page. However if you try to access a deeper level like yourdomain.tld/bogus/bogus/bogus it propabbly looks really fucked up like this:
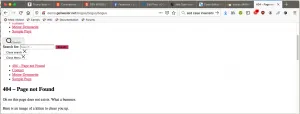
This is because Wget will rewrite all links to be relative and we access our 404 page from different paths. To fix this we cann add a <base> tag inside of the <head> with an absolute url. We insert the base tag with sed after running wget in the .gitlab-ci.yml like this:
[...]
- sed -i 's|<head>|<head><base href="/notfound/">|' wp_2789218/notfound/index.html
[...]
And that's it, if you run your pipeline again the 404 page should look fine:

Conclusion
We have successfully created a Gitlab job that generates and publishes a static copy of a WordPress site and secured the actual WordPress backend against attacks of bots and humans. And because of the 2000 free minutes of CI that Gitlab is currently offering, it didn't even cost us a dime. If you can live with the limitations of a static website, I would definitely recommend this or a similar solution. It will push the risk of getting hacked to near zero and you will no longer need to spend precious time ensuring that your site and all of it's plugins are up to date. Also your site will be as fast as lightening.
So go ahead and fork: https://gitlab.com/sgellweiler/demo-wordpress-static-copy. And let me know how it works for you in the comment section.
Best regards,
Sebastian Gellweiler
DevOps engineer at CRAFTCODERS
Karlsruhe, Germany
d":1188,"linkDestination":"custom"} -->

Posted from my blog with SteemPress : http://craftcodecrew.com/wordpress-vs-static-web-pages-the-best-of-both-worlds/