On my way exploring Augmented Reality under iOS, I have come across Core Motion Framework, which provides tools for working with motion- and environment-related data your device captures. There are numerous applications for this kind of information, especially if we are talking about location-based services or any apps which need to be sensitive to their environment. Since, as a mobile developer, you do not necessarily possess a degree in Physics, and math skills have gathered a thick layer of dust by now, let's try to make complicated things more approachable. In today's blog, we are going to talk about the built-in motion sensors and the way you can use them for the good of humanity. Or to build a silly useless app based on a cheesy cartoon, let's see which one it will be.
All kinds of -meters and a -scope.
In this section, we are going to be looking into 5 different kinds of sensors, built into your device and reading motion information while you're not watching. For one, it's good to know all the opportunities you have regarding tracking environment-related events, and, secondly, what an excellent ice-breaker for the next social event you're attending! So let's dive right in.
Accelerometer
This guy is not a slyish type of sensor, hiding its purpose behind some fancy mixture of greek and latin. It is a simple kind of guy, clear about its intentions: just minding its own business, measuring your acceleration here and there. If you know what acceleration is, you basically understood what this sensor is all about. If you don't, that is weird, and I don't think I can help you, so just stop reading and go rethink your life choices.
No, I'm kidding, I can totally help you. Just give me a call, we can talk this out. For the rest of you, we are just going to make one step further towards the understanding of how this sensor works. For this, imagine yourself on a freefall tower ride in an amusement park. The seatbelts are fastened, and you are going up. Since our tower is pretty tall, and the guy in control is really looking forward to his lunch break, you are going up pretty fast, so that you start feeling your body pressing harder on the seat beneath you. Seconds later, you are at the top and getting ready to experience the free fall. Our hungry amusement park employee presses the big red button on the panel in front of him, and you start falling all the way down, floating just a little above your seat. This time, you feel the shoulder harness pressing into your skin, holding you back from lifting up too much. This is what an accelerometer experiences all the time. Well, maybe it's not that exciting, we'll never know. But the principle used in the sensor is the same. A body, loosely attached to a moving plate, is going to experience forces, pushing it in the direction, opposite to the movement. By measuring the extent, to which these forces cause the body to move, our sensor is able to tell us, what the acceleration of the plate is. If you are interested in how it looks in real life, you can check this link or this one.
Pedometer
Next up is the pedometer, the favorite sensor of all the fitness-junkies. This is the guy who counts the number of steps between your bed and your fridge (because little achievements matter) and celebrates how sporty you are when you take 10.000 steps inside a shopping mall. How does he do that? The answer is a deep understanding of how walking works. Each step we take consists of several phases, in which we tilt and accelerate in different directions and to a different extent. Distinguishing between sets of movements that constitute a single step allows this sensor to count their total amount. Earlier in the days, separate mechanical sensors have been used to recognize the step pattern. Pedometers inside modern devices usually rely heavily on input data provided by other inertial sensors. They do not measure the motion themselves, and only make sense of the given measurements. This makes our pedometer a software wannabe among real hardcore hardware sensors we are discussing here. But it allowed you to stare at your monitor for the rest of the day since you've reached your walking goal, so be kind to it.
Magnetometer
I think we can all imagine, what this one is trying to measure. What is more interesting, is how it goes about the task. To answer this question, we would usually have to talk about electrons, conductors, circuits and voltage and all that jazz. But since I promised to make things simple, let's take an example of something that is more fun. Like tourists. Tourists are exceptional beings, who manage to get fascinated by a large number of things in a highly limited time. So imagine a place of interest, with an entrance, an exit and a path in between. Let's say it's a sea life museum, with all kinds of fish swimming around our tourists in fish tanks, which build an arch around the path. Our tourists would form a large group at the entrance and, the moment the museum opens its doors, a flow of fascinated humans is going to flood all the way up to the exit. They would keep walking, building what looks like a steadily moving queue through the whole museum. This is how electrons are usually portrayed in a circuit, moving along from where there is a whole bunch of them to where there is none.
Usually, the tourists are very busy, keeping their fascination ratio high. This accounts for a steady flow throughout the whole museum. But some things are especially magnetic to them since they would make for a good background on a photo. As a museum manager, we would like to measure, which particular spots are especially magnetic for the tourist (you see where I am going with this?). To do so, we come up with a brilliant idea - a magnetometer. We know, that if some especially magnificent fish is going to swim by on one side of the arched fish tank, the tourists are going to want to make a picture. Instead of building a steady flow in the middle of our path, they are going to get attracted to one side of it, to get their photo and only then pass by. People are heavy, so there is going to be a weight difference between the two sides of the path, which we could measure and translate into the magnetic power of a spot. The stronger the attraction - the more weight difference we will be registering. That's like tourist attraction management 101. But other than learning how to pursue an alternative career in tourism, you have just figured out the way magnetometers work. Electrons with tiny cameras are getting attracted by magnetic fields, and gather closer to the source of attraction, on one side of the conductor (our path segment). This causes a measurable weight difference between the left and right parts of the conductor (voltage). The whole thing is called the Hall effect, so now you can also google it, and I can move on to the next sensor.
Barometer
Barometers are some commonly used sensors, which you might have come across in real life. Especially if you hang out on ships a lot. Or around people who… like weather, I guess? The purpose of a barometer is to measure atmospheric pressure. They can take many forms, one of the simplest being that of two conjoined glass containers with water inside, only one of which is sealed. The other one is a thin spout which rises above the water level. The atmospheric pressure is measured based on the level of water in the spout.
Now that I'm done paraphrasing the Wikipedia page on barometers we can move to the way the sensor works inside your phone. Instead of containers with water or, god forbid, mercury, a membrane sensitive to pressure is used. The extent, to which it gets distorted is measured to calculate the atmospheric pressure, which causes the deformation. That's it, I guess barometers are only fascinating to weather people.
Gyroscope
Last but not least is the gyroscope. This is a really fancy one, just look at it. It looks like it belongs on an oak table in the office of some big corporate boss from the early 2000's. It can do some pretty impressive tricks as well, just check this video out. Instead, it is consigned to oblivion behind the cover of your phone.
Of course, the gyroscope inside your device doesn't have all these rings orbiting around it in different directions. Instead, it looks a lot like an accelerometer, if you still remember what that was. Only this time, the body is continually moving back and forth (oscillating, if you are in a search for the fancy word of the week). The moment the device is rotated on an axis perpendicular to the plate it is fixated on, it is going to move along the third axis. Because physics. The movement is measured and can be used to calculate the device orientation. To have a picture of the sensor in your head, watch this video.
Up! we go
If you want to get to know Core Motion, learning by doing is the way to go. That is why today we are going to be building a cheesy little app, which uses the accelerometer inside our iPhone to distinguish top from bottom. If this is your first iOS app and you need some help getting started, you should probably make your way through this tutorial first. But if you are as far in your iOS developer career, as being comfortable with creating a new single-screen project in Xcode, you are all set for what's coming up next.
Preparing the UIView
In our app, we want to be able to point upwards in the direction of the sky however the device is rotated. To do so, we need an indicator of some kind. I am using an image, so the first thing I am going to be setting up in my ViewController is a UIImageView object. I do want it to fill my whole screen, so the width and height of the frame are going to correspond to the dimensions of the device screen, and the image itself is going to be placed into that frame with the .scaleAspectFit option. To make the image show, I am going to add it as a subview of the current controller's view. If we ran our app at this point, we would see a static full-screen image of whatever we've chosen to indicate the direction.
class ViewController: UIViewController {
private var upView: UIImageView!
func showUp() {
let screenSize: CGRect = UIScreen.main.bounds
upView = UIImageView(frame: CGRect(x: 0, y: 0, width: screenSize.width, height: screenSize.height))
upView.image = #imageLiteral(resourceName: "bloons")
upView.contentMode = .scaleAspectFit
self.view.addSubview(upView)
}
}
Getting CoreMotion updates
The communication with the CoreMotion framework is handled by the CMMotionManager. After creating an instance of this class, we can ask it for the motion updates and even set up the intervals we want to receive the updates in. To get the updates, we need to give our motion manager an OperationQueue to send its data to. This needs to be done in case we are going to be flooded with motion information, so much so, that our device stops handling the events occurring in the UI. To prevent this from happening, we could make the motion manager send all the updates to another thread. This way, our app would stay responsive for the user, even though it is receiving a large number of updates in the background. In the simplified example below I am using one and the same Queue for both, motion information and the UI work.
import CoreMotion
class ViewController: UIViewController {
private var motionManager: CMMotionManager!
private var upView: UIImageView!
func setupCoreMotion() {
motionManager = CMMotionManager()
motionManager.deviceMotionUpdateInterval = 0.05
startAsyncDeviceMotionUpdates()
}
fileprivate func startAsyncDeviceMotionUpdates() {
motionManager.startDeviceMotionUpdates(to: OperationQueue.current!, withHandler: {
(deviceMotion, error) -> Void in
if(error == nil) {
self.handleDeviceMotionUpdates(deviceMotion)
} else {
// handle error
}
})
}
}
The second parameter our motion manager needs is a method, which will be invoked every time new motion information comes in. At this point, we can also take care of possible errors, which could occur while retrieving data from the sensors. Handling the motion updates is going to be our next task.
Handling the updates
All the motion data we can retrieve is held by a CMDeviceMotion object we receive in each update. All we need to do is figure out the rotation axis we want to be calculating (since there are 3 different directions you can rotate your iPhone in), apply the correct formula and transform our image. Let's take a look at the axis first.
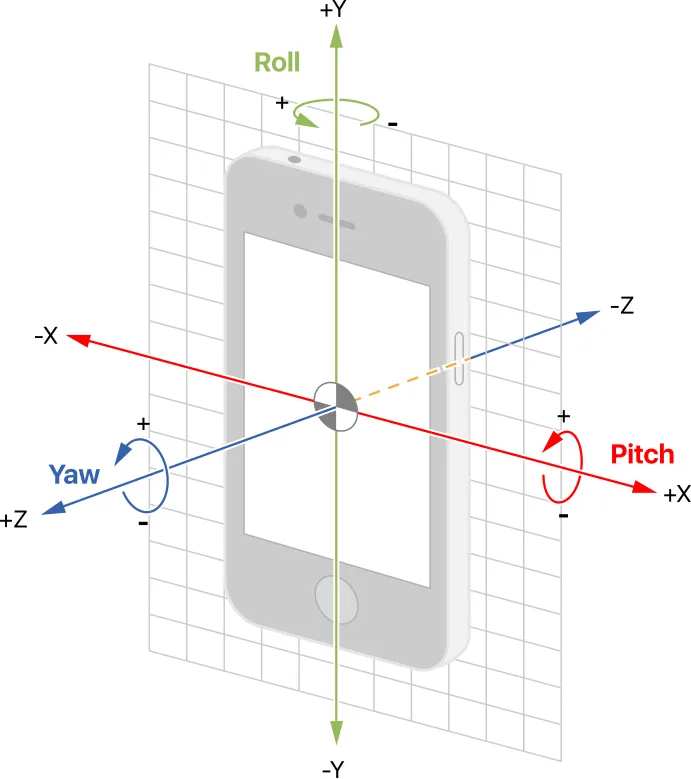
The picture above can be found in Apple documentation and shows how the rotation types are going to be referred to. In this tutorial, we will only cover the rotation on the Z-axis (yaw). This is going to take care of pointing to the sky as long as we are holding our device perpendicular to the ground. You can find the detailed mathematical explanation of the atan2 formula we are applying to calculate yaw, as well as its equivalents for roll and pitch, here.
import CoreMotion
class ViewController: UIViewController {
private var motionManager: CMMotionManager!
private var upView: UIImageView!
fileprivate func handleDeviceMotionUpdates(_ deviceMotion: CMDeviceMotion?) {
if let gravity = deviceMotion?.gravity {
let rotationDegrees = atan2(gravity.x, gravity.y) - Double.pi
rotate(with: rotationDegrees)
}
}
func rotate(with degrees: Double) {
upView.transform = CGAffineTransform(rotationAngle: CGFloat(degrees))
}
}
The very last step towards building our mini-app is applying the calculated rotation degrees to the image we have added to our screen in the first step. To do so, I am using the CGAffineTransformation, previously converting a double value into a CGFloat which is going to be passed as an argument, while initializing the transformation. Don't forget to wire both, the image creation and the motion manager set up in the viewDidLoad method. This way, all the elements are going to be initialized right after your View has loaded.
class ViewController: UIViewController {
private var motionManager: CMMotionManager!
private var upView: UIImageView!
override func viewDidLoad() {
super.viewDidLoad()
showUp()
setupCoreMotion()
}
}
That's it. Build, run and see the result for yourself! Here is what I've got:
I hope you've enjoyed our little journey into the functionality of CoreMotion and all kinds of sensors your device is stuffed with. Experiment with it for yourself and let's learn from each other.
Dannynator.
Posted from my blog with SteemPress : http://craftcodecrew.com/smartphone-sensors-for-dummies/