So Let's Start 😊
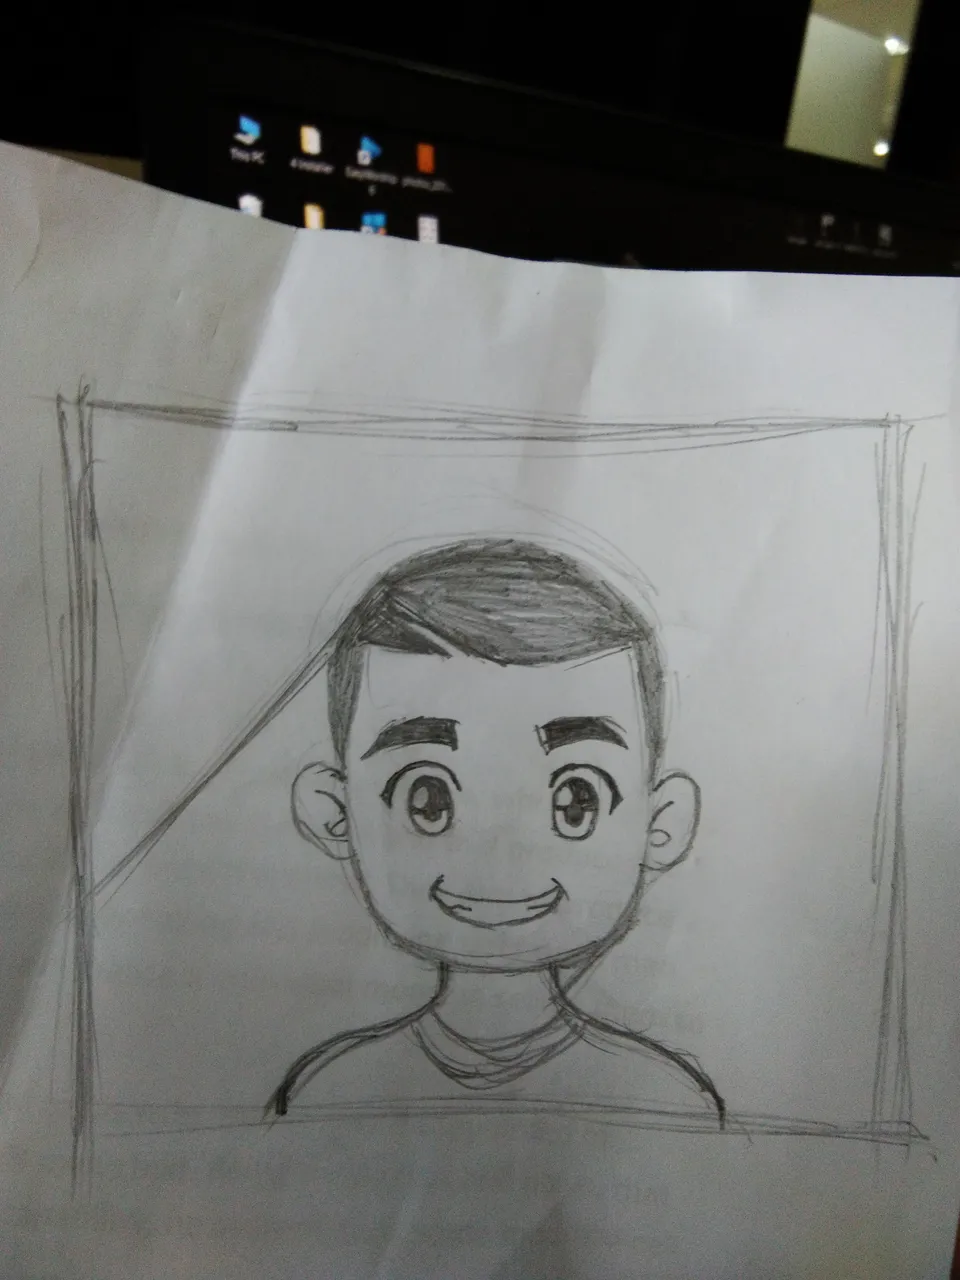
STEP 1. Make a Simple Sketch of Yourself in the most Cartoonic and Cutest form 🐰😆😂.
(since I don't have a pen tablet, I've just drawn it with a paper) ✍✍✍
You can check this sample image as a guide. You can adjust the form of the head depending on the shape of your head (it maybe round,square,oval,pointed, you'll free to judge it's your face anyways.
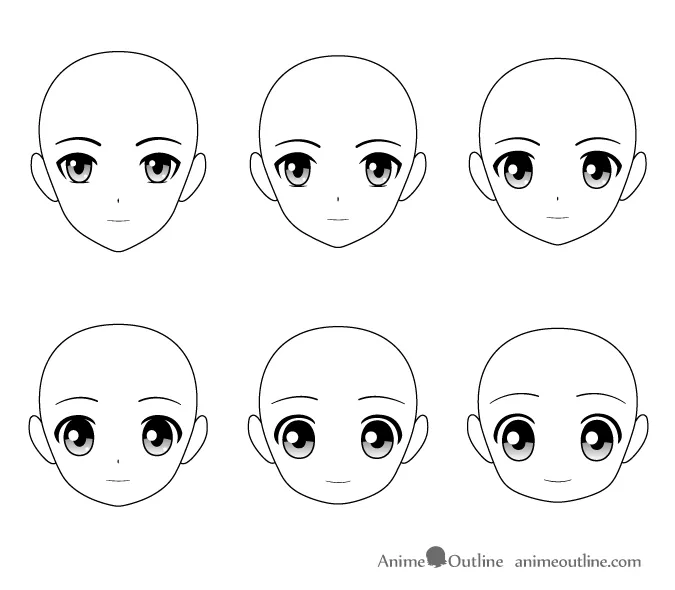
http://www.animeoutline.com/how-to-draw-different-styles-of-anime-heads-faces/
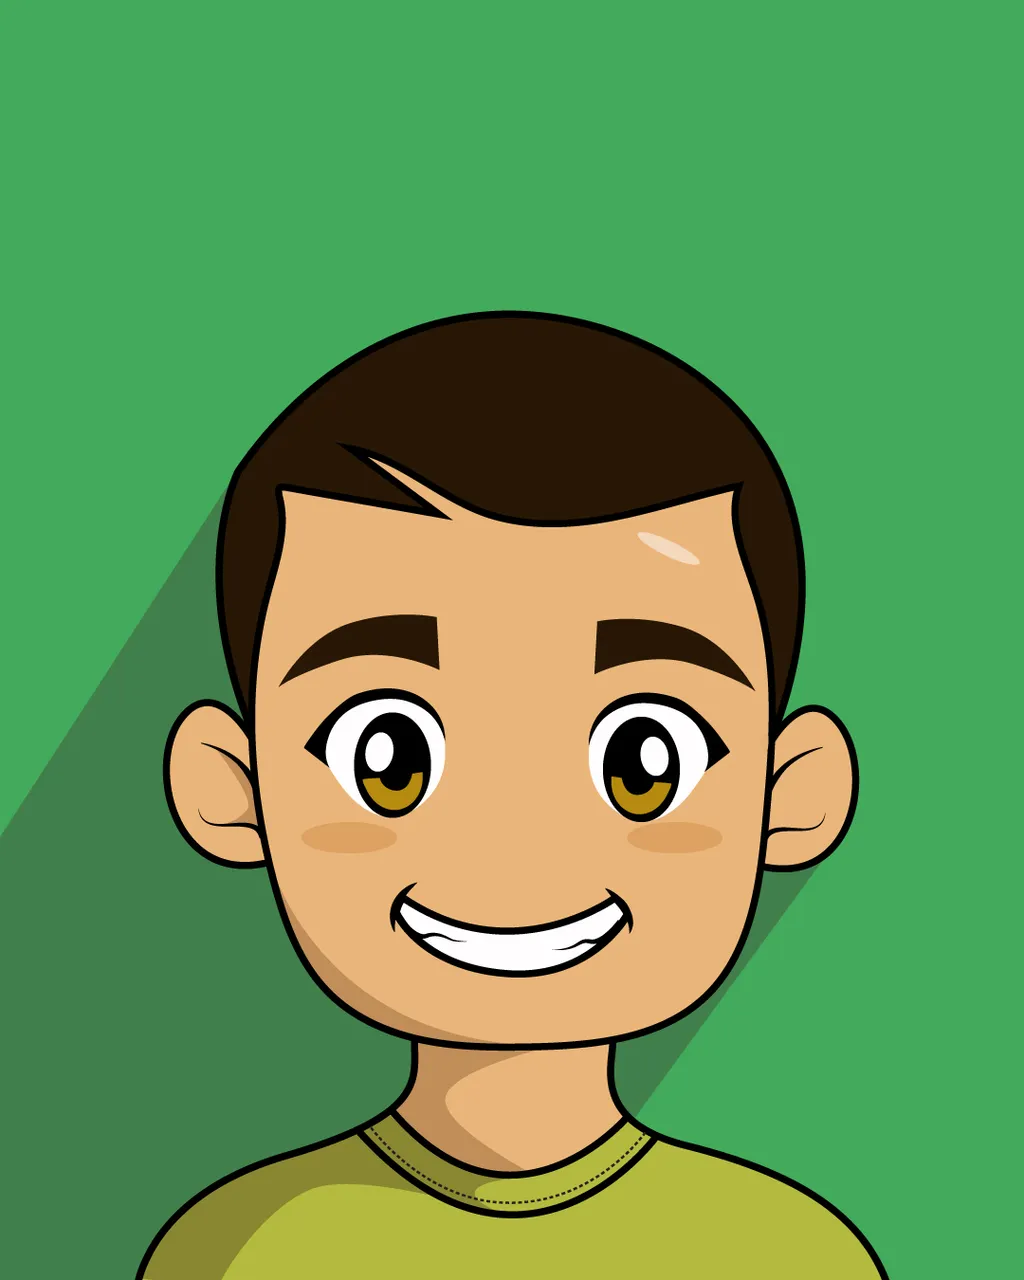
So this the final sketch of my avatar (CUTE), drawn from a scratch of my story synopsis that is submitted from yesterday's class. Since I have a square type of face (defined jaw) and slightly thick brows, this is the end result 😅🤣😄.
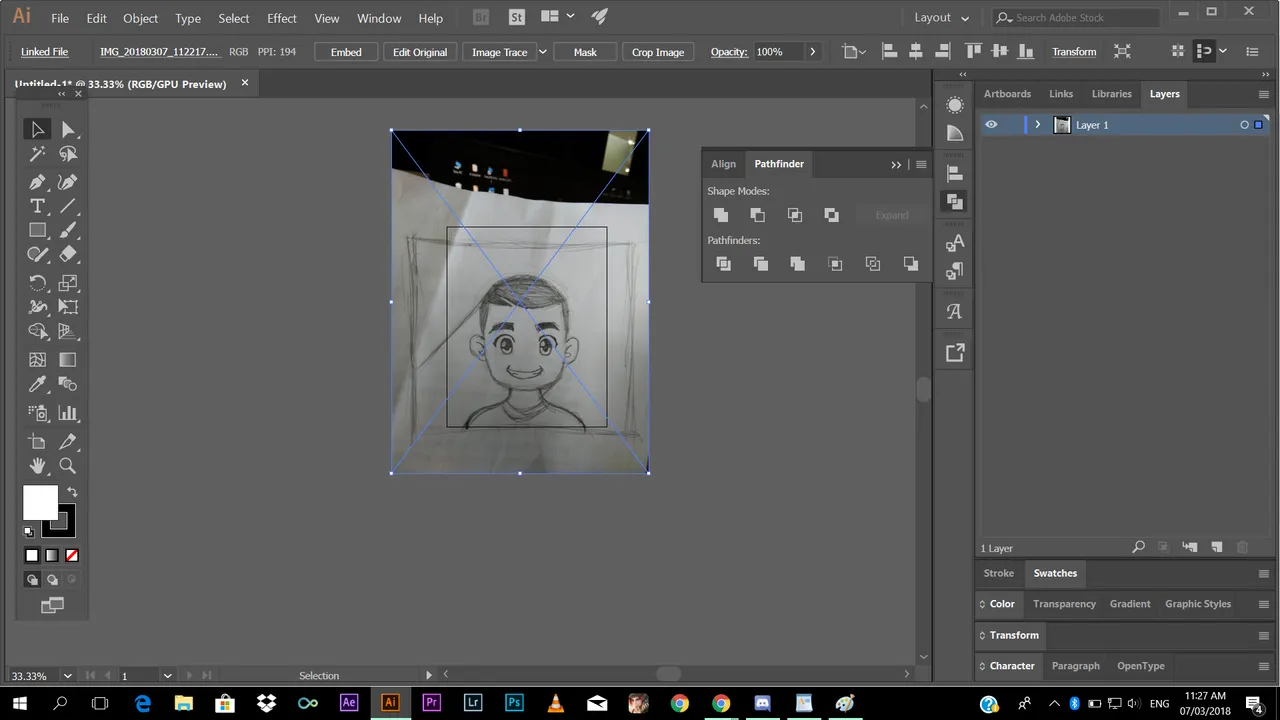
STEP 2. Open your Adobe Illustrator (Adobe Illustrator CC is the version I am using) 🖱💻.
(if you don't have one, you can download it in the internet, just be patient in finding legit website)
Click the Menu Bar (File-->New) then set the size of your Image. In my work I've used 700x900 px, i think that's fine for me. Then drag the photo to the software. Or you can just click menu bar (File-->open) then browse the file from your computer)
STEP 3. Trace the Outline
So the fun starts in tracing the outline, click the Pen Tool (shortcut key (p)) this tool is one of the most useful and well known tool of a graphic artist and designer 🖥💻.
Before anything else, I'll give you a quick brief tutorial how to use the pen tool 😉✍✒.
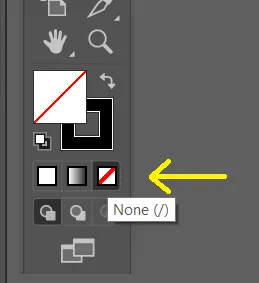
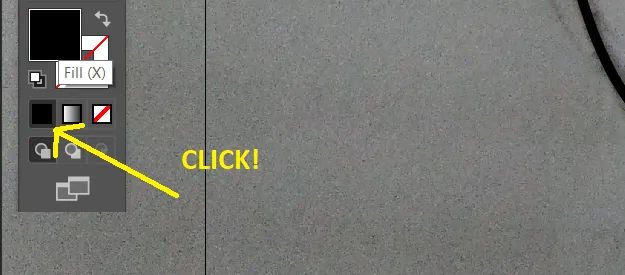
First, disable the fill by clicking this option (located in the bottom left corner) So that when you use Pen tool it won't have a fill, meaning only the stroke will remain.
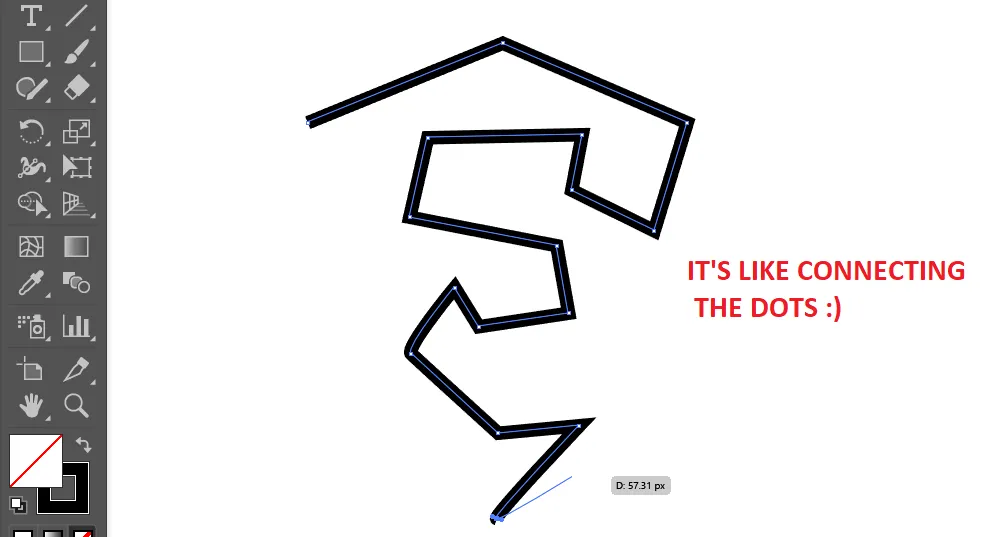
Then you can start making point to create a shape or pattern👏.
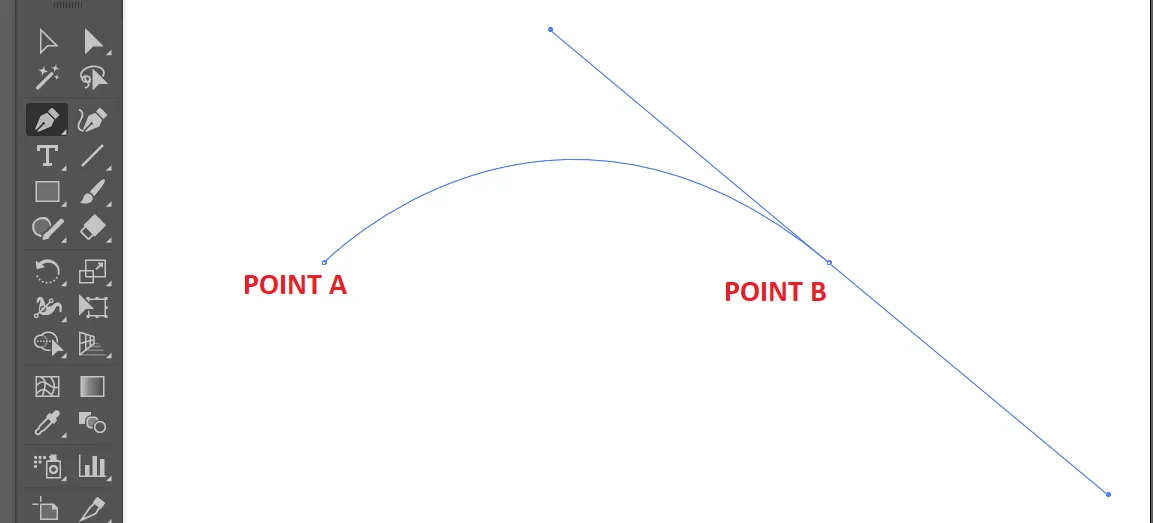
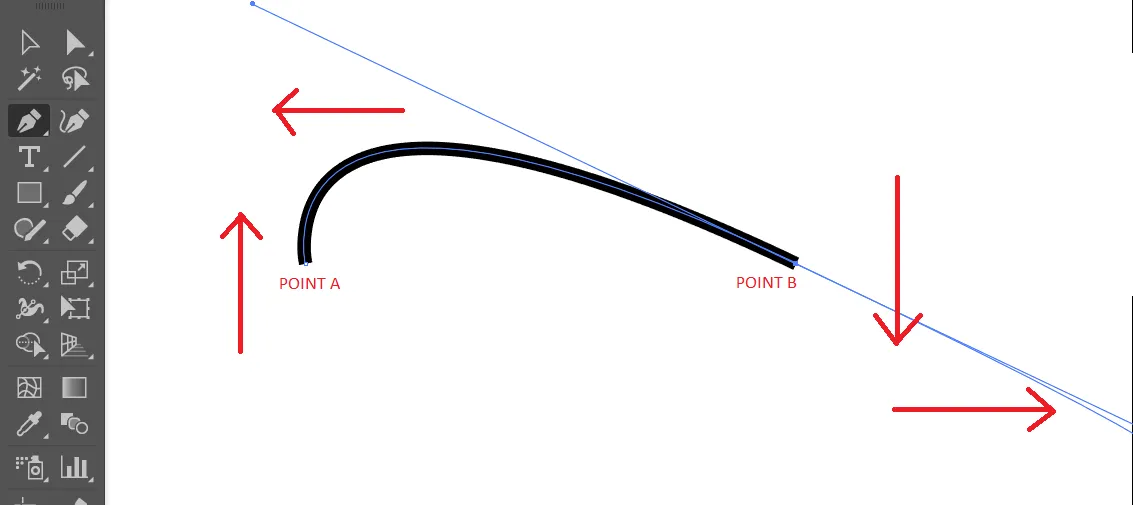
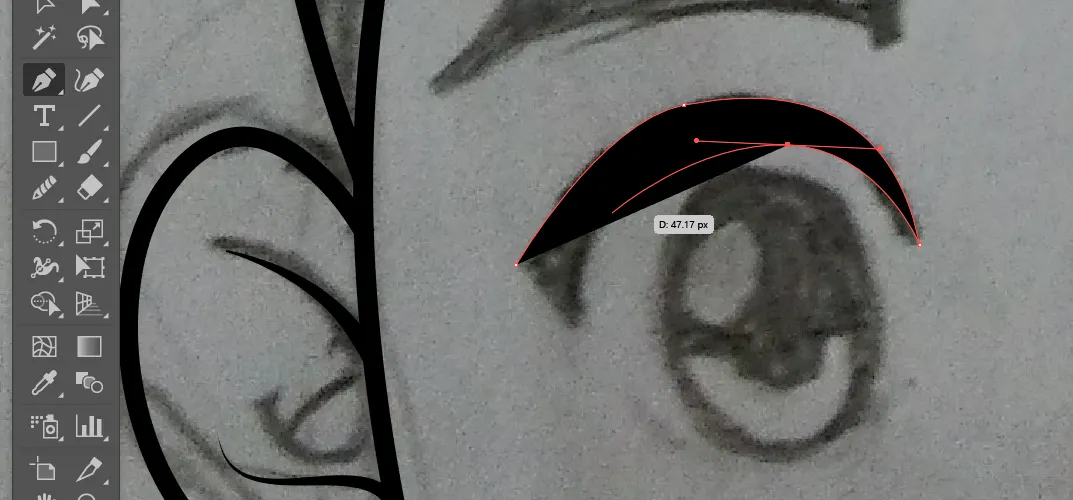
So moving on, in creating a curve with Pen tool, if you want to make a curve, make to sure drag the mouse /graphical pen after clicking the point b(second point). check this example.
You're doing good guys, take note, the movement of a Pen Tool is reversed way. If you drag your mouse/pen downward, the curve will go upward, vice versa🔃.
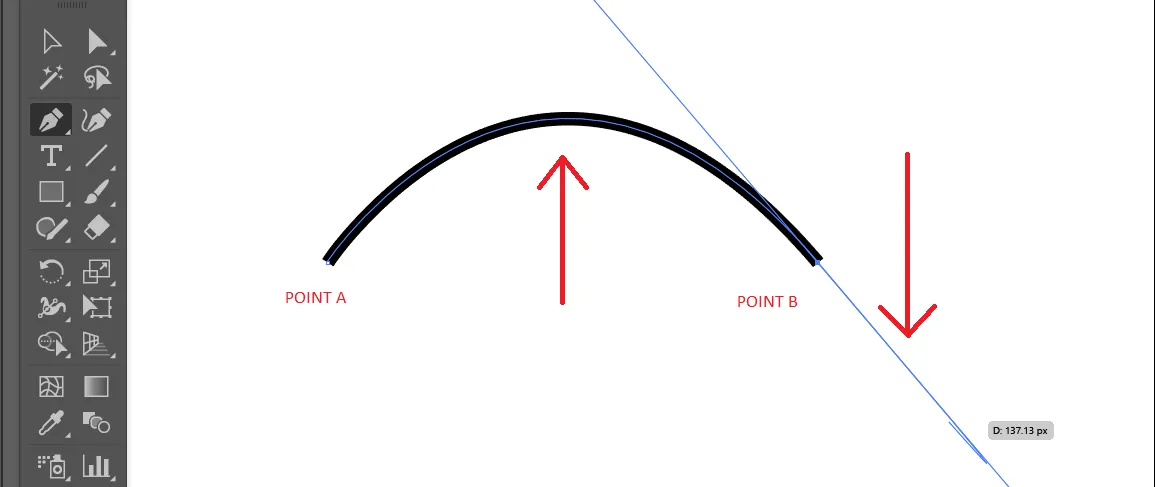
Then if you want adjust the angle of the curve just try drag the mouse/pen on left side or right side, depending on your picture reference.
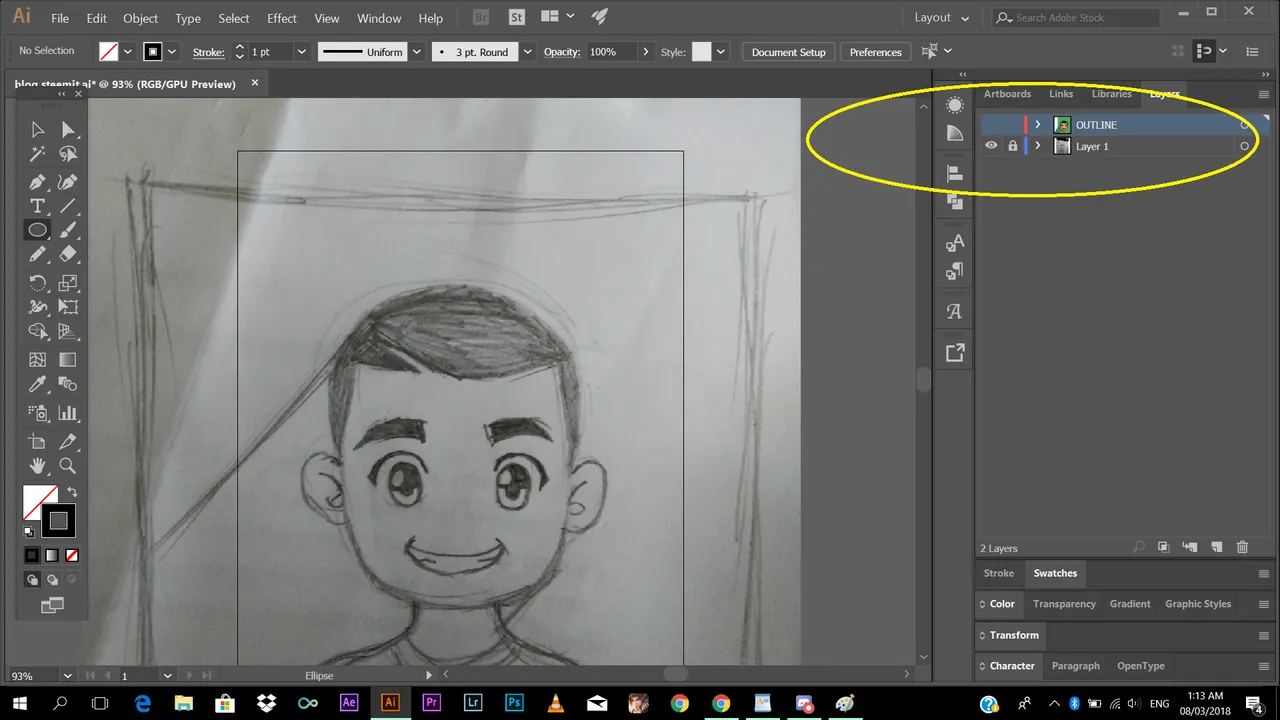
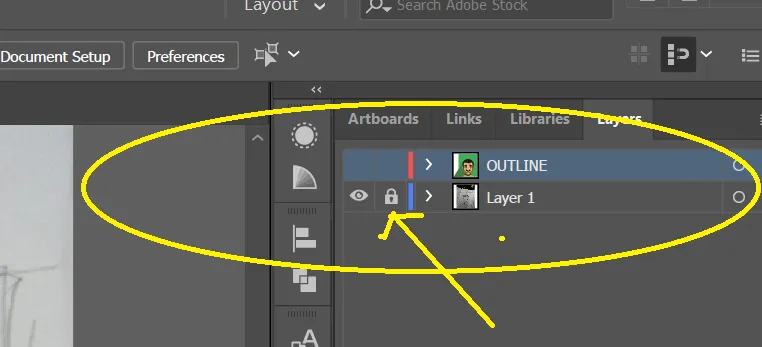
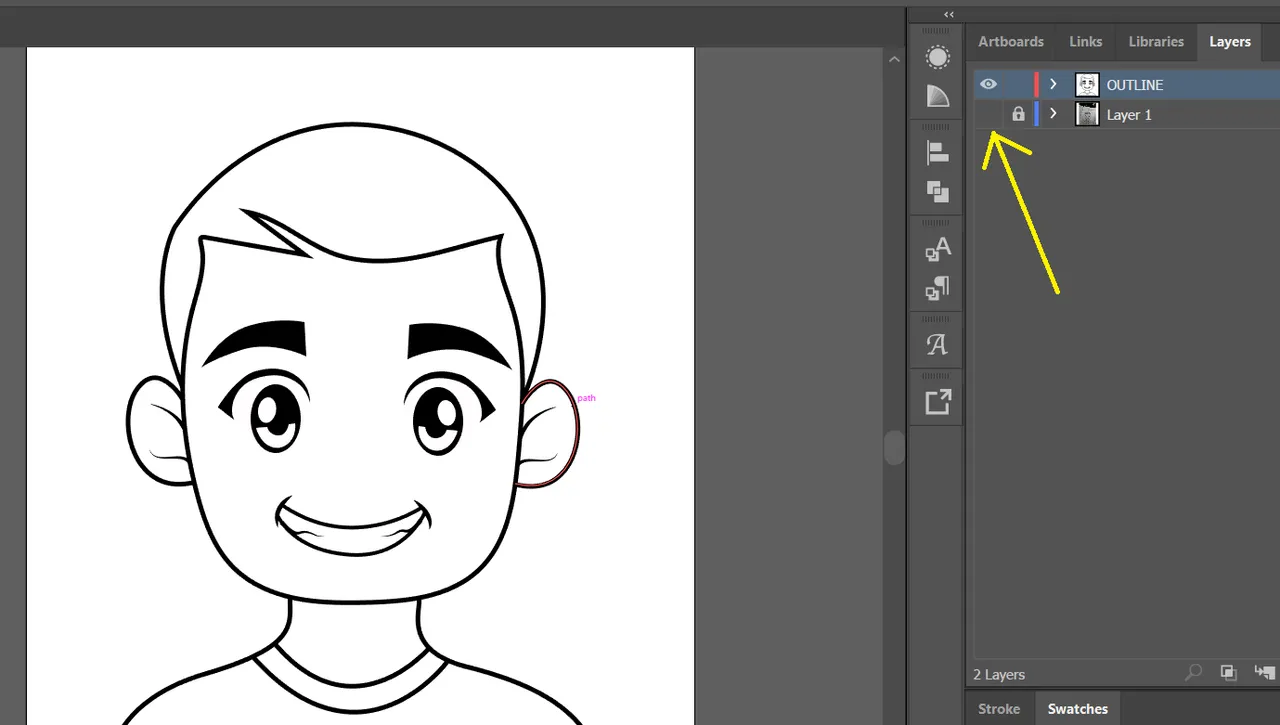
I think you already get the logic of it 😁👍👌, I know you're all smart. So yeah, back to Step 3. Just remember how use the Pen Tool you may be confused a little bit, but you'll get used to it soon. It takes practice and patience 👍. Before tracing make a separate layer of your photo reference and lock it 👍🔒,so that it won't bother you while tracing. Located at upper right area.
I think we're good to trace.
trace! trace! trace! 😄
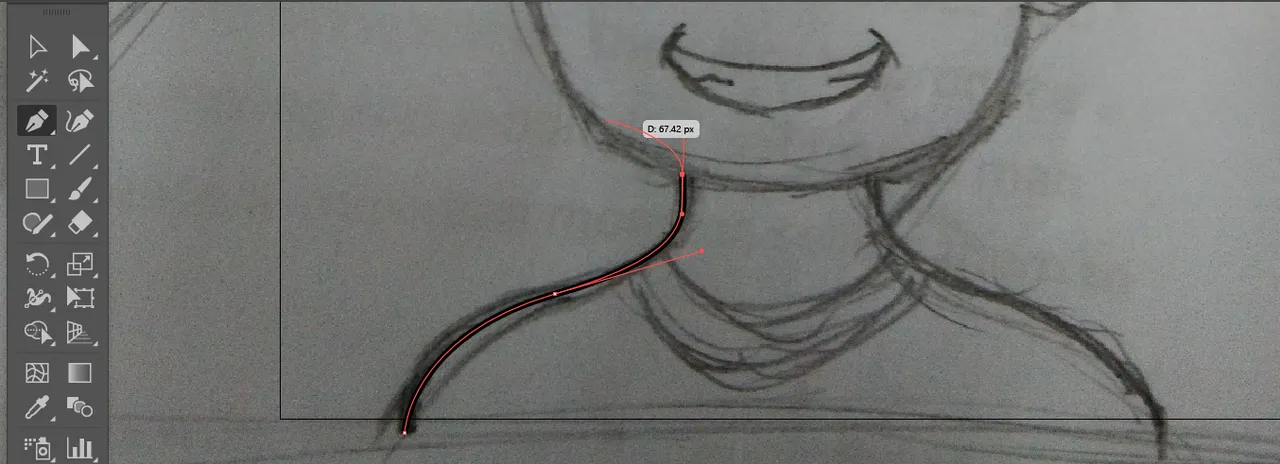
Almost done tracing 🤗🤗🤗

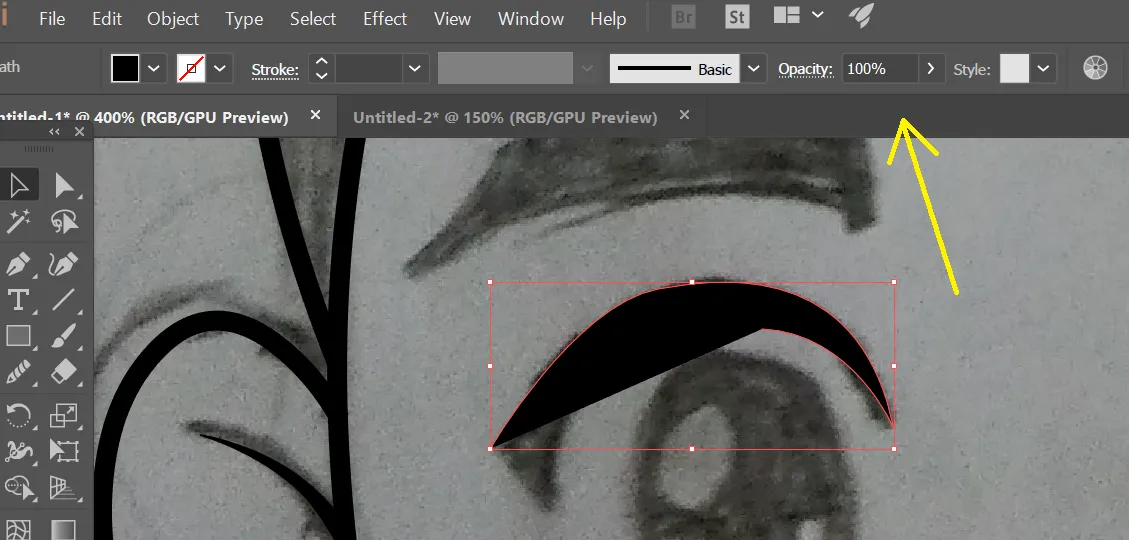
So there are things that can't be done by a stroke in Pen tool just like in the brows and eye detail, so we need to use fill. In order to use fill, just disable the stroke and put a fill on your Pen tool
Then trace the outline just like what you are doing with strokes earlier ✒🖋.
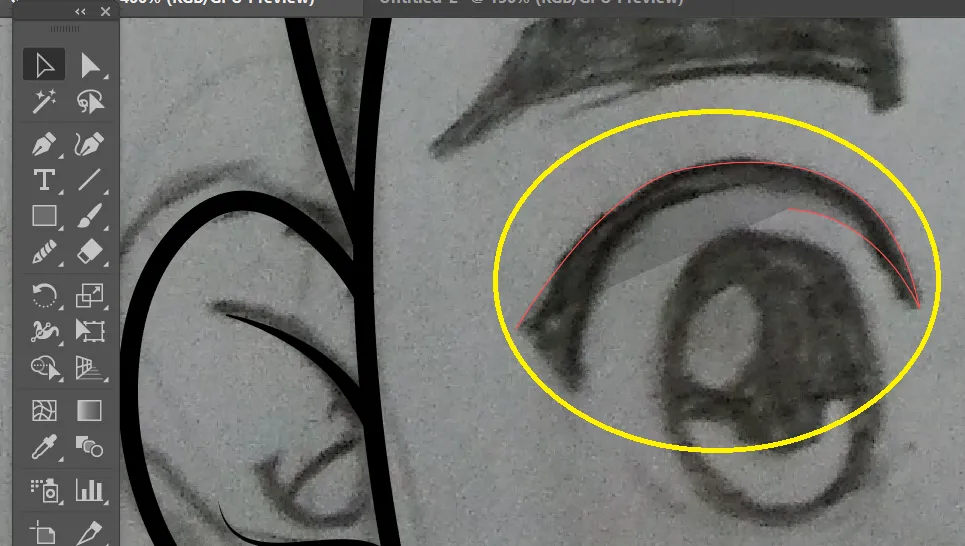
But as you can observe 🤔, the outline is covered by the fill and you won't be able to trace it precisely. So what you are going to do is click the Selection tool (shortcut key (v)) and click the fill you are working with, then an option will appear.🤗
After that change the opacity from 100 to 30-20%, depending on the visibility of your outline 🤓🤓🤓.
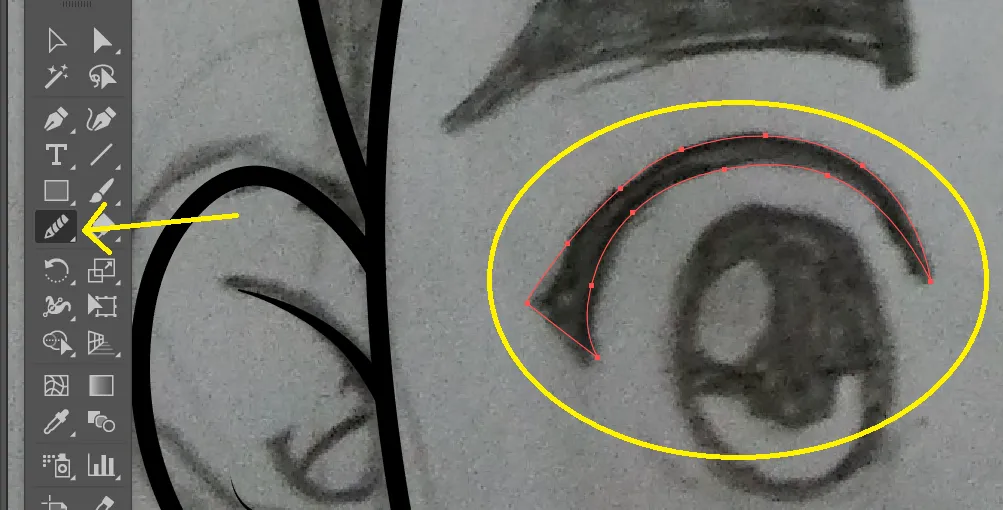
You can also use Smooth tool to smoothen things up.
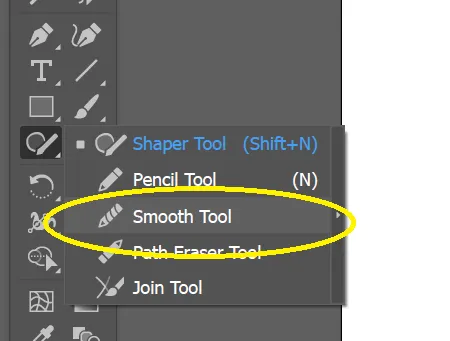
Just click the points you think is kinda awkward and ugly, to smoothen. And you can change the Opacity of the fill to 100% after getting the fill you wanna achieve 😉🤗.
STEP 4. Adding Colors 👨🎨🎨
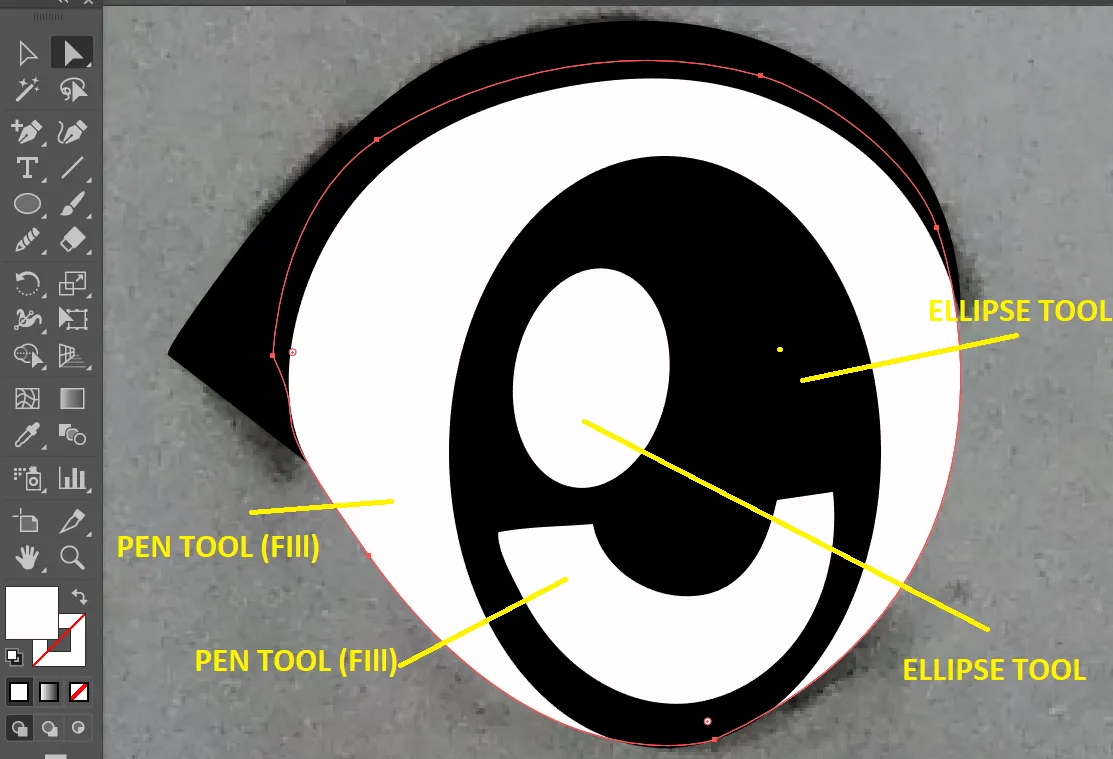
So I'll start with the eye. Just click the Ellipse toll for the shape eye and used pen tool for other detail.
So if you are done with the outline, you can just hide the layer where you put the photo reference. 👏👏👏
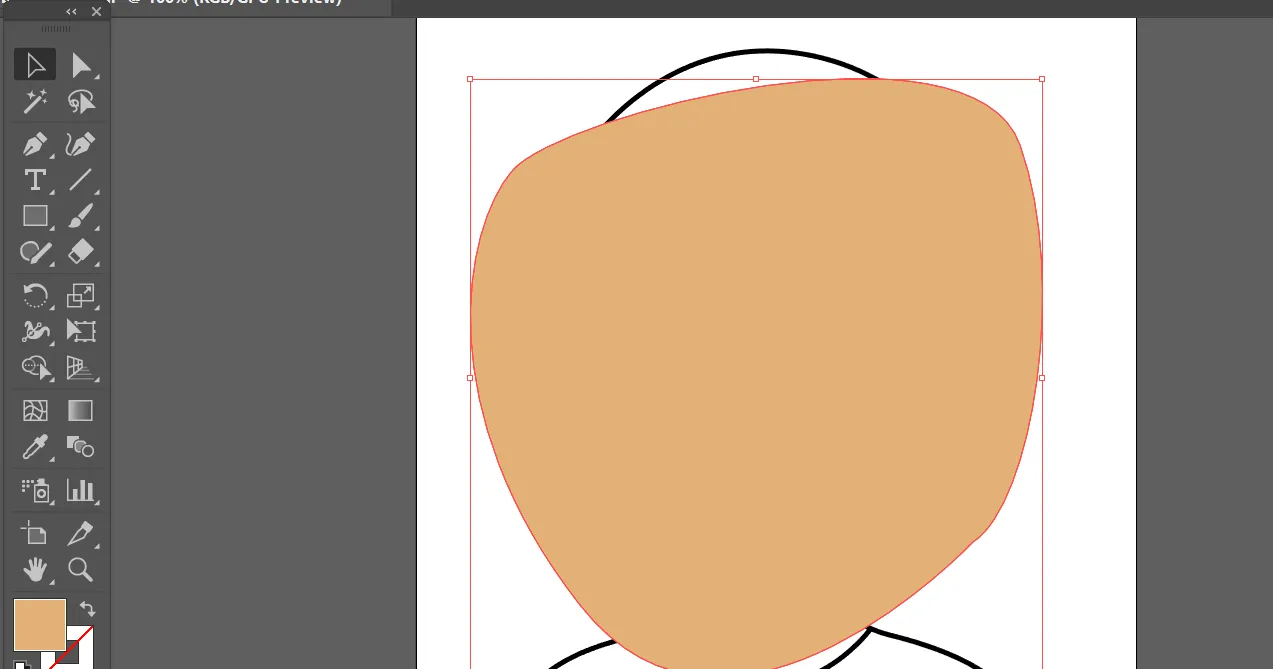
So here's the tricky and fun part 😶😱. Make a fill (make sure to enclose it properly), then choose a color fill that you want on your skin tone. Then make sure that the fill is exceed the outline.
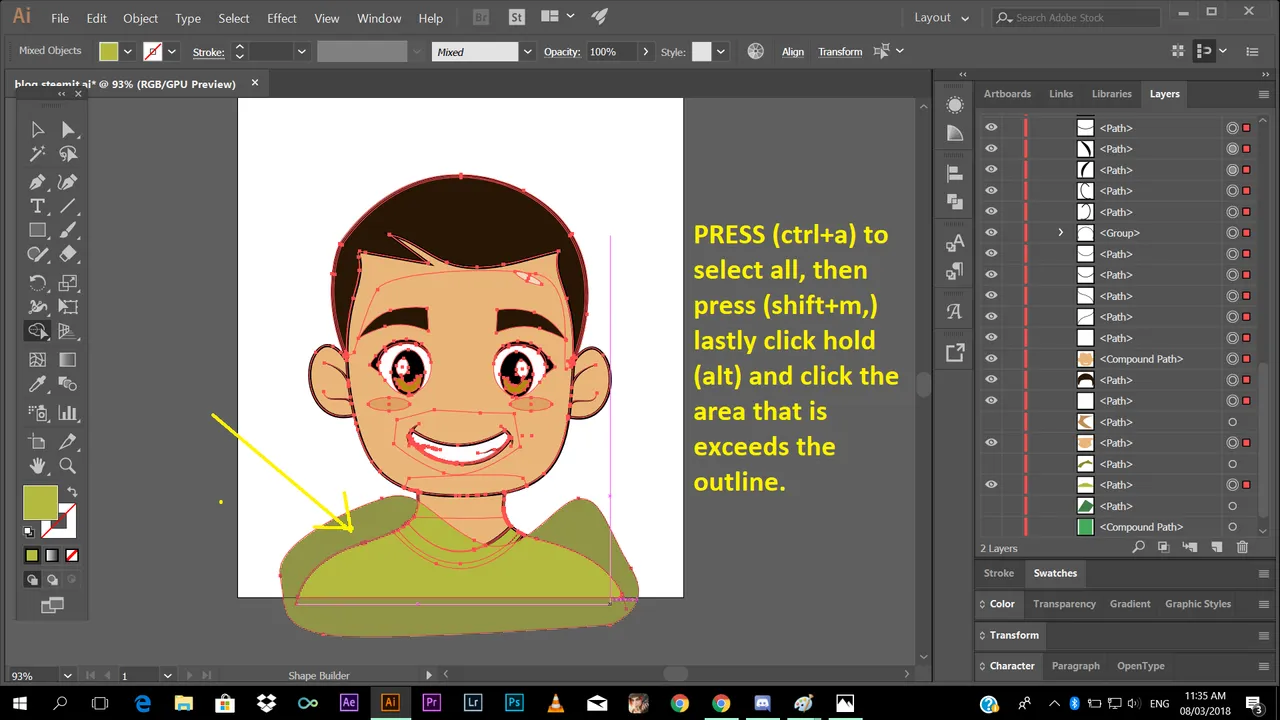
Then press (ctrl+a) to select all strokes and shape fill.
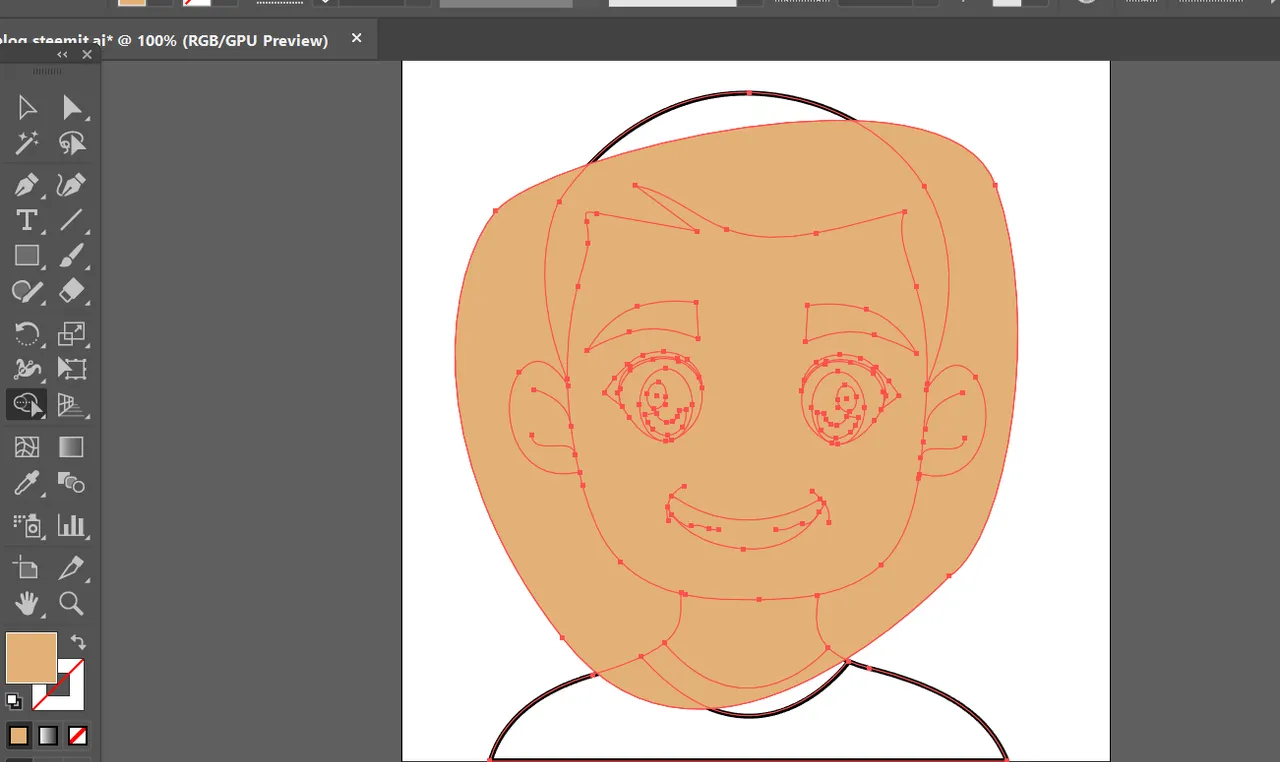
Then click the Shape Builder tool or press shortcut key (shift+m). Hope you're still following 😅🤗👌.
After pressing the Shape Builder tool or (shift+m), it should look like this. 👇
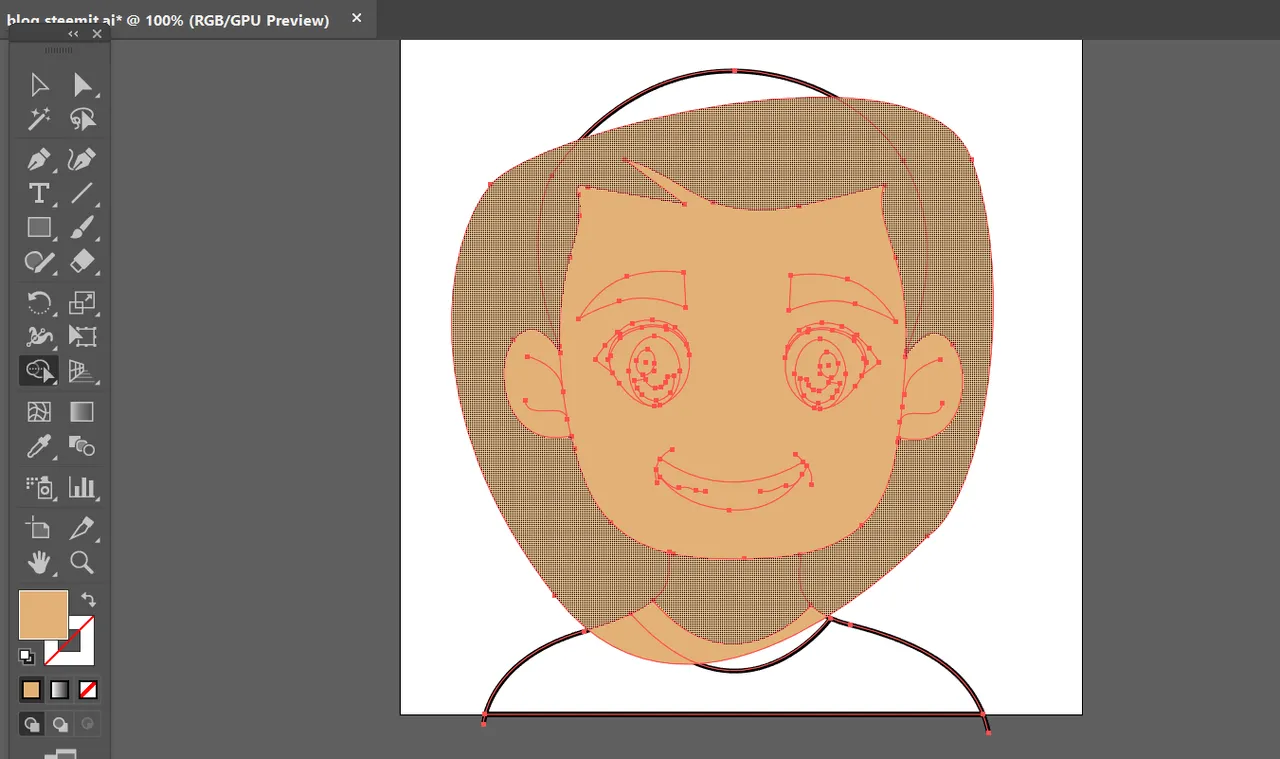
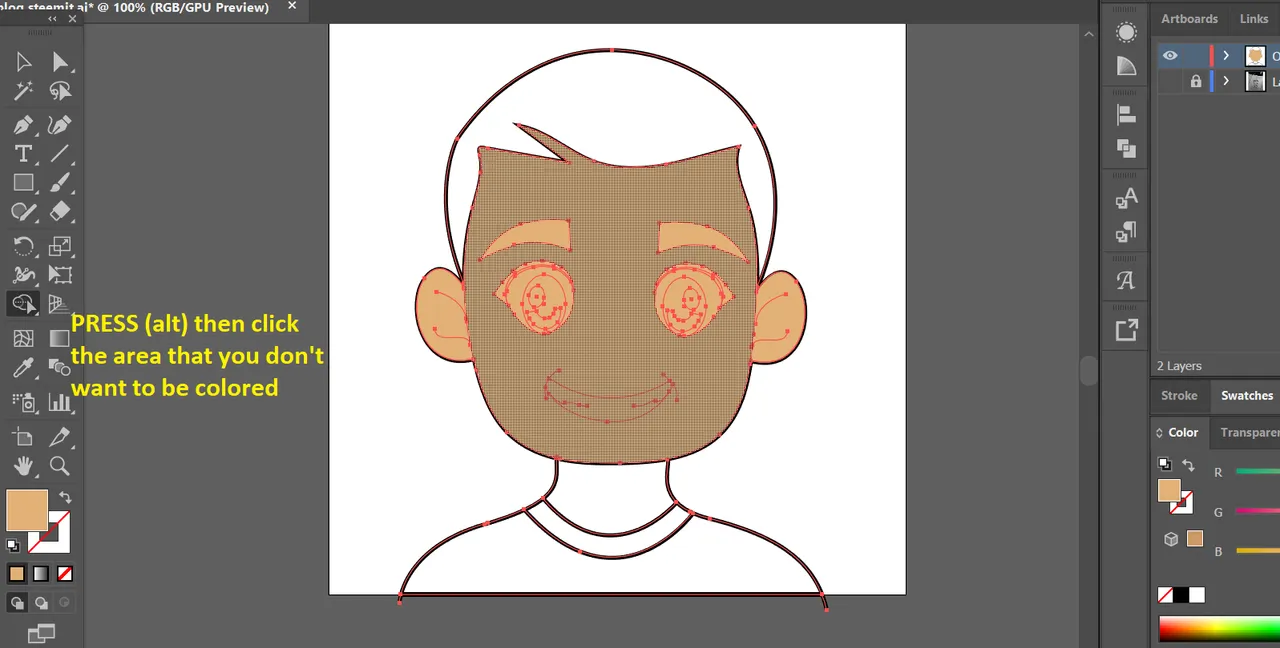
Then press (alt) just hold it, and click(left) the the area that overlaps and area you don't want to be filled with color.
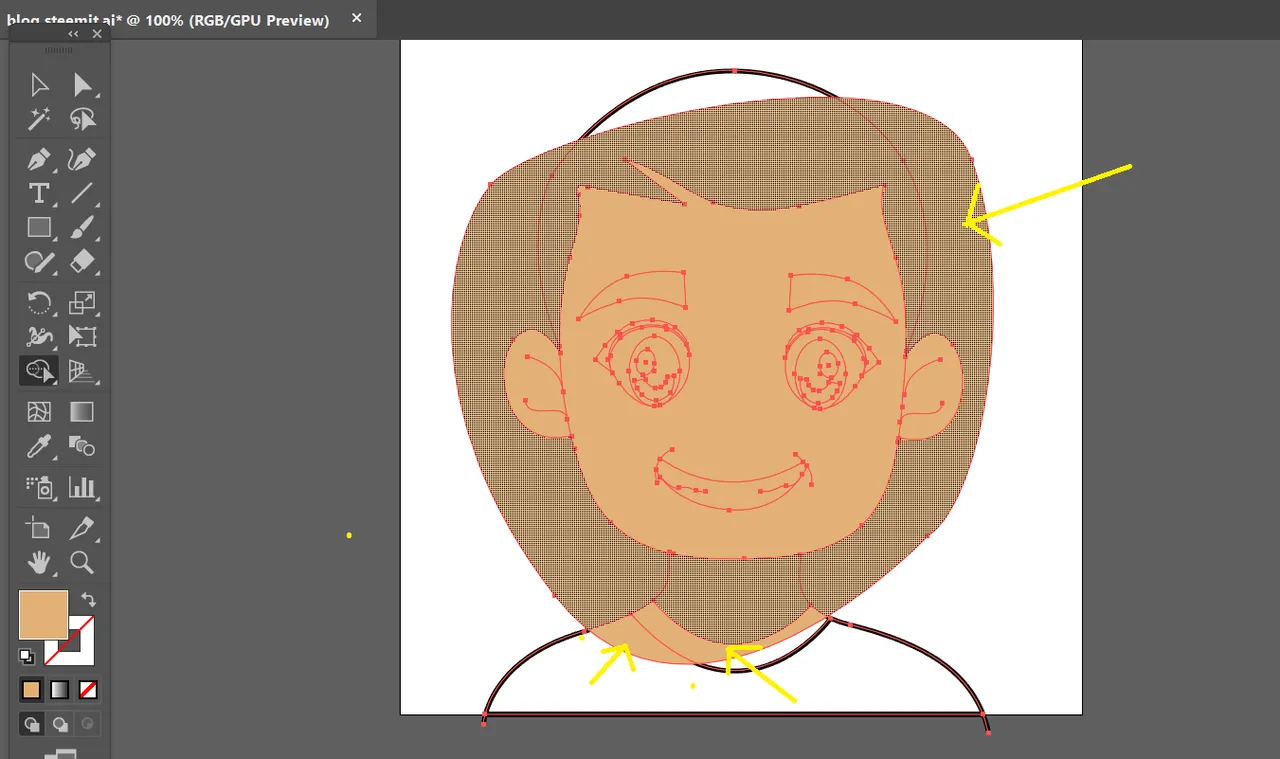
(Make sure that your lines (strokes) are interconnected to each other so that it will enclose properly, because if not, there's a tendency that the shape builder tool wont be able to divide the shape because the lines are not connected to each other. ) 👍👍👍
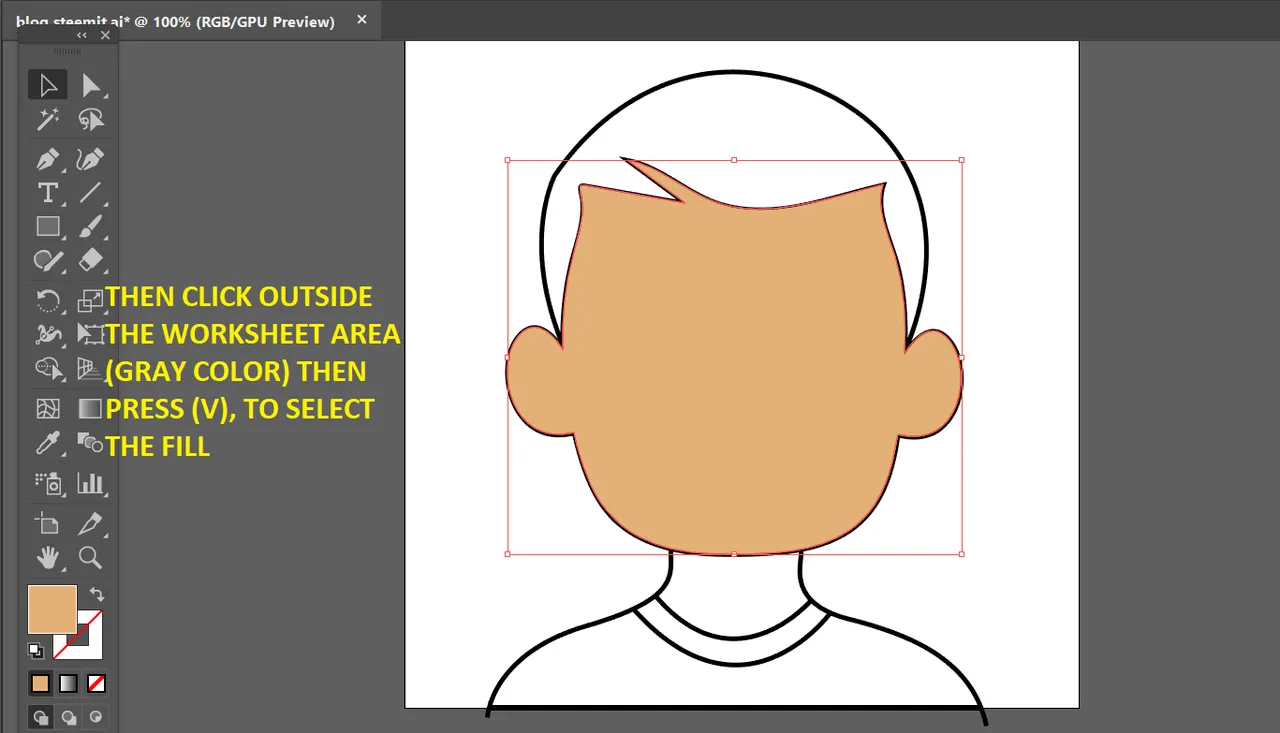
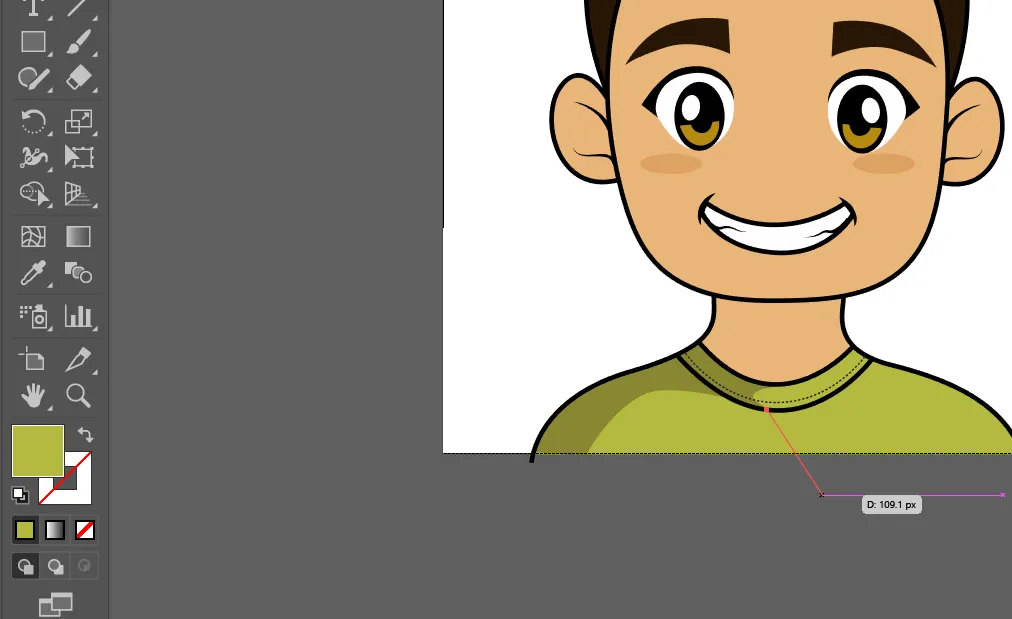
After selecting the areas you don't want to be colored. Click outside work sheet area, then press (V) to select the fill (the color of the skin)
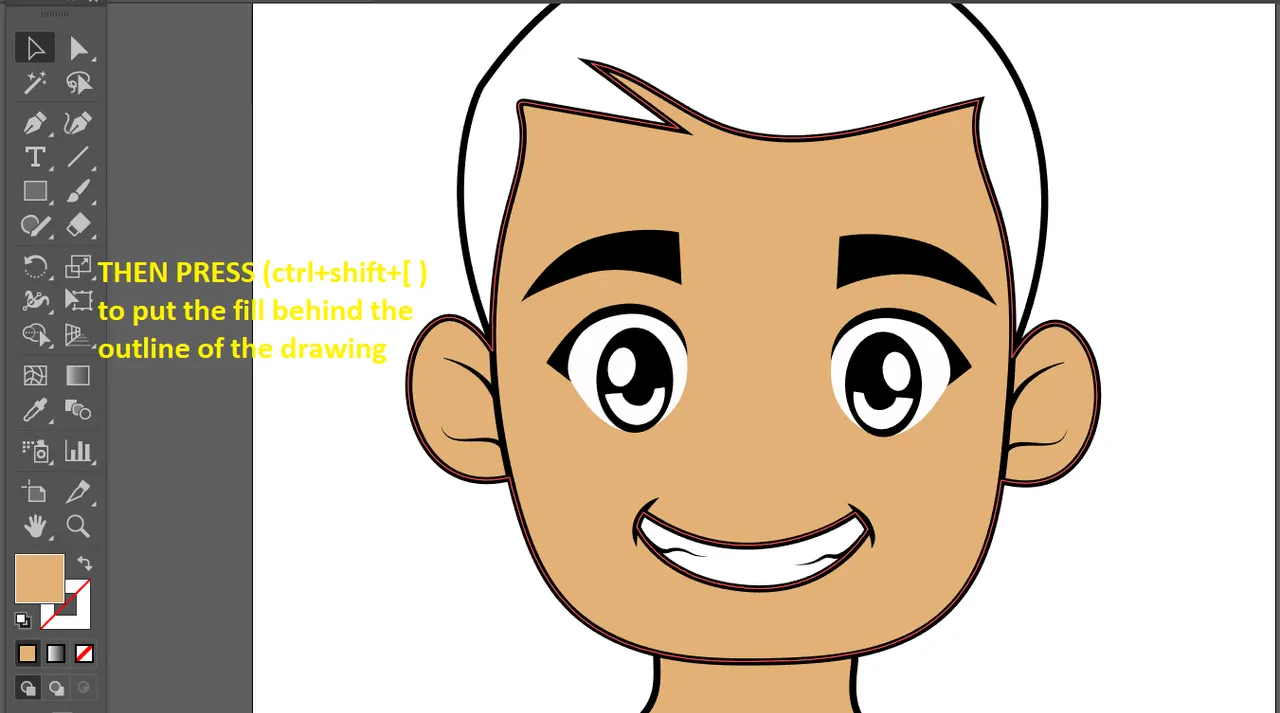
You wont able to see the eyes, because the shape fill is overlapping or it is above your outline. So what you are going to do is, after selecting the shape fill (by Selection tool (v)) press the key (ctrl+shift+[) to put the Shape fill to the back, it's just about the the positioning your layer guys. 😊😊😊
Check this out. 👇👇👇
So we're almost done. You're doing a progress, just follow the steps I am showing. 😄👍🤗
Next, adding some color the hair, brows, shirt, and other details. (Same process to add color, just like what I've showed you earlier on adding skin tone color to your avatar) 🧒🖍👕
(a recap)
STEP 5. Adding Shadows 🌒🌓🌔
So after you're done adding color to your work, we need to add a little bit of shadows to give some depth. Just choose a darker color tone for your shadow. 🌑
Double click the fill, a option will pop up then choose a darker shade for your shadow. (Tip, don't get to dark and too soft with your shadow, it should be balance. ⚖

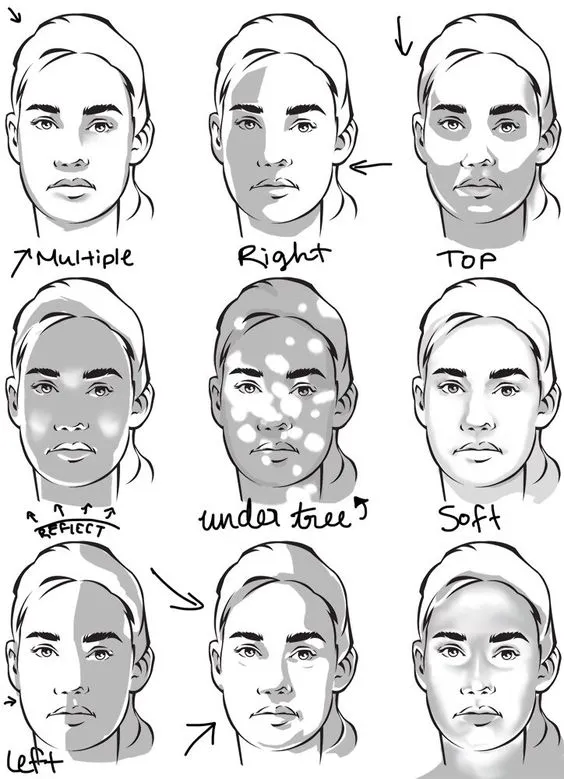
then, start adding shadow (decide carefully where the light source is located so that your shadow will be in right area.
check this guide guys. 👇👇👇
https://www.pinterest.co.uk/pin/571746115174988839/
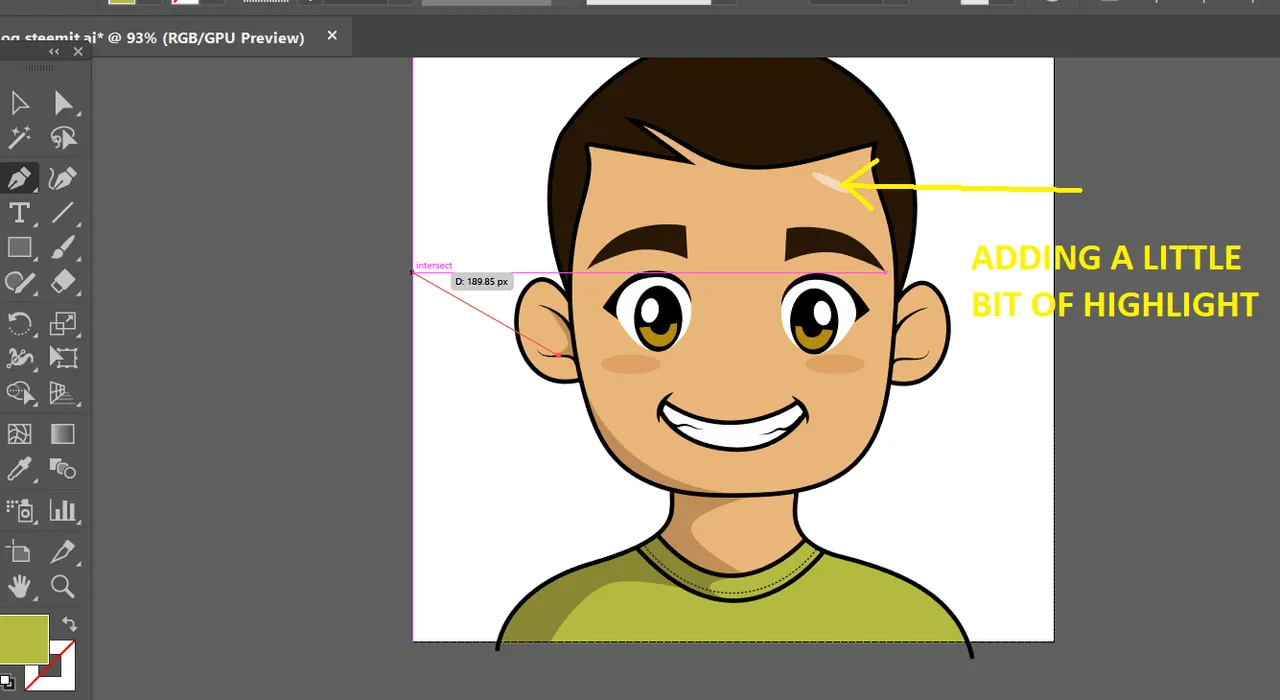
Adding some shadow in the neck, face, ear. (As you can see I don't add to much shadows and make it minimal, since our work is in not that detailed and for it to retain it's simplicity. )👌
And adding some shadow at the back of our character. 🧒🌓
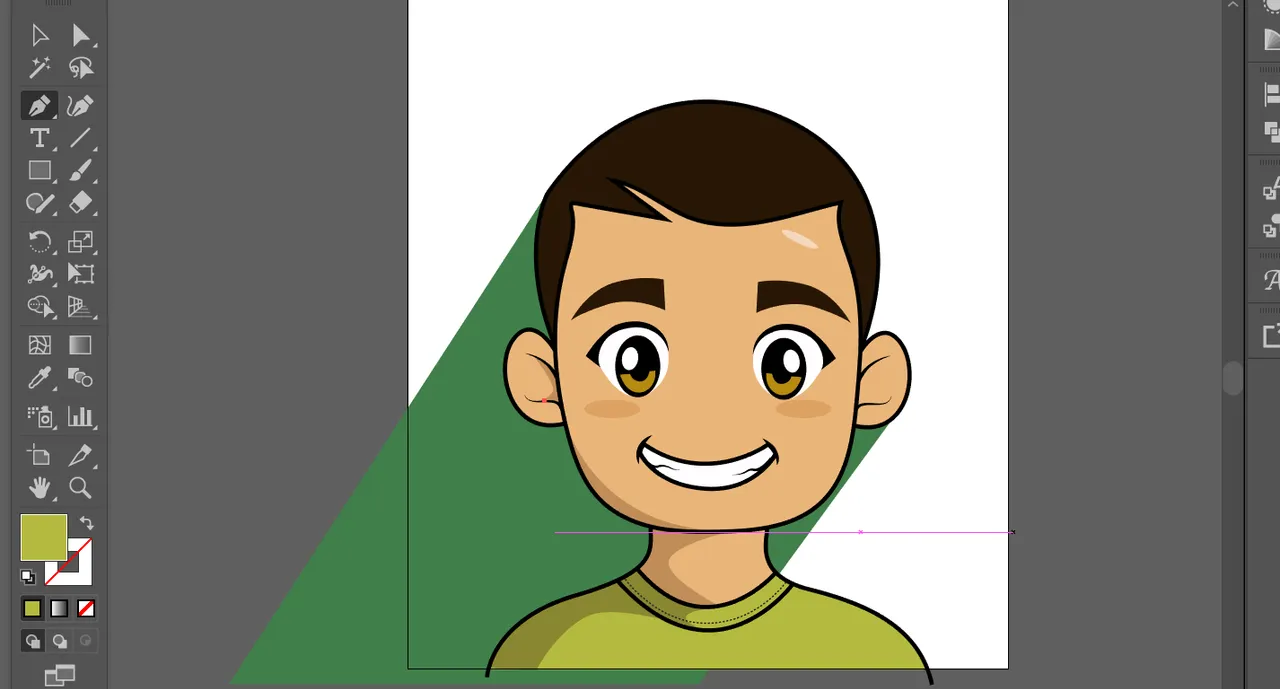
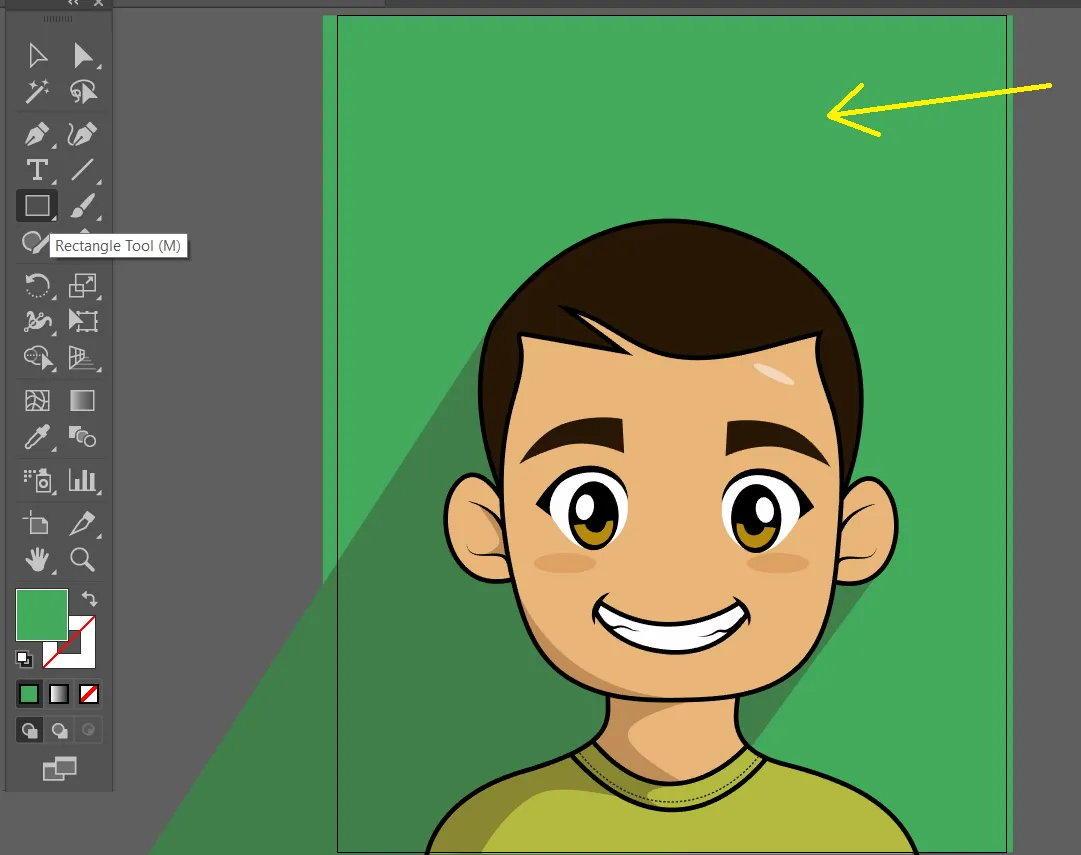
STEP 6. Adding Background 🏔
So we don't want to overdo our work, so I've just created a plane rectangle at put behind it behind the back.
(We're very near at the end of the tunnel 😃🤗😎)
STEP 7. Save Your Work 🖥💾
So this is the last step of this tutorial, I hope you had followed every process I've made 👍😁. So if you want to save your file in A.I file (your work that is editable, which you can go back to if you want to edit or add something)
Just press (ctrl+s) then make a title of your A.I file and save. And if you want to save it in JPEG (IMAGE FORM), just press (ctrl+alt+shift+s) gotta familiarize that shortcut key 😅😅😅. After that a option will pop up.
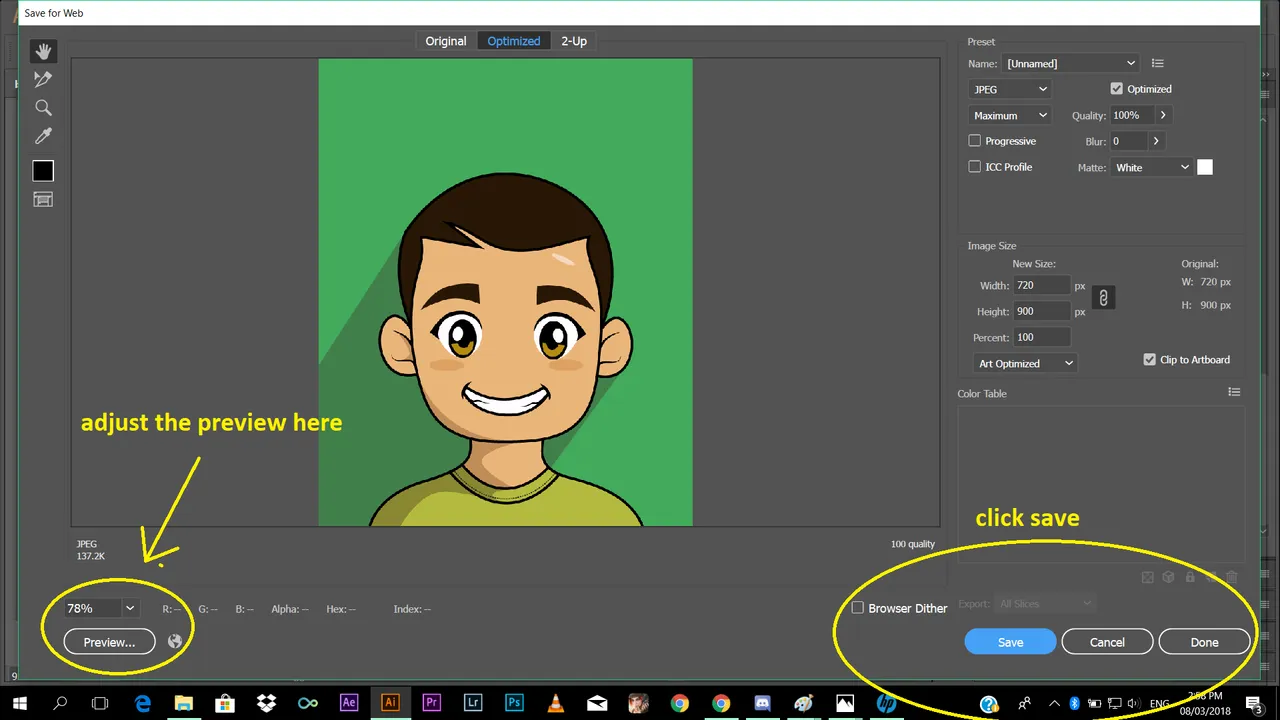
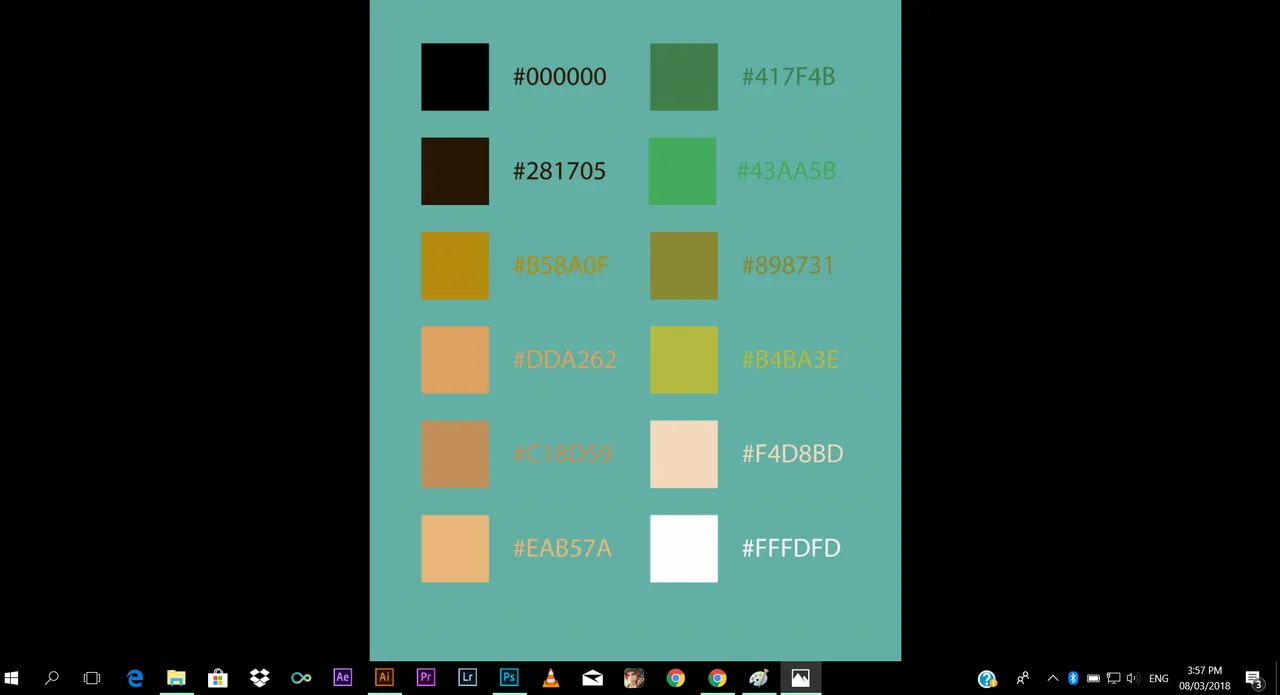
here are the color palette I've used in my work: 🎨🖍🖌
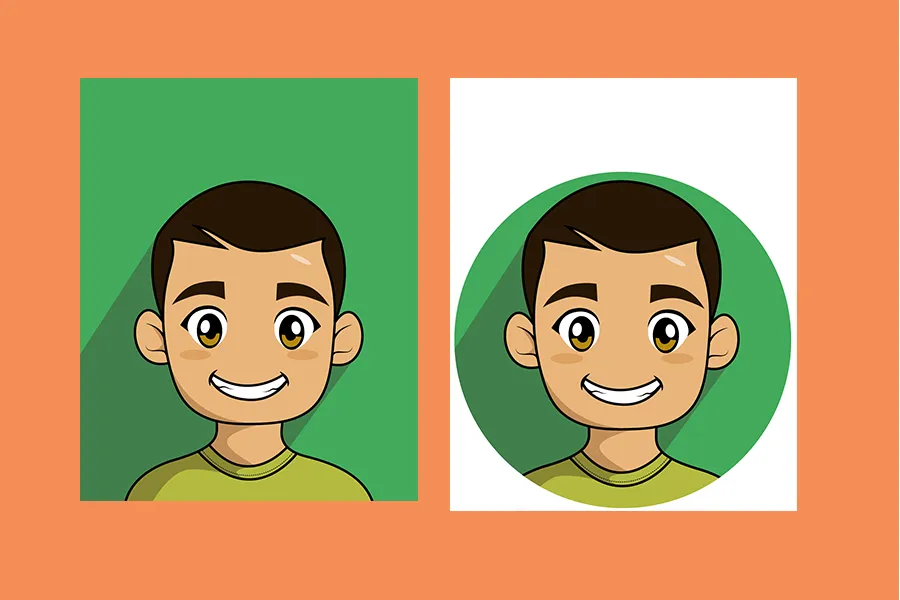
After following all of the process, Congratulations! 🤗👏🙌👍 you now have you own (cute)😄 profile avatar.
You may find it confusing and you may hard time creating your own. That's okay, I've experienced that stage to. Just take your time, practice. 👌👍💪
One thing to remember, "JUST REST, DON'T QUIT". Have a blessed day. 😇😀👋
Thanks for reading and visiting my blog. And thanks in advance for following and upvoting 🤗🙏👍.