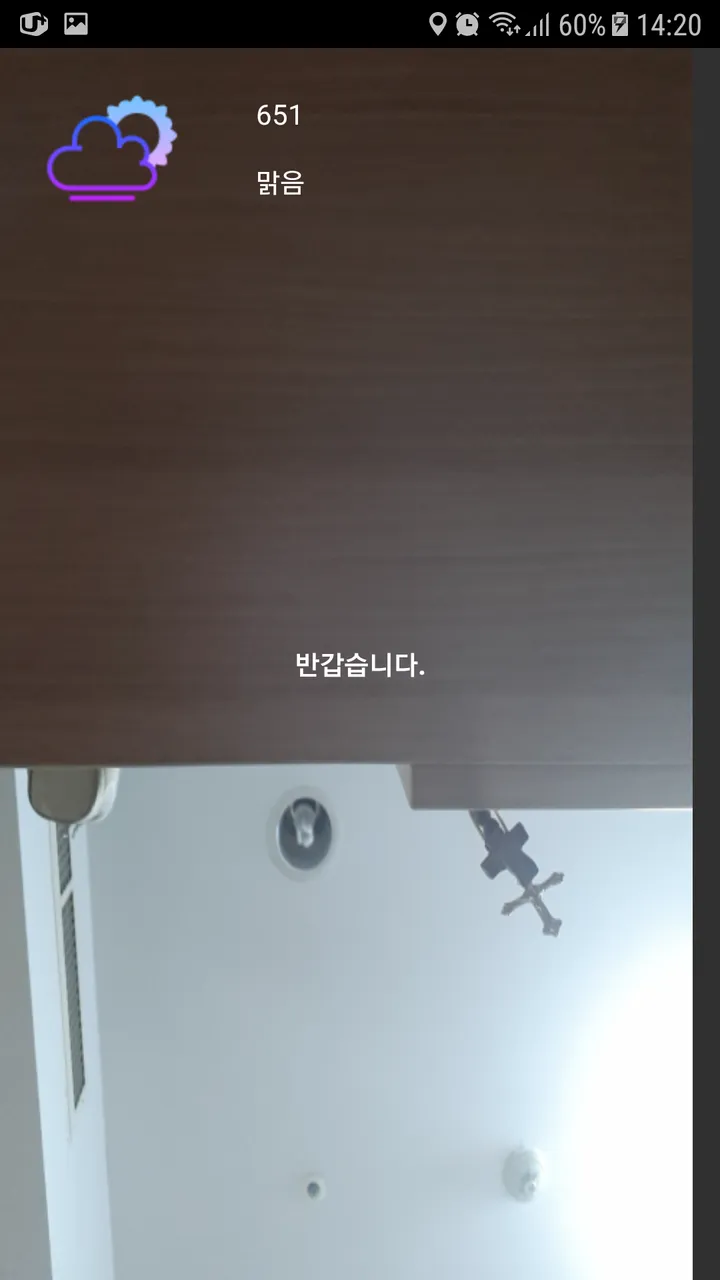
이제 카메라 위에 정보를 띄워봅시다.
먼저 저는 다음과 같은 정보를 띄우려고 합니다.
- 날씨
- 인사
다른 정보는 차차 추가하기로 하고 일단 저 두가지만 해보기로 합니다.
Layout
인사말 layout
<me.grantland.widget.AutofitTextView xmlns:android="http://schemas.android.com/apk/res/android"
    xmlns:app="http://schemas.android.com/apk/res-auto"
    xmlns:tools="http://schemas.android.com/tools"
    android:id="@+id/greeting_text"
    android:layout_width="match_parent"
    android:layout_height="100dp"
    android:layout_gravity="center"
    android:gravity="center"
    android:maxLines="1"
    android:padding="@dimen/default_pad"
    android:textAlignment="center"
    android:textColor="@android:color/white"
    android:textStyle="bold"
    app:sizeToFit="true"
    tools:showIn="@layout/activity_main"
    tools:text="안녕하세요."
    tools:textSize="50sp" />
날씨 layout
<?xml version="1.0" encoding="utf-8"?>
<LinearLayout xmlns:android="http://schemas.android.com/apk/res/android"
    xmlns:app="http://schemas.android.com/apk/res-auto"
    xmlns:tools="http://schemas.android.com/tools"
    android:layout_width="200dp"
    android:layout_height="100dp"
    android:gravity="center|start"
    android:orientation="horizontal"
    android:padding="@dimen/default_pad"
    tools:showIn="@layout/activity_main">

    <ImageView
        android:id="@+id/main_weather_image"
        android:layout_width="80dp"
        android:layout_height="80dp"
        tools:src="@drawable/ic_cloud" />

    <LinearLayout
        android:layout_width="match_parent"
        android:layout_height="match_parent"
        android:layout_gravity="center"
        android:orientation="vertical">

        <me.grantland.widget.AutofitTextView
            android:id="@+id/weather_temp_text"
            android:layout_width="match_parent"
            android:layout_height="0dp"
            android:layout_weight="1"
            android:gravity="center"
            android:maxLines="1"
            android:padding="4dp"
            android:textAlignment="center"
            android:textColor="@android:color/white"
            app:sizeToFit="true"
            tools:text="60°C" />

        <me.grantland.widget.AutofitTextView
            android:id="@+id/weather_type_text"
            android:layout_width="match_parent"
            android:layout_height="0dp"
            android:layout_weight="1"
            android:gravity="center"
            android:maxLines="1"
            android:padding="4dp"
            android:textAlignment="center"
            android:textColor="@android:color/white"
            app:sizeToFit="true"
            tools:text="SUNNY" />
    </LinearLayout>
</LinearLayout>
그리고 카메라 preivew가 있는 레이아웃에 다음과 같이 추가하였습니다.
<include layout="@layout/item_weather" />
<include layout="@layout/item_hello" />
Java
이제 레이아웃을 추가하였습니다. 하지만 소스를 잘 보면 tools로 텍스트와 이미지를 설정하였습니다. 이는 개발의 편의를 위해 개발 화면에서만 값이 보여지고 실제 화면에서는 보여지지 않습니다.
목표는 날씨, 기분에 따라 변하는 메시지, 이미지 이기 때문에 Java에서 이를 변경하도록 하겠습니다.
메시지로 사용할 resource
다국어 지원을 위해 별도의 xml 파일을 만들어서 관리하도록 하였습니다. 저는 파일명은 각각 greeting_message_array, weather_array로 하였습니다.
<?xml version="1.0" encoding="utf-8"?>
<resources>
    <string-array name="greeting_messages">
        <item>안녕하세요.</item>
        <item>반갑습니다.</item>
        <item>환영합니다.</item>
    </string-array>
</resources>

<?xml version="1.0" encoding="utf-8"?>
<resources>
    <string-array name="weather_type">
        <item>맑음</item>
        <item>눈</item>
        <item>비</item>
    </string-array>
</resources>
인사말을 만들 클래스
별도의 클래스에서 인사말을 만들게 하였습니다. 굳이 이렇게 할 필요는 없지만 추후 이름을 붙인다거나 등의 작업을 위해 분리하였습니다.
package app.kimyeonjung.visionmirror.greeting;

import android.content.Context;

import java.util.Random;

import app.kimyeonjung.visionmirror.R;

public class GreetingBuilder {
    private Context context;

    public GreetingBuilder(Context context) {
        this.context = context;
    }

    public String getRandomGreetingMessage() {
        String[] messageArray = context.getResources().getStringArray(R.array.greeting_messages);
        return messageArray[new Random().nextInt(messageArray.length - 1)];
    }
}
날씨정보
아직 정보를 인터넷에서 받아오는 부분은 구현하지 않았기 때문에 아무 값이나 넣어보았습니다.
package app.kimyeonjung.visionmirror.weather;

import android.content.Context;

import java.util.Random;

import app.kimyeonjung.visionmirror.R;

public class WeatherBuilder {
    private Context context;

    public WeatherBuilder(Context context) {
        this.context = context;
    }

    public int getWeatherImage() {
        int[] images = {
                R.drawable.ic_cloud,
                R.drawable.ic_electric,
                R.drawable.ic_partly_cloudy,
                R.drawable.ic_rain,
                R.drawable.ic_snow
        };

        return images[new Random().nextInt(images.length - 1)];
    }

    public int getTemperature() {
        int[] temps = {60, 50, 13, 20, 16, 165, 10, 6514, 651, 65};
        return temps[new Random().nextInt(temps.length - 1)];
    }

    public String getType() {
        String[] types = context.getResources().getStringArray(R.array.weather_type);
        return types[new Random().nextInt(types.length - 1)];
    }
}
그리고 마지막으로 액티비티에서 값을 설정해주면
AutofitTextView greetingTextView = findViewById(R.id.greeting_text);
        greetingTextView.setText(new GreetingBuilder(this).getRandomGreetingMessage());

WeatherBuilder weatherBuilder = new WeatherBuilder(this);

ImageView weatherImageView = findViewById(R.id.weather_image);
weatherImageView.setImageResource(weatherBuilder.getWeatherImage());

AutofitTextView temperatureView = findViewById(R.id.weather_temp_text);
       temperatureView.setText(String.valueOf(weatherBuilder.getTemperature()));

AutofitTextView typeView = findViewById(R.id.weather_type_text);
typeView.setText(weatherBuilder.getType());
결과
짠~! 이렇게 카메라 위에 정보가 출력되었습니다!
