
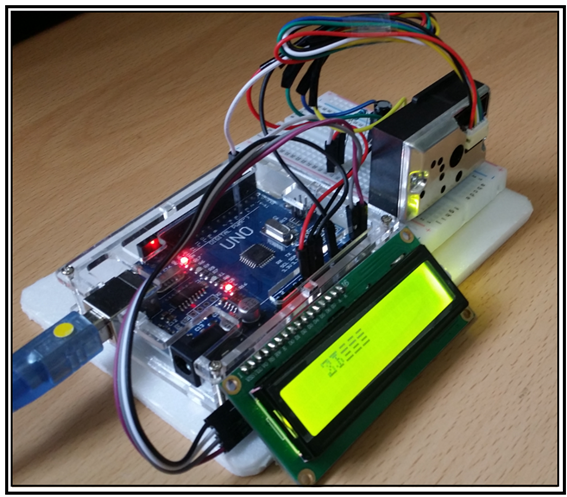
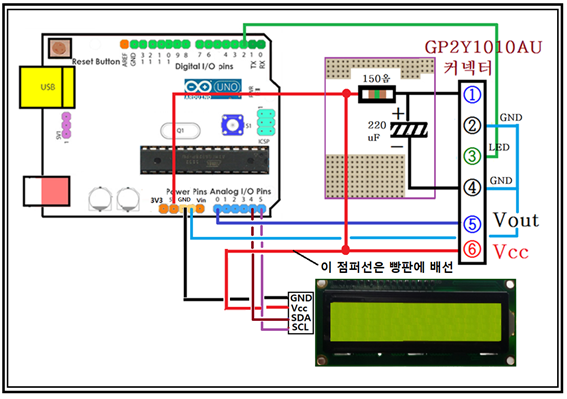
미세먼지 측정기에 I2C lcd를 추가하는 것은 그다지 어렵지 않습니다. 미세먼지 센서 배선도에 I2C 인터페이스 lcd 를 추가하기 위해서는 lcd 의 4가닥 점퍼선을 배선해야 한다.
lcd 의 GND -> 아두이노 GND ( 하나 여분이 있음)
lcd 의 Vcc -> 빵판의 5V Vcc ( 아두이노 5V를 미세먼지 센서가 선점)
SDA -> A4
SCL -> A5
위와 같이 정리하면 간단하나 아래의 배선도를 본다면 이상스러울 정도로 복잡해 보인다. lcd 의 Vcc를 아두이노에 직접 연결할 곳이 없으므로 빵판의 5V 합류지점에 점퍼선을 꽂으면 된다. lcd 점퍼선 4가닥은 20cm 용을 사용해야 여유가 있을 것이다.
첨부된 미세먼지 측정기 코딩을 복사하여 실행해 보도록 한다. 공기와 먼지의 터불런스 특성에 의한 데이터 변동이 심하므로 숫자가 다소 빨리 바뀜에 유의하자.
급변하는 데이터 값을 안정적으로 보기위한 LOW PASS FILTER 알고리듬을 적용한 코드를 곧 연재할 계획이다.
이 블로그는 아래의 블로그를 참조하고 I2C lcd를 추가하도록 해야 한다.
아두이노 코딩-27: 미세먼지 측정 엘렉트로닉스 회로 배선과 아두이노 코딩
https://steemit.com/kr/@codingart/27
//PM_sensor_i2clcd_01
#include <Wire.h>
#include <LiquidCrystal_I2C.h>
LiquidCrystal_I2C lcd(0x3F,16,2);
int measurePin = 0; //Connect dust sensor to Arduino A0 pin
int ledPower = 2; //Connect 3 led driver pins of dust sensor to Arduino D2
int samplingTime = 280;
int deltaTime = 40;
int sleepTime = 9680;
float voMeasured = 0;
float calcVoltage = 0;
float dustDensity = 0;
float average_dustDensity = 0;
void setup(){
lcd.init();
lcd.backlight();
Serial.begin(9600);
pinMode(ledPower,OUTPUT);// 미세먼지 센서 내부 LED
}
void loop() {
average_dustDensity = particleSensing();
// Serial.print("average_dustDensity = ");
// Serial.print("P");
Serial.println((int)average_dustDensity);
lcd.setCursor(3,0);
lcd.println(average_dustDensity,DEC);
// Serial.write((int)average_dustDensity);
}
float particleSensing() {
digitalWrite(ledPower,LOW); // power on the LED
delayMicroseconds(samplingTime);
voMeasured = analogRead(measurePin);
delayMicroseconds(deltaTime);
digitalWrite(ledPower,HIGH); // turn the LED off
delayMicroseconds(sleepTime);
// 0 - 5V mapped to 0 - 1023 integer values
calcVoltage = voMeasured * (5.0 / 1024.0);
if( calcVoltage > 0.6 ) {
// linear eqn from http://www.howmuchsnow.com/arduino/airquality/
dustDensity =1000.0*( 0.172 * calcVoltage - 0.1);
// Serial.print("Digital Value(0-1023): ");
// Serial.print(voMeasured);
// Serial.print(" - V: ");
// Serial.print(calcVoltage);
// Serial.print(" - Density: ");
// Serial.println(dustDensity); // unit: ug/m3
delay(190);
}
return dustDensity;
}//끝