
아두이노 코딩-103 Processing Client 버튼에 의한 아두이노 Ethernet 웹서버 LED ON OFF
(https://cdn.steemitimages.com/DQmZ3sVEq3ke2xnrFE2kAeLEGJZTsHtQyJa5PtGVPWmsiFY/noname01.png)
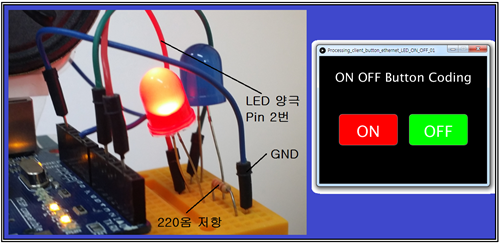
Processing 의 HTTP 기능을 사용하여 PC에 설치된 무선 공유기와 연결된 이더넷을 통해 아두이노 우노 보드에 설치된 LED를 제어하여 보자. 아두이노 우노의 웹서버 형식 코드는 그다지 바뀌는 내용이 없다. 별것아닌 코딩이지만 그래도 Processing 으로 버튼을 준비해서 아두이노 사물 인터넷 제어 LED ON OFF 최초로 성공적이네요.
아두이노 우노에 설치된 이더넷 보드의 ip 는 무선 와이파이 지원이 가능한 WeMos/NodeMCU 보드의 가상 ip 사례를 참조하여 이더넷 쉴드에도 적용하면 된다. 즉 WeMos/NodeMCU 보드의 가상 ip로 웹서버 코드가 잘 작동했다면 바로 그 ip 번호를 이더넷 쉽드의 가상 ip로 삼으면 된다.
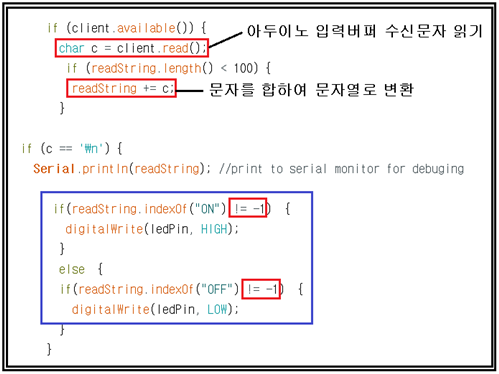
W5100 침을 채용한 이더넷 쉴드에서 입력 버퍼에 수신되는 문자를 client.read() 명령에 이해 한자씩 문자로 읽어 이들을 다 더해서 문자열 즉 readString으로 처리한 다음에 if ㅁ제어문에서 readString.indexOf(“ON”) 이나 readString.indexOf(“OFF”)의 값이 –1이 아닌지 여부가 확인되면 digitalWrite() 명령에 의해 LED를 ON OFF 하도록 한다.
한편 Processing 클라이언트에서 준비 사항을 알아보자. 이미 Button class 코딩을 통해 그래픽 화면상에 ON 과 OFF 2개의 버튼 준비가 가능하다. 각 버튼 위에 Mouse 가 위치하게 되면 하단에 납작한 형태의 버튼이 출력되고 클릭하면 콘솔 창에 클릭 횟수가 출력된다.
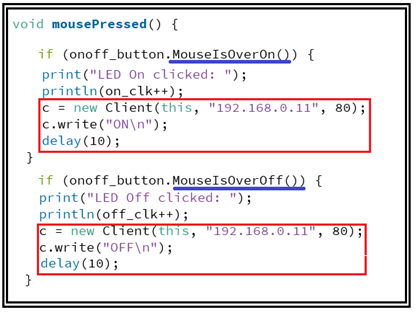
이 부분을 관장하는 부분이 이벤트성 입력을 처리하는 MousePressed() 루틴이다.
이 루틴의 코드는 두 가지가 포함되어 있어야 한다. 즉 ON 버튼과 OFF 버튼 중 하나를 클릭하게 되면 즉 MosusePressed 가 되면 콘솔 창 출력과 아울러 HTTP 가능을 사용하여 가상 ip를 가진 아두이노 이더넷을 향하여 request를 보낼 필요가 있다.
한편 커버 위치의 배선 사진에서 아두이노 이더넷 측의 배선을 살펴보면 2번 핀에 LED 양극을 연결하였다. LED 반대편은 220옴 전류제한 저항과 직렬 연결하여 GND와 연결한다.
아두이노 이더넷 LED 코드를 컴파일 업로딩하고 시리얼 모니터를 켜면 클라이언트로부터 request를 기다리며 가상 ip가 출력됨을 볼 수 있을 것이다. 아루러 Processing 클라이언트를 실행하여 버튼을 클릭해 주면 LED 의 ON OFF 와 시리얼 모니터 상에 수신된 ON OFF 가 출력됨을 알 수 있다. 이러한 과정에 의해서 Processing 클라이언트 기법에 의해서도 HTML 언어를 사용하는 아두이노 웹서버 코딩처럼 lED ON OFF 사물인터넷 제어가 가능하다.
동영상을 통해서 관찰해 보자.
사이트에 첨부된 코드를 실행시켜 보자.
//Processing_client_button_ethernet_LED_ON_OFF_01
import processing.net.*;
Client c;
Button onoff_button; // the button
int on_clk = 1; // number of times the button is clicked
int off_clk = 1;
int r_color = 256;
int g_color = 256;
void setup() {
size (430, 330);
smooth();
// xpos ypos xxpos widthB heightB
onoff_button = new Button("ON","OFF",r_color,g_color, 50, 150, 230, 150, 80);
}
void draw() {
// draw a square if the mouse curser is over the button
if (onoff_button.MouseIsOverOn()) {
fill(color(256,0,0));
rect(50, 250, 150, 30);
}
else if (onoff_button.MouseIsOverOff()) {
fill(color(0,256,0));
rect(230, 250, 150, 30);
}
else {
// hide the square if the mouse cursor is not over the button
background(0);
}
// draw the button in the window
onoff_button.Draw();
textAlign(CENTER, CENTER);
fill(256,256,256);
textSize(32);
text("ON OFF Button Coding", width/2, 50);
}
// mouse button clicked
void mousePressed() {
if (onoff_button.MouseIsOverOn()) {
// print some text to the console pane if the button is clicked
print("LED On clicked: ");
println(on_clk++);
c = new Client(this, "192.168.0.11", 80);
c.write("ON\n");
delay(10);
}
if (onoff_button.MouseIsOverOff()) {
// print some text to the console pane if the button is clicked
print("LED Off clicked: ");
println(off_clk++);
c = new Client(this, "192.168.0.11", 80);
c.write("OFF\n");
delay(10);
}
}
// the Button class
class Button {
String onlabel; // on button label
String offlabel; // on button label
int xcolor; // onbutton color
int ycolor; // offbutton color
float x; // top left corner x position
float y; // top left corner y position
float xx;
float w; // width of button
float h; // height of button
// constructor
Button(String onlabelB, String offlabelB, int x_color, int y_color, float xpos, float ypos, float xxpos, float widthB, float heightB) {
onlabel = onlabelB;
offlabel = offlabelB;
xcolor = x_color;
ycolor = y_color;
x = xpos;
y = ypos;
xx = xxpos;
w = widthB;
h = heightB;
}
void Draw() {
fill(xcolor,0,0);
stroke(141);
rect(x, y, w, h, 10);
textAlign(CENTER, CENTER);
fill(256,256,256);
textSize(40);
text(onlabel, x + (w / 2), y + (h / 2));
fill(0,ycolor,0);
stroke(141);
rect(xx, y, w, h, 10);
// textAlign(CENTER, CENTER);
fill(256,256,256);
// textSize(40);
text(offlabel, xx + (w / 2), y + (h / 2));
}
boolean MouseIsOverOn() {
if (mouseX > x && mouseX < (x + w) && mouseY > y && mouseY < (y + h)) {
return true;
}
return false;
}
boolean MouseIsOverOff() {
if (mouseX > xx && mouseX < (xx + w) && mouseY > y && mouseY < (y + h)) {
return true;
}
return false;
}
}//End
//Webserver_ethernet_LED_ON_OFF_from_Processing_01
#include <SPI.h>
#include <Ethernet.h>
byte mac[] = { 0xDE, 0xAD, 0xBE, 0xEF, 0xFE, 0xED }; //physical mac address
byte ip[] = { 192, 168, 0, 11 }; // fixed IP addr in LAN
EthernetServer server(80); //server port
String readString;
int ledPin = 2;
void setup(){
pinMode(ledPin, OUTPUT); //pin selected to control LED
Ethernet.begin(mac, ip);
server.begin();
Serial.begin(9600);
Serial.print("server is at ");
Serial.println(Ethernet.localIP());
}
void loop(){
EthernetClient client = server.available();
if (client) {
while (client.connected()) {
if (client.available()) {
char c = client.read();
if (readString.length() < 100) {
readString += c;
}
if (c == '\n') {
Serial.println(readString); //print to serial monitor for debuging
   if(readString.indexOf("ON") != -1)  {
     digitalWrite(ledPin, HIGH);
    }
    else  {
    if(readString.indexOf("OFF") != -1)  {
      digitalWrite(ledPin, LOW);
    }
  }

delay(1);
client.stop();
readString=""; //clearing string for next read
}//if (c == '\n') {

  }//if (client.available()) {
}//while (client.connected()) {
}// if (client) {
}//끝![noname01.png]