 Tutorial
 ...learn how to scroll the Custom TileMap (screen wrapped)
What Will I Learn?
This tutorial leverages the last, which explained how to create your own custom TileMap.
Let's make it scroll on the screen!
Note: a future tutorial will add smooth pixel scrolling
I intend to construct a dungeon crawler with the brilliant free art provided by Jesse Freeman as part of this series. For that, I'd like to implement a map that may expand and contract as required, per level, without limits of the screen size.
The scrolling shall also be applied to the Crazy Miner game that uses the same TileMap system to see if the game experience is improved whilst solving a few technical problems with the GUI.
Note: This tutorial is based on a screen sized map. I.E. As things scroll, they automatically wraps around to the other side. I will provide a future tutorial which expands this to a map wider than the screen.
Assumptions
- You understand the basics of GDScript
- You understand Godot Engine's editor and Tree/Node design
You will learn
- How to show the Custom TileMap displaced on the screen, to mimic scrolling
- How to place the player in the Map to ensure it remains relative to any scroll position (i.e. centre of screen)
- How to take a key-press and move the Map and Player
Requirements
You will need Godot Engine v3.0 installed, as well as a strong grasp of the GDScript syntax.
This Tutorial explains the implementation and use of TileMaps, rather than how to program in Godot Engine Script (GDScript). Please look at my other, and future, tutorials for help in that respect.
1. Modifications to Custom TileMaps
Before I start this tutorial, I confess I've made modifications to the code from the previous article. It is always good to cleanse code at the end of a phase, ready for the next; these allow for optimisations and clarity to be applied.
The code for the previous tutorial remains untouched in GitHub. The improvements have been added to the new project; therefore they can be compared.
You may find the code for the tutorial in the GitHub repository.
Modifications are summarised below with detailed explanations in the following sections:
- Comments
- The Tile now has exported variables for the Sprite Map
- The Map saw reassignment of methods to Tilemap
- The TileMap was split into finer grained functions
1.1. Comments
I've added comments where I believe they will help you to understand what the code is doing.
I strive to write code that can be understood, simply by reading it. I try to replace the complex code with simple functions, thereby improving readability, reduce complexity as well as increase reusability.
As a professional programmer, I'm always learning new techniques and styles.
Note: I suffer a mild form of dyslexia, therefore I believe my code is probably easier to read than my tutorial!
The only exception to this is when I develop a complex algorithm and code brevity is required. I then include comments to explain the concepts and set the thinking context, to allow the code to be read.
They have only been provided for your benefit.
Were they useful? Please comment, as it will determine whether I should add or omit them in future Tutorials
1.2. Changes to the Tile class
Whilst adding the Player Tile to the map, I needed to add it as a Sprite Map but recognised the previous implementation as being weak. The Sprite Map for characters is provided as a 1 x 10 image strip:

I opened the original Floor instance in the editor and looked at the script variables in the Inspector:
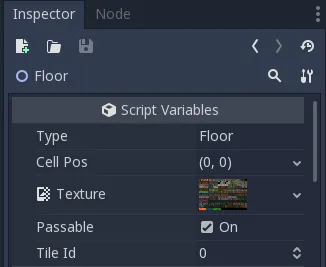
The properties I required were not fully exposed:
- VFrames - Vertical slices in the image, i.e. 1 for the above Sprite Map
- HFrames - Horizontal slices in the image, i.e. 10 for the above Sprite Map
- Frame - Frame to show after slicing Sprite Map
The Tile class only contained the Texture property:
- Texture - The Sprite Map image
Thus, I hardwired the 'frame' configuration directly into the Floor script:
tool extends "res://Objects/Tiles/Tile/Tile.gd"

export (int, 0, 259) var tileId setget setTileById

func setTileById(newId):
    tileId = newId
    if tileId != null and has_node("Texture"):
        $Texture.frame = newId

func _init():
    $Texture.scale = Vector2(2, 2)
    $Texture.vframes = 13
    $Texture.hframes = 20
    $Texture.frame = 1
This is bad because every concrete instance of a Tile would require code to be written in an init function to set these values. Given I needed to create a Player and eventually NPC (Non-Player Characters), I require the ability to configure those settings in the Editor.
My solution was to remove ALL of this code!

The Floor script now contains a single extends statement of Tile. This allows for others to be created with minimal effort. I.E. Player:

The secret was to add additional variables/properties to the Tile script:
extends Node2D

# Expose a type name, which is used in the Map array as a unique identifier per cell
export (String) var type

# Expose a Vector cell position
export (Vector2) var cellPos = Vector2(0, 0)

# Expose a texture to be provided, as a single image or sprite map
export (Texture) var spriteMap setget setSpriteMap

# Expose a vector size that the sprite map is set to (defaulted to 1,1 for a single image)
export (Vector2) var spriteMapSize = Vector2(1, 1) setget setSpriteMapSize

# Expose an integer for the sprite frame to show
export (int) var frame setget setFrame

func setSpriteMap(newSpriteMap):
    # Store the new texture and then issue update to refresh Texture
    spriteMap = newSpriteMap
    update()

func setSpriteMapSize(newSize):
    # Store the new sprite map sie and refresh the texture
    spriteMapSize = newSize
    update()

func setFrame(index):
    # Store the new frame index and refresh the texture
    frame = index
    update()

func update():
    if has_node("Texture"):
        # If the texture has been added, ensure its properties are up to date
        $Texture.texture = spriteMap
        $Texture.vframes = (spriteMapSize.y if spriteMapSize != null else 1)
        $Texture.hframes = (spriteMapSize.x if spriteMapSize != null else 1)
        $Texture.frame = (frame if frame != null else 0)

func addTexture():
    # If a Sprite named Texture has not be added, add it as a child!
    if !has_node("Texture"):
        var sprite = Sprite.new()
        sprite.name = "Texture"
        add_child(sprite)

func _init():
    # On initialisation of any Tile, ensure a Sprite named Texture is added (this is the image to show)
    addTexture()

func _ready():
    # When the Tile is ready to show, make sure its properties are up to date
    update()
To summarise:
- spriteMap is the name of the editor property, to be set with the Sprite Map Texture
- spriteMapSize is the slice Size of the Sprite Map, as a Vector2
- frame is simply the frame to show, once the Sprite Map has been sliced by the size
Each of these have a set method, which accepts the new value from the editor and applies it to the instance. The value is first stored and then applied by calling the update function; which sets the settings against the Sprite, which had been automatically added by Tile initialisation.
When the Floor instance is opened, the Inspector now reveals these settings:
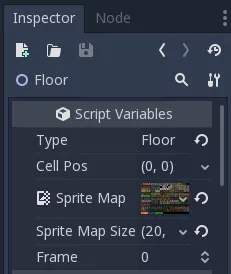
The texture has been assigned, along with the 20x13 size of the Sprite Map and Frame zero is desired.
This is much easier than writing an init statement for each new concrete Tile to be implemented!
Tool term
Another confession, I noticed that I'd left the term 'tool' at the top of the Tile and Floor scripts. The 'tool' term is used in the scripts to instruct Godot Engine Editor to show the shape in the 2D viewer of the editor. However, it has strict limitations and use. For this tutorial, those rules interfere with script inheritance, therefore, i've now removed this setting.
1.3. The Map class changes
The class contained 'wrap' functions, that ensure calculated positions remain on the map, by wrapping them around to the opposite edge if passed.
I decided to reassign these to the TileMap class, because it is responsible for the display of Tile's onscreen and manipulates the Map instance as needed.
The Map is therefore constrained to simply storage and retrieval of Tile instances.
An additional method was added to return the list of ALL dictionary items (_Tiles) in a cell (as required when showing the Map; see Tutorial section 2.1)
1.4. The TileMap class modifications
The TileMap has seen many changes, but they reflect the final responsibility of the class. Its purpose is to populate the 'dumb' Map object and to ensure it is displayed. The following is a list of its functions:
- Setting the size of the Map array
- Putting a new Tile into the array and into the instance's Tiles Node2D, displaying it on screen
- Remove a Tile from the array and from the Tiles Node2D, i.e. removing from the screen
- Lift a Tile from the array, but NOT from the Tiles Node2D. This is usually because the Tile is being moved
- Place an existing tile into the array; i.e. a 'lifted' tile
- Get a reference to a Tile in the array
- Move a Tile in the array, but lifting and then placing it
- Calculate the 'wrap' position if it exceeds a boundary border
- Reposition ('show') the tiles of the Map onto the screen
This is a long list, but it illustrates how this class has become a 'controller' for the map, which is exactly as it should be. The TileMap is added as an instance to the Game node and it is entirely responsible for ensuring the map is constructed and shown.
The 'show' functions is explained in the tutorial section 2.1.
2. Tutorial
Given the modifications to the TileMap, Map and Tile structure, scrolling is actually a simple process, you'll be pleased to read!
2.1. Map Scrolling
The art of map scrolling is essentially:
- Showing all the Tile's, indexed from a coordinate
- Adjust the coordinate in a direction, i.e. North, East, South or West
- Re-displaying the Tile's
There are two new functions in the TileMap which perform this task.
The first of which takes the reference position to display the map; i.e the Tile to show at the centre of the screen:
func show(centerPos):
    var firstTilePos = centerPos - (mapSize / 2).floor()
    # Loop through each cell and display the dictionary list of tiles
    for y in range (int(mapSize.y)):
        var cellPos = Vector2(0, y)
        for x in range (int(mapSize.x)):
            cellPos.x = x
            var tilePos = wrapMapPos(firstTilePos + cellPos)
            showAllTiles(tilePos, cellPos)
The logic being:
- Given the supplied position, subtract half of the map size from it; this is the first map cell to show on screen (top left); you could modify this calculation to position the Map on the left or right border instead (if required)
- Loop through the number of cells on screen; which is a screen sized map, thus a 1:1 ratio
- For each calculated tile cell position, ensure it is wrapped to remain within the map; this ensures the wrap occurs in the single screen sized map
- Call the second function to display all Tiles found in the cell.
As stated previously, this wraps the map for scrolling, therefore additional parameters would be required for a Map that is wider than the screen. This shall be explained in a future Tutorial
The second function simply loops through the list of Tiles found in a cell:
func showAllTiles(tilePos, cellPos):
    # Get the list of all the tiles at the tile position
    var tileList = $Map.getAllTiles(tilePos)

    # For each tile, reposition the tile to the new screen position
    for type in tileList:
        var tile = tileList[type]
        tile.position = cellPos * tileSize
The logic being:
- Get the list of Tiles back from the Map
- For each Tile reposition it to the cell position
2.2. Placing the Player at a relative position
Given the TileMap is capable of showing tiles at a reference position, the Player exists in the Map as a Tile.
If the reference position of the map is changed, the player must also be moved to remain in the centre of the screen. If not, he shall scroll along with the map.
This is explained in the next section.
2.3. Moving the map on a key press
A new script has been added to the Game Scene. This constructs and controls the Map and Player.
2.3.1. Ready function
When the Node is ready to be displayed in the node tree, it generates the map, places the player and shows the map:
func _ready():
    # Generate some random tiles
    generateMap()

    # Place the player into the map, so that he remains relative to it during movement
    $TileMap.placeTile(MAP_START, $Player)

    # Display the map from the starting position
    $TileMap.show(mapPos)
The input function is then used to determine what to do if a Cursor Key is pressed:
func _input(event):
    # Wait for a key to be pressed
    if event.is_pressed():

        # Get the direction, if a cursor key is pressed
        var direction = getDirection(event)

        # Move the player. If a cursor key was not pressed then direction will be 0,0
        movePlayer(direction)

        # Move the map too!
        moveMap(direction)

        # Reposition ALL tiles and show them. This causes the illusion of scrolling
        $TileMap.show(mapPos)
The logic being:
- Wait for a key to be pressed
- Determine the direction to move, if a Cursor Key is pressed; this is delegated to the function getDirection (see below)
- Add the direction to the Player position
- Add the direction to the Map position
- Invoke the TileMap function to display the map at the new position. A check could be added here, to cull the need to redisplay if no direction is selected
The getDirection function is worth understanding:
func getDirection(event):
    # Check which key is pressed and return the Vector direction to add
    if event.is_action("ui_up"):
        return DIRECTION_NORTH
    elif event.is_action("ui_right"):
        return DIRECTION_EAST
    elif event.is_action("ui_down"):
        return DIRECTION_SOUTH
    elif event.is_action("ui_left"):
        return DIRECTION_WEST
    return DIRECTION_NONE
It simply checks to see if one of the "ui_" keys are pressed and then return one of the DIRECTION constant Vectors. If nothing pressed, the (0, 0) constant is returned.
It is a GOOD habbit to use constant values when their name reflects the action required. Given these are Vector2 constants they can be added to the current position; instead of having to access an X and Y coordinate and applying a change.
The Game script controls the TileMap and Player and coordinates all selected actions from keyboard selections.
3.0 Result
The result of which can be seen below:
The source for this demonstration can be found in the GitHub project.
Download the 'Custom TileMaps (Scroll)' folder and then open it with Godot Engine v3.
Final
I hope this tutorial has helped you.
Please do feel free to comment and ask questions.
I plan to write more articles, if there is demand, the next planned will be an expansion on the size of the map (i.e. larger than the screen)
Other Tutorials
Posted on Utopian.io - Rewarding Open Source Contributors