[Custom Thumbnail]
All the Code of the series can be found at the Github repository:
https://github.com/drifter1/compiler
Introduction
Hello it's a me again @drifter1! Today we continue with my Compiler Series, a series where we implement a complete compiler for a simple C-like language by using the C-tools Flex and Bison. In this article we will continue with the implementation of Register Allocation, getting into the implementation of the two structures that were "teased" in part 1.Requirements:
Actually you need to read and understand all the topics that I covered in the series as a whole, as these articles will give you access to knowledge about:- What Compiler Design is (mainly the steps)
- For which exact Language the Compiler is build for (Tokens and Grammar)
- How to use Flex and Bison
- How to implement a lexer and parser for the language using those tools
- What the Symbol Table is and how we implement it
- How we combine Flex and Bison together
- How we can pass information from the Lexer to the Parser
- How we define operator priorities, precedencies and associativity
- What Semantic Analysis is (Attributes, SDT etc.)
- How we do the so called "Scope Resolution"
- How we declare types and check the type inter-compatibility for different cases that include function parameters and assignments
- How we check function calls later on using a "Revisit queue", as function declarations mostly happen after functions get used (in our Language)
- Intermediate Code Representations, including AST's
- How we implement an AST (structure and management)
- Action Rules for AST nodes and more
- The target system's architecture and its assembly language (MIPS)
- Register Allocation & Assignment and how we implement it
- How we generate Assembly code for various cases
Difficulty:
Talking about the series in general this series can be rated:- Intermediate to Advanced
- Medium
Actual Tutorial Content
Variable Array Implementation

In the last part we only briefly explained what the usage of this structure is. So, let's now implement the various functions that are needed...
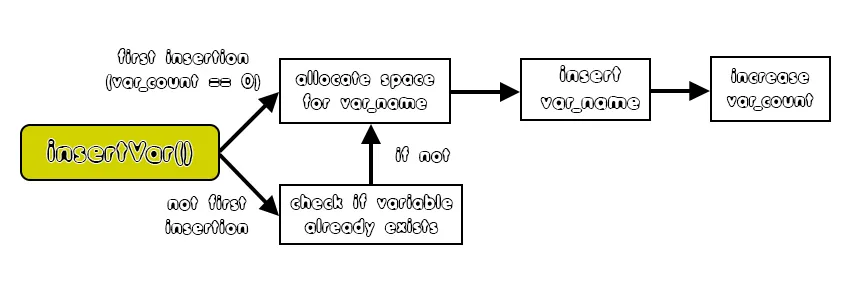
insertVar(name)
This function manages the insertion of variables into the Variable Array "var_name". Being an dynamic string array, we of course have to separate the first insertion (var_count == 0), because in that insertion the array gets allocated for the first time using malloc. For any other insertion, we will first check if the variable already exists, reallocating the space of the array (realloc) if not. After each insertion we should also not forget to increase the variable count (var_count).As a diagram, this procedure can be summarized as:
The Code is also fairly simple:
void insertVar(char *name){
    /* first insertion */
    if(var_count == 0){
        var_name = (char**) malloc(1 * sizeof(char*));
        var_name[0] = (char*) malloc((strlen(name) + 1) * sizeof(char));
        strcpy(var_name[0], name);

        var_count++;
    }
    else{
        /* check if variable already exists */
        int flag = 0;
        int i;
        for(i = 0; i < var_count; i++){
            if(strcmp(var_name[i], name) == 0){
                flag = 1;
                break;
            }
        }

        /* not inserted yet */
        if(flag == 0){
            var_name = (char**) realloc(var_name, (var_count + 1) * sizeof(char*));
            var_name[var_count] = (char*) malloc((strlen(name) + 1) * sizeof(char));
            strcpy(var_name[var_count], name);

            var_count++;
        }
    }
}
gerVarIndex(name)
To get the index of each variable name inside of the var_name array, we use the same loop as in the "checking" part of the previous function. The only difference is that instead of a flag, we will now store and return the index the variable was found in.In Code this looks like this:
int getVarIndex(char *name){
    int index = -1;

    int i;
    for(i = 0; i < var_count; i++){
        if(strcmp(var_name[i], name) == 0){
            index = i;
            break;
        }
    }

    return index;
}
printVarArray()
For debugging purposes, we also define a print function, that basically only loops through the array and prints the index-name pairs line-by-line.The Code for that is:
void printVarArray(){
    int i;
    printf("VarArray:\n");
    for(i = 0 ; i < var_count; i++){
        printf("%d: %s\n", i, var_name[i]);
    }
    printf("\n");
}
Adjacency Graph Implementation
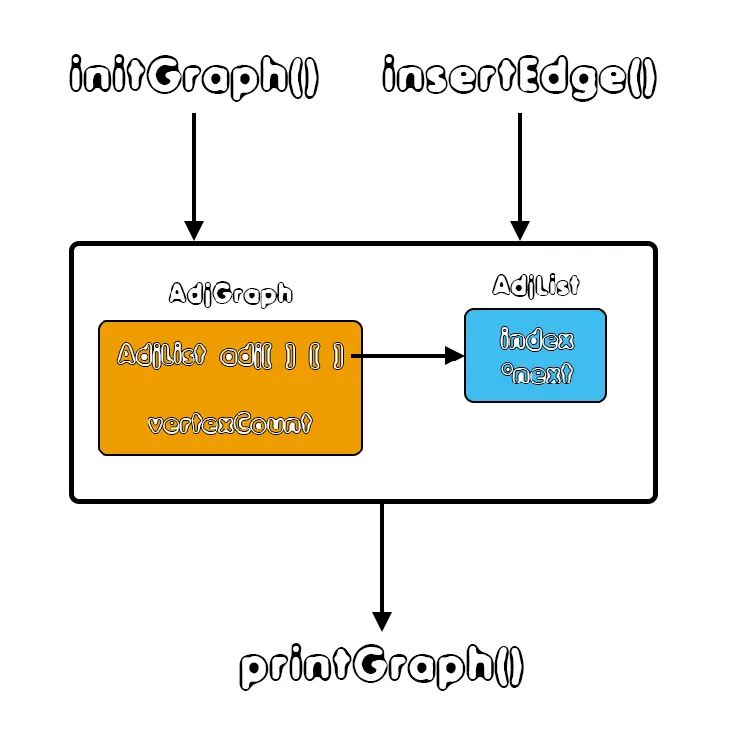
In the previous part, we only defined the two structures, AdjGraph and AdjList, as C-structs and explained how we tend to use the Graph for Register Allocation. So, let's now define the functions that will aid us...
initGraph()
The graph is stored as a static structure pointer with the name 'g':static AdjGraph *g;, which makes the Graph accessible from anywhere. Thus, we have to allocate space for that structure, while also initializating its two entries:- adj to NULL
- vertexCount to 0
The function that does that is:
void initGraph(){
    g = (AdjGraph*) malloc(sizeof(AdjGraph));
    g->adj = NULL;
    g->vertexCount = 0;
}
insertEdge(i, j)
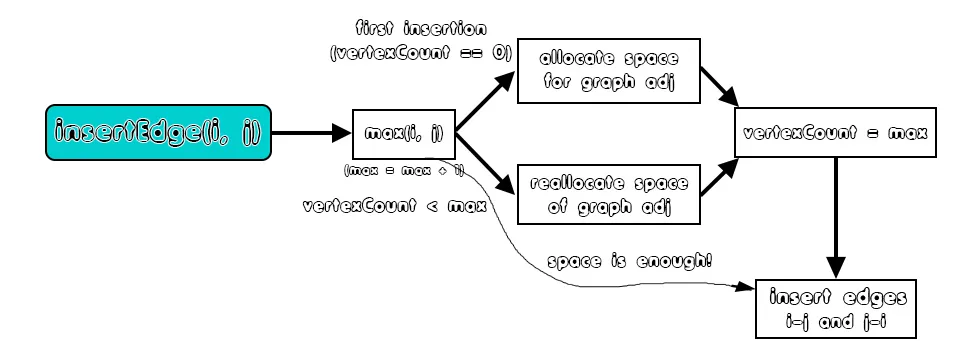
The most important function, after initGraph() is the function that manages the insertion of edges into the graph. Inserting edges is quite complicated, as we will have to manage the list-array adj and the various sublists adj[i].The index of each variable in var_name is exactly the same that is used in the graph, which is why we called the index g_index in the first place! So, when inserting an edge we basically insert the indexes of the two adjacent nodes-variables. Because the variable array and graph structure are being created dynamically, while parsing through the AST Trees, we will again have to allocate the space differently in the first allocation, having to reallocate the space only when either of the indexes (basically the max) can't be stored into the graph yet. When space gets reallocated, the new vertexCount is equal to the max-index + 1. While inserting an edge, we will basically add two edges: i-j and j-i, inserting j as a node of the adj[i] list and i as a node of the adj[j] list.
Its quite easier to understand this procedure, when seen from a diagram:
In Code we have:
void insertEdge(int i, int j){

    AdjList *l;

    // check if less than zero (constant in operation)
    if(i < 0 || j < 0){
        return;
    }

    /* find max */
    int max;
    if(i > j){
        max = i;
    }
    else{
        max = j;
    }

    /* variable count is max + 1 */
    max = max + 1;

    /* manage space */
    if (g->vertexCount == 0){ /* first allocation */
        g->adj = (AdjList**) malloc(max * sizeof(AdjList*));
        g->vertexCount = max;
    }
    else if(g->vertexCount < max){ /* allocate space for more variables */
        g->adj = (AdjList**) realloc(g->adj, max * sizeof(AdjList*));
        g->vertexCount = max;
    }

    /* insert edge i-j */
    l = g->adj[i];

    while ((l != NULL) && (l->index != j)) l = l->next;

    if (l == NULL){
        l = (AdjList*) malloc(sizeof(AdjList));
        l->index = j;
        l->next = g->adj[i];
        g->adj[i] = l;
    }

    /* insert edge j-i */
    l = g->adj[j];

    while ((l != NULL) && (l->index != i)) l = l->next;

    if (l == NULL){
        l = (AdjList*) malloc(sizeof(AdjList));
        l->index = i;
        l->next = g->adj[j];
        g->adj[j] = l;
    }
}
printGraph()
To print out the graph, we loop through each list of adj and then through each node of list adj[i].The Code is quite simple:
void printGraph(){
    int i;
    AdjList *l;

    printf("AdjGraph:\n");
    for(i = 0 ; i < g->vertexCount; i++){
        printf("%d: ", i);
        l = g->adj[i];
        while(l != NULL){
            printf("%d ", l->index);
            l = l->next;
        }
        printf("\n");
    }
    printf("\n");
}
getGraphIndex() Function
To get the g_index value for a specific variable, there are basically three cases: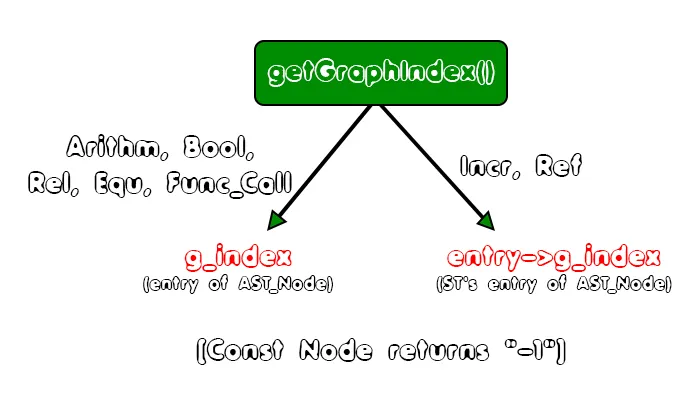
As you can see we use the g_index entry of the AST Nodes Arithm, Bool, Rel, Equ or Func_Call when the variable we are talking about is a temporary variable, the g_index entry of the symbol table entry for Incr and Ref Nodes, and return "-1" when there's a constant in the operation, to make sure that no edge gets inserted in the Adjacency Graph for such pairs!
This function is part of the ast code and is implemented as following:
ast.h:

...

int getGraphIndex(AST_Node *node);

...

------------------------------------------------

ast.c:

...

int getGraphIndex(AST_Node *node){
    /* temp nodes */
    AST_Node_Arithm *temp_arithm;
    AST_Node_Incr *temp_incr;
    AST_Node_Bool *temp_bool;
    AST_Node_Rel *temp_rel;
    AST_Node_Equ *temp_equ;
    AST_Node_Ref *temp_ref;
    AST_Node_Func_Call *temp_func_call;

    /* return type depends on the AST node type */
    switch(node->type){
        case ARITHM_NODE: /* arithmetic expression */
            temp_arithm = (AST_Node_Arithm *) node;

            return temp_arithm->g_index;
            break;
        case INCR_NODE:   /* special case of increment */
            temp_incr = (AST_Node_Incr *) node;
            return temp_incr->entry->g_index;
            break;
        case BOOL_NODE:   /* boolean expression */
            temp_bool = (AST_Node_Bool *) node;

            return temp_bool->g_index;
            break;
        case REL_NODE:    /* relational expression */
            temp_rel = (AST_Node_Rel *) node;

            return temp_rel->g_index;
            break;
        case EQU_NODE:    /* equality expression */
            temp_equ = (AST_Node_Equ *) node;

            return temp_equ->g_index;
            break;
        case REF_NODE:    /* identifier reference */
            temp_ref = (AST_Node_Ref *) node;

            return temp_ref->entry->g_index;
            break;
        case CONST_NODE:  /* constant */
            return -1;
            break;
        case FUNC_CALL:   /* function call */
            temp_func_call = (AST_Node_Func_Call *) node;

            return temp_func_call->g_index; /* return type */
            break;
        default: /* wrong choice case */
            fprintf(stderr, "Error in node selection!\n");
            exit(1);
    }
}

...
RESOURCES
References:
No references, just using code that I implemented in my previous articles.Images:
All of the images are custom-made!Previous parts of the series
General Knowledge and Lexical Analysis
- Introduction
- A simple C Language
- Lexical Analysis using Flex
- Symbol Table (basic structure)
- Using Symbol Table in the Lexer
Syntax Analysis
- Syntax Analysis Theory
- Bison basics
- Creating a grammar for our Language
- Combine Flex and Bison
- Passing information from Lexer to Parser
- Finishing Off The Grammar/Parser (part 1)
- Finishing Off The Grammar/Parser (part 2)
Semantic Analysis (1)
- Semantic Analysis Theory
- Semantics Examples
- Scope Resolution using the Symbol Table
- Type Declaration and Checking
- Function Semantics (part 1)
- Function Semantics (part 2)
Intermediate Code Generation (AST)
- Abstract Syntax Tree Principle
- Abstract Syntax Tree Structure
- Abstract Syntax Tree Management
- Action Rules for Declarations and Initializations
- Action Rules for Expressions
- Action Rules for Assignments and Simple Statements
- Action Rules for If-Else Statements
- Action Rules for Loop Statements and some Fixes
- Action Rules for Function Declarations (part 1)
- Action Rules for Function Declarations (part 2)
- Action Rules for Function Calls
Semantic Analysis (2)
- Datatype attribute for Expressions
- Type Checking for Assignments
- Revisit Queue and Parameter Checking (part 1)
- Revisit Queue and Parameter Checking (part 2)
- Revisit Queue and Parameter Checking (part 3)
- Revisit Queue and Parameter Checking (part 4)
- Revisit Queue and Assignment Checking (part 1)
- Revisit Queue and Assignment Checking (part 2)
- Revisit Queue and Assignment Checking (part 3)
Machine Code Generation
- Machine Code Generation Principles
- MIPS Instruction Set
- Simple Examples in MIPS Assembly
- full_example.c in MIPS Assembly (part 1)
- full_example.c in MIPS Assembly (part 2)
- Generating Code for Declarations and Initializations
- Generating Code for Array Initializations and String Messages
- Register Allocation & Assignment Theory
- Implementing Register Allocation (part 1)
Final words | Next up on the project
And this is actually it for today's post! I hope that I explained everything as much as I needed to. Next time we will continue with part 3.Next up on this series, in general, are:
- Machine Code generation (MIPS Assembly)
- Various Optimizations in the Compiler's Code
So, see ya next time!
GitHub Account:
https://github.com/drifter1
Keep on drifting! ;)