Ruby On Rails Push Notification
This post was written 2 years ago, I decided to store it on top of steem blockchain.
Push Notification with Rails Part 1 Setup
This blog is about upcoming Ruby Tuesday, and I am giving a talk with title of "Introduction to Push Notification"
Before I start talking about this topic, the Front end part can be apply to any of the existing website, just backend in this post, I am using Ruby On Rails.
Sample website
Ruby Gem used
Introduction
Push Notification is commonly seen on large messaging web like Facebook Messengers on Web, Whatsapp on Web.
How it works?
Requirement
- Web Serve on HTTPS
- Have ServiceWorker Registered
- Minimum setup on
manifest.json - User have to accept to receive notification
Requirement
- Understand of Modern JS (fetch, promise)
Before We start
Before get your hands on dirty to make a push server and client, we need to generate VAPID key for this to work. VAPID used JWT to carry information, and all transaction are called "claim". You can read more about VAPID Key here. VAPID Key basically will generate a Public and Private Key (Same concept as SSH), this key is used for authenticate purpose.
There are 2 methods on generating VAPID Key:-
Method 1: with Ruby
Install ruby gem webpush
gem install webpush
open irb or pry
require("webpush")
vapid_key = Webpush.generate_key
puts vapid_key.public_key
puts vapid_key.private_key
save the vapid key into your .env
Method 2: with Node.js & NPM
Install NPM package web-push
npm install -g web-push or yarn global add web-push
In terminal, simply just web-push generate-vapid-keys and it will return public and private key. Save it in .env for future use.
Push Notification with Rails Part 2 Front End
This method works on both Multipage Application or Any Single Page Applications, not necessary just with rails. But in this blog, I am focus more on rails part.
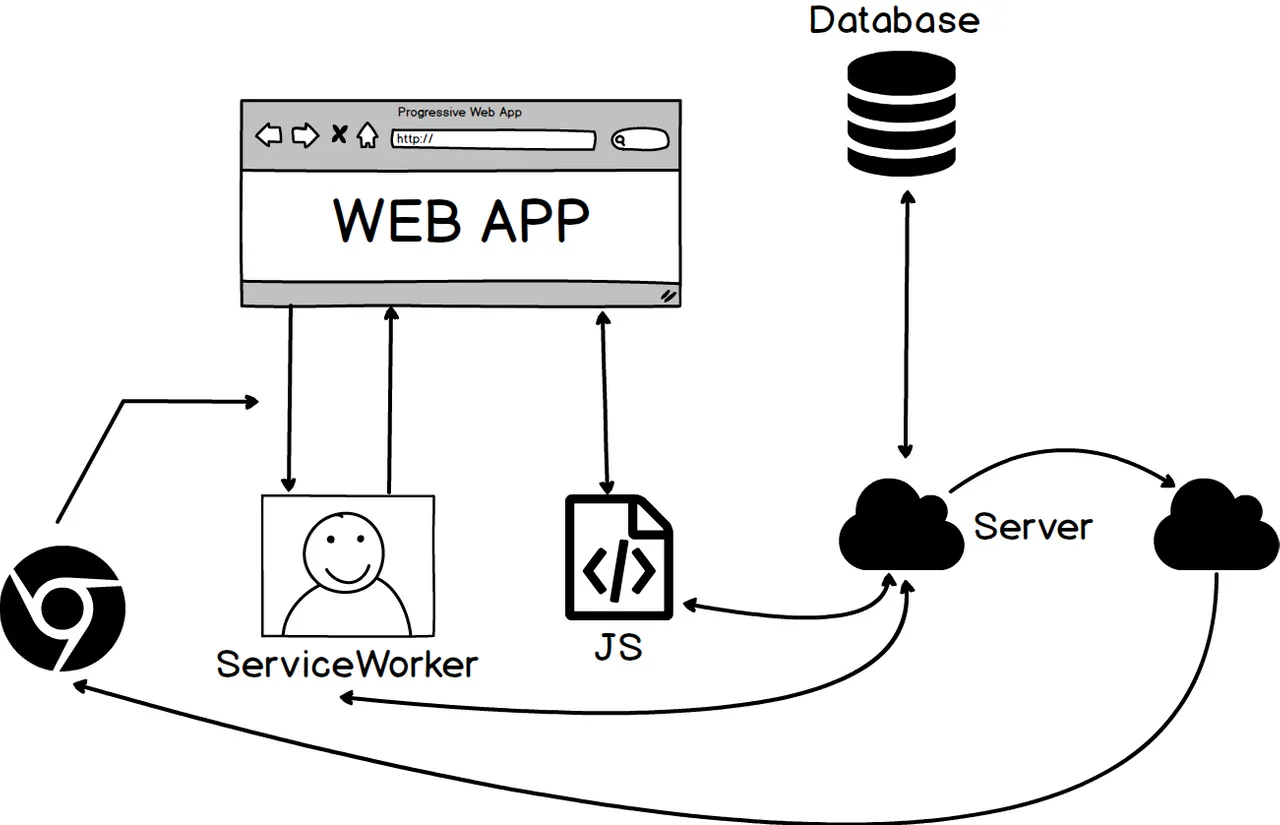
Service Worker
In modern Progressive Web Apps, it used a lot of features in service workers.
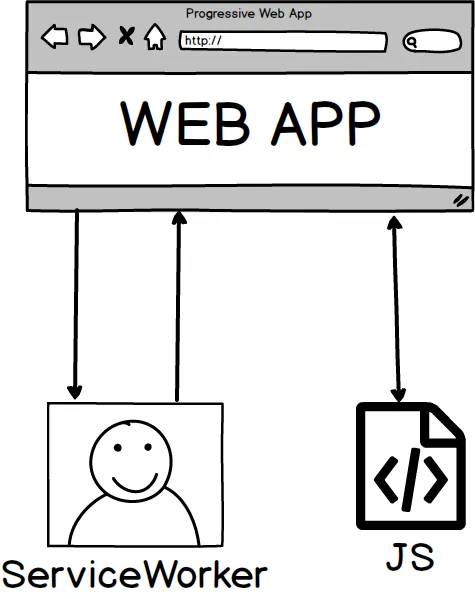
As you can see on the image above, service worker runs on different thread than typical JS files. The power of service worker is that even thought the web is close, but service worker still runs on background!
Currently, Service Worker supports mainly on Android Phone, Chrome and Firefox. You can check browser support at here.
Service Worker a few core features, such as: Caching, Background Synchronisation and Push Notification.
Add simple manifest.json
{
   "name": "Push MSG",
    "short_name": "Push MSG",
    "start_url": "/",
    "icons": [
     {
      "src": "/images/icon-64x64.png",
      "sizes": "64x64",
      "type": "image/png"
    },
    {
      "src": "/images/icon-192x192.png",
      "sizes": "192x192",
      "type": "image/png"
    }
    ]
}
Install Service Worker on rails
In rails, we install a gem called serviceworker-rails.
gem install serviceworker-rails
Then, we generate service worker with rails g serviceworker:install
This will automatically registered service worker and generate a service worker into rails workflow. There are 2 files that we need to modified in order to use.
serviceworker.js.erb <- Where the service worker lives
serviceworker-companion.js <- The js file that register service worker
By default, they already setup a basic caching strategy for you.
Use of VAPID key
In Part 1, we generated a pair of VAPID key (private & public). We can make use of it.
Create a vapid.js.erb file, and add this file to your application.js
I save my VAPID_PUBLIC in my .env file
<% @key = Base64.urlsafe_decode64(ENV['VAPID_PUBLIC']).bytes %>
window.vapidPublicKey = new Uint8Array(<%= @key %>)
This file basically convert your VAPID Public Key into UInt8Array for web. There is javascript function to do that also.
Ask User permission
in serviceworker-companion.js
if (navigator.serviceWorker) {
  navigator.serviceWorker.ready
    .then((swReg) => {
    console.log("When SW is ready");
    return swReg.pushManager
      .subscribe({
      userVisibleOnly: true,
      applicationServerKey: window.vapidPublicKey
    })
  })

    // TODO: sent data to server
}
l1 if (navigator.serviceWorker), checks wether service worker supported by browser or not
l2 navigator.serviceWorker.ready, when service worker is ready, it returns a promise, so we can use .then().
l3, l4 .then((swReg) => { console.log("When SW is ready");}), when service worker is ready, it return a value, we then use that value
l5 - l8
return swReg.pushManager.subscribe({
  userVisibleOnly: true,
  applicationServerKey: window.vapidPublicKey
})
We then call a function called pushManager and we ask user wether to subscribe to our web notification or not. The value will save, and we can make use of it later to sent to our database to store the user's credential.
Send user data to database
In the end of previous promise, .then(() => (swReg)) is added in order to return back the swReg for us to use later on.
if (navigator.serviceWorker) {
  navigator.serviceWorker.ready
    .then((swReg) => {
      console.log("When SW is ready");
      return swReg.pushManager
        .subscribe({
          userVisibleOnly: true,
          applicationServerKey: window.vapidPublicKey
        }).then(() => (swReg)) // Return swReg back to the next .then()
    })
    .then((swReg) => {
      swReg.pushManager.getSubscription()
        .then((sub) => {
          let body = {
            subscription: sub.toJSON(),
            message: 'Hey!'
          };
          console.log(body);
          fetch('/push', {
              method: 'POST',
              body: JSON.stringify(body)
            })
            .then((res) => {
              console.log(res)
            })
            .catch((err) => {
              console.log(err)
            })
        })
    })
}
Push Event in Service Worker
As explained earlier, we have service worker can listen to push event.
In serviceworker.js.erb, add the following:
push event -> From Browser Provider to user
  self.addEventListener('push', function (event) {
    var jsonbody = JSON.parse(event.data && event.data.text());

    var title = jsonbody.title || "New Blog Post";
    var body = jsonbody.content || "Come to wenghan.me";
    var dir = 'ltr';
    var tag = "push-simple-demo-tag";
    var data = jsonbody.link || "/blogs";
    var icon = "/images/icons/icon-96x96.png";
    var renotify = true;
    var actions = [{ action: 'confirm', title: 'Visit', icon: '/images/icons/icon-96x96.png' }];

    event.waitUntil(self.registration.showNotification(title, { body: body, icon: icon, dir: dir, tag: tag, renotify: renotify, data: data, actions: actions }));
});
notificaitonclick event Action taken by user when notification pops up
self.addEventListener('notificationclick', function (event) {
    var notification = event.notification;
    var action = event.action;
    var link = notification.data;
    console.log(event);
    if (action === 'confirm') {
        console.log('Confirm was chosen');
        notification.close();
    } else {
        console.log(action);
        notification.close();
    }

    event.waitUntil(clients.matchAll({
        type: "window"
    }).then(function (clientList) {
        for (var i = 0; i < clientList.length; i++) {
            var client = clientList[i];
            if (client.url == link && 'focus' in client) return client.focus();
        }
        if (clients.openWindow) return clients.openWindow(link);
    }));
});
Push Notification with Rails Part 3 Back End
First, we need to generate a Schema for storing the encrypted data of user in our rails backend.
rails g migration CreateNotifications endpoint:string p256h:string auth:string
This will generate a schema file.
class CreateNotifications < ActiveRecord::Migration[5.1]
  def change
    create_table :notifications do |t|
      t.string :endpoint, unique: true
      t.string :p256dh, unique: true
      t.string :auth, unique: true
    end
  end
end
run rails db:migrate.
Next, setup the Notification Model (models/notification.rb)
class Notification < ApplicationRecord
  validates_presence_of :endpoint, :p256dh, :auth
end
Then, we need to setup our Router (router.rb) to accept post request from our front end with: post '/push' => 'notifications#push'. We will also setup another endpoint with post '/message' => 'notifications#message' for us to send a push notifications with a REST API. (Meaning that I can use for other website)
Notifications Controller
we expect to receive json in this format
{
  "subscription": {
    "endpoint": "XXXXXX",
    "keys": {
      "p256h": "XXXXXXX",
      "auth": "XXXXXXX"
    }
  }
}
notifications_controller.rb
To allow Post Request: skip_before_action :verify_authenticity_token
def push
    jsonbody = JSON.parse request.body.read()
    endpoint = jsonbody["subscription"]["endpoint"]
    p256dh = jsonbody["subscription"]["keys"]["p256dh"]
    auth = jsonbody["subscription"]["keys"]["auth"]
    @notification = Notification.new(endpoint: endpoint, p256dh: p256dh, auth: auth)
    @notification.save()
  end
def message
    @notifications = Notification.all
    for notif in @notifications
     begin
       Webpush.payload_send(
           message: request.body.read(),
           endpoint: notif.endpoint,
           p256dh: notif.p256dh,
           auth: notif.auth,
           ttl: 24 * 60 * 60,
           vapid: {
               subject: 'mailto:jlwhoo7@gmail.com',
               public_key: ENV['VAPID_PUBLIC'],
               private_key: ENV['VAPID_PRIVATE']
           }
       )
     rescue
     end
    end
  end
in curl
curl -d '{"key1":"value1", "key2":"value2"}' -H "Content-Type: application/json" -X POST http://localhost:3000/data