
The crypto-space is booming and because of this, there is a very high level of demand for hardware wallets like Ledger nano, Trezor and KeepKey. If you order a ledger nano right now, it will not be shipped before September 2017. While ordering a Trezor you can choose: a shipment in 3 days for 18 EUR extra or a standard shipping in august. And KeepKey, another hardware wallet is Sold Out. I wouldn't be surprised if the Trezor will be sold out (soon) to.

On of my previous posts was about encrypting your USB drive to safely store your passwords, mnemonic passphrases, keys and wallet files. But there is another way. There are USB drives on the market with encryption software installed, which are very easy to use. An example is the Kingston DataTraveler Locker+ G3, which I'll show u how to use in this post.
Kingston DataTraveler Locker+ G3

My first impressions are very positive. It's made from steel and it feels very solid. Due to the materials used, it is heavier than regular USB sticks made out of plastic. It has a keyring in it's corner, so it will fit nicely on your keychain. The cap is a little harder to remove, which I think is a good sign, this will prevent losing it. The USB flash drive has a blue led light and the encryption software is installed and ready to use with a basic wizzard to follow.
Specifications
- 16 GB edition - 30 EUR (There is a 8 GB version to, which cost only 15 EUR)
- USB 3 Speed: 135MB/s read, 20MB/s write
- USB 2 Speed: 30MB/s read, 20MB/s write
- Dimensions: 60.56mm x 18.6 mm x 9.75 mm
- Minimum System Requirements: USB 3.0 compliant and 2.0 compatible
- Operating Temperature: 0°C to 60°C
- Storage Temperature: -20°C to 85°C
- Warranty/support: 5-year warranty with free technical support
- Compatible with: Windows® 10, Windows 8.1, Windows 8, Windows 7 (SP1), Mac OS X v. 10.9.x - 10.12.x
- Cloud Services Supported: Google Drive, OneDrive (Microsoft), Amazon S3, Dropbox, Box (I don't recommend using this for storing your keys, mnemonic phrases and passwords!
Setup (Windows Environment)
To start the setup, plug the USB drive in your computer (it only works on Microsoft Windows and Mac) and click on "DTLplus_Launcher" inside the USB's folder. This is the setup in the windows environment, for Mac it is slightly different, but there is a user's manual on the flash drive.
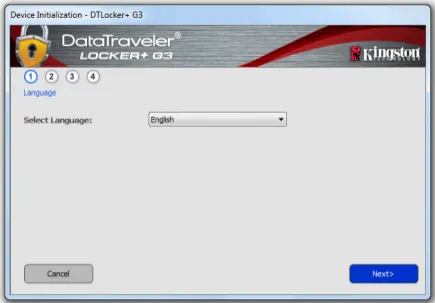
1. Select your language preference from the drop-down menu and click ‘Next’.
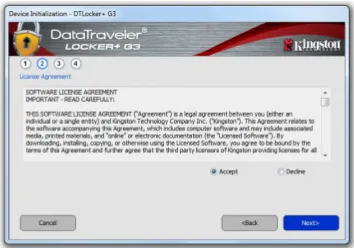
2. Review the license agreement and click ‘Next’ (Note: You must accept the license agreement before continuing; otherwise the ‘Next’ button will remain disabled.)
3. Create a password to protect your data on the DTL+ G3. Enter it in the ‘Password’ field, then re-enter it in the ‘Password Confirmation’ field, as seen below in the Figure. The password you create must meet the following criteria before the initialization process will allow you to continue:
- Passwords must contain 6 characters or more (up to 16 characters.)
- Passwords must contain three (3) of the following criteria options: UPPER CASE, lower case, numeric, and/or special characters (!, $, etc.)
You may also enter a password hint, but it is not a mandatory field. The hint field can be useful in providing a clue as to what the password is, should the password ever be forgotten. (Note: The hint CANNOT be an exact match to the password.)

4. Enter your contact information into the text boxes provided (Note: The information you enter in these fields may NOT contain the password string you created in Step 3. However, these fields are optional and can be left blank, if so desired.)
- The ‘Name’ field may contain up to 32 characters, but cannot contain the exact password
- The ‘Company’ field may contain up to 32 characters, but cannot contain the exact password.
- The ‘Details’ field may contain up to 156 characters, but cannot contain the exact password.

5. Click ‘Finish’ to complete the device initialization process.
The DTL+ G3 will now format the secure data partition and notify you when it is complete.

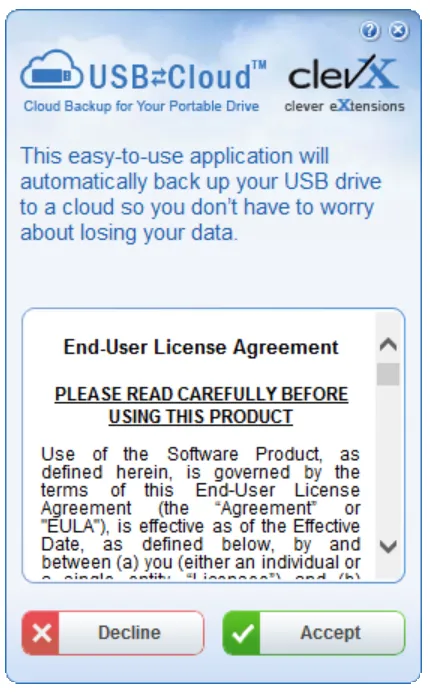
6. Decline the Cloud Initialization
Once the device has been initialized, the USB-to-Cloud application will appear (image below). For securing your keys related to the storage of cryptocurrency I recommend you not installing the cloud back-up of your files. To decline the installation, click the red ‘Decline’ button in the bottom left-hand corner of the clevX window.
(Note: If you click the red ‘Decline’ button, it will cancel the USB-to-Cloud installation. In doing so, a special text file named ‘USBtoCloudInstallDeclined.txt’ is created on the data partition. The presence of this file will prevent the application from prompting you for the installation in the future.)
Device Usage (Windows Environment)
Once the DTL+ G3 has been initialized, you can access the secure data partition and utilize the device options by logging into the device with your password. To do so, follow these steps:
1. Insert the DTL+ G3 into a USB port on your notebook or desktop and enter your password.
2. Once you’ve typed your password, click the ‘Login’ button to continue.
- If the correct password is entered, the DTL+ G3 will unlock and you can begin using the device.
- If an incorrect password is entered, an error message will appear just below the ‘Hint’ field, indicating a login failure

During the login process, if a bad password is entered, you will be given another opportunity to enter the correct password; however, there is a built-in security feature that tracks the number of failed login attempts. If this number reaches the pre-configured value of 10 failed attempts, the DTL+ G3 will lock and require a device format of the secure data partition prior to next use.THIS MEANS THAT ALL DATA STORED ON THE DTL+ G3 WILL BE LOST.
3. Now you can use the USB drive like any other usb flash drive
4. To safely remove your USB drive after using it, click on the DTL+ G3 Icon and "Shutdown DTL+ G3"

Stay secure!
Sources
- Image lock - free to use from pixabay.com
- Image DataTraveler aph networks
- Kingston's user manual
