Setting up Steemit profile is an easy task if you know how to do it. Due to a different procedure from all the other social media platforms, newbie Steemians can find it hard to set up their Steemit profile; especially not knowing how to add profile picture. If you are new on Steemit then, first of all, I welcome you here. Adding a profile picture in Steemit is a bit different but it would be easy once you go through this post.

Rest of the settings are simple enough but for the purpose of completing the process, all settings are briefly covered. The purpose of this post is to help beginners set up their profiles nicely and start contributing to the community with a better profile that can be trusted and liked by community members. Faceless profiles don't particularly do very well anywhere on the internet.
How to Set Up Steemit Profile
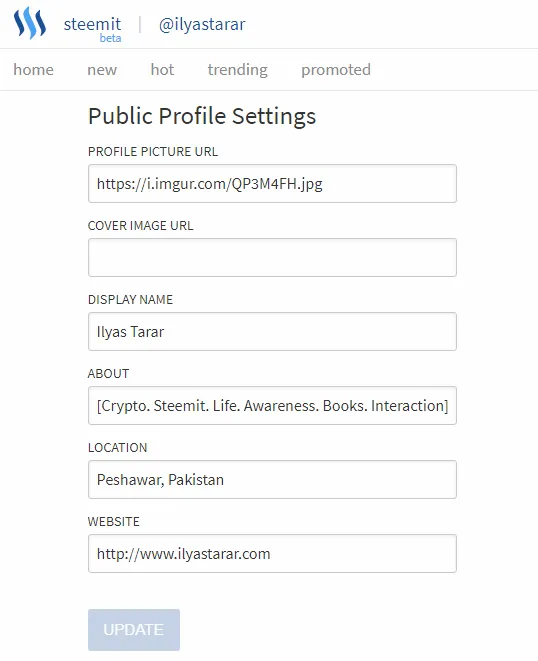
Here's a quick look at everything you need to update. The image below is from my settings page. Go to your settings page and update all the fields, or the ones you want to.
Let's see each step quickly.
- Profile Picture URL: You need to enter the image URL here. How to do that is covered in this post below.
- Cover Image URL: Covers are very recent development. Procedure is same as the ile picture.
- Display Name: Write your name. It will be your account on Steemit. You can use your own name or any name that you want to use as your account. For example @teamsteem (that's taken).
- About: Write some lines about yourself. Try to add relevant details about you, your mission, interests, and profession.
- Location: Write name of your city and/or country.
- Website: If you have a website, write it down. You can paste the link to any of your social media profile or a discord channel as well.
That's it. You are done with settings. You can change them anytime so don't worry about their permanence.
How to Add Steemit Profile Picture & Cover Photo
As the profile uploading procedure is a bit different to other social media platforms, I'll quickly cover the settings for you. Here you go.
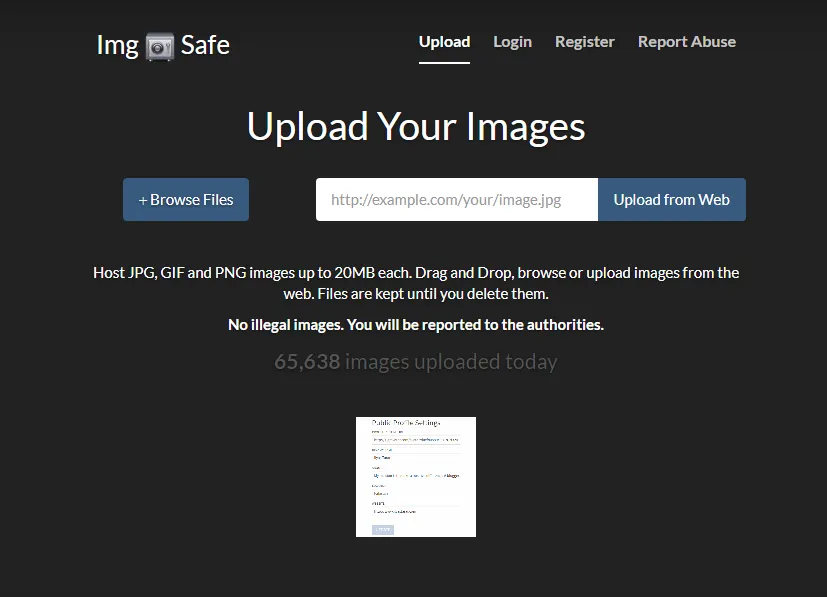
To update profile picture, you will have to upload the image on the web first.
- Go to Img Safe website. If the site doesn't work, try CTRLQ website or google 'free image hosting' sites.
- From the Upload tab, click browse files and select your profile picture from the storage.
- Click upload.
- After it is uploaded, click the image. A new window or page will open containing your uploaded picture.
- Copy the URL (website address) from the address bar.
- Paste it into the Profile / Cover Picture URL box in your settings page on Steemit.
Here's a visual guide if you didn't understand the verbal procedure or need visual aid.
Step # 1 : Upload Your Image to Image Hosting Site
Go to any of the websites mentioned above. On the Upload tab, click browse files. Select the files to upload and press the upload button below the image. (I tried signing up and signing in but it didn't work. If it works for you, great. Otherwise no need to login.)
Step # 2 : Copy / Paste the URL
Click the uploaded image. A new window will open. Copy the URL in the address bar and paste it in the Profile Picture URL box.
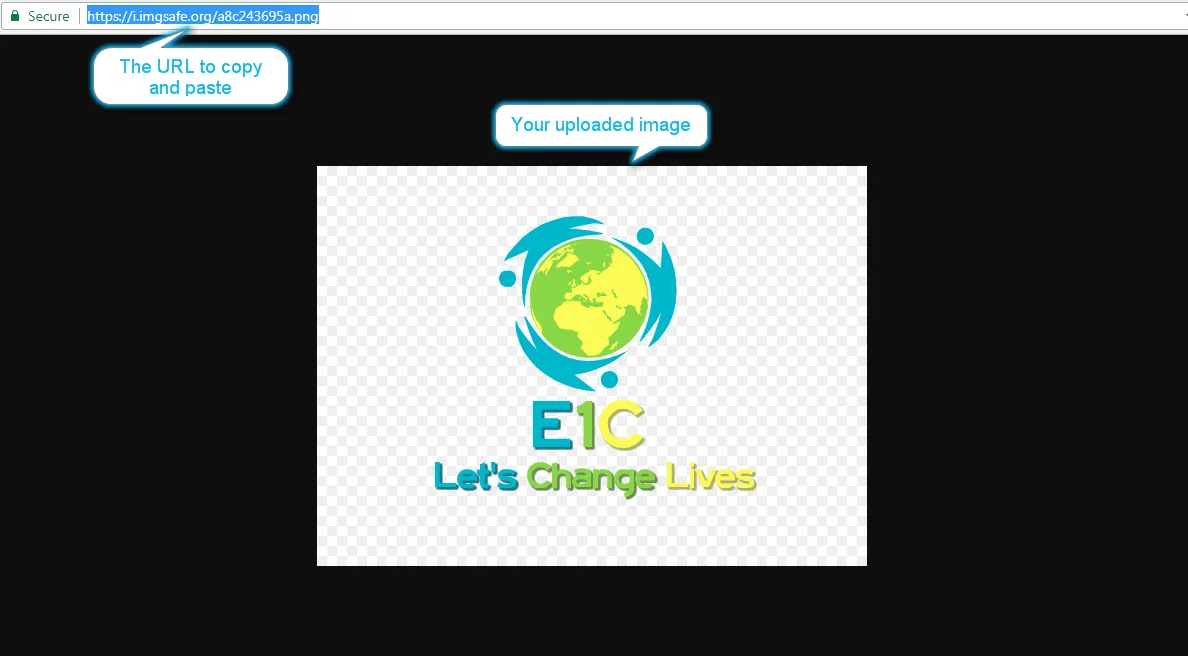
Note:- The image URL needs to have an image extension at the end to work (.jpg, .png etc.). Take care of that.
Conclusion
That's it. You are done with settings. I created the first such tutorial four months ago and people still comment to thank me for making the information available. It has since been seen by more than eleven hundred people.

However, the website options were limited to Img Safe only and I wanted to include more websites but couldn't because old posts cannot be edited. Hence this updated post. Here's the screenshot of the old post.
The old post is on top of the Google search pages for relevant queries. I updated the post to make the better information available to anyone who joins Steemit. Please consider upvoting and resteeming this helpful post. Thank you.
