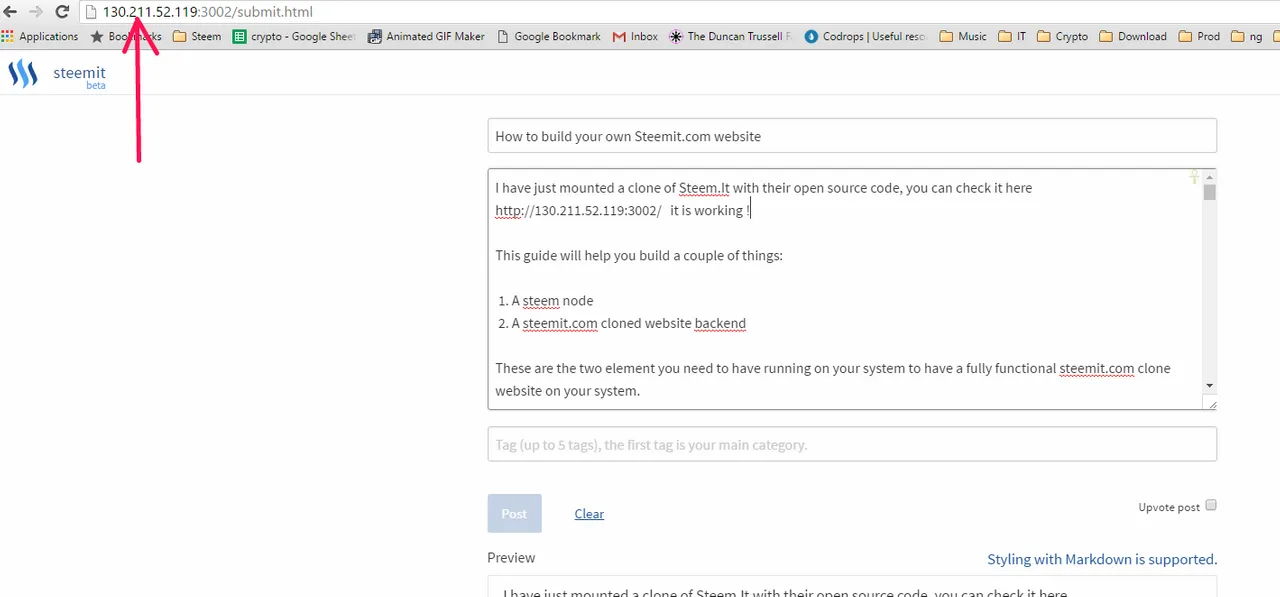
I have just mounted a clone of Steem.It with their open source code, you can check it here
https://steemlt.com/ (Yes there is a 'l' instead of an 'i') it is working ! I am publishing this post from my clone ;-)
So you want to do the same ? I am sure you do .....
Here is the guide
This guide will help you build a two things:
- A steem node
- A steemit.com cloned website backend
These are the two elements you need to have running on your system to have a fully functional steemit.com clone website on your system.
This guide can be used to build a system on a Windows machine or directly on a Ubuntu 16.04 LTS server (I am not an OSX person, but as VmWare is going to be used, it should be easy to adapt).
The subject is quite dense, and you'll need some knowledge about virtual machine, linux, nodejs, networking, how to open multiple bash terminals.
The steemd node
This is the guide I used to build my node.
https://steemit.com/allinone/@omotherhen/ezsteem-suite-1-0-the-ez-way-to-setup-your-steem-miner-node-in-a-linux-vm-windows-compatible
BUT, BEFORE YOU START BUILDING your node, you'll have to change the following in order to have a fully running node, being able to read posts content:
So if you follow @omotherzhen post, you will get to this instruction:
sudo git clone https://github.com/omotherhen/EZSTEEM/
What we need to do is change the 3 following files:
bin/minerScript.sh
bin/nodeScript.sh
bin/recompile.sh
and replace DLOW_MEMORY_NODE=ON by DLOW_MEMORY_NODE=OFF. This will enable your node to return post content. All the tutorial you found around here are more into mining, that's why the option was turned ON. Thanks @jesta.
So you can go and change it yourself or you can use this repo (https://github.com/artakan/EZSTEEM.git), where I already made the change.
Now you are good to go and you can keep on following @omotherhen guide.
Choose option 1) so you can mine and serve you website ....
Note: you will be asked to enter an account name. This require some more explanation:
You will not be able to use your regular steemit account, at least not immediately.
You will need to use a new account name, which you will NOT create on steemit.
Your private key (WIF) is given by the script, and can be read in the this file:
~/EZSTEEM/steem/programs/steemd/witness_node_data_dir/config.ini
look for miner = ["#newAccountName", "5K... WIF Key"]This is the part I was really confused, the new account will be created as soon as a block will be mined, you do not have to create it on steemit.
Synchronizing the blockchain looks like this:
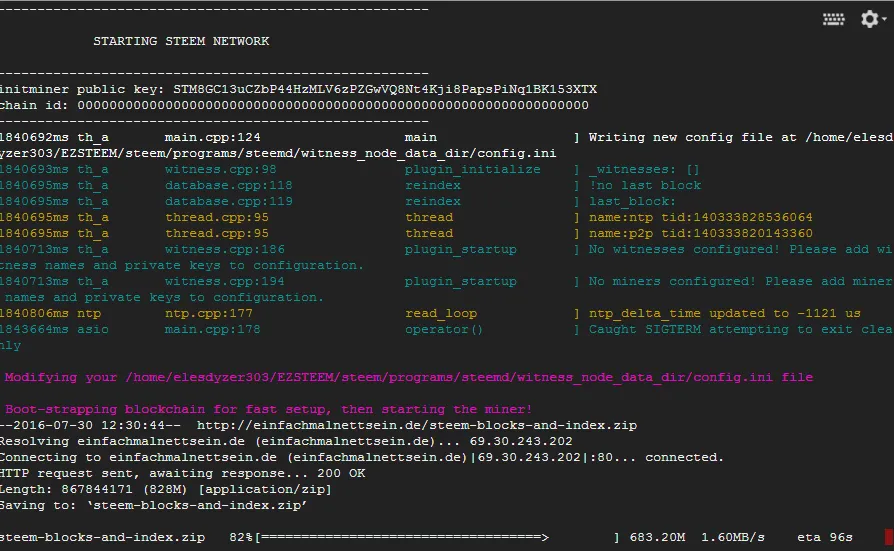
(by the way https://onpaste.com/ is the best tool for cut and paste screenshot, you can even draw on it)
Ok, after the blockchain is synchronized, you now have a running mining node.
You should see this:
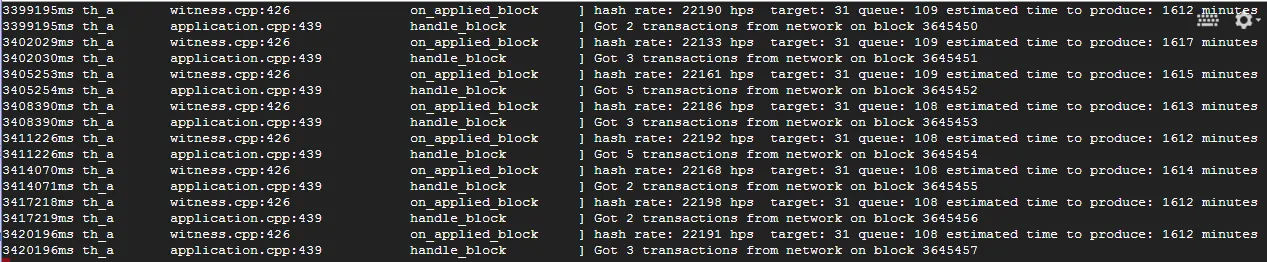
We observe some hashrate, all is good !
We will live our node running for now, you never know it could mine a block ;-)
Open a new terminal (I hope you know how to do that, otherwise I am not sure you are on the right page).
steemit.com cloned website backend
The reference for all this is:
https://github.com/steemit/steemit.com/ README.md
I will repeat the steps here. I also have added some package that were necessary but that were not mentioned.
First you'll have to clone the steemit repo:
git clone https://github.com/steemit/steemit.com/
cd steemit.com
Install npm
sudo apt-get update
sudo apt install nodejs-legacy
sudo apt install npm
install dependencies
npm install
sudo npm install -g babel-cli
Create config file
cd config
cp steem-example.json steem-dev.json
Some adjustement in steem-dev.json has to be made, mysql root password and other things ...
(note: it's steem.json in production)
Setup steemd
Go back to your steemd terminal and issue a CTRL-C ( just once otherwise you'll have to reload or reindex the whole blockchain). Restart steemd with --rpc-endpoint 127.0.0.1:8090 flag
We have already done this ..... but we have to edit the config.ini according to the following instructions
enable-plugin = witness account_history tags follow market_history
public-api = database_api login_api network_broadcast_api follow_api market_history_api
Install mysql server
sudo apt-get install mysql-server
DO NOT let the root password empty, and write it down somewhere safe
Now launch mysql client and create steemit_dev database:
sudo mysql -u root -p
create database steemit_dev;
Install sequelize-cli globally:
sudo npm install -g sequelize-cli pm2
Add your password in the file db/config/config.json
Run
sequelize db:migrate in db/ directory.
Add your mysql root password int the steemit.com/config/steem-dev.json
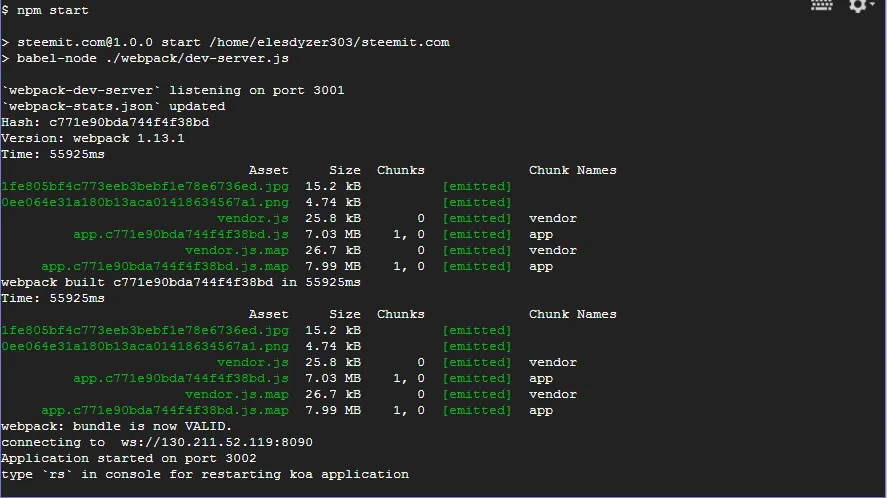
First start:
npm start
This is what you should see, if all goes well
Now you should be able to go in your browser and check your clone at
http://localhost:3002
The one you see at the top of this post is running on Google Cloud platform .... that's the next step ...
maybe another post later ....
But for now try to run it locally, and have fun !