(Trezor logo and photo of Trezor Model T pictured above belongs to Trezor / SatoshiLabs - the company behind Trezor. OpenSSH logo is the official OpenSSH logo as found on openssh.com)
DISCLAIMER
- I am not sponsored by Trezor / SatoshiLabs. I bought a Trezor recently, and was disappointed by the lack of official information regarding the SSH support and using Trezor's SSH support on macOS. After piecing some information together from around the web, I managed to get SSH support working decently on macOS, and figured I would save people a lot of time by explaining everything in one singular article.
- I did not invent nor do I / have I ever developed Trezor's products. I am not involved in developing
trezor-agentor it's dependencies. If bad things happen to you as a result of following this article, whether loss of coins, loss of data, or getting locked out of your server(s) - I am not responsible.
What is Trezor?
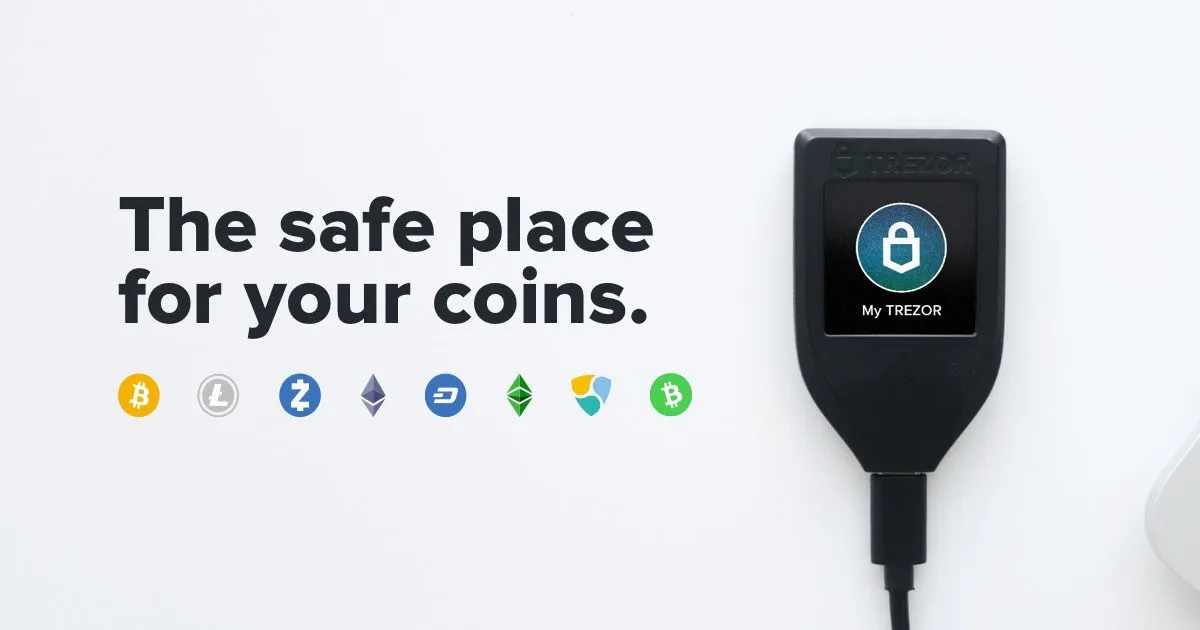
(Official promo image created by Trezor themselves)
Trezor is the brand name for one of the longest standing Hardware Wallets - created by SatoshiLabs. The first Trezor model was released in January 2014, known as "Trezor One".
A hardware wallet is a device which can generate / store private keys for cryptocurrencies such as Bitcoin, Litecoin, DOGE, and even EOS! Not only can it store keys, but it's able to use them to sign transactions from within the device itself. This means that the private keys never leave the device.
Since 2014, Trezor has become the gold standard for hardware wallets, with support for over 1000 cryptocurrencies, and extra non-cryptocurrency security features - such as:
- The ability to use your Trezor as a U2F security token (it can act like a YubiKey)
- Support for using it as a hardware GPG/PGP device
- Support for using it as a password manager
- And recently - support for generating and using SSH keys for authentication when connecting to servers/other devices over SSH.
How much does a Trezor cost?
The cost varies based on your location, due to VAT (sales tax), shipping costs etc.
For the USA - the Trezor One currently costs $55.00 USD (48.76 EUR), while the Trezor Model T costs $169.99 USD (149 EUR). A lot of US states don't have sales tax, and Trezor offers free shipping to the USA - so depending on which state you're in - the prices listed here are all you'll pay.
For the UK, the Trezor One costs 48.76 EUR + 10 EUR shipping + 11.75 EUR VAT (total: 70.51 EUR), while the Trezor Model T costs 178.80 EUR + 10 EUR shipping + 31.80 EUR VAT (total 190.80 EUR).
NOTE: These prices may vary over time, and may also be different depending on which country that you're ordering the device to.
To decide whether you want to buy the cheaper Model One, or the more expensive (but more powerful) Model T, go to https://trezor.io which has a comparison between the two models.
If you already know which model you want - and want to buy one now, or just check the prices - go to https://shop.trezor.io
Trezor SSH Authentication Support
In this article, I'm going to be showing you how to use Trezor's SSH authentication support with macOS (Mac OSX), which will allow you to generate an Ed25519 SSH key on your Trezor Model One or Model T, as well as the ability to use it to log into servers, with effective SSH 2FA through authorising SSH logins using your Trezor screen / buttons.
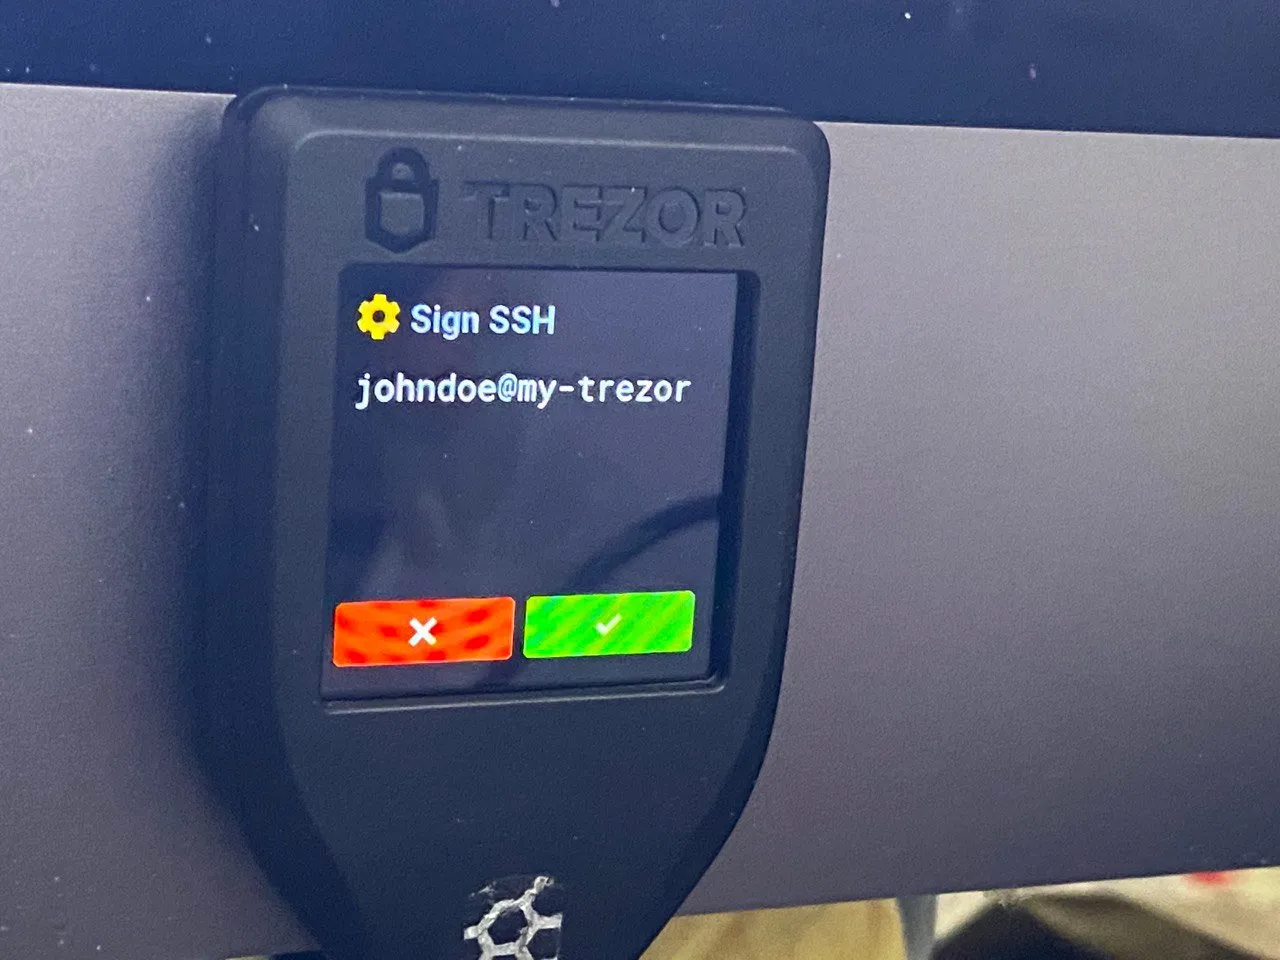
Above is a photo of my Trezor Model T asking for confirmation when I was trying to connect to an example VPS which was used in the making of this guide.
As you can see, this will help protect your personal / organisation's servers from the risk of SSH key stealing malware, as the private SSH key is kept on your Trezor (cannot be extracted), and any attempts at connecting to an SSH server using your Trezor SSH key will require human confirmation by either tapping a button on the touch screen, or pressing a physical button (depending on the Trezor model you have).
What you need (Requirements)
- A Trezor hardware wallet which has already been setup, unlocked, and plugged into your Mac.
- While I have only tested this guide against my personal Model T (the more expensive Trezor), it should also work on the lower end Model One - as "SSH" is listed in the features of both devices.
- The trezor-agent service also works with other hardware wallets, primarily certain Ledger models, and Shapeshift's KeepKey. But again - this article is only going to cover usage with the Trezor.
- A Mac (Hackintosh may work) running OSX High Sierra (10.13), Mojave (10.14), or Catalina (10.15). It may work on older/newer versions of OSX, however these are the supported versions which are listed in the Homebrew formula.
- Trezor's SSH support also works on Windows, Linux and NixOS - but this guide is only going to be covering macOS - since Trezor does not have any documentation on how to use it on macOS.
- You may also need Trezor Bridge installed for this to work properly. I'm not sure whether it's needed or not, but it will generally improve your Trezor experience overall as it allows Trezor to work with non-Chrome based browsers.
- Basic experience working with the macOS terminal. If you don't know how to use the macOS terminal, then you probably also don't know how to use a Linux shell once you're connected via SSH - so this really shouldn't need to be said...
Install and configure Trezor SSH Agent
First, you'll need the packages libusb (used for communicating with the Trezor) and trezor-agent (an SSH key agent which talks with your Trezor)
For those wondering "is trezor-agent safe? is it going to steal my crypto?" - first I applaud you for even thinking about that - secondly, the answer is: probably not. Trezor-agent is open source and supported by Trezor directly.
Installing trezor-agent
Both libusb and trezor-agent can be easily installed using Homebrew like so:
brew install libusb
brew install trezor-agent
Generating an SSH key
Now, assuming there were no big red errors spat out during the installation, you can now generate an SSH key.
Unfortunately, the built-in macOS ssh-keygen does not yet support key generation using hardware wallets yet, but trezor-agent includes a tool to allow you to work around this.
Note about key names: From what I'm aware so far, the name of your key (for example
johndoe@my-trezor) is very important. The name of your key is used in the derivation process along with your seed - meaning thattrezor-agent -e ed25519 johndoe@my-trezorwill always generate the same public and private key based on your seed.
In the below example, we'll generate the key johndoe@my-trezor (you can change the user johndoe and host my-trezor to something more personal to you), using the algorithm ed25519 - which is a modern Elliptic Curve (EC) algorithm which has a great balance between performance, key size and security:
trezor-agent -e ed25519 johndoe@my-trezor >> ~/.ssh/trezor.conf
If you cat the file ~/.ssh/trezor.conf - you'll find that it simple contains your SSH public key in OpenSSH authorized_keys format, for copying to other servers.
$ cat ~/.ssh/trezor.conf
ssh-ed25519 AAAAC3NzaC1lZDI1NTE5AAAAILcjJR3Ks3+C/BTfH0K2iwEpO+I3WQ6eIPyED4hGx8Pi <ssh://johndoe@my-trezor|ed25519>
Running trezor-agent in the background as a service
Create the folder ~/.ssh/trezor-agent - which will be used to house the UNIX socket file for trezor-agent, as well as the error log file.
mkdir -p ~/.ssh/trezor-agent
Now, you'll want to install the background service, known as a launchd plist file.
Download the trezor.ssh.socket.plist file from Privex using wget - outputting it directly into ~/Library/LaunchAgents/trezor.ssh.socket.plist
wget -O ~/Library/LaunchAgents/trezor.ssh.socket.plist https://cdn.privex.io/extras/configs/trezor.ssh.socket.plist
Once you've downloaded the plist file, we can register it as a background service using launchctl:
launchctl load ~/Library/LaunchAgents/trezor.ssh.socket.plist
We can confirm that the service was registered using launchctl list | grep -i trezor - look for Trezor SSH Socket
$ launchctl list | grep -i trezor
95865   0   com.bitcointrezor.trezorBridge.trezord
-       1   Trezor SSH Socket
We can see that the first column - which normally holds the Process ID (PID) to tell you the process this service is running as - is currently blank. This means that the socket service is not running.
To start the service, we use launchctl start followed by the name of the service in quotes. In this case, it's name is Trezor SSH Socket:
launchctl start "Trezor SSH Socket"
If we check launchctl list again - we'll find that the Trezor SSH Socket is now running under a process ID (the process ID will vary every time it's ran - all that matters is that there's a number in the first column).
$ launchctl list | grep -i trezor
95865   0   com.bitcointrezor.trezorBridge.trezord
94975   139 Trezor SSH Socket
We can further confirm that the agent is running by checking if it created the socket file and error log (run ls -l ~/.ssh/trezor-agent):
$ ls -l ~/.ssh/trezor-agent
total 8
lrwxr-xr-x  1 Someguy123  staff   45 26 Jul 10:56 S.ssh -> /private/tmp/com.apple.launchd.XZqiA1Ijrj/ssh
-rw-r--r--  1 Someguy123  staff  149 26 Jul 10:56 error.log
Using your Trezor SSH key(s)
Copy your SSH public key to remote servers/devices
As we saw previously when we ran cat ~/.ssh/trezor.conf - that file contains a public key like this:
ssh-ed25519 AAAAC3NzaC1lZDI1NTE5AAAAILcjJR3Ks3+C/BTfH0K2iwEpO+I3WQ6eIPyED4hGx8Pi <ssh://johndoe@my-trezor|ed25519>
The easiest way to copy the key without any extra accidental characters or whitespace, is to use the built-in command pbcopy (short for "pasteboard copy")
pbcopy < ~/.ssh/trezor.conf
Your new Trezor public key should now be on your clipboard, ready to paste where-ever you want to.
Simply connect to a remote server (or other device) via SSH, add your new Trezor key to ~/.ssh/authorized_keys - and then we'll begin the next step.
# First make sure .ssh actually exists if you aren't sure.
user@some-server ~ $ mkdir ~/.ssh
# Now open up ~/.ssh/authorized_keys with your favourite editor
# and paste the public key onto a new line.
user@some-server ~ $ nano ~/.ssh/authorized_keys
Add the ssh-trez function to your bashrc / zshrc
On macOS, using a Trezor SSH key requires using trezor-agent as your SSH agent. For many people, changing their default SSH agent to Trezor SSH agent would cause a lot of problems if they still use standard SSH keys locally.
Similarly, while it's possible to configure certain SSH hosts to always use the Trezor agent, this can be a pain if you frequently connect to new servers which you haven't yet configured in your ~/.ssh/config.
I also quickly found that OpenSSH does not prompt you to authorise connections on your Trezor - instead it just appears as if your SSH connection has hung - until you realise that you had to confirm it on your Trezor.
Because of these issues, I've written a small, simple function which works with both Bash, ZSH, and most other shells. This function, ssh-trez - is a shortcut for ssh -o 'IdentityAgent ~/.ssh/trezor-agent/S.ssh' [args] - which is the SSH command you'd have to enter any time you wanted to connect to a host using your Trezor SSH key without configuring it in .ssh/config.
The function also prints out some colourful messages to stderr, letting you know what arguments were passed to ssh, AND reminding you to authorise the login on your Trezor.
NOTE: If you're not sure what shell you're using, then you're probably using Bash.
If you use Bash, open up ~/.bashrc in your preferred editor.
If you use ZSH, open up ~/.zshrc in your preferred editor.
Example:
nano ~/.bashrc
At the bottom of the file, simply paste the following lines of code to add the ssh-trez convenience function:
BOLD="" GREEN="" YELLOW="" RESET=""
if [ -t 1 ]; then
    BOLD="$(tput bold)" GREEN="$(tput setaf 2)" YELLOW="$(tput setaf 3)" RESET="$(tput sgr0)"
fi

ssh-trez() {
    >&2 echo -e "${BOLD}${GREEN} [...] Connecting to SSH using parameters:${RESET} $*"
    >&2 echo -e "${YELLOW} [...] Please remember to CONFIRM the login on your Trezor!${RESET}"
    ssh -o 'IdentityAgent ~/.ssh/trezor-agent/S.ssh' "$@"
}
Connecting to an SSH host directly using a Trezor SSH key
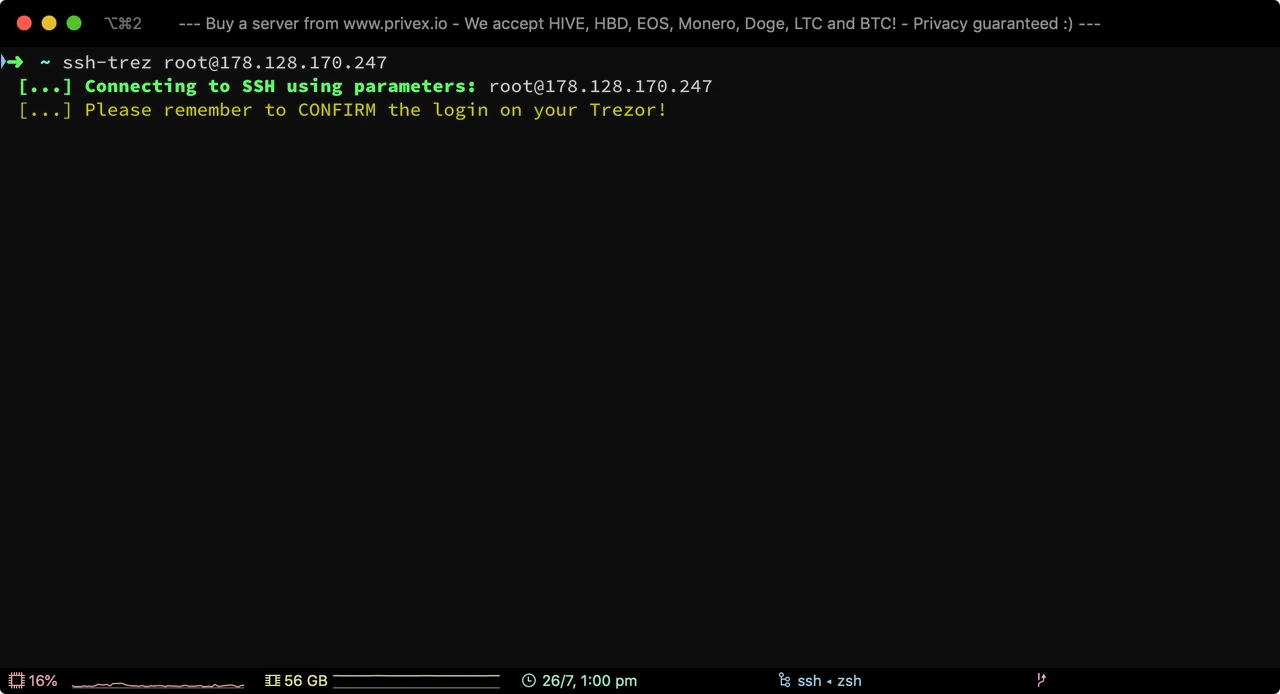
Using my helper function ssh-trez - we can connect to an arbitrary server without the need to configure it in the SSH config to use Trezor.
ssh-trez root@1.2.3.4
As can be seen in the screenshot above - ssh-trez reminds us that we need to approve the login on our Trezor.
On my Trezor, the screen shows "Sign SSH" with the description "johndoe@my-trezor" - which tells me that if I hit the green tick - I'll be allowing an application to sign something using the SSH key johndoe@my-trezor.
In this case it's legitimate, so go ahead and tap that green tick :)

Now that we've tapped the green tick on the Trezor, we're now logged into the server via SSH.
Just as a proof of concept, I set up a FreeBSD VPS - which was used in the above screenshot to show that Trezor's SSH agent works not only when connecting to Linux systems, but should also work for connecting to other operating systems SSH without issues.
Configuring SSH to always connect to a certain host using Trezor
For servers that you might frequently connect to using your Trezor SSH key, and/or need your Trezor key to work with other SSH-based applications such as rsync or scp - then you'll want to setup an SSH host config entry.
Open up ~/.ssh/config on your Mac in your favourite editor:
nano ~/.ssh/config
This file may not exist if you've never setup a ~/.ssh/config file before. That's fine though - the following config will work even with a previously blank/non-existent config file.
Add the following lines to the end of the ~/.ssh/config file:
Host someguy-bsd
    Hostname 178.128.170.247
    User root
    Port 22
    IdentityAgent ~/.ssh/trezor-agent/S.ssh
The
Hostline defines arbitrary user set aliases for this SSH host. You can define multiple aliases by separating them with spaces. In my case, I have aliased the host assomeguy-bsd.The
Hostnameline defines either the IP address (IPv4 or IPv6), or a domain/hostname which points to the server you're defining.The
Portline is optional - it defaults to22if not specified. However I've included it just to make it clear for anyone who might have SSH on a non-standard port.The
IdentityAgentline is the most important line. This tells OpenSSH to use the SSH agent located at this UNIX socket file.In this case, we're wanting it to use
trezor-agent's agent socket located at~/.ssh/trezor-agent/S.ssh
Adjust the config lines to point to your own server that you're wanting to use your Trezor SSH key with.
Then, save the file.
Connecting to a host defined in ~/.ssh/config
In the previous section, I defined the host alias someguy-bsd.
So, in order to connect to that host, we can simply use standard ssh - but instead of typing the user@host - we only have to type the alias.
ssh someguy-bsd
Unlike with ssh-trez - it will appear as if your ssh command has simply hung. So pay close attention to your Trezor - as it will only prompt you on the Trezor screen to authorise the connection.
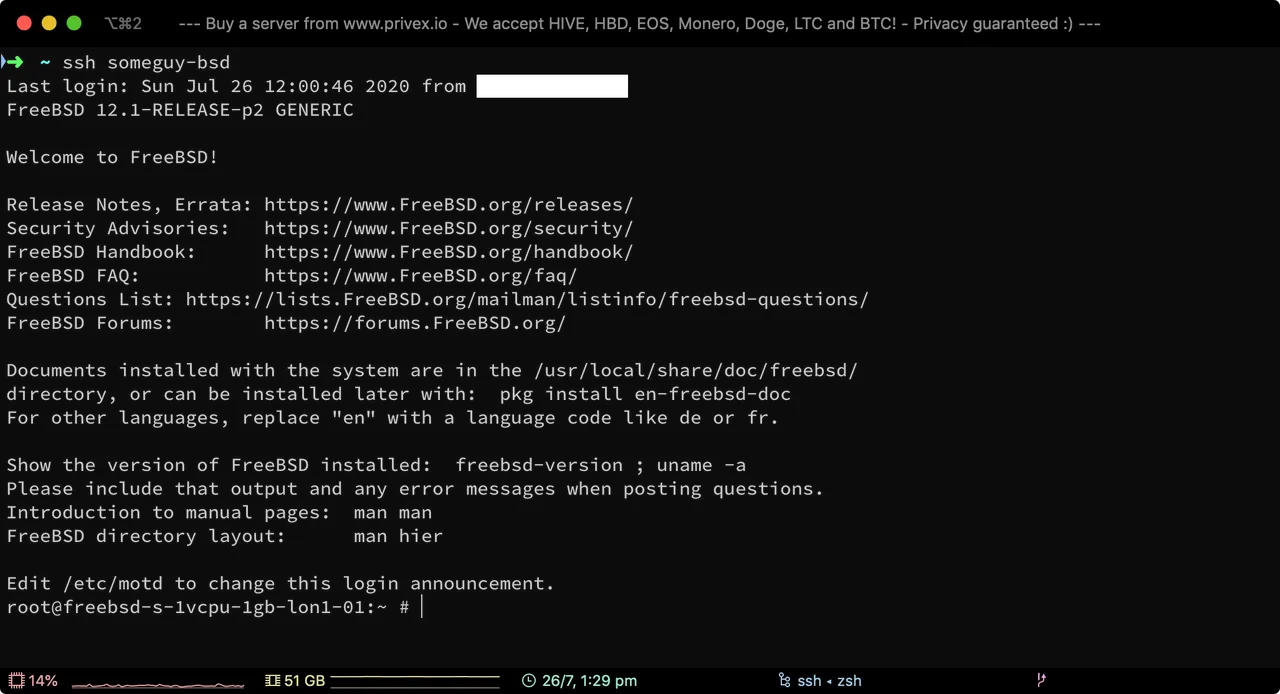
Once you've authorised the SSH login - you'll then be successfully logged into your server / other device.
References
This article was based on a much less in-depth article by RRYTER, and there's a few other special mentions which helped make this article possible:
- SSH via Hardware Wallet on macOS - by RRYTER - The original article which covered some of the key points, but missed out some important information such as how to actually use the plist file
- trezor.ssh.socket.plist file published on Gist by RRYTER - The plist service file written by RRYTER as part of the previously mentioned article - now mirrored on Privex's CDN (with a back reference added in the plist source code)
- https://github.com/romanz/trezor-agent
- https://github.com/romanz/trezor-agent/blob/master/doc/INSTALL.md
- MacOS ‘launchd’ examples - by Alvin Alexander - for understanding where to install the .plist service file
- How to Use launchd to Run Services in macOS - by Kosala Sananthana - for understanding how to load the plist, start it, and confirm it's running etc.
Thanks for reading!

GIF Avatar by @stellabelle
Do you like what I'm doing for Hive?
Vote for me to be a Hive witness - every vote counts.
Don't forget to follow me for more like this.
Have you ever thought about being a witness yourself? Join the witness channel. We're happy to guide you! Join in shaping the STEEM economy.
Are you looking for a new server provider? My company @privex offers highly-reliable and affordable dedicated and virtual servers for HIVE, HBD, EOS, LTC, BTC, and even DOGE! Check out our website at https://www.privex.io
You can join Privex's public Discord at https://discord.privex.io - we also have a Matrix server, sign up at https://riot.privex.io (or if you have an existing Matrix account, join our General chat at #privex:privex.io)