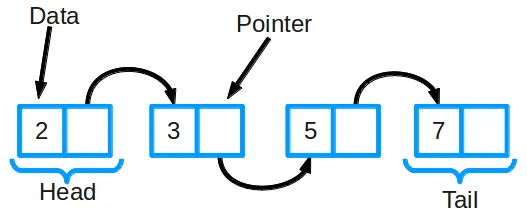
Singly Linked List
Linked lists is a data structure which is widely used across many applications, you can think of blockchain as a linked list too. Where each block contains information about transactions and information about next node ..
Linked list are similar data structure where it consists upon Nodes chained together in a way that each node contains information about next node.
Create a singly linked list, Where each node of list has connection to next node
Note that every chain of linked list has a head node, where it has no previous node.. you can also call it genesis node that's head will be nil, null or 0x000000, what that means is, it has no previous node, it is start of the node.
Every chain would also have a tail node, which has no information about next node because next node does not exists and in between head and tail nodes, you will find rest of the nodes which are linked together
When you are writing blockchain applications, most of the times you need to make sure once a node is completed, its no more update-able but that's not always the case you can always leave few data entries to be always editable.
e.g you are writing a blockchain where user needs to recover his password
Most of times once a block is completed it is locked. and its no more editable.. you can only retrieve information from it :)
but what linked list we are Implementing here, we will allow user to update the data in any node, anytime they want
Identifying the Entities
By studying blockchains and linked lists for a while, we came to conclusion that it has two entities
- Block/Node
- Chain/Nodes connected together
lets create a class for Node
class Node
    attr_accessor :val, :next

    def initialize(val, next_node)
        @val  = val
        @next = next_node
    end
end
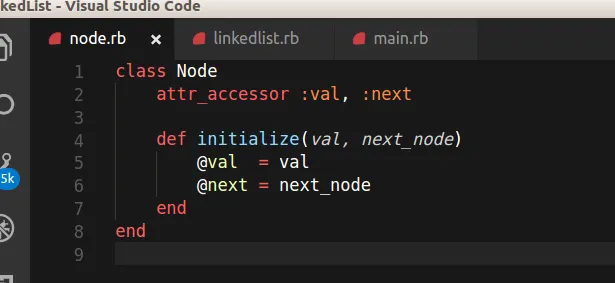
attr_accessor :val, :next
attr_accessor is used to create getter and setter methods for instance variables @val and @next, which allows to get and set values of these variables easily ..
we can do like node.val = "This value" and puts node.val to get the value and display it..
It is similar to writing methods like so
def val
  @val
end

def val=(value)
  @val = value
end

def next
  @next
end

def next=(value)
  @next = value
end
Once we have Node created, that has a data variable which can hold data, and a variable which holds the next Node
We are ready to create a linked list.
This linked list will be able to create as many lists as you want, you can always instantiate a new object from it, and create a list that serves your purpose.
This linked list has following properties
- Create a new list
- Add a node to existing list, node will be added at the tail of list
- Display all the nodes information, contained within them
- Get all the node references
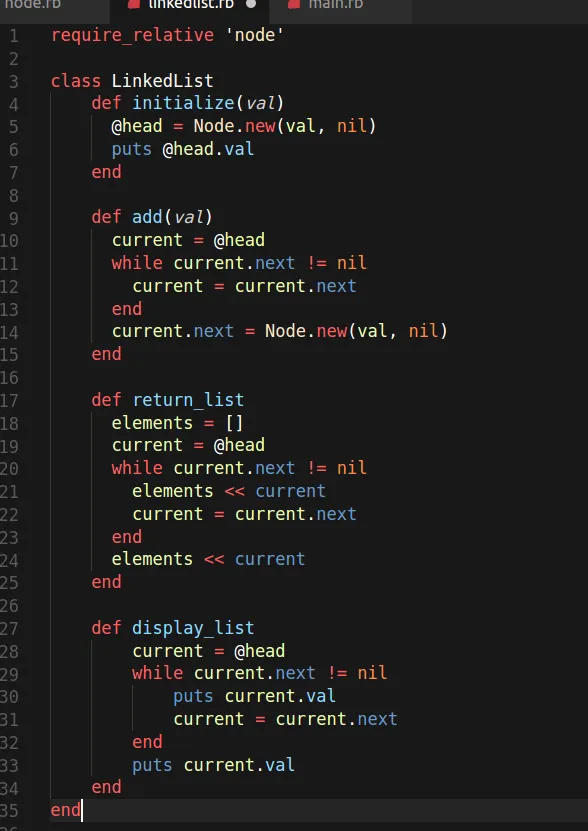
require_relative 'node'

class LinkedList
    def initialize(val)
      @head = Node.new(val, nil)
      puts @head.val
    end

    def add(val)
      current = @head
      while current.next != nil
        current = current.next
      end
      current.next = Node.new(val, nil)
    end

    def return_list
      elements = []
      current = @head
      while current.next != nil
        elements << current
        current = current.next
      end
      elements << current
    end

    def display_list
        current = @head
        while current.next != nil
            puts current.val
            current = current.next
        end
        puts current.val
    end
end
1 - Initialize
Initialize method will take a genesis Node and will create a new list. you can add anything into the data variable.
We learned to create hashes, so we are going to take a hash to insert into the node.
note that whenever a new chain/linkedlist is created, it contains only 1 node that is genesis node. that's node's next variable is nil, so a new chain's head and its tail are the same node :)
2 - add (val)
This method allows us to add a new node in our chain, it starts from the root node. and traverse the list until it finds the tail. and then it adds new node there, and link it with existing chain
3 - return_list
This method will return the node's reference information to us
4 - display_list
This method allows us to see the values contained within the list nodes.
lets create a main.rb file. where we can create a new list, or a simple blockchain application
require_relative 'linkedlist'

_data = {username: "bilalhaider", age: "27", salary: 0.00, reward: 50}
puts "Data to be inserted in node. #{_data}"

_mylist = LinkedList.new(_data)

while $entry.to_i != 4
    print "1 - Insert new data\n2 - Display List\n3 - Return List\n4 - Exit\n Your Choice: "
    $entry = gets.chomp

    if $entry.to_i == 1
        print "Insert your Name: "
        _username = gets.chomp

        print "Insert your age: "
        _age      = gets.chomp

        print "Insert your salary: "
        _salary   = gets.chomp

        _data = {username: _username, age: _age, salary: _salary, reward: 50}
        puts "Data to be inserted in node #{_data}"

        _mylist.add(_data)
    elsif $entry.to_i == 2
        puts _mylist.display_list
    elsif $entry.to_i == 3
        puts _mylist.return_list
    elsif $entry.to_i == 4
        puts "Exiting .... "
    else
        puts "Invalid choice "
    end
end
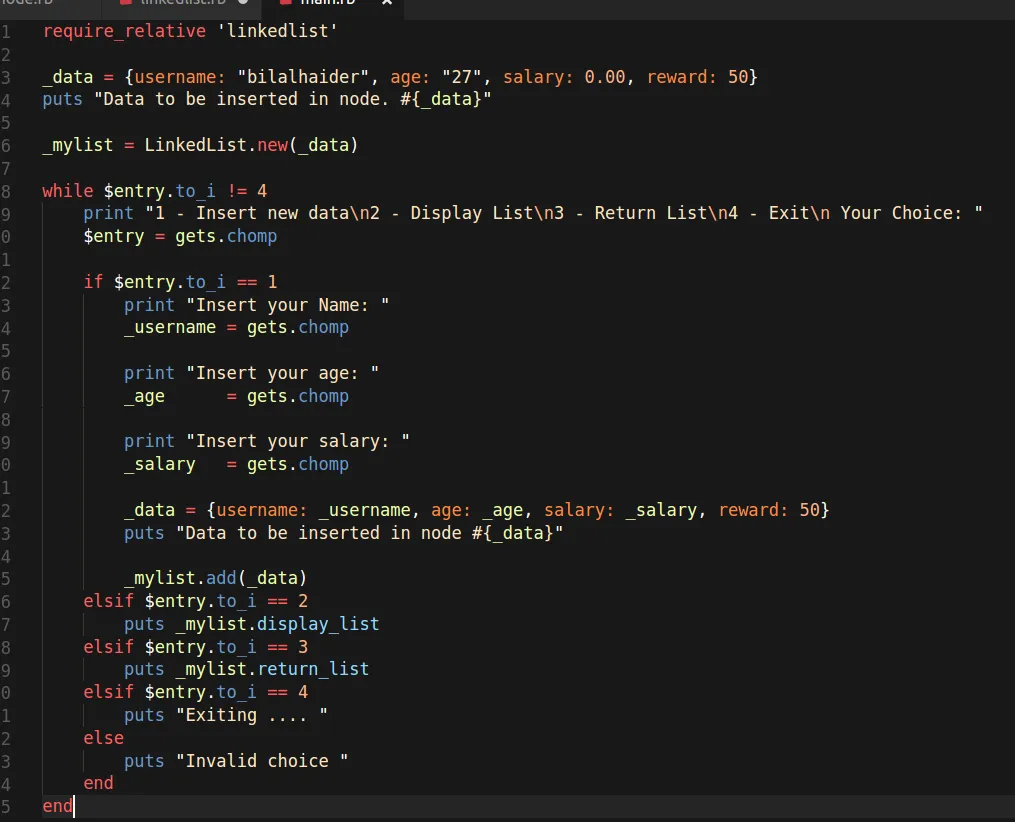
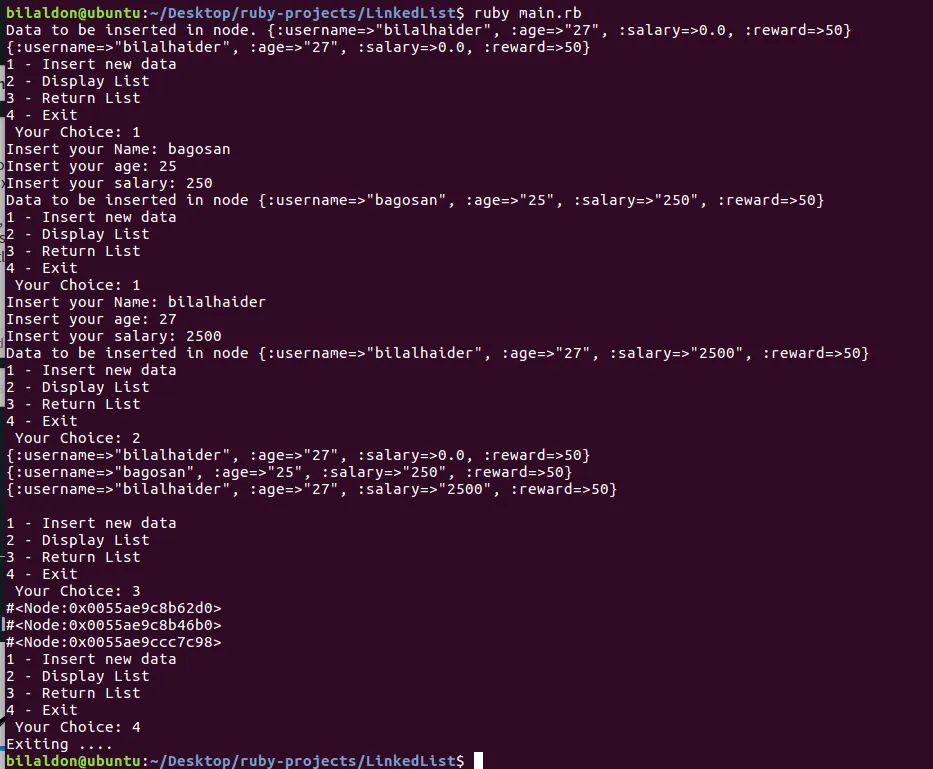
Above program, provides us a command line interface, where we have 4 options to choose from. If you have followed my previous articles you should be able to understand all the code.
we are constantly displaying choices to user .. when user selects an option we call methods accordingly to perform required task
In this example, we learned to create a simple blockchain application, which does not persist data. e.g it will lost all the data as soon as the program is exited.
In upcoming articles, we will learn different methods to persist data :)
We can use files, we can use database systems.. We will explore many different ways to persist data
For future
- Persist data, and store it in files
- Encrypt and Sign data, so that it can't be duplicated
- Create Peer to Peer network , so that we can push data to other people