Hi Hi.!
"Sweet atmosphere", a bit unusual...But that's how I have named it. 🤣
It so happens that for my entry to the Prof Of Brain contest, I wanted to try a sweet recipe. The thing is, I love them and I think this fits very well with the theme of the contest. The word for this week is: "Atmosphere."
And, here are my reasons why it represents what I have done, based on this word...
About the Dessert:
A delicious dessert that includes a variety of flavors and colors, the latter differentiated with the intention of resembling the layers of the earth. Wait, I investigated and according to internet sources, they tell me in a nutshell that:
Atmosphere, it is the gaseous layer that covers some celestial body, placing greater emphasis on the earth our planet...
For this reason, I decided to make a dessert that was clearly divided into layers and at the same time, is inserted in its own atmosphere. Wow.! My bionic tumbler gives me all the features, cute and beautiful oomph potential!
Layers:
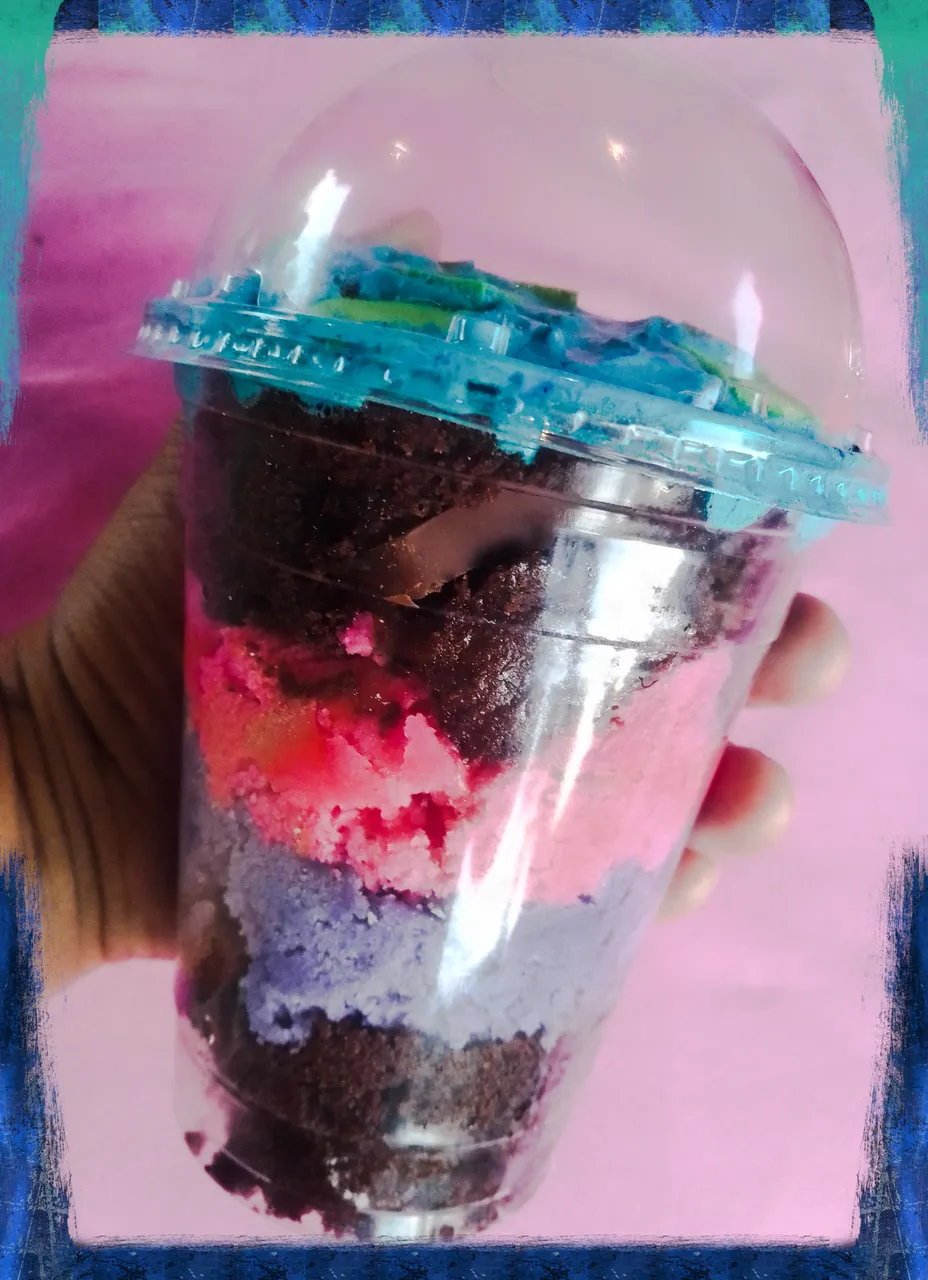
From bottom to top, we can define it as:
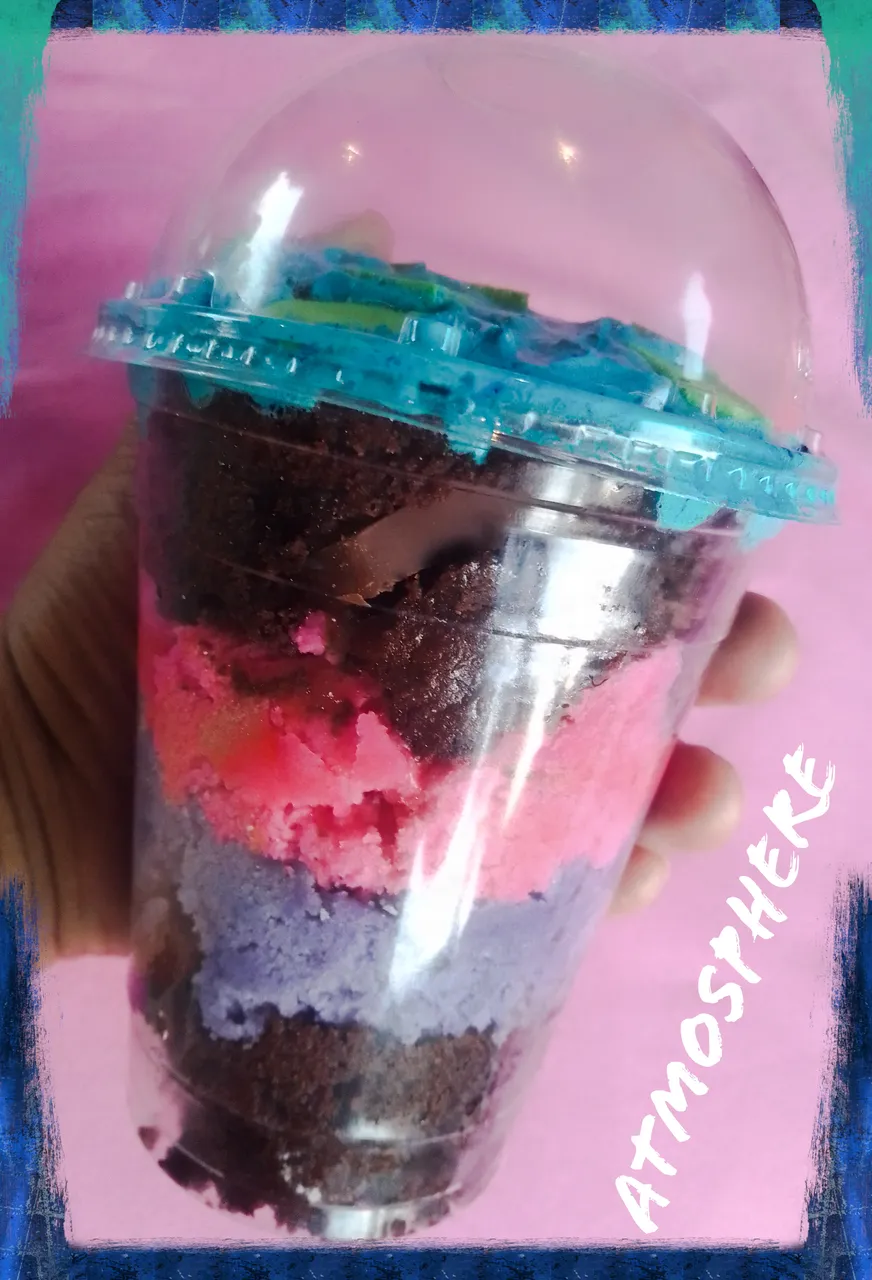
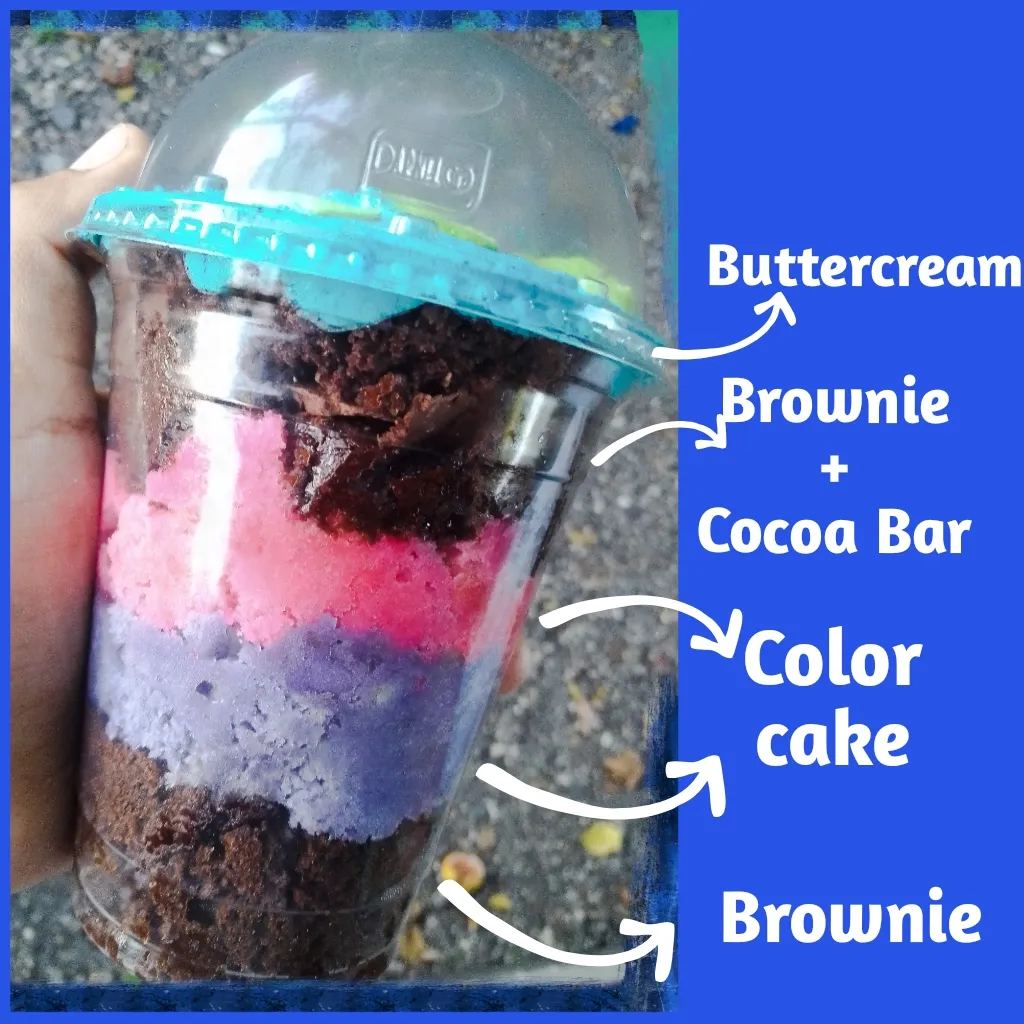
Core: represented by a layer of delicious brownie.
Lower mantle: represented by a layer of milk sponge, with lilac color.
Upper Mantle: represented by a layer of milk cake, with pink color.
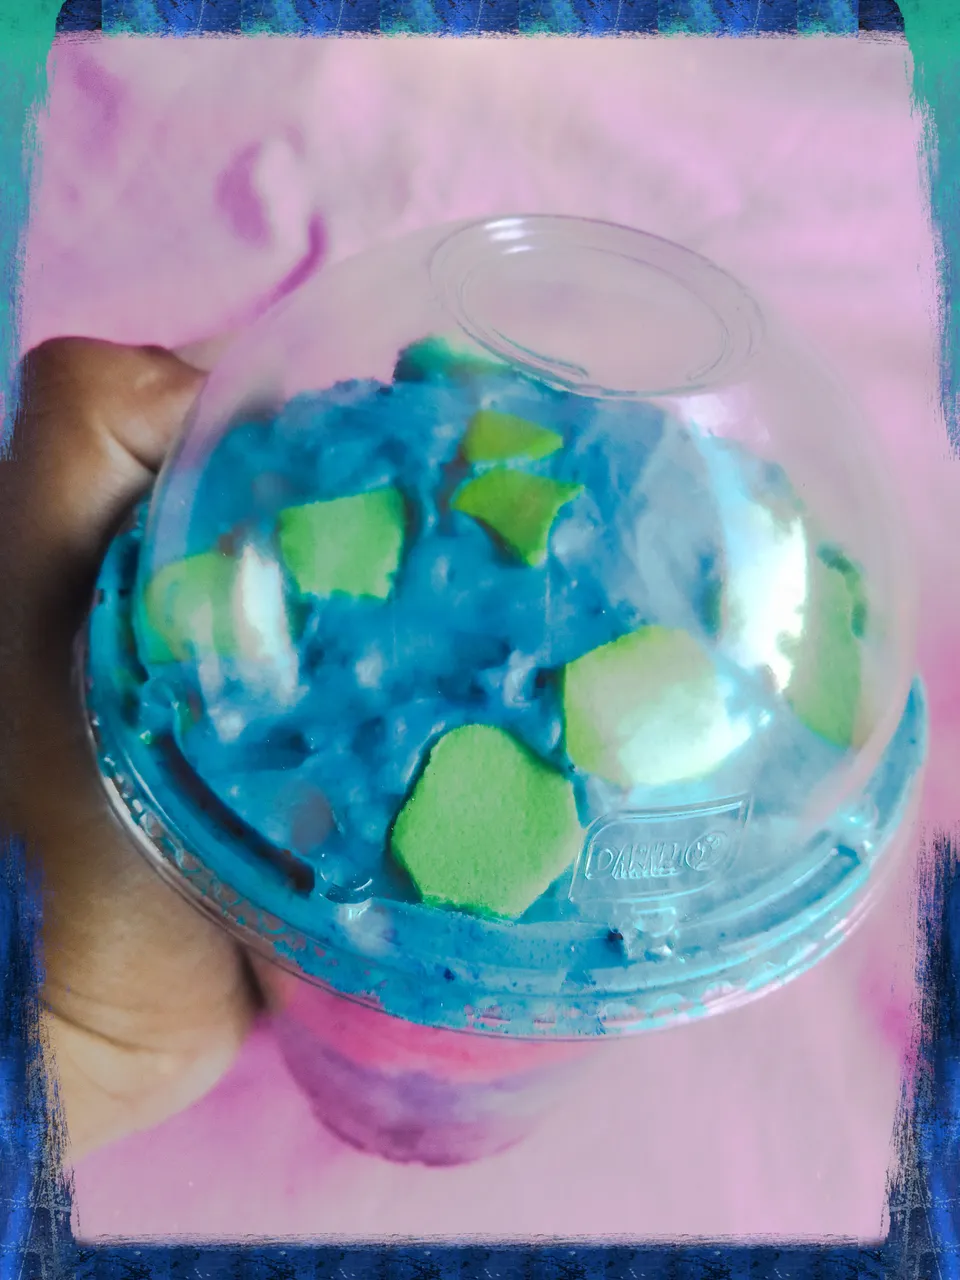
Crust: this one, I have divided it into an underground layer that is represented by a mixture of brownie and chocolate bar (adds that crunchy characteristic!). The outer crust layer was made with blue Buttercream. The latter in turn represents the seas or bodies of water viewed from the atmosphere. I also added pieces of edible pastillage, in green tone, these represent the solid part seen from the atmosphere.
A crucial detail for the construction of the dessert "Atmosphere", was this type or style of glass, I love its beautiful presentation so particular.
Now, everything cleared up...
We can go to the kitchen and step by step of my recipe:
🙌🙌
Ingredients:
For the brownie:
- 2 whole eggs.
- 1 and 1/2 cups of wheat flour.
- 1 tablespoon of baking powder.
- 3 level tablespoons of butter.
- 100 gr of cocoa powder.
- Vanilla.
- 1 cup of sugar.
Aside, for the filling: 1 tablespoon of butter, one of cocoa and two of vegetable oil
For the milk cake:
- 2 eggs.
- 2 cups of wheat flour.
- 500 ml of liquid milk.
- Vanilla.
- 200 g of butter.
- 1 and 1/2 cups of sugar.
- Colors: pink and lilac.
- 1 tablespoon of baking powder.
Blue Buttercream:
- 150 gr of butter.
- 150 gr of icing sugar.
- 2 tablespoons of milk.
- Vanilla.
- Blue coloring.
We will also use bar chocolate and basic syrup (made with water, sugar and white vanilla).
👩🍳👩🍳👩🍳👩🍳👩🍳👩🍳
Preparation:
Let's start with the preparation of the brownie:
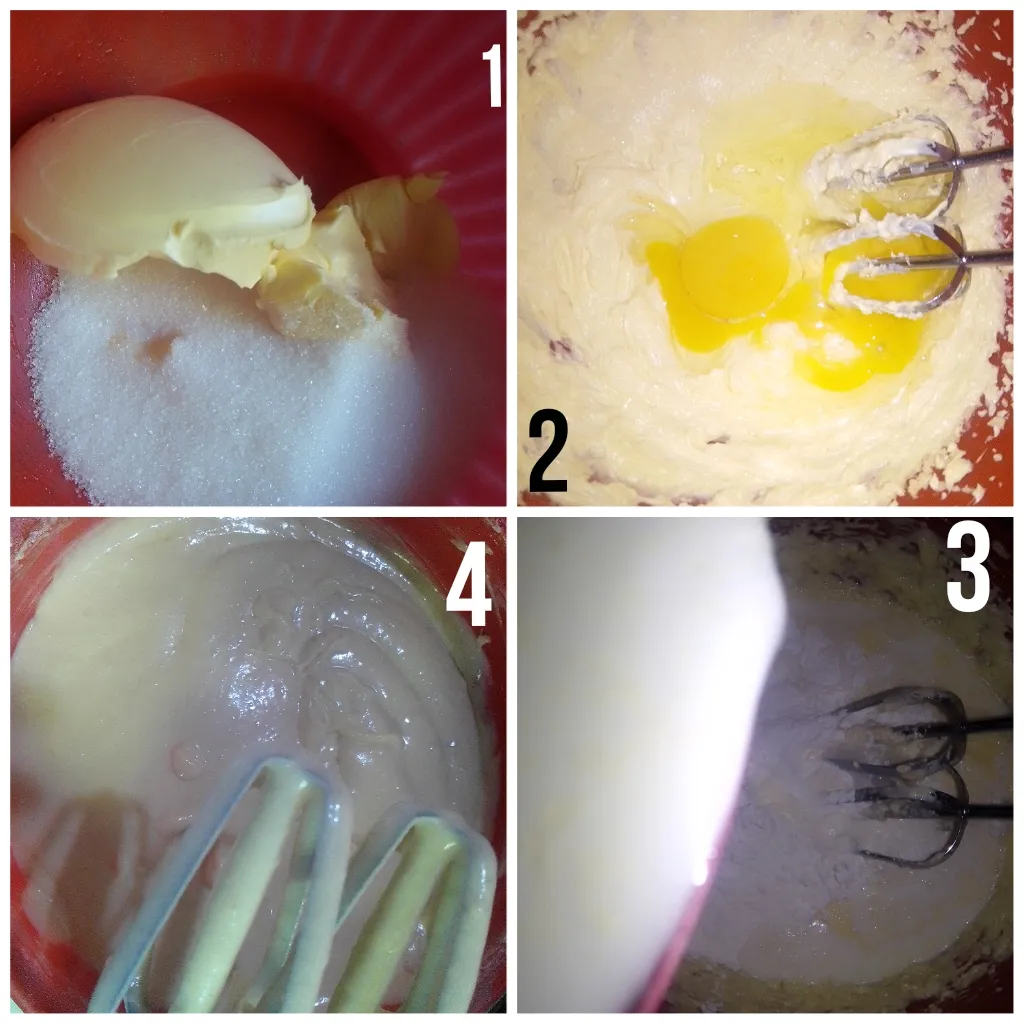
A.- We will place the eggs and sugar in a bowl, stir a little. In this mix, a trowel can be used. It is not necessary a blender, so that it does not take air, remember that brownies are fluffy and not fluffy. We add vanilla. In addition, in a pot we place the butter, when it is melted we add the cocoa powder. See figures 3 and 4. Mix well.
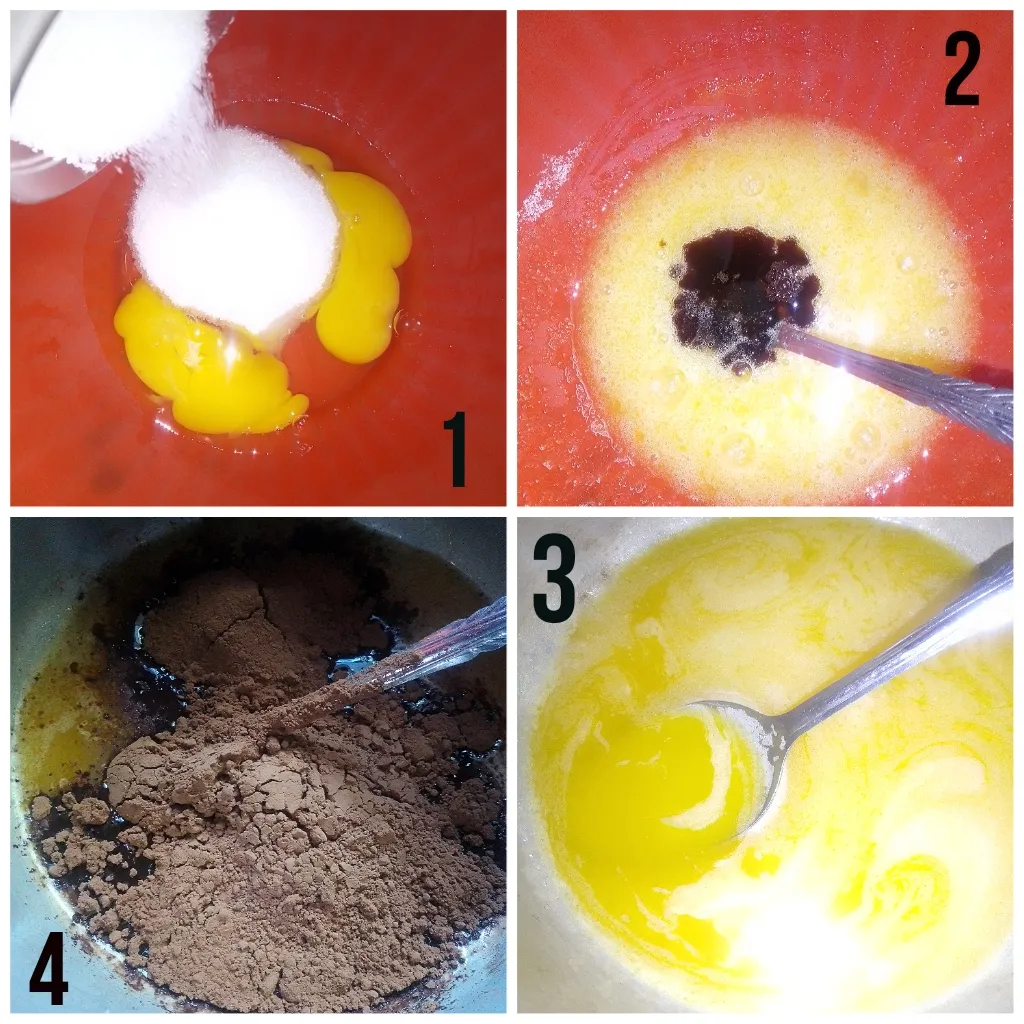
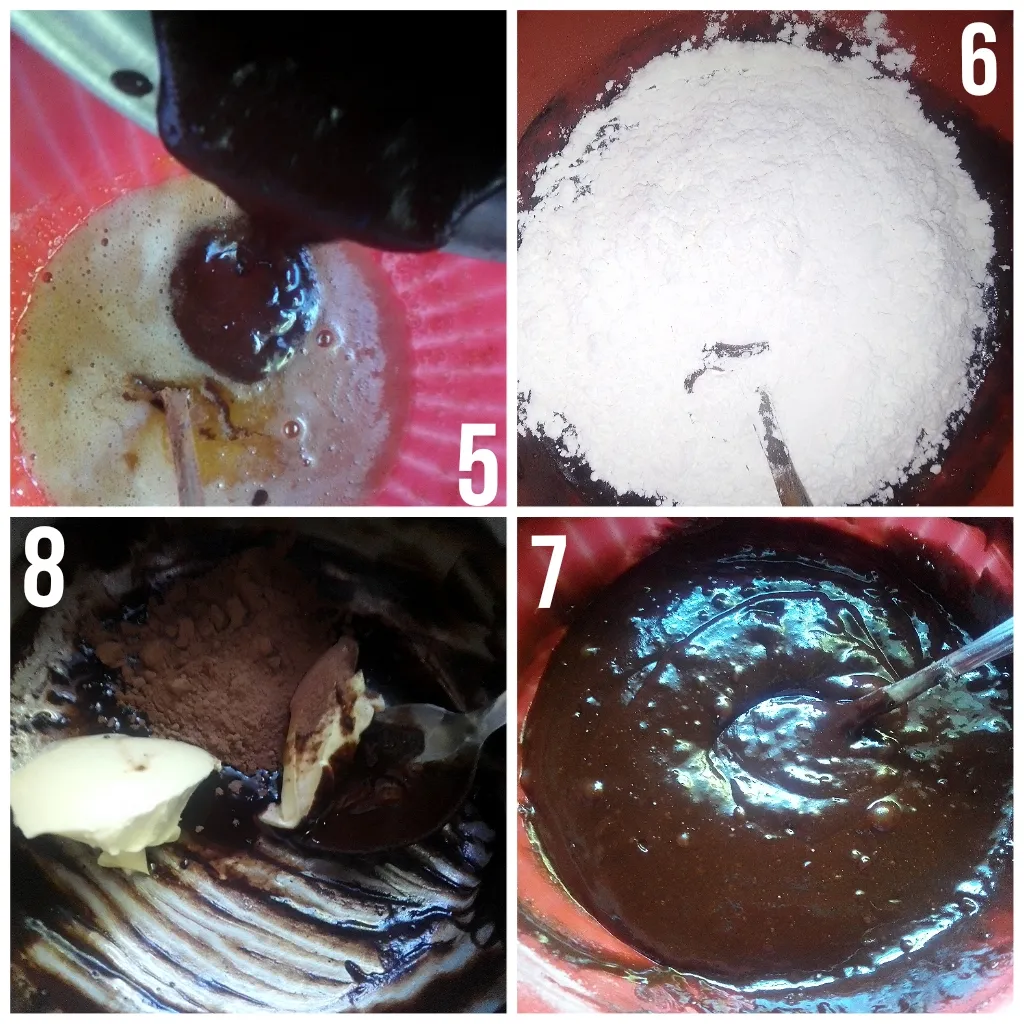
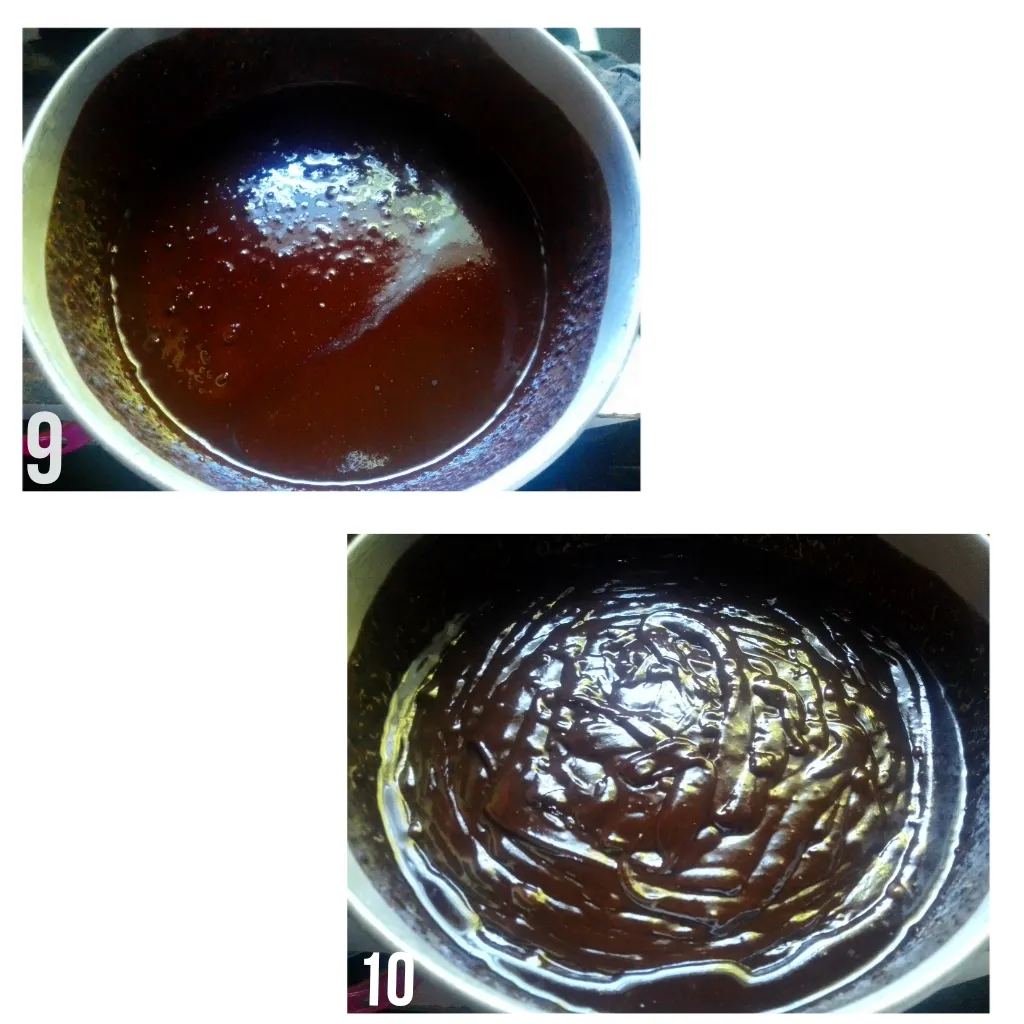
B.- We add the cocoa mixture to the previous mixture. See figure 5. We then add the wheat flour and the baking powder. See figure 6. We mix, we will then obtain a mixture of a beautiful color, as seen in figure 7. Besides, in a pot, we will make the filling. We place the ingredients in the pot and bring to a fire, see figure 8.
C.- When integrating, we add it to the mold that we will use. And then, let's get back to the brownie mix. See figures 9 and 10. Bake, until when inserting a toothpick, it comes out a little moist. Remember that brownie is not dry.
Now, preparing the milk cake:
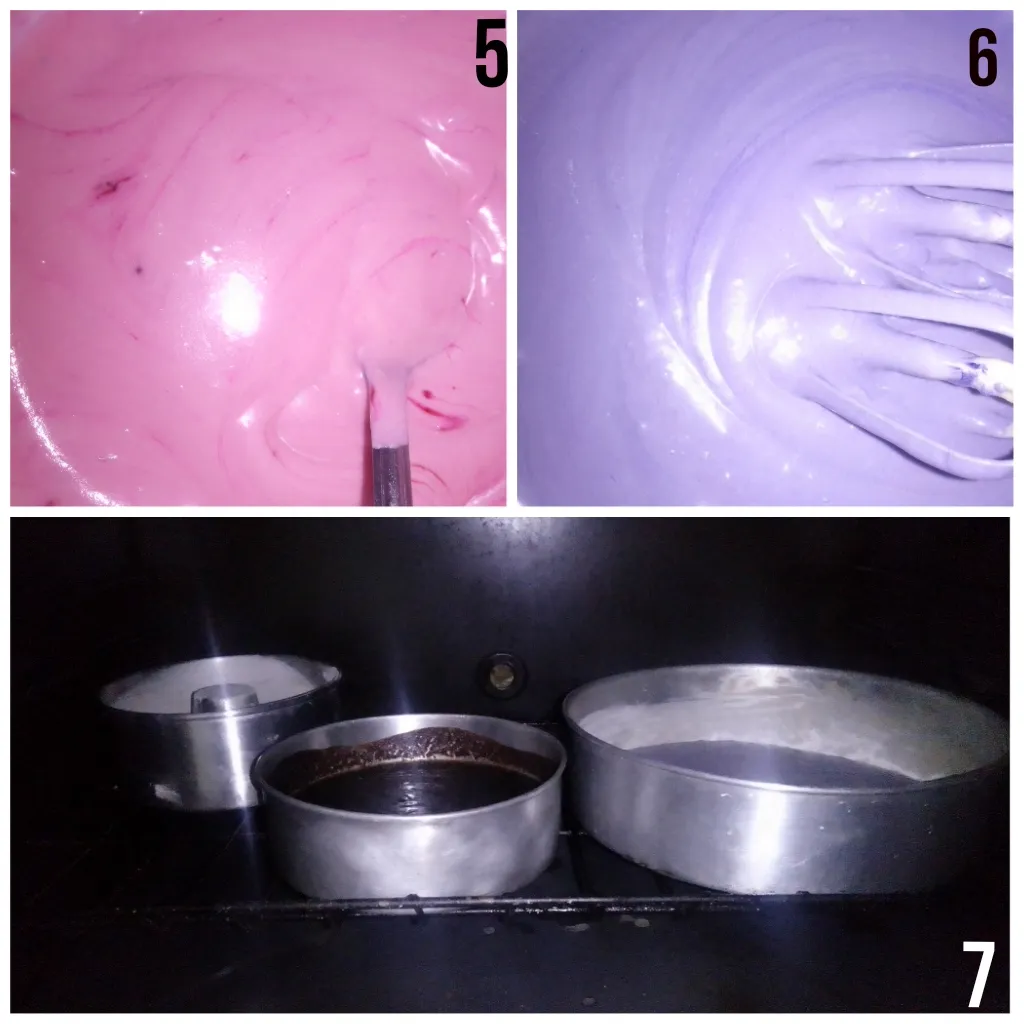
A.- In a large bowl, we place the butter and sugar. See figure 1. We beat until obtaining a foamy and airy mixture. We add the eggs. See figure 2. Now, we add the vanilla, baking powder, flour. We alternate the latter with milk. See figure 3. By integrating all the ingredients, we will obtain a completely homogeneous mixture, that is, it will not have any type of lump. See figure 4.
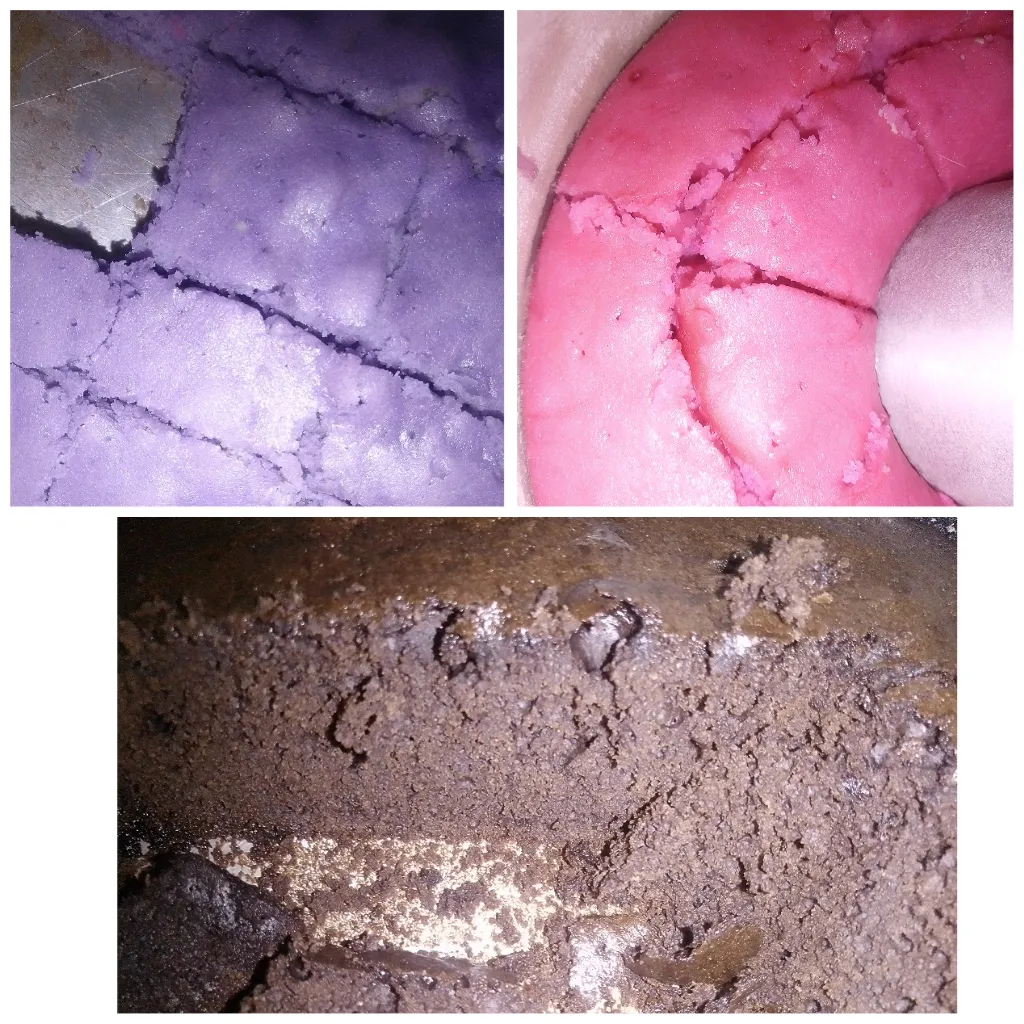
B.- We separate the mixture into two parts, one with pink and the other with lilac. See figures 5 and 6. We pour the mixtures into molds, previously greased and floured. See figures 5 and 6. We bake, see figure 7.
Take a close look at the ready-made cupcakes...what a color!😍
Preparing the Buttercream:
This cream has many uses, mainly I use it to decorate because of the texture it has and because it is easy to put different colors.
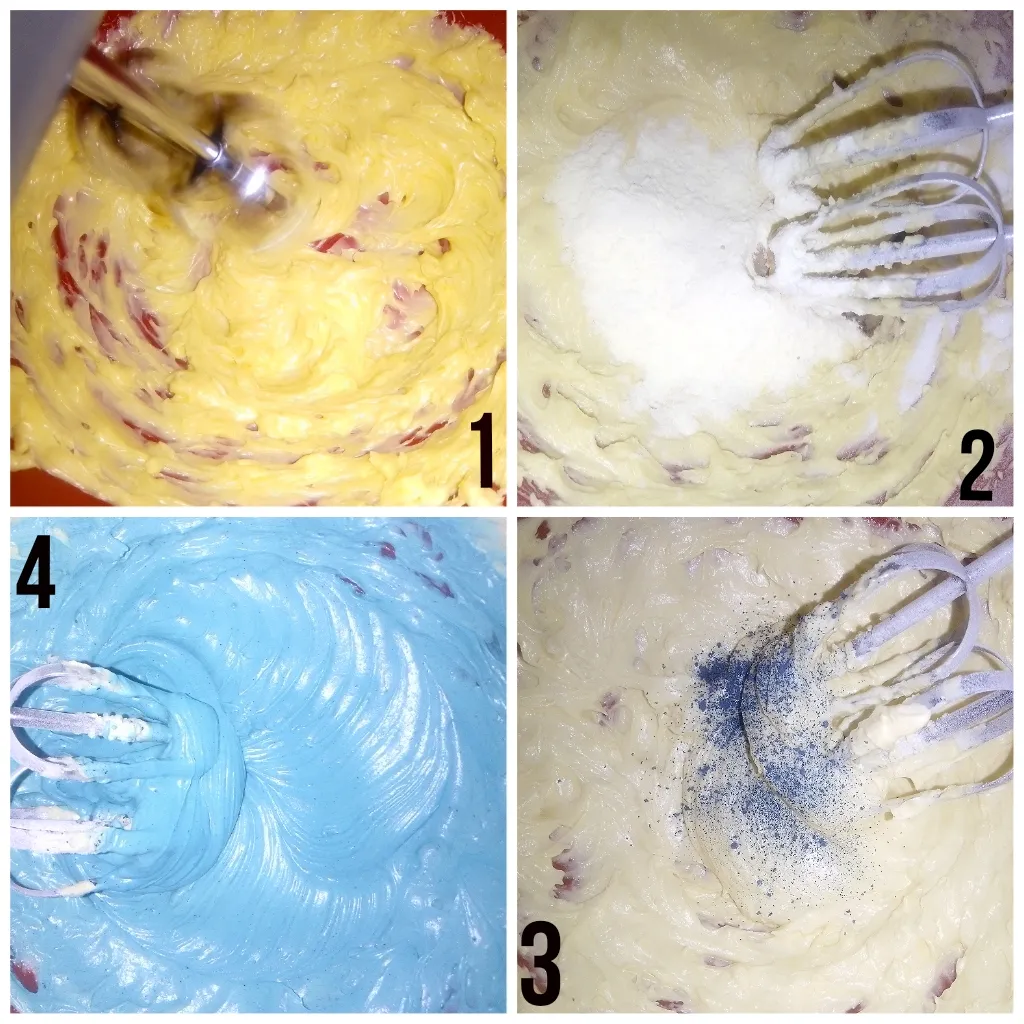
A.- We place the butter in a cup and start beating. We will do it until the butter takes the texture of an ointment and changes to a lighter color. See figures 1 and 2. At this point we add the icing sugar and milk. Then, after beating for a few minutes, we are going to incorporate the coloring. See figure 3. When you finish incorporating the coloring to taste, it will be as in figure 4.
Assembling the glass:
Having all the layers ready, we will start the assembly. It is important that all the ingredients are at room temperature, so that they do not cloud the glass.
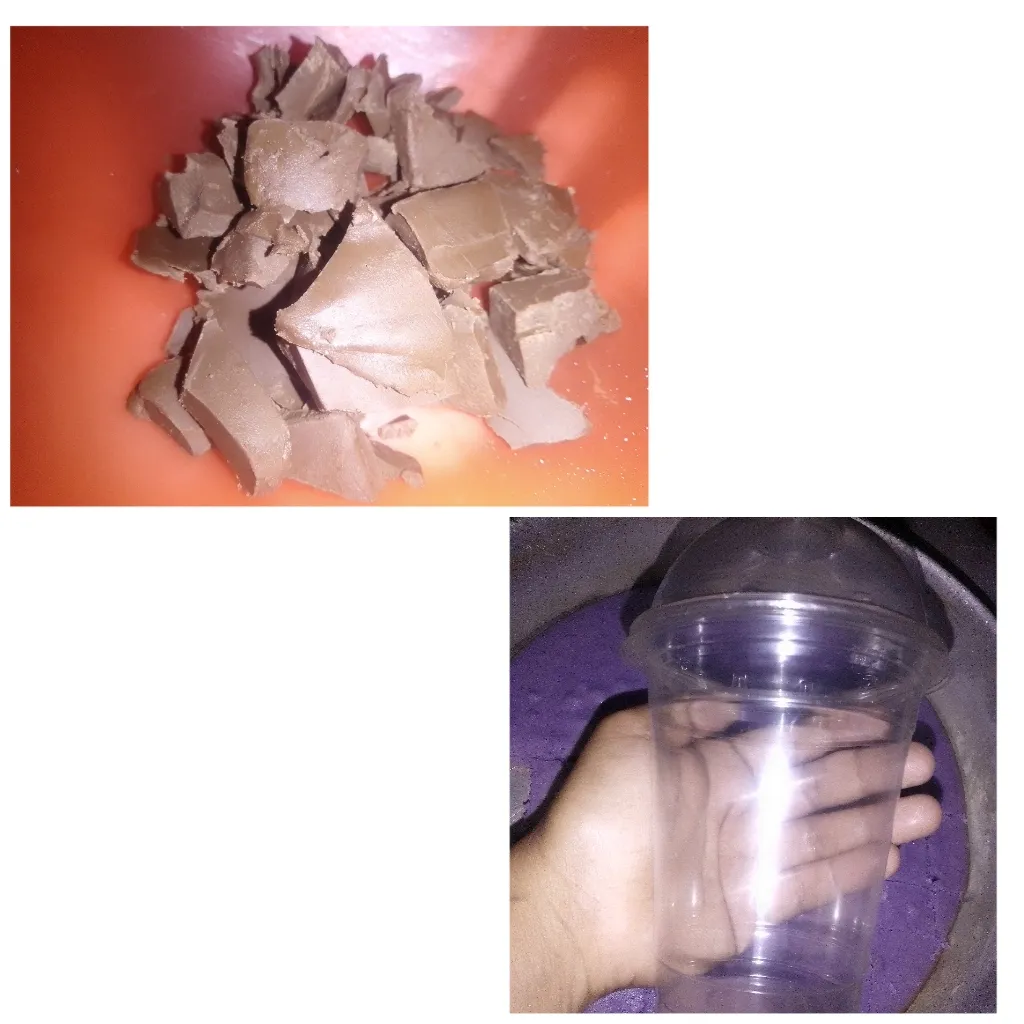
Here I show you the glass that we will use and what is the chocolate in pieces.
A.- We start by placing a brownie base, moisten with syrup. Then a layer of lilac sponge cake, we also moisten with syrup. Now comes a layer of pink sponge cake, moisten with syrup. See figures 1, 2 and 3. Layer 4 has chocolate chunks and brownie. I find this chocolate to give it a crunchy layer.

Finally, we added a Buttercream cover, so that it simulates the bodies of water that we usually see in drawings from the atmosphere and their definition. For the solid part, I have used pieces of edible pastillage. When finished, we put the lid of the bionic glass. There is our Atmosphere dessert!
Layers display:
This dessert is really lovely, it is different, it is sweet, it is colorful! I love the diversity of colors in what I do.
🧠🧠🧠🧠🧠🧠
Thank you for your attention, kindly: Ana Pialejo, under my username: @pialejoana.
✨✨✨✨✨
Versión en Español:
Hola, hola.!
"Atmósfera dulce", un poco inusual... Pero así le he bautizado. 🤣
Sucede que para mi entrada al concurso de Prof Of Brain, he querido intentar con una receta dulce. Es que, me encantan y creo que esto se acopla muy bien a la temática del concurso. La palabra de esta semana es : "Atmósfera."
Y, aquí van mis motivos del porque representa lo que he hecho, en base a esta palabra...
Sobre el Postre:
Un delicioso postre que incluye una variedad de sabores y colores, estos últimos diferenciados con intenciones de asemejarse a las capas de la tierra. Espera, es que investigué y según las fuentes del internet, me indican a resumidas cuentas que:
Atmósfera, es la capa gaseosa que recubre algún cuerpo celeste, haciendo mayor énfasis a la tierra nuestro planeta...
Por ello, decidí hacer un postre que estuviese claramente divido por capas y a la vez, esté insertado en su propia atmósfera. Vaya. ! Mi vaso biónico me brinda todas las características, lindo y hermoso potencial de empuje.!
Las capas:
Desde abajo hacia arriba, la podemos definir como:
Núcleo: representado por una capa de delicioso brownie.
Manto inferior: representado por una capa de bizcocho de leche, con color lila.
Manto Superior: representado por una capa de bizcocho de leche, con color rosa.
Corteza: esta, la he dividido en una capa subterránea que se representa por una mezcla de brownie y chocolate en barra (agrega esa característica crujiente.!). La capa de la corteza exterior, la hice con Buttercream de color azul. Esta última a su vez representa los mares o cuerpos de agua visualizados desde la atmósfera. También agregué trozos de pastillaje comestible, en tono verde, estos representan la parte sólida vista desde la atmósfera.
Un detalle crucial para la construcción del postre "Atmósfera", fue este tipo o estilo de vaso, amo su linda presentación tan particular.!
Ahora, ya aclarado todo...
Podemos ir a la cocina y al paso a paso de mi receta:
🙌🙌
Ingredientes:
Para el brownie:
- 2 huevos enteros.
- 1 y 1/2 taza de harina de trigo.
- 1 cucharada de polvo de hornear.
- 3 cucharadas rasas de mantequilla.
- 100 gr de cacao en polvo.
- Vainilla.
- 1 taza de azúcar.
Aparte, para el empaste: 1 cucharada de mantequilla, una de cacao y dos de aceite vegetal
Para el bizcocho de leche:
- 2 huevos.
- 2 tazas de harina de trigo.
- 500 ml de leche líquida.
- Vainilla.
- 200 gr de mantequilla.
- 1 y 1/2 taza de azúcar.
- Colorantes : rosa y lila.
- 1 cucharada de polvo de hornear.
Buttercream azul:
- 150 gr de mantequilla.
- 150 gr de azúcar glass.
- 2 cucharadas de leche.
- Vainilla.
- Colorante azul.
También usaremos chocolate en barra y almíbar básico (elaborado con agua, azúcar y vainilla blanca).
👩🍳👩🍳👩🍳👩🍳👩🍳👩🍳
Preparación:
Iniciemos con la preparación del brownie:
A.- Colocaremos en un bowl los huevos y la azúcar, removemos un poco. En esta mezcla, se puede usar una paleta. No es necesario una batidora, para que no tome aire, recuerden que los brownies son melcochosos y no esponjosos. Añadimos vainilla. Aparte, en una olla colocamos la mantequilla, al estar derretida le agregamos el cacao en polvo. Ver figuras 3 y 4. Mezclamos bien.
B.- Agregamos la mezcla de cacao, a la mezcla anterior. Ver figura 5. Agregamos entonces la harina de trigo y el polvo de hornear. Ver figura 6. Mezclamos, obtendremos entonces una mezcla de un color hermoso, tal como se ve en la figura 7. Aparte, en una olla, haremos el empaste. Colocamos los ingredientes en la olla y llevamos a fuego, ver figura 8.
C.- Al integrarse se lo agregamos al molde que usaremos. Y luego, volvamos la mezcla de brownie. Ver figuras 9 y 10. Horneamos, hasta que al insertar un palillo, este salga un poco húmedo. Recuerden que el brownie no es seco.
Ahora, preparando el bizcocho de leche:
A.- En un bowl amplio, colocamos la mantequilla y azúcar. Ver figura 1. Batimos hasta lograr una mezcla espumosa y aireada. Añadimos los huevos. Ver figura 2. Ahora, agregamos la vainilla, polvo de hornear, harina. Esta última, la alternamos con la leche. Ver figura 3. Al integrar todos los ingredientes, obtendremos una mezcla totalmente homogénea, es decir que no tendrá ningún tipo de grumo. Ver figura 4.
B.- Separamos las mezcla en dos partes, una la teniños con rosa y la otra con lila. Ver figuras 5 y 6. Las mezclas las volcamos en unos moldes, previamente engrasados y enharinados. Ver figur6 5 y 6. Horneamos, ver figura 7.
Da un vistazo de cerca a los bizcochos listos... Qué color.! 😍
Preparando la Buttercream:
Esta crema tiene muchos usos, principalmente la uso para decorar por la textura que tiene y porque es fácil de colocar colores diferentes.
A.- Colocamos la mantequilla en una taza e iniciamos batiendo. Lo haremos hasta que la mantequilla tome textura de pomada y cambie a un color más claro. Ver figuras 1 y 2. En este punto agregamos el azúcar glass y la leche. Luego, de batir unos minutos, vamos a incorporar el colorante. Ver figura 3. Al terminar de incorporar el colorante al gusto, nos quedará como en la figura 4.
Armado del vaso:
Teniendo todos las capas listas, iniciaremos el armado. Es importante que todos los ingredientes estén a temperatura ambiente, para que no empañen el vaso.
Aquí les muestro el vaso que usaremos y lo que es el chocolate en trozos.
A.- Iniciamos colocando una base de brownie, humedecemos con almíbar. Luego una capa de bizcocho color lila, humedecemos también con almíbar. Ahora viene una capa de bizcocho rosa, humedecemos con almíbar. Ver figuras 1, 2 y 3. La capa 4, tiene chocolate en trozos y brownie. Considero que este chocolate le brinda una capa crujiente.
Por último, agregamos una cobertura de la Buttercream, para que simule los cuerpos de agua que usualmente vemos en los dibujos desde la atmósfera y su definición. Para la parte sólida, he usado trozos de pastillaje comestible. Al terminar, colocamos la tapa del vaso biónico. Allí, esta nuestro postre Atmósfera.!
Visualización de las capas:
Es realmente Encantador este postre, es diferente, es dulce, es colorido.! Amo la diversidad de colores en lo que hago.
🧠🧠🧠🧠🧠🧠
Gracias por su atención, atentamente: Ana Pialejo, bajo mi usuario de : @pialejoana.