Hola, holaaa! Saludos Artistas Creativos de la joyería como se encuentran, listos para disfrutar el fin de semana? Así lo espero hay que irse preparando pues solo faltan ochenta y cinco días para celebrar la navidad; a pesar de las lluvias y el clima desastroso que hemos tenido el ambiente se nota con bastante alegría y la gente muy divertida haciendo sus pre-compras de navidad.
Les cuento que me sentí muy emocionada por los valiosos comentarios de que fue objeto mi colgante y la pulsera con la temática "Clave de Sol" que le hice a mi sobrina, y es que lo digo muy en serio esos comentarios son como un alimento que me llena y halaga cuando veo como mis publicaciones reciben esos elogios de grandes Creativos cómo son ustedes; gracias mil gracias.
También mi sobrina se mostró bastante complacida por el detalle, pues me dijo que ademas de original le encantó el diseño y como les digo por todo eso Yo...feliz.
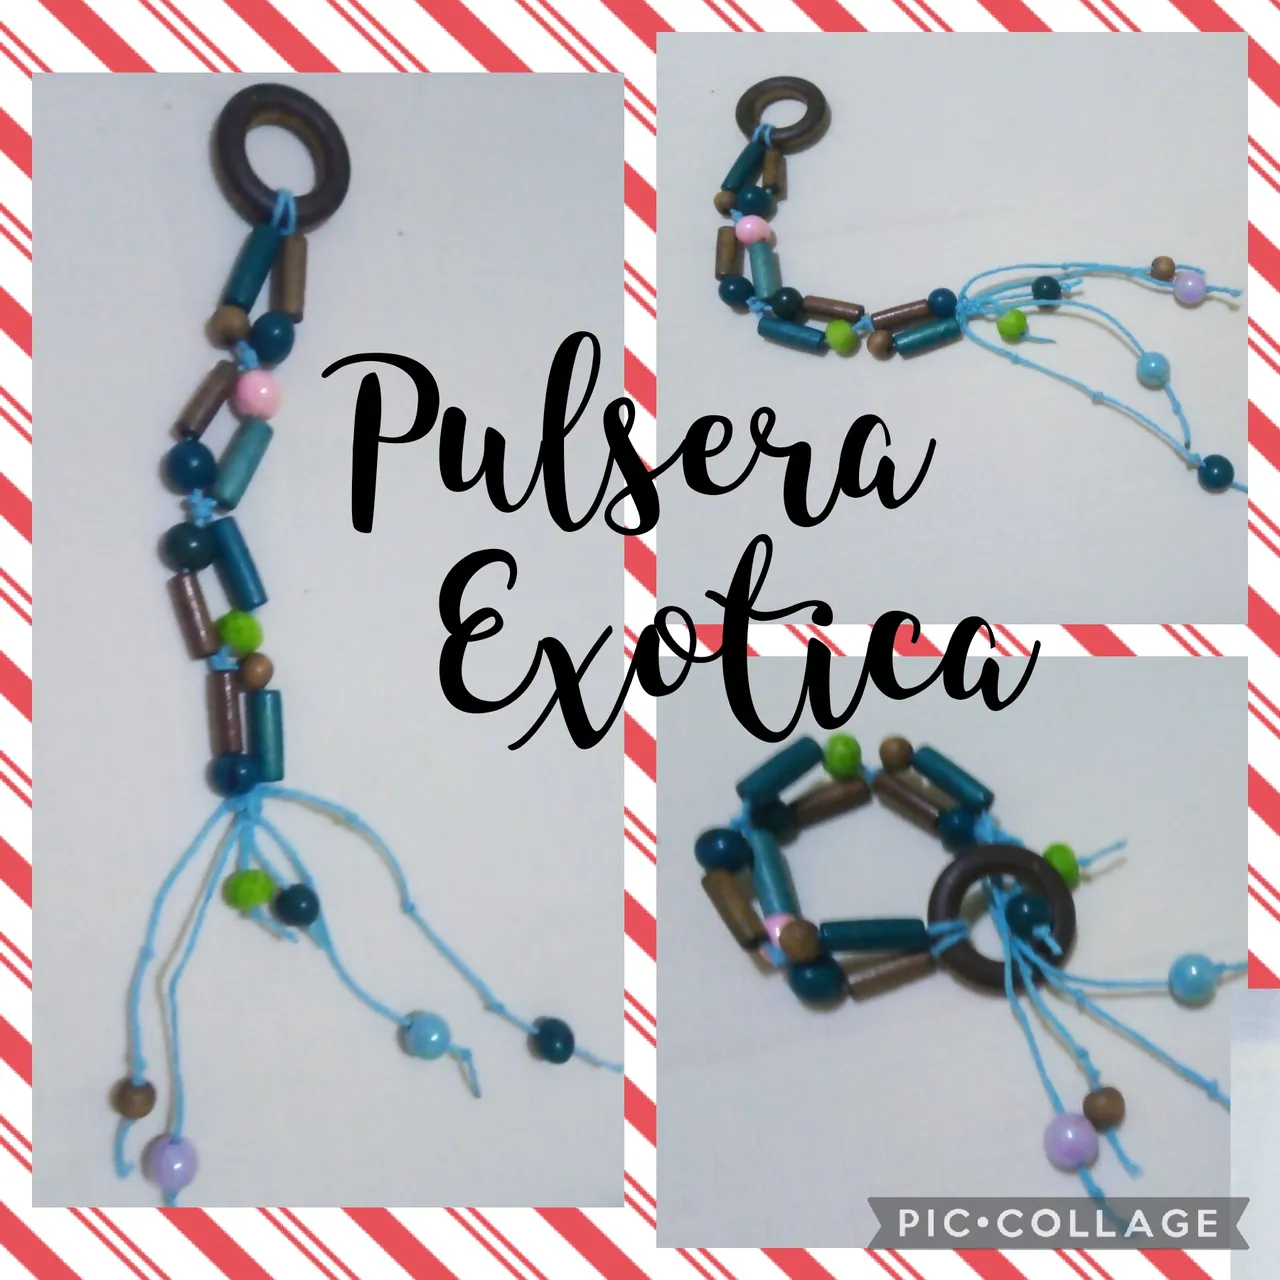
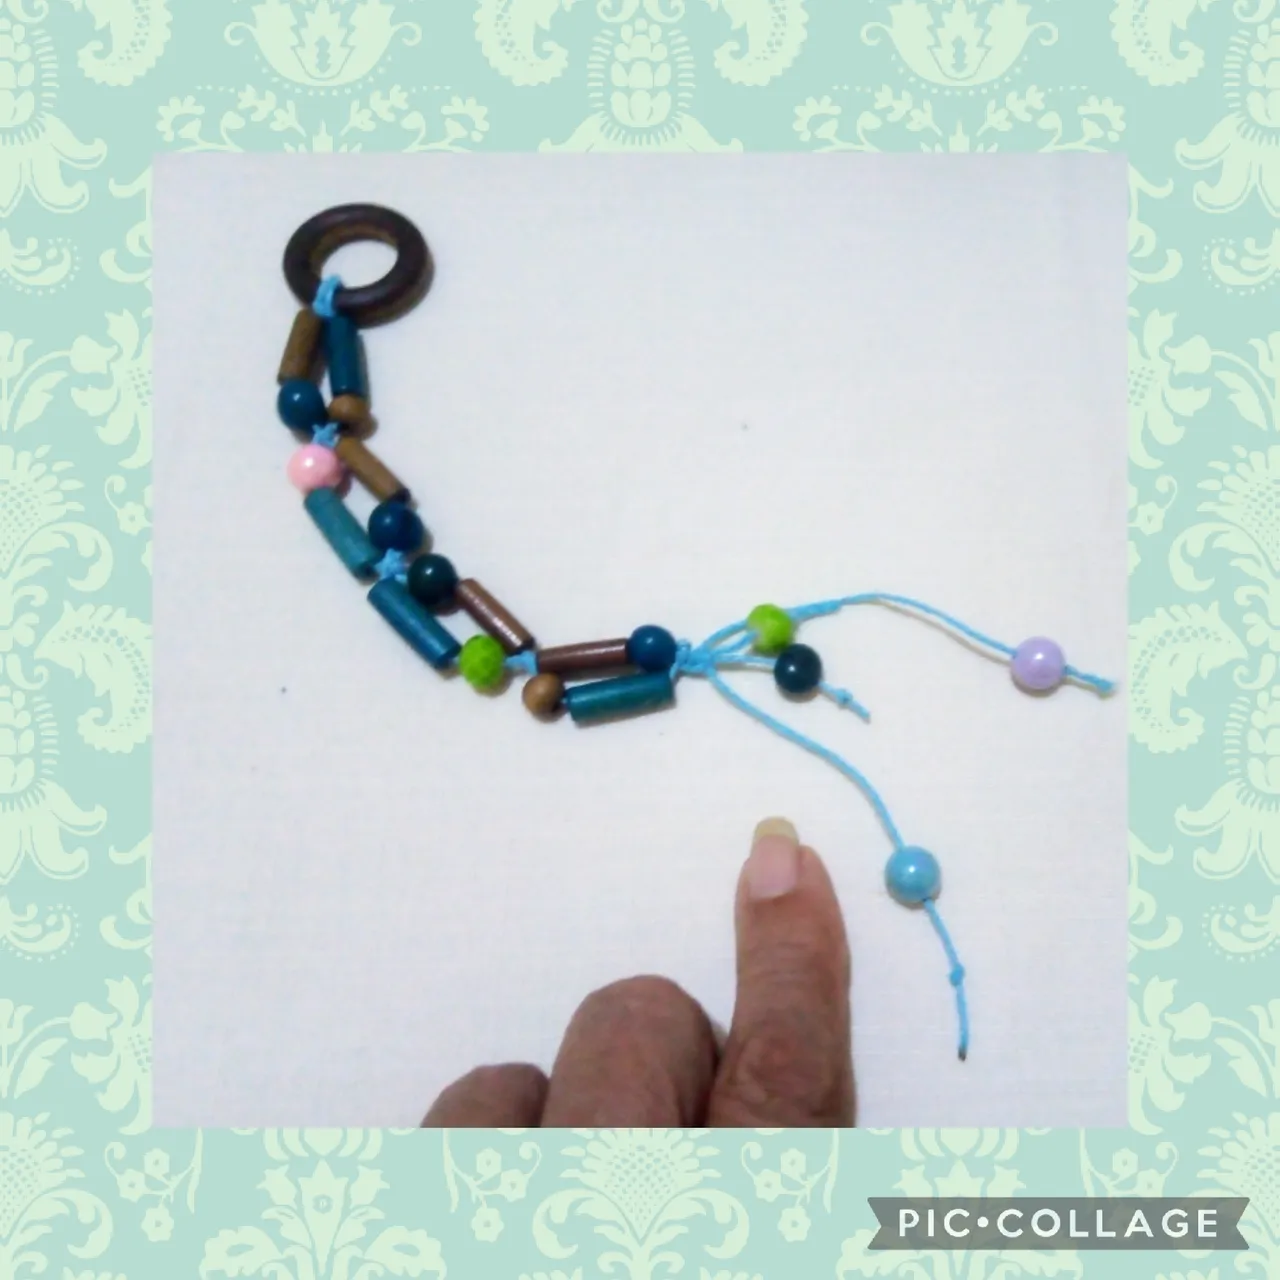
Hoy voy a compartirles Una Exótica Pulsera, es un poco diferente de las demás por el tipo de cierre que le puse una argolla de madera que es poco común.
Aquí voy a dejarles el paso a paso y sigan leyendo para que vean como la hice:
Hello, hello! Greetings Creative Jewelry Artists, how are you, ready to enjoy the weekend? I hope so, you have to start preparing because there are only eighty-five days left to celebrate Christmas; Despite the rains and the disastrous weather that we have had, the atmosphere is quite joyful and the people have a lot of fun doing their pre-Christmas shopping.
I tell you that I felt very moved by the valuable comments that my pendant and the bracelet with the theme "Treble Clef" that I made for my niece received, and I mean it very seriously, those comments are like a food that It fills and flatters me when I see how my publications receive such praise from great Creatives how you are; thank you thank you very much.
My niece was also quite pleased with the detail, because she told me that besides being original she loved the design and as I say for all that I... happy.
Today I am going to share with you An Exotic Bracelet, it is a little different from the others because of the type of closure that I put on it, a wooden ring that is unusual.
Here I am going to leave you the step by step and continue reading so you can see how I did it:
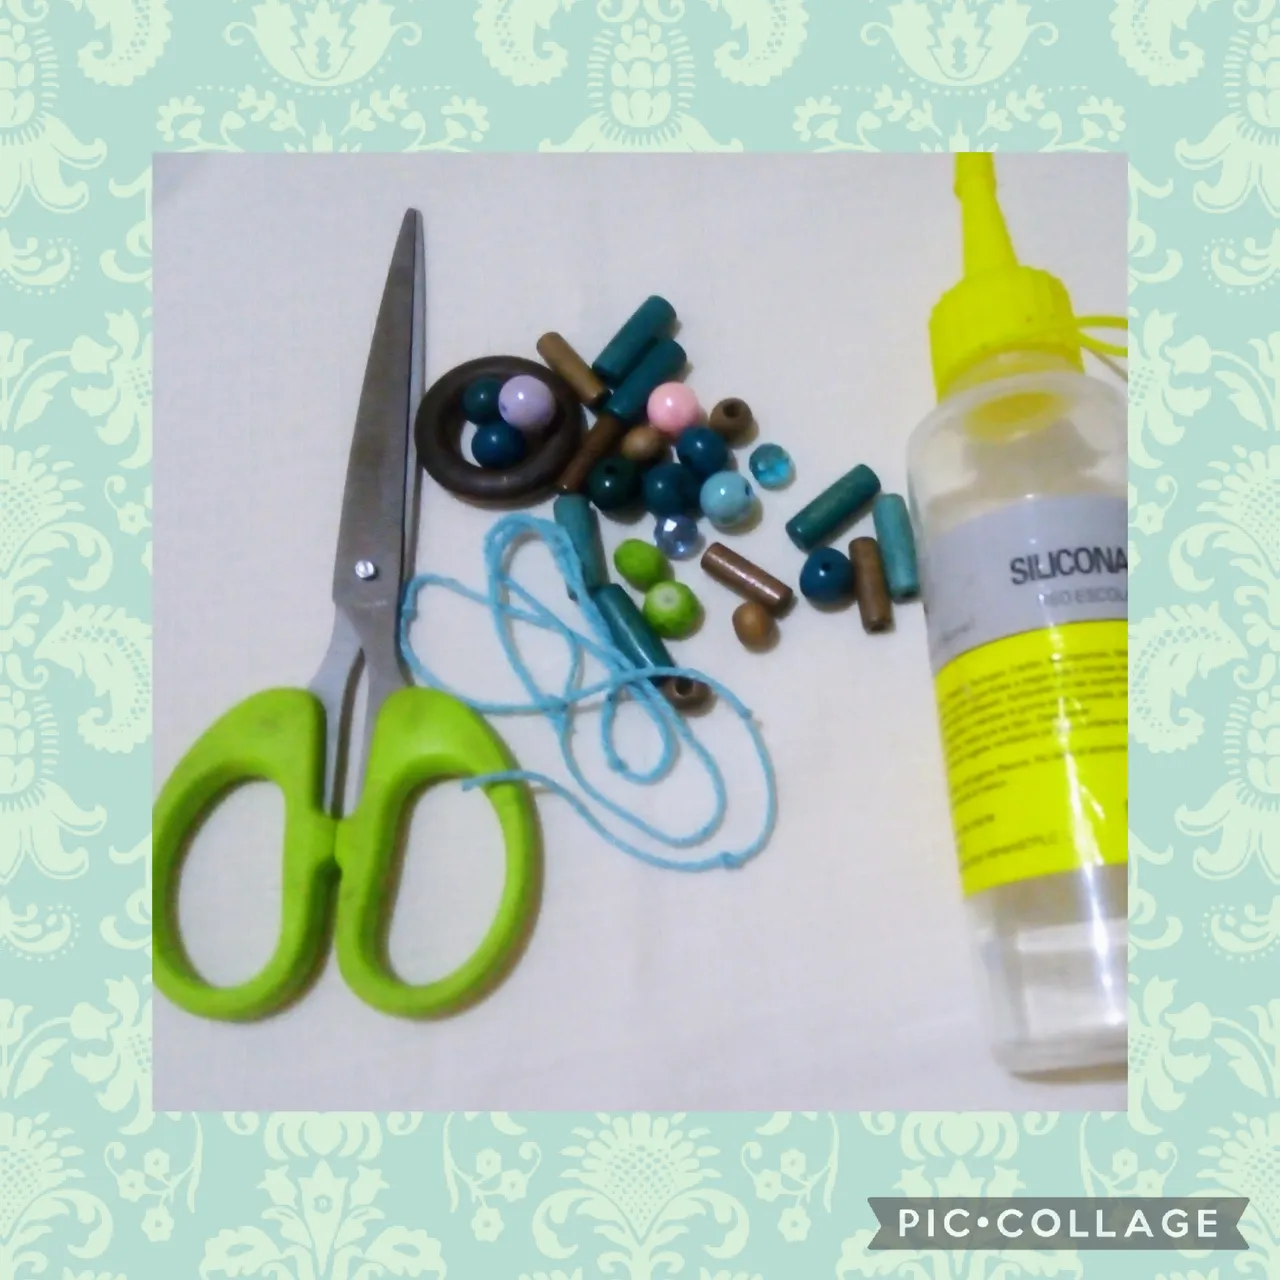
Para realizar esta Exótica Pulsera, usé estos materiales:
-Una argolla de madera.
-Medio metro de cordón
turquesa encerado.
-Cuatro piezas cilindricas
de madera color turquesa.
-Cuatro piezas cilindricas
de madera color marrón.
-Seis cuentas redondas de
madera color turquesa .
-Tres cuentas de madera
color marrón.
-Una cuenta de cerámica
abrillantada color rosa.
-Dos cuentas redondas
color verde citrico
-Una cuenta de cerámica
abrillantada azul cielo.
-Una cuenta de cerámica
abrillantada color lila.
-Tijeras.
-Silicón frío
To make this Exotic Bracelet, I used these materials:
-A wooden ring.
-Half meter of cord
waxed turquoise.
-Four cylindrical pieces
turquoise wood.
-Four cylindrical pieces
brown wood.
-Six round beads
turquoise wood.
-Three wooden beads
Brown color.
-A ceramic bead
polished pink.
-Two round beads
citrus green color
-A ceramic bead
sky blue gloss.
-A ceramic bead
lilac polished.
-Scissors.
-Cold sylicon.
Para la elaboración de la Pulsera usé estos sencillos y pocos pasos:
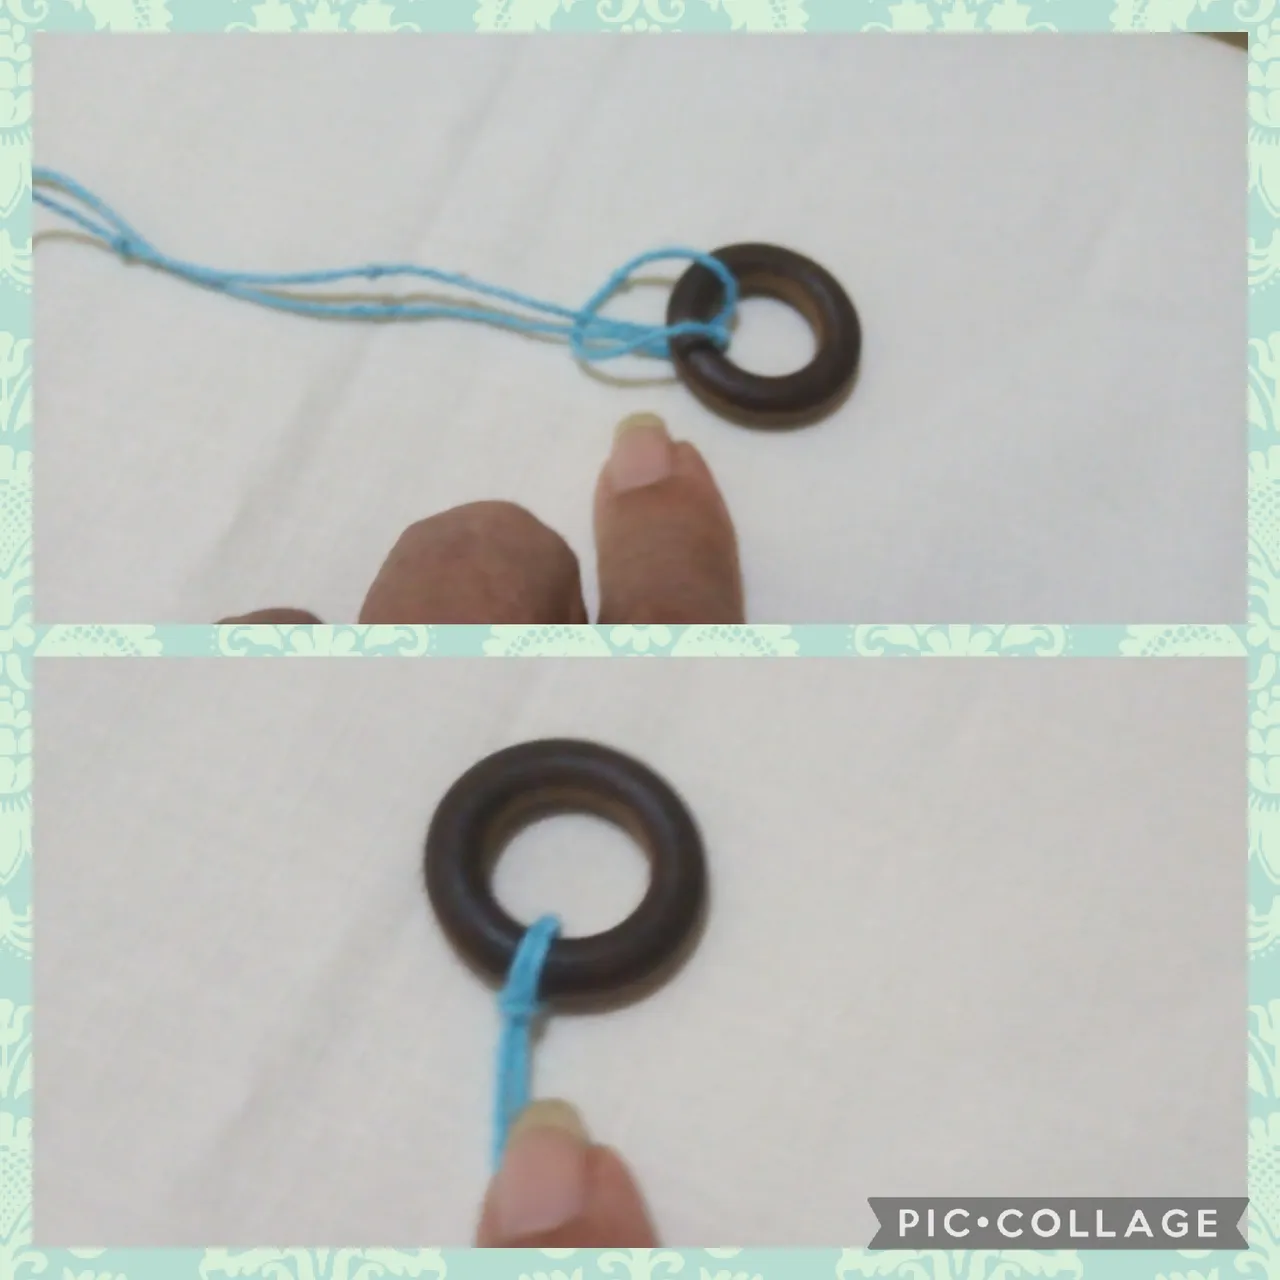
PRIMER PASO: empezamos tomando el cordón turquesa y lo doblamos a la mitad, luego colocamos la argolla de madera encima del cordón, hacemos una especie de lazada y lo fijamos a la argolla como en las fotos.
For the elaboration of the Bracelet I used these simple and few steps:
FIRST STEP: we start by taking the turquoise cord and folding it in half, then we place the wooden ring on top of the cord, make a kind of loop and fix it to the ring as in the photos.
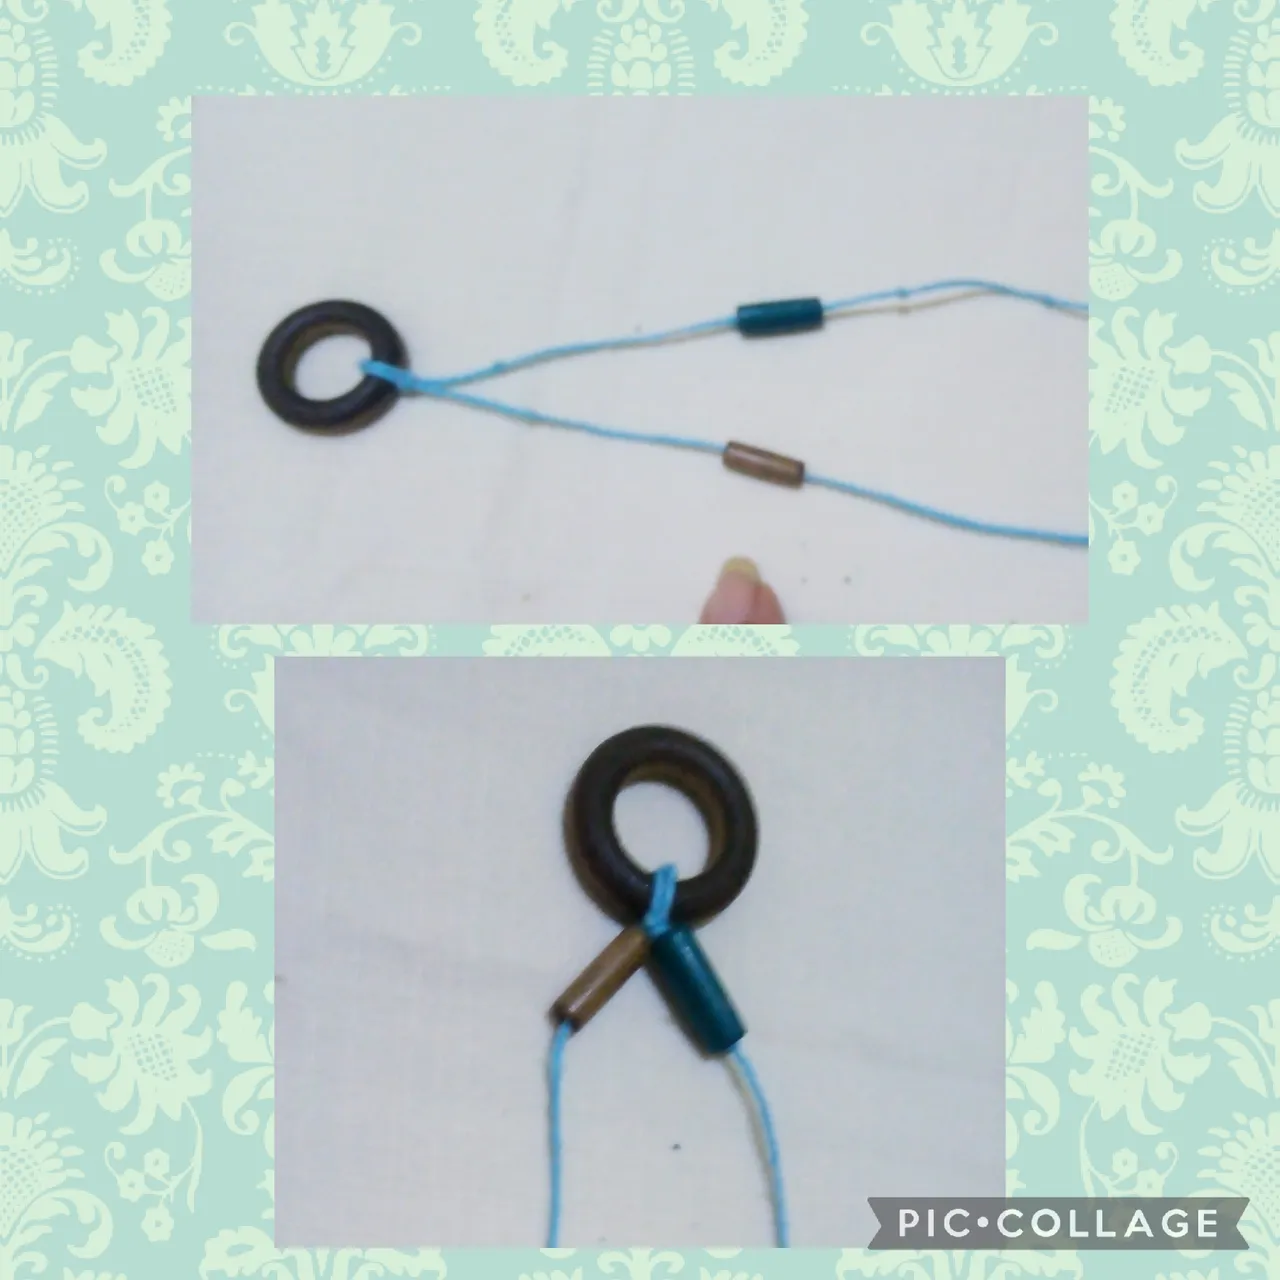
SEGUNDO PASO: vamos a tomar ahora una pieza cilindrica de madera color turquesa y una pieza cilindrica color marrón y las vamos a introducir por cada punta del cordon hasta llegar a la argolla, después coloco una cuenta redonda turquesa y una cuenta de color marrón y hago un nudo simple para formar un módulo de los 4 con que voy a formar la pulsera. (ver fotos,)
SECOND STEP: We are now going to take a cylindrical piece of turquoise wood and a cylindrical piece of brown wood and we are going to insert them through each end of the cord until we reach the ring, then I place a round turquoise bead and a brown bead and make a simple knot to form a module of the 4 with which I am going to form the bracelet. (to see photos,)
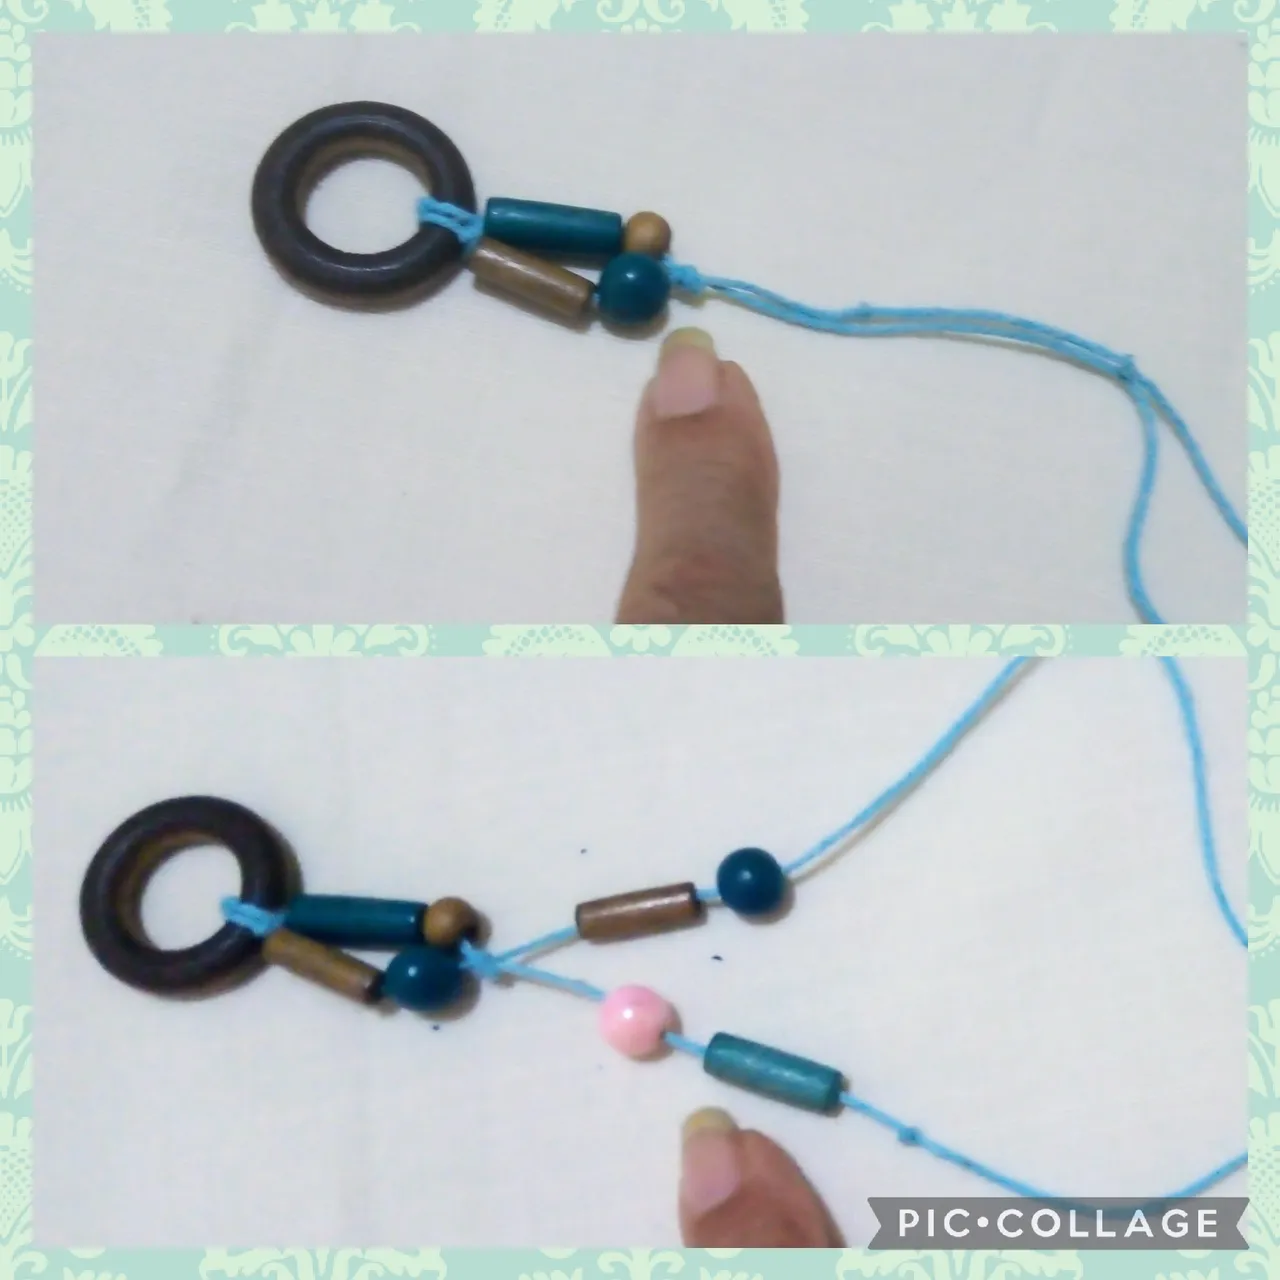
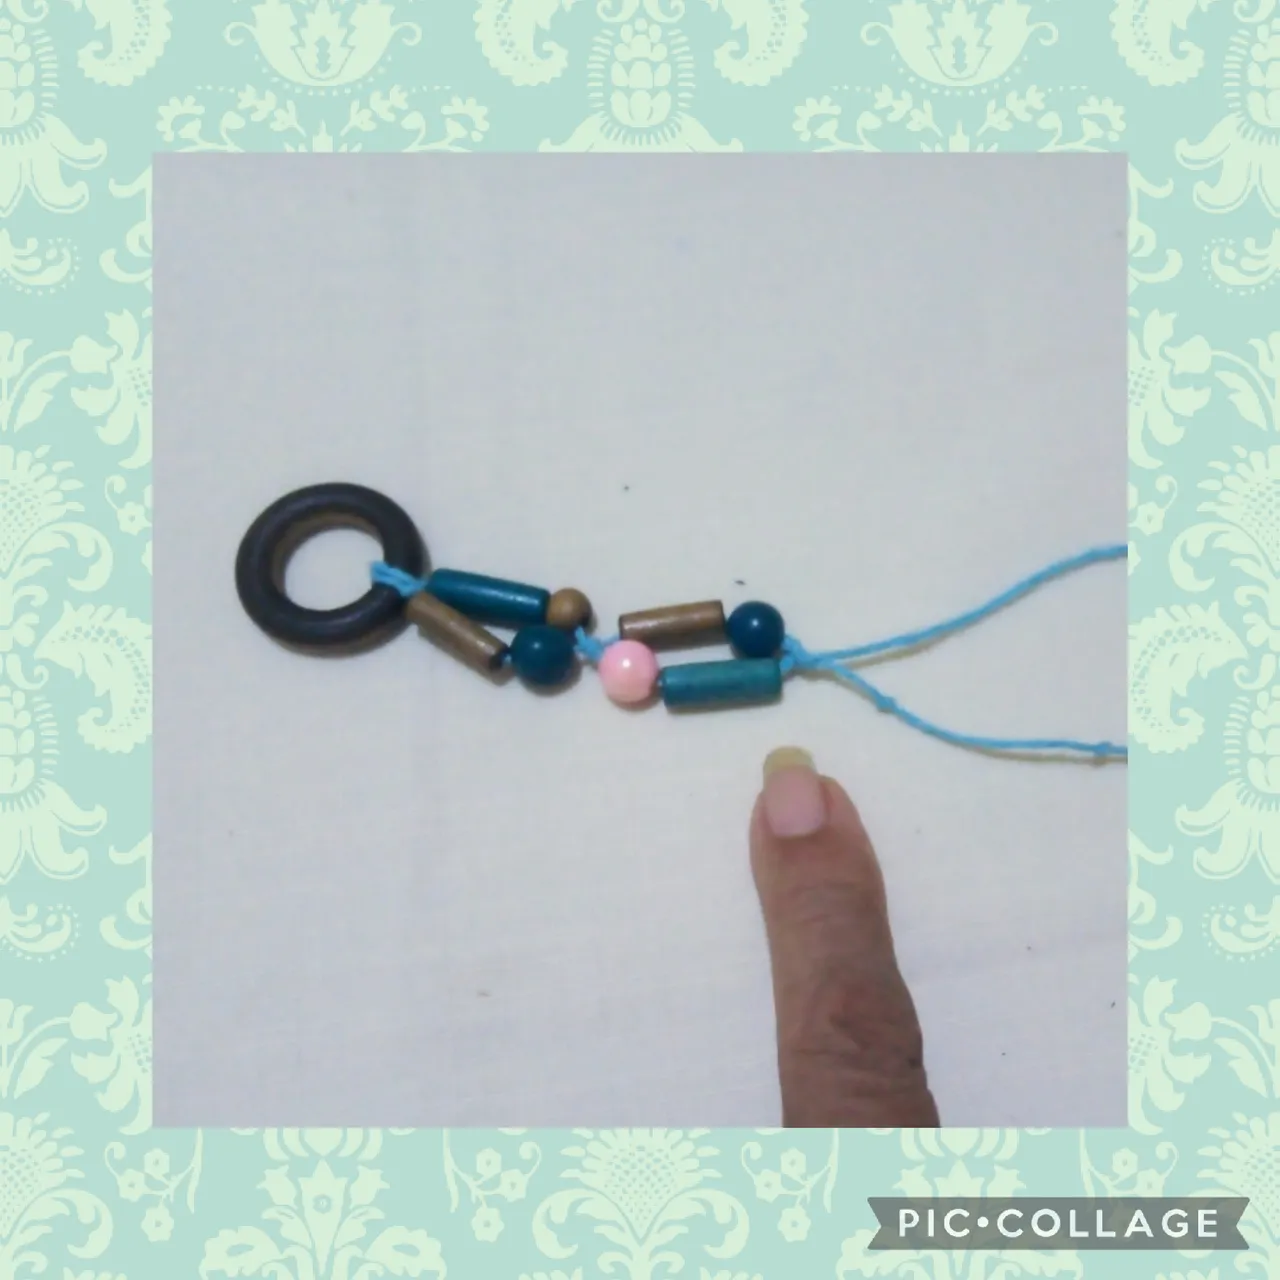
TERCER PASO: ahora en este paso introduzco por uno de los cordones una pieza cilindrica marrón y una cuenta redonda turquesa, y por el otro cordón una cuenta abrillantada rosa y una pieza cilindrica color turquesa, con otro nudo simple realizó el segundo modulo (ver fotos)
THIRD STEP: now in this step I introduce a brown cylindrical piece and a turquoise round bead through one of the cords, and through the other cord a polished pink bead and a turquoise cylindrical piece, with another simple knot I made the second module (see photos )
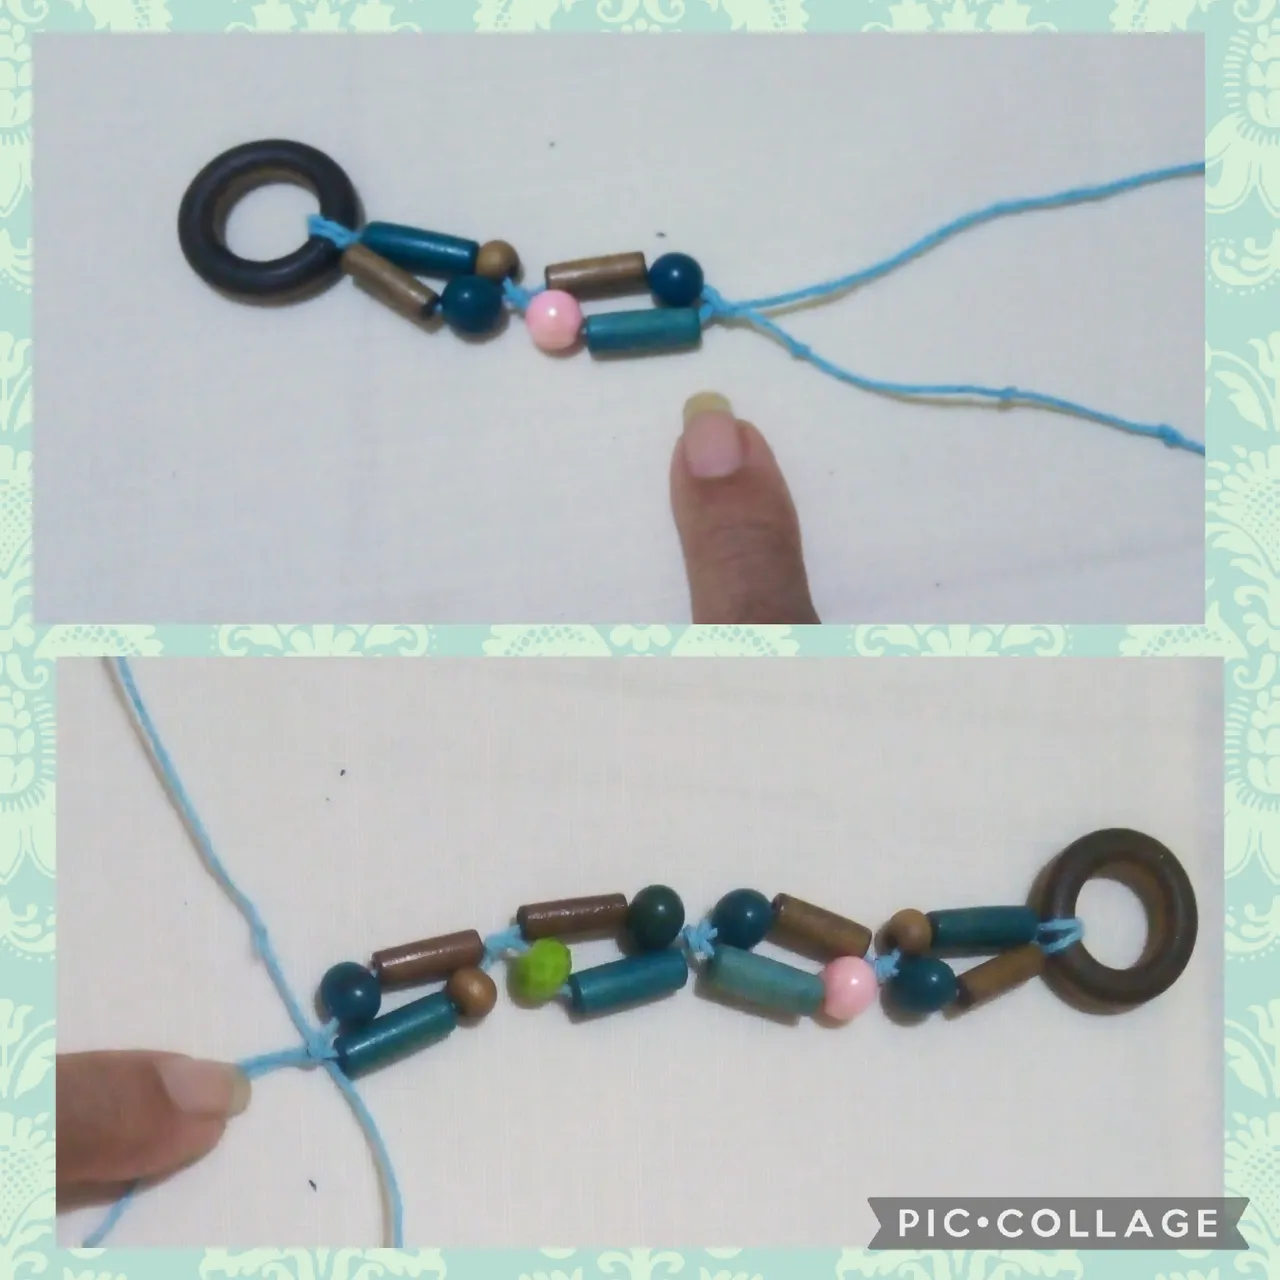
CUARTO PASO: ahora en uno de los lados introduzco una pieza redonda turquesa y una pieza cilindrica de color marrón, del otro lado coloco una pieza cilindrica color turquesa y una cuenta abrillantada verde citrico, hago un nudo simple y continúo con el último modulo. Aquí coloco primero la cuenta redonda de madera y luego la pieza cilindrica turquesa, del otro lado la pieza cilindrica de color marrón y la cuenta redonda turquesa hago el nudo simple como se ve en las fotos y están listos todos los módulos que llevará la pulsera.
STEP FOUR: now on one side I insert a round turquoise piece and a cylindrical brown piece, on the other side I place a cylindrical turquoise piece and a polished citrus green bead, I make a simple knot and continue with the last module. Here I place first the round wooden bead and then the turquoise cylindrical piece, on the other side the brown cylindrical piece and the turquoise round bead I make the simple knot as seen in the photos and all the modules that the bracelet will have are ready.
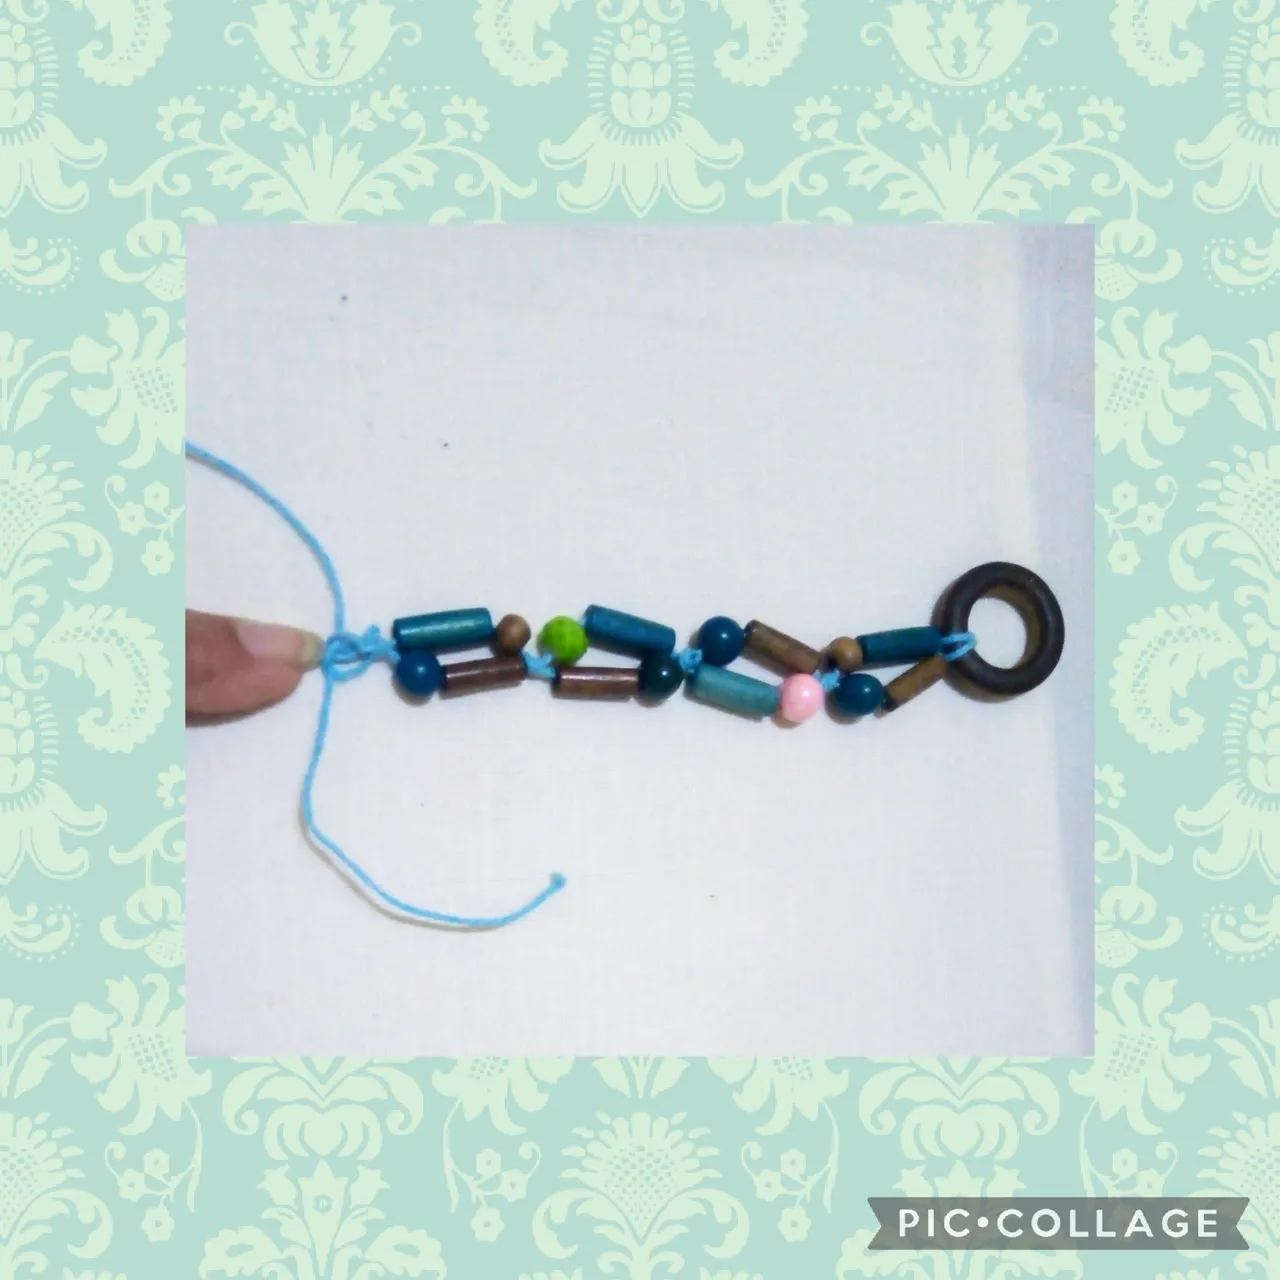
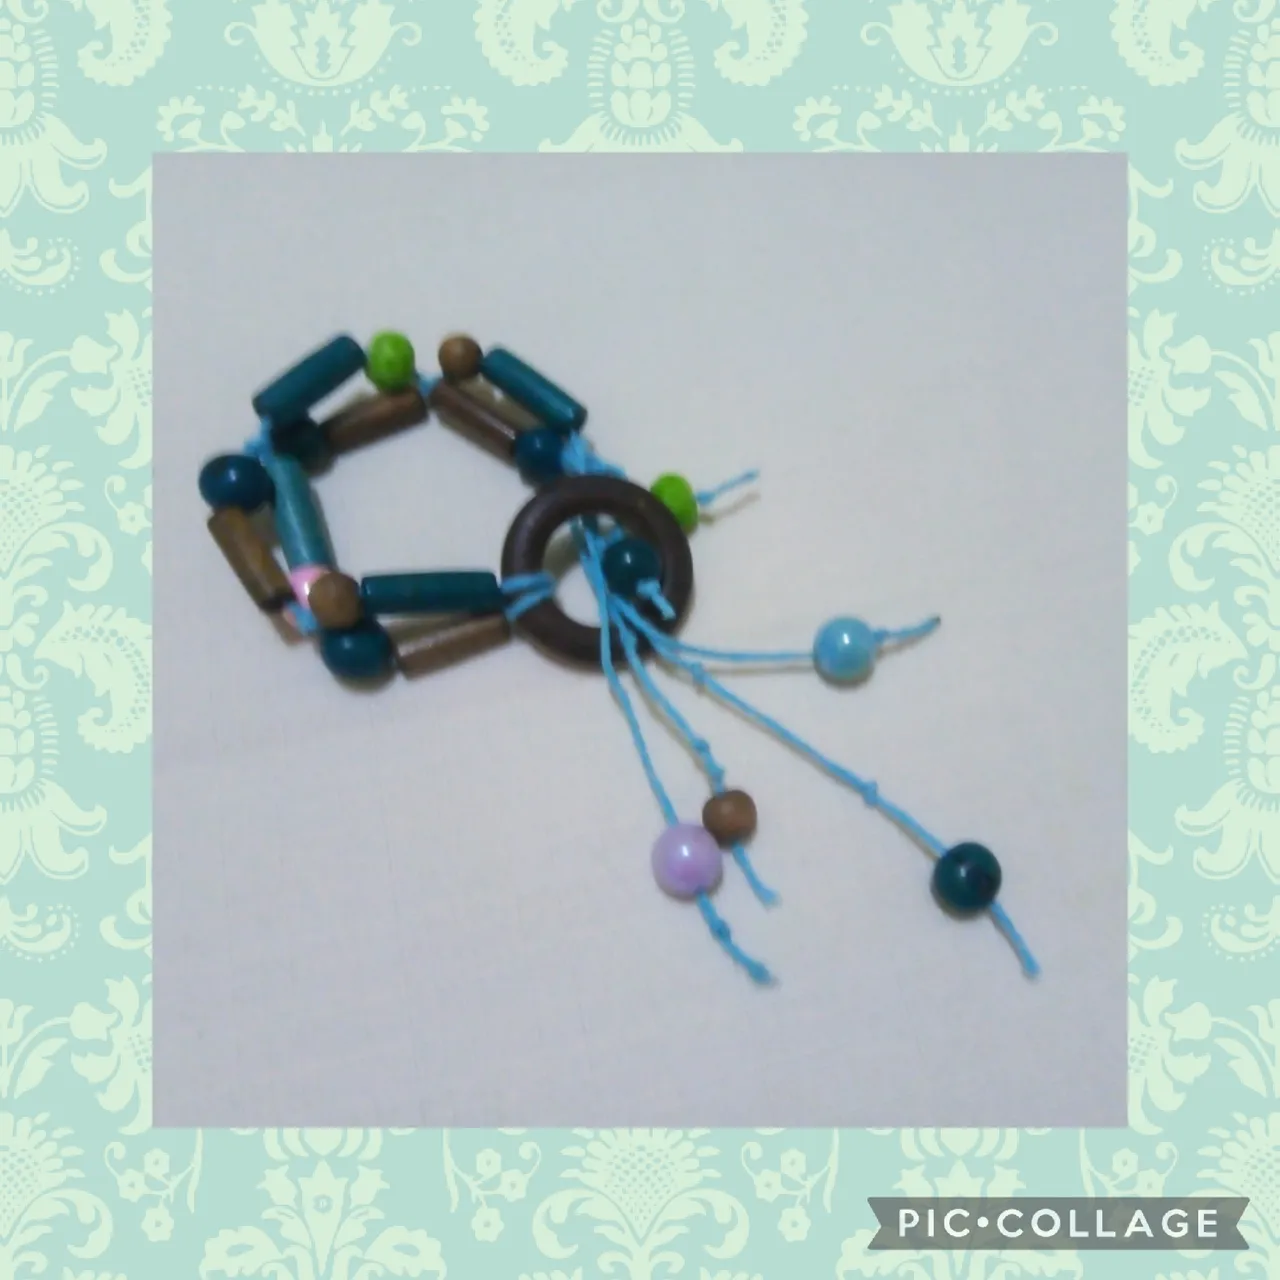
QUINTO PASO: cuando hago el último módulo, del hilo encerado turquesa corto un pedazo de diez centímetros lo pongo como se ve en las fotos debajo de los cordones del final y realizó cuatro nudos planos que fijo con una gota de silicón, sin cortar los cordones sobrantes dejo unos más largos que otros para que se vea más sofisticada la pieza.
Ya para terminar coloco al final de cada cordón una piedra redonda turquesa, una color marrón, una verde acrílica y una azul cielo y así queda lista la pulsera.
FIFTH STEP: when I make the last module, I cut a ten centimeter piece from the turquoise waxed thread, I put it as seen in the photos under the final laces and I made four flat knots that I fixed with a drop of silicone, without cutting the laces leftovers I leave some longer than others to make the piece look more sophisticated.
To finish, I place a round turquoise stone, a brown one, an acrylic green one and a sky blue one at the end of each cord and the bracelet is ready.
Artesanos de la joyería, este es el resultado final de mi manualidad creativa de hoy, espero que les guste y me dejen sus comentarios acerca de que les pareció mi Exótica Pulsera, ya mis compañeras decidieron que aprenderán para realizarse ellas mismas sus joyas de bisutería y Yo, encantada de ser una de sus consejeras.
Les reitero mi agradecimiento a todos los que leen y apoyan mis publicaciones. Nos vemos en la próxima manualidad.
Jewelry artisans, this is the final result of my creative craft today, I hope you like it and leave me your comments about what you thought of my Exotic Bracelet, and my colleagues decided that they will learn to make their own jewelry and Me, delighted to be one of your advisers.
I reiterate my thanks to everyone who reads and supports my posts. See you at the next craft.
Las imágenes de este tutorial son de mi propiedad las fotos fueron tomadas con mi celular Motorola E6 y las edite con una aplicación gratis del mismo.
Para traducir texto usé geogle traduuctor.
The images in this tutorial are my property, the photos were taken with my Motorola E6 cell phone and I edited them with a free application of the same.
To translate text I used geogle translator.