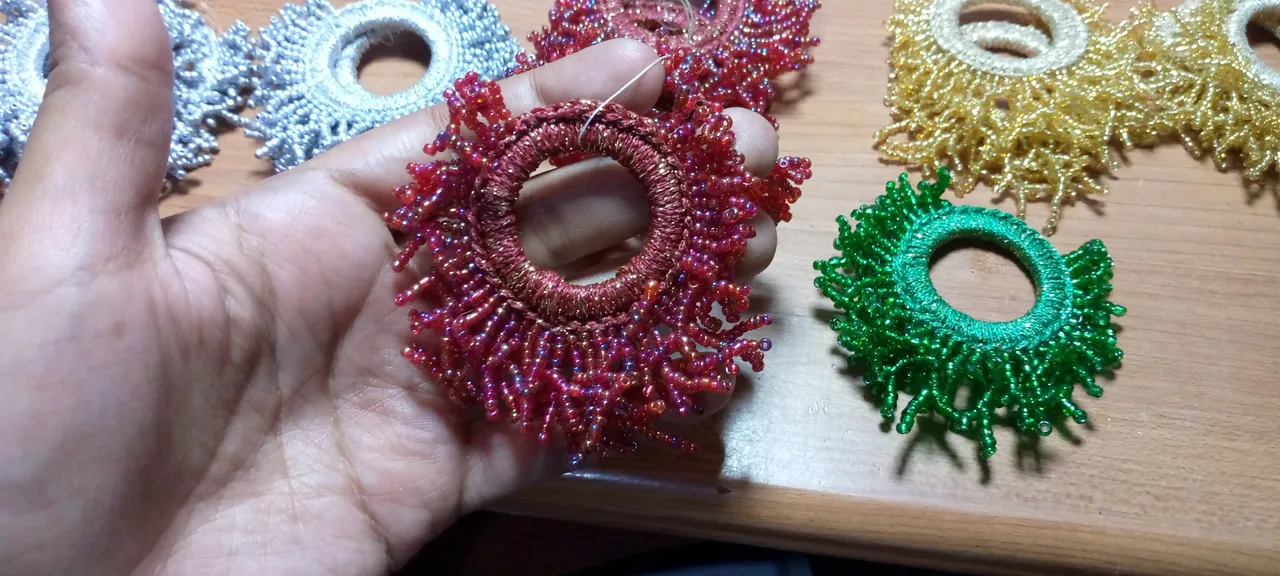
Feliz y bendecido nuevo día ante todo gracias por estar aquí leyendo esto sé que tengo muchos días que no he publicado, siempre los tengo presentes y leo sus publicaciones! Estos meses eh tenido ventas al mayor ya que se acerca diciembre, las tiendas normalmente en estas fechas se surten de mercancía nueva y variada,a veces las horas del día a no alcanzan para hacer tantas cosas, así que trato de centrarme para organizar mejor mi tiempo, aún no logro una organización exitosamente satisfactoria aunque paso a paso lo haré! Puedes ver lo que eh realizado en mi Instagram @Marleyndesigner aunque no e publicado ni la mitad de lo que estoy realizando. Bueno, El día de hoy quiero mostrarles unos zarcillos redondos con unos flecos estilo coral qué me ha pedido una cliente de Colombia son muy bonitos y el resultado final es espectacular se ve diferente, innovador, fresco. Los materiales que vamos a utilizar son accesibles y muy económicos los puedes encontrar en cualquier mercería de tu agrado.
Happy and blessed new day first of all thank you for being here reading this I know I have many days that I have not published, I always keep you in mind and I read your publications! These months I have had wholesale sales as December is approaching, the stores usually at this time are stocked with new and varied merchandise, sometimes the hours of the day are not enough to do so many things, so I try to focus to better organize my time, I still do not achieve a successful organization but step by step I will! You can see what I've done on my Instagram @Marleyndesigner although I haven't published half of what I'm doing. Well, today I want to show you some round tendrils with some coral style bangs that a client from Colombia has asked me for, they are very beautiful and the final result is spectacular, it looks different, innovative, fresh. The materials that we are going to use are accessible and very economical, you can find them in any haberdashery of your liking.
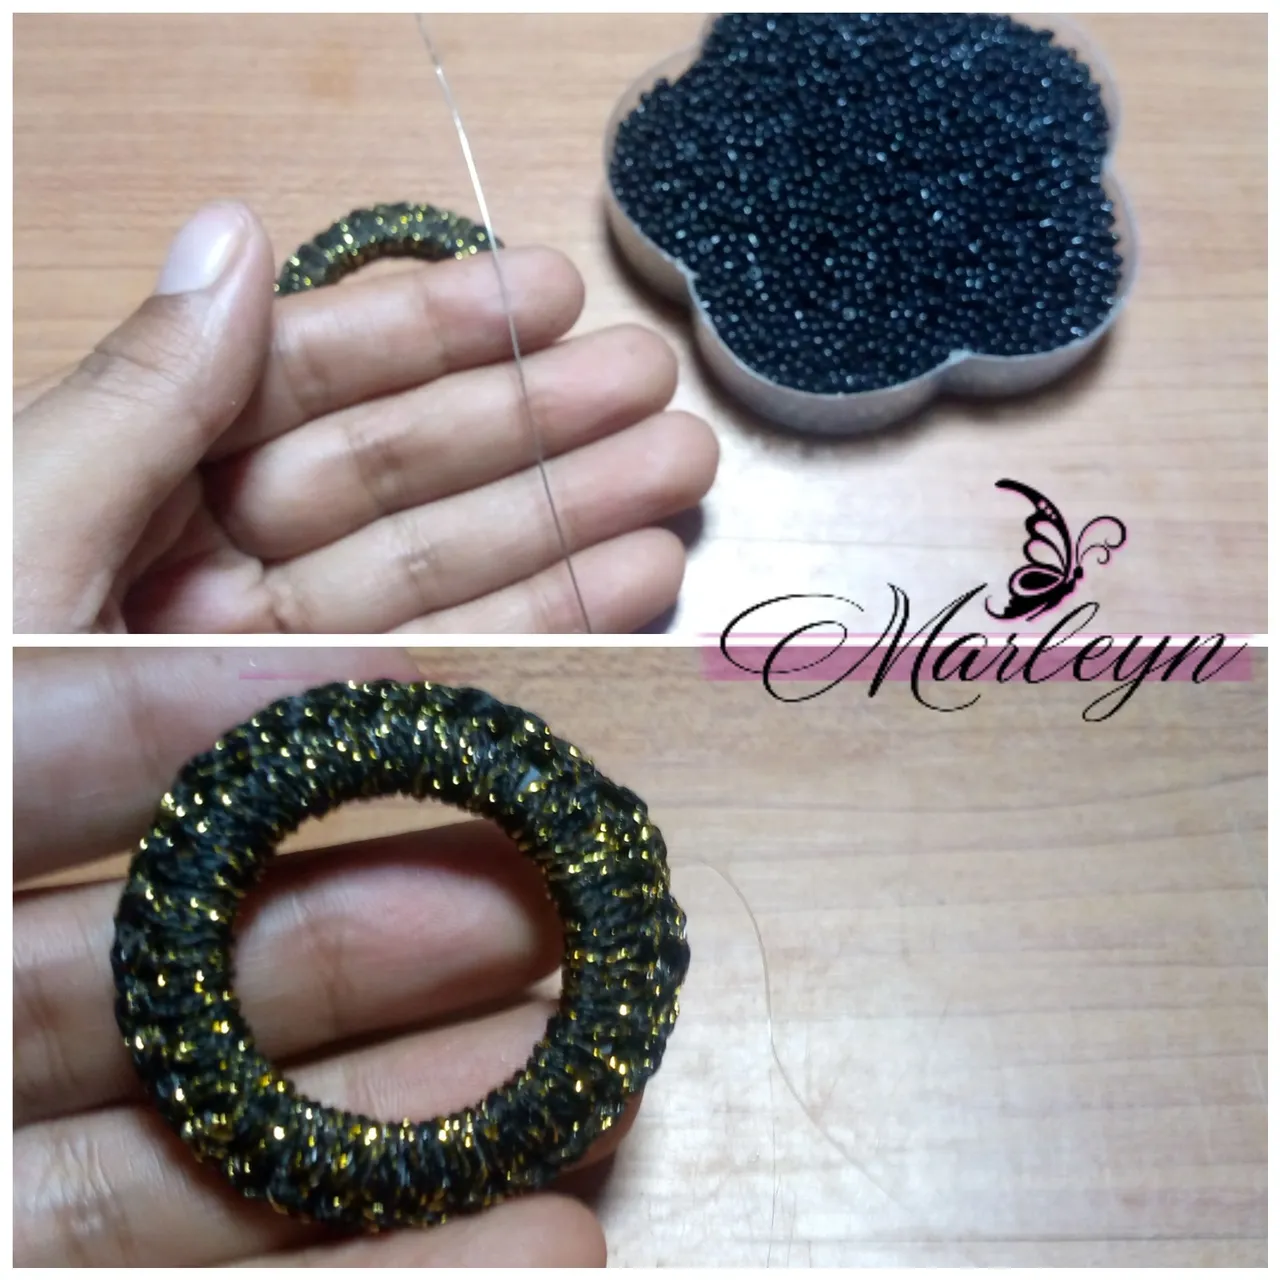
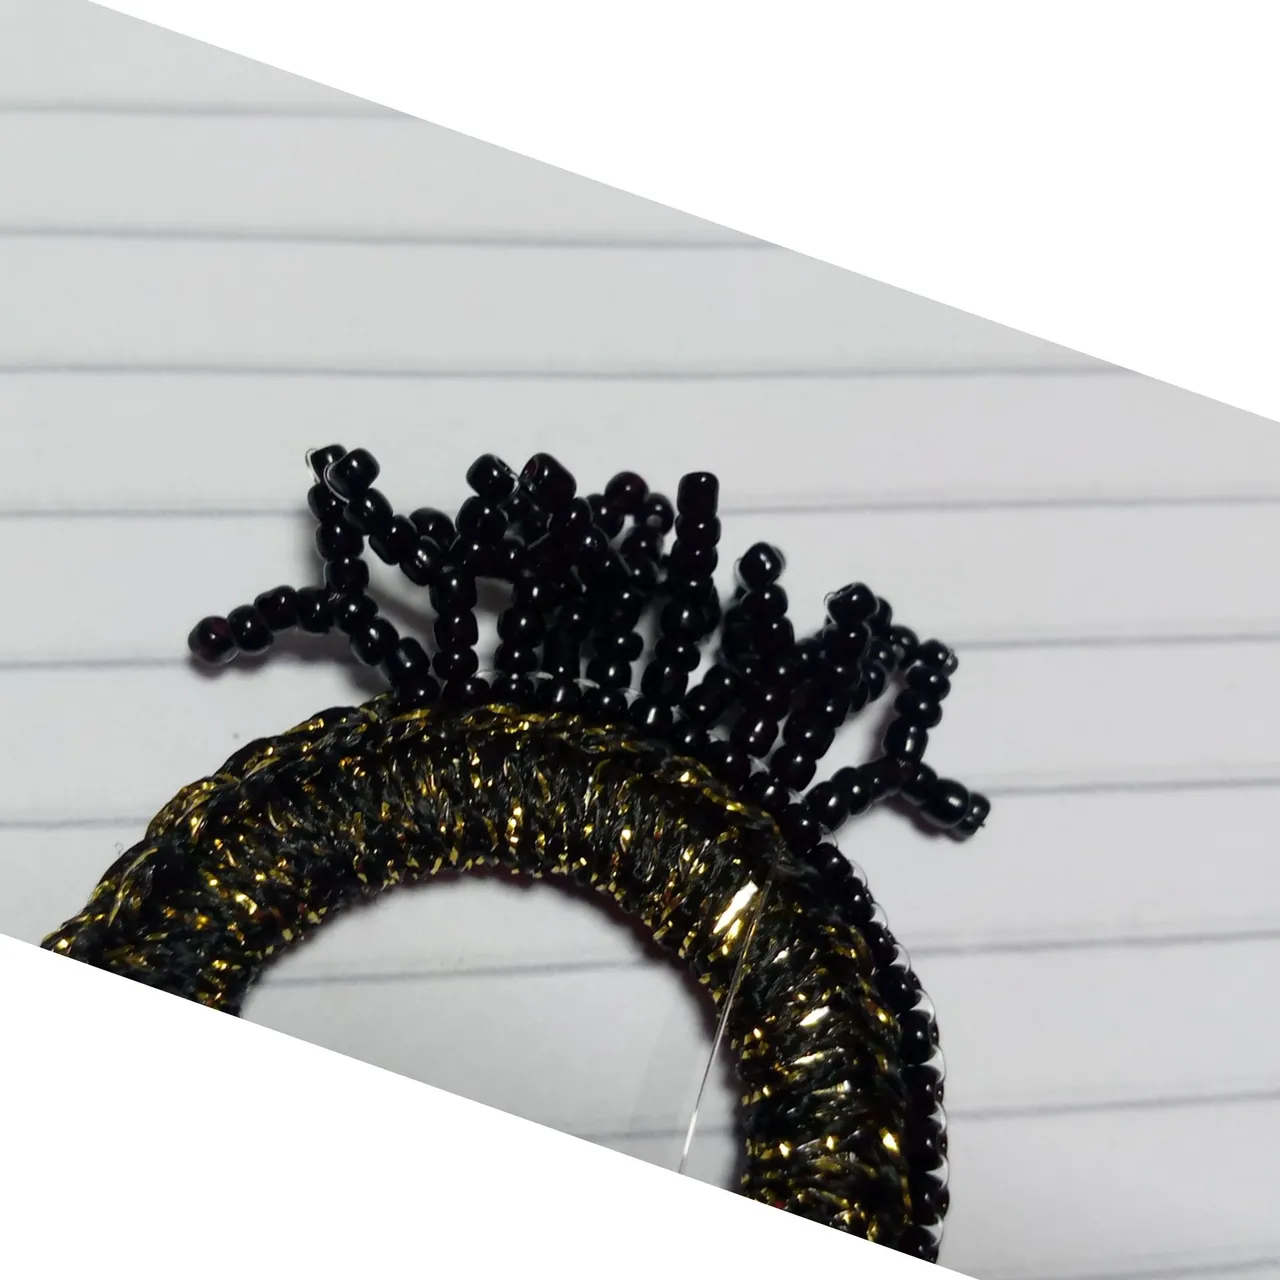
Materiales mostacilla número 11 base para zarcillos ya bordada con crochet aguja para mostacilla larga número 100 hilo nylon número 22 o 20
Materials number 11 stitch base for tendrils already embroidered with crochet needle for long stitch number 100 stitch number 22 or 20 nylon thread
Para comenzar vamos a bordar por toda la linea principal 45 mostacillas con la técnica de ladrillo esta técnica tela explicado en varios tutoriales anteriores es realmente fácil De todas maneras a través de la secuencia de imágenes de la voy a explicando nuevamente, en Santo en nylon en la aguja ahora introducen el nylon en la pieza ya tejida y hazle un nudo para que no se suelte vamos a sacar la aguja por la parte superior agrega 2 mostacillas a la aguja e introducción nuevamente en la aguja hacia abajo, ahora saca la aguja nuevamente hacia arriba entrando por la segunda mostacilla.
To begin we are going to embroider all along the main line 45 beads with the brick technique this technique fabric explained in several previous tutorials is really easy Anyway through the sequence of images I will explain it again, in Santo in nylon on the needle now introduce the nylon in the already woven piece and make a knot so that it does not come loose we are going to remove the needle at the top add 2 beads to the needle and introduction again in the needle down, now remove the needle again upwards entering the second bead.
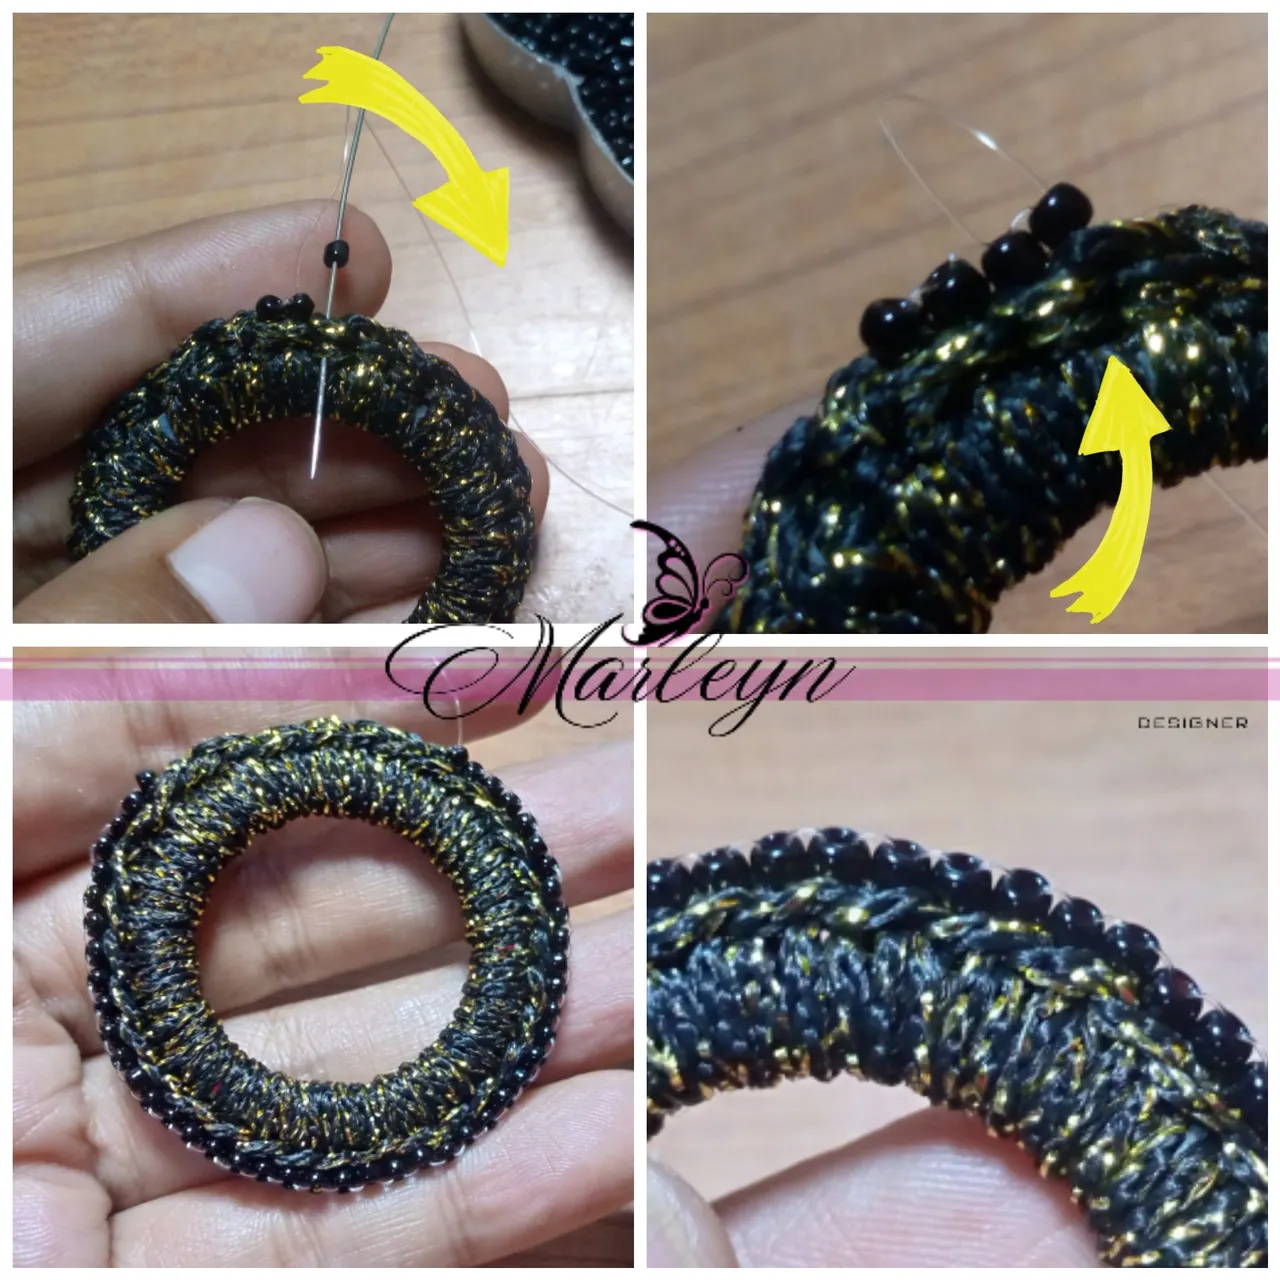
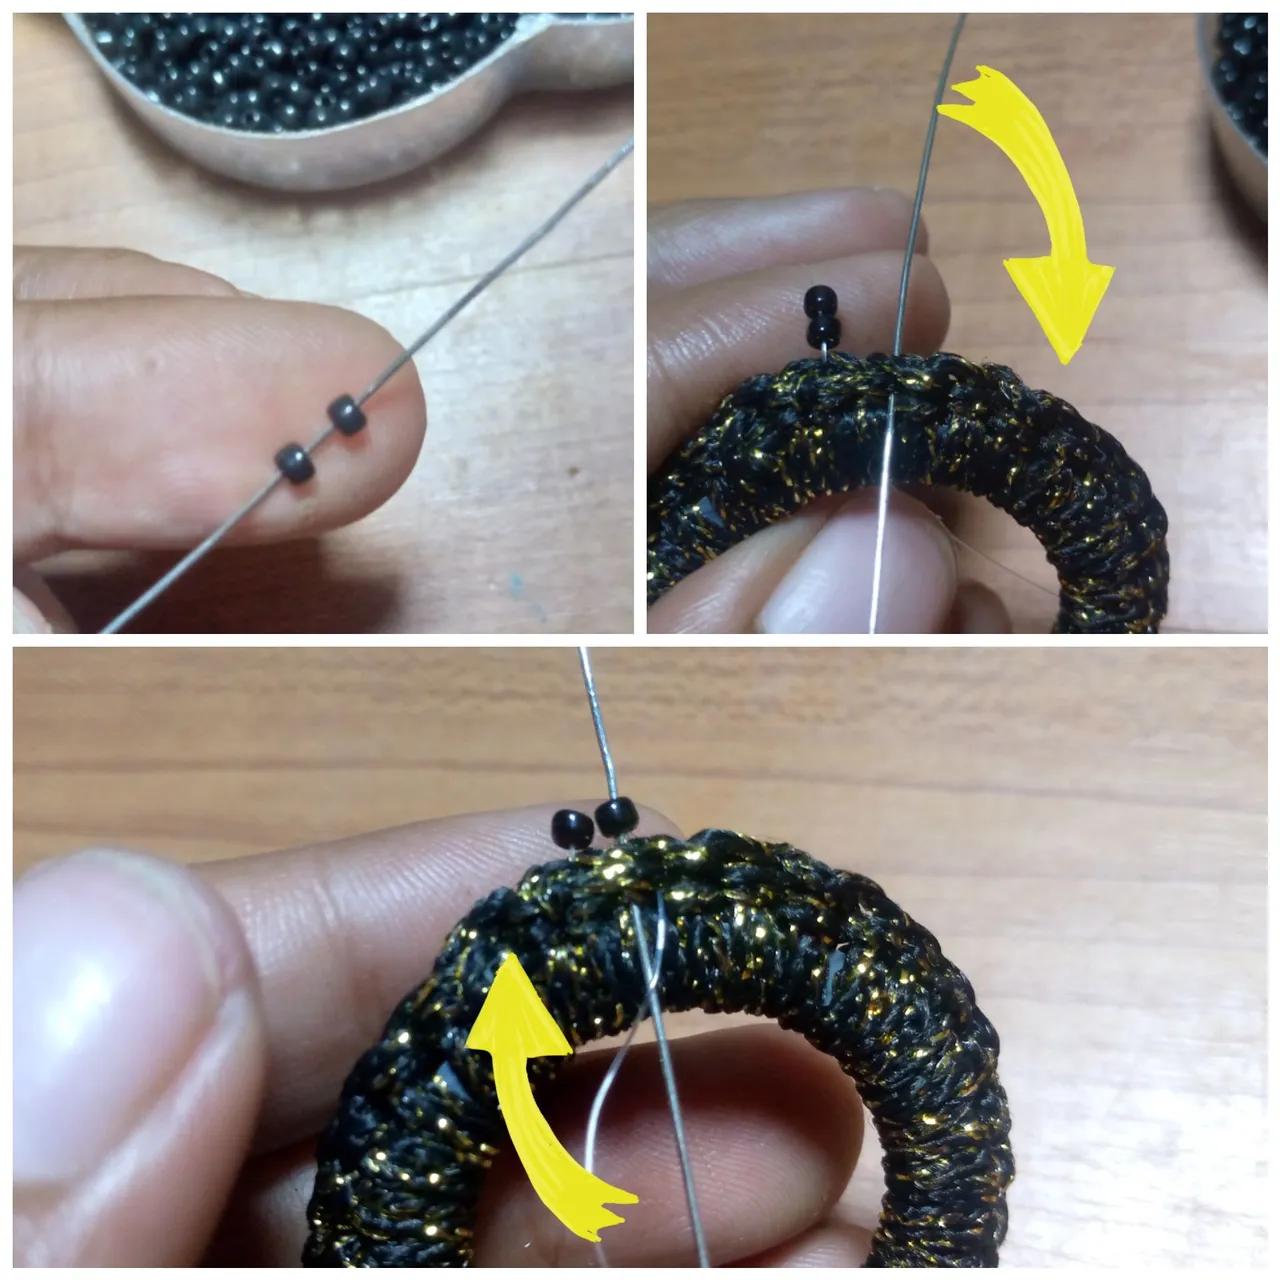
Vamos a repetir el proceso anterior esta vez con una de una mostacilla en una mostacilla, introduce una mostacilla en la aguja ahora pasamos la aguja hacia abajo por la pieza, ahora toma la aguja y subirla nuevamente, haciendo que atraviese la pieza bordada y salga por la mostacilla que acabamos de colocar continuar este proceso hasta completar las 45 mostacillas dependerá de la cantidad de flecos que tú le quieras colocar para esta pieza es recomendable entre 45 a 40 algo que se me había olvidado acotar mi pieza mide 3.5 cm de diámetro Lo importante es que tengamos suficiente mostacillas para que el fleco cubra prácticamente toda la pieza.
We are going to repeat the previous process this time with one of a bead in a bead, introduce a bead in the needle now we pass the needle down the piece, now take the needle and raise it again, making it go through the embroidered piece and out through the bead that we just placed continue this process until completing the 45 beads will depend on the amount of fringe that you want to place for this piece is recommended between 45 to 40 something that I had forgotten to note my piece measures 3. The important thing is that we have enough beads so that the fringe covers almost the entire piece.

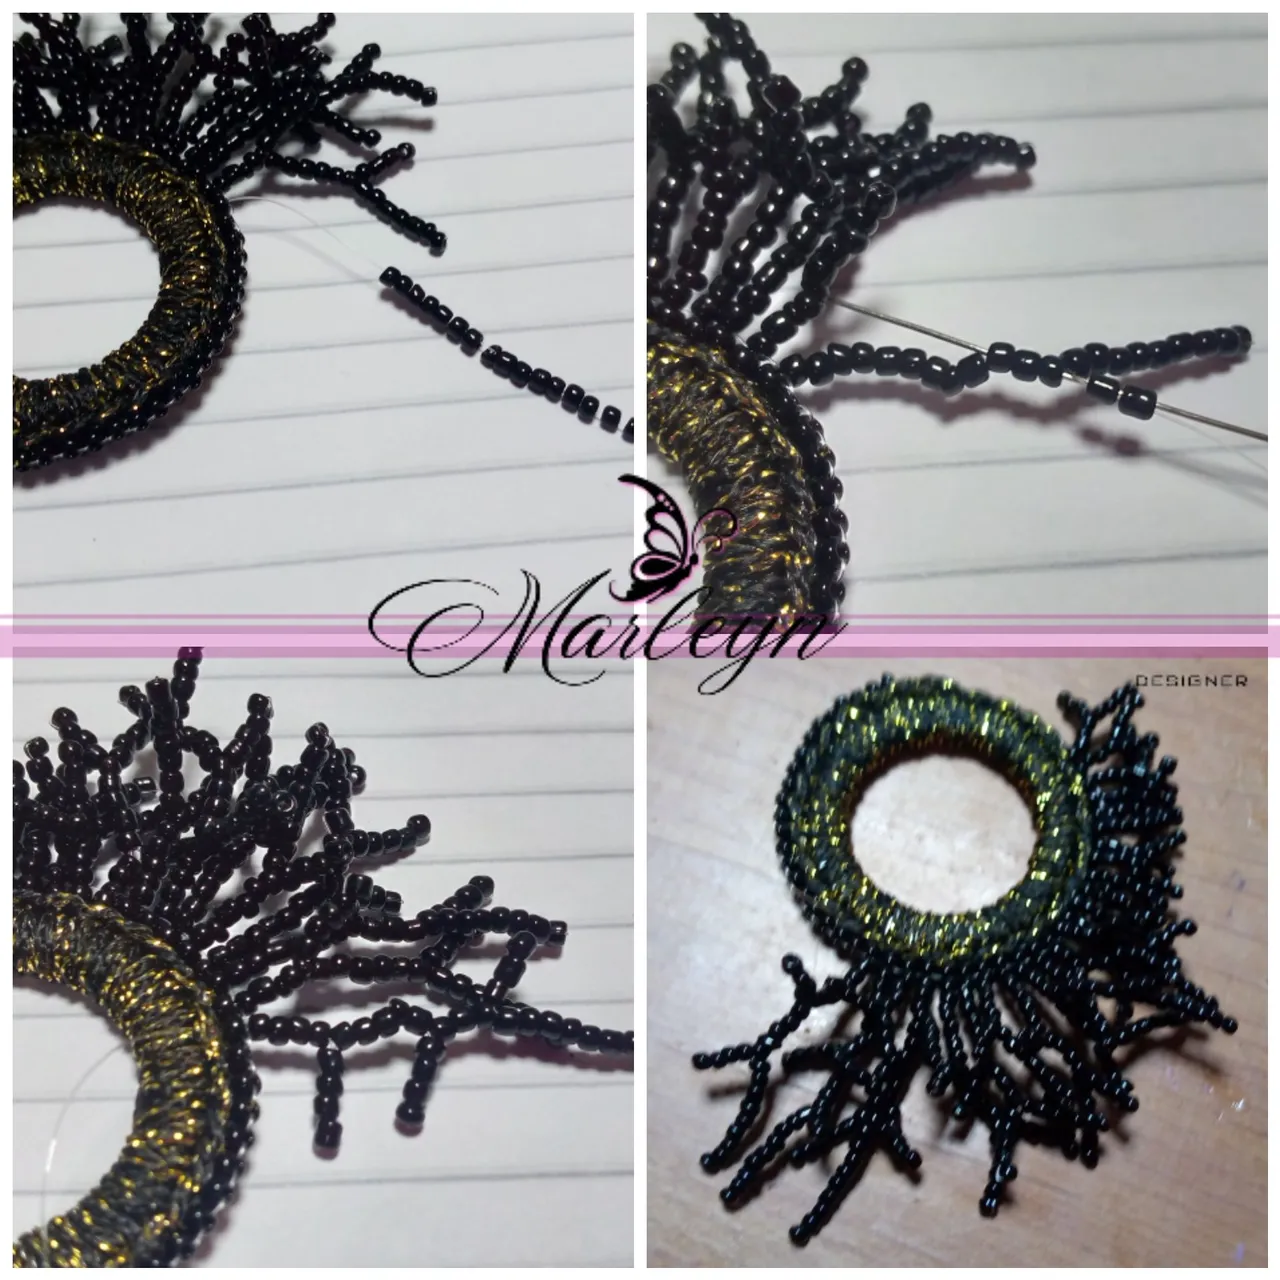
Al terminar de abordar todas las mostacillas por el alrededor de la pieza, vamos a comenzar a colocar los flecos las primeras de 9 a 10 mostacillas yo coloque flecos pequeños de solamente 7 mostacillas cada fleco con una variante de 3 mostacillas de un ladito de manera que se vea como un coral, está este efecto lo logramos de una manera muy fácil te explico introducción a 7 mostacillas en la aguja ahora bajas dejando una mostacilla por fuera, te vas a devolver por las mismas mostacillas hasta llegar a la mostacilla 4 sacan la aguja por un lado, debemos halar el hilo para que quede prensado ahora introducimos nuevamente 3 mostacillas en la aguja y la regresamos con el mismo proceso dejando una mostacilla por fuera a las mostacillas centrales de todas maneras se puede ver en las imágenes arriba. Realiza este proceso hasta completar las 9 o 10 flecos según el ancho que quieras de tu pieza.
When we finish to approach all the beads around the piece, we will begin to place the bangs the first 9 to 10 beads I placed small bangs of only 7 beads each fringe with a variant of 3 beads on one side so that it looks like a coral, this effect is achieved in a very easy way I explain you introduction to 7 beads on the needle now down leaving a bead on the outside, you are going to return by the same beads until you reach the bead 4 take out the needle on one side, we must pull the thread so that it is pressed now we introduce again 3 beads on the needle and return it with the same process leaving a bead on the outside to the central beads anyway you can see in the pictures above. Do this process until completing the 9 or 10 bangs depending on the width you want your piece to be.
De esta manera saber mi pieza con los diez primeros flecos ya terminados.
This way I know my piece with the first ten bangs already finished.
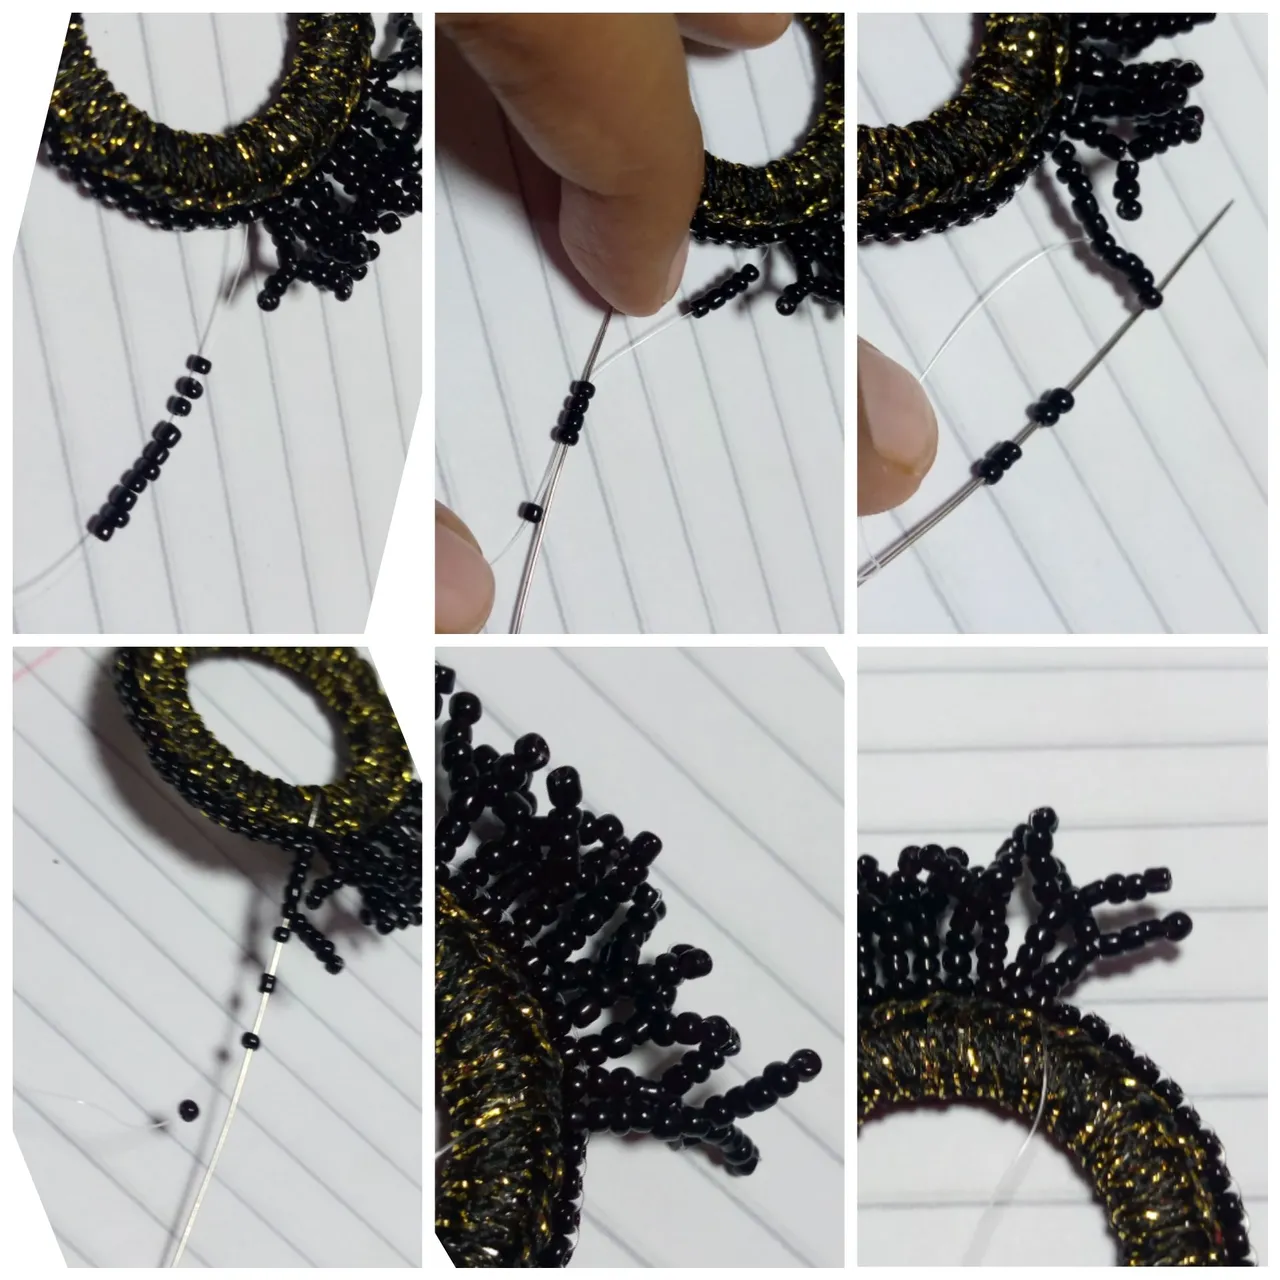
Luego de realizar los 10 primeros flecos con 7 mostacillas, vamos a realizar el mismo proceso ahora con 9 mostacillas, te regresas por las primeras 4 dejando una por afuera y agregamos 4 mostacillas más para realizar la forma de y... Este proceso será realizado en 3 flecos solamente.
After making the first 10 bangs with 7 beads, we are going to make the same process now with 9 beads, you go back through the first 4 leaving one outside and add 4 more beads to make the shape of a y.... This process will be done in 3 bangs only.
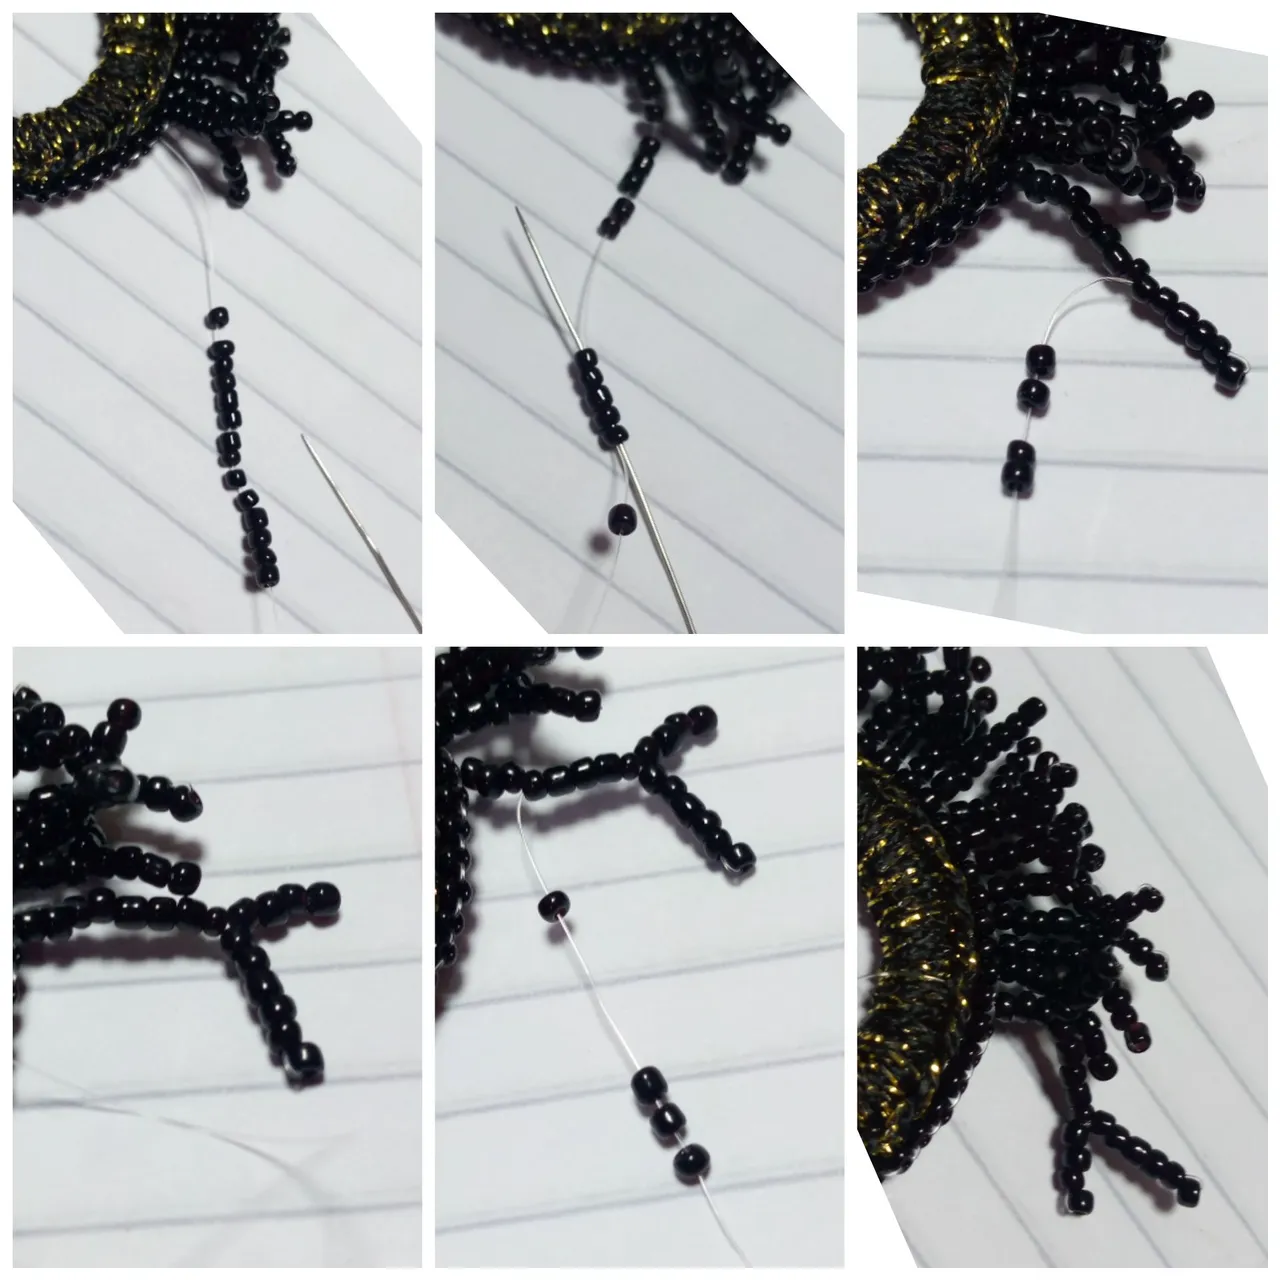
El fleco número 14 lo haremos de 14 mostacillas, te regresas dejando 6 mostacillas sumando la mostacilla que dejamos por afuera, agregamos 4 mostacillas para formar la y y sacaremos la aguja nuevamente en la tercera mostacilla luego de la y para agregar 3 mostacillas más, antes de regresarnos a la hilera principal para salir a la próxima mostacilla.
Fringe number 14 will be made of 14 beads, you return leaving 6 beads adding the bead we left outside, we add 4 beads to form the y and we will take the needle out again in the third bead after the y to add 3 more beads, before returning to the main row to go out to the next bead.
A partir de esta etapa realizaremos 5 flecos con 17 mostacillas dejando 6 mostacillas en la punta, y luego agregando dos puntas de 4 mostacillas como lo haz realizado en los pasos anteriores, luego realizaremos 3 flecos de 18 mostacillas dejando 6 mostacillas en la punta y agregamos igualmente 2 puntas de 4 mostacillas cada uno.
From this stage we will make 5 bangs with 17 beads leaving 6 beads at the tip, and then adding two points of 4 beads as you have done in the previous steps, then we will make 3 bangs of 18 beads leaving 6 beads at the tip and also add 2 points of 4 beads each.
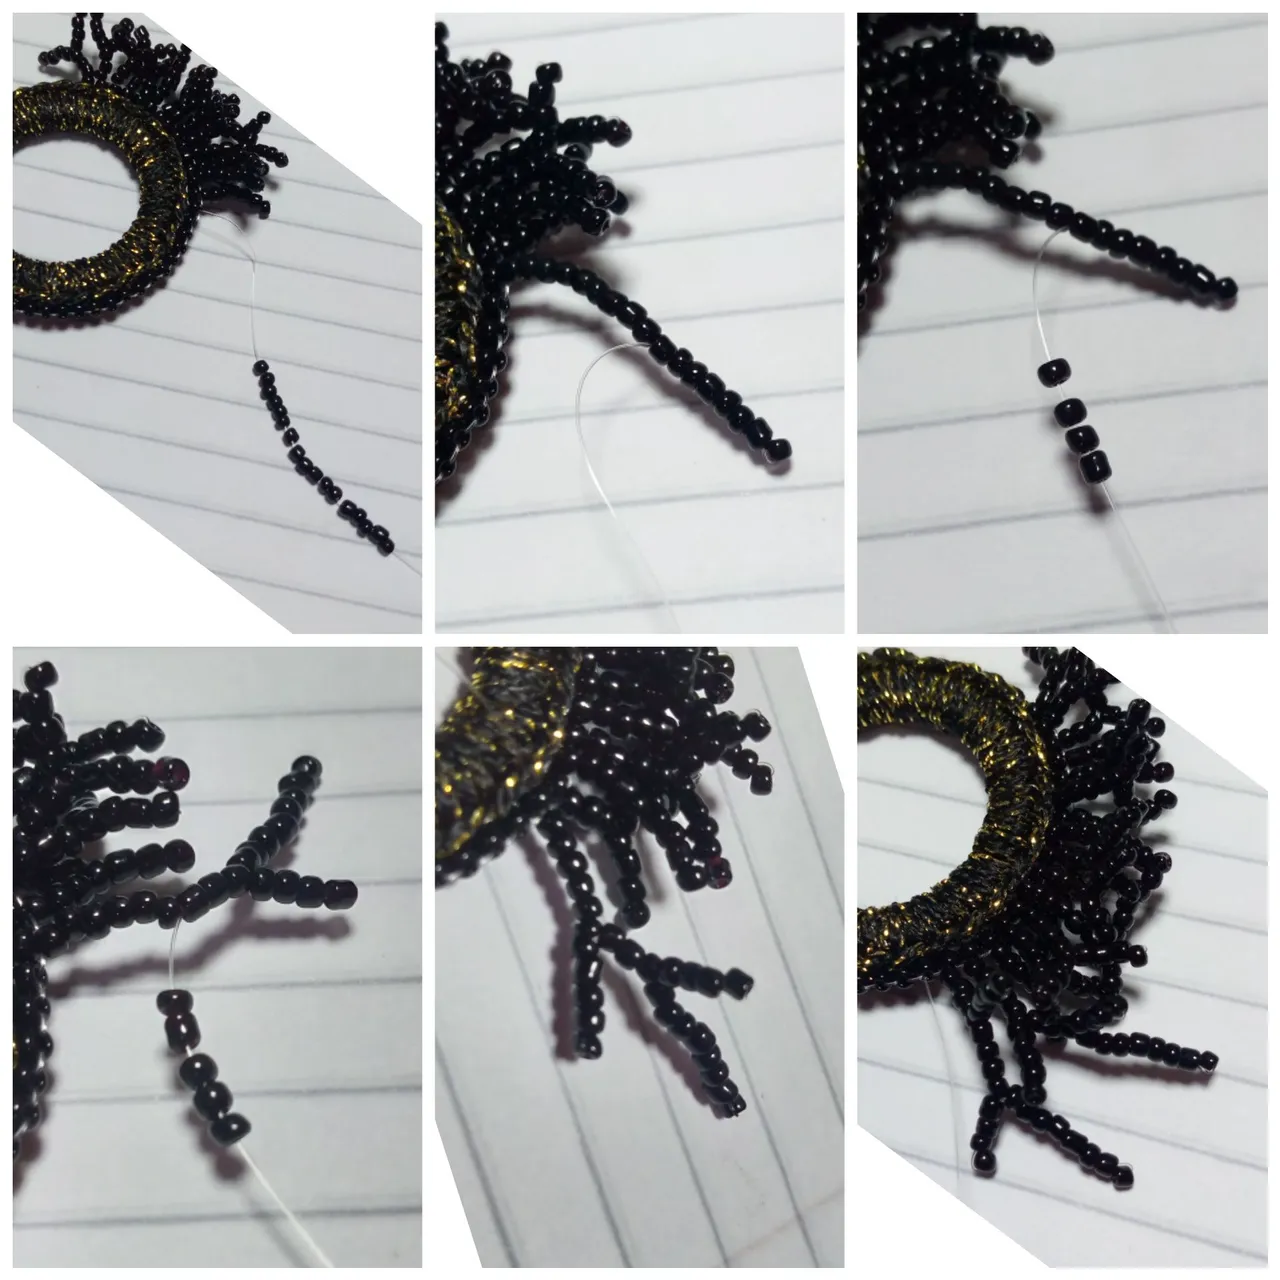
Esta es la parte más larga del zarcillo, donde vamos a agregar 4 flecos de 21 mostacillas cada fleco, nos regresamos dejando una Mostacillas por fuera hasta sumar las 9 mostacillas incluida la que dejamos por afuera, ahora realizamos una punta de 3 mostacillas, bajamos 3 mostacillas y realizamos otra punta de 4 mostacillas, bajamos unas 4 o 5 mostacillas y realizamos otra punta de 4 mostacillas, para regresar a la hilera principal, desde este momento empezaremos de nuevo todo el proceso anterior a partir de las 3 hileras de 18 Mostacillas en adelante.
This is the longest part of the tendril, where we are going to add 4 bangs of 21 beads each fringe, we go back leaving one bead on the outside until we add 9 beads including the one we left on the outside, now we make a tip of 3 beads, we lower 3 beads and we make another tip of 4 beads, we lower 4 or 5 beads and we make another tip of 4 beads, to return to the main row, from this moment we will start again the whole previous process from the 3 rows of 18 beads onwards.
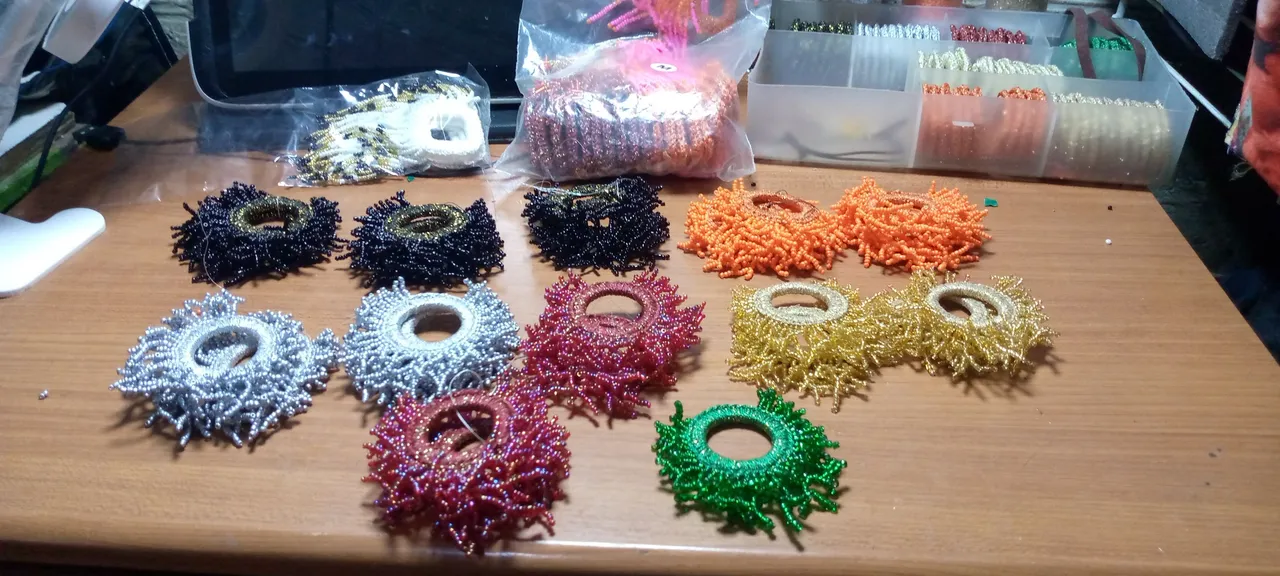
Yo estoy creando en variedad de colores, la parte de arriba solo le colocaremos una base de zarcillo que sea de tu agrado con la ayuda de un aro de bisutería para sujetar, así como también puedes realizar el.topito que realizamos en tutoriales anteriores, que quedan muy bien con este estilo de zarcillos de flecos... De verdad espero te sea de total agrado este tutorial y si requieres alguna explicación adicional que quizás pase por alto no dejes de escribirme, estaré atenta aún cuando no estoy publicando constante aquí estaré para todos! siempre los leo y los tengo en mente. 🥰
I am creating in a variety of colors, the top will only place a base of tendril that is to your liking with the help of a costume jewelry ring to hold, as well as you can also perform the.topito that we made in previous tutorials, which are very well with this style of fringe tendrils .... I really hope you like this tutorial and if you require any further explanation that maybe I overlooked do not forget to write me, I will be attentive even when I'm not posting constant I'll be here for everyone! I always read them and keep them in mind. 🥰


IMAGENES CREADAS EN CANVA
IMAGES CREATED IN CANVA