¡Bienvenido a mi blog!
Welcome to my blog!

Hola queridos amigos que integran esta linda comunidad de #NeedleWork y en especial a todos los que sienten pasión por el arte de las agujas, deseo que todos estén bien.
Como no unirme a este concurso si trata de ¡Costura tu cocina! Me gusta tener mi cocina limpia y muy bonita ya que es mi sitio favorito , de vez en cuando se le debe hacer un cariñito. Cuando colocaron el concurso , dije,la comunidad y yo estamos conectados ya que tengo tiempo por hacer unos agarradores de olla y no he establecido el tiempo para hacerlo, pero ya llegó la hora.
Quería mostrarle como estaban de sucio mis agarradores de olla , pero me dió pena.
Hoy les enseñaré por medio de un tutorial, como hacer unos:
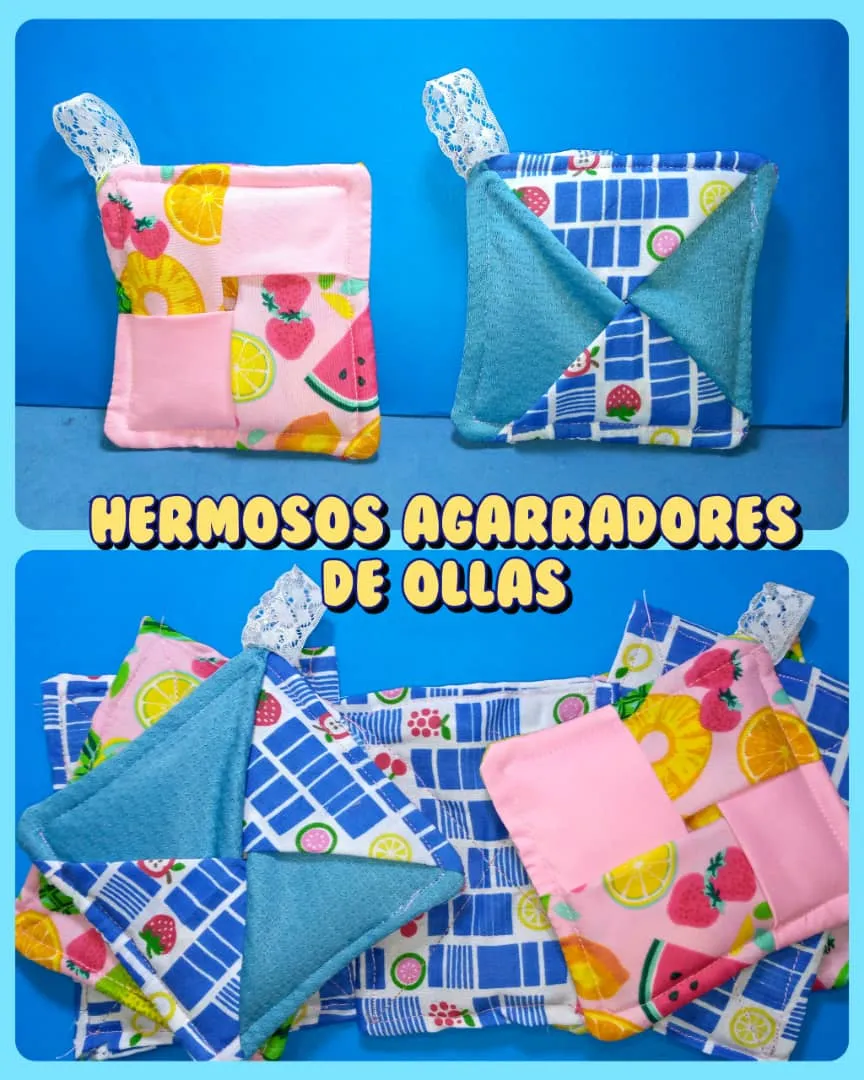
Agarradores de olla, muy coloridos y fácil de realizar.
Este concurso es moderado por @kattycrochet y administrado por @marblely
I wanted to show you how dirty my pot holders were, but I was embarrassed.
Today I will show you through a tutorial, how to make some:
Pot Grippers, very colorful and easy to make.
This contest is moderated by @kattycrochet and administered by @marblely


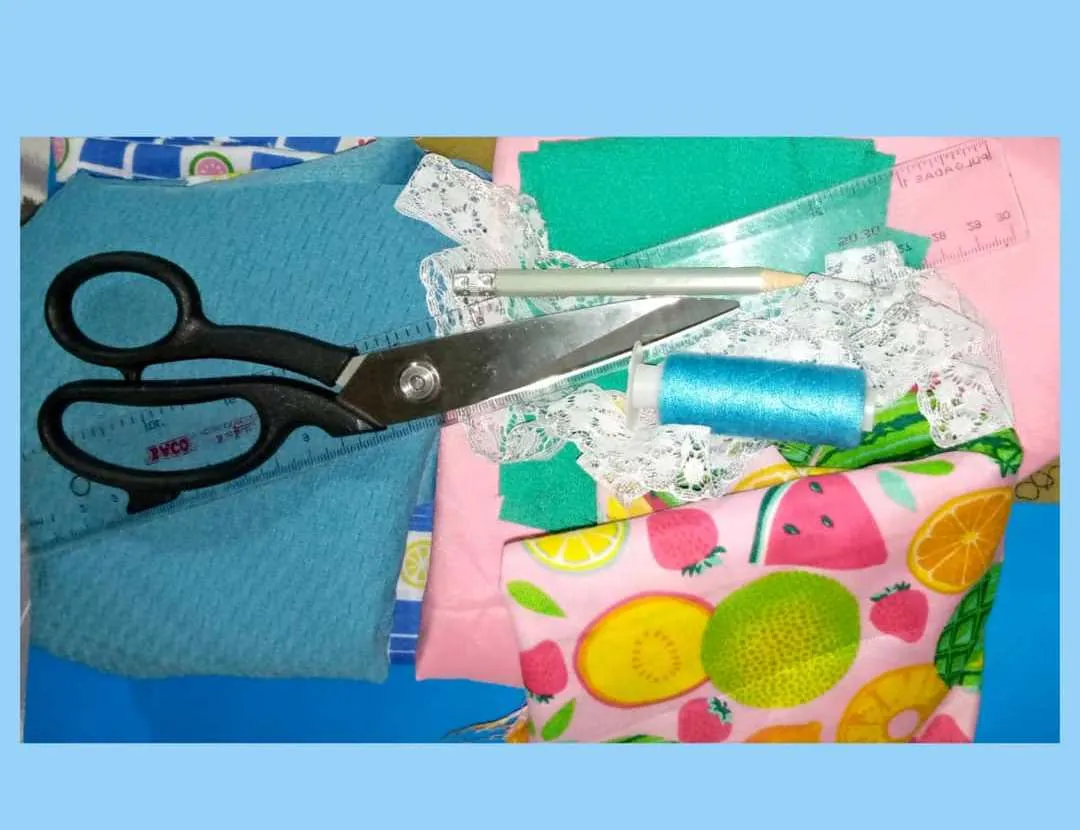
- Retazos de tela : azul,rosada y telas estampadas.
- Hilo.
- Tijera
- Lápiz.
- Regla.
- Agujas y sujetadores
- Máquina de coser.
- Encaje.
- 2 pedazos de esponja.
- Estos materiales no son difíciles de conseguir ,casi todos hay en nuestros hogares.
- Fabric scraps: blue, pink and printed fabrics.
- Thread.
- Scissors
- Pencil.
- Ruler.
- Needles and fasteners
- Sewing machine.
- Lace.
- 2 pieces of sponge.
- These materials are not difficult to obtain, almost all of them are in our homes.

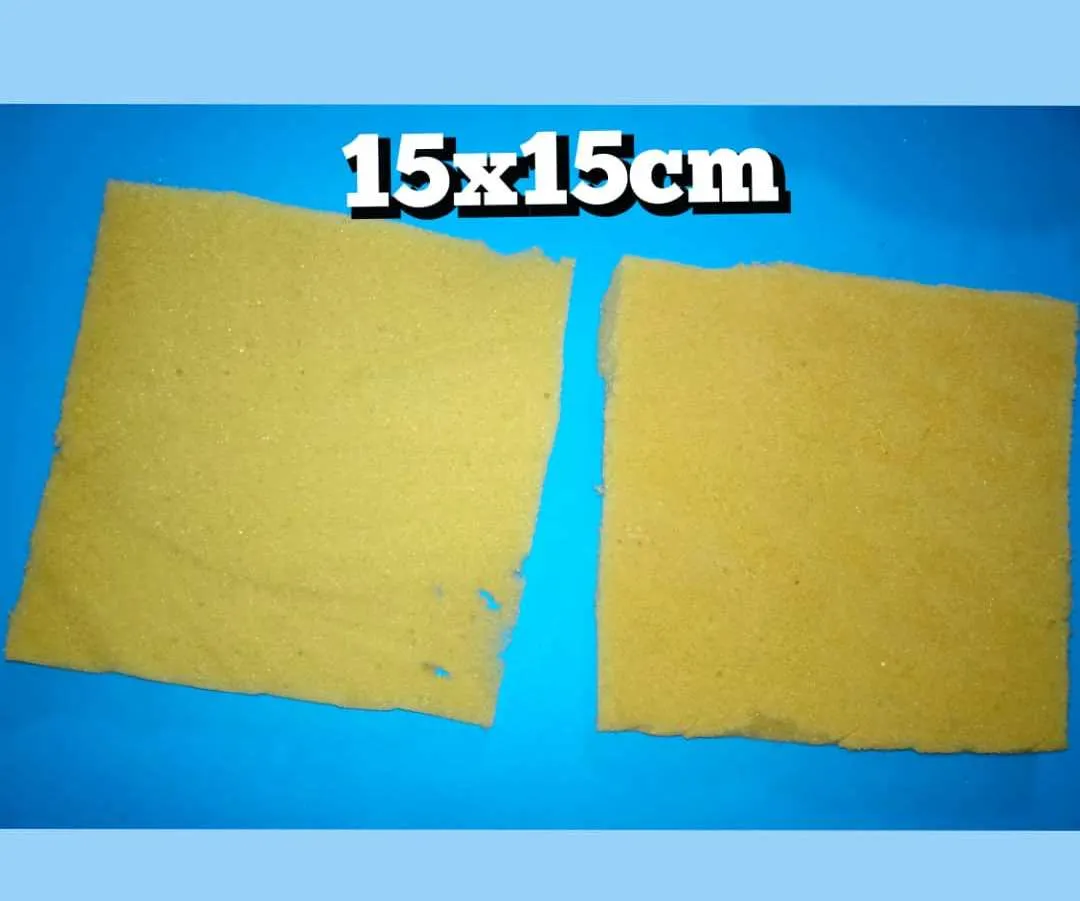
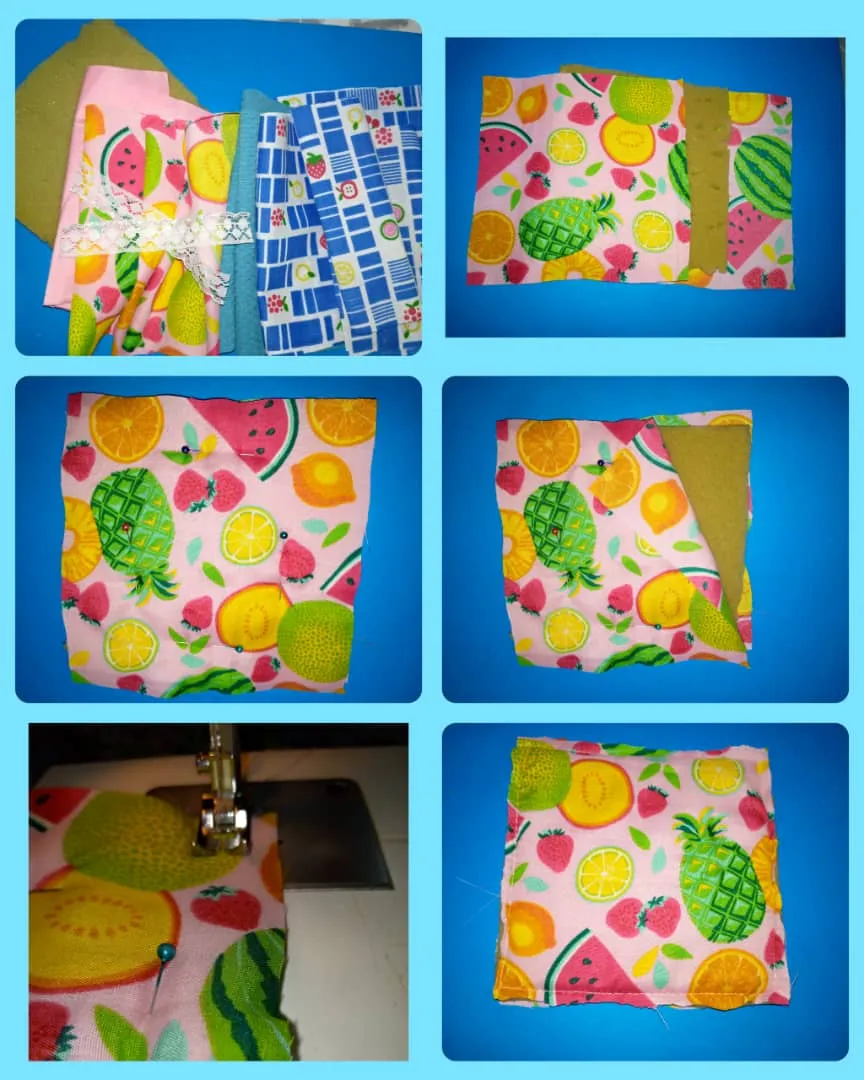
- Lo primero que haremos es cortar los pedazos de esponjas de 15x15 centímetros , es lo que va a permitir que no te quemes cuando agarre olla caliente.
- The first thing we will do is to cut 15x15 centimeter pieces of sponge, this is what will allow you not to get burned when the pot gets hot.
- Ahora marca con una regla y lápiz la tela, un cuadrado de 15x15 centímetros,el agarra olla lleva 6 piezas de 15x15 cm, después de marcarla se corta con unas tijera
- Now mark the fabric with a ruler and pencil, a square of 15x15 centimeters, the pot holder has 6 pieces of 15x15 cm, after marking it is cut with scissors.

- Procedemos a realizar el agarra olla, tomar dos piezas de tela , en el medio colocar la esponja con la misma medida, luego coser una línea recta por todo el borde de la tela, para que se haga más fácil la costura sujetar la tela con las agujas.
- Proceed to make the pot holder, take two pieces of fabric, in the middle place the sponge with the same size, then sew a straight line along the edge of the fabric, to make it easier to sew the seam hold the fabric with the needles.
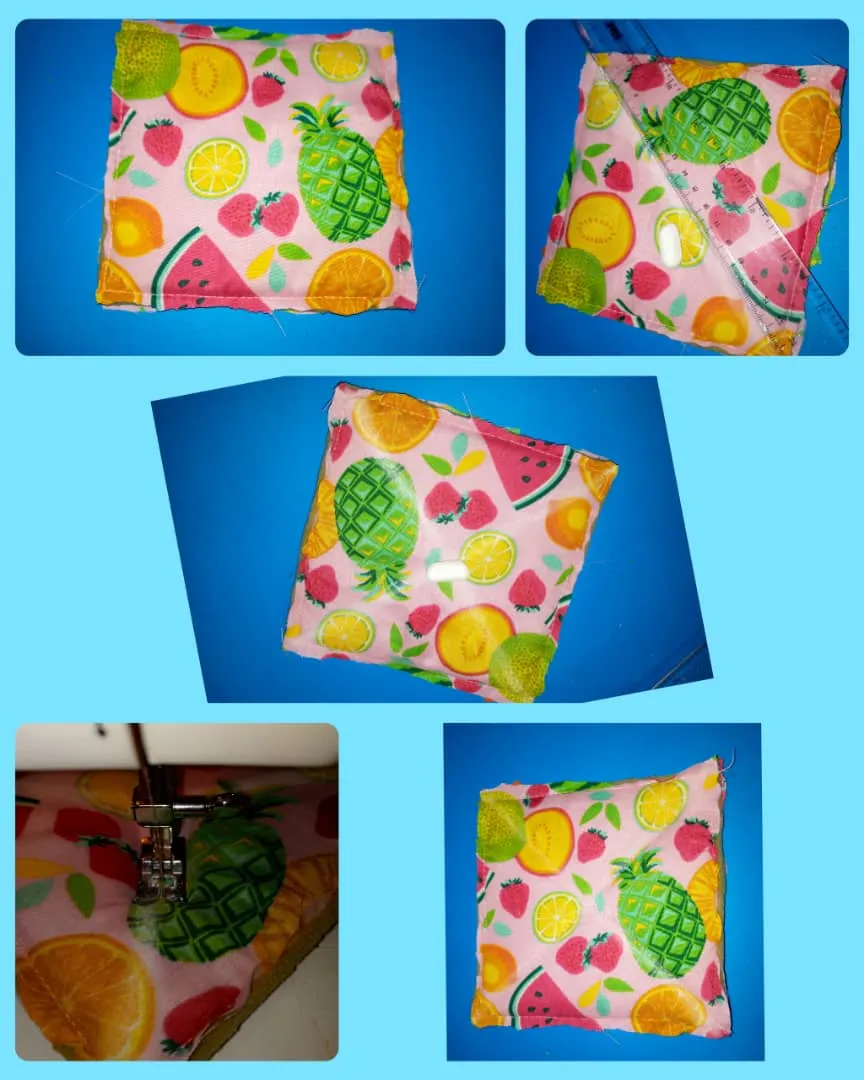
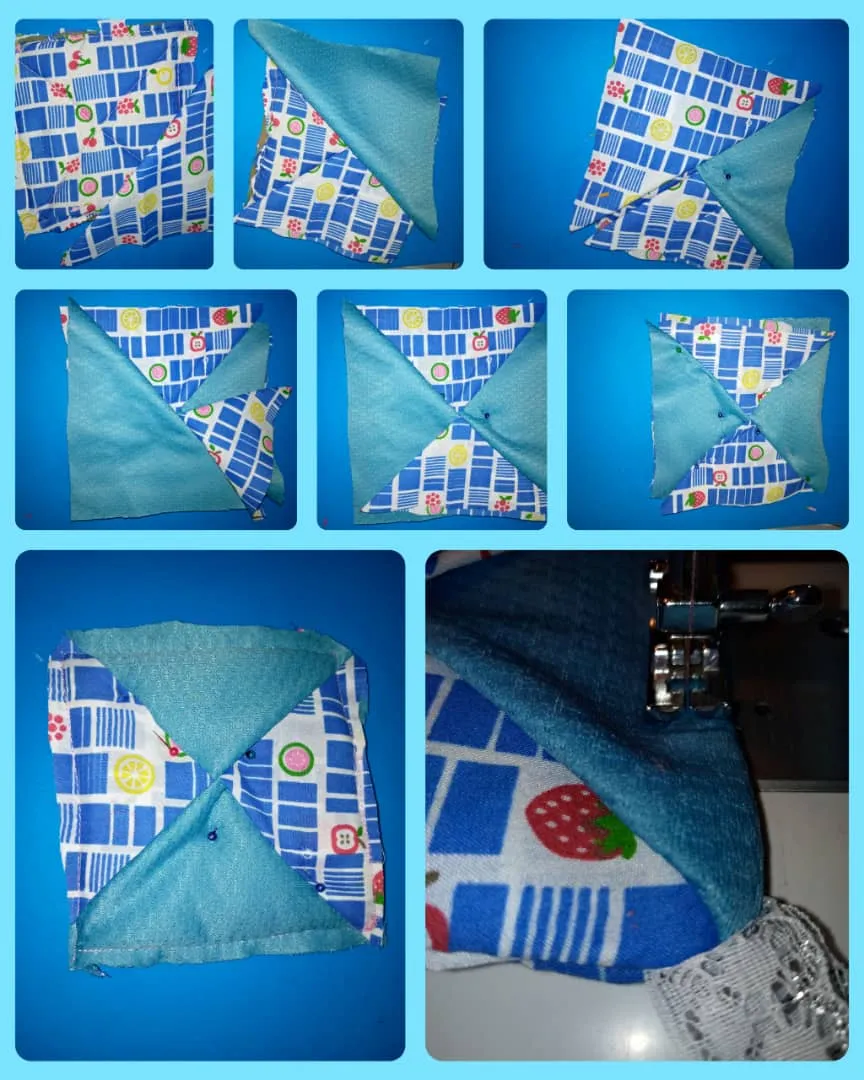
- Después que hemos cosido por todo el borde del agarra olla, tomamos una regla y marcamos con una regla en forma de equis (x)sobre el agarra olla, con el lápiz o una tiza marcamos y por allí le pasamos una costura recta.
- After we have sewn all around the edge of the pot holder, we take a ruler and mark with a ruler in the shape of an X (x) on the pot holder, with a pencil or a chalk we mark and then we sew a straight seam.
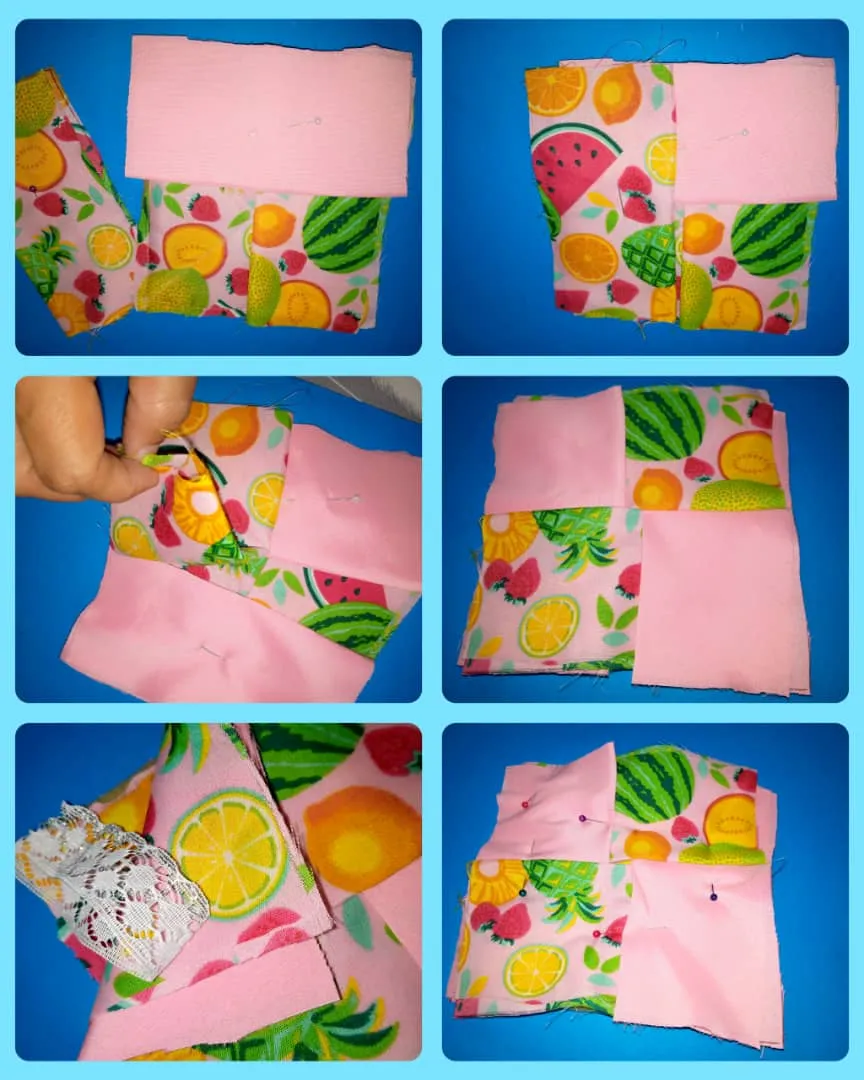
- Ya utilizamos dos pedazos de tela ,ahora los cuatros pedazos que faltan lo utilizaremos de la siguiente forma:cada pedazo doblar por la mitad o planchar para que quede mejor, tratar de hacer con los cuatros pedazos doblado un cuadrado, colocar uno arriba, otro abajo,hacia un lado y otro lado, pueden guiarse por la imagen, en cada extremo colocar una aguja sujetador para que la tela no se ruede, antes de coser debes colocar un pedazo de encaje de 10 centímetro que va a formar parte de donde se sujeta el agarra olla.
- We already used two pieces of fabric, now the four missing pieces will be used in the following way: each piece fold in half or iron to make it better, try to make a square with the four pieces folded, place one up, one down, to one side and the other side, can be guided by the image, at each end place a needle fastener so that the fabric does not roll, before sewing you must place a piece of lace 10 centimeter that will be part of where the pot holder is attached.
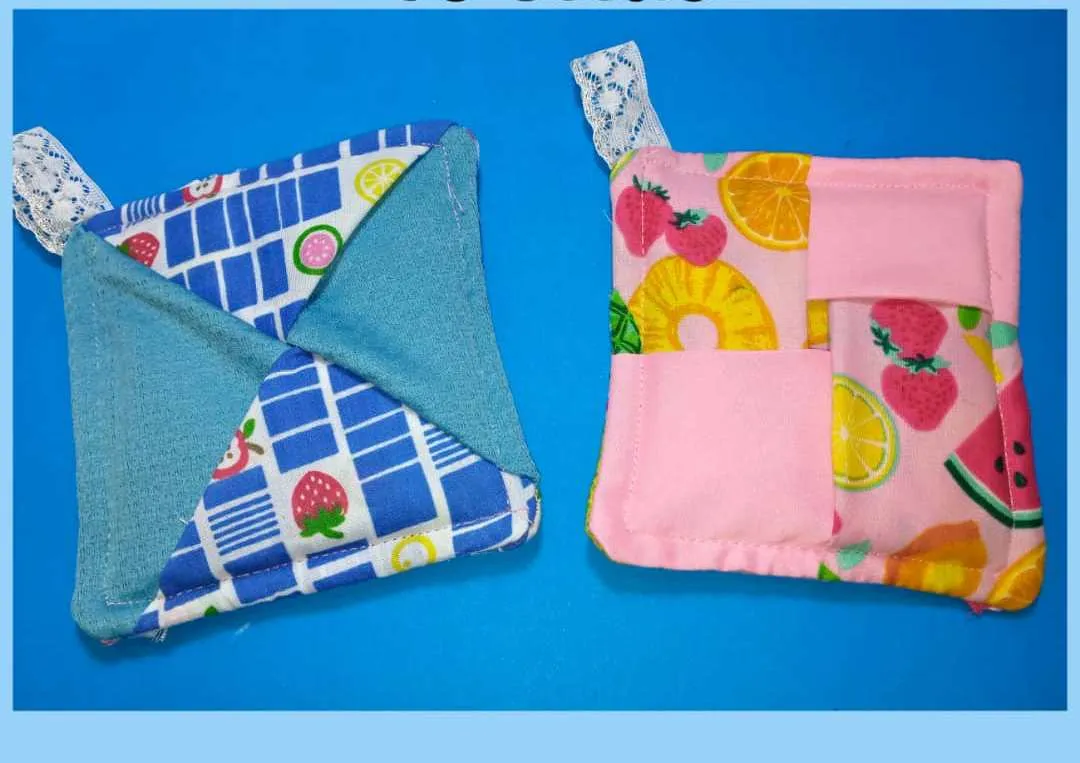
- Aquí se puede observar que se pasó la costura recta por todo el borde de la tela siempre dejando como un centímetro. Luego de haber cosido los borde de la tela, voltear con cuidado, antes recortar las puntas para que el acabado se vea mejor, Después hacer otra costura ya el garra olla volteado por el derecho y queda así de lindo.
- Here you can see that the seam was sewn straight along the edge of the fabric, always leaving about one centimeter. After having sewn the edges of the fabric, carefully turn over, before trimming the ends so that the finish looks better, then make another seam and the garra olla turned right side out and it looks as nice as this.
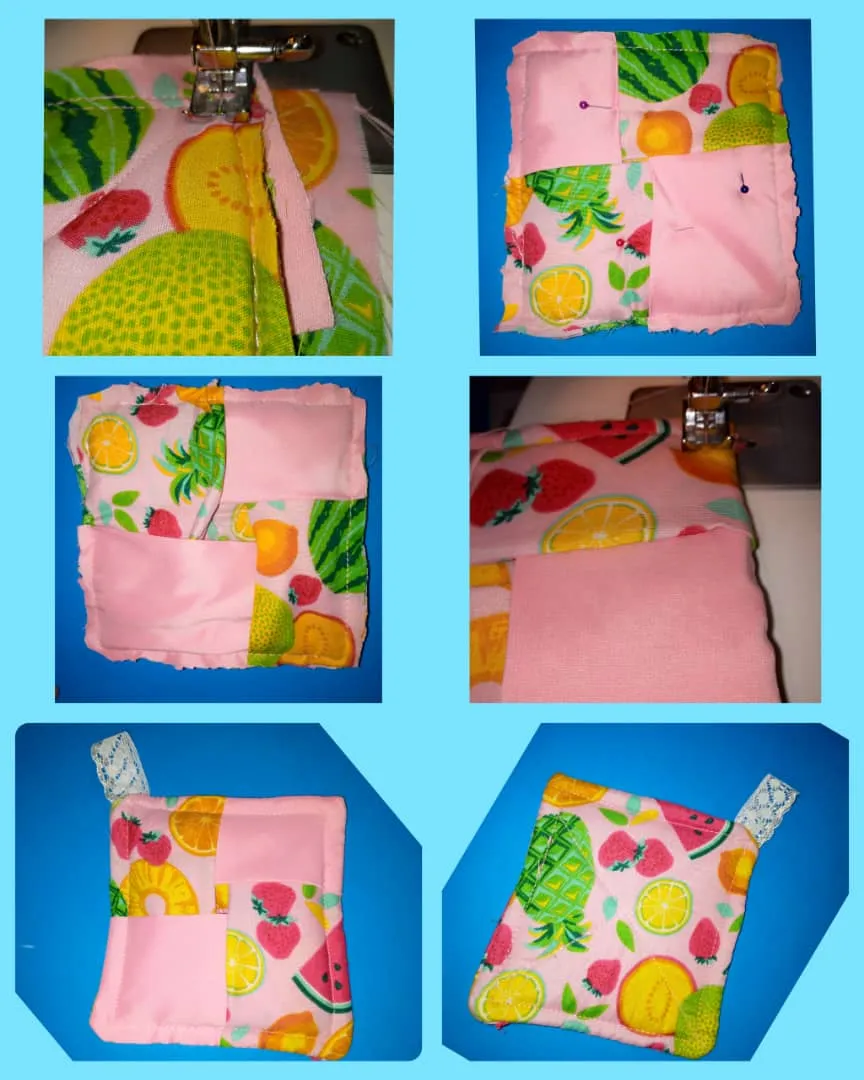
- Para realizar el otro agarra ollas, se hará como el primero, agarramos dos pedazos de telas y en el centro colocamos un pedazo de esponja, cosemos con línea recta por todo el borde ,ahora colocar los cuatros pedazos en forma de triángulo y colocamos cada uno sobre el agarra olla, de esta manera, pueden guiarse por la imagen.Colocar el encaje en donde se colgará el agarra olla, después coser y voltear
con cuidado,volver a coser por todo los extremos dejando un centímetro.
- To make the other pot holder, it will be done like the first one, we take two pieces of fabric and in the center we place a piece of sponge, sew with a straight line around the edge, now place the four pieces in the shape of a triangle and place each one on the pot holder, in this way, you can be guided by the image.place the lace where the pot holder will hang, then sew and turn it over carefully, sew again around the edges leaving a centimeter.
Carefully stitch all around the ends leaving one centimeter.
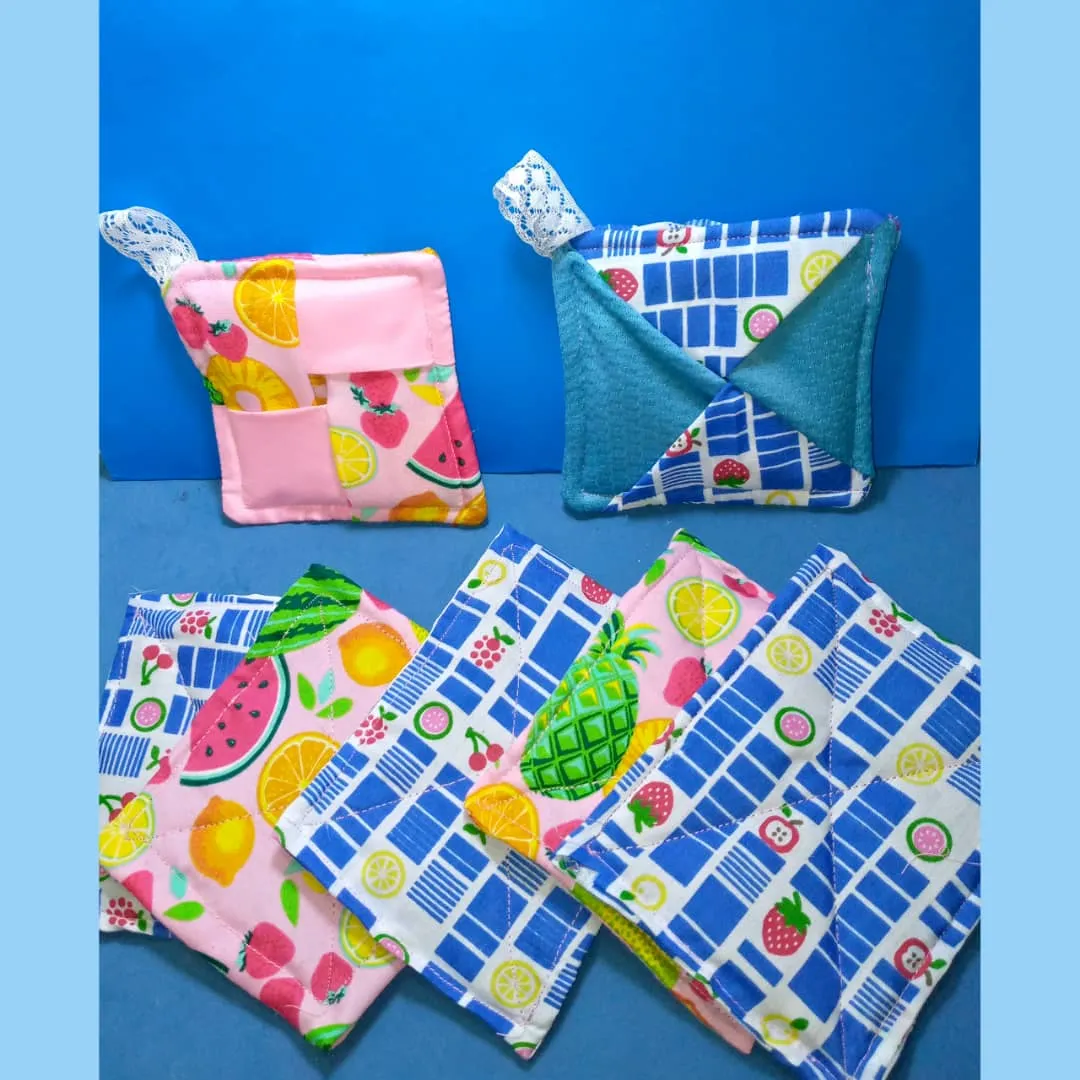
Aquí podemos observar el lindo agarra olla de otro modelo
Here we can see the nice pot grip of another model

Lindos agarradores de ollas, También muestro los que restauré, gracias #Needlework y #Needleworkyourkitchen por realizar este concurso para que restaurara mis agarradores de ollas sino todavía estuviese los viejos y feos.
Cute pot holders, I also show the ones I restored, thank you #Needlework and #Needleworkyourkitchen for holding this contest for me to restore my pot holders if I still had the old ugly ones.
     Las fotos son de mi propiedad , capturada con teléfono Infinix, editada con inollage y bitmoji, traducida con DEEPL.

             The photos are my own, captured with Infinix phone, edited with inollage and bitmoji, translated with DEEPL.