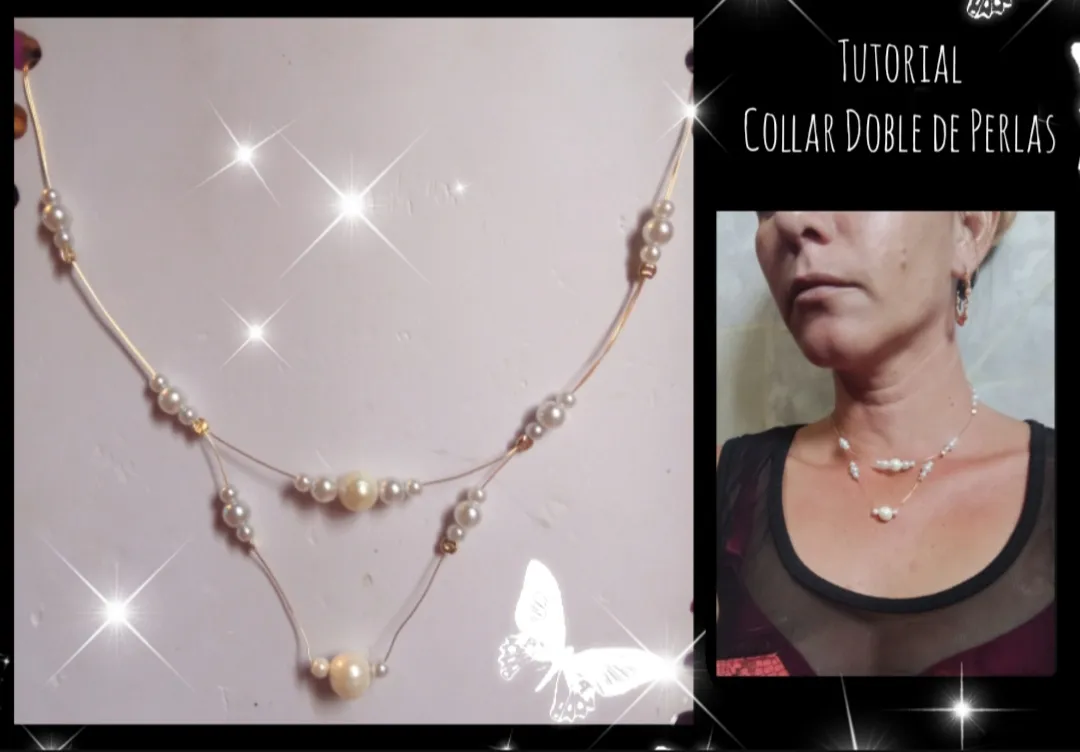
feliz y bendecido día tengan todos ustedes mis queridos y apreciados amigos creativos y miembros de esta hermosa comunidad en esta oportunidad paso por acá para compartir con ustedes mi última creación, ésta ves se trata de un hermoso collar doble elaborado con lindas piedras perladas. Este es un diseño súper sencillo de elaborar pero obtendremos un resultado súper hermoso y elegante ideal para lucir en ocasiones especiales quise elaborarlo con piedras perladas e introducir algunas perlas verdaderas para darle la elegancia y belleza necesaria además por su color podemos combinarlo con cualquier vestimenta.
Happy and blessed day to all of you, my dear and appreciated creative friends and members of this beautiful community, on this occasion I am stopping by to share with you my latest creation, this time it is a beautiful double necklace made with beautiful pearly stones . This is a super simple design to make but we will obtain a super beautiful and elegant result, ideal to show off on special occasions.
I wanted to make it with pearl stones and introduce some real pearls to give it the necessary elegance and beauty. Additionally, due to its color, we can combine it with any outfit.
Below I invite you to join me in this tutorial where step by step I share with you how we can easily make this beautiful necklace at home.
So let's start from now.
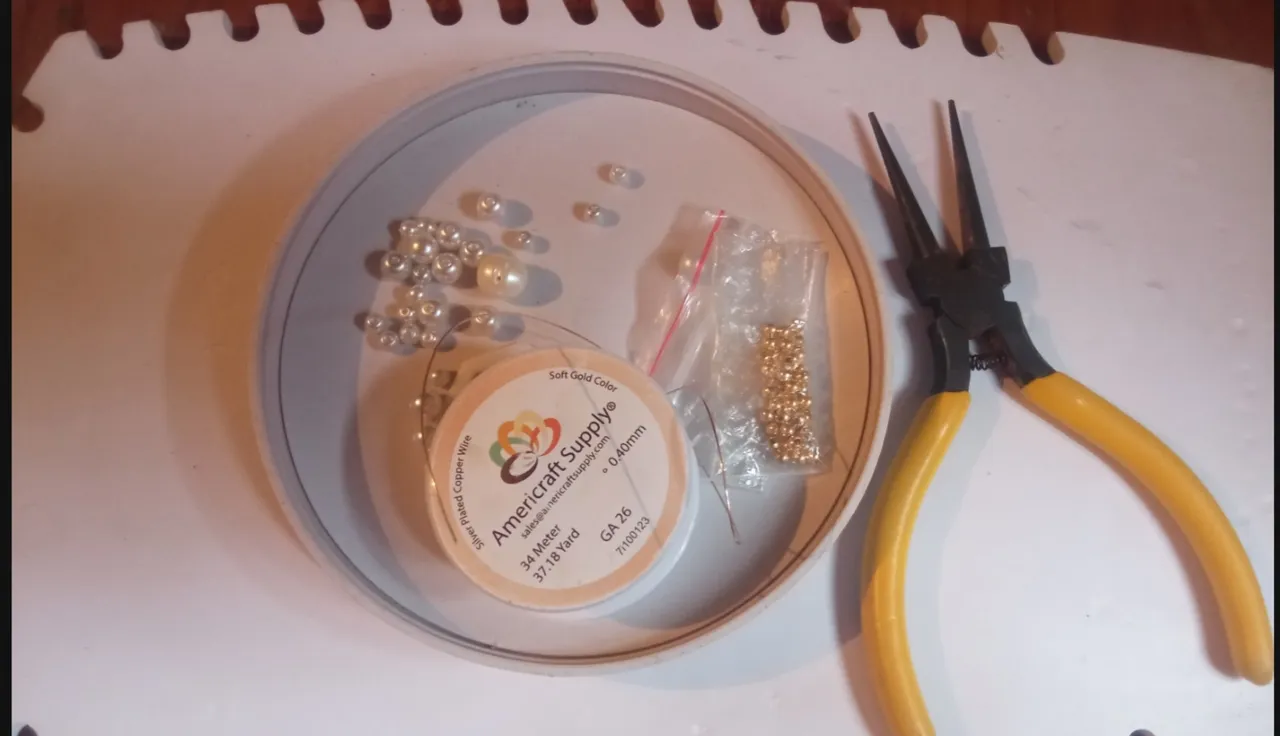
- 20 gauge jewelry wire.
- 26 gauge jewelry wire.
- small and medium pearl stones.
- two natural pearls.
- closing stones.
- jewelry clamp.
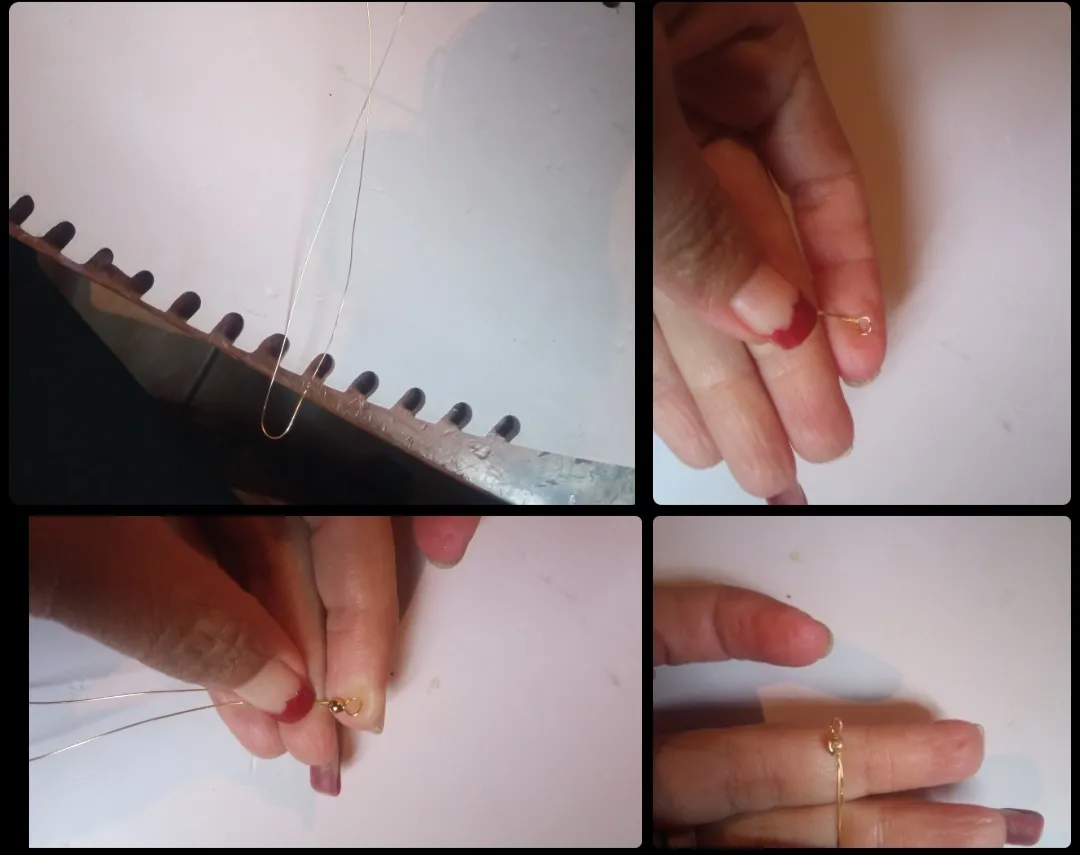
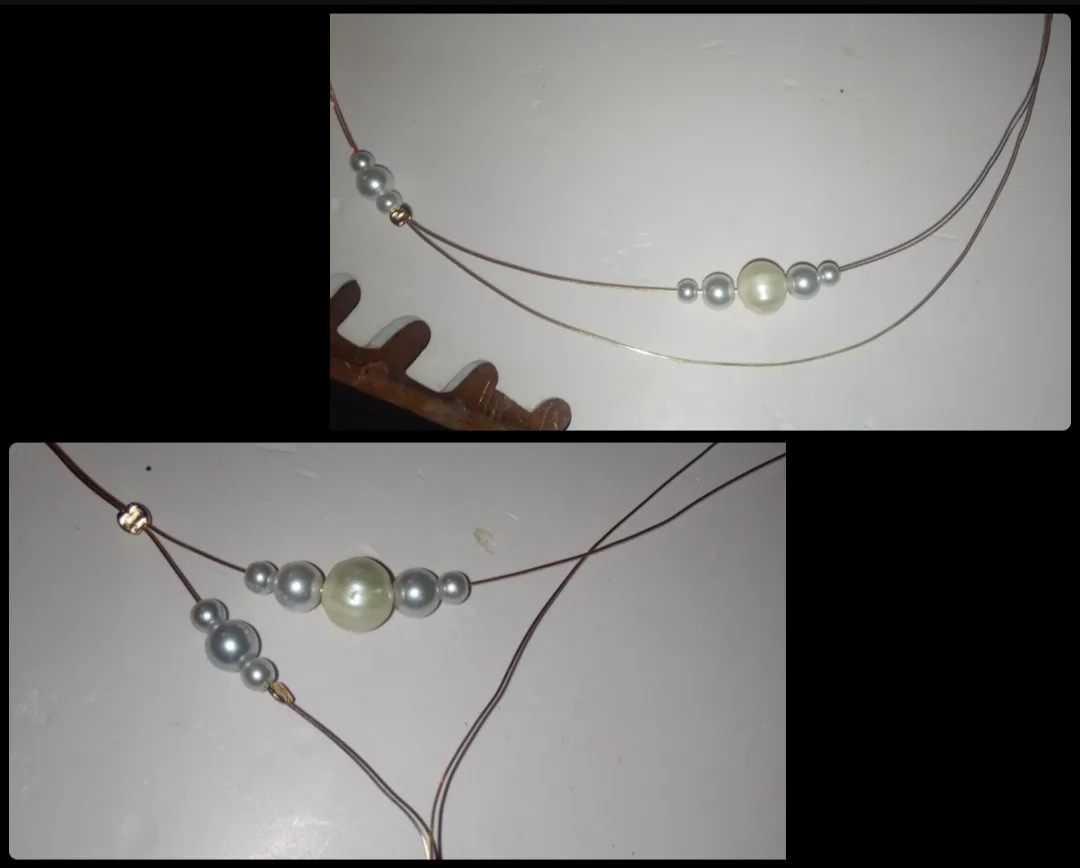
⭐ Paso 1: para iniciar la elaboración de este hermoso diseño lo primero que debemos realizar es tomar el alambre de bisutería calibre 26 y cortaremos un pedazo bastante largo de aproximadamente 60 o 70 cm luego lo doblaremos en dos partes iguales tal cual pueden observar en las siguientes imágenes. Una vez hayamos doblado este alambre en el doblez elaboraremos con ayuda de la pinza de bisutería una pequeña argolla circular como la podrán observar e introduciremos una piedra secador la llevaremos hasta donde tenemos esta argolla y con ayuda de la misma pinza aplastaremos el cerrador para así sostener la forma inicial de nuestro hermoso collar.
⭐ Step 1: to start making this beautiful design, the first thing we must do is take the 26 gauge jewelry wire and we will cut a fairly long piece of approximately 60 or 70 cm then we will fold it into two equal parts as you can see in the following images.
Once we have folded this wire in the fold, with the help of the jewelry tweezers, we will make a small circular ring, as you can see, and we will insert a drying stone. We will take it to where we have this ring and with the help of the same tweezers, we will crush the closer to hold it. the initial shape of our beautiful necklace.
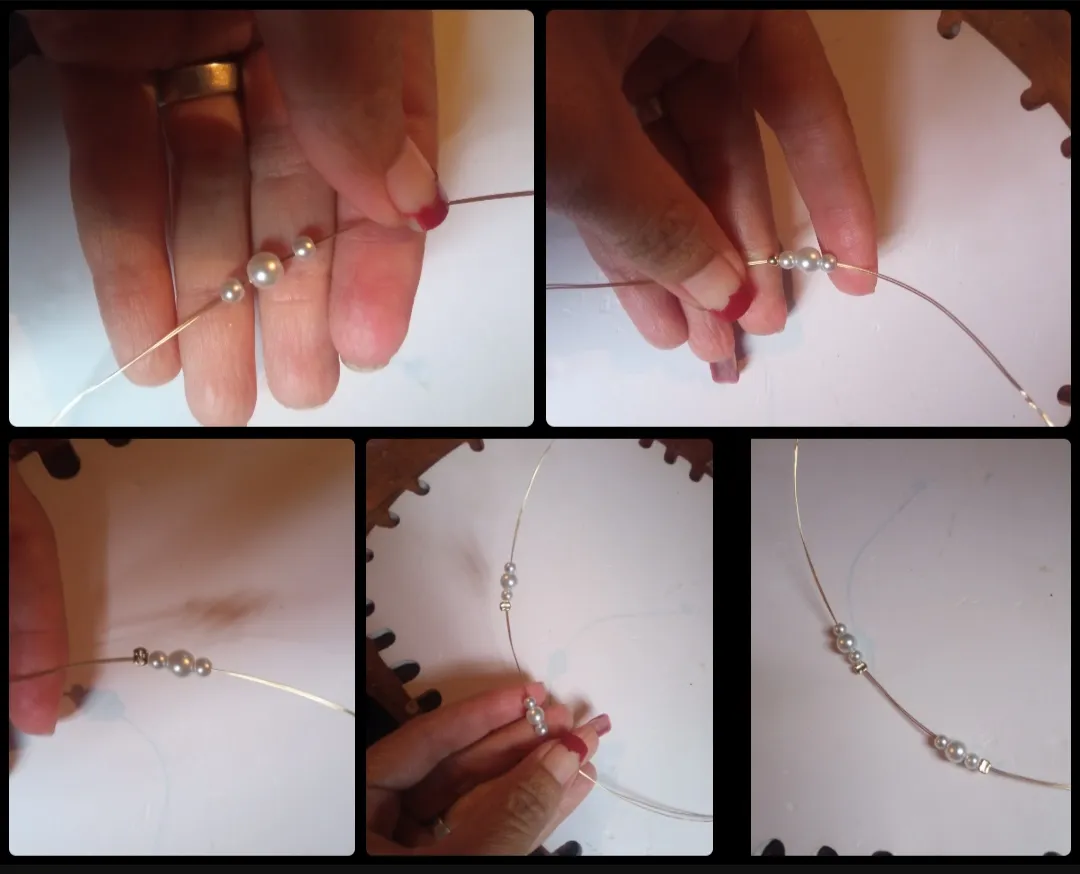
⭐ Paso 2: ahora introduciremos por ambos alambres una piedra pelada pequeña una mediana y otra piedra pelada pequeña la subiremos en el alambre pero la dejaremos separada del inicio de nuestro collar unos 6 cm y debajo de estas piedras introduciremos una piedra secador la cual aplastaremos para sostener las piedras exactamente donde las queremos. De la misma manera dejando un espacio de cinco o seis centímetros introduciremos una piedra pelada pequeña una mediana y otra pequeña de igual manera introduciremos una piedra secador y la aplastaremos para así sostener estas piedras en donde las deseamos.
⭐ Step 2: now we will introduce through both wires a small peeled stone, a medium one and another small peeled stone. We will raise it on the wire but we will leave it separated from the beginning of our necklace by about 6 cm and below these stones we will insert a dryer stone.
which we will crush to hold the stones exactly where we want them. In the same way, leaving a space of five or six centimeters, we will introduce a small, medium, and another small peeled stone. In the same way, we will introduce a dryer stone and crush it to hold these stones where we want them.
⭐ Paso 3: Ahora procederemos a separar las dos hebras de alambre de bisutería y poder el alambre superior introduciremos una piedra pelada pequeña una mediana y una perla natural luego otra piedra mediana y una pequeña. Ahora tomaremos el alambre de la parte de abajo y por este introduciremos una piedra pelada pequeña una mediana y otra pequeña y con ayuda de una piedra la sostenemos un poco alejada de la separación de los alambres aplastando la piedra cerrador.
⭐ Step 3: Now we will proceed to separate the two strands of jewelry wire and, using the upper wire, we will introduce a small peeled stone, a medium one, and a natural pearl, then another medium stone and a small one.
Now we will take the wire from the bottom and through it we will insert a small, medium and another small peeled stone and with the help of a stone we hold it a little away from the separation of the wires, crushing the sealing stone.
⭐ Paso 4: seguidamente bajaremos un poco el alambre y realizaremos un pequeño doblez o punta hacia abajo allí introduciremos una piedra pelada pequeña una perla natural y otra piedra perlada pequeña la quedará un poco más abajo en forma de punta extendemos nuevamente el alambre un poco hacia arriba dejando un pequeño espacio libre colocaremos una piedra secador la cual aplastaremos para luego introducir una piedra pelada pequeña una piedra pelada mediana y otra piedra pelada pequeña que pueda sostenerse allí donde colocamos el cerrador.
⭐ Step 4: next we will lower the wire a little and make a small bend or point downwards, there we will introduce a small peeled stone, a natural pearl and another small pearly stone that will remain a little lower in the shape of a point, we extend the wire again a little upward, leaving a small free space, we will place a dryer stone which we will crush and then introduce a small peeled stone, a medium peeled stone and another small peeled stone that can be held there where we place the closer.
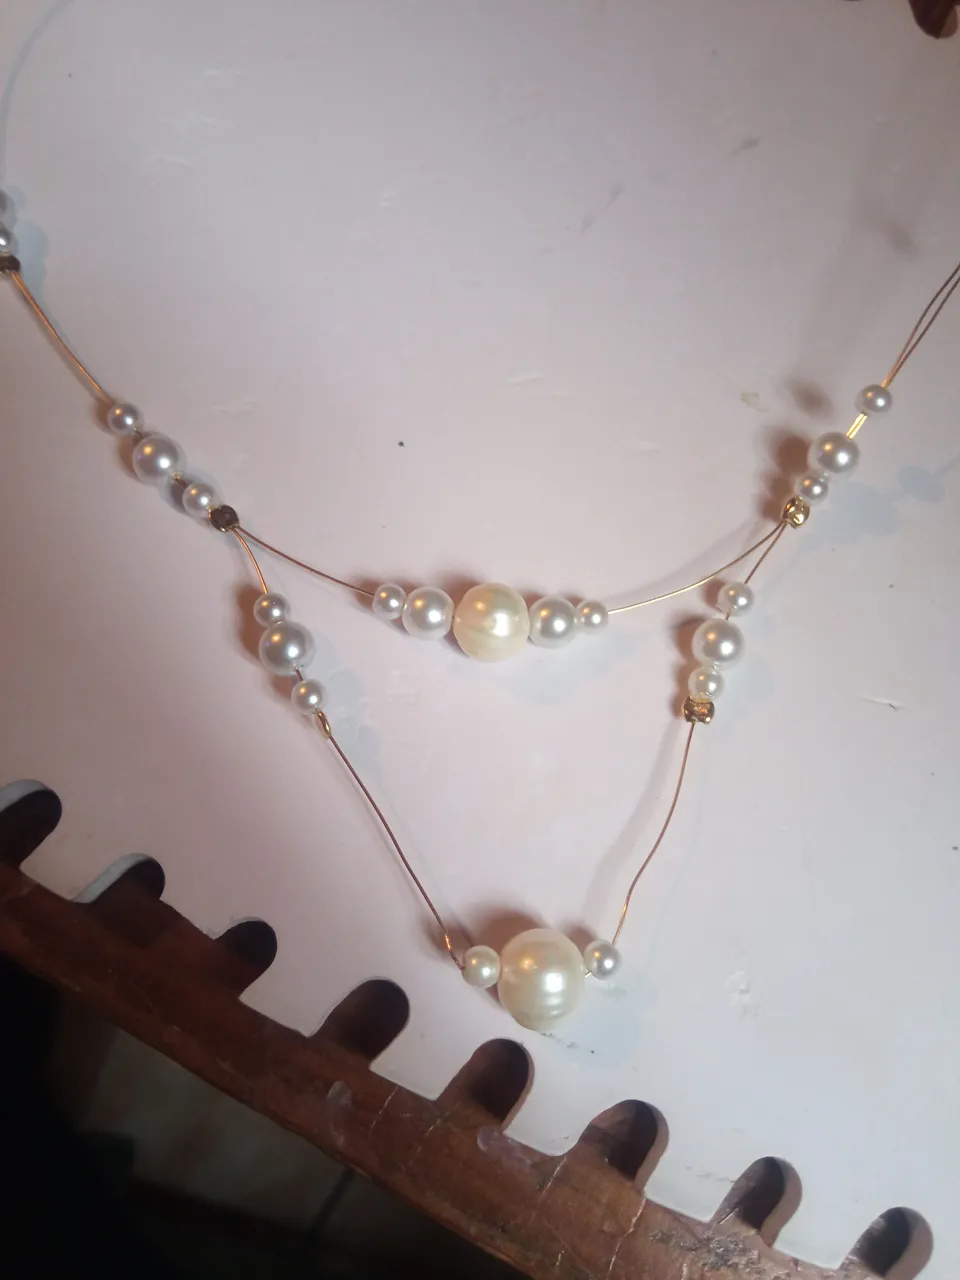
⭐ Paso 5: ahora procederemos a unir nuevamente los dos pedazos de alambre introduciendo una piedra secador al nivel de la que tenemos del lado contrario y la aplastaremos y ahora introduciremos las mismas piedras que tenemos en el otro lado es decir una piedra perolada pequeña una mediana y otra pequeña dejamos un pequeño espacio y volvemos a realizar el mismo procedimiento. Para cerrar colocaremos una piedra secador que unirá ambas puntas del alambre y realizaremos una forma de argolla idénticamente igual a la que realizamos al inicio ya solo nos quedará elaborar una forma de gancho que colocaremos en uno de los extremos.
⭐ Step 5: now we will proceed to join the two pieces of wire again by introducing a drying stone at the level of the one we have on the opposite side and we will crush it and now we will introduce the same stones that we have on the other side, that is, a perolated stone small, medium and small, we leave a small space and do the same procedure again.
To close, we will place a dryer stone that will join both ends of the wire and we will make a ring shape identical to the one we made at the beginning and we will only have to make a hook shape that we will place at one of the ends.
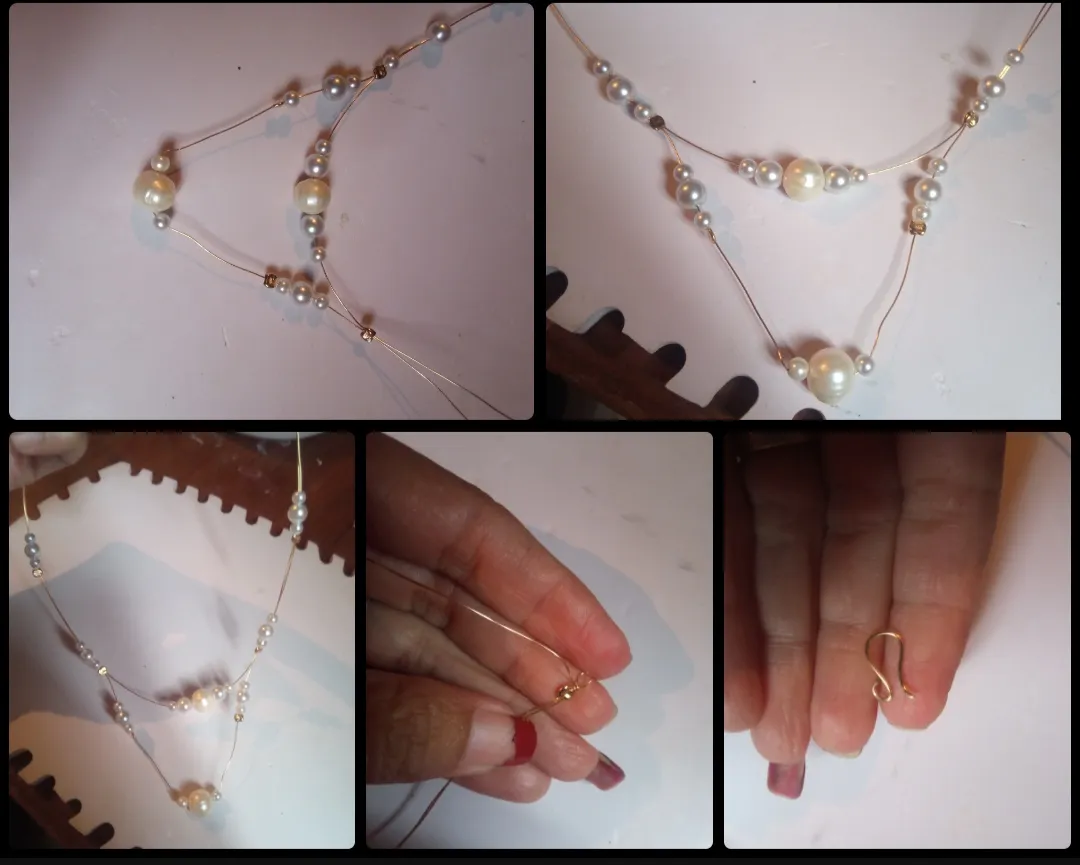
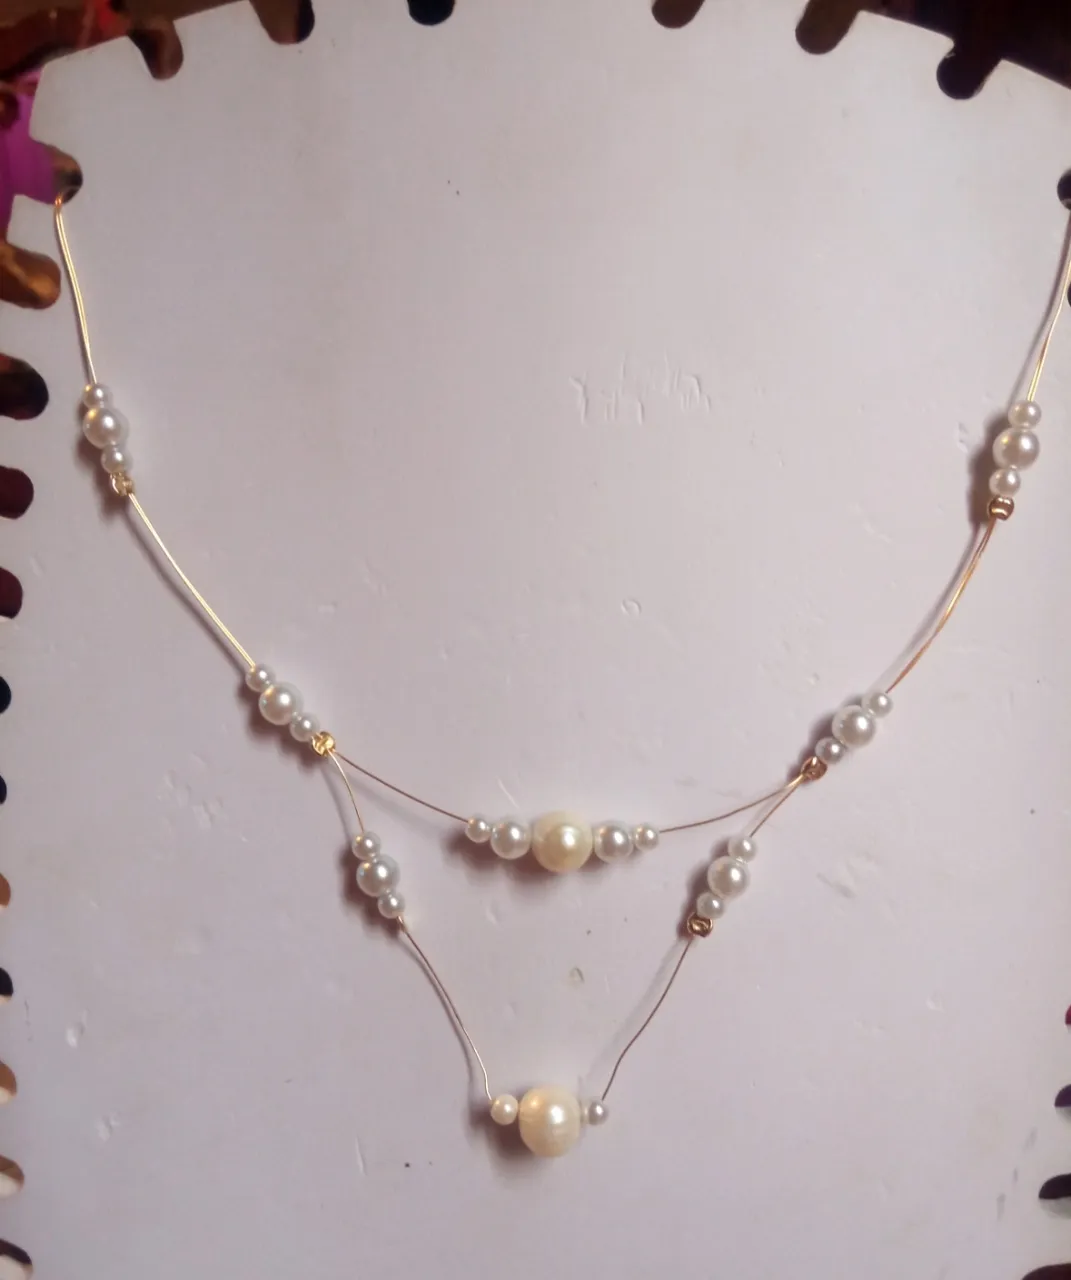
Todas las Fotos son de mi autoría y fueron tomadas con mi Celular Redmi 9.And so, my dear and appreciated friends, we will be able to make a very beautiful necklace that will be super elegant and very striking because as you can see, at first glance it will have the shape of a double necklace, one will be in the shape of a choker and another piece that will be a little more pendant.
I loved this design and I did not hesitate for a moment to share it with all of you because I hope that you completely like it and that this simple tutorial can be useful and beneficial. I say goodbye for this opportunity, grateful for your visit and waiting for your comments. .
All Photos are my authorship and were taken with my Redmi 9 Cellphone