A lot of you may not have been bitten by the photography bug yet, but wait until you start experimenting with the new cameras offered today with the likes of smart phones and the new consumer or professional DSLR market-it’s amazing stuff.
One particular area I wanted to shed light on is infrared photography. It’s one of the most unique and eye catching forms of photography that I’ve seen over the years, not to mention the new software apps for phones and computers; but that’s for another time.
But the infrared arena is something truly amazing and as long as you learn and understand this process, you can create some fantastic work that will make your friends and family members ask how you did it.

I’ve been involved in photography for many years and have enjoyed capturing awesome things that have burned their images in my mind forever. But over time as I looked online at all the websites and in numerous magazines, it was very familiar stuff, just a different time of day, or a slightly different interpretation.
Plus if you want to market your work, it’s extremely difficult because of the increased competition due to the fact that cameras are so much more advanced and easily attainable. Additionally, these new software programs help fix blemishes or mishaps and can even sometimes save you from a gargantuan mess.
When it comes to infrared photography, you have the ability to capture and share work that is very unique and stands out among the crowd. Now, there are limitations and many people don’t like the work required to add an infrared filter to their lens including making the necessary manual adjustments. In addition you must find the right available light at the correct angles. Plus, since the filters are so dark, it takes a lot more time for the exposure to actually finalize because the sensor has to obtain enough light to consider it enough to create the exposure.
But times have changed, and many new companies now provide services to make sure this process is as easy as possible. In addition, there are new types of cameras that make this process even easier. These companies replace the infrared filter in your camera and add a filter that allows the infrared light to pass through. This light cannot be seen by the human eye, but when introduced to the sensor it can create some of the most interesting photos you’ve ever seen.

There are two ways you can create infrared digital photographs. I will focus on the digital side of this today, but you can also purchase infrared film if you have a film camera.
The first is by adding an infrared filter onto your lens. There are many different makes and a few different densities depending on how you want your pictures to look. Plus as I said before, there is a lot of work involved to make a decent exposure when using this type of filter such as adjusting your white balance settings and shutter speeds to compensate for the time needed for enough light to hit the sensor. This usually requires a very steady hand, or a tripod to make this happen.
The second option is to have a professional company change and add the correct filter internally, where you don’t have to worry about scratching or taking care of an outside filter. You can either have your DSLR or Mirror-less camera with an electronic view finder converted.
The unique thing about mirror-less cameras is that you can make the adjustments to your shutter speed, aperture and +/- exposure levels while you’re looking through the eyepiece instead of going back and forth between taking the picture and looking at the LCD screen for confirmation on a DSLR. The DSLR cameras don’t show you the finished product until you look on the LCD, but you see the finished image in real time with a mirror-less camera with an electronic viewfinder.
Mirrorless cameras are in my opinion, a game changer in this area because I like to focus on composing my pictures and enjoying the process instead of scrambling to make the correct adjustments. Many still like to make these adjustments without looking in the eyepiece, which is fine, but to see the finished image in real time is the true gem in infrared photography. Furthermore, electronic viewfinders offer a safer option when it comes to eye damage because the image isn’t reflecting directly off of a mirror.

I’ve learned a great deal from reading articles, buying numerous cameras and taking countless photographs over the years and I think if you have the means to invest in a camera with these particular features you’ll be greatly rewarded. There are two companies that in my opinion are the best at what they do, and that’s installing infrared filters.
LifePixel and KolariVision offer outstanding workmanship and customer service. I’ve never had a problem with any of my conversions. They list the different types of filters and what types of exposures these filters create to give you an idea of what you might like to explore. They also sell pre converted cameras to make the shopping experience and shipping time easier. Tutorials are also provided on these sites showing what adjustments you need to make in Photoshop or whatever software you use to do post production.
NOTE- make sure you’re post processing software allows you to adjust the Red-Blue-Green channels like Photoshop does. This is a very important processing step and you’ll be lost if you don’t have access to these. These steps will become clear when you watch the instructional videos on these two websites. There’s plenty of other software available too. I use PaintShop Pro 2018 Ultimate myself along with Photoshop as well.
The conversion can always be reversed at a later time, but it may be wise to use a camera that you can devote to this so you don’t have to keep sending it back to be converted again. You can also sometimes find some really good deals of already converted cameras on ebay and the two sites listed if you don’t want to go through the process of buying a camera and then sending it to one of these companies to have it converted.
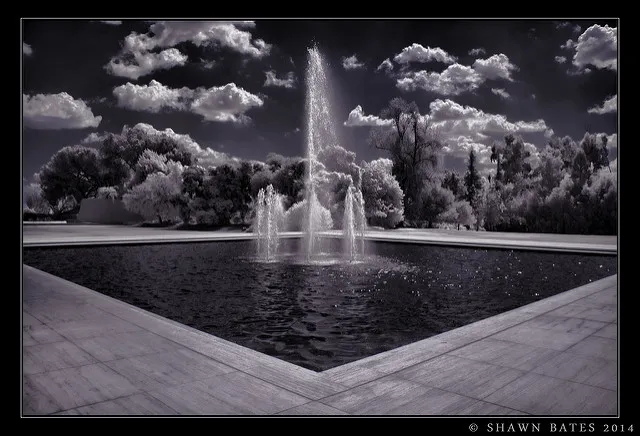
The images shown in this article are mine. The specific camera I use currently is the Sony alpha NEX7 24.3 mega pixel mirrorless camera. It’s a stellar model with great reviews and can be found used on reputable websites such as B&H Photo and others.
Infrared photography presents a new and interesting format where individuals can become more creative since only a few colors are represented, and the fact that you must have the proper sun light in just the right amounts and at the right angle in order to make a memorable image. And if you are a black and white fan, these images are much more pronounced and richer than normal black and white images derived from either film or standard black and white options on digital cameras today.
This article just scratches the surface but I hope it intrigues some of you and starts your journey into trying a new genre. I will add additional writings in the future focusing on technique and sharing options.
If you decide to dip your toe into these waters, you may have found a new hobby that will open your eyes to what the eyes cannot see-INFRARED LIGHT