
Dear Steemers,
This post is the first english post in this series of image editing and photography. I hope you enjoy my topics about

Recently I held a seminar about taking photos with smartphones, so I thought some of this information might also be interesting for people on steemit.
The big advantage about your phone and photography is obvious… it it at hand when photomotivs like situations you want to hold photographically for later...suddenly pop up in front of you. A smartphone has less weight than a camera and it is also very comfortable for looking through the picts on a bigger display than cameras usually have.
But of course there are not only advantages, but also disadvantages.
The most significant disadvantage regarding photo-quality might be the very small sensor. While on one hand, this small size enables the phone to incorporate a camera and being very thin at the same time, on the other hand a small sensor means image quality is prone to noise. To avoid noisy photos one should not increase ISO to much (which normally is done automatically in your phone, as you are normally using A (Auto) - mode. As soon as there is not enough light, ISO will go up to compensate the lack of light… automatically the picture will be much noisier than pictures taken in good light conditions.
However there is another way to get more light than increasing ISO… you can increase exposure time. The disadvantage here is that it is much more difficult to avoid shaky images.
One of the most important factors to improve image quality in smartphone-photography is holding your camera still.
The way you release your shutter can make huge difference.
Try to find something to lean against while shooting, even better lean the smartphone itself against something like a wall, a door frame or a table.
One more valuable thing to think about is how you press the shutter. This depends on your camera app as well. On some older Samsung phones and others the shutter only released when the finger left the button on the touch display. This enabled the photographer to hold the camera still and concentrating on the right moment to release the button instead of concentrating to hit the button without missing it and giving the phone a little shake.
This information can make the difference between a good and a bad photo my friends… and it is not difficult! However… if your phone starts to shoot fast series of photos when holding the shutter, you can not do it this way… but there are other ideas to help you out. One good alternative for your camera app might be the app “open camera” (open source, without any advertising, without any cost). This works only for android phones and can be downloaded as usual in google Play Store. This app offers a lot of cool features including real HDR, manual camera setting and much more… and the shutter works as described above.
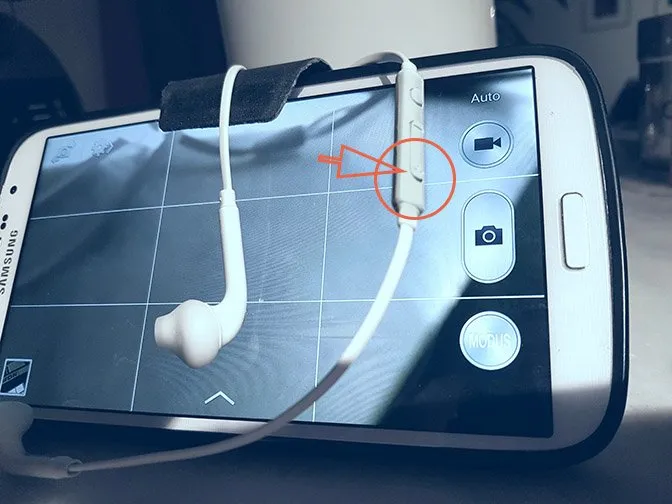
One more way to press the shutter of your phone very often is the volume-up button… and the coolest thing … this also works using the volume button of the little headphones that came with your smartphone… probably you have them with you anyway as you dont`t want to heat up your brain while speaking on the phone.
Using this headset and pressing the little volume key, you can release the shutter while pressing the phone against the wall to avoid any movement. Best conditions for best photos!

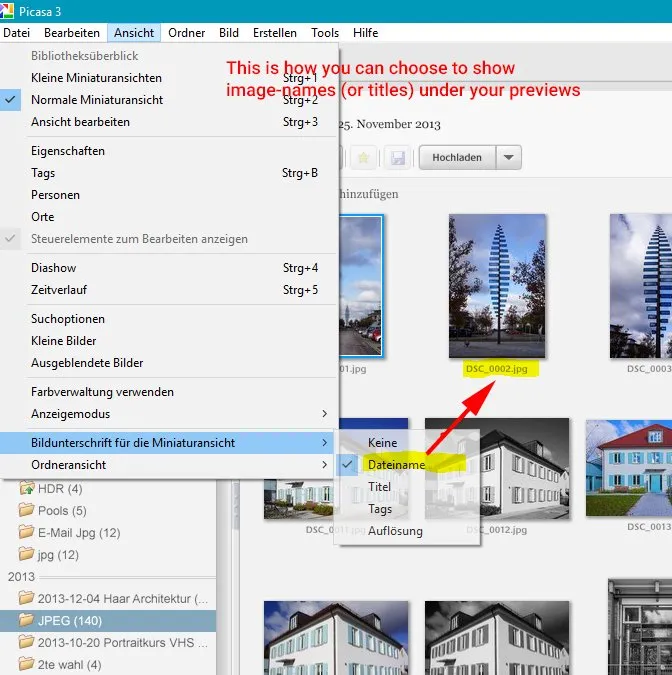
I introduced picasa in my last posts. This time I want to show you something you might have been missing as it is not the default setting… however, I like to see the image-file names under the previews. So this is how you can change it the way you like. I am sure, you can find it, even if I use the german language version in the screenshot.
Although Picasa shows pictures in “real” folders corresponding to your harddrive, it does not show the hierarchical structure of folders from your drive in default view. You can switch to folder tree view… but I would rather recommend to understand how picasa was designed to be used. To put things in order… instead of nesting folders in folders on your harddrive, you can use “collections” (as folders for imagefolders) and albums for groups of images that you want to show together, without the need to have these pictures in only one single folder on the harddrive. One photo can show up in as many albums as you like...without moving a single copy of that photo from its folder on your harddrive.
By doing this you save harddrive-space, but nevertheless can have any of your photos in several different albums.
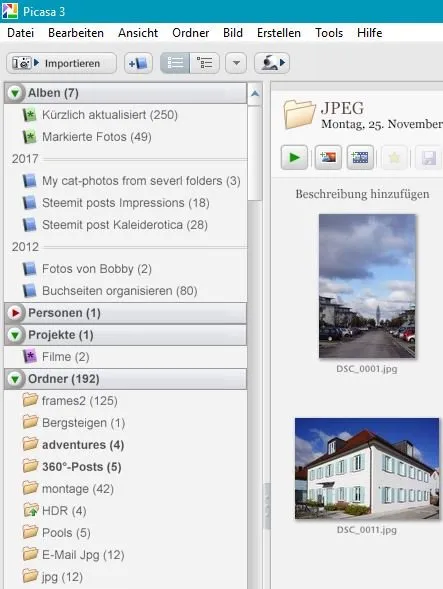
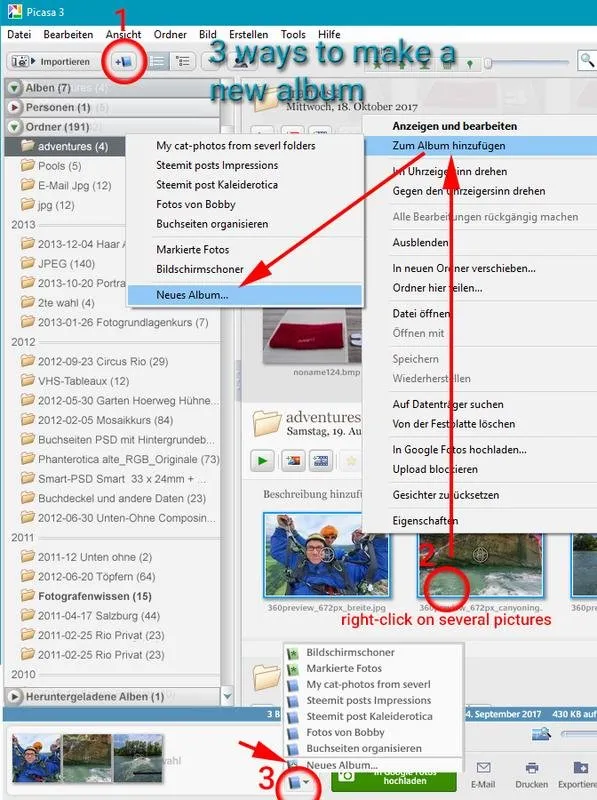
The green book-icons are automatic albums, the blue ones are created by myself. For example I could collect all cat-photos from diffrent folders in one album.
I created the album with the name "My cat-photos from..." as you can see in the screenshot.
You can not group albums any further.
Albums cannot be ordered in folders… many picasa-users wanted that feature… but google didnot fullfill their desires but but gave up picasa instead.
This how you create albums in picasa.
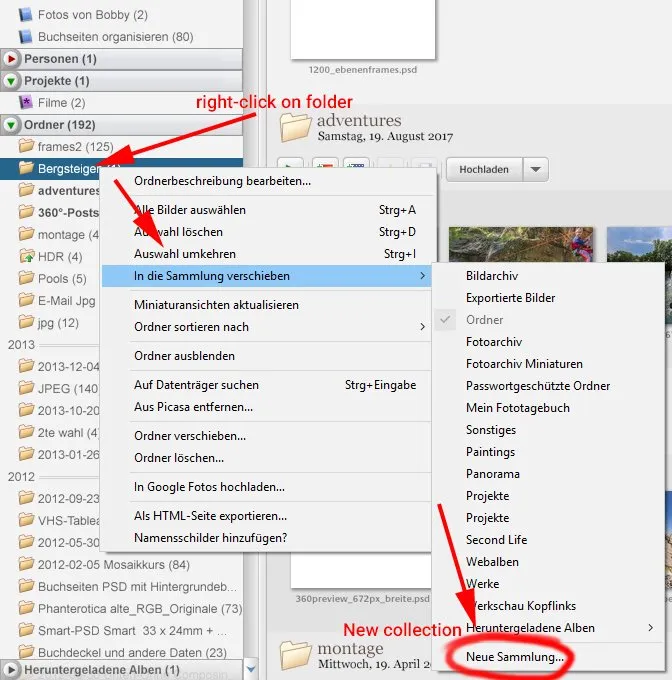
Collections are "picasa-folders" holding real folders as subfolders
You can order folders into “collections”, only one level (no collections in collections). This means you are virtually putting real folders in some "picasa-folders" called collections. The folders are not moved anywhere, it is only a tool to organize your data within picasa.
For example in the screenshot above, I have one collection called "ordner".
This is how you organize your folders in collections.
If you request it in comments, I will explain real cool things you can do with albums and collections in picasa in future posts.
I am here for you! Tell me what you want to learn!

Press


Beitrag zur Installation von Picasa
Installation of open camera in Google Play Store (Open Source Freeware)

This reminder reminds you about posts only from this series about photography- and image editing issues. You can deactivate at any time using the red button. Press the green button to activate and dont`t miss the next post about Fotografenwissen (photographers know how).
You can speak to me in german, italian or english language!
 |
  |

Coaching zu Fotografie oder Bildbearbeitung via Videochat?
Ihr findet mich unter dem Namen "herrbobbyboe" auf Skype.


|
I will upvote your friendly comment! |
||
|
If you resteem my post I will:
|