Camera Rotation Photography represents one of the most interesting techniques that I know in the field of photography.
Let's learn a new photography technique. My original blog post you'll also find on my website with some more examples and links - Camera Rotation Photography.
Most of the readers here on my blog are LightPainters. If you are one of them, you would move the light sources in front of the camera to create Light Paintings. If you are not, start trying now 😉 Here I share my view on Camera Rotation Photography.
Now let’s get moving with the Camera Rotation Topic!
Just as “Using reflection in photography“, camera rotation also makes an image a little bit more interesting. The challenge to the curious brain is what I look for where is up and down and is it a reflection or a Photoshop manipulation. Is the viewer going to figure it out? The photographer as well as the viewer is required to have a decent comprehension of the perspective of where the camera was. Artistically you can create images with a special twist for the artistic and engineer’s eye. I use Reflection and Camera Rotations for my Light Paintings very often.
Camera Rotation as a Light Painting Photography technique
belongs into the category of Kinetic Light Painting. Camera Rotation is exactly what you think it is. During the exposure time, the camera rotates on a tripod or any device needed. The lens can stay open during the rotation, then you’ll see some light trails. If the lens is open only at some points or times – you may see the same scene just in different lights.
Over the past years, this technique has become one of my favorites to combine with the more traditional approaches. Many times it lets the mind wander and ask oneself, how did that happen. The Kinetic aspect changes everything. The human mind will find patterns yet very often it’s hard to comprehend what actually happened there. This is the aspect I find super intriguing. There is so much more to explore.
Camera Rotation belongs certainly to Kinetic photography and it is not a very common technique amongst photographers. Light Paintings are choreographed movements with light tools carried out with the camera during a single exposure. During a Camera Rotation, the light sources are often in a fixed position in relation to the camera, and the light trails are then drawn into the picture solely by the camera movements.
Disclaimer:
In this blog article, I will not tell you what F-Stops and what ISO or exposure times to set on your camera. I simply assume You know what to do if you’re interested in this particular topic.
It all comes down to having the camera in different positions or moving “around” during the image. There are multiple methods to the madness. As a LightPainter, I would use two major categories. A) Lens is open during the entire Rotation exposure time and B) Closing the lens during the rotation steps and open to imprint the chosen scene. What follows is that people get creative and mix all sorts of methods. But let us look at the first two categories.
A) Continous Rotation
Here is the Lens is open during the entire Rotation exposure time. During the exposure time of this shot, the fiber optic whip was tangling just downwards when the camera was making a 360° rotation around the Z-axis of the camera.
B) Covered Stepping Rotation
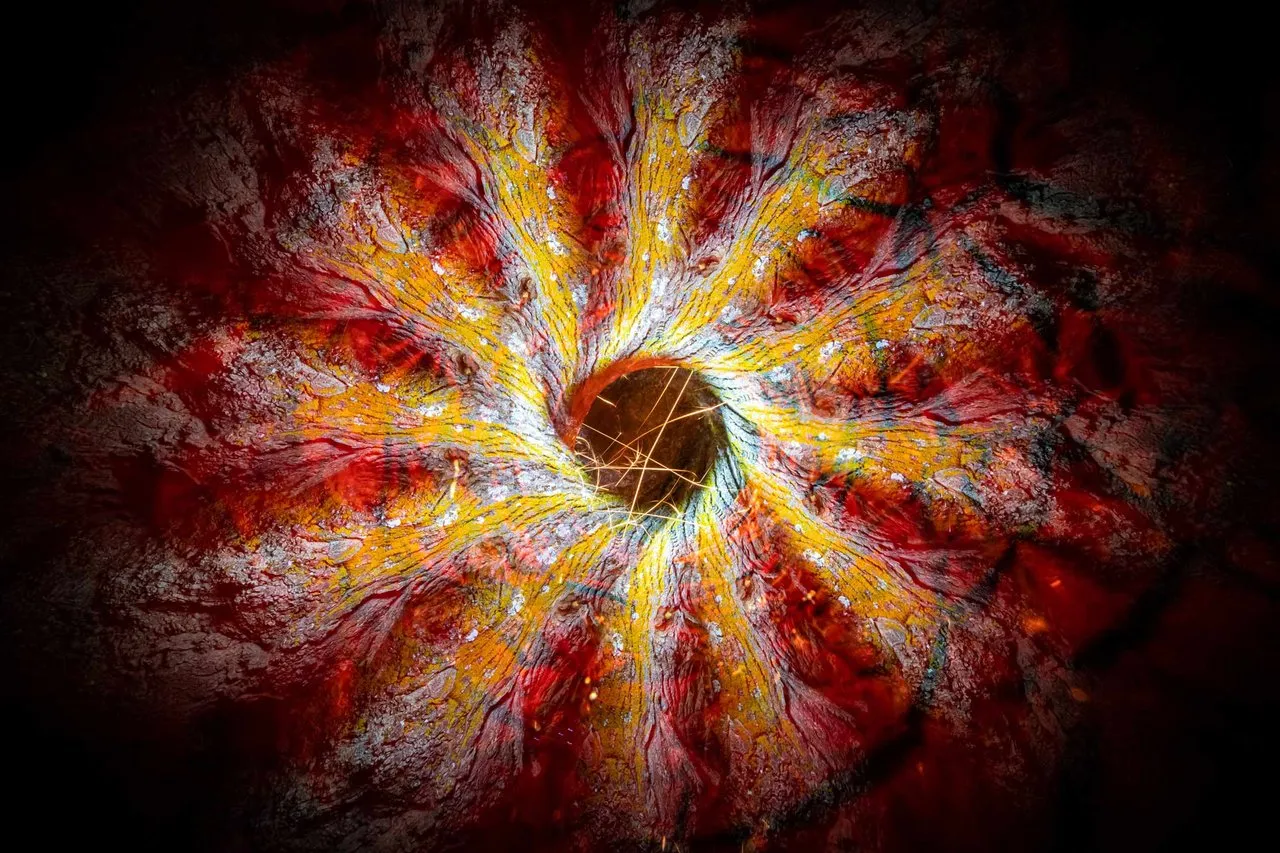
Closing the lens during the rotation steps and open to imprint the chosen scene multiple times. For this shot, I opened and closed the lens 12 times during the exposure while rotating the camera around the Z-axis in 12 steps to 360°. The tree bark was sensational – could not walk past it.
More examples:
A) Continous Rotation 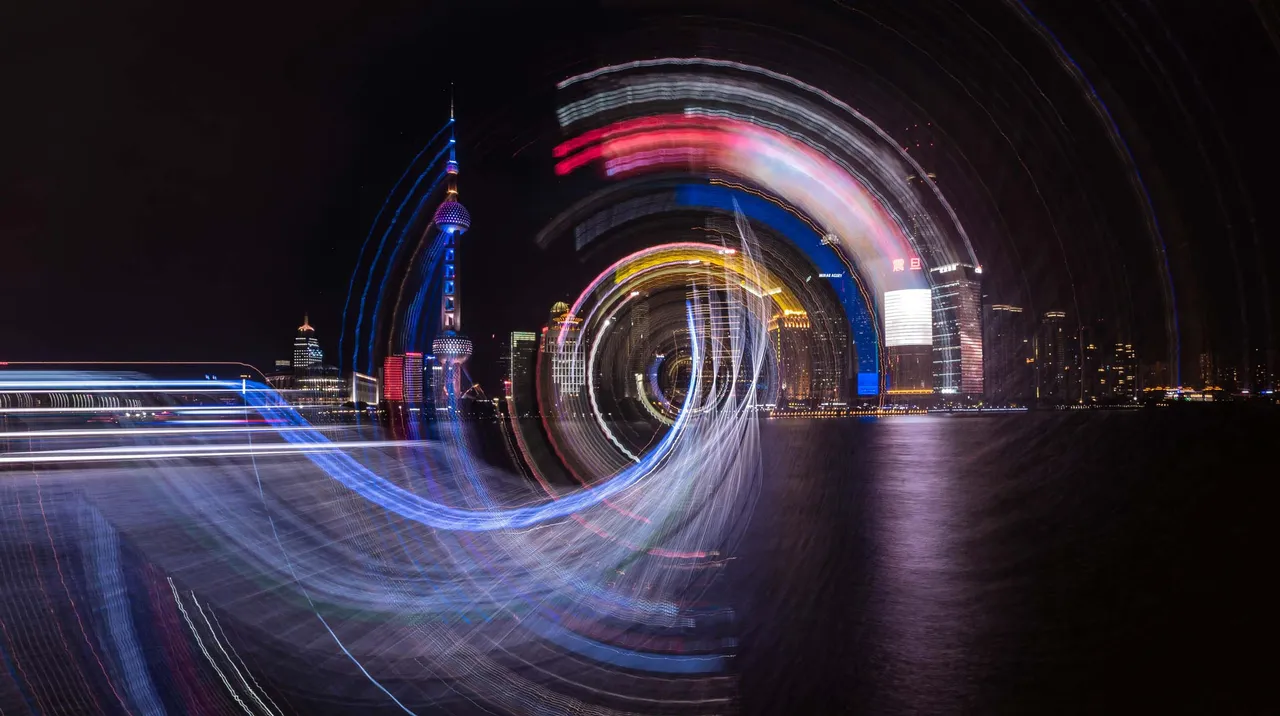
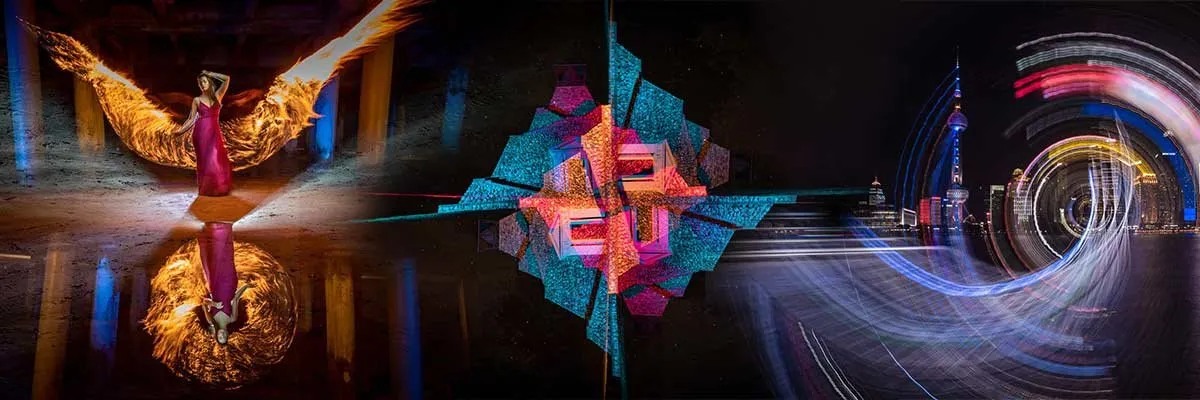
The Bund on the riverside of Shanghai looking at the Pudong skyline. The specialty here is that I rotated the camera continuously in one direction. Just before I ended the exposure I rotated back and forth instead of just the same direction. That’s why you see the helix-like light trails. The other super interesting feature is the trails of the boat. The boats were moving in all directions. So on the large boat gave me that trail that extends in diameter. I loved that special feature in combination with the twist at the end.
B) Covered Stepping Rotation
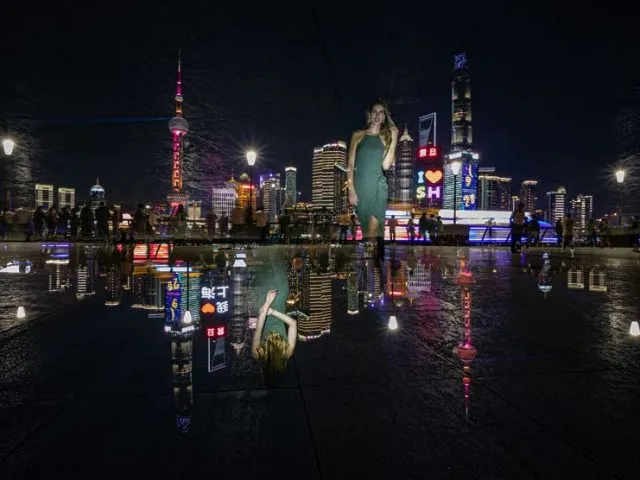
This shot was also taken at the Bund on the riverside of Shanghai looking at the Pudong skyline. The specialty here is that I rotated the camera only in two steps by 180°during the exposure. At first, Lisa was looking at me and the Skyscraper say I love Shanghai in English, and when she turns around looking at the Skyline the Skyscrapers LEDs from the Chinese version of this. What I love here is that the background also changes because the advertising and the people change.
How to get the Twist in your Photo? Camera rotation Explained.
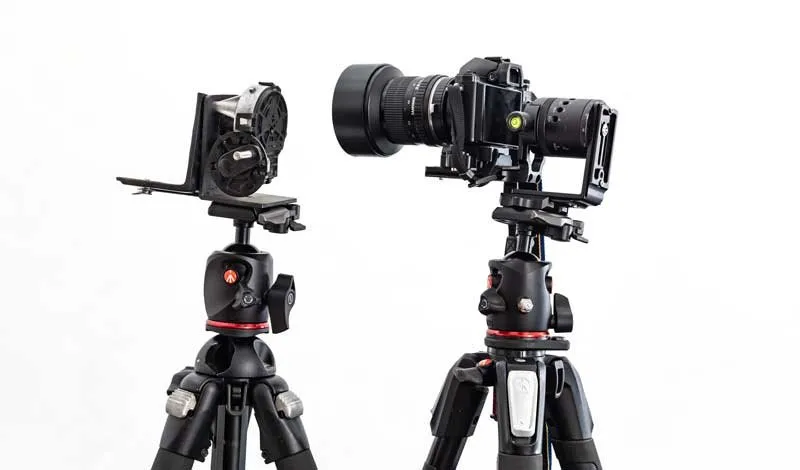
Here you see the two Camera Rotation devices I have currently in use. Both are actually built by friends for me. Thanx Dan and Chris.
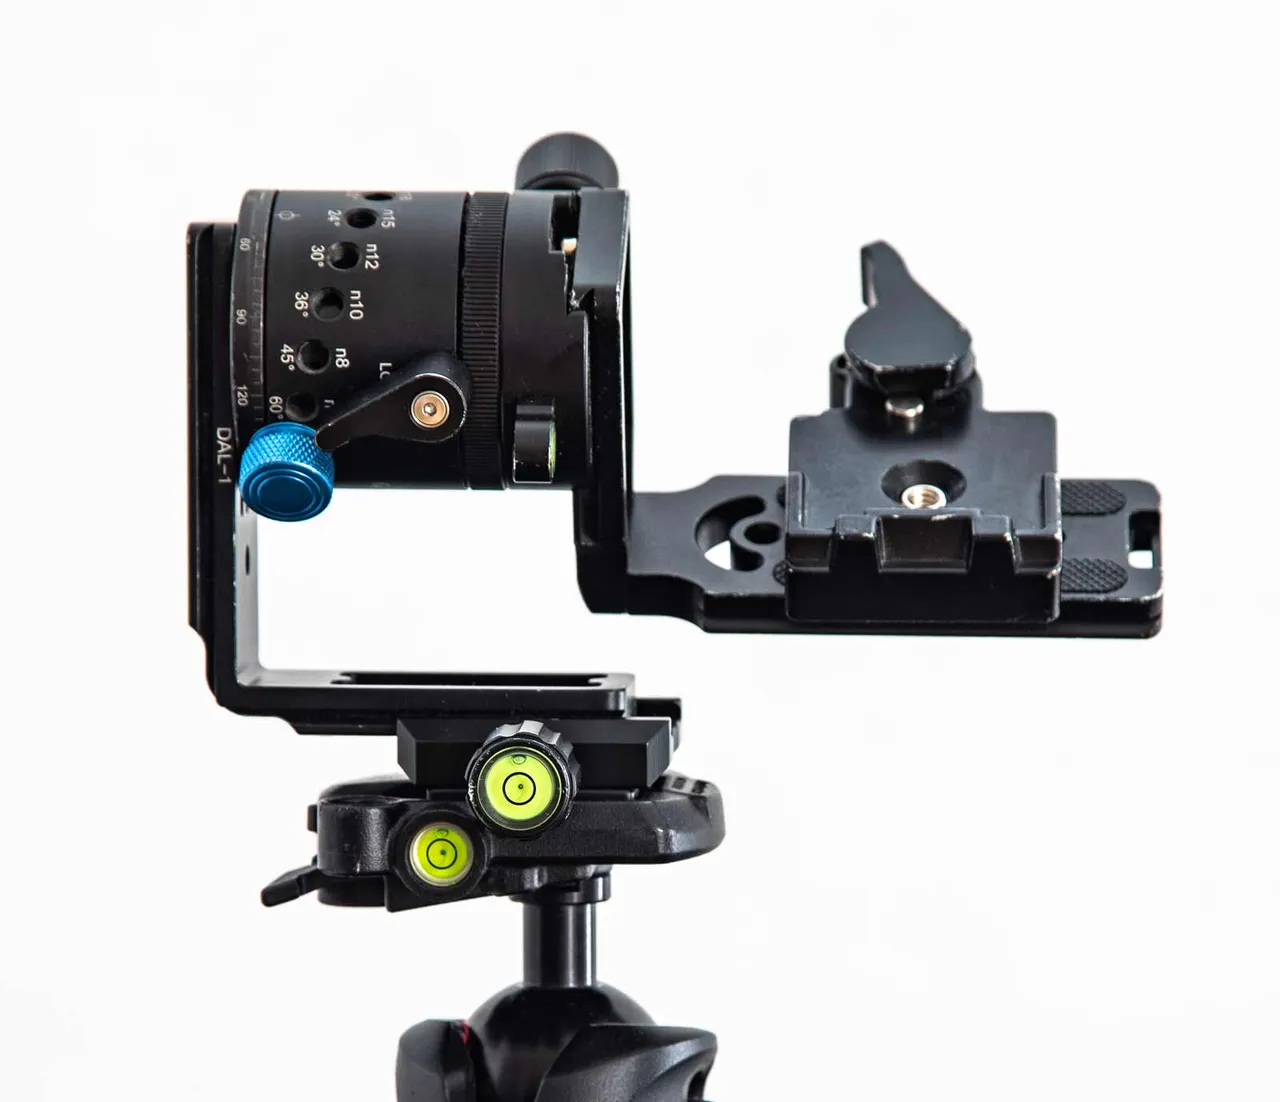
This is a close-up of the Camera Rotation device that shows you the nobs and fixtures to achieve an accurate angle selection. It allows you to set the cameras angle for 5°, 10°, 15°, 20°, 24°, 30°, 36°, 45°, 60°, 90° steps to achieve any regular rotations you desire.
In Germany, you find the GemTune DH55 Rotation Head on Amazon with the following link.
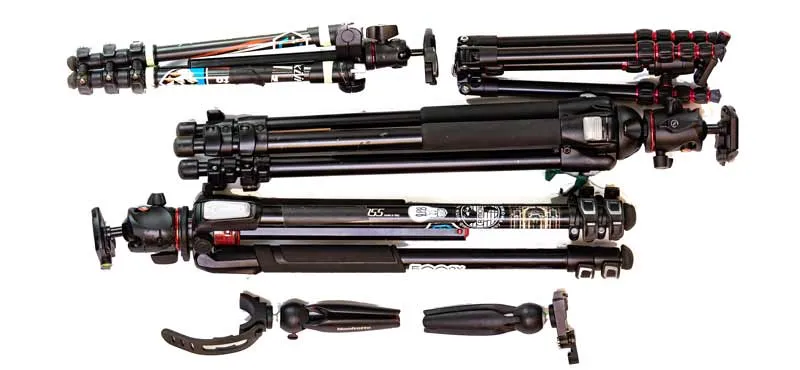
Tripods!
Another very important part of your Camera Rotation experiments would be a great stable fixture. It should bring some substantial weight to hold your camera and the rotation rig in position and should not move in the wind or when you rotate the camera. As you see in the image above I use Manfrotto tripods. The model I prefer is a compromise of price and weight and stability. The Manfrotto 055 is a good choice. It is also offered as a carbon lightweight version but then you need to allocate a hefty sum of your income.
Have a solid stand!
Once you got those two things and your camera you should be good to go for some continuous Camera Rotation. Set up your camera and composition with the rotation in your mind. The main concern here is where the rotation center should be. Think about that for a second. Every light source will create a light trail once the camera starts moving. So often you would leave the camera sitting for a bit to see the main subject. Then you start rotating and all the city lights start trailing along around the axis. If the rotation and the Z-axis of the sensor are aligned you will have all pixels potentially create trails. If the rotation axis is not in the center of your sensor you’ll get a donut light-trail-free zone in the rotation center.
Lens cover! Lens-capping.
Now you would like to try the second technique? Ok, then you need one more thing. Not extremely high tech but essential of you do not seek the light trails. A cover for your lens while you rotate the camera and change your setup. For that many photographers, I know, simply chose what is on their head to cover the lens; a simply non-light transparent cap or hat. This technique is often referred to as lens-capping. That’s important for pretty much all LightPainters to be safe at night. Especially when moving around and changing the set-up during the exposure.
If you would like to find out what lenses I use for Light Painting follow this link.
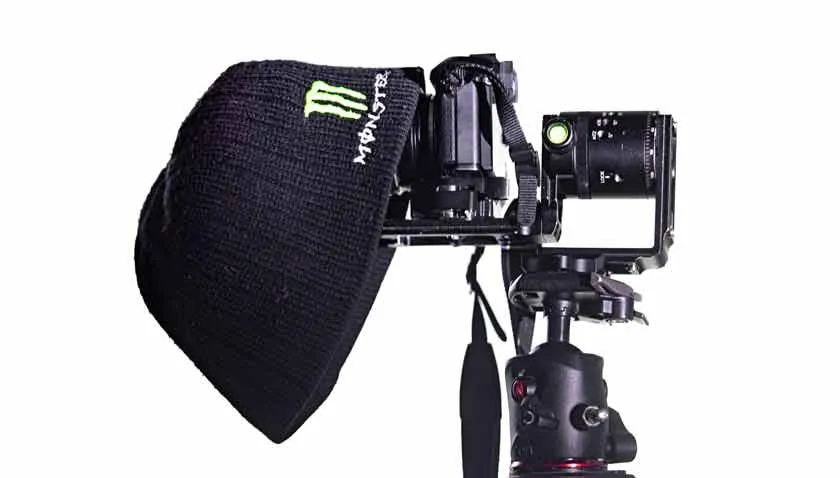
So here you see a small part of my collection. Remember in the worst case you can use your forearm (if the Jacket or Jumper is black) to cover the lens while you rotate the lens. (Man I have done that so often when I forgot where my hat is.) And if for some unimaginable reason you run around in a white jacket use your hopefully black socks. Anything Goes!

Leave your hat on.
Who does not know that song? Anyhow well now you can run off and imagine a composition where your subject would be worth it to rotate. Think about how many steps you would like to do and set your camera to bulb mode. Hit the trigger with the hat on and take it off when you are ready. Then you can take it off when you think the light is ok. Put it back on (or have an assistant who can do that on your command so you stay close to the subject). During the time the hat is on you can change your set-up and move around with your headlamp on without the danger of falling into a pit (yes that has happened to friends).
Getting the first Rotation going:
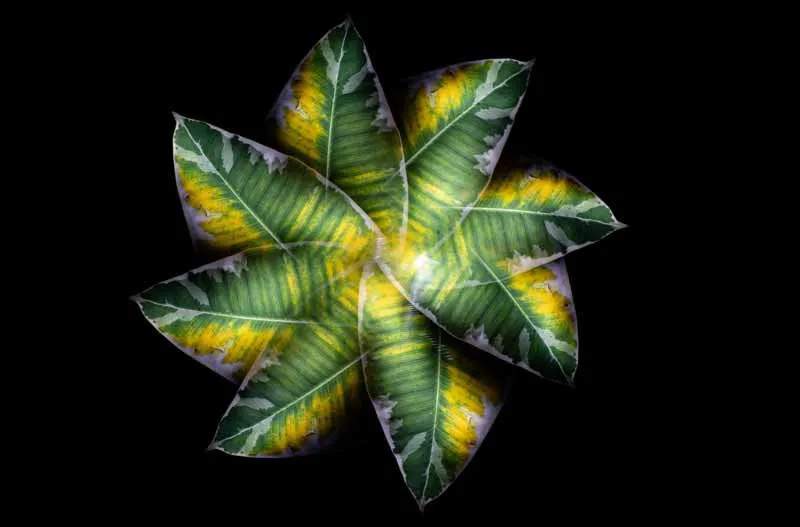
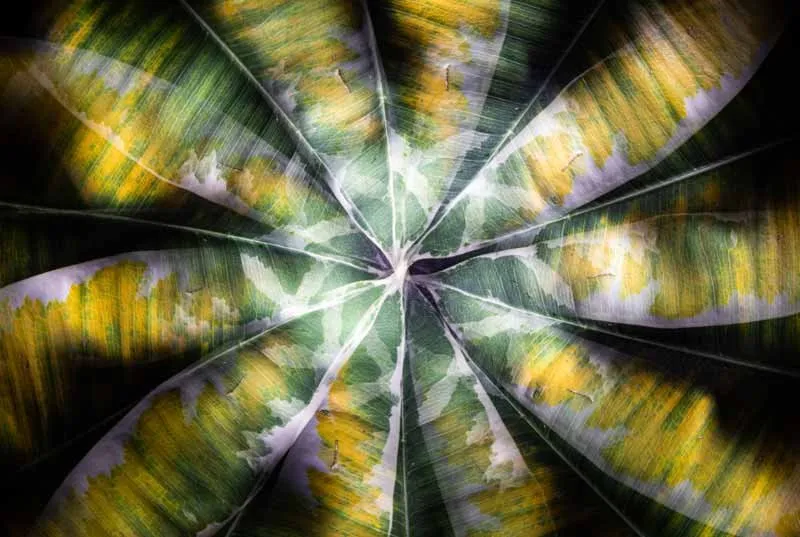
Why don’t you start safe and sound in your living room with a beautiful leaf of a plant or your cactus? They will certainly hold still and you have enough time to practice and find the right settings for your photo. Here is a ficus tree leaf that I fixed on a tripod and lit several times until the 360° rotation was complete.
“Camera Rotation – Making of video”
Here you find a hands-on – real-life example of how I use the Camera rotation tools.

At last some more inspiration.
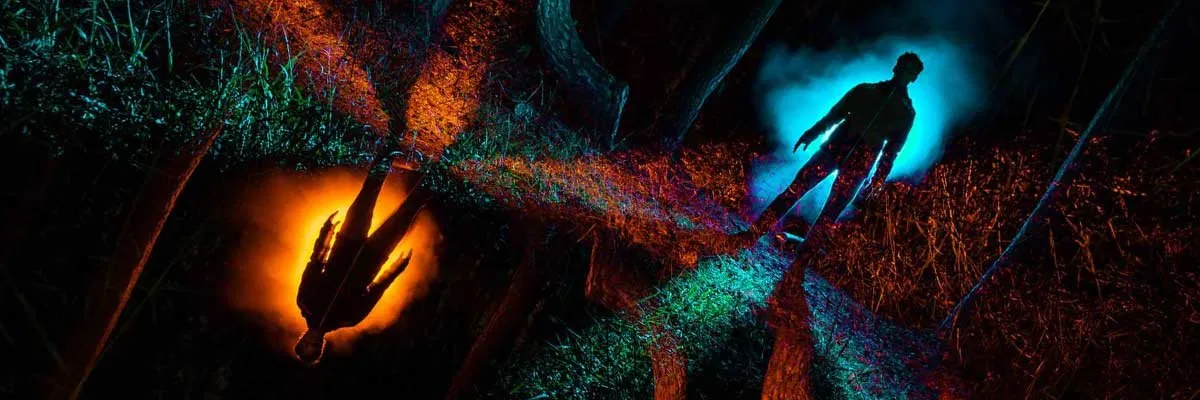
The following shot was taken in the crooked forest on the polish German border together with one of my best friends Tim who is the model here. In both parts of the exposure, I followed the same steps only changing from blue to orange. The one thing I was aiming for was the shadow of his legs should create a shadow space where I find him “on the other side”. that worked out well. 😉
I really hope you learned something here and liked what you saw and with a little luck, it was also inspirational. If you have more questions please do not hesitate. I am happy to share my knowledge.

Gunnar Heilmann Photogrpahy
If you are interested in more of my art please also see:
Website YouTube Facebook Page Instagram Feed
Since I am one of the cofounders of the LightPainters project, I also help and support the Light Painting community as a curator - not only on the Hive.
We are Light Painters

To help and support the LightPainters community here on Hive I would appreciate your delegation of HivePower. Any amount is appreciated. It does not require much to get started, we are happy for any gesture.
How to delegate?
Delegate 50HivePower, [50HP]
Delegate 250HivePower, [250HP]
Delegate 500HivePower, [500HP]
All the Hive Power will help to upvote the artist's contribution as part of the LightPainters community.
Thank you so much!