
step by step instructions on how to set up and mine steem.
If like me, youve tried mining unsuccessfully before and have found it daunting and complicated to search through all the out of date mining tutorials, then this tutorial may be of help.
firstly i'd like to thank @abit @pfunk @gandalf @joseph @bitcoiner @someguy123 for their help and tutorials, without which i wouldn't have been able to learn the mining process.
If you are running windows you need to set up a virtual machine :
I followed @pfunk's excellent post on how to set up Ubuntu Server 16.04 on vmware on a windows machine.
step 1
First we need to check if the CPU's virtualization features are enabled.
Download cpu-z. http://www.cpuid.com/downloads/cpu-z/cpu-z_1.76-en.zip
check if VT-x or AMD-V is enabled in cpu-z.
If its not enabled you should be able to enable it in your bios.

step 2
download and install VMware Workstation 12.5.2 Player for Windows 64-bit Operating Systems and ubuntu-16.04-server-amd64.iso
https://my.vmware.com/en/web/vmware/free#desktop_end_user_computing/vmware_workstation_player/12_0
http://releases.ubuntu.com/16.04/ubuntu-16.04-server-amd64.iso
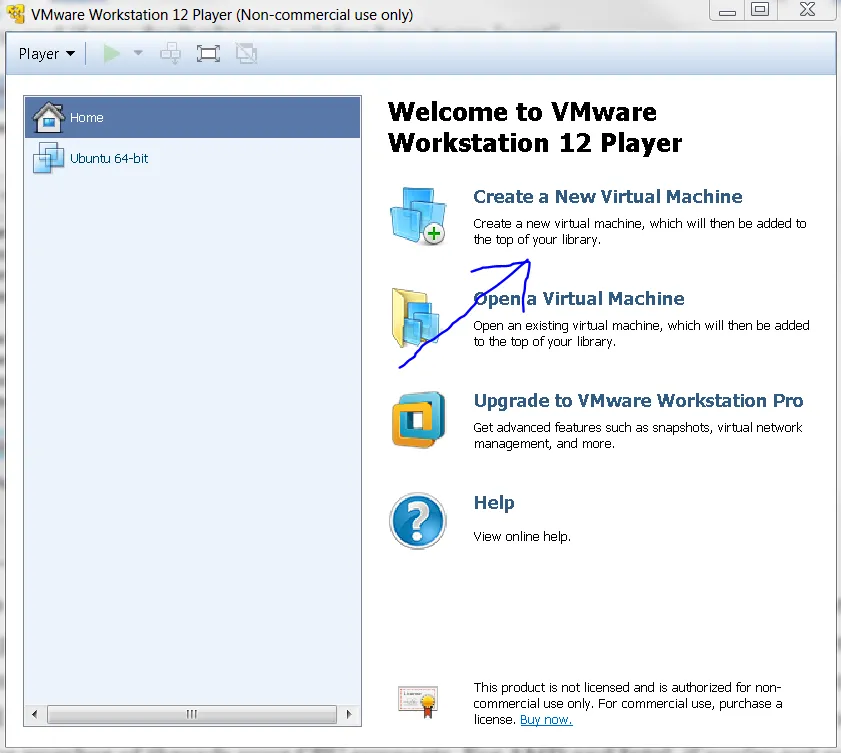
launch vmware and 'create new virtual machine. then select 'installer disk image file' and browse to the location of your ubuntu iso download.
then create a user name and password, these details are for your login when you login to ubuntu.
Next screen choose your location to install, leave these settings on default unless you want to install on a different disk to your operating system.
same with the next screen 'specify disk capacity' you can accept the default settings
on the next screen 'ready to create virtual machine' select customize hardware.
I suggest using a minimum of 2GB, I have 12 GB in my machine so ive allocated 4GB on my installation.

select the number of processors. some cpu's i.e. dual core may actually show as 4 cpu's in windows because each cpu may have 2 threads. to check how many cpu's you have use cpu-z again and look at the box listing threads. this is the number you need to enter.
then click close, and finish.
Vmware will now istall ubuntu. when finished your screen will show a login prompt with your user name. i.e. on my mine it show the line pcste@ubuntu:~$
ubuntu is now installed.
leave your vmware window open.
step 3 setup a telnet / SSH client
donload and install Kitty https://www.fosshub.com/KiTTY.html
now go back to your vmware window and type the command line :
sudo apt-get -y install openssh-server
press enter then put your password in. (the password you created when you set up your ubuntu installation)
then type:
ifconfig
press enter
your screen will now show your i.p address that we need to connect to with kitty.
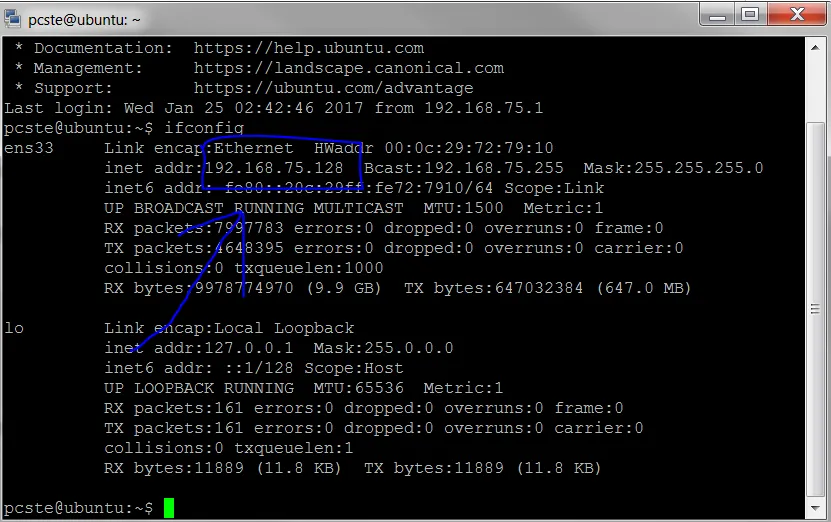
enter this number (include dots) into kitty in the 'host name or (i.p.address)' field
leave ssh selected and port 22
type 'steem' into the saved sessions/new folder field and click save and then open.
when you first run kitty you will get an error box, just accept it.
now in your kitty window it will say 'login as:' enter your user name and password (the ones you created when installing ubuntu)
you are now logged into ubuntu via kitty. kitty is much easier to use than the vmware/ubuntu window
step 4 installing steemd
It may seem daunting if you are a windows user so first a few tips.
rather than typing the commands you can copy and paste them from this tutorial. copy the type as usual in windows and then right handside mouse click when in kitty to paste (ctrl + v doesnt work)
if you get lost and your not sure which folder you are in you can type dir to see the contents of your folder
to navigate up 1 folder type : cd ..
to navigate to the top of the tree type : cd
use kitty rather than the vmware terminal as the vmware terminal has problems with cut and paste and seeing your cursor.
If you are in windows connect to via kitty as instructed in step 3. or in ubuntu open a terminal.
follow the instructions below and wait for each process to finish before moving on to the next
type :
sudo apt-get update
enter.
type :
sudo apt-get -y upgrade && sudo apt-get -y install git cmake g++ python-dev autotools-dev libicu-dev build-essential libbz2-dev libboost-all-dev libssl-dev libncurses5-dev doxygen libreadline-dev dh-autoreconf screen
enter.
next we are going to install steem and @abits patched code. thanks @abit
type :
git clone https://github.com/steemit/steem.git
enter
type :
cd steem
type :
git checkout v0.16.1
enter
type :
git remote add abit https://github.com/abitmore/steem.git
enter
type :
git fetch abit
enter
type :
git merge -m "merge" abit/v0.16.0-mining-shorcut-1
enter
if you get an error
*** Please tell me who you are.
Run
git config --global user.email "you@example.com"
git config --global user.name "Your Name"
to set your account's default identity.
Omit --global to set the identity only in this repository.
fatal: unable to auto-detect email address (got 'pcste@ubuntu.(none)')
then type :
git config --global user.name "pcste"
enter
git--global user.email djpcste@gmail.com
enter
(obviously put your own user and email in) i do believe you can put anything as your email i.e. yourname@email.com
then type :
git merge -m "merge" abit/v0.16.0-mining-shorcut-1
enter
it should now merge sucessfully.
next type :
git submodule update --init --recursive
enter
type :
cmake -DCMAKE_BUILD_TYPE=Release -DENABLE_CONTENT_PATCHING=OFF -DLOW_MEMORY_NODE=ON
type :
make
enter
type :
cd programs/steemd
enter
Now we want to run steemd so it creates config.ini
type :
./steemd
enter
then leave it a minute then press Ctrl + C on your keyboard to stop steemd
now navigate to the file that stores config.ini
type :
cd witness_node_data_dir
enter
now we are going to edit config.ini
type :
nano config.ini
enter
now copy this list of steem nodes :
seed-node = 176.31.126.187:2001
seed-node = 212.117.213.186:2016
seed-node = 212.47.249.84:40696
seed-node = 45.55.54.83:2001
seed-node = 5.9.18.213:2001
seed-node = 52.4.250.181:39705
seed-node = 52.74.152.79:2001
seed-node = gtg.steem.house:2001
seed-node = seed.bitcoiner.me:2001
seed-node = seed.jesta.us:2001
seed-node = seed.riversteem.com:2001
seed-node = seed.rossco99.com:2001
seed-node = seed.royaltiffany.me:2001
seed-node = seed.steemd.com:34191
seed-node = seed.steemnodes.com:2001
seed-node = seed.thecryptodrive.com:2001
seed-node = steem-id.altexplorer.xyz:2001
seed-node = steem-seed1.abit-more.com:2001
seed-node = steem.clawmap.com:2001
seed-node = steem.global:2001
seed-node = 89.36.26.82:2001
seed-node = seed.esteem.ws:2001
seed-node = 104.199.118.92:2001
seed-node = anyx.co:2001
seed-node = seed.bhuz.info:2001
seed-node = seed.steemfeeder.com:2001
paste into your config.ini that you just opened with nano (right mouse click in your kitty window to paste)
now move your cursor down the page using your arrow keys until you get to
# P2P nodes to connect to on startup (may specify multiple times)
# seed-node =
move your cursor under # seed-node = and then right click your mouse to paste into nano.
you should end up with this :
# Endpoint for P2P node to listen on
# p2p-endpoint =
# Maxmimum number of incoming connections on P2P endpoint
# p2p-max-connections =
# P2P nodes to connect to on startup (may specify multiple times)
# seed-node =
seed-node = 176.31.126.187:2001
seed-node = 212.117.213.186:2016
seed-node = 212.47.249.84:40696
seed-node = 45.55.54.83:2001
seed-node = 5.9.18.213:2001
seed-node = 52.4.250.181:39705
seed-node = 52.74.152.79:2001
seed-node = gtg.steem.house:2001
seed-node = seed.bitcoiner.me:2001
seed-node = seed.jesta.us:2001
seed-node = seed.riversteem.com:2001
seed-node = seed.rossco99.com:2001
seed-node = seed.royaltiffany.me:2001
seed-node = seed.steemd.com:34191
seed-node = seed.steemnodes.com:2001
seed-node = seed.thecryptodrive.com:2001
seed-node = steem-id.altexplorer.xyz:2001
seed-node = steem-seed1.abit-more.com:2001
seed-node = steem.clawmap.com:2001
seed-node = steem.global:2001
find the lines :
# Location of the shared memory file. Defaults to data_dir/blockchain
# shared-file-dir =
# Size of the shared memory file. Default: 32G
# shared-file-size =
and change to :
# Location of the shared memory file. Defaults to data_dir/blockchain
shared-file-dir = /dev/shm/
# Size of the shared memory file. Default: 32G
shared-file-size = 12G
make sure you remove the # where i have done (information after the # sign is read only and will not be excecuted by the program)
Now find the lines :
# Plugin(s) to enable, may be specified multiple times
enable-plugin = witness account_history account_by_key
and change to :
# Plugin(s) to enable, may be specified multiple times
enable-plugin = witness
Now we want to set up our miner name and key while still in config.ini these are instructions to set up a new account name which will create a new account in steemit. to check if the name is available got to steemit and in the url bar put the user name you want in. i.e.
https://steemit.com/@pcste01 (replace pcste01 with the name you want)
if it then says 'account unknown' then your name is available.
firstly we need a wif key (Wallet import format key)
if you want to use an existing steemit account name then use the active private key on your steemit account. (listed in permissions on steemit)
if creating a new account :
open a web browser and go to https://www.bitaddress.org open an internet browser
save the page (right mouse click, save page as)
once downloaded open the downloaded page move your mouse around until you see the percentage go up to 100%
then click on 'bulk wallet' and UNCHECK Compressed addresses (so there is no tick in the box)
click 'generate'
now copy 1 of the wif private keys on the right hand side (private key begins with a 5)
go back to your nano window and find the line :
# name of witness controlled by this node (e.g. initwitness )
# witness =
and remove the # and put your name you want to mine with
# name of witness controlled by this node (e.g. initwitness )
witness = "pcste01"
(replace pcste01 with your name)
then just below find the line :
# name of miner and its private key (e.g. ["account","WIF PRIVATE KEY"] )
# miner =
and change to :
# name of miner and its private key (e.g. ["account","WIF PRIVATE KEY"] )
miner = ["pcste01","put your wif key here"]
as before, remove the # and replace pcste01 with your name and replace put your wif key here with the wif key you have just copied from the bitaddress page (or from your steemit permissions)
if you want more than 1 miner then add more witness's and miner details. e.g.
# name of witness controlled by this node (e.g. initwitness )
witness = "pcste01"
witness = "pcste02"
witness = "pcste03"
# name of miner and its private key (e.g. ["account","WIF PRIVATE KEY"] )
miner = ["pcste01","wifkey"]
miner = ["pcste02","wifkey"]
miner = ["pcste03","wifkey"]
next line underneath, change the mining threads. i have a 4 core processor so i have 4 threads enabled
# Number of threads to use for proof of work mining
mining-threads = 4
now scroll to bottom of file and change the log levels to info
# route any messages logged to the default logger to the "stderr" logger we
# declared above, if they are info level are higher
[logger.default]
level=info
appenders=stderr
# route messages sent to the "p2p" logger to the p2p appender declared above
[logger.p2p]
level=info
appenders=p2p
now save config.ini by pressing Ctrl and o
then enter
now press Ctrl and x to exit.
now move up a level back into the folder steemd
type :
cd ..
enter
type :
sudo mount -o remount,size=10G /dev/shm
enter
now we want to run steemd.
type :
./steemd
steemd will now sync with the blockchain so may take a while. once it has synced you should start the mining process.
if you want to stop steemd at any point press Ctrl and c for a clean shutdown, this will ensure you start steemd next time without having to re sync the blockchain.
when mining you should see this :

sources i used.
https://steemit.com/mining/@abit/steem-v0-16-0-brief-mining-guide
https://steemit.com/steem/@pfunk/guide-maximize-your-mining-hashrate-in-windows-by-mining-steem-in-a-vm
https://steemit.com/steemhelp/@joseph/mining-steem-for-dummies
https://github.com/steemit/steem
https://status.steemnodes.com/
links to some of my other tutorials and projects.
https://steemit.com/mining/@pcste/how-to-build-your-own-gpu-mining-rig-frame-stackable-option-for-farms
https://steemit.com/photography/@pcste/pcste-s-photography-tutorials-how-to-make-your-own-photography-paper-cyanotype-easy-process
https://steemit.com/steemit/@pcste/total-crypto-newbie-guide-how-to-turn-your-steem-into-btc-and-fiat-cash
https://steemit.com/photography/@pcste/pcste-s-photography-tutorials-introducing-digital-transfer-film-we-ve-come-full-circle-digital-back-to-analogue
https://steemit.com/steemit/@pcste/new-website-www-howtosteemit-com-simple-newbie-instructions-first-test-stage-please-give-feedback
https://steemit.com/steemit/@pcste/new-website-steemfriends-com-social-site-for-steem-users-alpha-stage-testers-needed-please-give-feedback