Hello HIVEs
It's currently stormy in my area and it's raining non-stop. Light painting outdoors is no fun in this bad weather. Time to visit my little one's workshop in the basement and take care of the light painting tools. Since I often realize my light painting projects alone, automation plays an important role. That's why I got it into my head to automate the Rotation Tool for Flashlights, which until now has been driven by a crank, so that I can control it remotely using my cell phone.
Zurzeit ist es bei mir in der Gegend stürmisch und es regnet pausenlos. Bei diesem schlechten Wetter macht Lightpainting im Freien kein Spass. Zeit um meine kleine Werkstatt im Keller zu besuchen und sich um die Lightpainting Tools zu kümmern. Da ich meine Lightpainting- Projekte oft allein realisiere, spielt Automation eine wichtige Rolle. Deshalb hatte ich mir in den Kopf gesetzt, die bis jetzt durch eine Kurbel angetriebene Drehhilfe für Taschenlampen so zu automatisieren, dass ich diese mit Hilfe meines Handys fernsteuern kann.
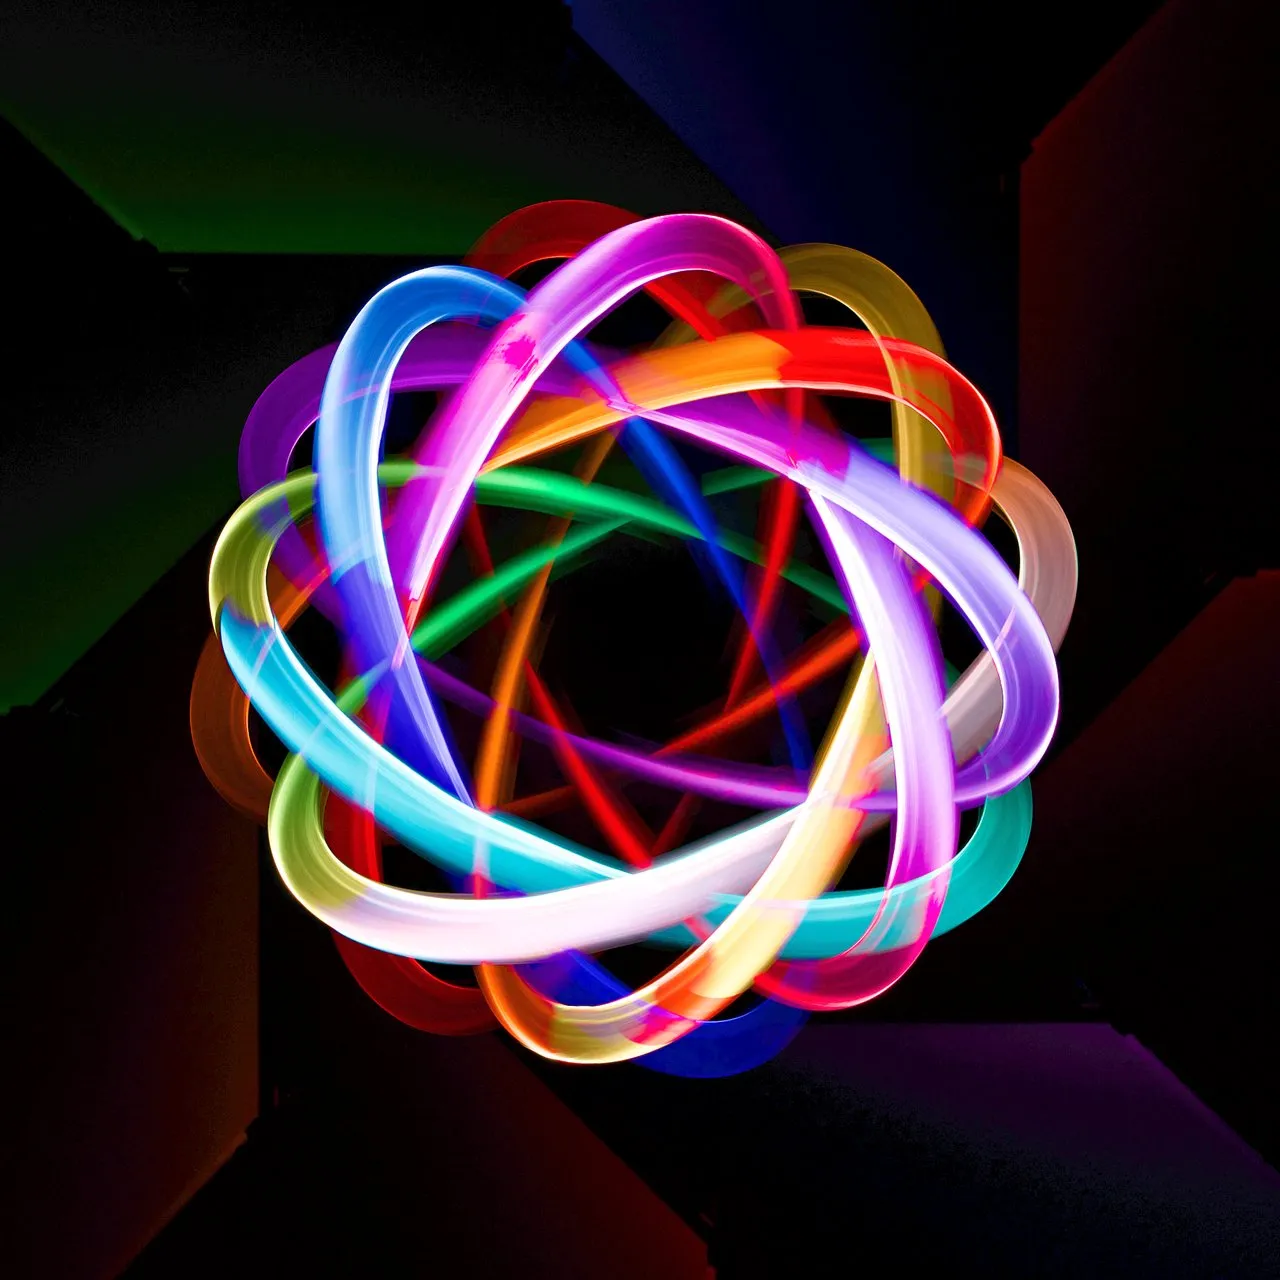
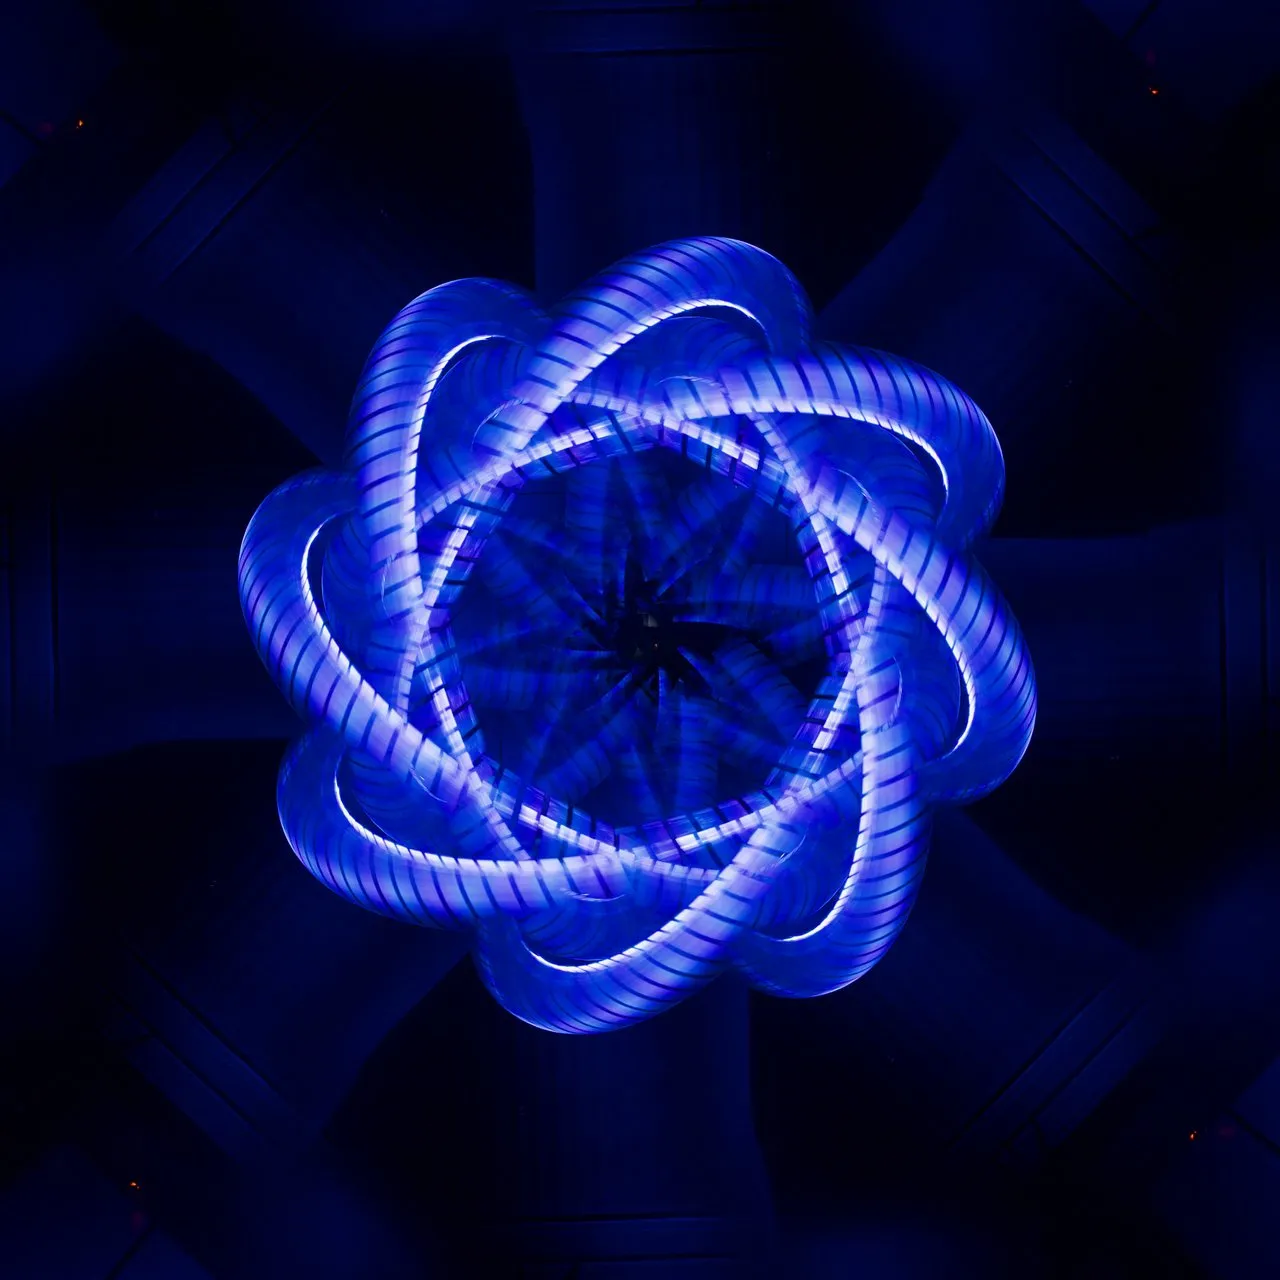
A Rotation Tool for flashlights was used in the cover image to which an RGB CRITTER flashlight from Ants on a Melon with an oval light blade was mounted. Together with a camera rotation these mandalas are created. The flashlight is rotated once by 360° on the rotation aid and the camera is rotated by 45° around the optical axis after each rotation.
Im Titelbild kam eine Drehhilfe zum Einsatz, an der eine RGB CRITTER -Taschenlampe von Ants on a Melon mit ovalem Lightblade montiert war. Zusammen mit einer Kamerarotation entstehen dabei diese Mandalas. Dabei wird die Taschenlampe auf der Drehhilfe einmal um 360° rotiert und die Kamera nach jeder Umdrehung um 45° um die optische Achse gedreht.

If you like it even more complicated, first rotate the camera by 180°, change the tripod and lens and then use the rotating tool to conjure up this orbital in the picture. This is what happened to Hans Rouflair in an old warehouse at a disused Soviet airfield. I will report on this type of light painting in a future post. Today I would like to introduce you to the light rotation tool for flashlights.
Wer es gern noch komplizierter mag, rotiert erst die Kamera um 180°, wechselt das Stativ und Objektiv, um dann mit Hilfe der Drehhilfe noch dieses Orbital in das Bild zu zaubern. So geschehen mit Hans Rouflair in einer alten Lagerhalle auf einem stillgelegten Sowjetflugplatz. Ich werde zu dieser Art von Lightpainting noch in einem zukünftigen Beitrag berichten. Heute möchte ich euch die Drehhilfe vorstellen.
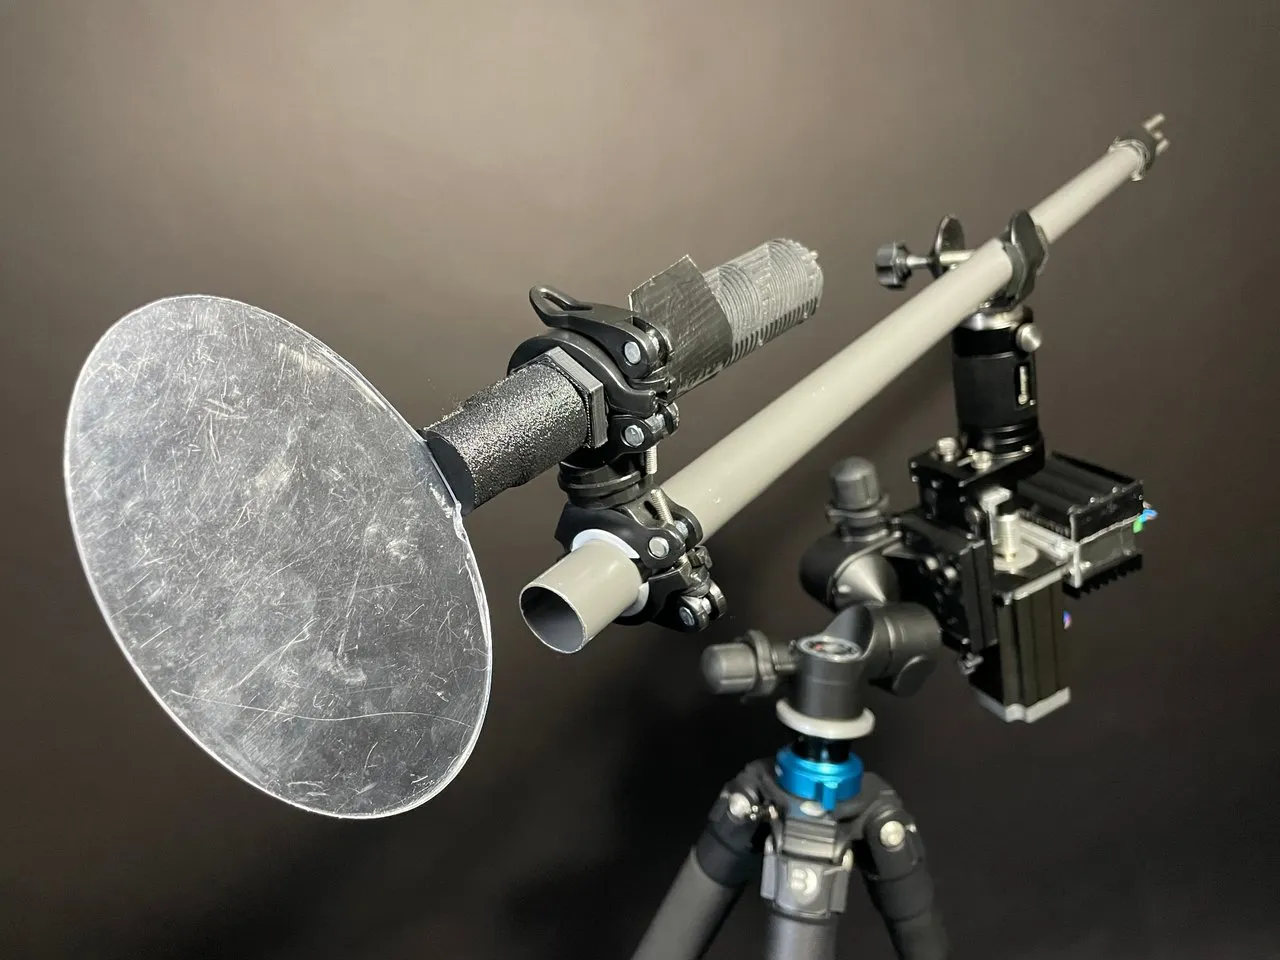
The project was realized from parts that I had at home. I admit I'm a collector and I pick up every piece no matter how small if I find it useful. This has the advantage that you don't have to go to the hardware store for every small project and it saves money.
For those of you who want to replicate the project I've put a small parts list.
Realisiert wurde das Projekt aus Teilen, die bei mir zu Hause vorhanden waren. Ich gebe zu, ich bin ein Sammler und hebe jedes noch so kleine Teil auf, wenn es mir brauchbar erscheint. Das hat den Vorteil, dass man nicht wegen jedem kleinen Projekt in den Baumarkt fahren muss und es spart Geld. Für diejenigen unter euch, die das Projekt nachbauen möchten, habe ich eine kleine Teileliste aufgestellt.
Um die bereits vorhandene (2) Magilight-Drehhilfe in das System zu integrieren, habe ich noch ein Stück (1) Rohr mit einem Deckel verschweißen lassen um die Klemme für das Rohr verschrauben zu können und einen (3) Adapter von Rund auf Vierkant angefertigt, um den Motor an Stelle der Kurbel zu montieren.
In order to integrate the existing (2) Roller for Magilight into the system, I had a piece of (1) tube welded to a cover so that the clamp for the tube could be screwed on and made a (3) adapter from round to square to mount the motor in place of the crank.

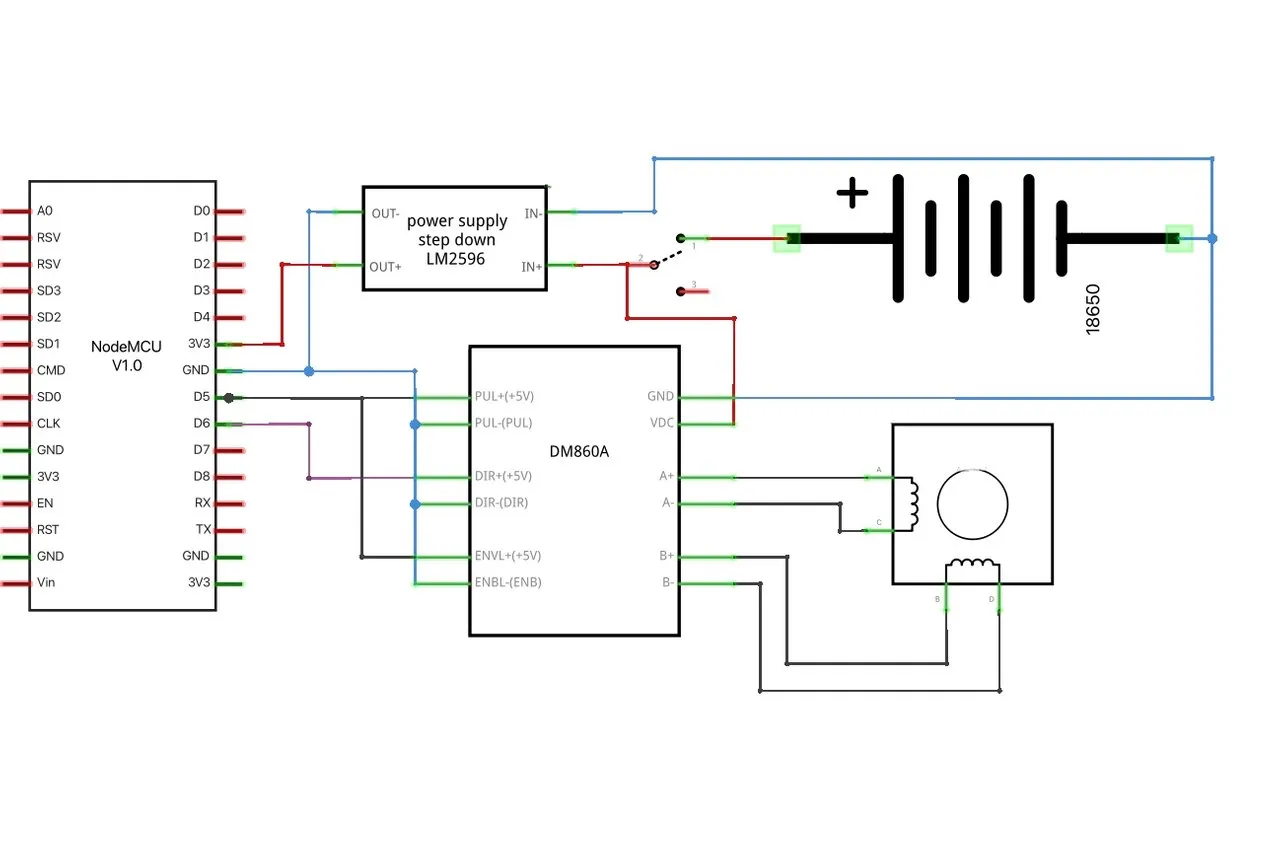
Electronics
Not a lot of electronic parts are necessary and the amount of wiring is limited. Below I show the plan. An ON-OFF switch is important, as the motor consumes 0.5A even when it is stationary. So always switch it off after use, otherwise the battery will quickly run out!
Es sind nicht sehr viele elektronische Teile notwendig und der Verdrahtungsaufwand hält sich in Grenzen. Nachfolgend zeige ich den Plan. Wichtig ist ein EIN-AUS-Schalter, da der Motor auch im Stillstand 0,5A zieht. Nach Gebrauch also immer schön ausschalten, sonst ist der Akku schnell leer!
Code
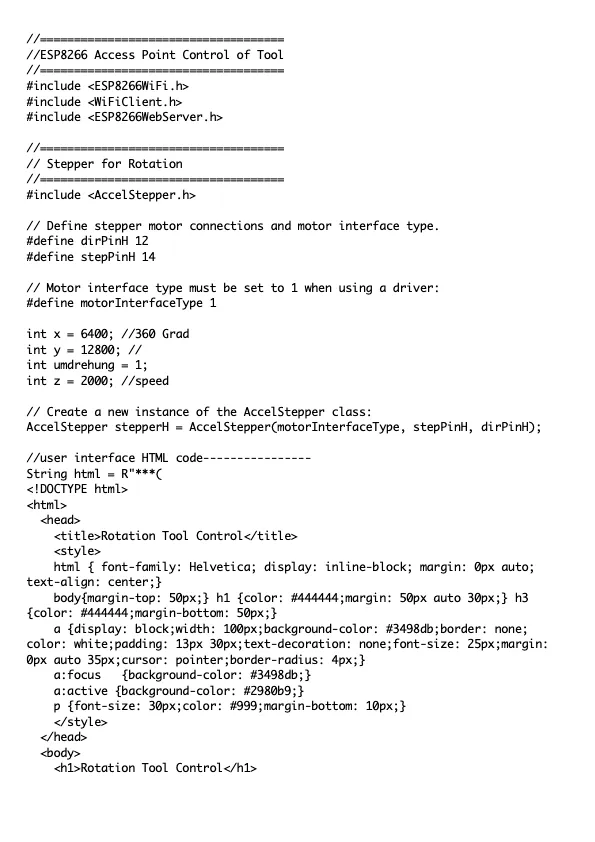
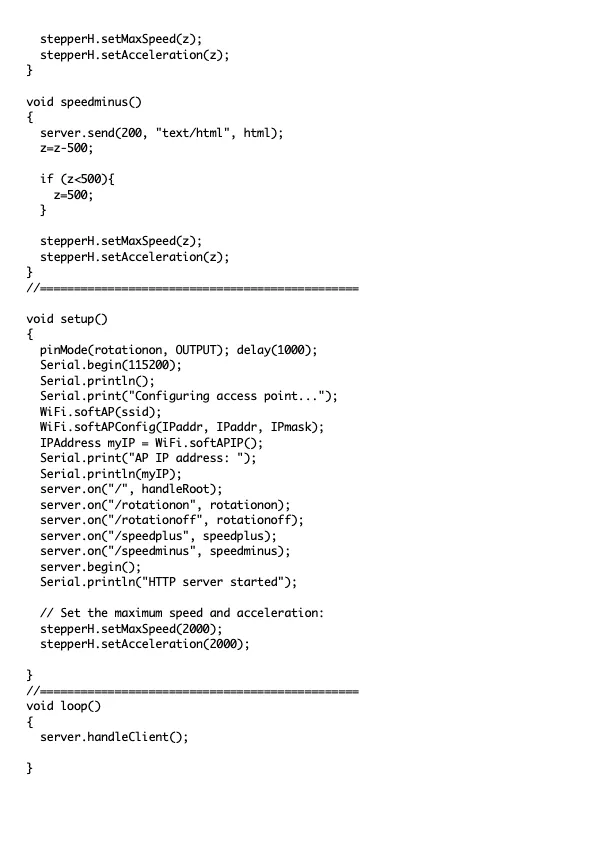
Below I've uploaded the code for the ESP8266 as PNG. Unfortunately I didn't find any other possibility on ECENCY. Please leave a comment if you know a better solution. It will be helpful for future DIY blogs.
Unten habe ich den Code für den ESP8266 als PNG hochgeladen. Leider fand ich keine andere Möglichkeit auf ECENCY. Bitte hinterlasst ein Kommentar, wenn ihr eine bessere Lösung kennt. Es wird für zukünftige DIY -Blogs hilfreich sein.

App
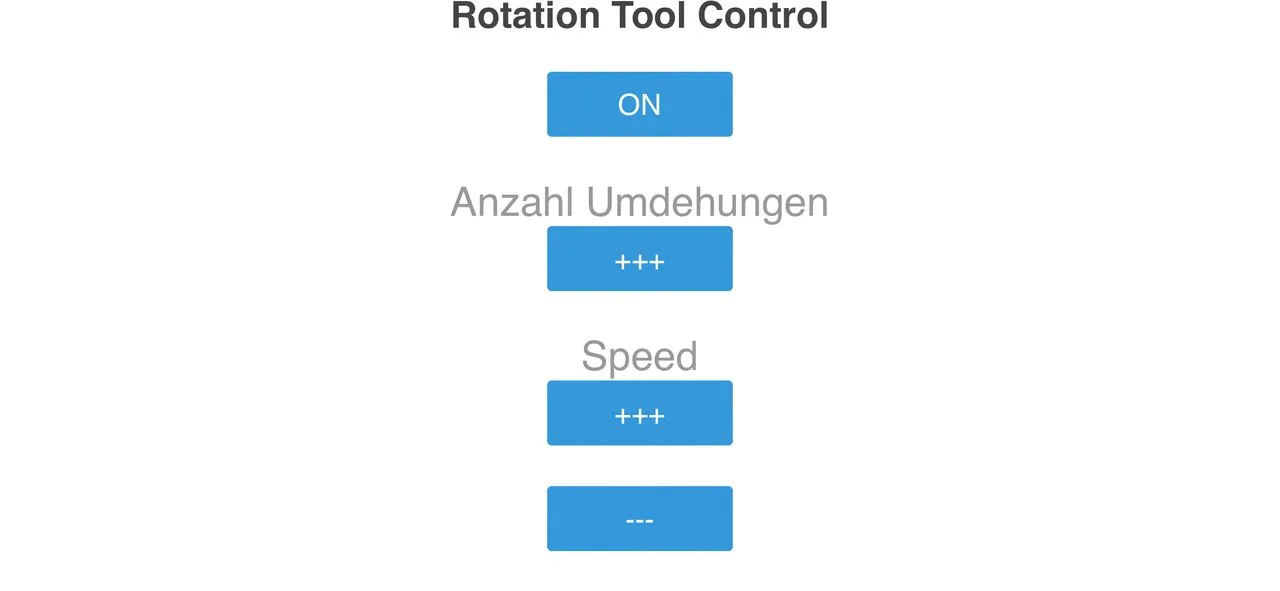
First you have to connect to the WiFi "RotationToolControl". Then you open the BROWSER and enter the IP 192. 168. 2. 2. The controls will then appear on your device. See picture below. Button ON makes the Rotation Tool for Flashlights rotate once. Button +++ (number of turns) increases the number with each click. For example if I click twice I get three revolutions. With the button Speed +++ / --- I can change the rotation speed. For the time being I have dispensed with an actual value display since the programming should be quick. A practical test showed me that I can do without it in the future.
Zuerst müsst ihr euch mit dem WLAN "RotationToolControl" verbinden. Dann öffnet ihr den BROWSER und gebt die IP 192. 168. 2. 2 ein. Danach erscheint die Steuerung auf eurem Gerät. Siehe Bild unten. Button ON lässt die Drehhilfe einmal drehen. Button +++ (Anzahl Umdrehungen) erhöht die Anzahl mit jedem Klick. Wenn ich zum Beispiel zwei mal klicke bekomme ich drei Umdrehungen. Mit dem Button Speed +++ / --- kann ich die Rotationsgeschwindigkeit verändern. Auf eine Istwertanzeige habe ich vorläufig verzichtet, da die Programmierung schnell gehen sollte. Ein Praxistest hat mir gezeigt, dass ich auch in Zukunft darauf verzichten kann.
Summary
It doesn't take much effort to build such a tool. I needed a total of three evenings (6-8 hours in total). I already had most of the parts in the drawer. If you have to buy the parts, I estimate the costs between 100 and 200 € depending on the version. The challenge for me is always to use what is available. I wish you a lot of fun with the replica and improve it. Finally, a tool test image.
Es ist kein großer Aufwand solch ein Tool zu bauen. Ich habe insgesamt drei Abende (insgesamt 6-8h) benötigt. Die Teile hatte ich größtenteils schon in der Schublade. Wenn man sich die Teile kaufen muss, schätze ich die Kosten je nach Ausführung zwischen 100,00 - 200,00 €. Wobei bei mir stets die Challenge ist, das Vorhandene zu nutzen. Ich wünsche euch viel Spaß beim Nachbau und verbessern. Abschließend noch ein Tool-Testbild.
Leave a comment if you have any questions about the project or would like to read more articles about tool building.
I hope you enjoyed the post. Next Sunday I'll be reporting on a light painting again. So stay tuned!
Lasst einen Kommentar da, wenn ihr noch Fragen zu dem Projekt habt oder noch mehr Beiträge über den Toolbau lesen möchtet.
Ich hoffe euch hat der Beitrag gefallen. Nächsten Sonntag werde ich wieder über ein Lightpainting berichten, also bleibt dran!
WHAT IS LIGHT PAINTING?
Light painting is a unique form of art. The darkness is illuminate by the artist with diverse light sources and light traces are paint into the picture with various light tools. Various techniques are use, such as camera rotation or other movements of the camera during the exposure. The creative possibilities are almost unlimited. All the pictures were taken during one single exposure. Apart from denoising, sharpening, cutting and possibly adjusting the white balance, the pictures are not processed on the computer.
CandelART
more about me and my art:
www.candelart.de
Flickr
OpenSea
Instagram

WE ARE LIGHT PAINTERS
To help and support the LightPainters community here on Hive I would appreciate your delegation of HivePower. Any amount is appreciated. It does not require much to get started, we are happy for any gesture. @lightpainters
How to delegate?
Delegate 50HivePower, [50HP]
Delegate 250HivePower, [250HP]
Delegate 500HivePower, [500HP]
Delegate 1000HivePower, [1000HP]
All the Hive Power will help to upvote the artist's contribution as part of the LightPainters community.