Good day everyone! Zak here from Cape Town, South Africa.
For those that have done a lot of build projects, you might be familliar with what I am about to show you. Some of you might have see something like this as a made to buy product at a hardware store and they work to a certain degree.
Others might have never seen this before and I think everyone can agree that once you learn how to make something yourself that works, that it is such a blessing and that we often do not worry about spending our money at the shops in that case.
Recently I have been able to clear out some of my garage space and start making stuff! Because I work on my own it becomes tricky to hold something with enough stability while I cut or grind on it and for that reason I needed to build myself a cutting jig:

I built this contrapsion within an afternoon and has since been a great help to my production and safety. I used the bottom bits of two pallets as the base. On top of this I fastened two large blocks of plywood that were joined together as a pallet previously. I then put thee planks across between the two bases.
All of this is to give me height and a gap between the table and the cutting blades of the power tools that I use. Especially the sabre saw.
This jig also helps me to stand square with the table and cut instead of hanging the piece of wood over the side of the table and standing sideways to try cut with a power tool.
The other blocs that I have mounted horizontally on the three planks are set to various widths and if it is really needed, with a reverse on my cordless drill, I can take these out and reposition them.
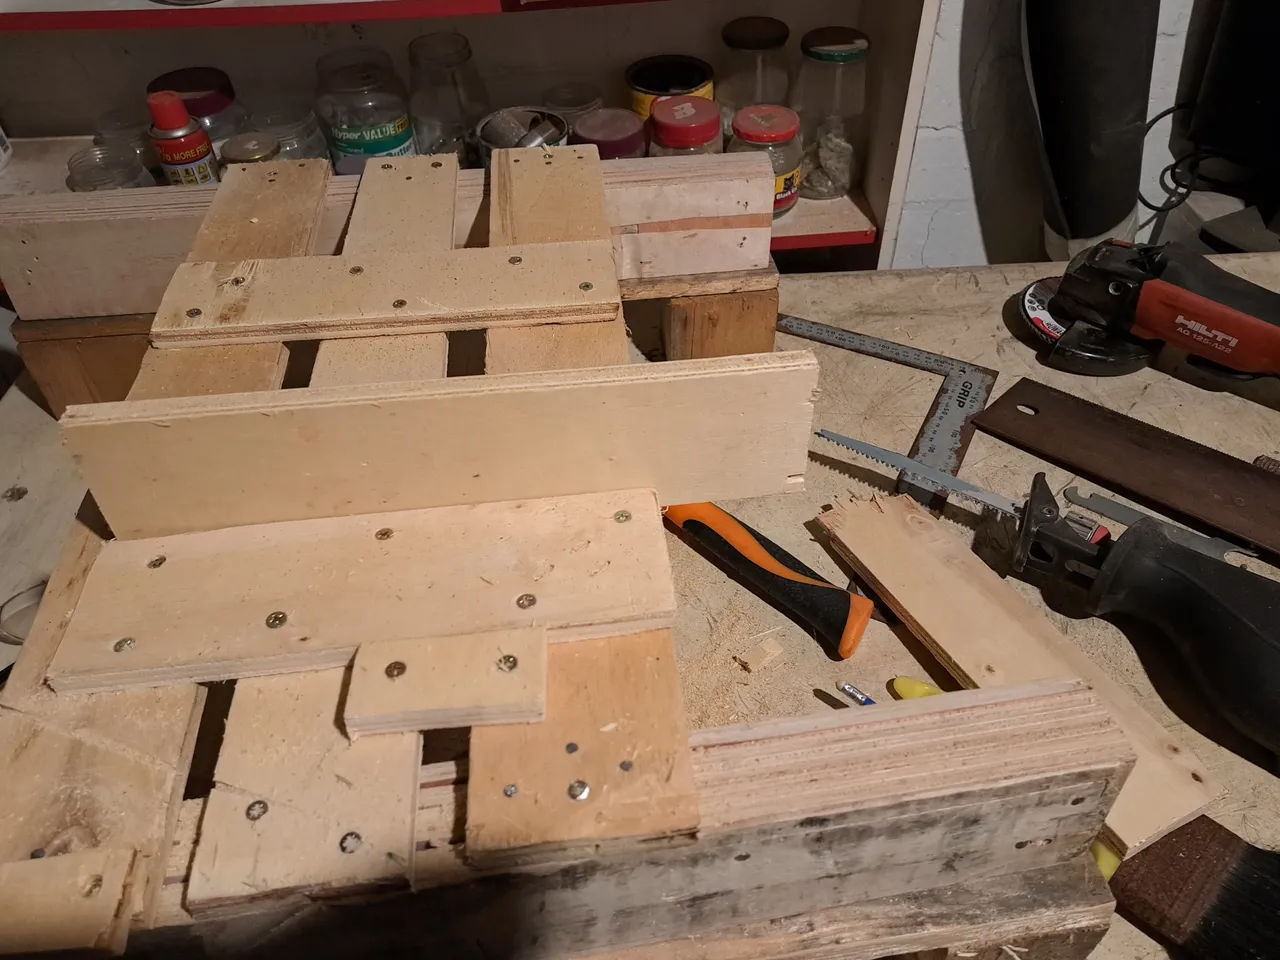
The narrowest gap is to take a plyboard plank straight up and allows me to cut down on a line. Cutting like this, I can get a nearly perfect straight downwards cut with the sabre saw. I then take my cordless grinder with flap-disc grinding pad and straighten out whatever is imperfect on the cut.
Of course this means that I am cutting and making sure that there is some meat left over rather than over-cutting.
Rule of thumb: Always rather undercut than overcut. You can always cut or grind more away. You cannot grind any back on!

The next plank makes a space to allow a board to be inserted flat. Sometimes this angle is needed when making a cut.

Finally there are the two little blocks at the bottom. This is hold a piece of wood while I cut it diagonally. I can either use a saw or the sabre saw. In this case it is not 45 degrees, but if I wanted to make it 45 on a square plank then I could just move the block forwards.
It all depends on what I am cutting and making and what sort of repitition is seen.

Here is the Sabre Saw! As you can see it is a cordless tool. So is my drill and so is my grinder!
I have a Bosch Sabre Saw, Makita Drill and Hilti Grinder, meaning I can sharge their batteries all at the same time because there are three different chargers.
This also helps when the power goes out in South Africa but its still daylight, I can still work for hours afterward and to be honest, most of the time power is out for 2 hours only so it hardly impacts me.
Lighting is another matter. I will need to buy more cordless emergency lights to make that feasable.

Thank you for reading! Lexi does like the stuff I build. Especially if it is box shaped! Haha!
Cheers!
@zakludick