
Bienvenidos, amigos creativos🎨💜
Espero se encuentren muy bien, y que siga teniendo una grandiosa semana llena de buenos y felices momentos. Por mi parte me encuentro bien gracias a Dios, por supuesto feliz porque una vez más les traigo mi participación en el concurso mensual de la comunidad de DIYHub el cual nos trae como tema EN HOMENAJE A LOS GATOS, para este mes me encantaría invitar a mis amigos @gaboamc2393 y @creacioneslelys a que se unan a este concurso. Además, quisiera agradecer la invitación de mi amiga @jorgelissanchez.
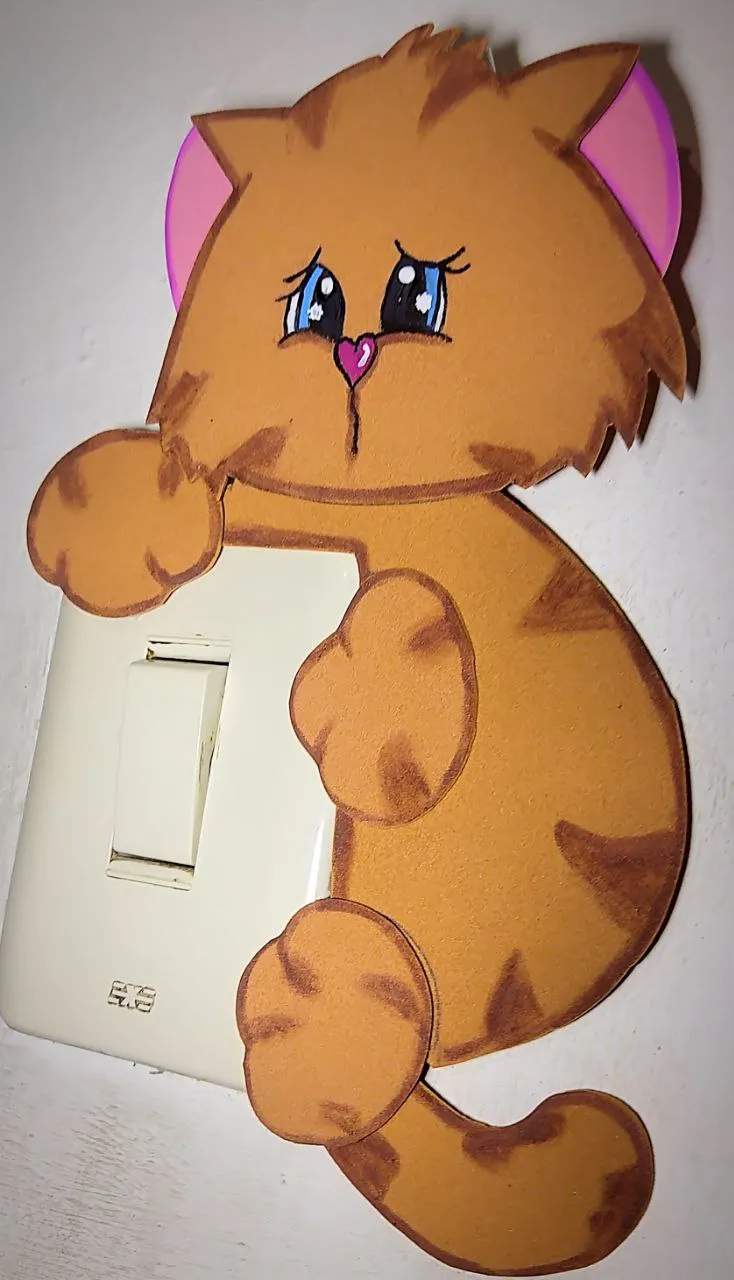
En esta oportunidad este tema me gusto mucho, por supuesto que en honor a mi gatica llamada Bella, así que decidí hacer algo que siempre esté presente en mi habitación y que de una u otra forma estaré viendo mientras esté en la habitación, la cual fue decorar el interruptor de la luz con el tema del mes usando pocos materiales.
En esta oportunidad este tema me gusto mucho, por supuesto que en honor a mi gatica llamada Bella, así que decidí hacer algo que siempre esté presente en mi habitación y que de una u otra forma estaré viendo mientras esté en la habitación, la cual fue decorar el interruptor de la luz con el tema del mes usando pocos materiales.
Welcome, creative friends🎨💜
I hope you are doing well, and that you continue having a great week full of good and happy moments. For my part I am well thank God, of course happy because once again I bring you my participation in the monthly contest of the DIYHub community which brings us as a tematheme IN HOMAGE TO CATS, for this month I would love to invite my friends @gaboamc2393 and @creacioneslelys to join this contest. Also, I would like to thank my friend @jorgelissanchez for her invitation.
This time I really liked this theme, of course in honor of my kitty named Bella, so I decided to do something that will always be present in my room and that in one way or another I will be seeing while I am in the room, which was to decorate the light switch with the theme of the month using few materials.
 |
|---|

😺 Paso 1: De acuerdo al tamaño del interruptor de luz hice el tamaño del dibujo que en este caso es una tierna gatica, puedo de medir el tamaño dibuje el diseño deseado en simulacro como si este estuviese agarrando el interruptor de la luz. Luego de plasmarlo en una hoja blanca, recorte obteniendo así el molde a utilizar.
😺 Step 1: According to the size of the light switch I made the size of the drawing which in this case is a cute kitten, I can measure the size and draw the desired design in simulacrum as if it were holding the light switch. Then I cut it out on a white sheet of paper to obtain the mold to be used.

😺 Paso 2: Ya listo el molde separe cada parte de la gatica, para luego transferir en el foami, el cual lo escogí de color beige y parte de sus orejas rosadas.
😺 Step 2: Once the mold was ready, I separated each part of the kitten, and then transferred it to the foami, which I chose beige and part of its ears pink.

😺 Paso 3: Seguidamente di color a cada parte en foami, comencé por pintar los ojos con colores azul, negro y blanco en pintura al frío y con la ayuda de un pincel muy finito el tamaño que yo uso es 000, la nariz la pinte en color fucsia y realice delineado con color negro para así resaltar un poco más los colores. Después con ayuda de un color marrón realice difuminados alrededor de todo los bordes de las partes de la gatica, adicional realice algunos rayados con el mismo color. De igual forma difumine parte de las orejas pero en color rosado.
😺 Step 3: Then I colored each part in foami, I started by painting the eyes with blue, black and white colors in cold paint and with the help of a very fine brush the size I use is 000, the nose I painted in fuchsia color and made outlining with black color to highlight the colors a little more. Then with the help of a brown color I blurred all around the edges of the parts of the kitten, I also made some stripes with the same color. In the same way blur part of the ears but in pink color.

😺 Paso 4: Dejé secar muy bien la pintura y pegue cada parte en su lugar hasta completar el diseño principal, como último detalle agregue unos puntos de color blanco en los ojos y así expresar más ternura.
😺 Step 4: I let the paint dry very well and glued each part in its place to complete the main design, as a last detail I added some white dots in the eyes to express more tenderness.

Y de esta forma obtuve una tierna gatica para decorar el interruptor de la luz de nuestra habitación, me encantó mucho como se ve, le da un perfecto toque para decorar las habitaciones, e incluso hacer divertido las habitaciones de los pequeños, todo es cuestión de dejar volar tu imaginación✨.
Nos vemos en una nueva creación👩🎨
And this way I got a cute kitty to decorate the light switch of our room, I really loved how it looks, it gives a perfect touch to decorate the rooms, and even make fun the rooms of the little ones, it's all a matter of letting your imagination fly✨.
See you in a new creation👩🎨


Mil gracias por leerme una vez
Nos vemos en una próxima publicación.
Muchas bendiciones y abrazos digitales🤗
Thank you very much for reading me once
See you in an upcoming post.
Many blessings and digital hugs🤗

Mil gracias por leerme una vez
Nos vemos en una próxima publicación.
Muchas bendiciones y abrazos digitales🤗
Thank you very much for reading me once
See you in an upcoming post.
Many blessings and digital hugs🤗