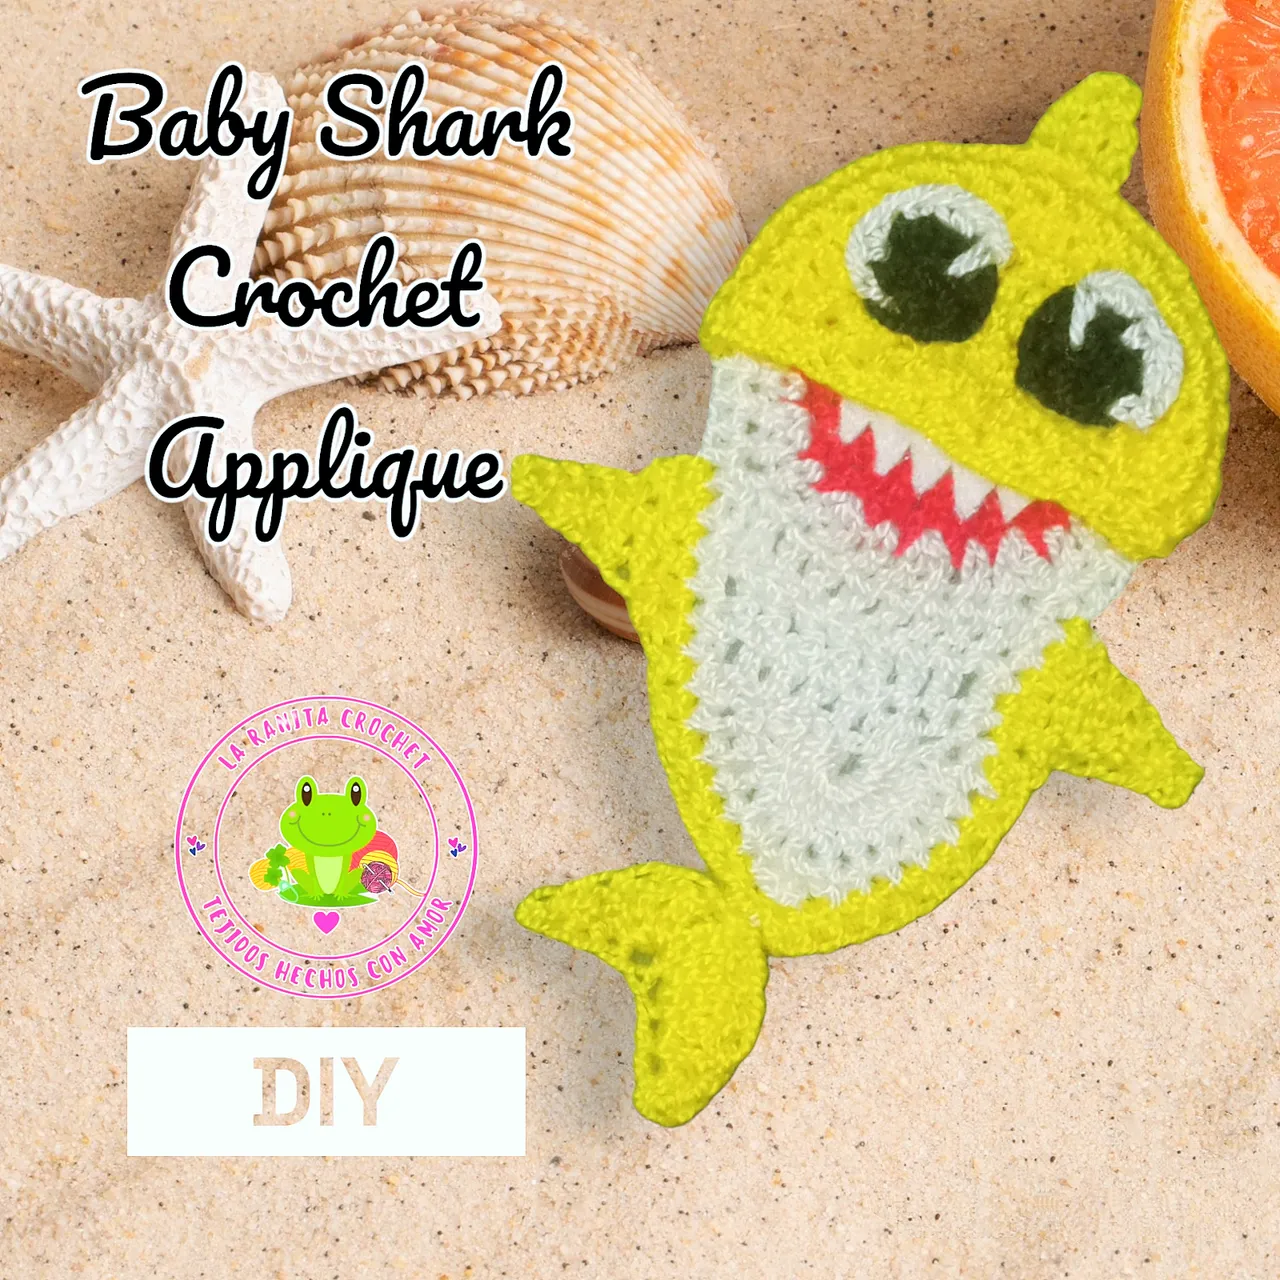
¡Hola, hola! Hivers y linda comunidad de DIYHub, espero todos se encuentren súper bien, animados e inspirados 💟
Hoy les mostrare el paso a paso de cómo realizar un aplique tejido a crochet de Baby Shark, este tierno tiburón a más de uno le ha contagiado su pegajosa canción jajaja…. Al menos a mí sí, y todo el rato que pase tejiéndolo tenía la canción en la mente y también la tarareaba y hasta la cante cuando lo termine de tejer jajaja….
Es una pieza bastante sencilla de tejer y la podemos usar para pegarlo en alguna camisa, gorro o hasta en un bolso, y de seguro lucirá hermoso y súper tierno. El patrón que les mostrare lo seguí del canal de you tube de Mariie Crochet, lo que hice fue adaptar el tamaño al que yo deseaba obtener.
Hello, hello! Hivers and nice DIYHub community, I hope you're all feeling great, cheerful and inspired 💟
Today I will show you step by step how to make a Baby Shark crochet applique, this cute shark has infected more than one of you with his catchy song hahaha.... At least I did, and all the time I was knitting it I had the song in my mind and I even hummed it and sang it when I finished knitting it hahaha....
It's a pretty simple piece to knit and we can use it to stick it on a shirt, a hat or even a bag, and it will look beautiful and super cute for sure. The pattern I will show you is from Mariie Crochet's you tube channel, what I did was to adapt the size to the one I wanted to get.
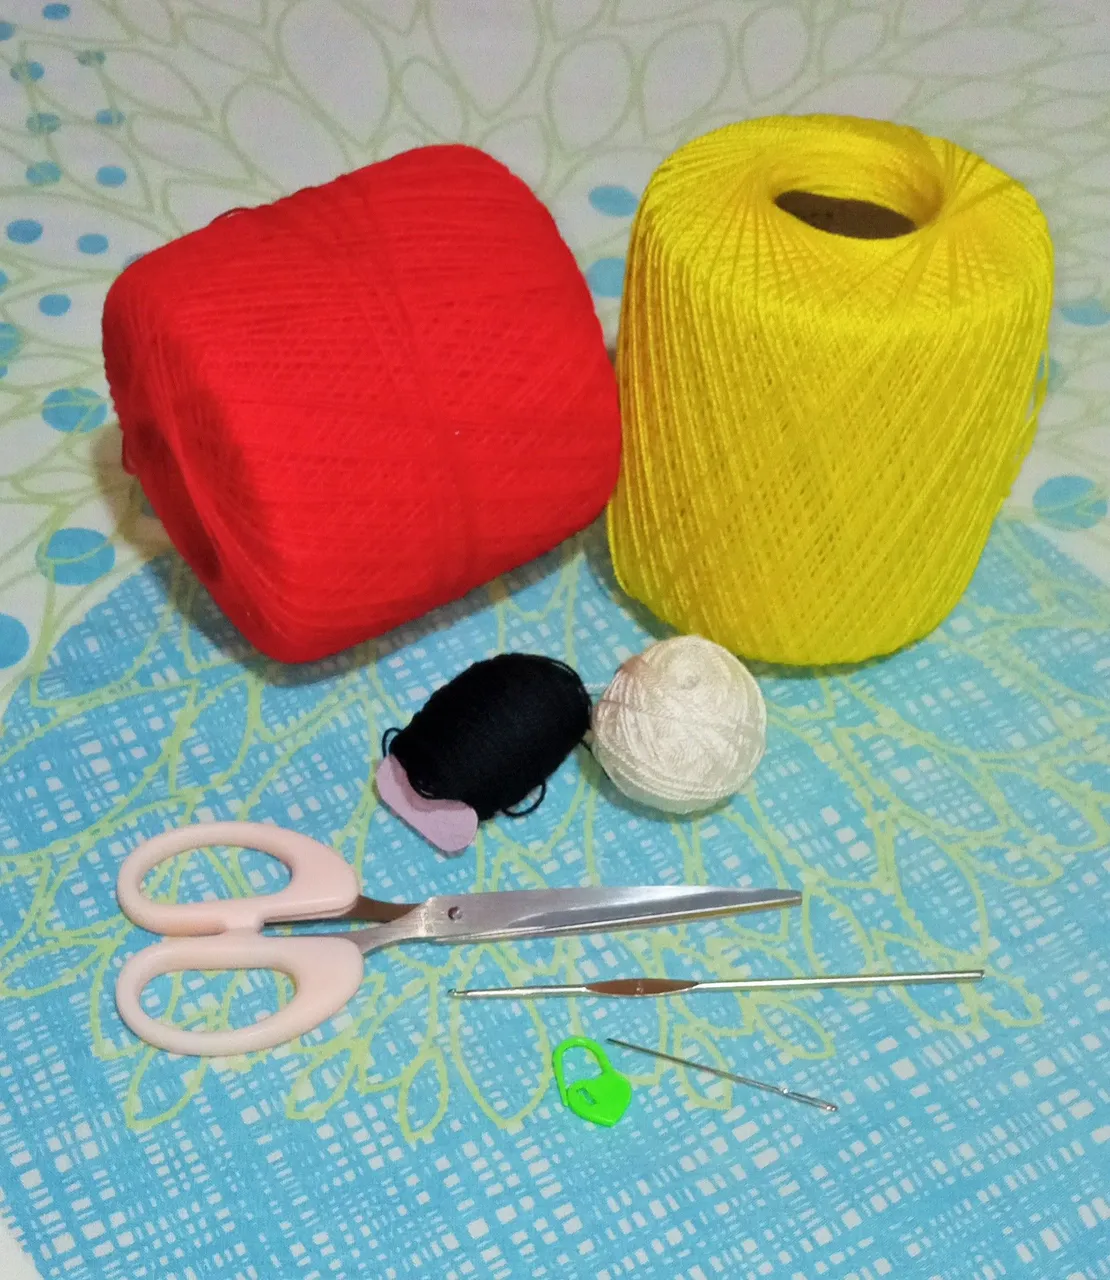
A continuación los dejo con los materiales que use y también con el paso a paso para tejer este divertido aplique de Baby Shark.
Materiales:
- Hilos de crochet en color amarrillo, blanco, rojo y negro.
- Ganchillo #4.
- Marcador de puntos.
- Un pequeño pedazo de fieltro blanco.
- Aguja lanera y tijera.
Here are the materials I used and also the step by step instructions for knitting this fun Baby Shark applique.
Materials:
- Crochet threads in yellow, white, red and black.
- Crochet hook #4.
- Stitch marker.
- A small piece of white felt.
- Wool needle and scissors.
Paso a paso:
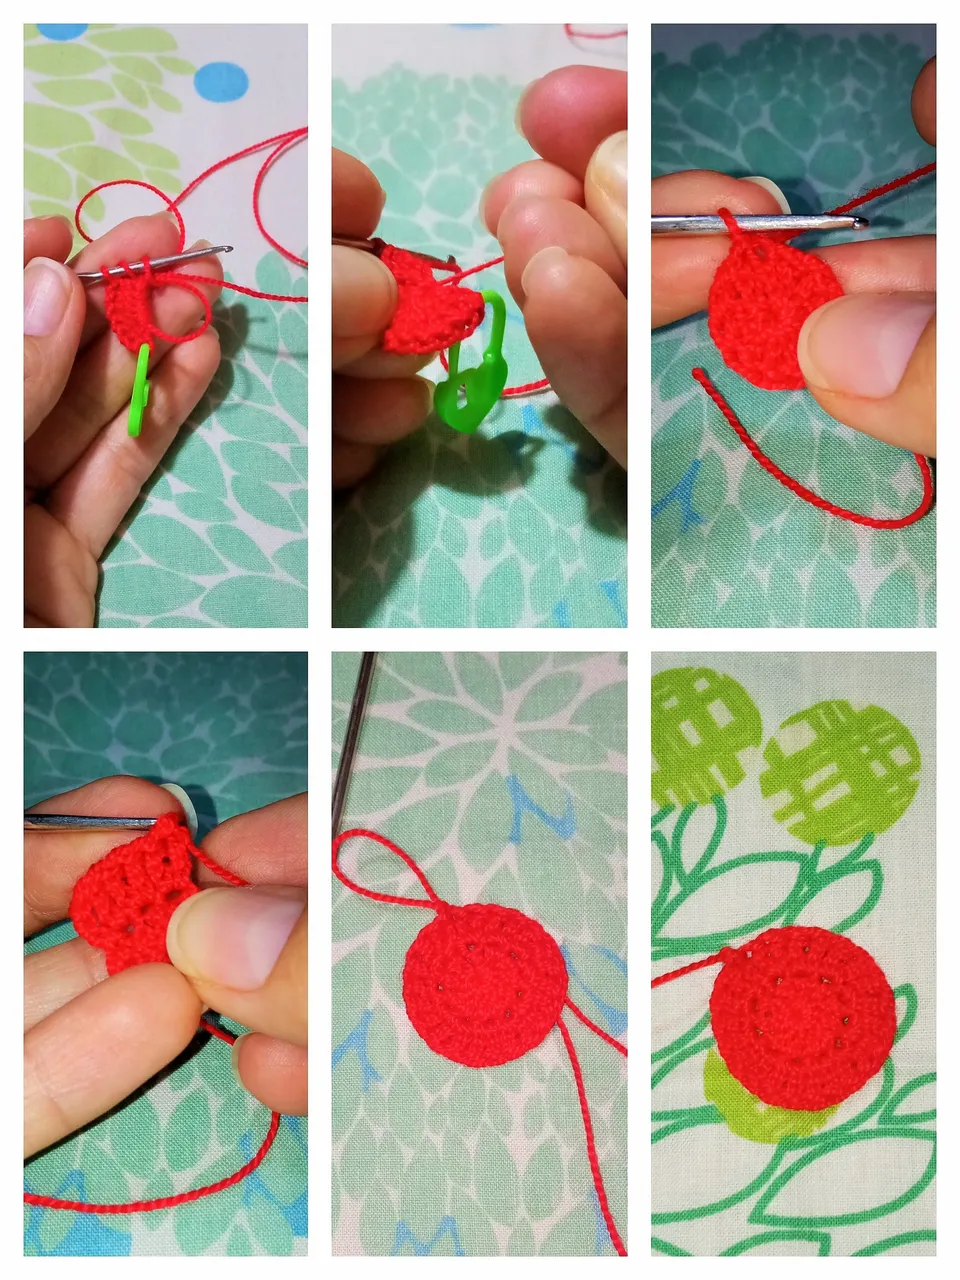
Iniciaremos tejiendo con el color rojo:
V1: Hacemos un Am y luego tejemos 3cad. Que contaran como primer Pa y seguidamente tejeremos 10Pa, para un total de 11Pa en esta vuelta, cerramos con 1Pd y hacemos 3 cad de altura.
V2: vamos a tejer 2Pa en cada punto o espacio, es decir realizaremos 11 Aumentos, para un total de 22Pa en esta vuelta, cerramos con 1Pd, cortamos y aseguramos la hebra.
Step by step:
We will start by knitting with the colour red:
V1: We make an Am and then we knit 3ch That will count as the first dc and then we will knit 10 dc, for a total of 11 dc in this round, we will close with 1sl st and we will make 3 high ch.
V2: we will knit 2dc in each stitch or space, that is to say, we will make 11 increases, for a total of 22dc in this row, we close with 1sl st, cut and secure the yarn.
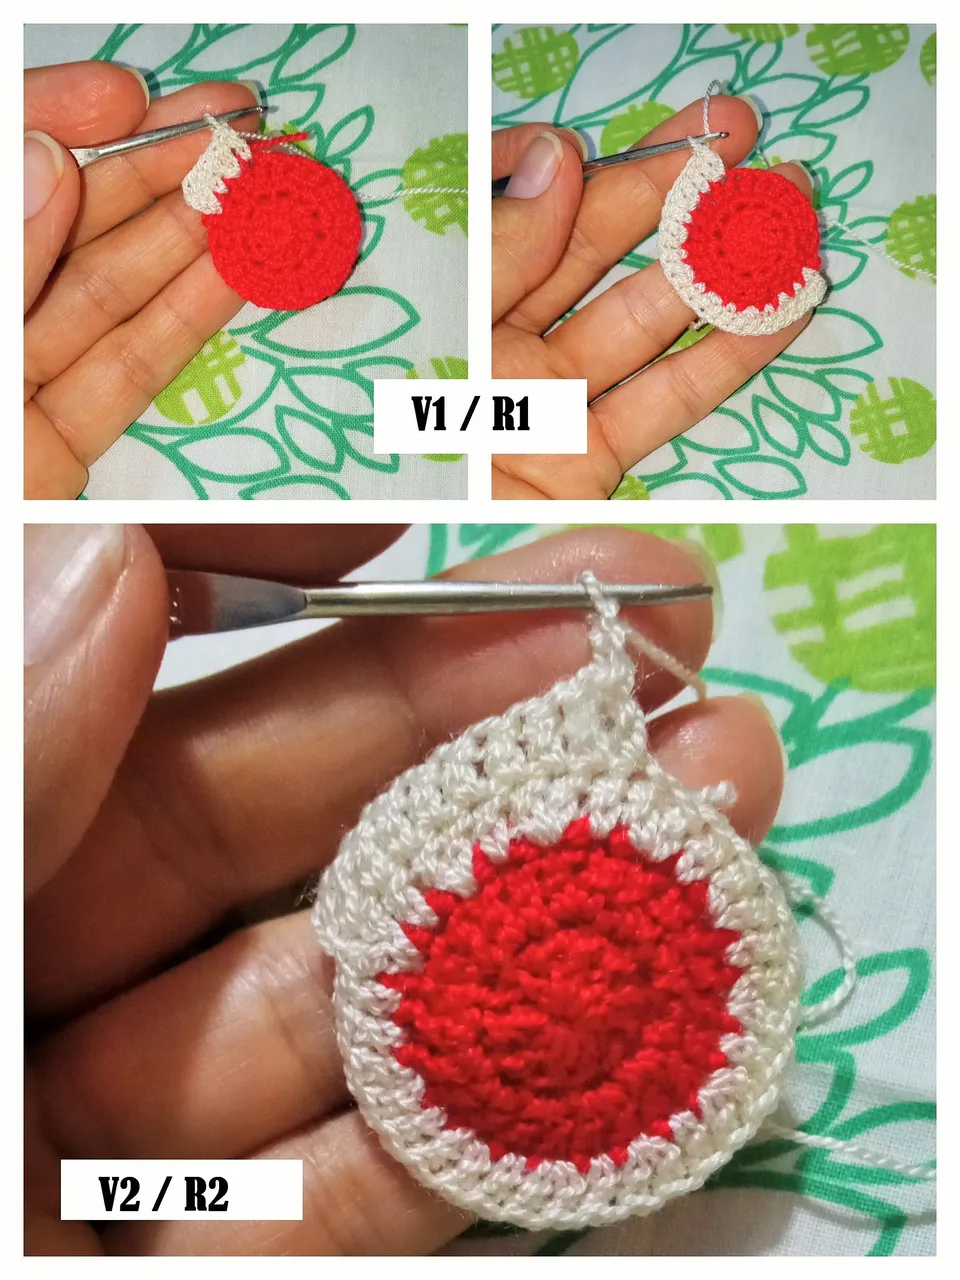
Ahora trabajaremos con el color blanco:
V1: iniciando en el mismo punto de cierre del círculo rojo que ya tejimos, insertamos la habrá de hilo blanco y hacemos 2 cad y en ese mismo punto tejemos 1Pa, en el siguiente punto también hacemos 1Pa, y continuamos haciendo la secuencia de ‘1Aum, 1Pa’ en toda la vuelta, al finalizar tendremos 33Pa, cerramos la vuelta haciendo 1Pd; ya tenemos listo lo que será la cabeza del Baby Shark.
V2: continuamos con el cuerpo, e iniciamos tejiendo 2 cad, y tejemos 10Pa contando la cadeneta como el primer Pa, al terminar hacemos 2cad y damos vuelta al tejido.
Now we will work with white:
V1: starting in the same closing stitch of the red circle that we already knitted, we insert the white yarn and make 2 ch and in that same stitch we knit 1dc, in the next stitch we also make 1dc, and we continue making the sequence of '1inc, 1dc' in all the round, when we finish we will have 33dc, we close the round making 1sl st; we already have ready what will be the head of the Baby Shark.
V2: we continue with the body, and we start knitting 2 ch, and we knit 10dc counting the chain stitch as the first dc, when we finish we knit 2 ch and turn the fabric.
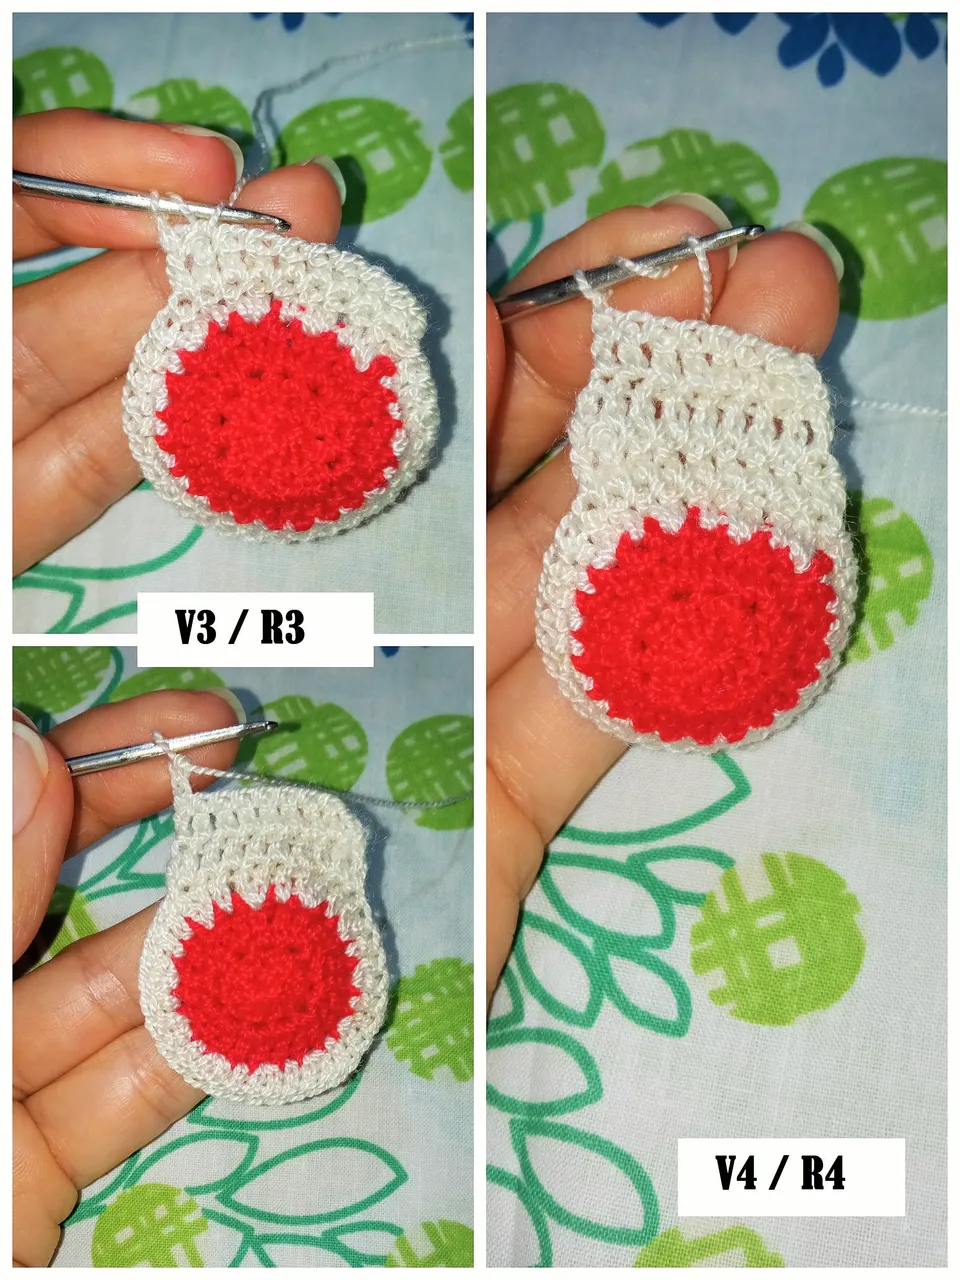
V3: nos saltamos el primer punto y tejemos 1Pa sobre cada punto de la vuelta anterior, así tendremos 9Pa en esta vuelta, recuerden que la cadeneta de altura contara siempre como el primer Pa, tejemos 2cad y damos vuelta al tejido.
V4: igual que en la vuelta anterior, nos saltamos el primer espacio y tejemos 7Pa, para un total de 8Pa en esta vuelta, ahora hacemos 1cad y giramos el tejido.
V3: skip the first stitch and knit 1dc over each stitch of the previous row, so we will have 9dc in this row, remember that the high chain will always count as the first dc, knit 2ch and turn the fabric.
V4: same as in the previous row, we skip the first space and knit 7dc, for a total of 8dc in this row, now we knit 1cad and turn the fabric.
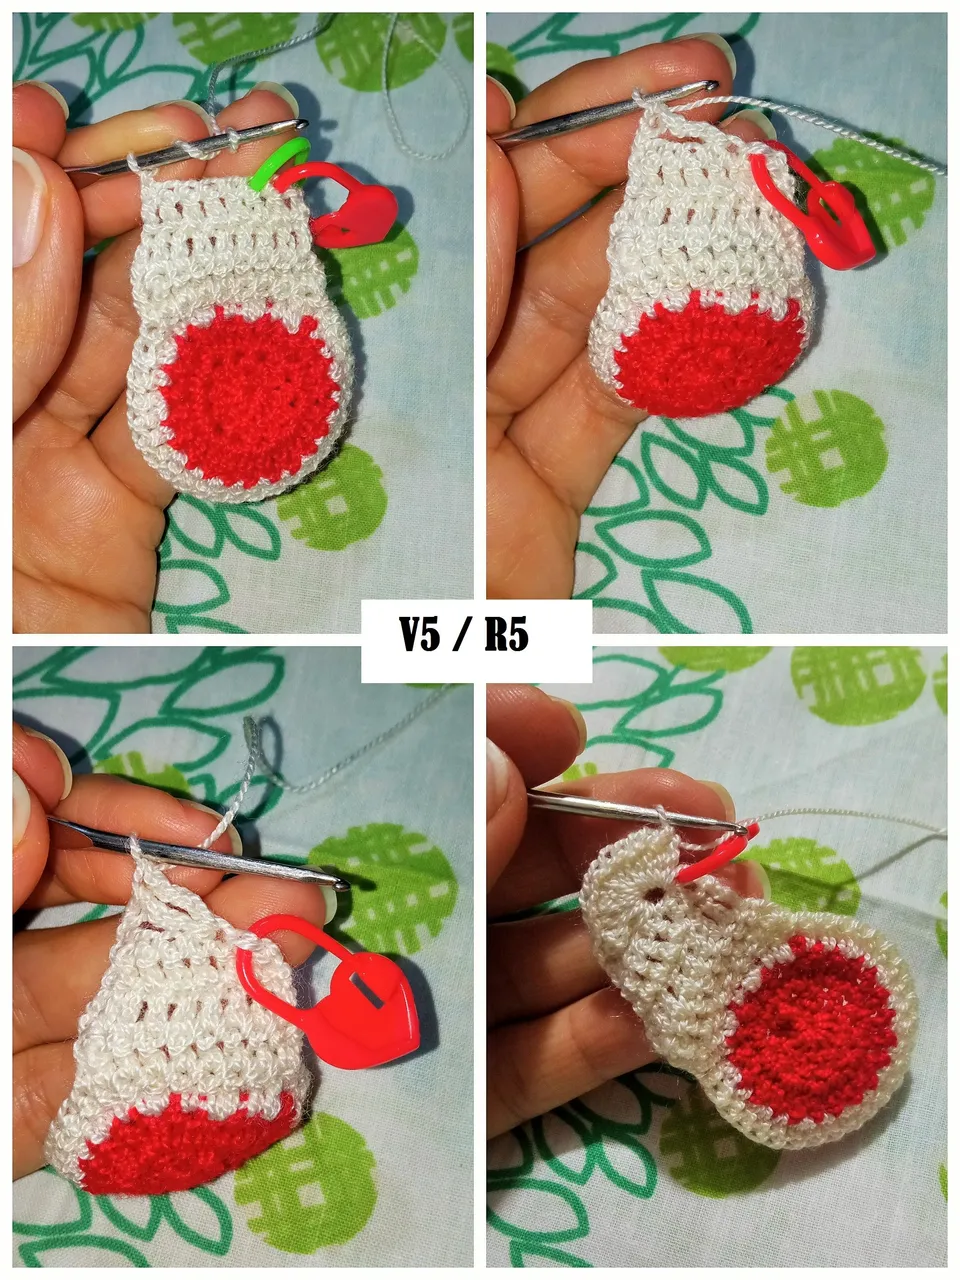
V5: acá iniciaremos lo que será la cola del tiburón, contaremos 6 espacios y en el sexto tejeremos 2 Pad y 10Pa, es decir, realizaremos 12 puntos dentro del mismo punto, en el punto siguiente que es el séptimo punto de la vuelta anterior hacemos 1Pd, ya tenemos formada la parte de la cola.
V5: here we will start what will be the tail of the shark, we will count 6 spaces and in the hedge we will knit 2 Trc and 10dc, that is, we will knit 12 stitches within the same stitch, in the next stitch which is the seventh stitch of the previous round we will knit 1sl st, we have already formed the tail part of the shark.
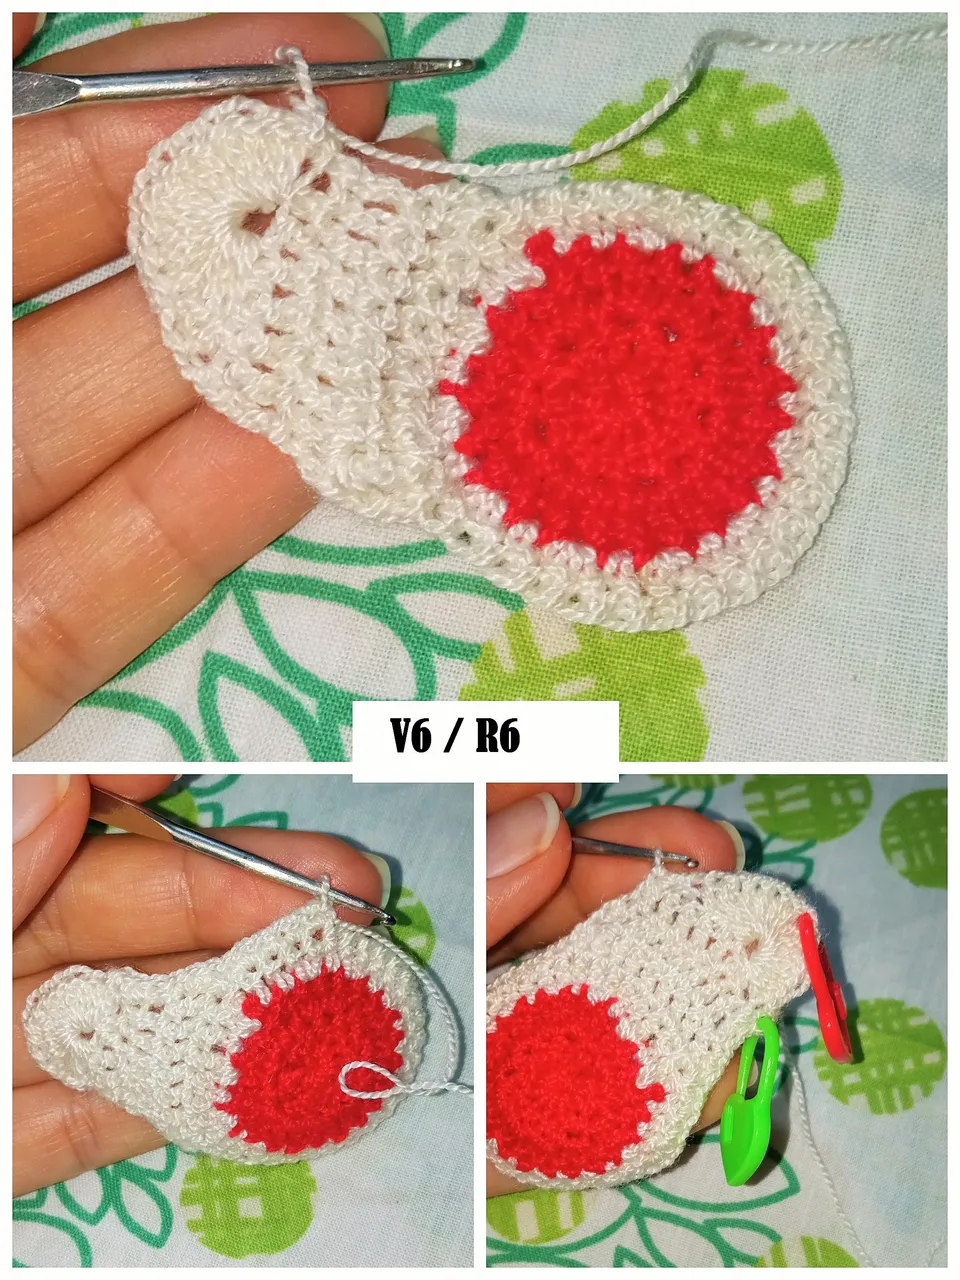
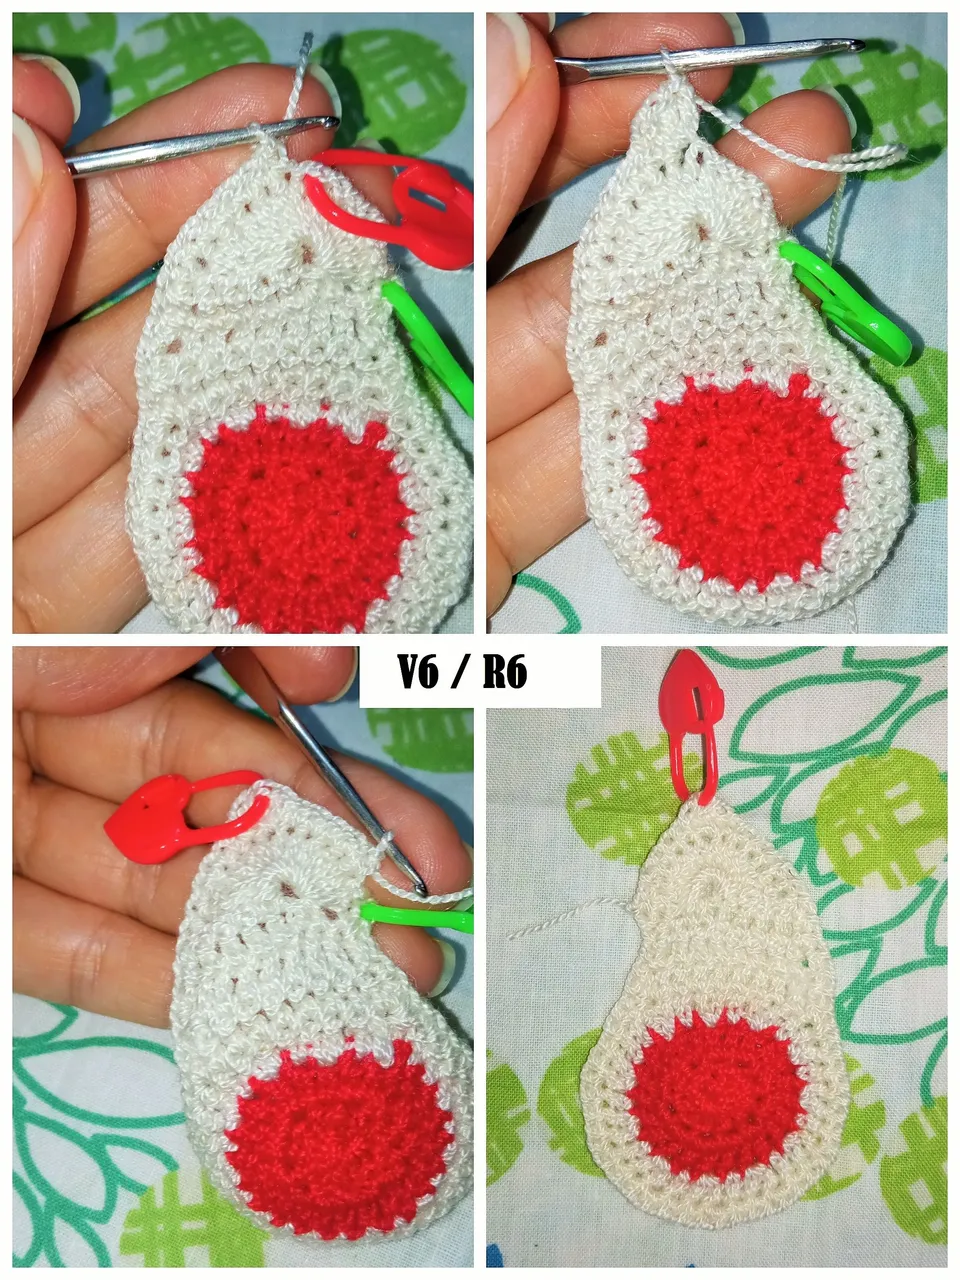
V6: ahora realizamos 1cad de altura e iniciamos a tejer puntos bajos por todo el borde, en lo que es el cuerpo haremos 1Pb en cada espacio, y atravesando los puntos para que no nos queden muchos huequitos en el tejido, al llegar a la parte de la cabeza tejeremos los Pa haciendo la secuencia de ‘1Aum, 2Pb’. Al llegar a la parte de la cola tejeremos 5Pb, en el sexto punto tejeremos 3Pa y continuamos tejiendo con Pb hasta terminar la vuelta, cerramos con 1Pd en el primer Pb de la vuelta, cortamos y aseguramos la hebra.
V6: now we knit 1cad in height and we start to knit low stitches all around the edge, in the body we will knit 1sc in each space, and crossing the stitches so that we don't have too many holes in the fabric, when we reach the head we will knit the dc making the sequence of '1inc, 2sc'. When we reach the tail we will knit 5sc, in the sixth stitch we will knit 3dc and continue knitting with sc until the end of the row, we close with 1sl st in the first sc of the row, we cut and secure the yarn.
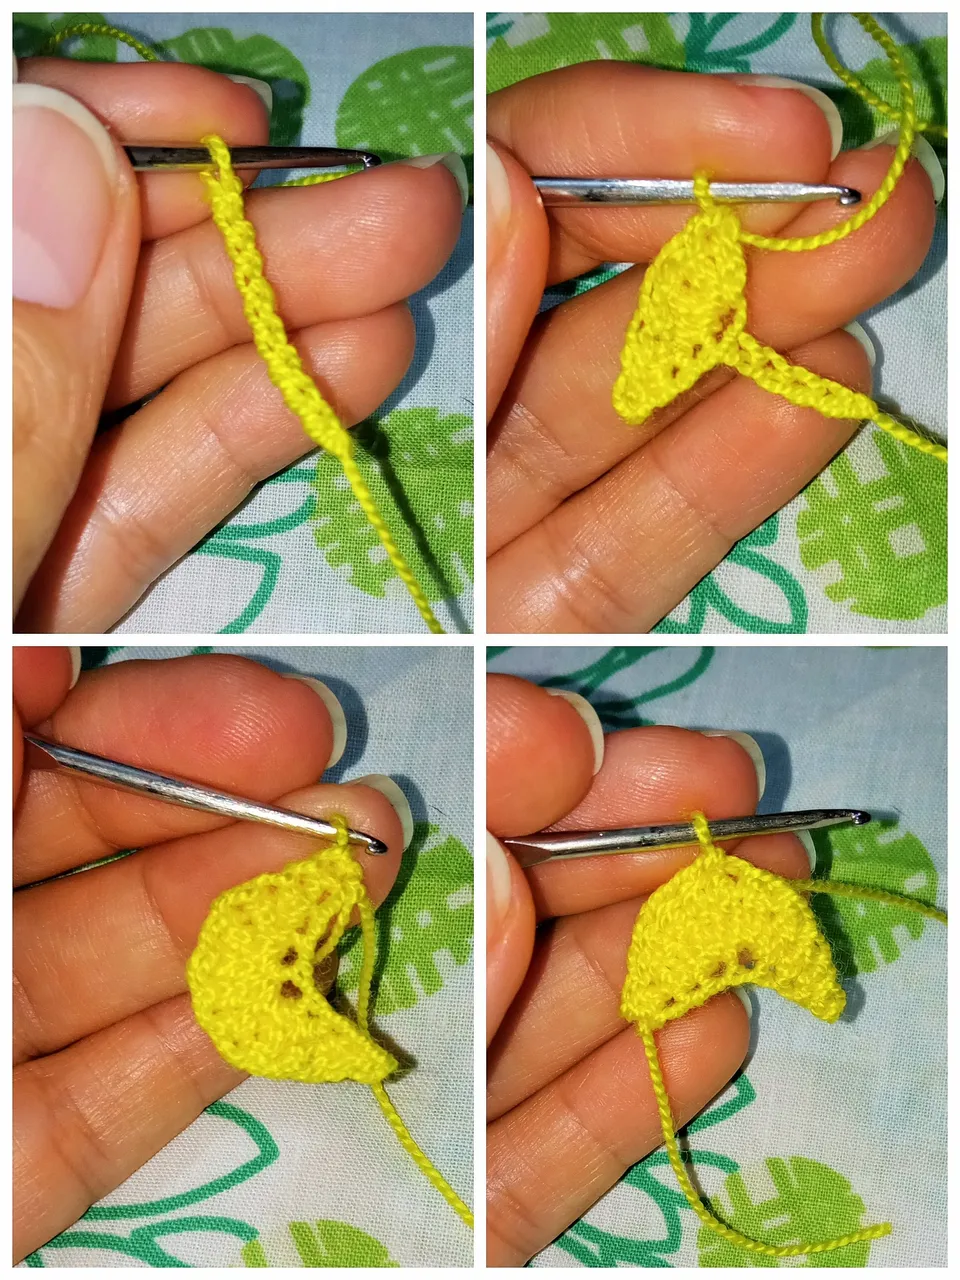
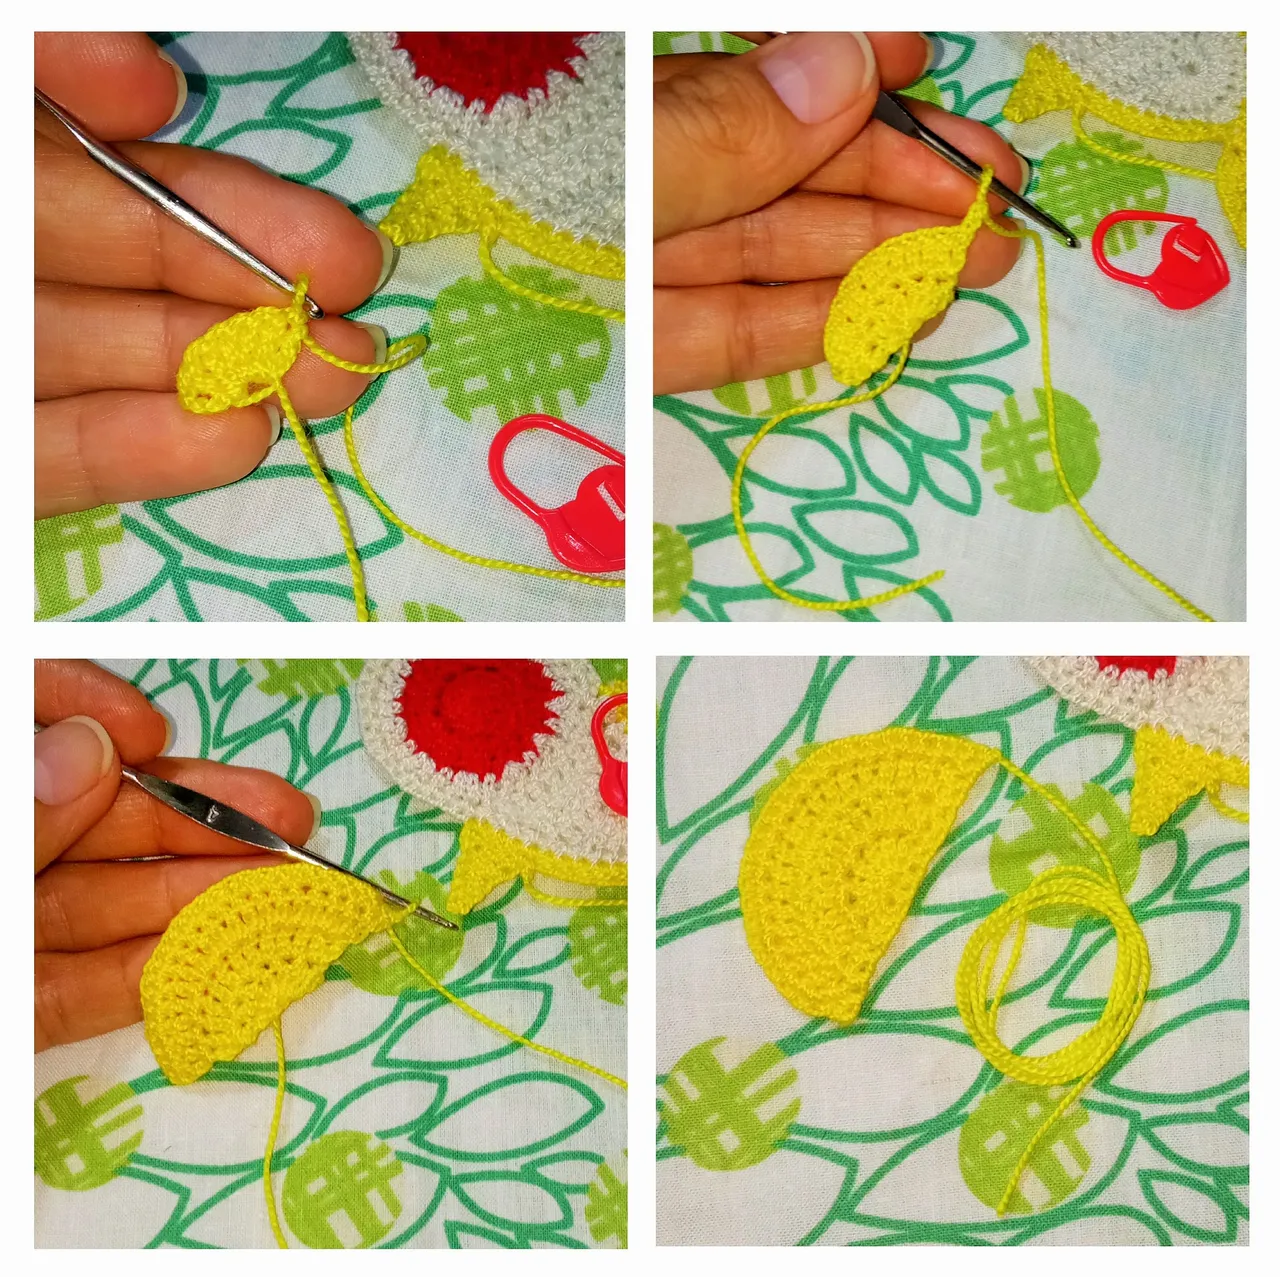
Cambiamos al color amarillo:
Lo primero que haremos serán las aletas de la cola, tejemos 9cad y en la segunda cadena contando desde la aguja hacemos 1Pd, en la siguiente 1Pb, en la que sigue 1Pmay en la siguiente 3Pa, en la siguiente cadena tejemos también 3Pa, luego tejemos le misma secuencia pero al revés, haremos 1Pma, luego 1Pb y por ultimo 1Pd.
Luego giramos el tejido y sin hacer cadena de altura haremos 6Pd y así nos ubicamos en el centro de las aletas de la cola.
We change to yellow:
The first thing we will do will be the tail fins, we knit 9ch and in the second chain counting from the needle we make 1sl st, in the next 1sc, in the next 1sc, in the next 1hdc y in the next 3dc, in the next chain we also knit 3dc, then we knit the same sequence but the other way round, we will make 1hdc, then 1sc and finally 1sl st.
Then we turn the weave and without making a high chain we make 6sl st and in this way we place ourselves in the centre of the tail fins.
Lo que haremos a continuación es unir las aletas al resto del cuerpo y para esto pasamos la lazada que tenemos en la aguja a través del punto central de la cola que es donde habíamos tejido los 3Pa juntos, hacemos 1Pb atravesando tanto la cola, que es la parte blanca, como las aletas, y continuamos tejiendo 1Pb sobre cada punto hasta llegar a la parte de la cabeza.
What we will do next is to join the fins to the rest of the body and for this we pass the loop we have on the needle through the central point of the tail, which is where we had knitted the 3dc together, we knit 1sc through both the tail, which is the white part, and the fins, and we continue knitting 1sc over each point until we reach the part of the head.
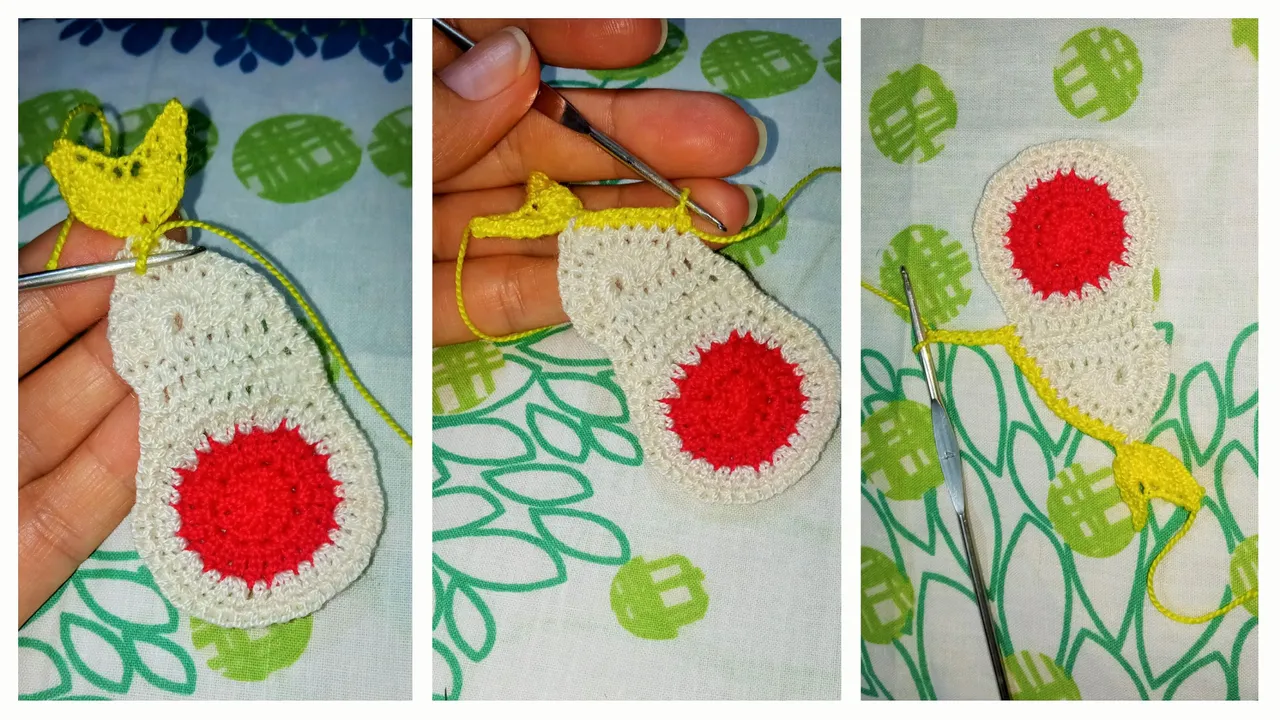
Justo donde inicia la cabeza nos detenemos y tejemos 6cad., giramos el tejido y en el segundo punto contando desde la aguja tejemos 1Pd, en el siguiente 1Pb, luego 1Pma y en los últimos 2 espacios tejemos 1Pa en cada uno, y así tenemos lista la primera aleta lateral.
Ahora contamos 4 puntos y en el quinto introducimos la aguja haciendo 1Pd, para así unir la aleta al cuerpo, hacemos 1cad. , cortamos y aseguramos la hebra.
Just where the head starts we stop and knit 6 chains, we turn the fabric and in the second stitch counting from the needle we knit 1sl st, in the next 1sc, then 1hdc and in the last 2 spaces we knit 1dc in each one, and so we have the first side flap ready.
Now we count 4 stitches and in the fifth one we introduce the needle making 1sl st, in order to join the flap to the body, we knit 1ch Cut and secure the yarn.
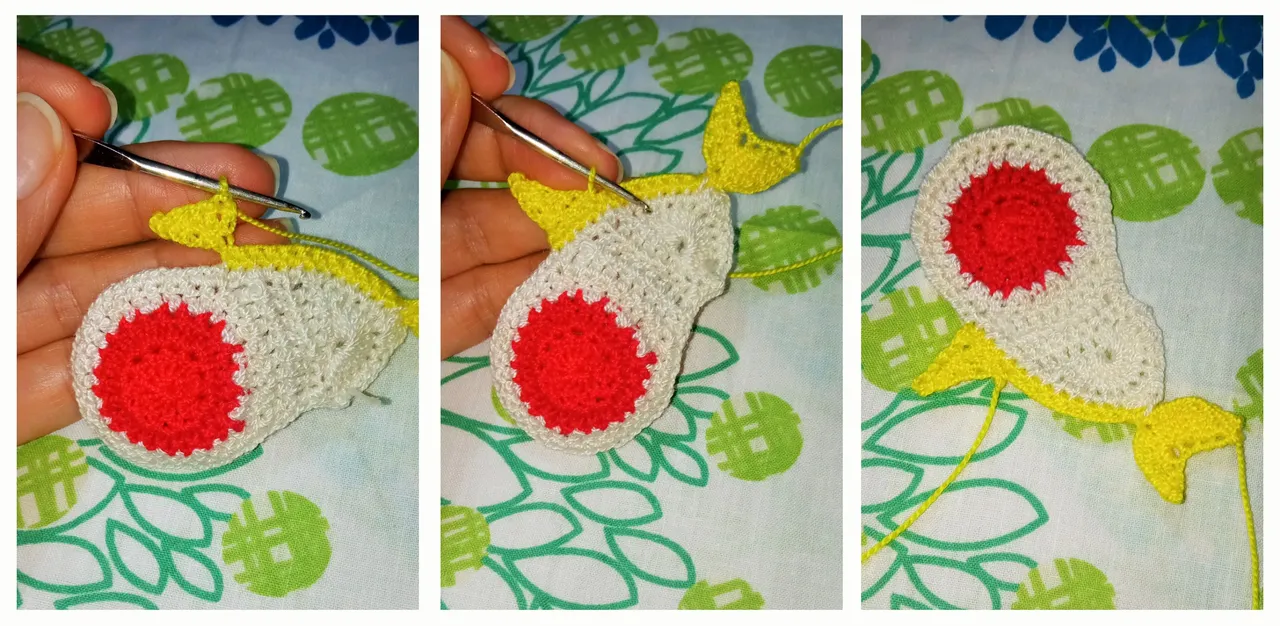
Continuamos tejiendo el otro costado del cuerpo para hacer la otra aleta y lo que haremos será hacer un nudo deslizado en la hebra y lo introduciremos en el mismo punto donde unimos las aletas de la cola y luego hacemos 1Pd y continuamos haciendo 1Pb sobre cada punto hasta llegar a donde inicia la cabeza y repetimos lo que hicimos anteriormente para hacer la segunda aleta lateral.
We continue knitting the other side of the body to make the other flap and what we will do is make a slip knot in the yarn and we will introduce it in the same stitch where we join the tail flaps and then we make 1sl st and continue making 1sc over each stitch until we reach where the head starts and we repeat what we did before to make the second side flap.
Continuando con el hilo amarillo, tejeremos la carita del tiburón:
Iniciamos haciendo un anillo mágico, tejemos 3cad y 6Pa, cerramos el anillo mágico, hacemos 2cad giramos el tejido y tejemos 1 aumento en cada punto de la vuelta anterior; nuevamente tejemos 2cad giramos el tejido y ahora la secuencia será 1Pa, 1Aum, al terminar la vuelta hacemos 1cad giramos el tejido y haremos puntos bajos siguiendo la siguiente secuencia (2Pb, 1Aum).
Al terminar el último punto hacemos una cadena de altura y tejemos puntos bajos en la parte recta, para dar un mejor acabado y cerramos con 1Pd, cortamos la hebra dejando unos 20 cm de la misma para unir las piezas más adelante.
Continuing with the yellow yarn, we will knit the shark's face:
We start by knitting a magic ring, we knit 3ch and 6dc, we close the magic ring, we knit 2ch, turn the fabric and knit 1 increase in each stitch of the previous round; again we knit 2ch, turn the fabric and now the sequence will be 1dc, 1inc, at the end of the round we knit 1ch, turn the fabric and knit single crochet following the next sequence (2sc, 1inc).
At the end of the last stitch we make a high chain and we knit low stitches in the straight part, to give a better finish and we close with 1sl st, we cut the yarn leaving about 20 cm of yarn to join the pieces later.
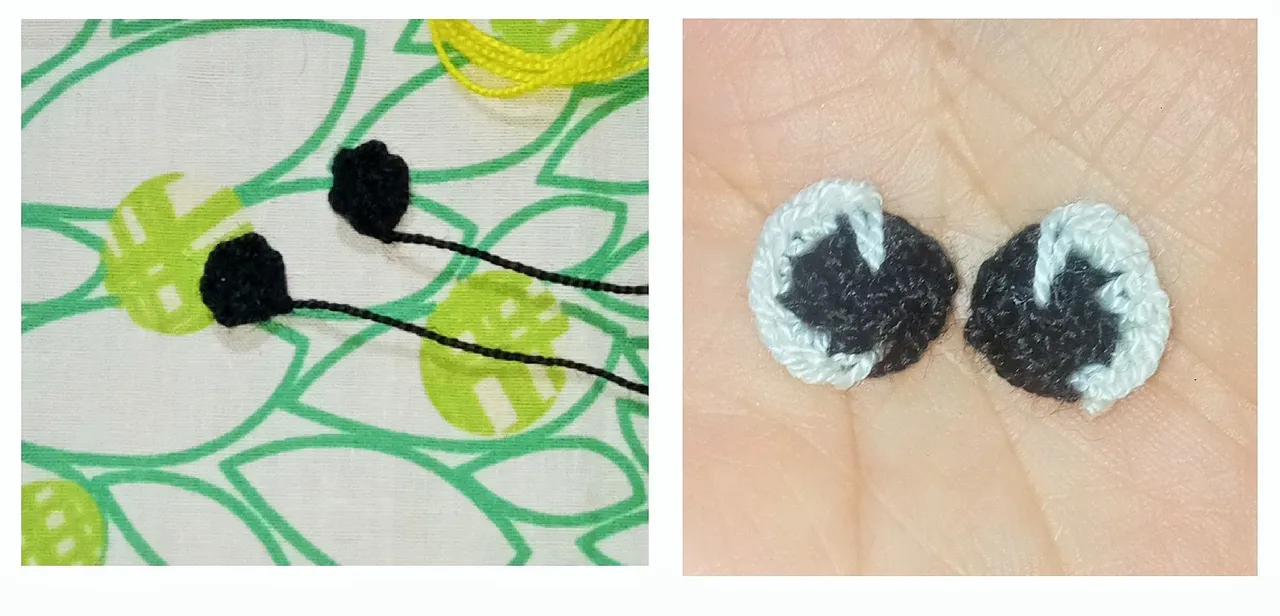
Para tejer los ojos tomamos el hilo negro, y lo que haremos es tejer 6Pa dentro de un anillo mágico, pero no vamos a cerrar el anillo mágico, cerramos la vuelta con 1Pd y cortamos la hebra. Hacemos dos piezas iguales.
Ahora tomamos una de las piezas y nos ubicaremos en cualquiera de los punto y pasamos la hebra de color blanco y hacemos una cadena, esta cuenta como 1Pb, en el siguiente punto haremos 1 aumento, luego 1Pb, en el que sigue 1Aum y para hacer el último punto bajo tomaremos la lazada por el centro del anillo mágico, hacemos una cadena y cortamos la hebra.
El otro ojo lo haremos siguiendo la misma secuencia pero al revés, es decir, iniciaremos tomando lazada a través del centro del anillo mágico, y continuamos la secuencia haciendo 1Aum, 1Pa, 1Aum, 1Pa, y hacemos 1cad, cortamos la hebra y aseguramos el hilo.
To weave the eyes we take the black yarn, and what we will do is weave 6Pa inside a magic ring, but we are not going to close the magic ring, we close the loop with 1sl st and cut the yarn. We make two equal pieces.
Now we take one of the pieces and we will place it in any of the stitches and we pass the white thread and we make a chain, this counts as 1sc, in the next stitch we will make 1 increase, then 1sc, in the next one 1Aum and to make the last low stitch we will take the loop through the centre of the magic ring, we make a chain and we cut the thread.
The other eye we will make following the same sequence but in reverse, that is, we will start by taking the loop through the centre of the magic ring, and continue the sequence making 1inc, 1dc, 1inc, 1dc, and we make 1ch, cut the strand and secure the yarn.
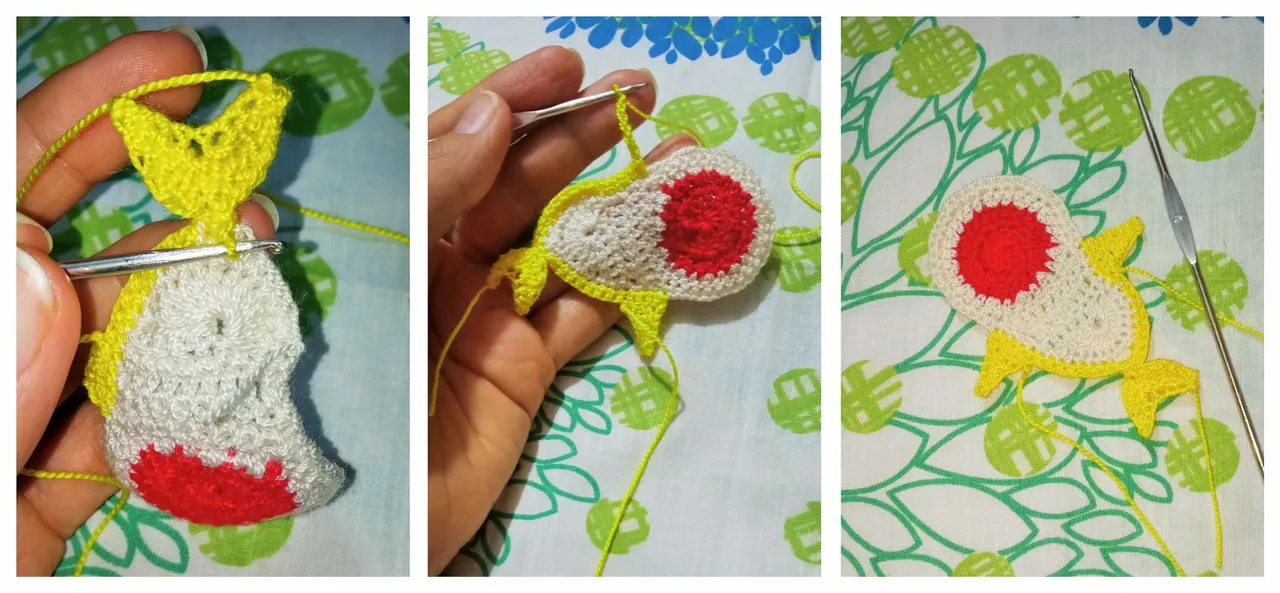
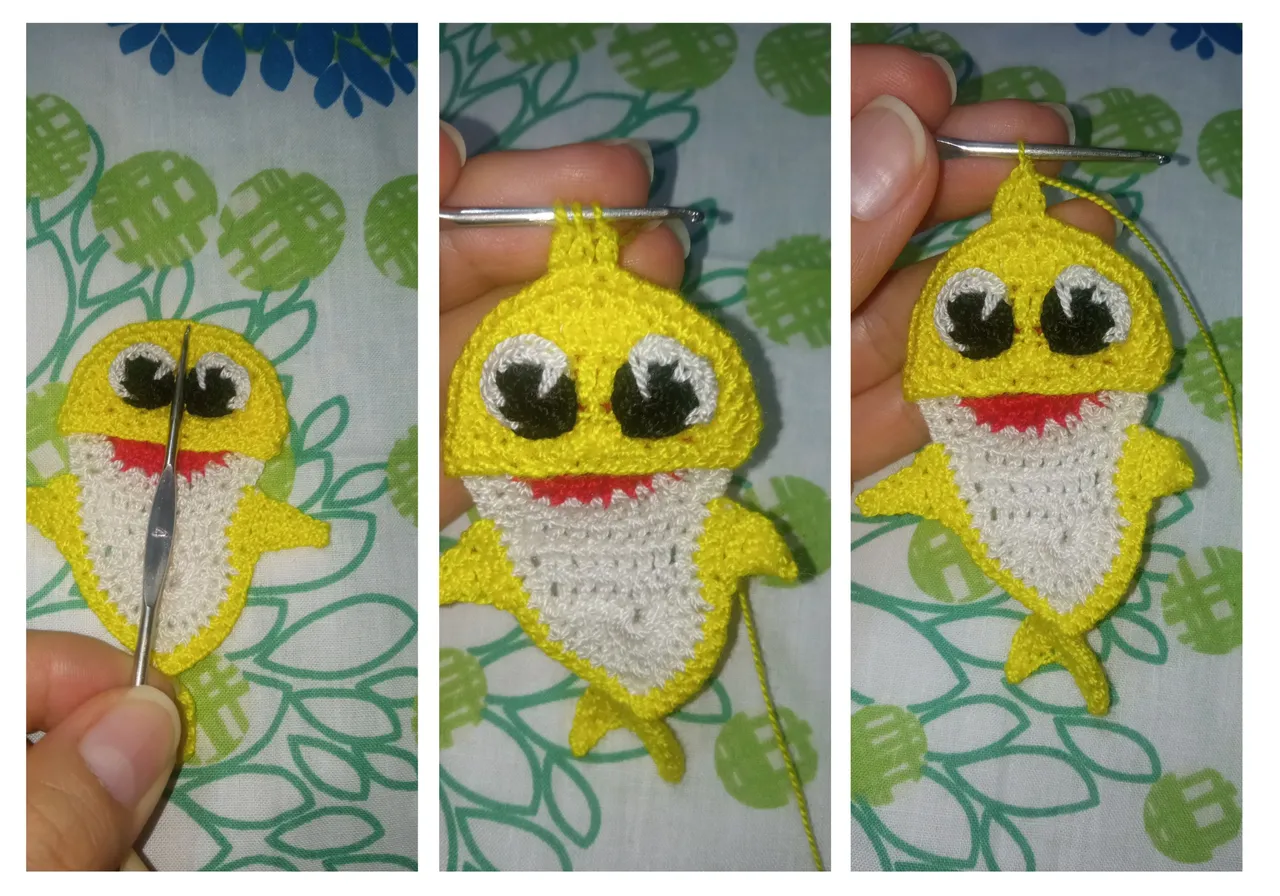
Ya para terminar de hacer este lindo aplique de Baby Shark lo que nos falta es unir la pieza de la cara a la del cuerpo, cociéndola con la hebra de hilo amarillo que le dejamos a la pieza de la cara, luego pegamos los ojitos y seguidamente tejemos la aleta dorsal del tiburón, y lo que haremos será ubicar el centro de la cabeza y tejer 1Pa en cada uno los tres puntos centrales y los cerramos juntos. Luego ocultamos todas las hebras, y con un pedacito de fieltro blanco hacemos los colmillos y los pegamos con silicón caliente.
To finish making this cute Baby Shark applique, what we need to do is to join the face piece to the body piece, sewing it with the yellow thread we left on the face piece, then we glue the eyes and then we weave the shark's dorsal fin, and what we will do is to place the center of the head and weave 1Pa in each of the three central stitches and close them together. Then we hide all the strands, and with a small piece of white felt we make the fangs and glue them with hot silicone.

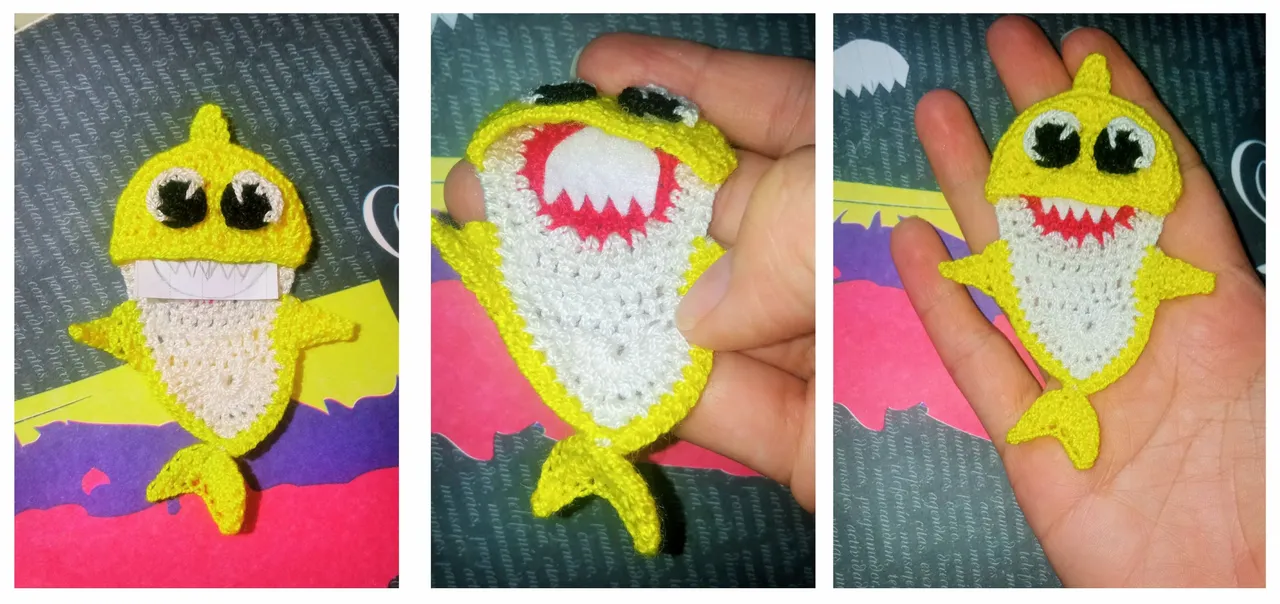
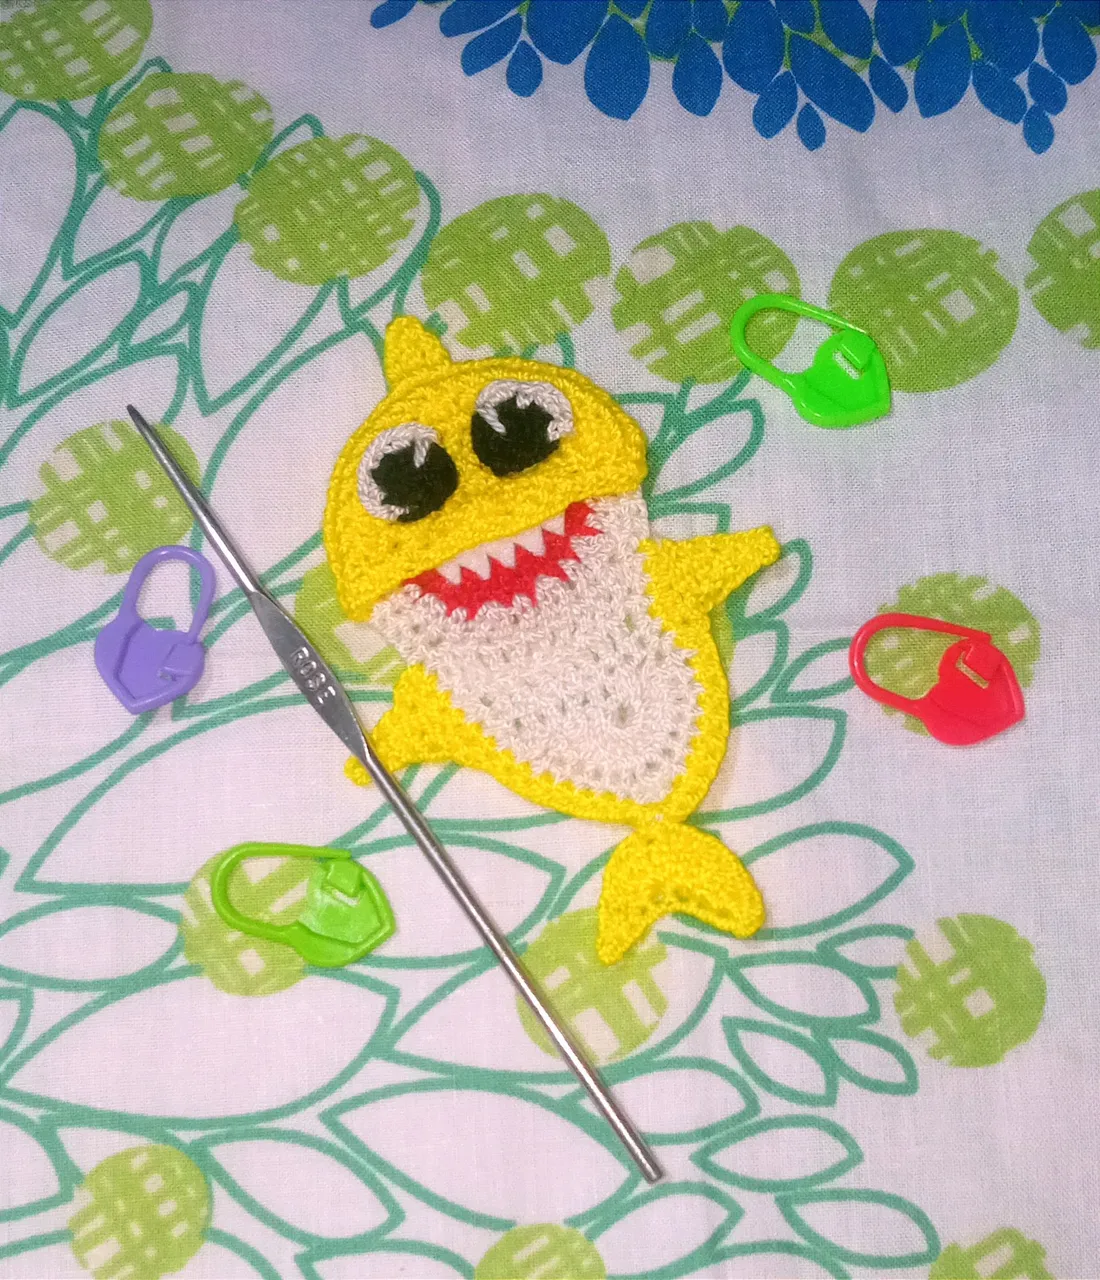
RESULTADO FINAL / FINAL RESULT
DESEO LES HAYA GUSTADO TANTO COMO A MI EL RESULTADO FINAL DE ESTE BONITO APLIQUE DE BABY SHARK Y ESPERO SUS BONITOS COMENTARIOS Y/O VOTOS, ASÍ ME MOTIVAN PARA SEGUIR COMPARTIENDO MIS CREACIONES CON USTEDES, YO ESTARE FELIZ DE RESPONDER TODOS SUS COMENTARIOS 😊💚🐝 SEAN FELICES Y QUE LA MUSA DE LA CREATIVIDAD NUNCA LOS AVANDONE!
GRACIAS POR VISITAR MI BLOG!
Se despide de ustedes con mucho cariño su amiga Nathalie @laranitacrochet
I HOPE YOU LIKED AS MUCH AS I DID THE FINAL RESULT OF THIS BEAUTIFUL BABY SHARK APPLIQUE AND I HOPE YOUR NICE COMMENTS AND / OR VOTES, SO MOTIVATE ME TO CONTINUE SHARING MY CREATIONS WITH YOU, I WILL BE HAPPY TO ANSWER ALL YOUR COMMENTS 😊💚🐝 BE HAPPY AND THAT THE MUSE OF CREATIVITY NEVER LEAVE YOU!
THANK YOU FOR VISITING MY BLOG!
Your friend Nathalie @laranitacrochet bids you a fond farewell.
*Todas las fotografías utilizadas en la publicación son propiedad de la autora.
*Las fotografías fueron tomadas y editadas con mi REDMI 9 y con la App FotoRoom.
*La traducción la hice en https://www.deepl.com/es/translator
*All photographs used in this publication are property of the author.
*The pictures were taken and edited with my REDMI 9 and the FotoRoom App.
*The translation was done at https://www.deepl.com/es/translator