🧶 💚🐸 ESPAÑOL 🐸💚 🧶
¡Hola, hola! Hivers y hermosa comunidad de DIYHub, espero todos se encuentren súper bien, animados e inspirados 💟
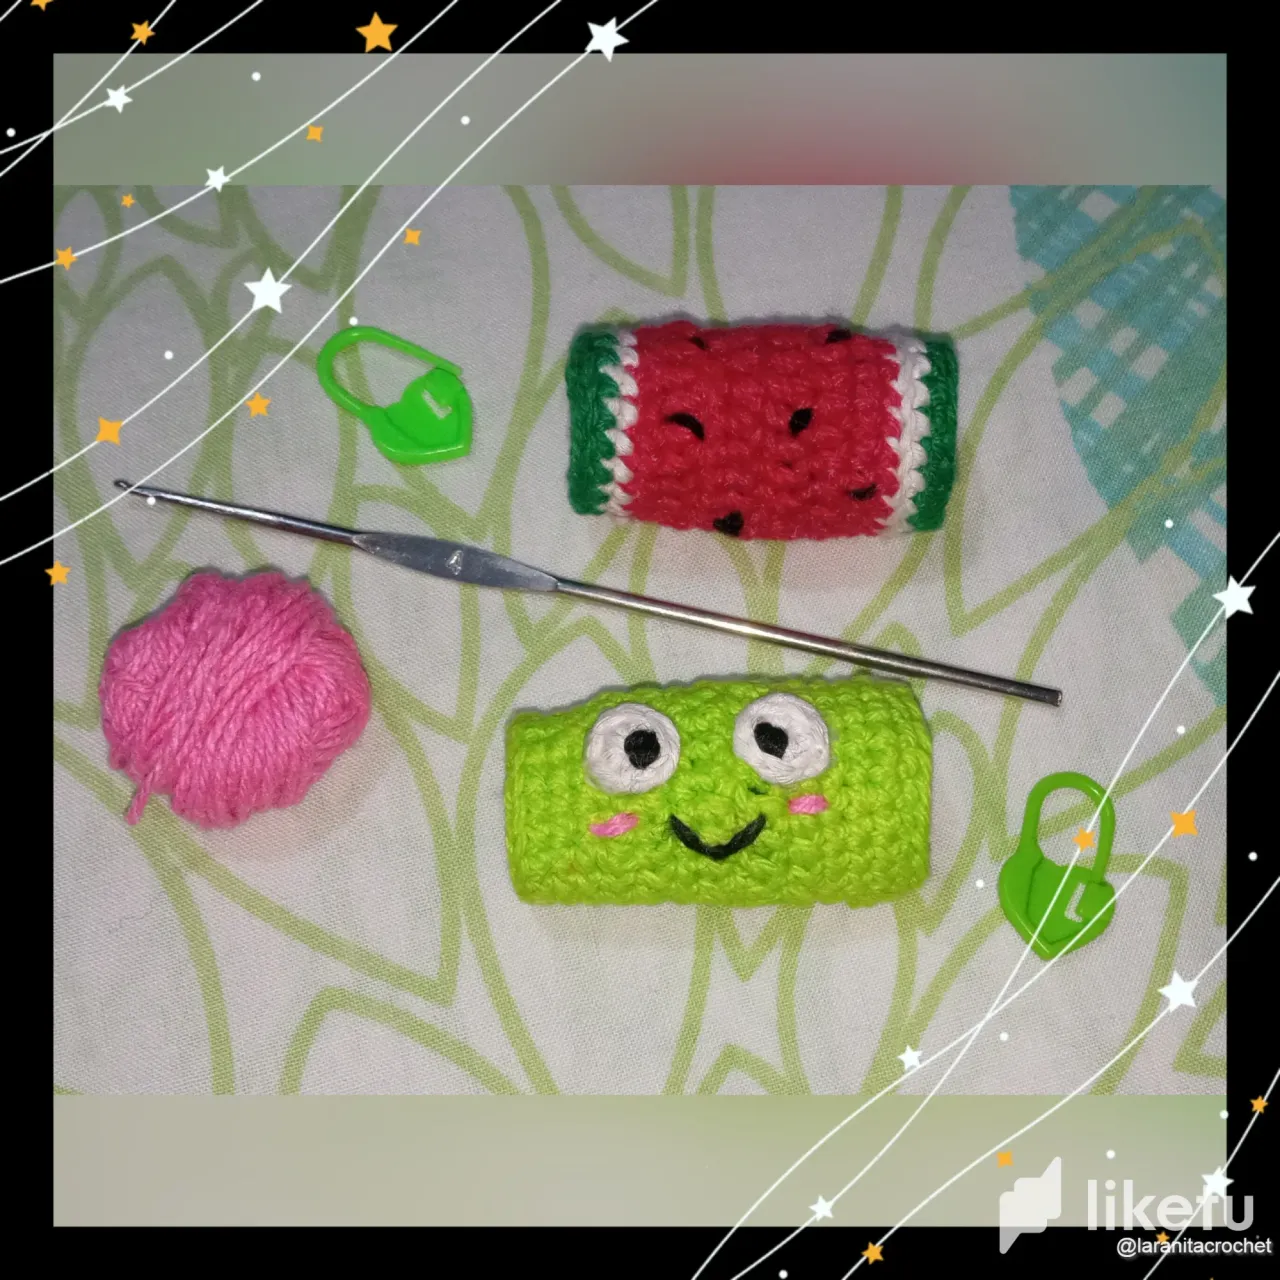
Hoy les presentare mi primer post de este año, y decidí empezar haciendo algo para mi uso personal y que realmente me hace mucha falta, así que les mostrare como realice un hermoso par de ANILLOS TENSORES TEJIDOS A CROCHET.
Y es que si son muy útiles y pues hace mucho que quiero tener uno pero no me lo he podido comprar ya que en las tiendas de mi ciudad no los venden y pues no se me ha dado el comprarlos en línea, así que decidí hacerlos yo misma y como el resultado al usarlos me encanto, pensé que sería genial compartirlo y así alguna amiga crochetera se anime también a tejer los suyos.
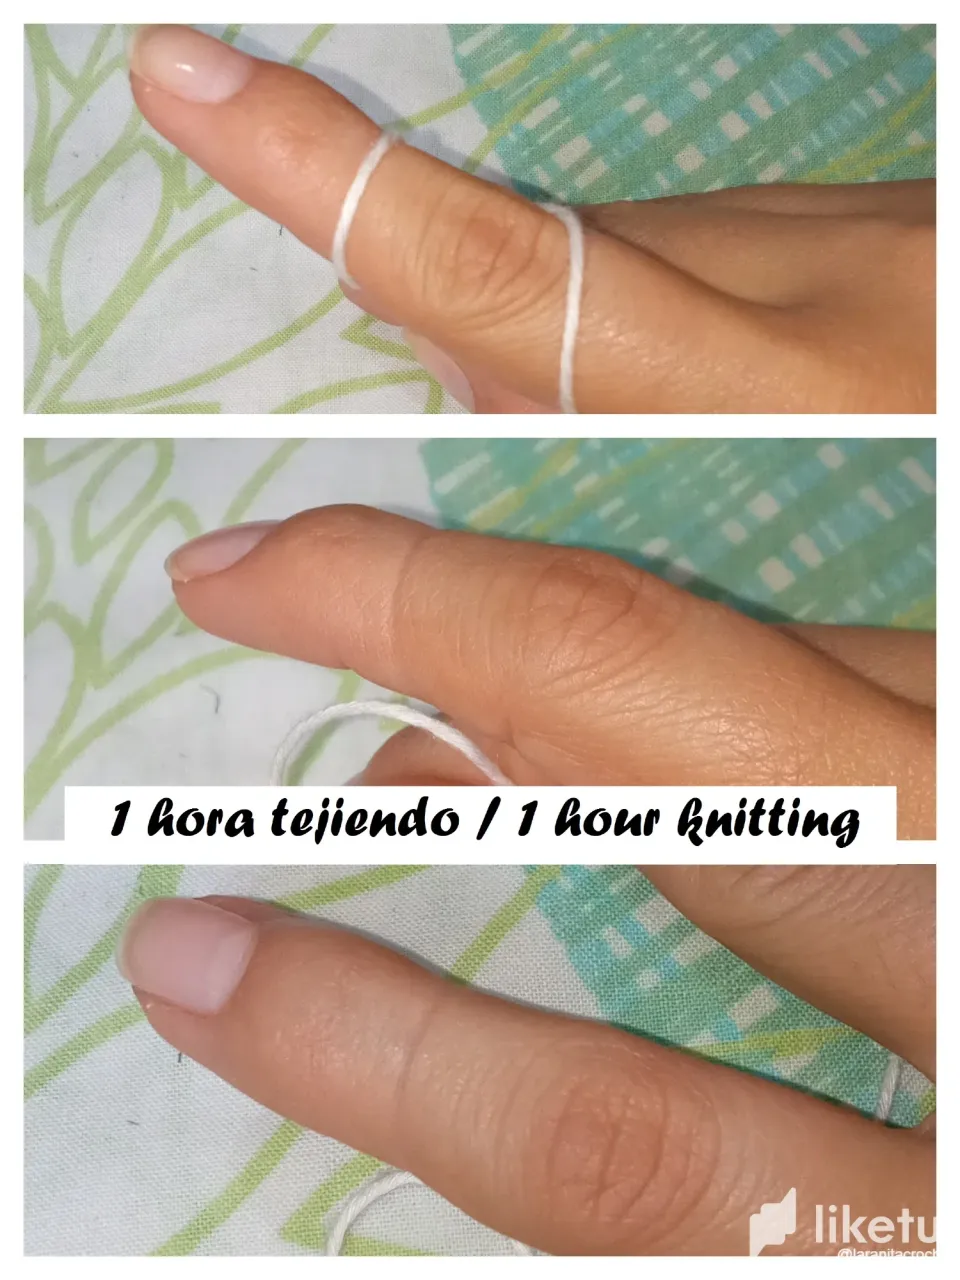
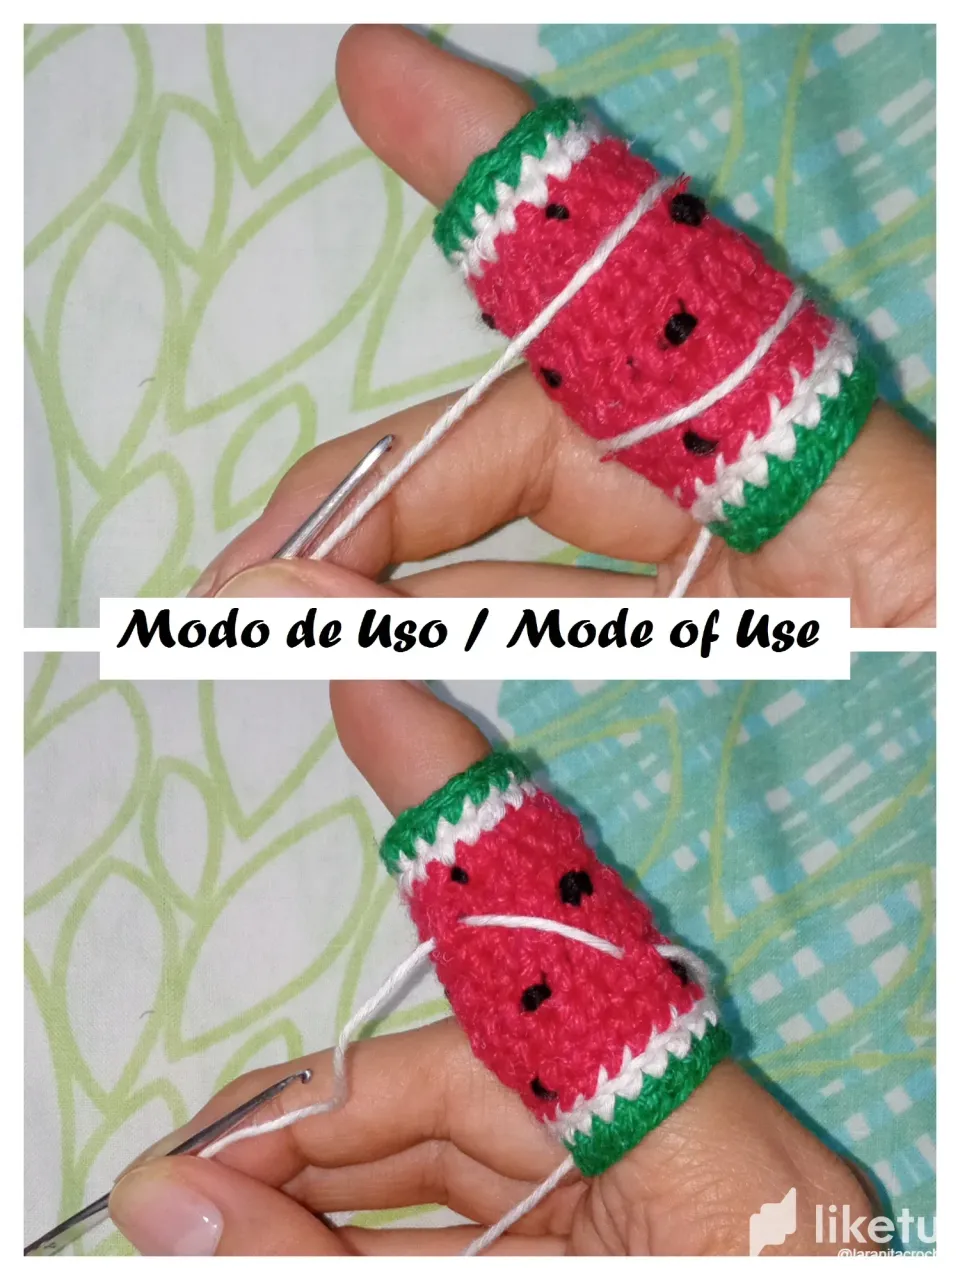
Y si aún no sabes que es un anillo tensor ya te lo explico, es un anillo que se utiliza para mantener constante la tensión del hilo o lana al tejer, y también nos ayuda a proteger nuestros dedos del roce del hilo, ya que al pasar muchas horas tejiendo se pueden llegar a surgir pequeños enrojecimientos y marcas, que en ocasiones son algo dolorosas e incomodan la labor, a tal punto que debemos parar de tejer.
En las imagines les dejo un modelo de anillo que es el que tanto he querido comprar, pero les juro que los anillos tejidos son súper cómodos y funcionales, así que puedo recomendarlo al 100% si les pasa como a mí y no se lo pueden comprar.
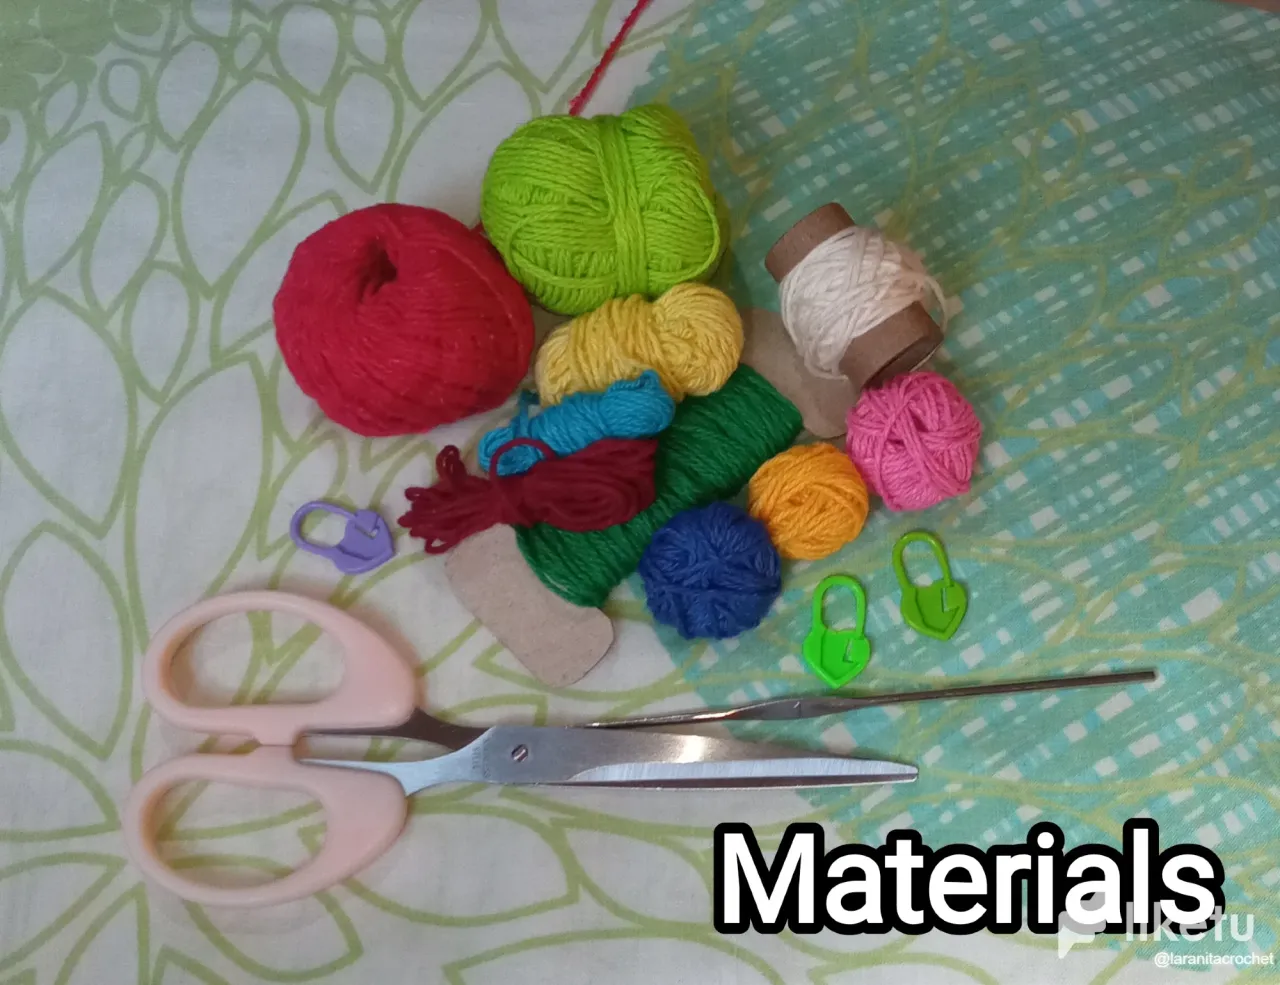
Bueno amigos a continuación los dejo con los materiales que use y también con el paso a paso de cómo lo realice.
MATERIALES:
- Hilo de algodón de los colores deseados.
- Aguja de crochet #4.
- Marcador de puntos y tijera.
ABREVIATURAS DE LOS PUNTOS A UTILIZAR:
- Pa: punto alto.
- mpa: medio punto alto
- Pb: punto bajo.
- Cad: cadeneta.
- Pd: punto deslizado.
- Dism: disminución.
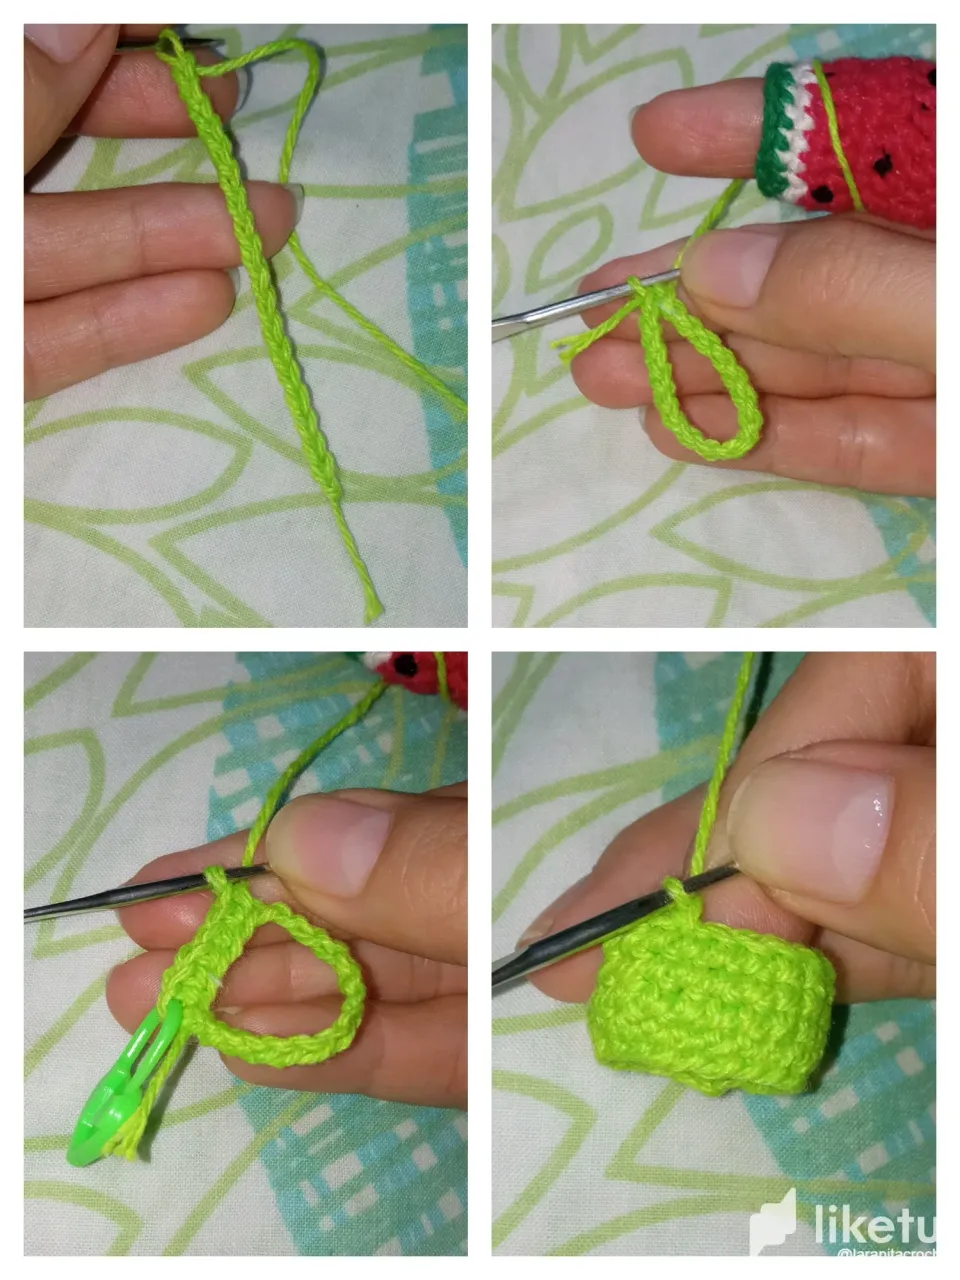
PASO A PASO:
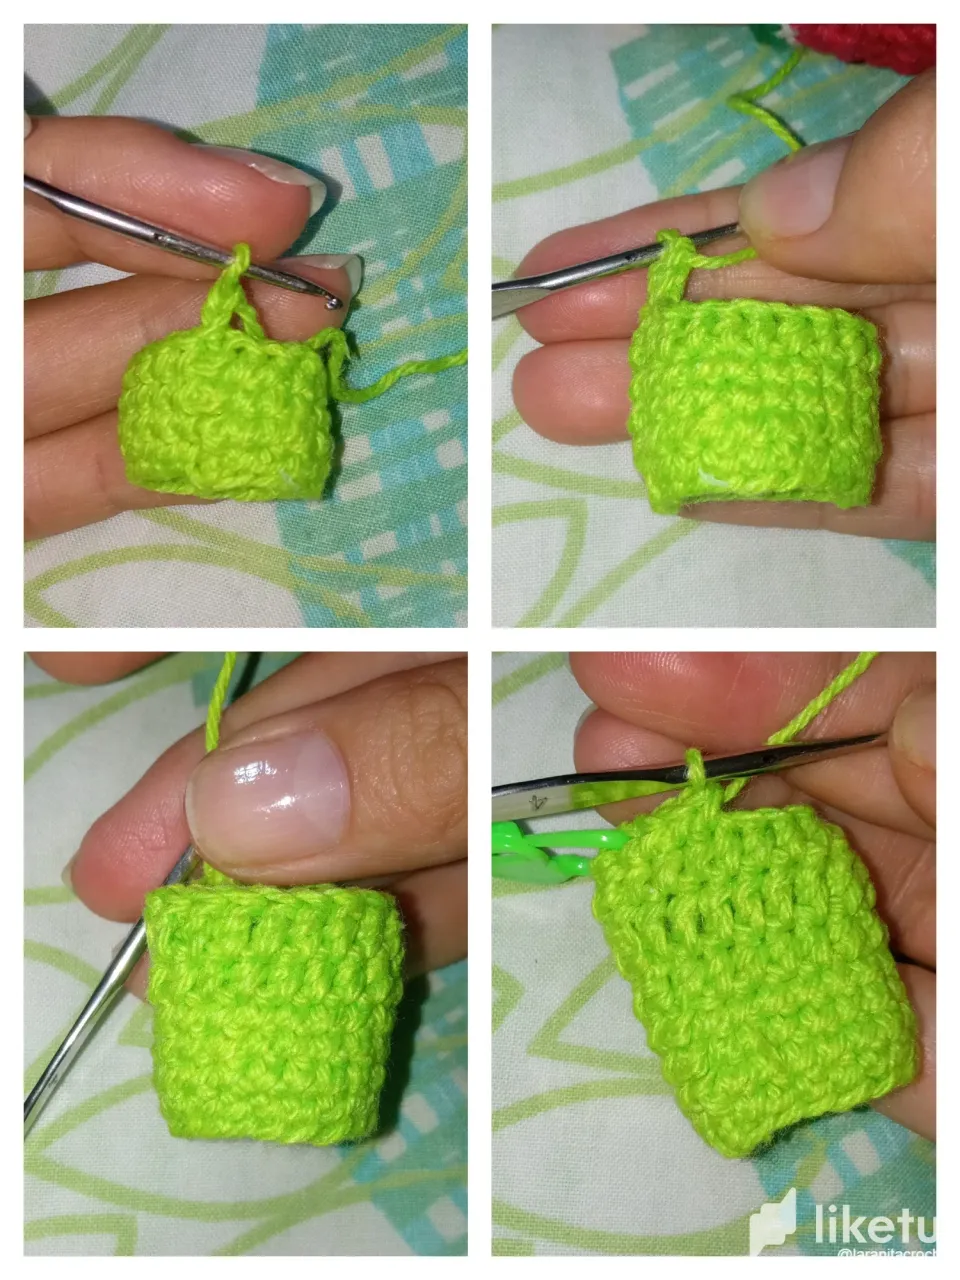
Para la base del anillo, tejer una cadeneta con la cantidad de puntos necesarios para cubrir el grosor de nuestro dedo, en mi caso fueron 18 puntos cadena, luego las unimos con un punto deslizado formando un anillo, y ya simplemente te guías por el patrón que dejo a continuación, las cadenetas al inicio de cada vuelta son para dar altura y no cuentan como punto:
V1-4: 1 cad, 18 Pb, 1Pd. (18)
V5: 2 cad, 18 mpa, 1 Pd. (18)
V6: 3 cad, 18 Pa, 1 Pd. (18)
V7: 2 cad, 18 mpa, 1 Pd. (18)
V8: 1 cad, 18 Pb, 1Pd. (18)
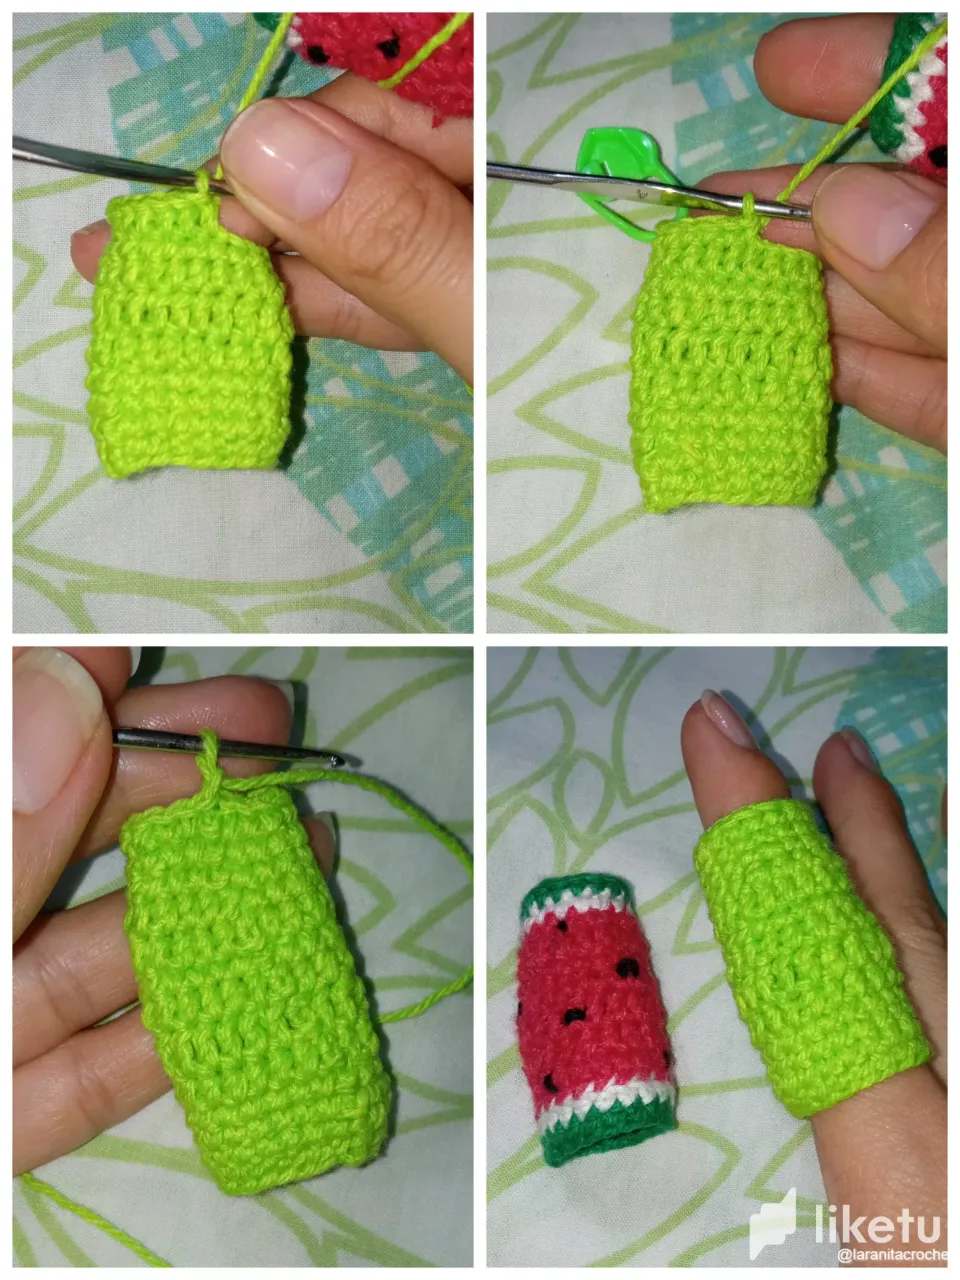
V9: 2 cad, 6 mpa, 1Dism., 10 mpa, 1Pd. (17)
V10: 1 cad, 8 Pb, 1Dism., 7 Pb, 1Pd. (16)
V11-12: 1 cad, 16 Pb, 1Pd. (16) cortar y asegurar la hebra.
Recuerden al iniciar, hacer la cantidad de cadenetas según el grosor de su dedo y que no les quede apretado pero tampoco muy suelto, ya que de ser así seria incomodo usarlo.
Para finalizar me gustaría recalcar que lo mejor es tejer el anillo con hilo de algodón, de preferencia delgado, tipo pabilo o crochet ya que en este material la mayoría de los hilos con que tejamos deslizaran con facilidad pero también con un poco de resistencia que es lo que se necesita para mantener constante la tensión del hilo a la hora de tejer.
Otra cosita es que la idea de hacer vueltas de diferentes puntos es para que podamos pasar el hilo entre los puntos y que nos funcione el mismo anillo para casi cualquier grosor de hilo o lana.
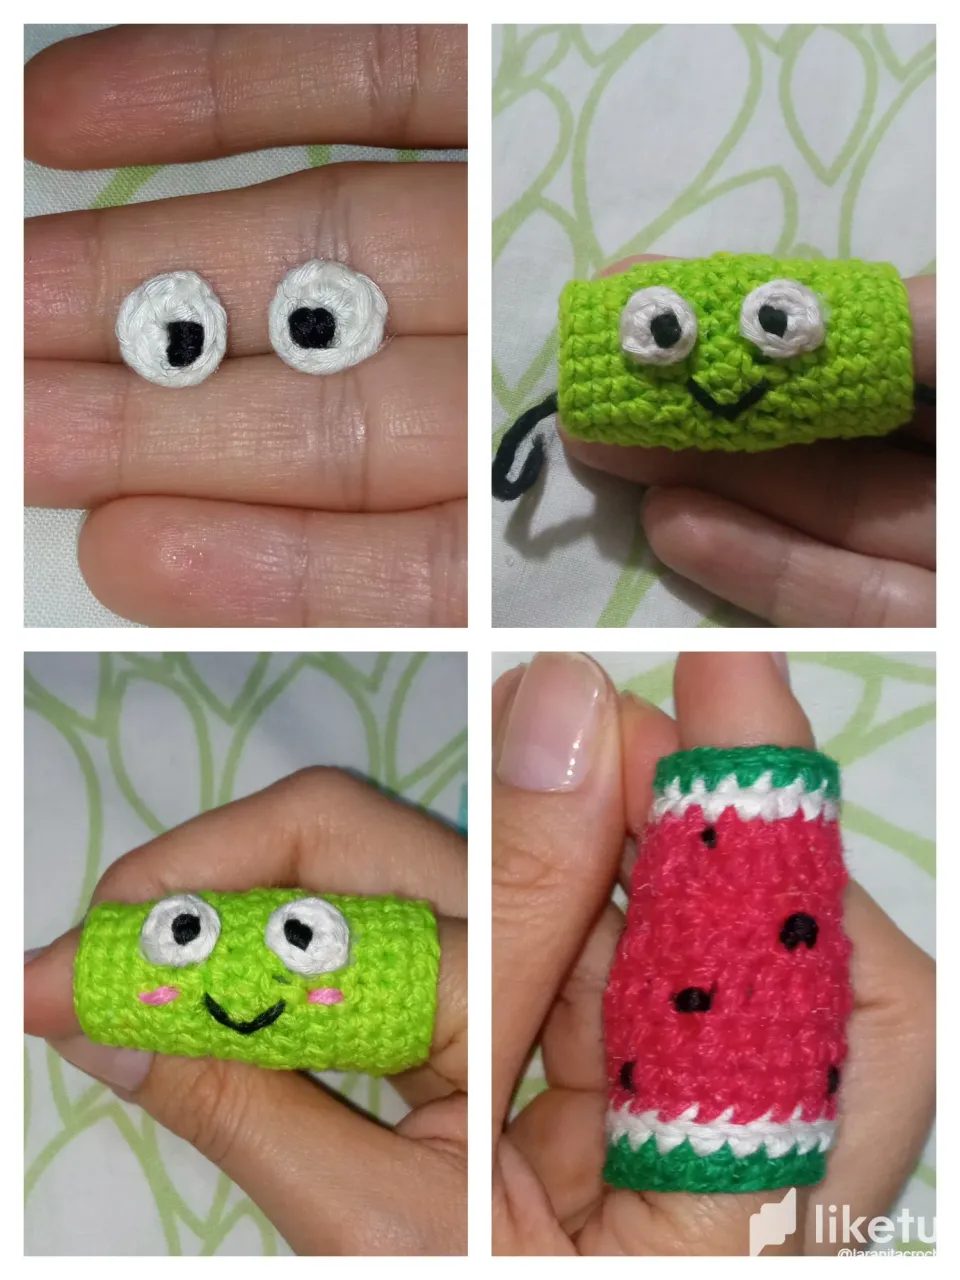
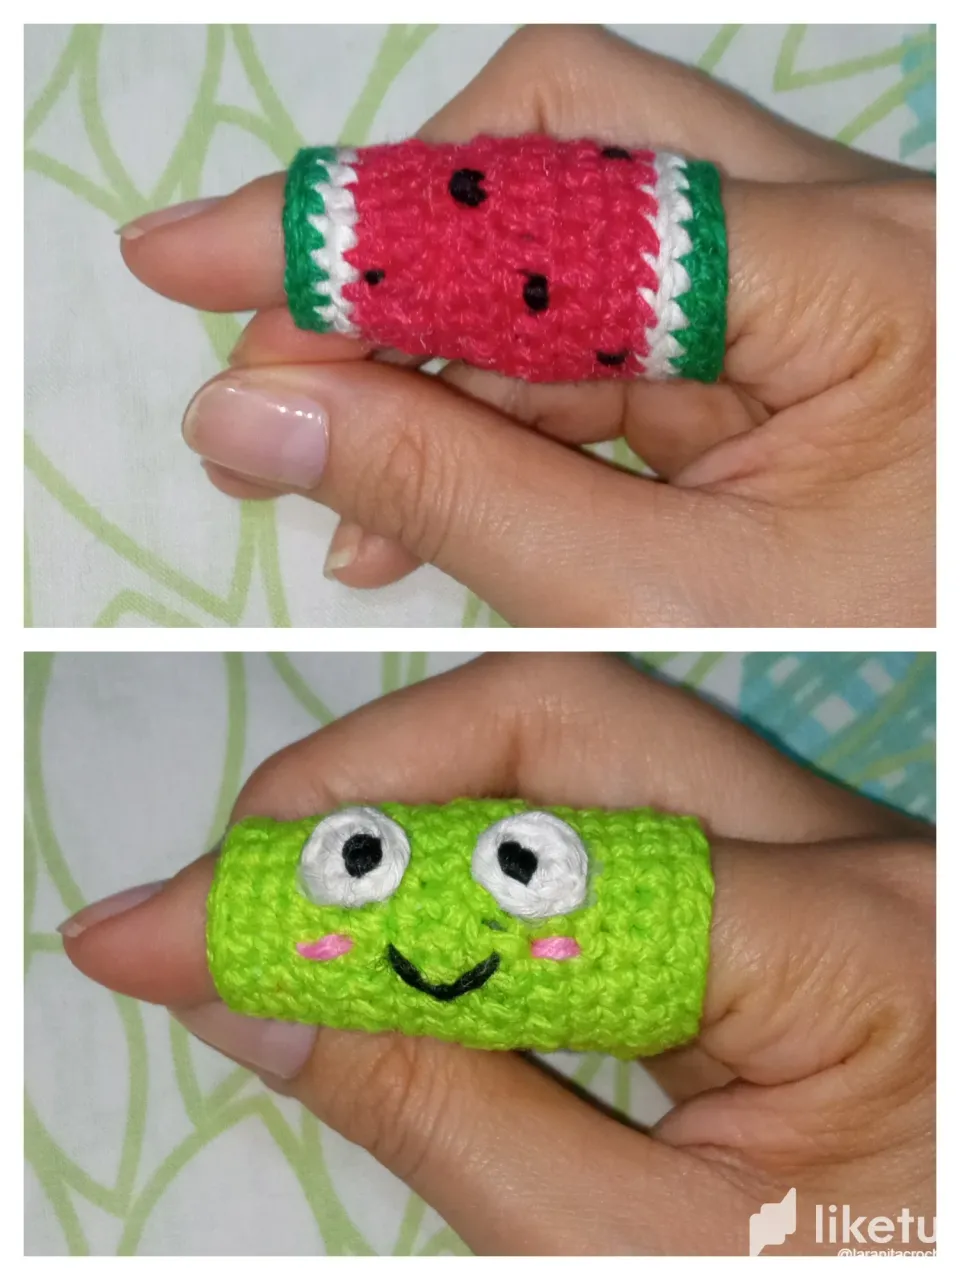
Y bueno con este patrón que les dejo pueden hacer sus anillos y ya la decoración es a gusto de cada quien, yo hice una ranita y otro con diseño de sandía, pero podrías simplemente dejarlo unicolor en tu color preferido o multicolor.
BUENO AMIGOS DESEO LES HAYA GUSTADO TANTO COMO A MÍ EL RESULTADO FINAL DE ESTOS LINDOS ANILLOS TENSORES PARA TEJER PERSONALIZADOS, ESPERO SUS BONITOS COMENTARIOS Y/O VOTOS, ASÍ ME MOTIVAN PARA SEGUIR COMPARTIENDO MIS CREACIONES CON USTEDES, YO ESTARÉ FELIZ DE RESPONDER TODOS SUS COMENTARIOS SEAN FELICES Y QUE LA MUSA DE LA CREATIVIDAD NUNCA LOS ABANDONE!
GRACIAS POR VISITAR MI BLOG! Y ¡FELIZ Y PROSPERO AÑO 2024!
Se despide de ustedes con mucho cariño su amiga Nathalie @laranitacrochet
*Todas las fotografías utilizadas en la publicación son propiedad de la autora.
*Las fotografías fueron tomadas y editadas con mi REDMI 9 y con la App FotoRoom.
*La traducción la hice en https://www.deepl.com/es/translator
🧶 💚🐸 ENGLISH 🐸💚 🧶
Hello, hello! Hivers and beautiful DIYHub community, I hope you all are super well, encouraged and inspired 💟.
Today I will present you my first post of this year, and I decided to start doing something for my personal use and that I really need, so I will show you how to make a beautiful pair of TIGHTENING RINGS WOVEN WITH CROCHET.
And if they are very useful and because I have long wanted to have one but I have not been able to buy it because in the stores in my city do not sell them and I have not been given to buy them online, so I decided to make them myself and as the result to use them I loved, I thought it would be great to share it and so some crochet friend is also encouraged to knit their own.
And if you still don't know what a tension ring is, I'll explain it to you, it is a ring that is used to maintain constant the tension of the yarn or wool when knitting, and also helps us to protect our fingers from the thread rubbing, because when we spend many hours knitting, small reddening and marks can appear, which sometimes are somewhat painful and uncomfortable, to such an extent that we have to stop knitting.
In the images I leave a model of ring that is the one I wanted to buy so much, but I swear that knitted rings are super comfortable and functional, so I can recommend it 100% if it happens to you like me and you can not buy it.
Well friends below I leave you with the materials I used and also with the step by step of how I made it.
MATERIALS:
- Cotton thread of the desired colors.
- Crochet needle #4.
- Stitch marker and scissors.
ABBREVIATIONS OF THE STITCHES TO USE:
- dc: double crochet.
- hdc: half double crochet.
- sc: single crochet.
- ch: chain stitch.
- ss: slipped stitch.
- Dec: decrease.
STEP BY STEP:
For the base of the ring, knit a chain stitch with the amount of stitches needed to cover the thickness of our finger, in my case it was 18 chain stitches, then we join them with a slip stitch forming a ring, and you simply follow the pattern below, the chain stitches at the beginning of each row are to give height and do not count as a stitch:
R1-4: 1 ch, 18 sc, 1 ss. (18).
R5: 2 ch, 18 hdc, 1 ss. (18)
R6: 3 ch, 18 dc, 1 ss. (18)
R7: 2 ch, 18 hdc, 1 ss. (18)
R8: 1 ch, 18 Sc, 1ss. (18)
R9: 2 ch, 6 hdc, 1Dec, 10 hdc, 1ss. (17)
R10: 1 ch, 8 sc, 1Dec, 7 sc, 1ss. (16)
R11-12: 1 ch, 16 sc, 1ss. (16) cut and fasten off the strand.
Remember at the beginning, make the number of chains according to the thickness of your finger and make sure that it is not too tight but not too loose either, otherwise it would be uncomfortable to wear.
Finally I would like to emphasize that it is best to weave the ring with cotton thread, preferably thin, such as wick or crochet because in this material most of the threads that we weave will slide easily but also with a little resistance which is what is needed to maintain constant thread tension when weaving.
Another little thing is that the idea of making loops of different stitches is so that we can pass the yarn between the stitches and that the same ring will work for almost any thickness of yarn or wool.
And well with this pattern I leave you can make your rings and the decoration is to everyone's taste, I made a frog and another with watermelon design, but you could just leave it unicolor in your favorite color or multicolor.
WELL FRIENDS I HOPE YOU LIKED AS MUCH AS I DID THE FINAL RESULT OF THESE CUTE CUSTOM KNITTING TENSION RINGS, I HOPE YOUR NICE COMMENTS AND / OR VOTES, SO MOTIVATE ME TO CONTINUE SHARING MY CREATIONS WITH YOU, I WILL BE HAPPY TO ANSWER ALL YOUR COMMENTS BE HAPPY AND THAT THE MUSE OF CREATIVITY NEVER LEAVE YOU!
THANK YOU FOR VISITING MY BLOG! AND HAPPY AND PROSPEROUS YEAR 2024!
Your friend Nathalie @laranitacrochet bids you a fond farewell!
*All photos used in the publication are property of the author.
*The pictures were taken and edited with my REDMI 9 and the FotoRoom App.
*The translation was done at https://www.deepl.com/es/translator