

Hola queridos amigos de Hive, es un gusto poder unirme al concurso propiciado por nuestra querida comunidad Diy-Hub, hoy 27 de noviembre cierra el concurso de esta maravillosa tecnica. He utilizado la tecnica china de piezas de origami 3D para ensamblar un hermoso Dragón con los bonitos colores de Hive.
Espero que les guste!
Materiales:
6 hojas de maquinas blancas
3 hojas de cartulina roja
1 hoja de cartulina negra
Pegamento
Paso a PAso
Formacion de las pieza básica
1

Se divide la hoja en 4 lados iguales de forma vertuical, luego de se cuelven a doblar a la mitad los 4 lados, para formar 8 lineas en la hoja.
Seguidamnete de forma vertical se divide la hoja en 4 segmentoso iguales.

Luego se recortan cada uno de los segmentos que forman rectangulos.
2

seguidamnete se toman los rectangulos y se van formando cada pieza. el rectangulo se dobla a la mitad de forma vertcal, luego se abre y se divide a la mitad de forma horozontal.
3

Luego se forman triangulos, doblando desde la mitad que divide el rectangulo, se hace lo mismo con la otra punta.
Luego la pieza se voltea y la parte inferior izquierda se doblahacia dentro, tambien se hace lo mismo con el otro extremo derecho de la pieza

Luego se dobla hacia arribla el extremo saliente y nos quedaria este triangulo, solo debemos nuevamente doblar la pieza a la mitad.
4

Para darle una forma ovalada lal cntro de la figura se debe hacer una piramide de estas piezas insertando las punta por los orificios de estas. Cuando se haga la piramide, se toma la punta trasera de un lapiz y se presina un poco sobre esta.

De esta manera tendremos la figuras.
Se necesitan las siguientes piezas para formar al Dragon.
- 190 piezas blancas
- 64 rojas
- 2 negras

Cabeza del Dragon
1

Se toman dos figuras rojas y sobre estas se inserta una roja, haciendo unir el lado izquierdo y el lado dereco de las piezas que estan juntas.
2

Se insertan dos piezas a ambos lados y forman el segundo nivel del origami, luego se insertan dos centrales para formar el tercer nivel de la pieza.En el cuarto nivel se insertan 4 piezas más y luego en ambos laterales del cuarto nivel se inserta una pieza blanca.
3

Se hace los mismo con el otro lado y luego se inserta una fila de piezas rojas. Seguidamente se deben colocar ambas piezas negras dentro de la pieza blana y roja. Luego sobre la pieza negra se insertan una pieza blanca del lado izquierdo y otra pieza roja del lado derecho, se hace lo mismo con el oro lado de la cara del Dragon.
4

Para formar los cuernos del Dragon se debe hacer una fila uno sobre otro de piezas rojas y se hace lo mismo con el otro lado. Seguidamnete tambien se hace unos cachos mas largos y se hace otra fila de piezas blancas.


Este seria el resultado final. En realidad es lomás complejo de la figura porque para realizar el cuerpo es muy sencillo la tecnica. YA lo veremos...
CUERPO DEL DRAGÓN
1

Para realizar el cuerpo del dragón se sigue un patrón y es colocar dos piezas blancas juntas y sobre este insertar una blanca, luego se insertan dos y luego una, y asi sucesivamente. Tambien he alternado el color rojo, pero solo para colocarlo en la parte central cuando solo insertamos una sola pieza.
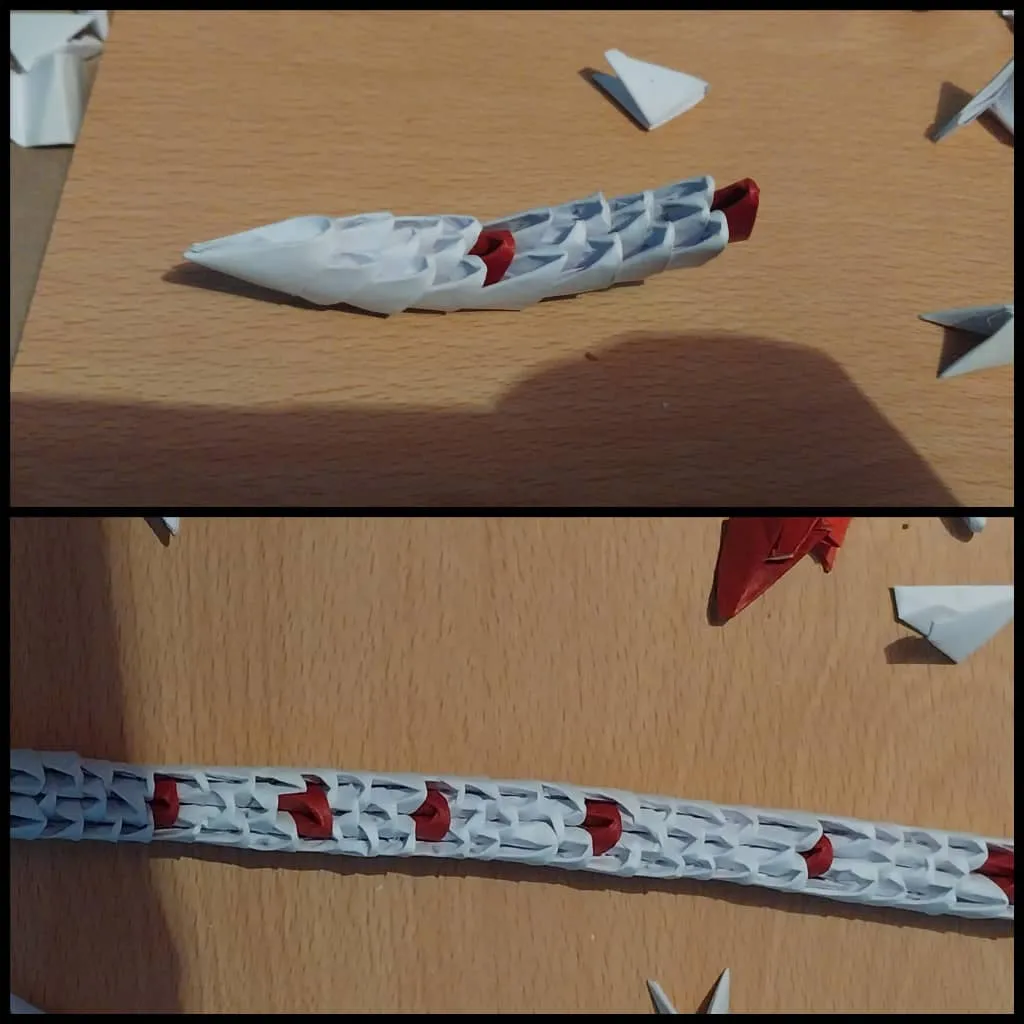
Ese es el patron por el cual nos regimos.
La Cola del Dragon
1

Iniciamos con una pieza e insertamos dos sobre esta, luego sobre estas dos insertamos cuatro en cada una de las puntas. Luego insertamos 4 piezas más sobre estas. y en la parte central insertamos dos rojas, luego sobre estas dos insertamos dos blancas.

Podemos darle forma a la figura, le he hecho una curva en la mitad de la figura.
PATAS
1

Luego para hacer las patas solo basta con unir tres figuras blanccas y formamos las patas delanteras.
Para hacer las patas trasera iniciamos con una pieza, luego con dos rojas y luego con una roja en el centro. Seguidamemte se debe insertar en cada punta las figuras blancas.
Una vez que esten listas debemos pegar estas en los extremos de la figura, al final del Dragon se pegan las traseras y cerca de la cabeza se peganlas patas delanteras.

Seguidamnete aplicamos un pco de pegamento blanco a toda la figura para que este quede rigido y brilloso.


Espero que les guste el resdultado!
- Las imagenes me pertenecen
- Traductor: Deepl Traslator
- Edicion: Canva
Hello dear friends of Hive, it is a pleasure to join the contest sponsored by our dear community Diy-Hub, today November 27th closes the contest of this wonderful technique. I have used the chinese technique of 3D origami pieces to assemble a beautiful Dragon with the beautiful colors of Hive.
I hope you like it !
Materials:
6 white machine sheets
3 sheets of red cardboard
1 sheet of black cardboard
Glue
Step by step
Formation of the basic piece
1
Divide the sheet into 4 equal sides vertically, then fold the 4 sides in half to form 8 lines on the sheet.
Then vertically divide the sheet into 4 equal segments.
Then cut out each of the segments to form rectangles.
2
then take the rectangles and form each piece. the rectangle is folded in half vertically, then it is opened and divided in half horizontally.
3
Then form triangles, folding from the half that divides the rectangle, do the same with the other end.
Then the piece is turned over and the lower left side is folded inward, and the same is done with the other right end of the piece.
Then fold up the protruding end and we would have this triangle, we only have to fold the piece in half again.
4
To give an oval shape to the center of the figure, we must make a pyramid of these pieces by inserting the tips through the holes of these. When the pyramid is made, take the back tip of a pencil and press a little bit on it.
In this way we will have the figures.
The following pieces are needed to form the Dragon.
- 190 white pieces
- 64 red
- 2 black
Dragon's head
1
Take two red figures and insert a red one on top of them, joining the left and right sides of the pieces that are next to each other.
2
Two pieces are inserted on both sides and form the second level of the origami, then two central pieces are inserted to form the third level of the piece. 4 more pieces are inserted on the fourth level and then a white piece is inserted on both sides of the fourth level.
3
Do the same with the other side and then insert a row of red pieces. Next, place both black pieces inside the white and red piece. Then on the black piece insert a white piece on the left side and another red piece on the right side, do the same with the gold side of the Dragon's face.
4
To form the horns of the Dragon, make a row of red pieces one on top of the other and do the same with the other side. Then also make some longer pieces and make another row of white pieces.
This would be the final result. Actually this is the most complex part of the figure because the technique is very simple to make the body. We will see...
BODY OF THE DRAGON
1
To make the body of the dragon we follow a pattern and that is to place two white pieces together and insert a white one on top, then insert two and then one, and so on. I have also alternated the red color, but only to place it in the central part when we only insert one piece.
That's the pattern we go by.
The Tail of the Dragon
1
We start with one piece and insert two pieces over it, then over these two we insert four at each of the ends. Then we insert 4 more pieces on top of these, and in the central part we insert two red ones, then on top of these two we insert two white ones.
We can shape the figure, I have made a curve in the middle of the figure.
LEGS
1
Then to make the legs just join three white figures and form the front legs.
To make the back legs we start with one piece, then with two red ones and then with a red one in the center. Then insert the white figures at each end.
Once they are ready we must glue these at the ends of the figure, at the end of the Dragon we glue the rear ones and near the head we glue the front legs.
Next we apply a little white glue to the whole figure to make it rigid and shiny.
I hope you like the result!!
- The images belong to me
- Translator: Deepl Traslator
- Edition: Canva