Hello everyone... 🐱🐾💕
Hello my dear Hiver and the dear community of artists #DiyHub, I am very excited to be here again with you to present a work made with love and affection.
For today I wanted to please all those lovers of the French television series in digital animation, called the adventures of Ladybug or also known as Miraculous Ladybug. This series tells the story of Marinette and Adrien, two teenagers who are able to transform into the superheroes Ladybug and Cat Noir, respectively, thanks to the power of magical jewels called "Miraculous". While Ladybug is a heroine inspired by a ladybug and has the power of creation, Cat Noir is a hero based on a black cat and with the power of destruction. Both must use their powers to protect Paris from the villains that threaten it.
Here I leave you the source and link of the information I just provided about the series, in case you want to know a little more about it.
That is why by multiple requests for me to make some earrings alluding to the animated series, I was inspired by it, and I wanted to make through an easy process in the technique of quilling some simple fixed tendrils of some "Miracolous" which are the magical jewels that give them power, to give to all those fans.
Let's start:😃

Hola a todos... 🐱🐾💕
Hola a mis queridos Hiver y a la querida comunidad de artistas #DiyHub, estoy muy emocionada es estar por acá nuevamente con ustedes para presentarles un trabajo hecho con mucho amor y cariño.
Para el día de hoy quise complacer a todos aquellos amantes de la de la serie de televisión francesa en animación digital, llamada las aventuras de Ladybug o también conocida como Miraculous Ladybug. Esta serie narra la historia de Marinette y Adrien, dos adolescentes que son capaces de transformarse en los superhéroes Ladybug y Cat Noir, respectivamente, gracias al poder de unas joyas mágicas llamadas “Miraculous”. Mientras Ladybug es una heroína inspirada en una mariquita y tiene el poder de la creación, Cat Noir es un héroe basado en un gato negro y con el poder de la destrucción. Ambos deben utilizar sus poderes para proteger París de los villanos que la amenazan.
Por acá les dejo la fuente y link de la información que les acabo de proporcionar de la serie, por si desean saber un poco más de ella.
Es por ello que por múltiples peticiones de que elaborara unos pendientes alusivos a la serie animada, me inspiré en la misma, y quise realizar mediante un fácil proceso en la técnica de quilling unos sencillos zarcillos fijos de unos “Miracolous” que son las joyas mágicas que les dan poder, para obsequiar a todos aquellos fans.
Comencemos:😃

• Cintas de quilling de 3mm de ancho rojas y plateadas.
• Un trozo de servilleta.
• Aguja para quilling.
• Pega blanca extra fuerte (de carpintería).
• Tijera.
• Lápiz o bolígrafo.
• Marcador negro punta fina.
• Base para zarcillos fija.
• Pincel.
- Red and silver quilling ribbons 3mm wide.
- A piece of napkin.
- Quilling needle.
- Extra strong white glue (woodworking glue).
- Scissors.
- Pencil or pen.
- Black fine tip marker.
- Base for fixed tendrils.
- Paintbrush.

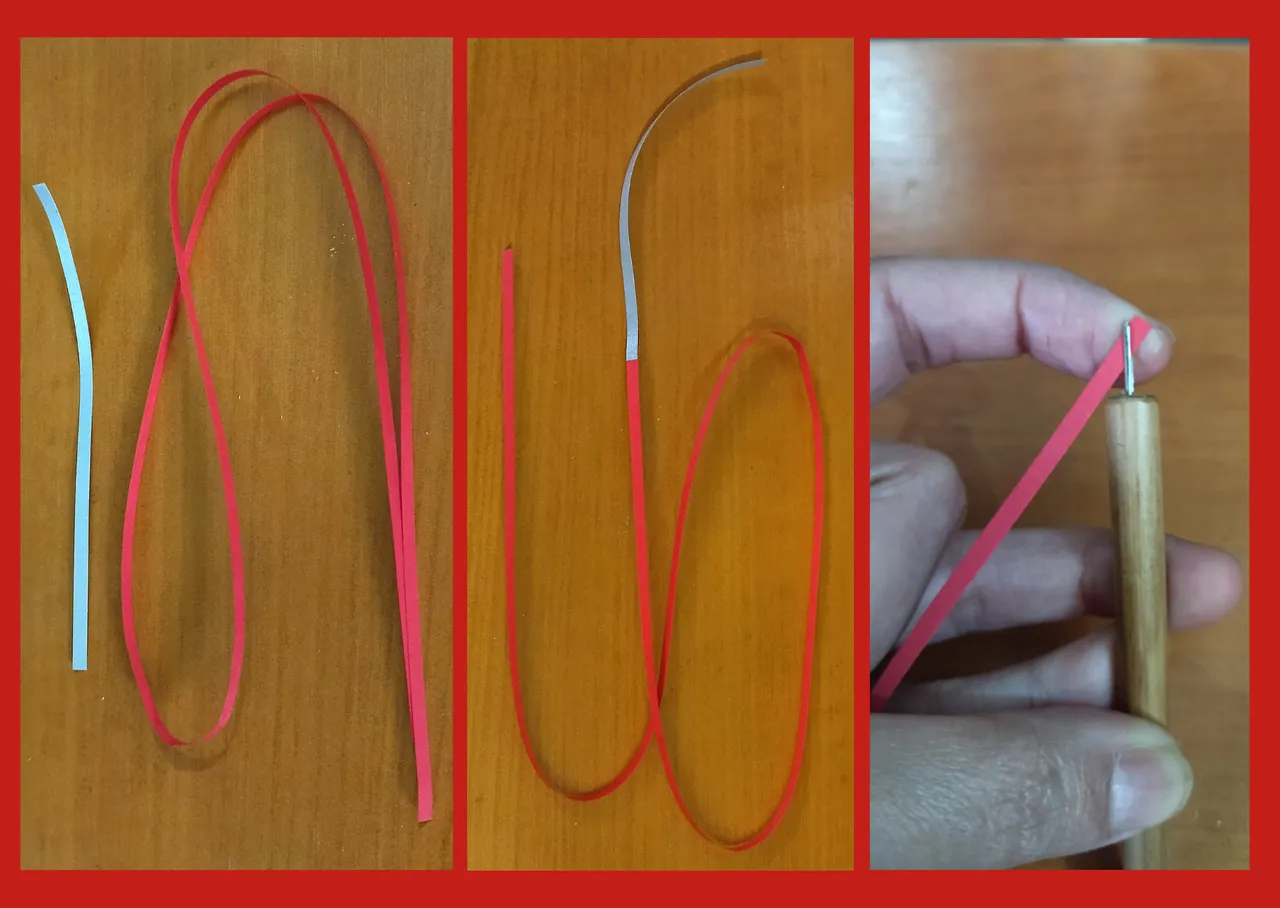
- Let's start by taking a 3mm wide x 50cms long red quilling ribbon, and a piece of 3mm wide x 10cms long silver ribbon, we will join both ribbons to form a single one.
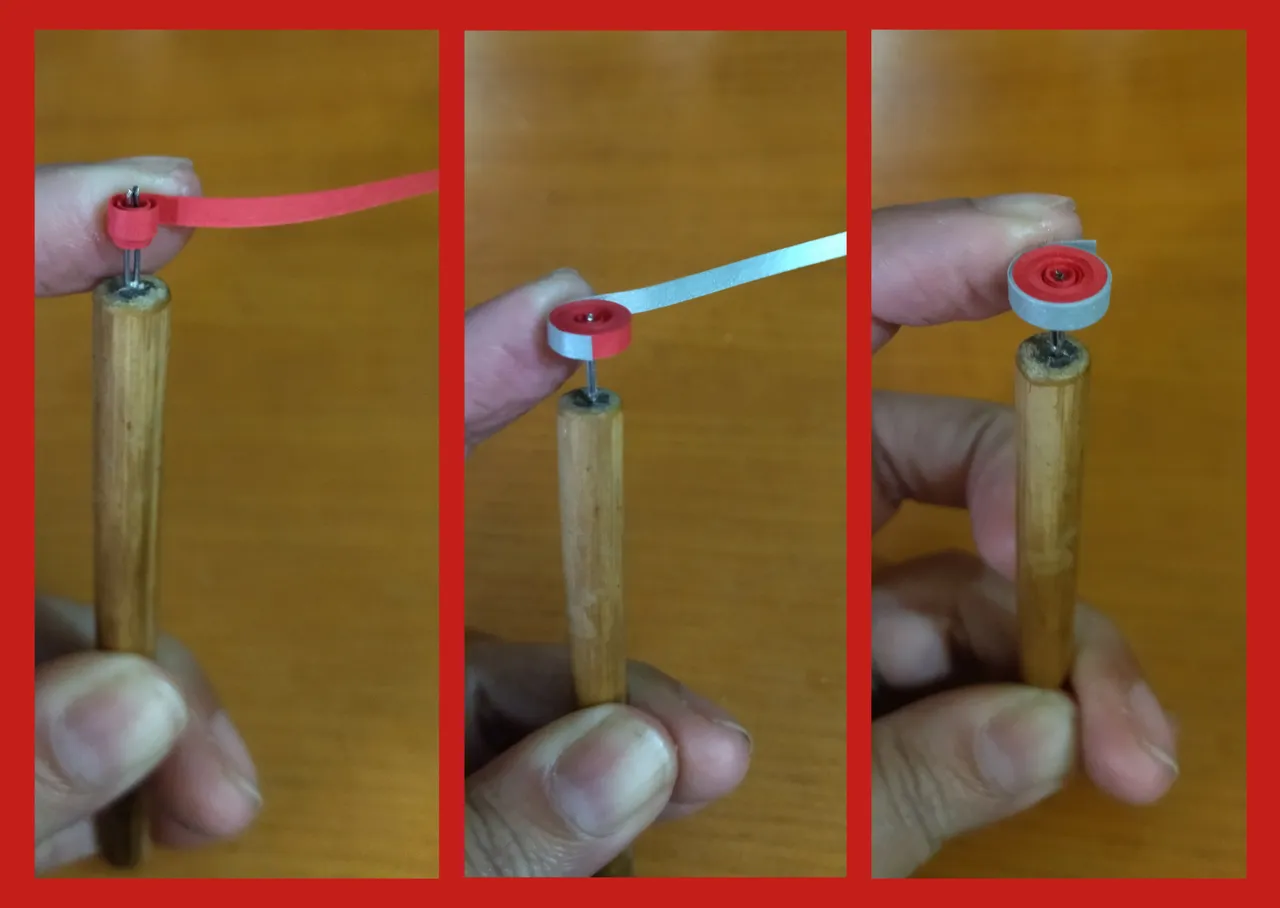
- With the quilling needle we are going to roll up starting with the red part and ending with the silver part, seal with glue and remove from the needle, to obtain a closed circle.
- Now we have the piece that will be the fundamental base of our earring, we are going to mold it to give it a 3D finish, we take a pen and with the flat part we push the circle outwards, to prevent the work we did from deforming, we add extra strong white glue on the inside of the piece, let it dry.

• Vamos a comenzar tomando una cinta para quilling color roja de 3mm de ancho x 50cms de largo, y un trozo de cinta plateada de 3mm de ancho x 10cms de largo, vamos a unir ambas cintas para formar una sola.
• Con la aguja para quilling vamos a enrollar comenzando por la parte roja hasta terminar por la parte plateada, sellamos con pega y sacamos de la aguja, para obtener un circulo cerrado.
• Ya tenemos la pieza que va a ser la base fundamental de nuestro pendiente, vamos a moldear para darle un acabado 3D, tomamos un bolígrafo y con la parte plana empujamos el círculo hacia afuera, para evitar que el trabajo que hicimos se deforme, añadimos pega blanca extra fuerte por la parte interna de la pieza, dejamos secar.

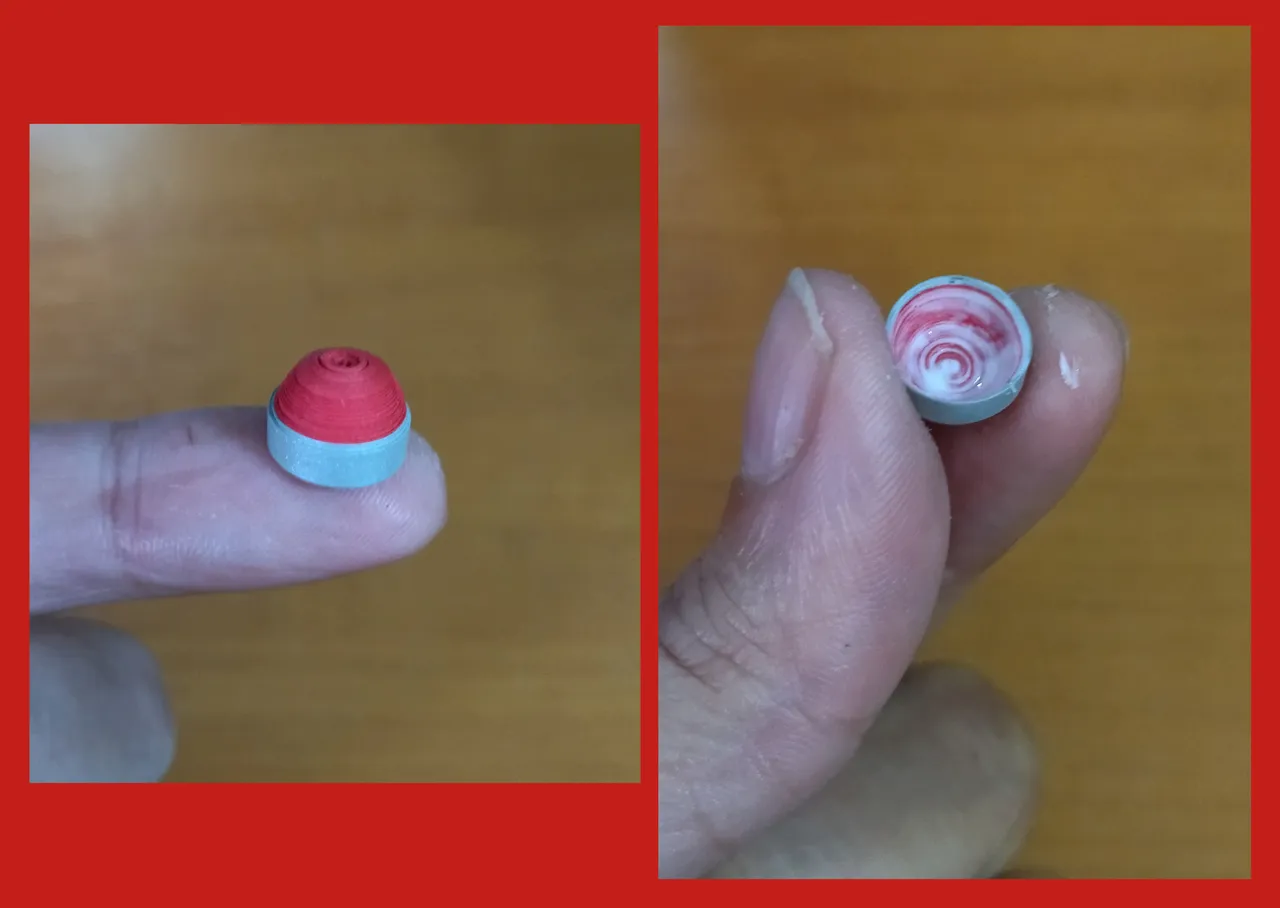
To give consistency to the piece and to be able to place the fixed base of the tendril we must fill the hollow part, so I took the idea of taking a piece of napkin, soak it with extra strong white glue and fill the pendant, we will take advantage of placing the base for tendrils at once, we put around it another bit of glue and we must let it dry well to finish the pendant.
Note that I am showing you the process of making a single pendant, but we must repeat the process to have the pair or the amount of pieces we want to obtain.
We are going to give the final detail to the piece to make it allusive to Ladybub, we take a black marker and in the center we will make a circle and on the sides of the pendant in its red part we will make small semicircles.
To finish we will give the tendril its liquid protection (plasticized), for this we will apply several layers of extra strong white woodworking glue, letting it dry between one layer and the other.
In this way we will have our simple tendrils with Ladybud's Adventures motif, ready to give as a gift to those fans of the series.
Did you see how fast you can make some nice tendrils and with easy to obtain materials?
• Para darle consistencia a la pieza y poder colocar la base fija del zarcillo debemos rellenar la parte hueca, por esto tome la idea de tomar un trozo de servilleta la empapamos con pega blanca extra fuerte y rellenamos el dije, vamos a aprovechar de colocar de una vez la base para zarcillos le ponemos alrededor otro poco de pega y debemos dejar secar bien para poder terminar el pendiente.
Tomemos en cuenta que les estoy mostrando el proceso de elaboración de un solo pendiente, pero debemos repetir el proceso para tener el par o la cantidad de piezas que queramos obtener.
• Vamos a darle el detalle final a la pieza para hacerlo alusivo a Ladybub, tomamos un marcador negro y en el centro haremos un circulo y a los lados del dije en su parte roja haremos pequeños semicírculos.
• Para finalizar proporcionaremos al zarcillo su protección liquida (plastificado), para esto aplicaremos varias capas de pega blanca extra fuerte de carpintería dejando secar entre una capa y otra.
De esta manera tendremos nuestros sencillos zarcillos con motivo de las Aventuras de Ladybud, listos para obsequiar a esos fans de la serie.
¿Viste que rápido puedes hacer unos lindos zarcillos y con materiales fáciles de obtener?


What did you think, did you like it?
I hope you did, I hope you liked my explanation, procedure and photos, I made them with love for you.
"Let out that muse that inspires you, and let your imagination fly".
Thank you all, see you next time. 🐾🐱💕
¿Que les pareció, les gustó?
Espero que sí, que les haya gustado mi explicación, procedimiento y fotos, los hice con mucho cariño por y para ustedes.
"Deja salir esa musa que te inspira, y deja volar tu imaginación".
Gracias a todos, nos vemos en la próxima. 🐾🐱💕
Los invito que apoyen a "La Colmena", dale tu voto ✨
 Vote la-colmena for witness By @ylich
La imagen de LaidyBug fue tomada de un sitio de libre uso y editada en Canva Fuente
La mayoría de las fotos usadas en este post son de mi autoría y han sido sacadas en mi celular personal un Redmi 9T y editadas Canva Banner y separador hecho por mí en Canva Traducido con la ayuda de DeepL
