Hello everyone... ✨
Hello my dear Hiver and the dear community of artists #DIYHub, as always I am very pleased and excited to be here to participate in this contest of the month inspired by flowers. I invite you to participate, here are the guidelines for this beautiful contest.
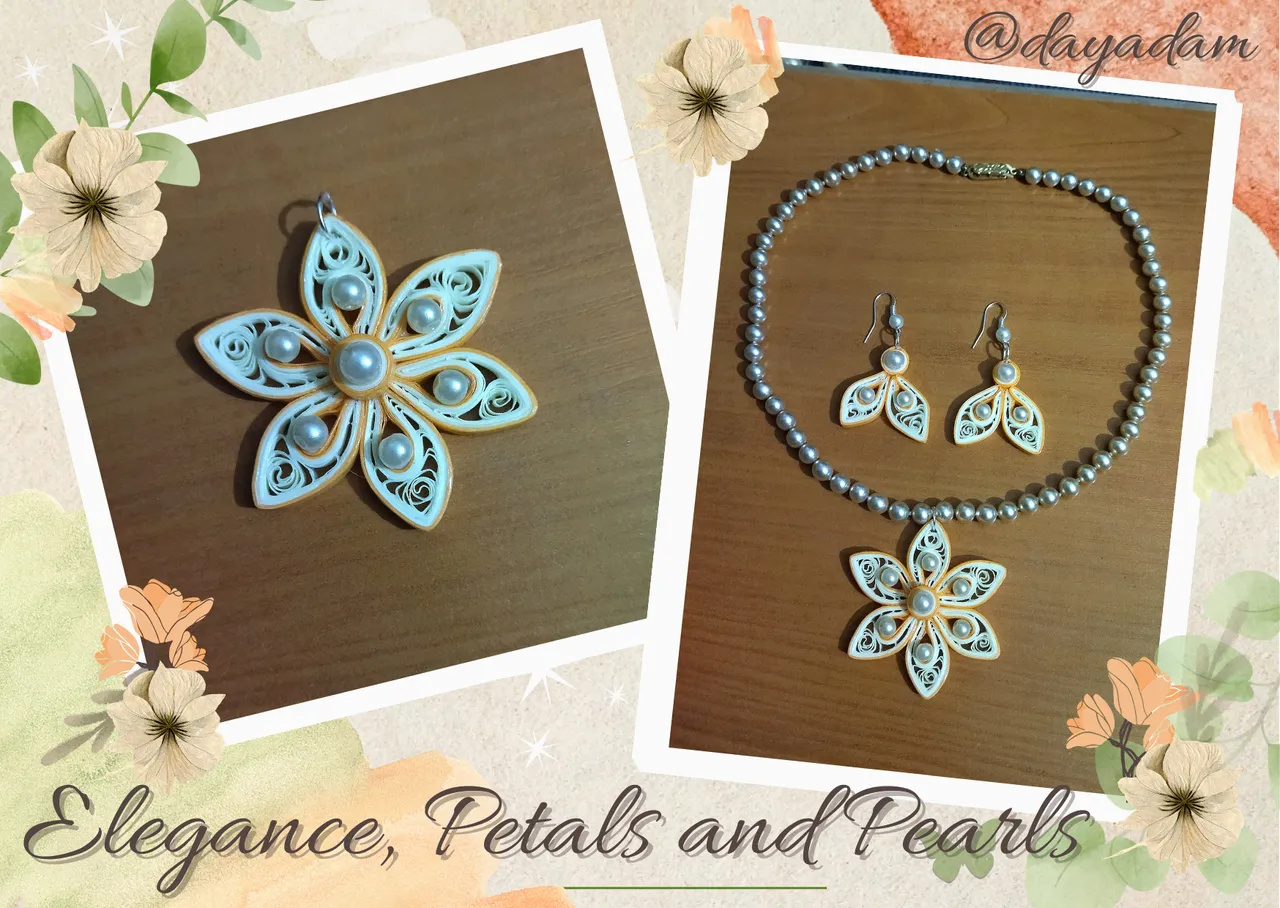
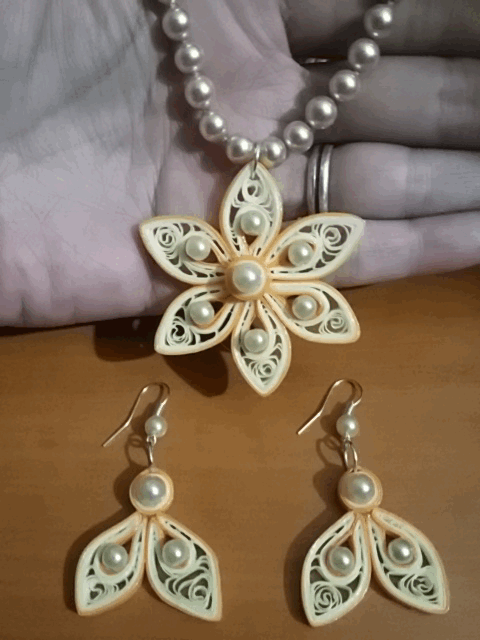
For today I bring you an elegant 6 petal flower medallion decorated with pearls in the quilling paper technique. I want you to notice that with this technique apart from making charms or accessories with casual models we can also go a little further and make much more elegant garments to wear on occasions from semi-formal to formal, demonstrating the versatility of it. I am going to focus on giving you the guidelines for the elaboration of the central charm that you can use with the necklace of your choice, adding as an additional detail some earrings that will match it.
I invite @anaarevalo01 and @brittandjosie to participate in the contest.
So friends, without further ado join me in this creative process that I made especially for you.
Let's get started:😃

Hola a todos... ✨
Hola a mis queridos Hiver y a la querida comunidad de artistas #DIYHub, como siempre muy complacida y emocionada de encontrarme por acá para participar en este concurso del mes inspirado en las flores. Te invito a participar, por acá te dejo las pautas de este bonito concurso.
Para hoy les traigo un elegante medallón con forma de flor de 6 pétalos decorado con perlas en la técnica de papel quilling. Quiero que observen que con esta técnica aparte de realizar dijes o accesorios con modelos casuales también podamos irnos un poco más lejos y realizar prendas mucho más elegantes para usar en ocasiones desde las semi-formales hasta las formales, demostrando la versatilidad de la misma. Me voy a enfocar en darles las pautas para la elaboración del dije central que podrán utilizar con el collar de su preferencia, añadiendo como detalle adicional unos zarcillos que van a hacer juego con el mismo.
Invito a participar en el concurso a @anaarevalo01 y a @brittandjosie .
Entonces amigos, sin más preámbulos acompáñenme en este proceso creativo que realice especialmente para ustedes.
Comencemos:😃

• Cintas de papel (quilling) de 3mm de ancho colores beige y naranja.
• Aguja para quilling.
• Pega blanca
• Regla con diversas medidas de circunferencias.
• Tijera.
• Argolla de bisutería mediana.
• Perlas mediana y pequeñas color beige.
• Alicate punta fina.
• Pincel.
• Collar de su preferencia.
- Paper ribbons (quilling) 3mm wide beige and orange colors.
- Quilling needle.
- White glue
- Ruler with different circumference measures.
- Scissors.
- Medium size costume jewelry ring.
- Medium and small beige beads.
- Fine-nosed pliers.
- Paintbrush.
- Necklace of your choice.

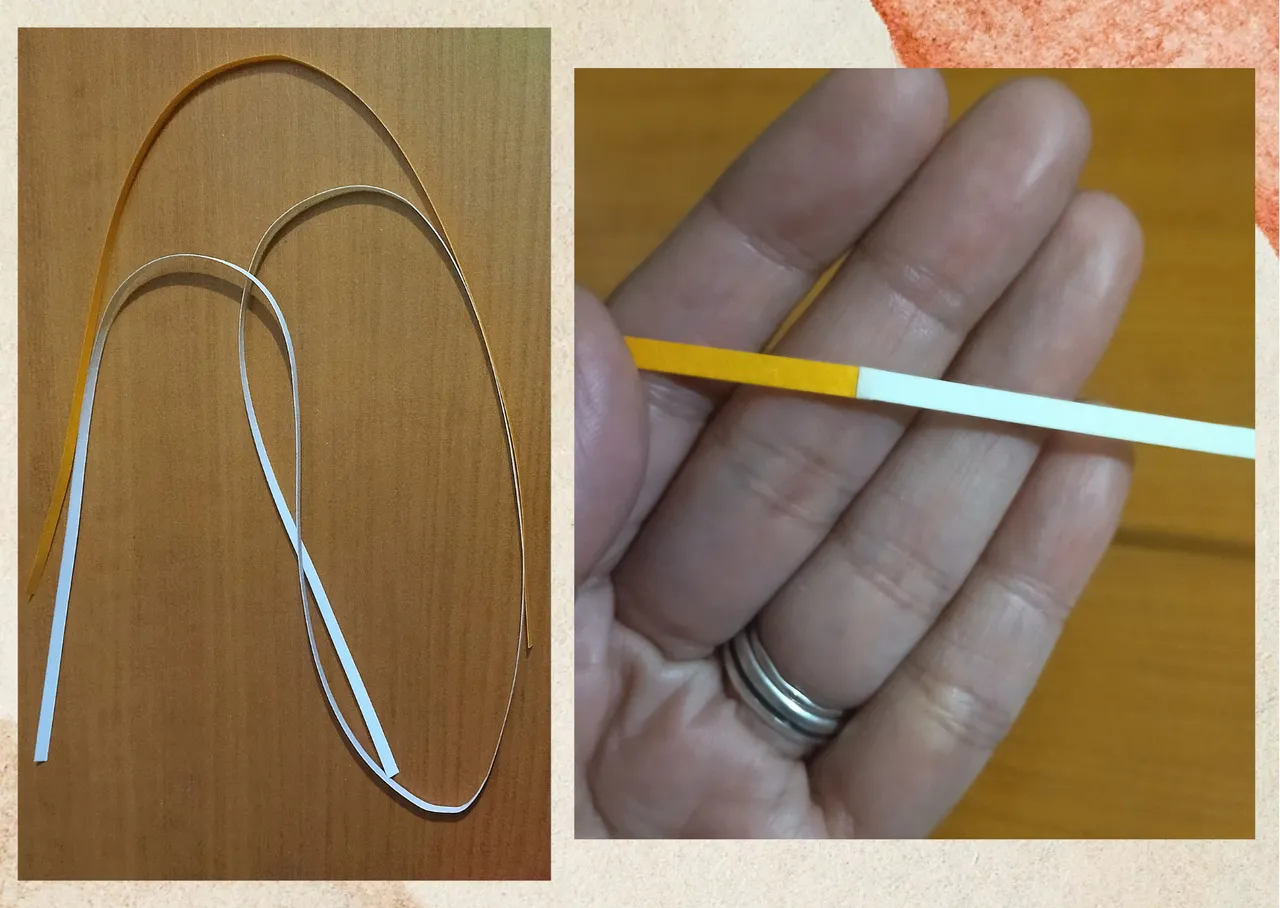
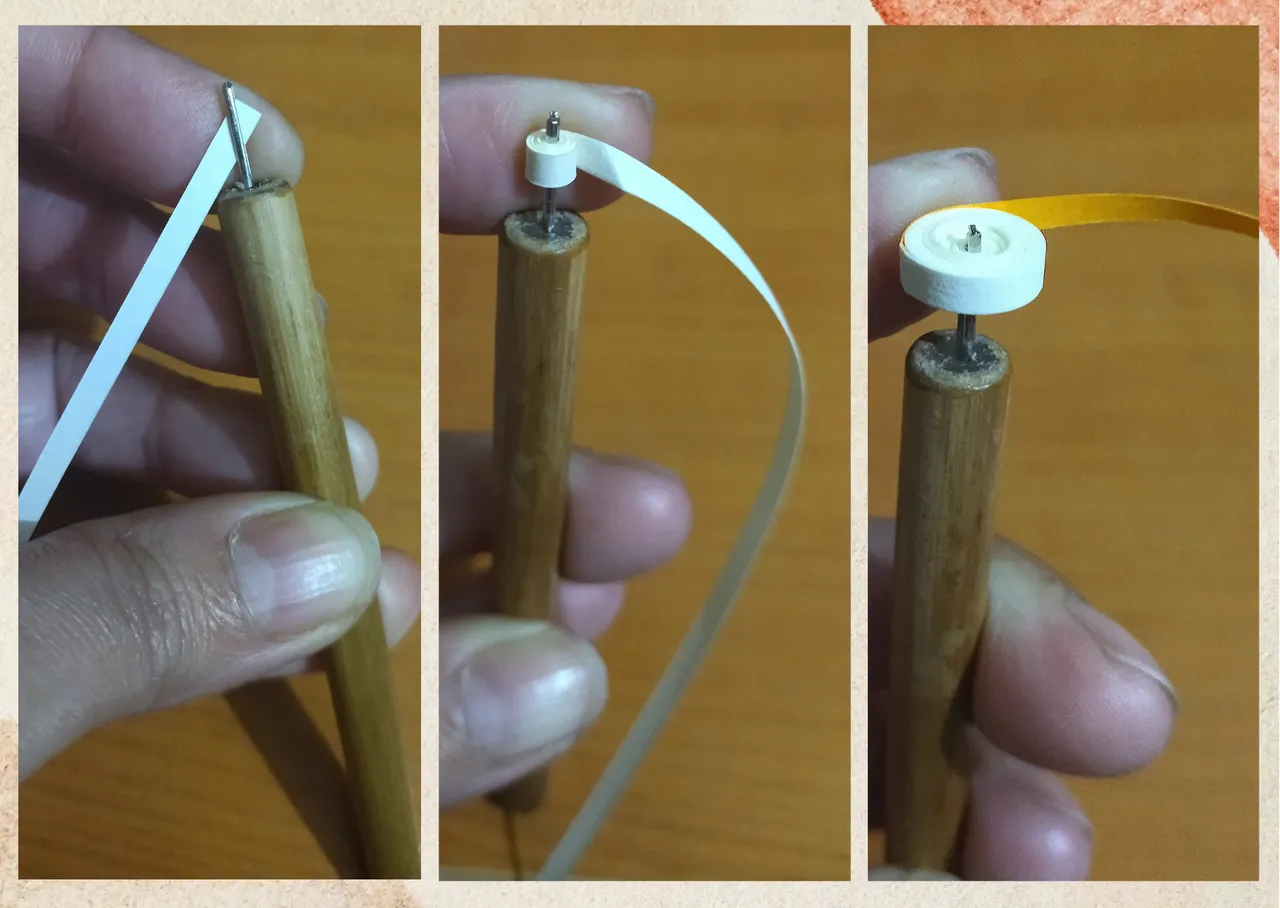
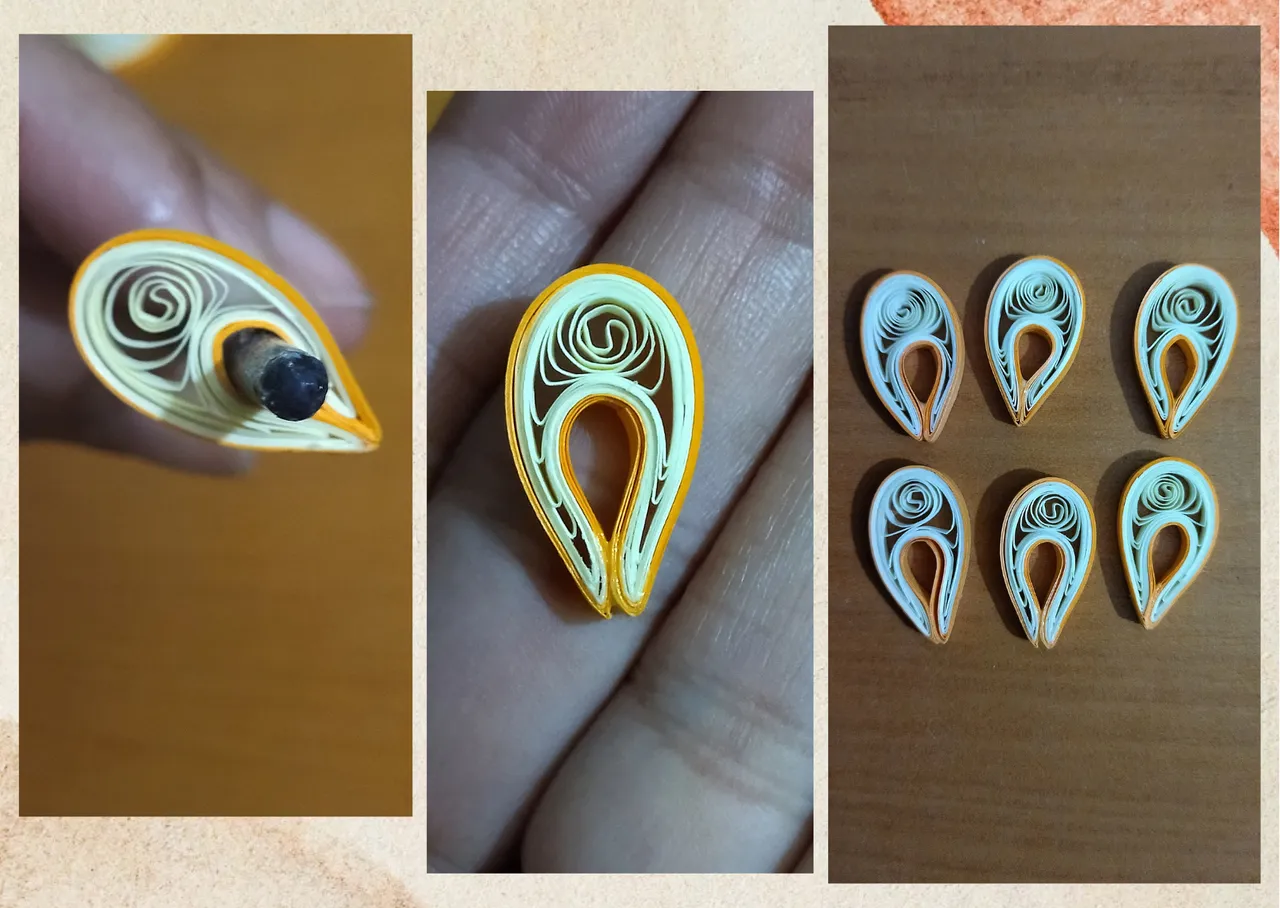
- We start taking a quilling ribbon orange color 3mm wide x 25cms long and a beige color 3mm long x 50cms long, we will take both ribbons and join them with a glue stitch to form only one, once joined we will roll with the quilling needle starting with the beige color and ending with the orange color, we take out of the needle and put in the circumference ruler in the circle number 25, we take out of the ruler and seal with a little extra strong white color, we will obtain an open circle, like this we will need 6 circles, which will be the petals of our flower.

• Comenzamos tomando una cinta de quilling color naranja de 3mm de ancho x 25cms de largo y una color beige de 3mm de largo x 50cms de largo, vamos a tomar ambas cintas y uniremos con un punto de pega para formar 1 sola, una vez unidas enrollaremos con la aguja para quilling comenzando por el color beige hasta terminar por el color naranja, sacamos de la aguja y metemos en la regla de circunferencias en el círculo número 25, sacamos de la regla y sellamos con un poco de color blanca extra fuerte, obtendremos un circulo abierto, como este vamos a necesitar 6 círculos, que serán los pétalos de nuestra flor.

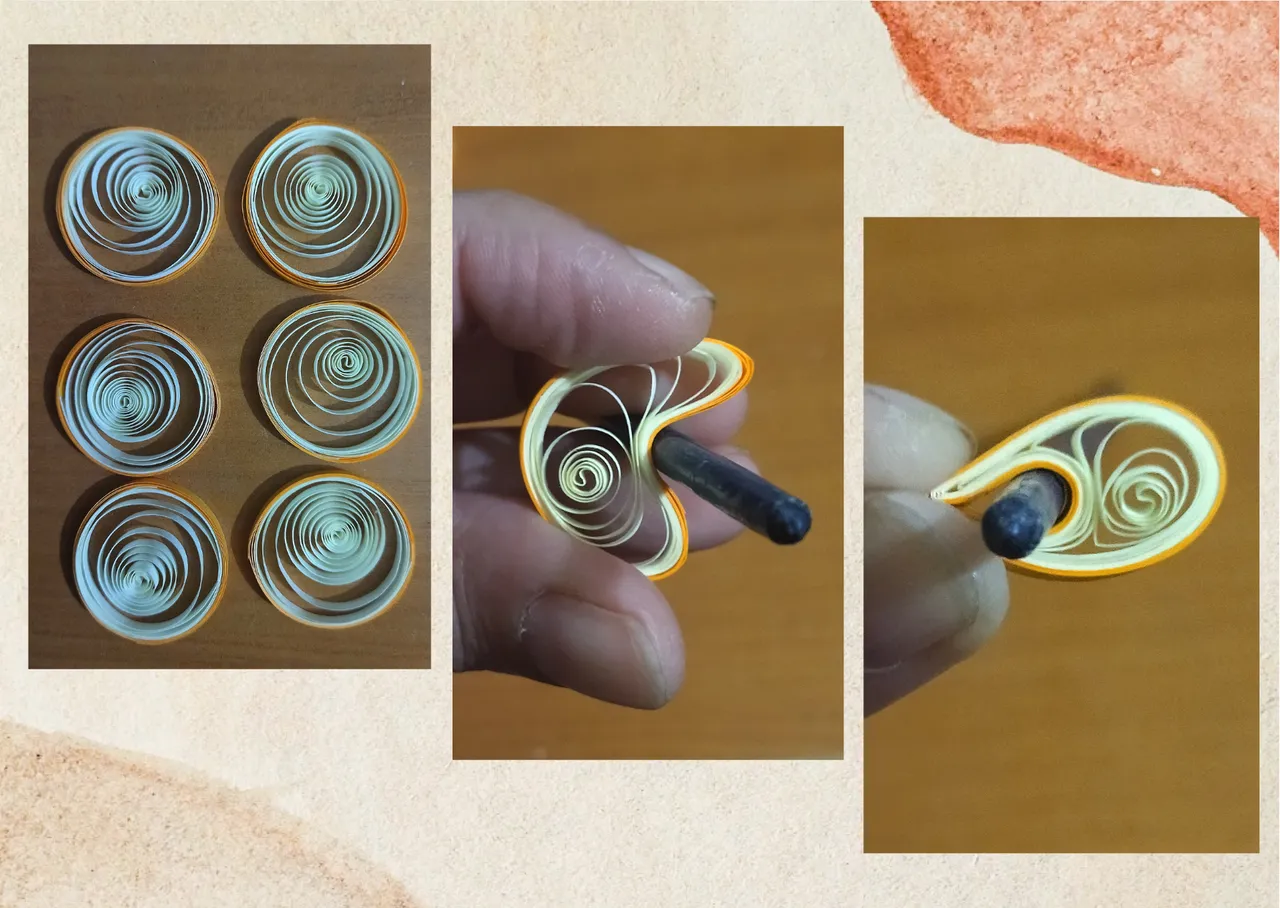
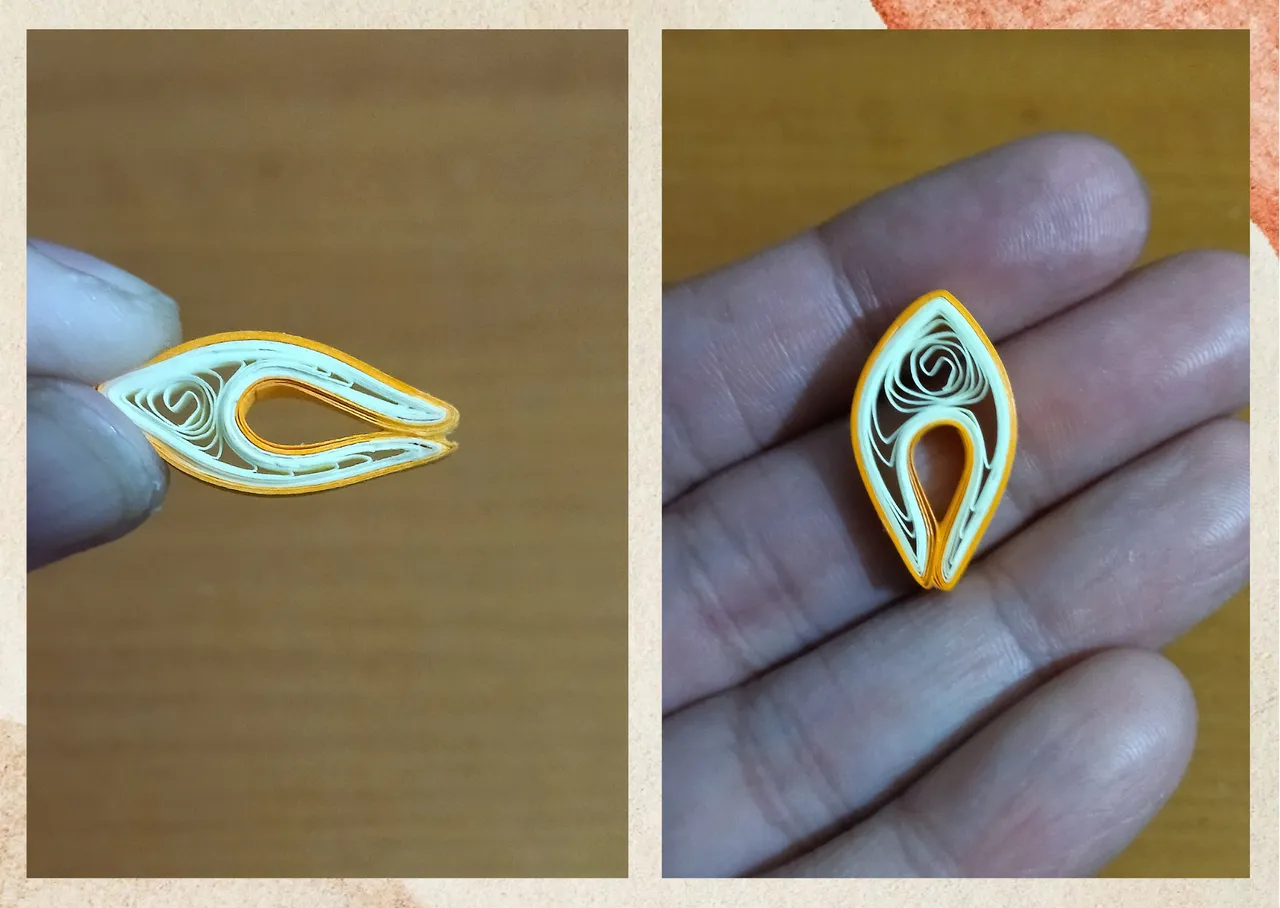
- Once our circles are ready we are going to mold them to form our petals, we take a brush and we are going to pass the lateral part of the circle through the base of it, joining both ends, we apply glue and wait a few seconds for it to seal, then we remove the brush. Finally I wanted to give a pointed shape to the petal, so I pinched a little the top of the circle.
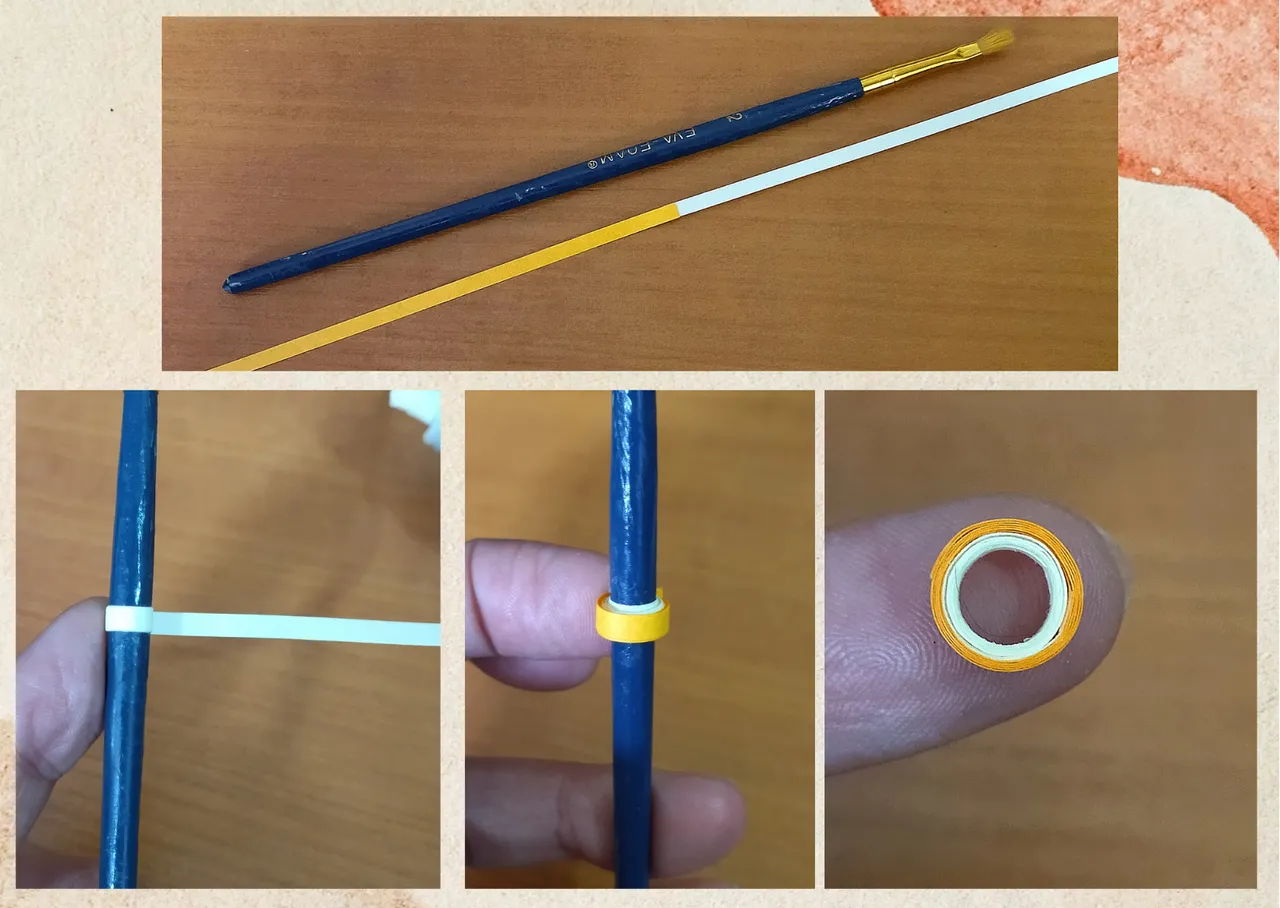
- Now we are going to take a piece of orange and beige ribbon 3mm wide x 12cms long, we join them together to form a single ribbon, we will take a brush that has more or less 4mm in circumference and we will roll the ribbon starting with the beige part around the brush, when we finish rolling we seal with glue and remove it from the brush.
• Listos nuestros círculos vamos a moldear para formar nuestros pétalos, tomamos un pincel y vamos a pasar la parte lateral del circulo por la base del mismo, uniendo ambos extremos, aplicamos pega y esperamos unos segundos a que selle, luego retiramos el pincel. Por ultimo quise darle una forma puntiaguda al pétalo, por ello pellizqué un poco la parte de arriba del círculo.
• Ahora vamos a tomar un trozo de cinta naranja y otro beige de 3mm de ancho x 12cms de largo, unimos para formar una sola cinta, tomaremos un pincel que tenga más o menos 4mm de circunferencia y enrollaremos la cinta empezando por la parte beige alrededor del pincel, al terminar de enrollar sellamos con pega y sacamos del pincel.
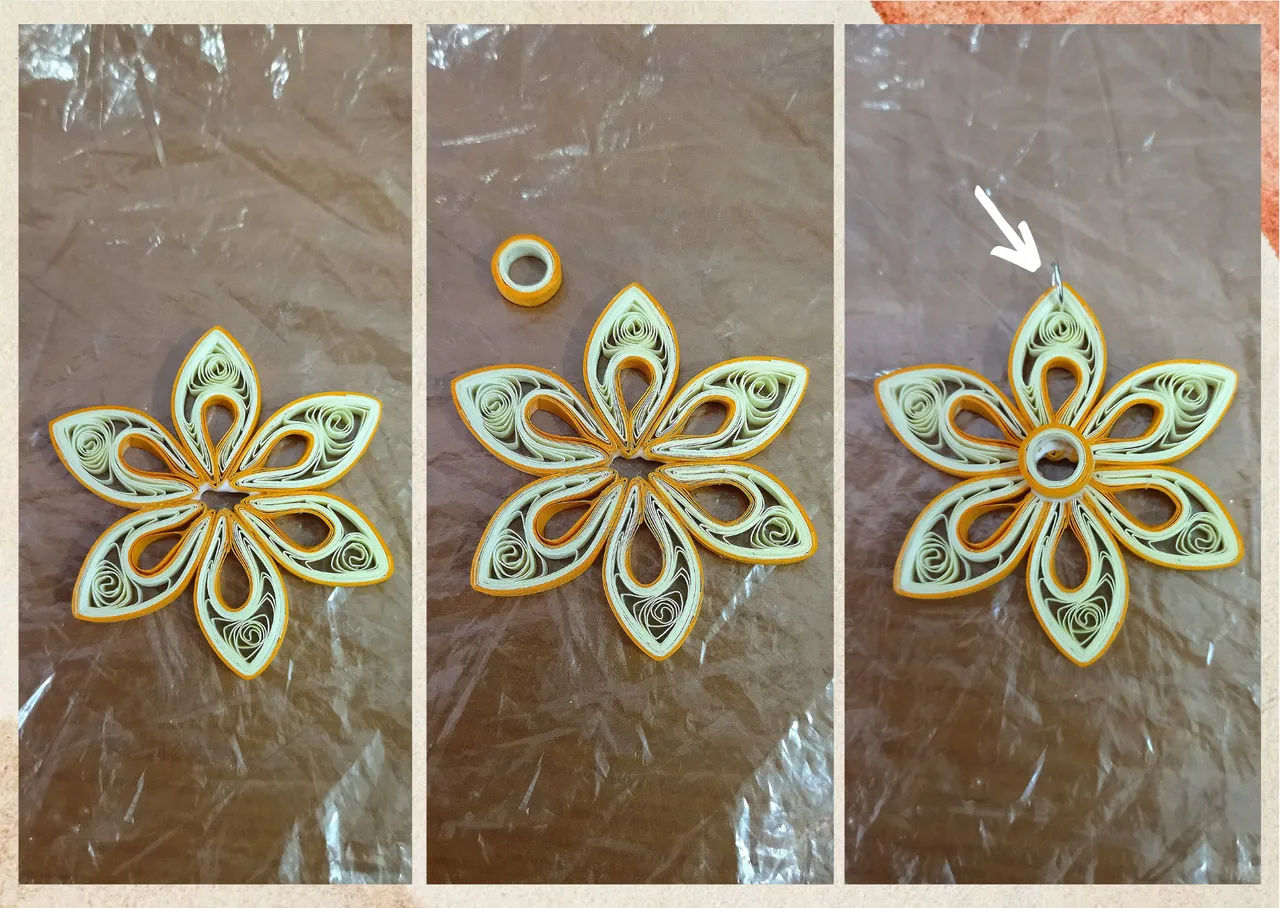
- We are going to form our flower, we are simply going to join the 6 petals harmoniously using white glue to seal, the small circular hollow piece we made, we are going to glue it in the central part of the flower and in one of the petals of the flower in the upper part we will place a medium size costume jewelry ring.
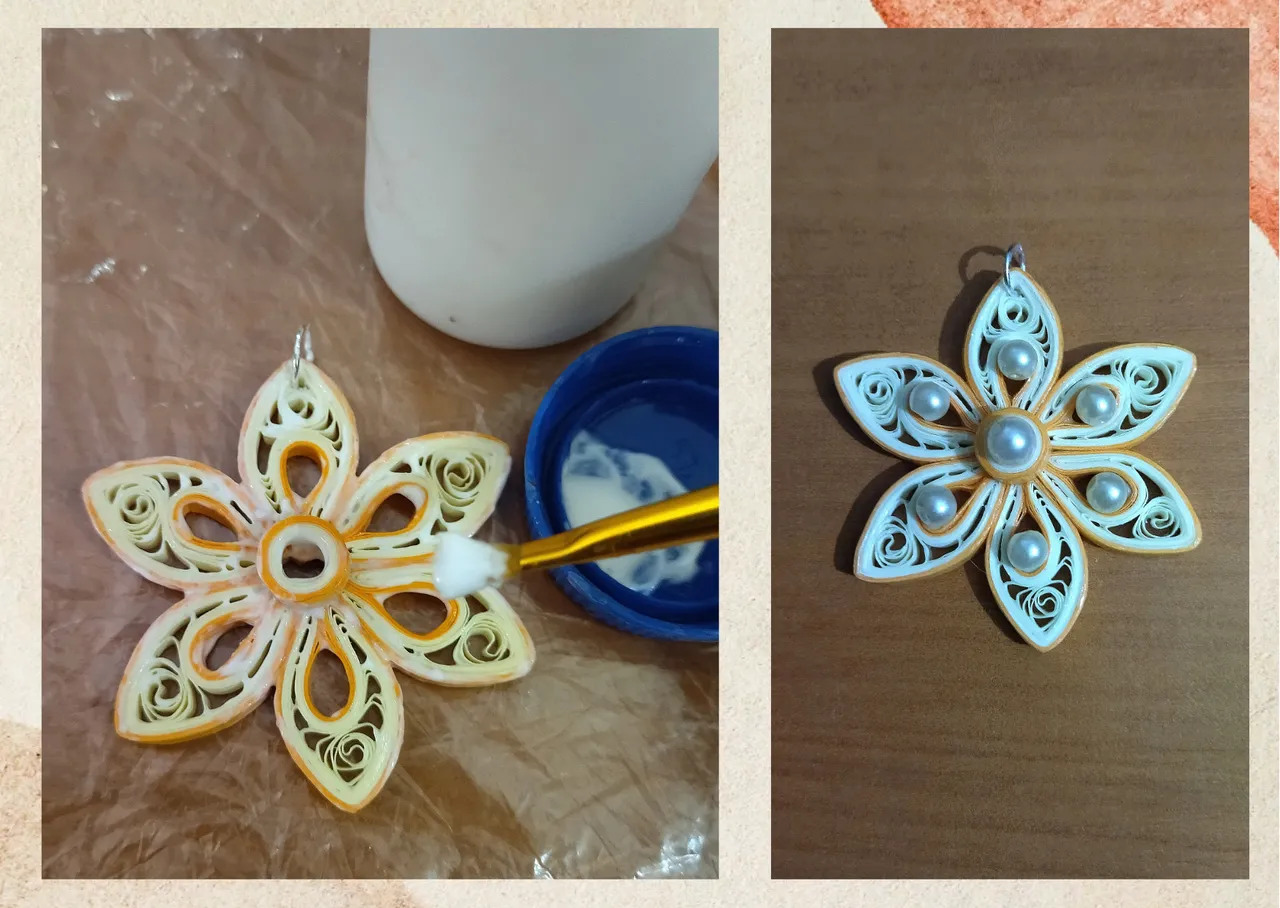
- Now let's protect our piece, we will apply several layers of extra strong white glue, letting it dry between one and the other.
- Once our flower is dry, we will decorate it by adding a medium beige pearl in the central circle, and in the petals we will place a few smaller pearls.
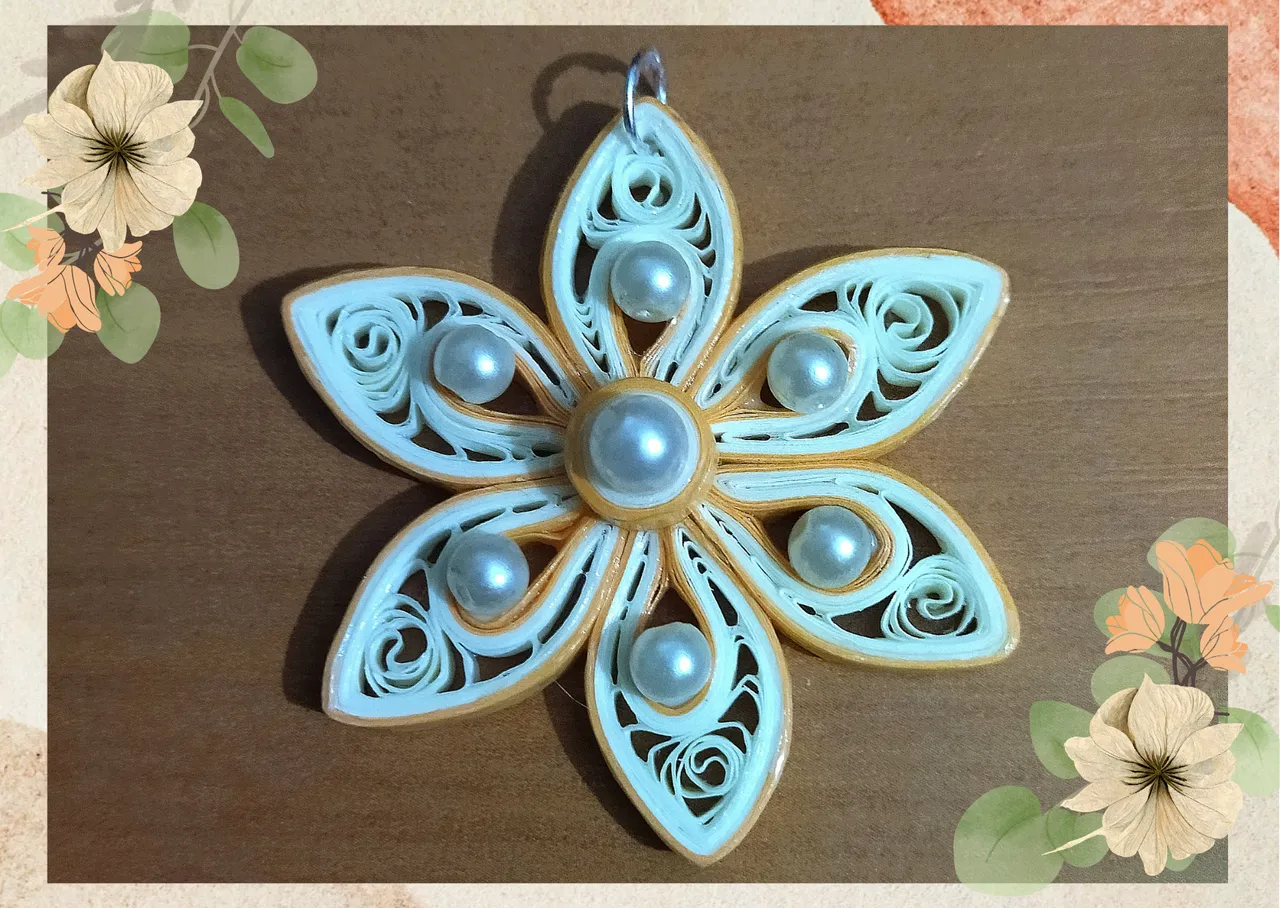
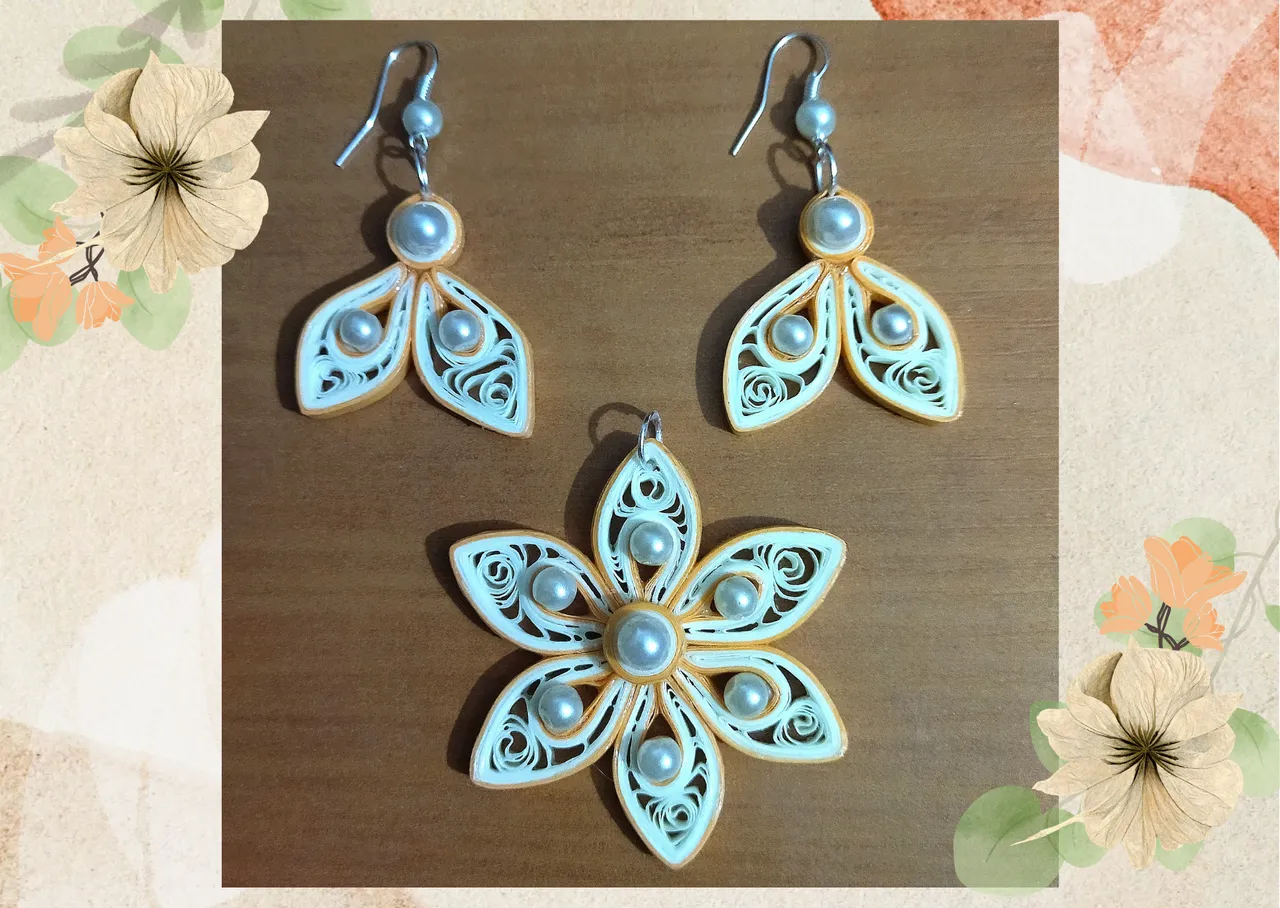
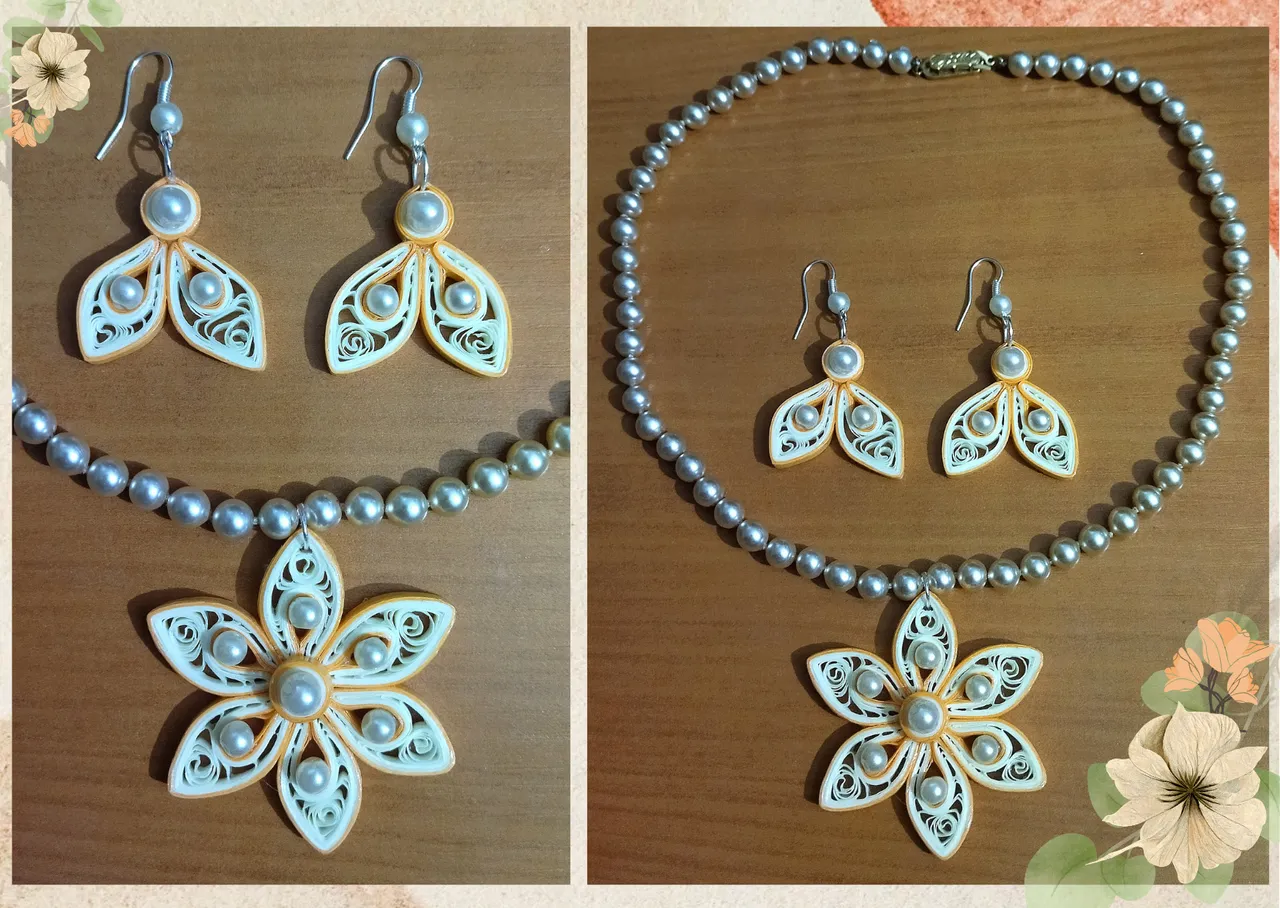
In this way we have ready an elegant medallion decorated with pearls, that you can place in the necklace of your preference, and use it in a semi-formal or formal occasion, in the images of the final result I will leave some tendrils that match with the medallion, I came up with that design, but you can do it adding as many petals as you like and also, you can make a pair of tendrils that are equal to the flower.✨
• Vamos a formar nuestra flor, sencillamente vamos a unir los 6 pétalos de forma armónica utilizando pega blanca para sellar, la pequeña pieza circular hueca que realizamos, la vamos a pegar en la parte central de la flor y en uno de los pétalos de la flor en la parte de arriba colocaremos una argolla mediana de bisutería.
• Ahora protejamos nuestra pieza, aplicaremos varias capas de pega blanca extra fuerte, dejando secar entre una y la otra.
• Seca nuestra flor vamos a decorar añadiendo en el círculo central una perla beige mediana, y en los pétalos colocaremos unas perlas un poco más pequeñas.
De esta manera tenemos listo un elegante medallón decorado con perlas, que pueden colocar en el collar de su preferencia, y utilizarlo en una ocasión semi-formal, o formal, en las imágenes del resultado final les dejare unos zarcillos que hacen juego con el medallón, a mí se me ocurrió ese diseño, pero ustedes lo pueden hacer añadiendo tantos pétalos como gusten como también, pueden hacer un par de zarcillos que sean iguales a la flor.✨


What did you think, did you like it?
I hope you did, I hope you liked my explanation, procedure and photos, I made them with love for you.
"Let out that muse that inspires you, and let your imagination fly".
Thank you all, see you next time. 🐾🐱💕
¿Que les pareció, les gustó?
Espero que sí, que les haya gustado mi explicación, procedimiento y fotos, los hice con mucho cariño por y para ustedes.
"Deja salir esa musa que te inspira, y deja volar tu imaginación".
Gracias a todos, nos vemos en la próxima. 🐾🐱💕
Todas las fotos usadas en este post son de mi autoría y han sido sacadas en mi celular personal un Redmi 9T y editadas Canva Banner y separador hecho por mí en Canva Traducido con la ayuda de DeepL
