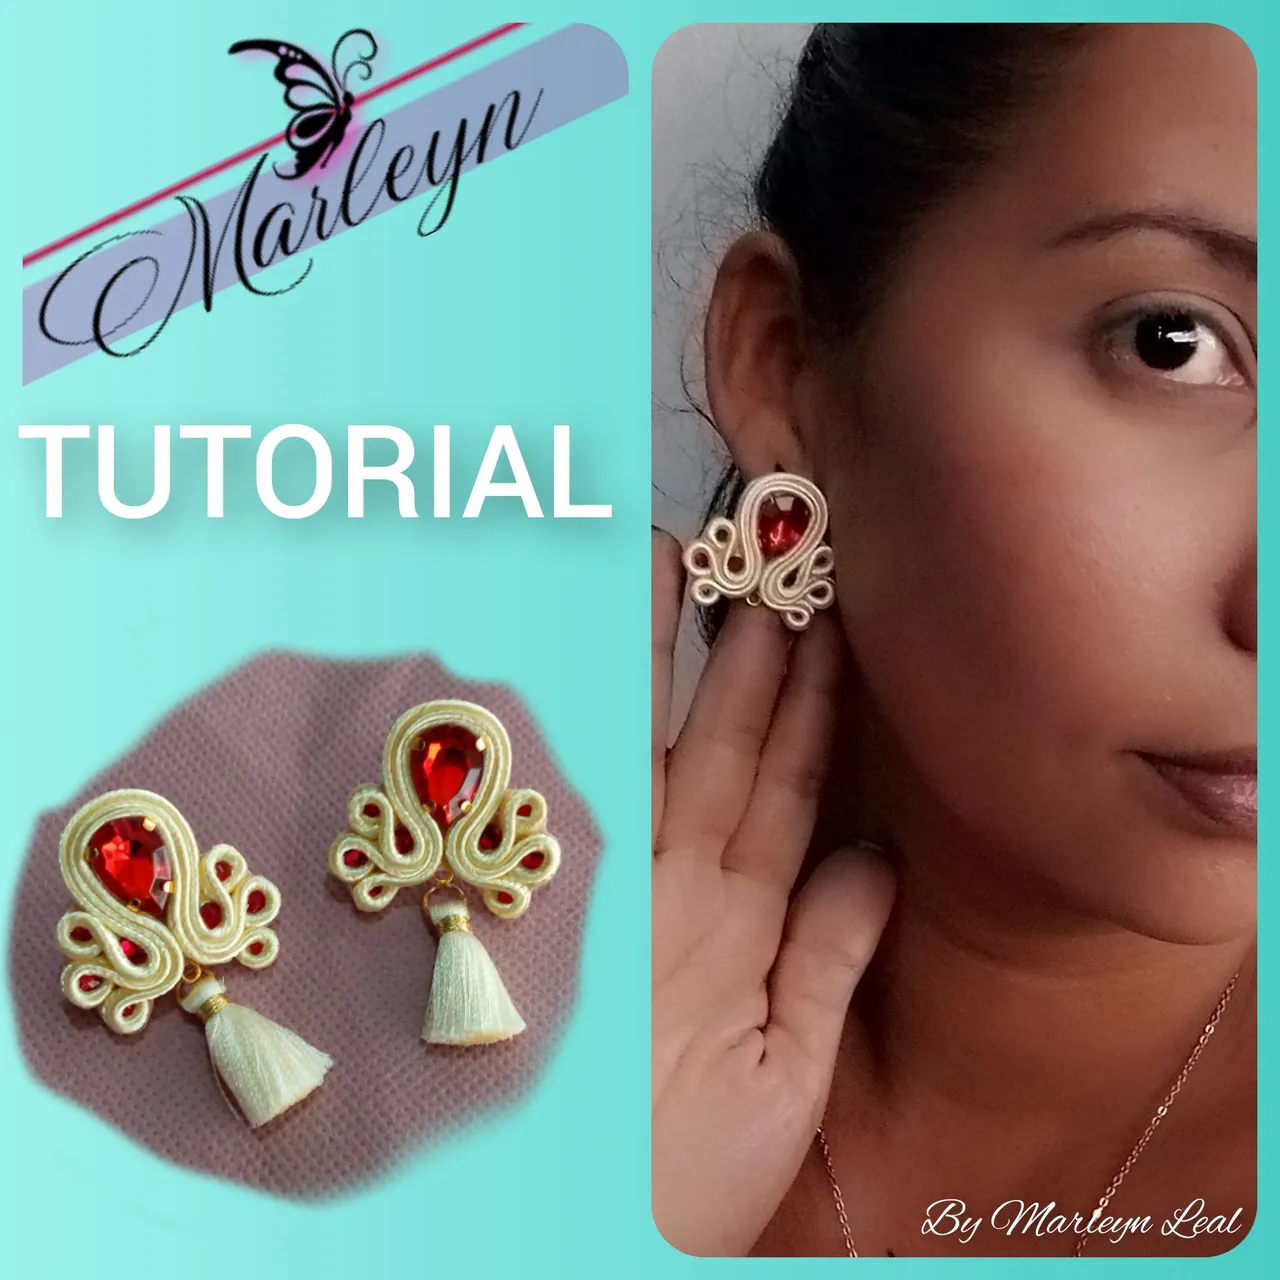
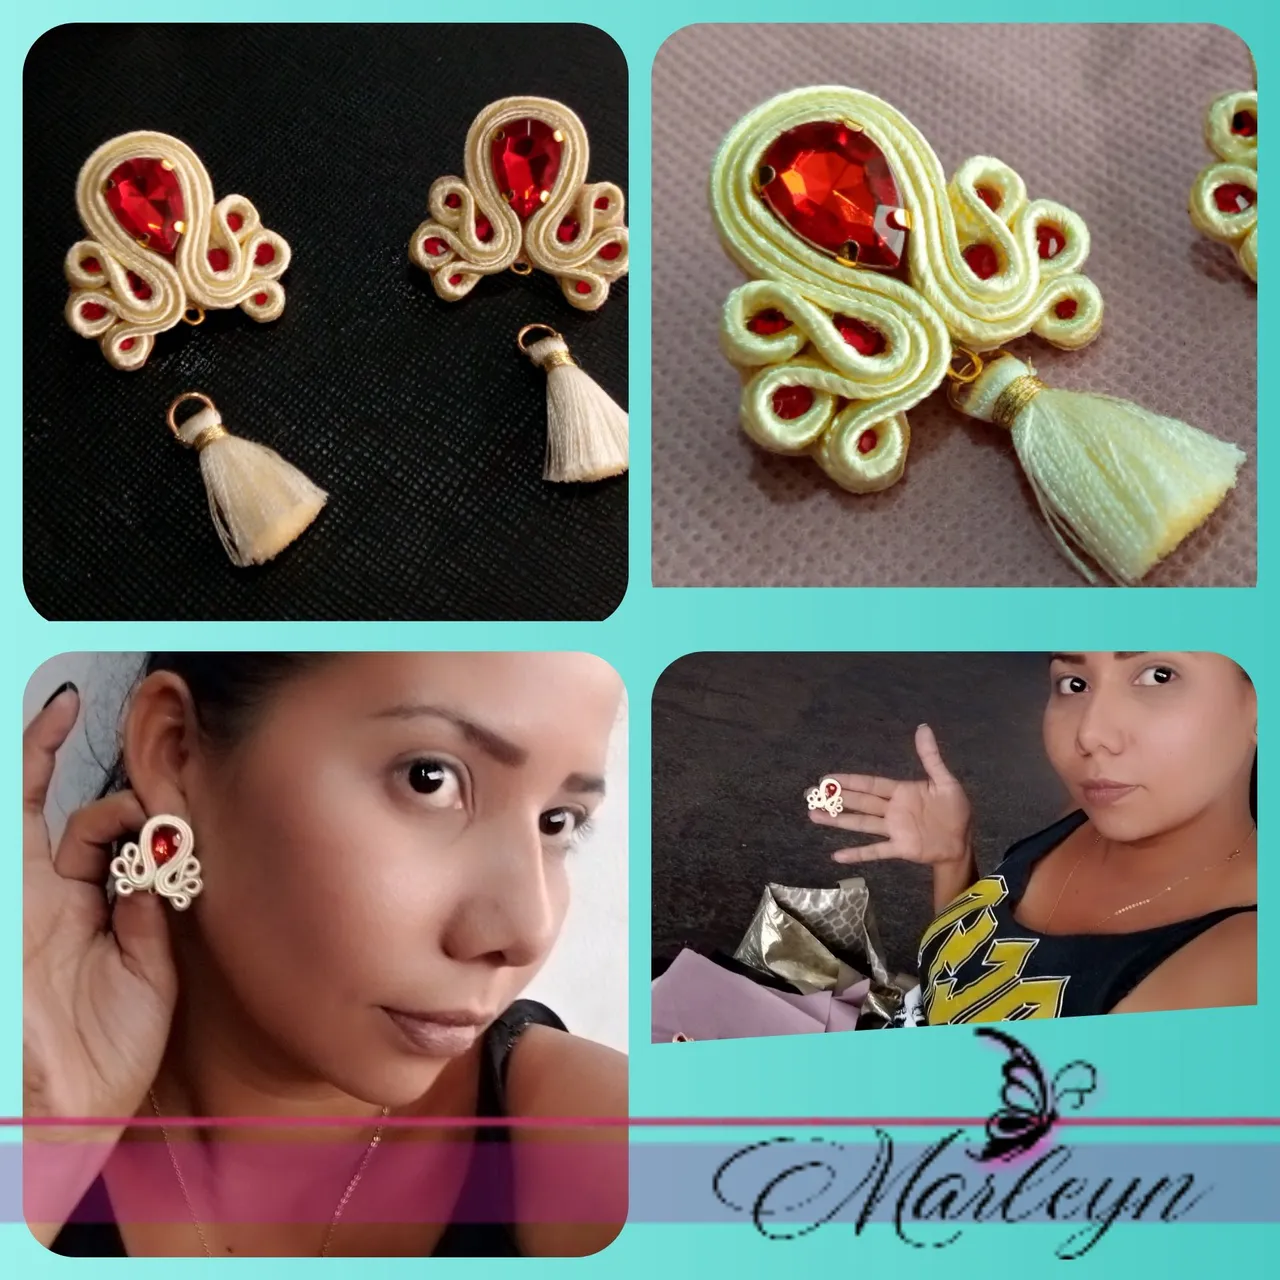
Feliz y bendecido nuevo día mis queridos amigos de realmente estoy muy feliz de estar acá con ustedes nuevamente con un nuevo tutorial, como saben esto mas que mi trabajo es mi pasión me encanta lo que hago, me encanta enseñarles, y compartir todo lo que hago con ustedes, estos son unos zarcillos medianos, con borlas de hilo de seda realizados con la técnica del Soutache! Tratare de explicar de la manera mas sencilla posible para su mayor entendimiento aunque ante cualquier duda, me dejas un comentario que estaré atenta de ayudarte! Estas últimas 2 semanas han sido super copados 🤗 me no tenia tiempo de Prácticamente nada, aunque feliz apoyando a mi hija, yo opté por llevarme materiales en mi bolso, y mientras mi hija estaba en sus ensayos yo trabajaba, estos zarcillos los realice con mucho amor, aunque no lo creas sentada en el piso del auditorio mientras mi nena @ana.elizabeth estaba ensayando con la orquesta sinfónica infantil para una presentación que dieron ese mismo día en la tarde.
Happy and blessed new day my dear friends from I am really very happy to be here with you again with a new tutorial, as you know this more than my work is my passion I love what I do, I love to teach you, and share everything I do with you, these are medium earrings, with silk thread tassels made with the Soutache technique! I will try to explain in the simplest way possible for your better understanding, although if you have any questions, leave me a comment and I will be attentive to help you! These last 2 weeks have been super cool 🤗 I didn't have time for practically anything, although happy supporting my daughter, I chose to take materials in my bag, and while my daughter was in her rehearsals I worked, I made these earrings with a lot love, believe it or not sitting on the floor of the auditorium while my girl @ana.elizabeth was rehearsing with the children's symphony orchestra for a presentation they gave that same day in the afternoon.
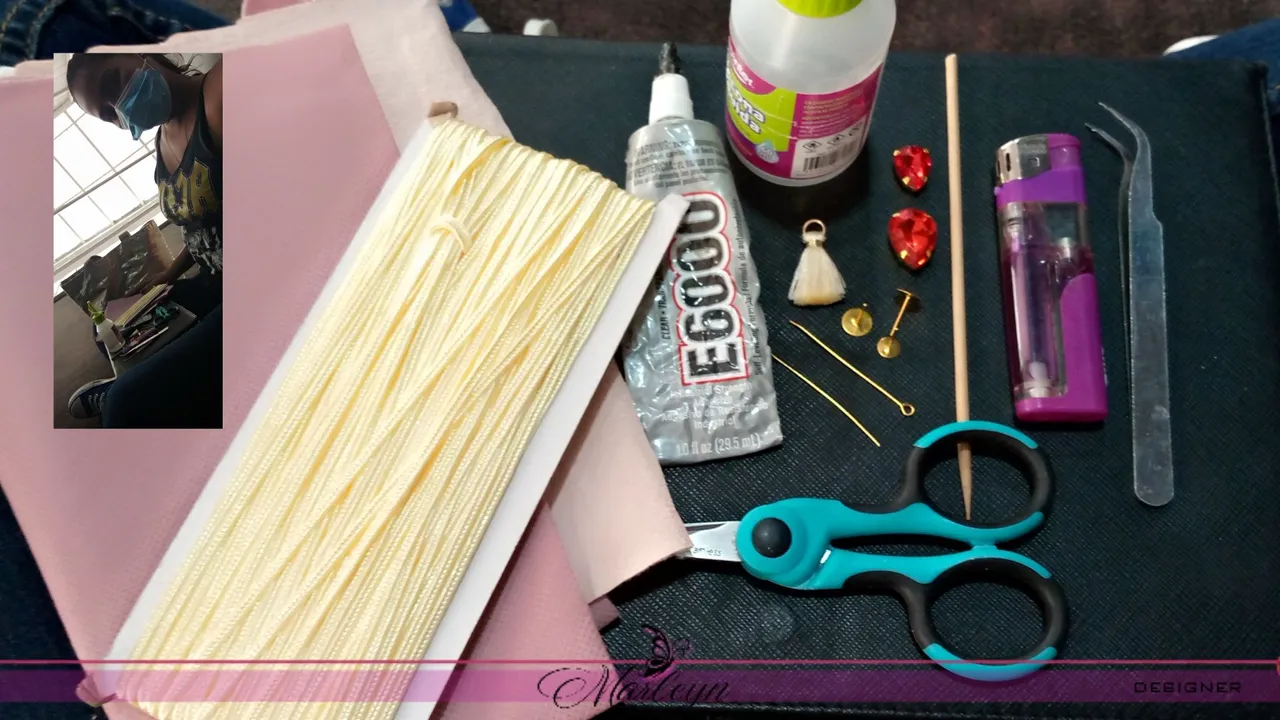
Materiales: Todos los materiales son de facil acceso, los puedes encontrar en las mercerias son: hilo soutache o trenza de rayon para soutache, base de zarcillo plana, piedra tipo gota engastada, apliques redondos planos de 0,1mm y 0.3mm, borla de hilo, pega E6000, silicon liquido, pinza punta fina, tijera, encendedor, alfiler de bisutería hembra, un palito para regar la pega, tela POP o la misma tela de las bata de cirujano, tela gruesa, cuero o cuerina para la base y por sobre todo paciencia y amor por lo que hacemos!
Materials: All materials are easily accessible, you can find them in haberdashery: soutache thread or rayon braid for soutache, flat tendril base, set drop-type stone, flat round appliqués of 0.1mm and 0.3mm, tassel of thread, E6000 glue, liquid silicone, fine tip tweezers, scissors, lighter, female jewelry pin, a stick to water the glue, POP fabric or the same fabric as the surgeon's gown, thick fabric, leather or faux leather for the base and above all patience and love for what we do!
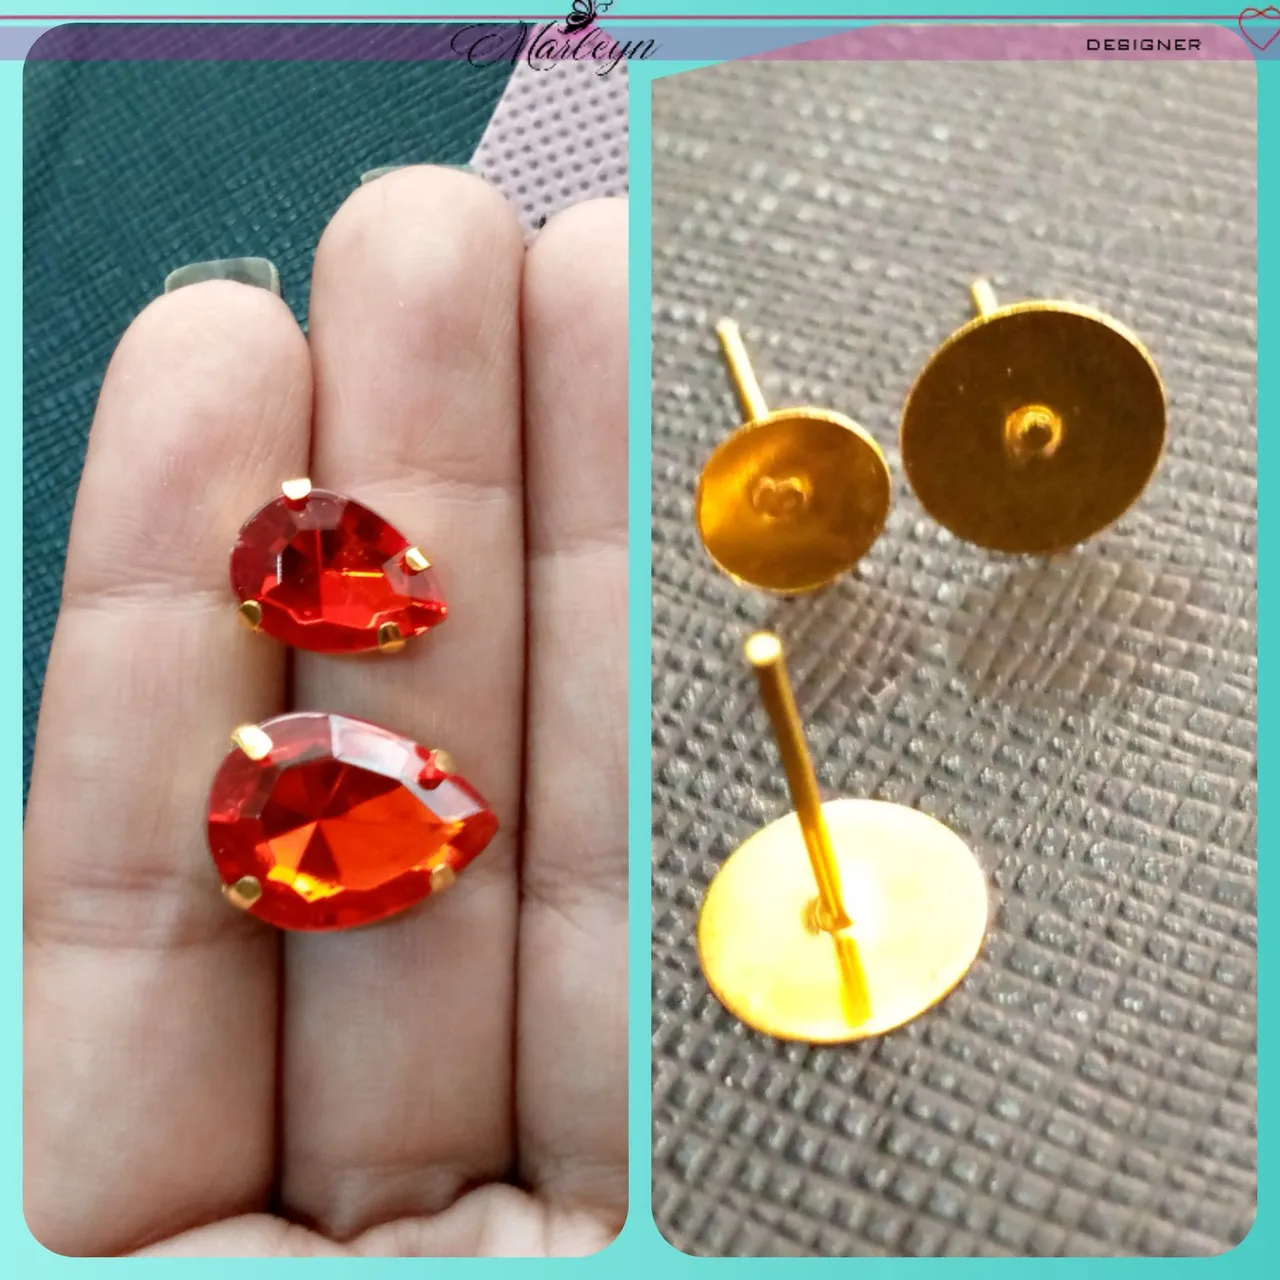
Como puedes ver,Las piedras vienen en diferentes tamaños yo aca solo te muestro dos tamaños, que son las que mas se utilizan en los zarcillos, mientras mas pequeña es la piedra mas pequeño queda el zarcillo dependerá de tu gusto! En cuanto a las bases de zarcillo planas también vienen en varios tamaños yo casi siempre los utilizo dependiendo del zarcillo ya que hay algunos muy delgados que requieren una pieza delgada y asi sucesivamente, los mas recomendables es que sean de acero inoxidable o con algun baño de oro o plata para que no se tornen negros con el tiempo, depende de tus gustos y tus opciones.
As you can see, the stones come in different sizes, here I only show you two sizes, which are the ones that are most used in the tendrils, the smaller the stone, the smaller the tendril will depend on your taste! As for the flat tendril bases, they also come in various sizes, I almost always use them depending on the tendril since there are some very thin ones that require a thin piece and so on, the most recommended is that they are made of stainless steel or with a bath of gold or silver so that they do not turn black over time, it depends on your tastes and your options.
COMENZAMOS
LET'S BEGIN
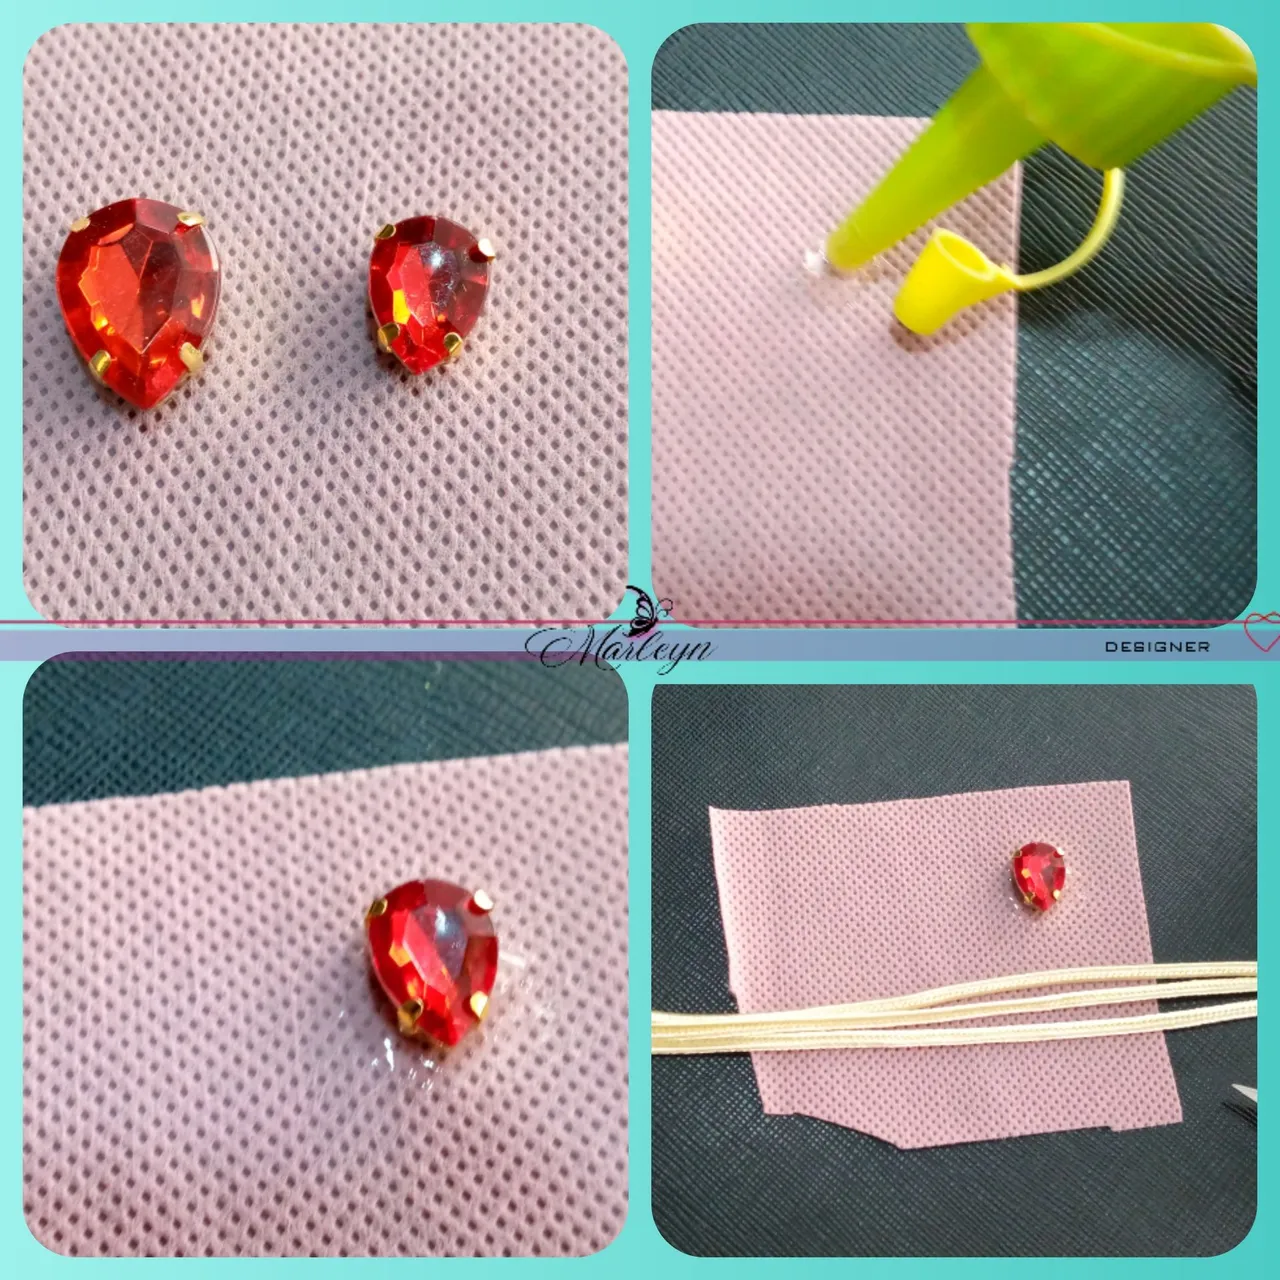
Paso 1: Cortamos un trozo de tela POP de aproximadamente 4 centímetros de diámetro, busca el centro superior dejando un espacio en la parte de arriba para los hilos, y colocamos un poco de pegamento y pegamos una de las piedras engastada de tu elección, para las piedras recomiendo que sea la E6000 de esta manera no se caerán con el tiempo, ahora cortaremos 3 tiras de hilo soutache o de rayón de 10 centímetros de largo aproximadamente, de este largo te sobrara un poco de hilo pero tendras mayor facilidad para manejarlo y cortar.
Step 1: We cut a piece of POP fabric of approximately 4 centimeters in diameter, find the upper center leaving a space at the top for the threads, and put a little glue and stick one of the set stones of your choice, to I recommend that the stones be the E6000 in this way they will not fall over time, now we will cut 3 strips of soutache or rayon thread approximately 10 centimeters long, of this length you will have a little thread left over but you will have an easier time handling it and cut.
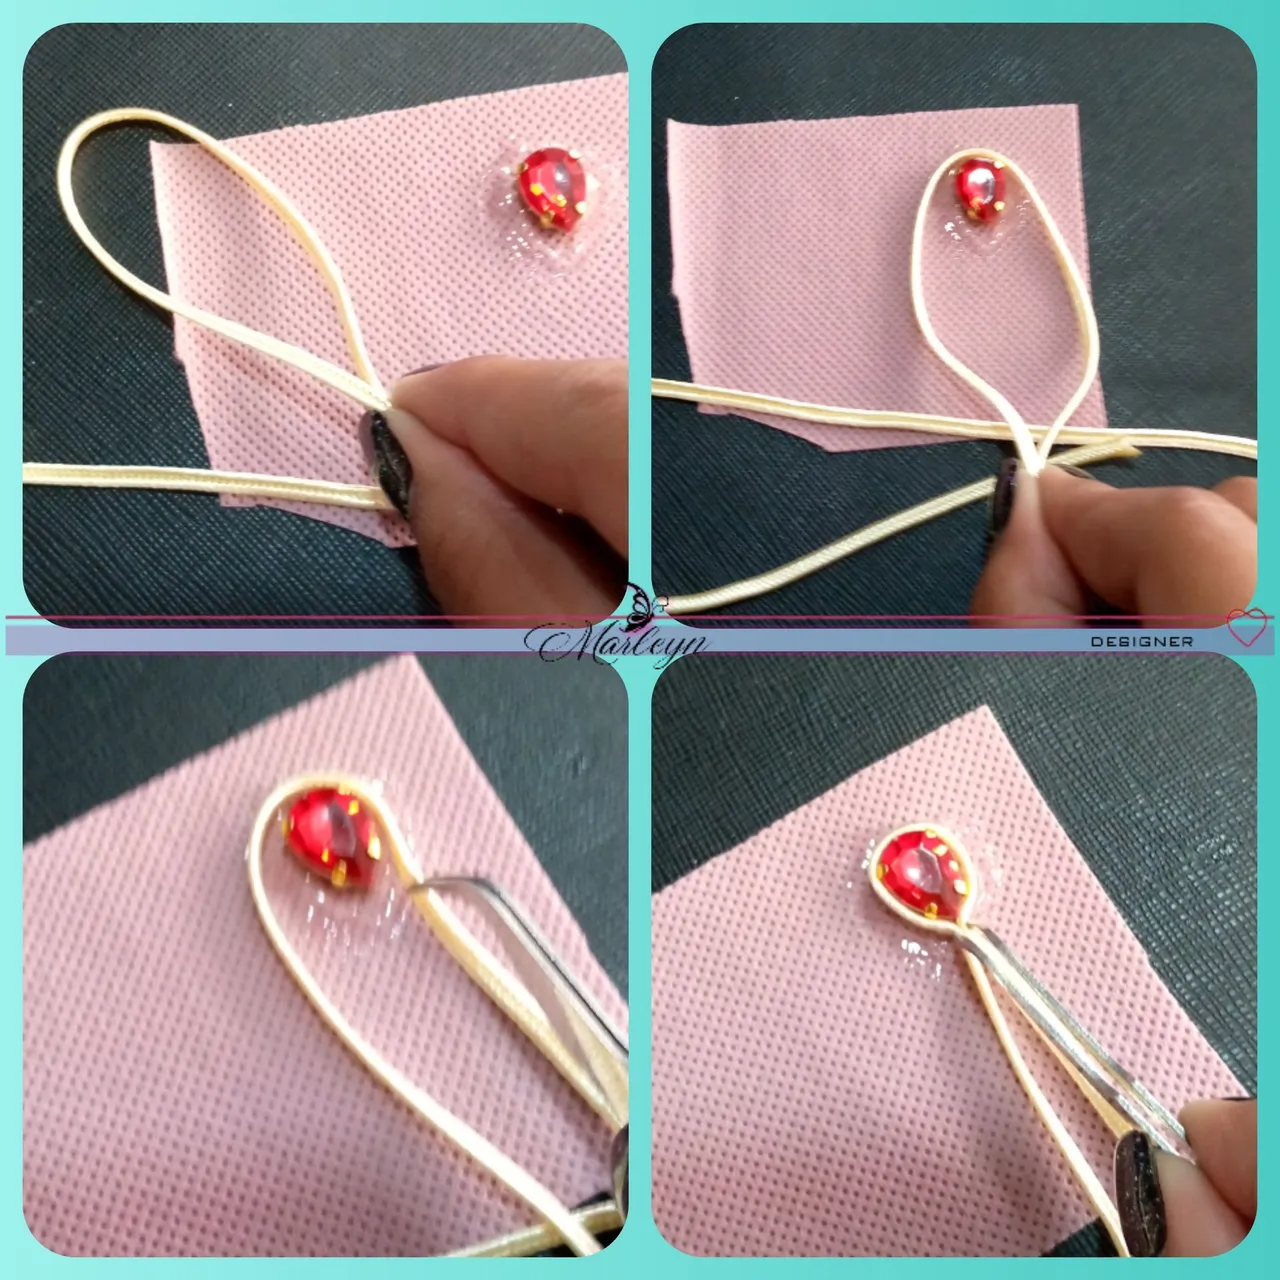
Paso 2: Deja secar un poco la pega de la piedra de manera que no se mueva cuando coloques los hilos, vamos a colocar silicón liquido alrededor de la piedra en poca cantidad, no coloques en exceso porque si llenas la pieza por arriba no se vera bien! Toma un hilo punta con punta como te muestro en la imagen número 1, ahora coloca el hilo sobre la piedra como te muestro en la imagen 2, puedes ayudarte con la pinza asi no te llenas de pega.
Step 2: Let the glue of the stone dry a little so that it does not move when you place the threads, we are going to place liquid silicone around the stone in a small amount, do not place in excess because if you fill the piece from above it will not be seen right! Take a thread end to end as I show you in image number 1, now place the thread on the stone as I show you in image 2, you can help yourself with the clamp so you don't get stuck.
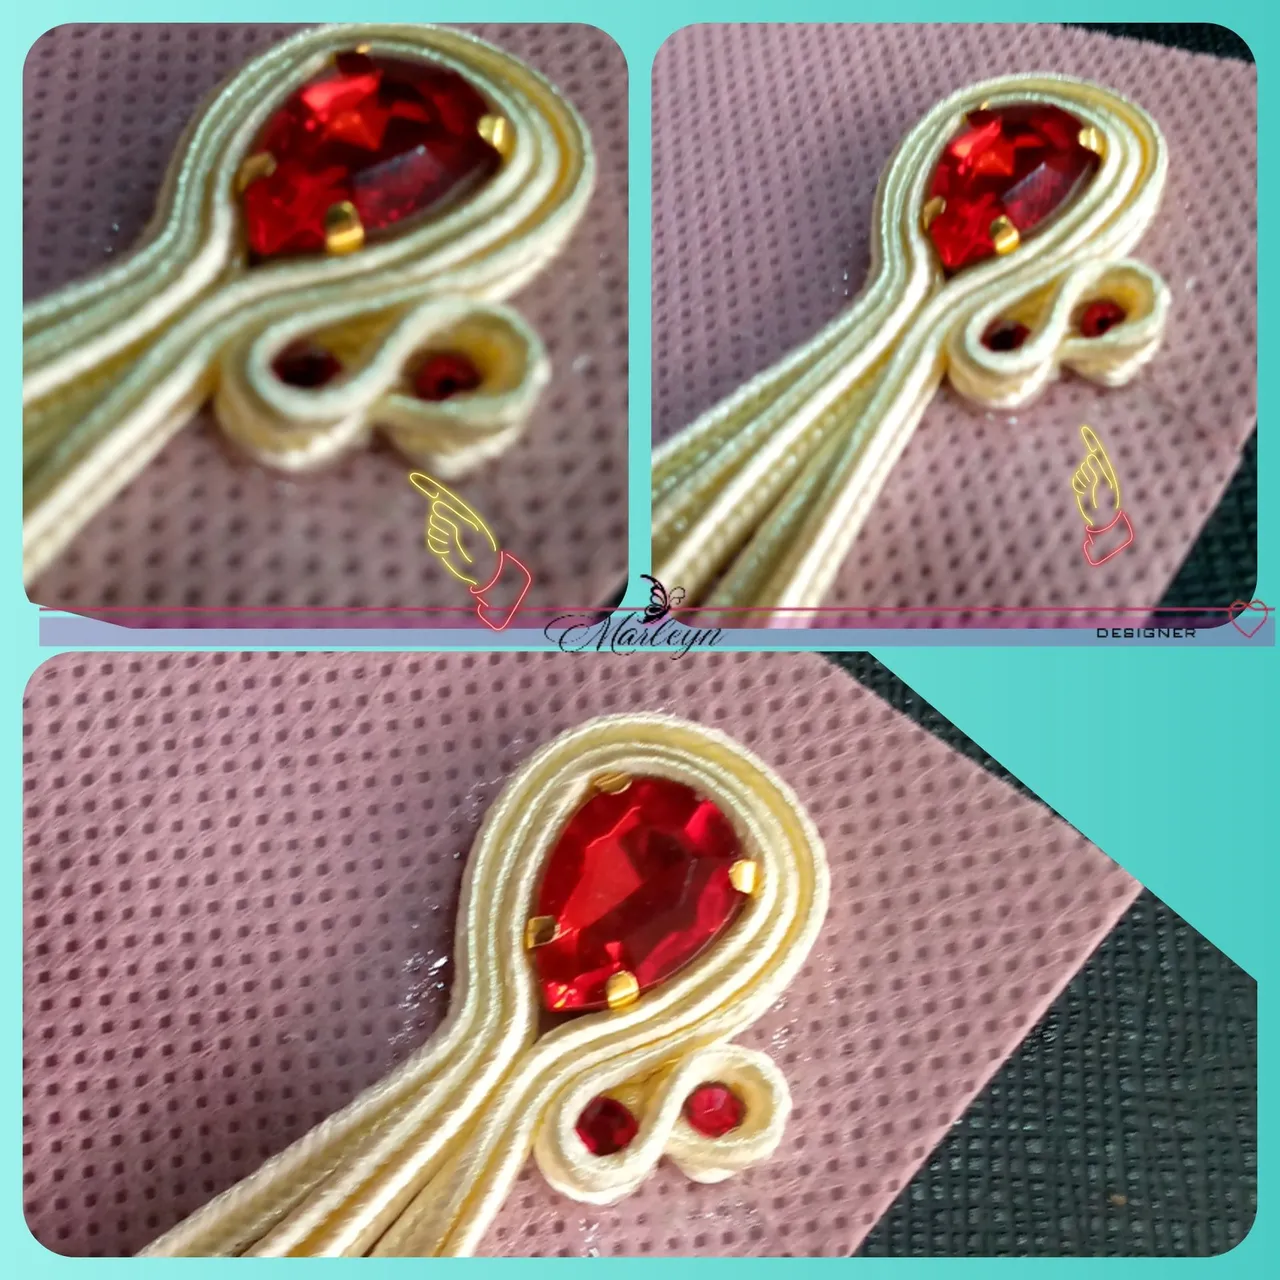
Paso 3: Realizar el mismo proceso con los otros 2 hilos y mantener un momento algo de presión en los hilos en la parte de abajo de la gota para que se peguen bien juntos. Yo estaba probando diferentes tipos de apliques redondos a ver cuál utilizar, el que me gusto mas son unos pequeños brillantes como los que utilizan para las uñas.
Step 3: Carry out the same process with the other 2 threads and keep some pressure on the threads at the bottom of the drop for a moment so that they stick well together. I was trying out different types of round appliques to see which one to use. The one I like the most are the small rhinestones like the ones used for nails.
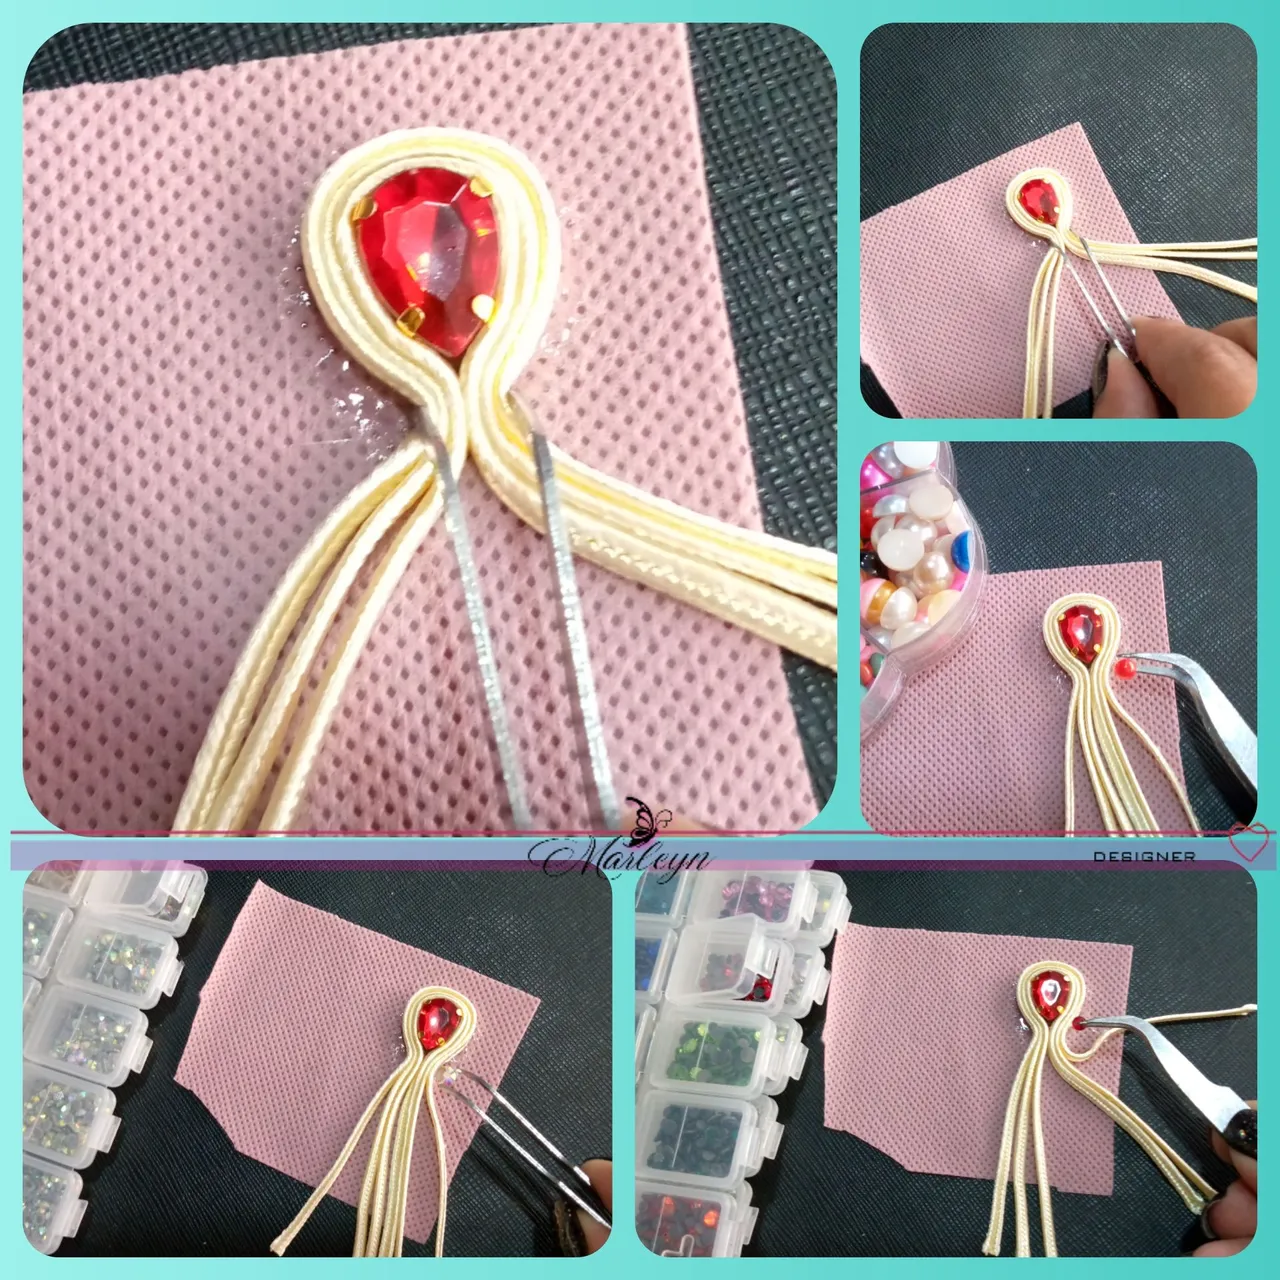
Paso 4: Vamos a comenzar a colocar los apliques redondos, quizás se te hace un poco difícil porque estos son muy pequeños pero es cuestión de Práctica yo los agarro con la pinza como puedes ver en la imagen de esta manera no lleno mis manos de silicón! Bueno te explico como lo eh realizado, vamos a hacerlo de uno en uno, colocamos un poquito de silicón liquido justo donde terminan los hilos que acabamos de pegar, con cuidado coloca un aplique plano de 0,3 milímetros aproximadamente, ahora sube el primer hilo arropando con este el aplique, hazlo con mucho cuidado!
Step 4: We are going to start placing the round appliques, maybe it is a bit difficult for you because these are very small but it is a matter of Practice I grab them with the pliers as you can see in the image in this way I do not fill my hands with silicone ! Well I'll explain how I've done it, we're going to do it one by one, we put a little liquid silicone right where the threads that we just glued end, carefully place a flat applique of approximately 0.3 millimeters, now go up the first thread wrapping the appliqué with this, do it very carefully!

Paso 5: Ahora vamos a volver a colocar un aplique en la parte superior realizando el mismo proceso, en el paso anterior el hilo nos quedo arriba, ahora coloca un poco de silicón liquido alli y pagaremos otro aplique, baja el hilo arropando la piedra y con tu dedo marca el hilo sobrante, cortamos y quemamos la punta con el encendedor, ahora con la punta de la pinza vamos a agarrar la punta del hilo y con cuidado lo vamos a introducir por abajo de los hilos como te muestro en las imágenes 5 y 6...🤗 Quizas al principio sera un poco difícil, si lo realizas con cuidado y paciencia todo es posible.
Step 5: Now we are going to re-place an appliqué on the upper part, carrying out the same process. In the previous step, the thread was left on top. Now place a little liquid silicone there and we will pay another applique. Lower the thread wrapping the stone and With your finger mark the excess thread, cut and burn the tip with the lighter, now with the tip of the pliers we are going to grab the tip of the thread and carefully we are going to introduce it below the threads as I show you in the images 5 and 6...🤗 Maybe at first it will be a bit difficult, if you do it carefully and patiently everything is possible.
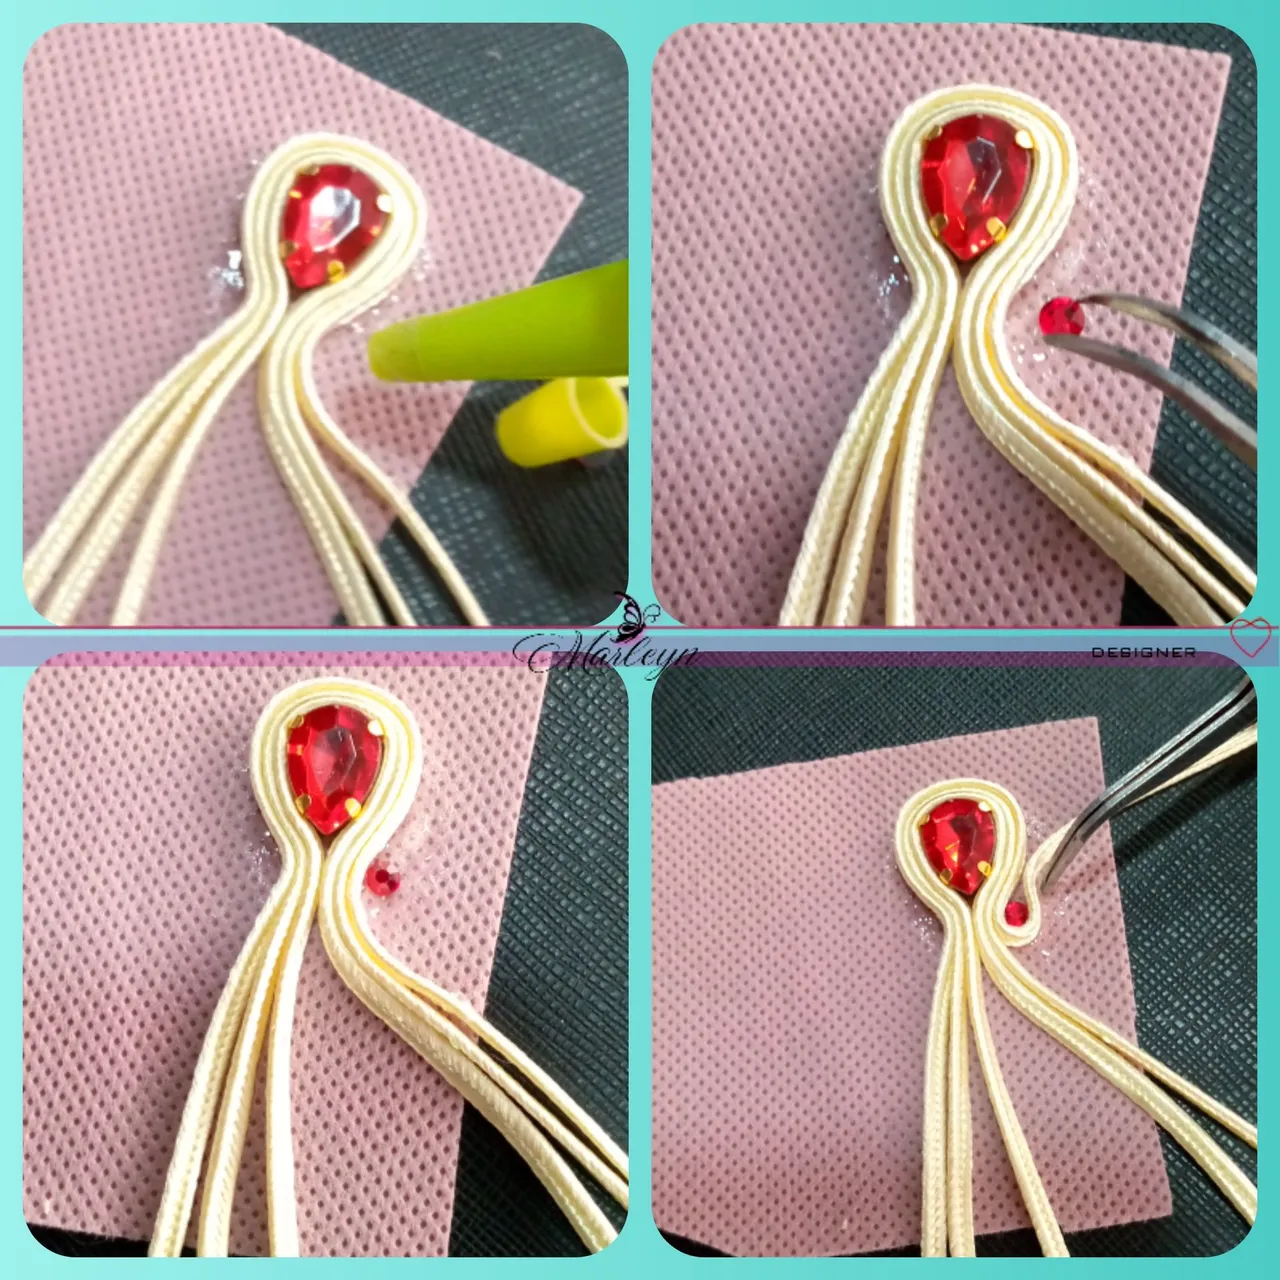
Es importante que cuando coloques la punta por debajo de los hilos es importante que verifiques y lo hagas con cuidado que no muevas el aplique de abajo, en dado caso lo mejor es con paciencia levantes un poquito lo ya pegado introduzca la punta con cuidado! 🤗✨
It is important that when you place the tip below the threads it is important that you check and do it carefully so that you do not move the appliqué below, in which case it is best to patiently lift what is already attached a little, insert the tip carefully! 🤗✨
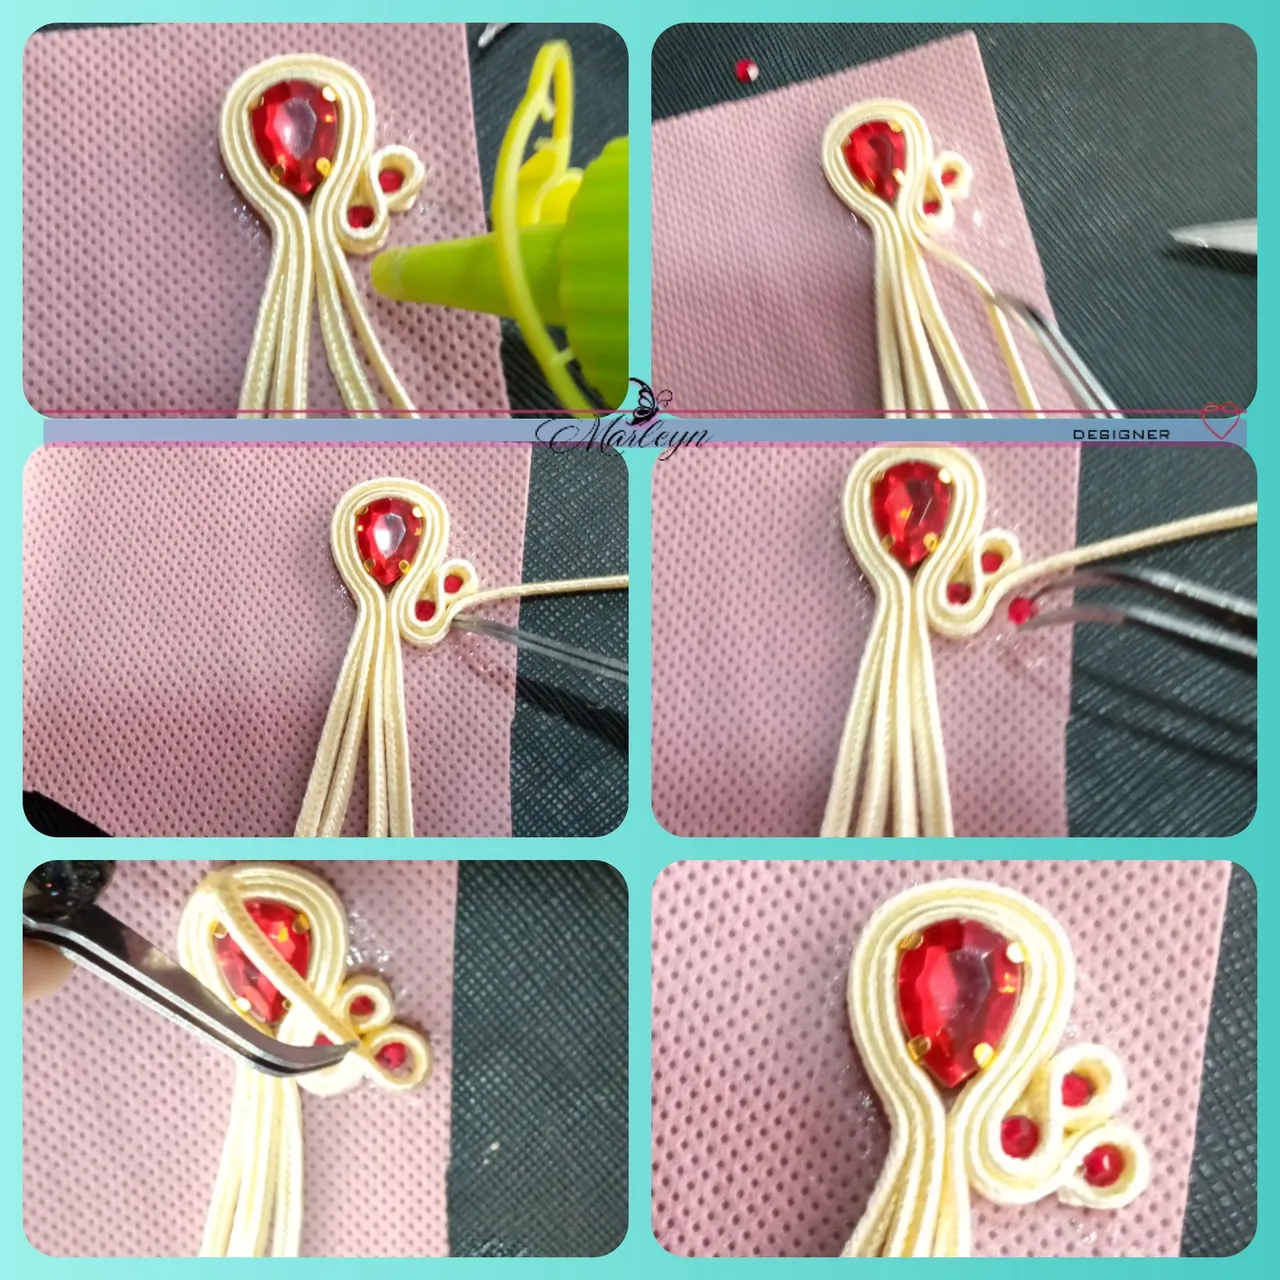
Paso 6: Como puedes ver este proceso es repetitivo, con paciencia solo ve pegando los apliques y arropando los mismos con el hilo, esta vez se va a realizar en la parte central es decir en el medio entre los dos apliques que colocamos en los pasos anteriores. Colocamos silicon liquido y sube el hilo número 2, ahora coloca un aplique redondo pequeño, cubrelo en su alrededor con el hilo, y nuevamente marca donde debemos cortar, corta, quema la punta con el encendedor y con ayuda de la pinza introduce la punta por abajo, recuerda cuidado de no mover el aplique anterior, lo mas recomendable es que la pases por abajo.
Step 6: As you can see this process is repetitive, with patience just stick the appliqués and wrap them with the thread, this time it will be done in the central part, that is, in the middle between the two appliques that we placed in the steps previous. We place liquid silicone and thread number 2 goes up, now place a small round applique, cover it around with the thread, and again mark where we should cut, cut, burn the tip with the lighter and with the help of the tweezers insert the tip through below, remember to be careful not to move the previous appliqué, it is best to pass it below.
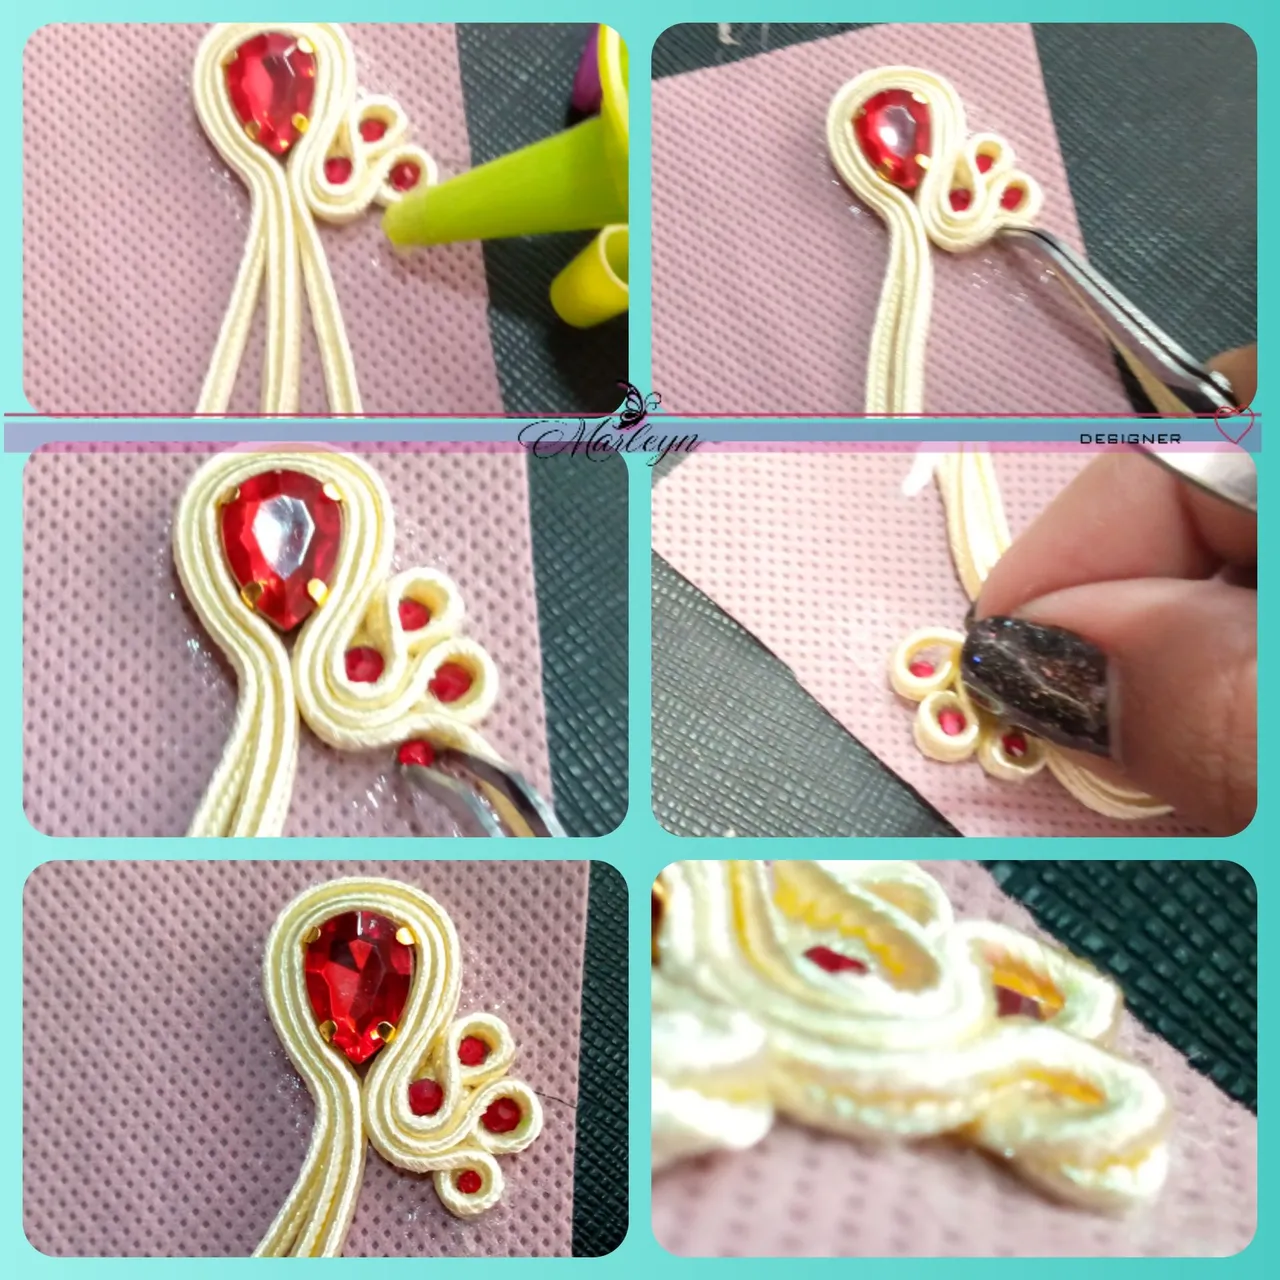
Paso 7: Realizamos el mismo proceso que los pasos anteriores, esta vez sera el ultimo aplique de este lado si lo notas en las imagenes eh jugado un poco con los tamaños de las piedras, en esta última parte de abajo coloque la mas pequeña, realizando el mismo proceso anterior, colocamos silicón liquido, subimos el ultimo hilo que es el tercero de este lado de la pieza, colocamos el aplique con ayuda de la pinza, cubrimos el aplique, marcamos el sobrante
Step 7: We carry out the same process as the previous steps, this time it will be the last applique on this side if you notice it in the images I have played a little with the sizes of the stones, in this last part below place the smallest one, making the same previous process, we place liquid silicone, we raise the last thread that is the third on this side of the piece, we place the applique with the help of the clamp, we cover the applique, we mark the excess
Paso 8: Como te comente todo es repetitivo, ahora solo debemos repetir los pasos anteriores del otro lado del zarcillo, siempre estando muy atentos de marcar donde debe ir el aplique de arriba de esta manera quedaran ambos lados iguales.
Step 8: As I told you, everything is repetitive, now we only have to repeat the previous steps on the other side of the tendril, always being very careful to mark where the appliqué above should go, in this way both sides will be the same.
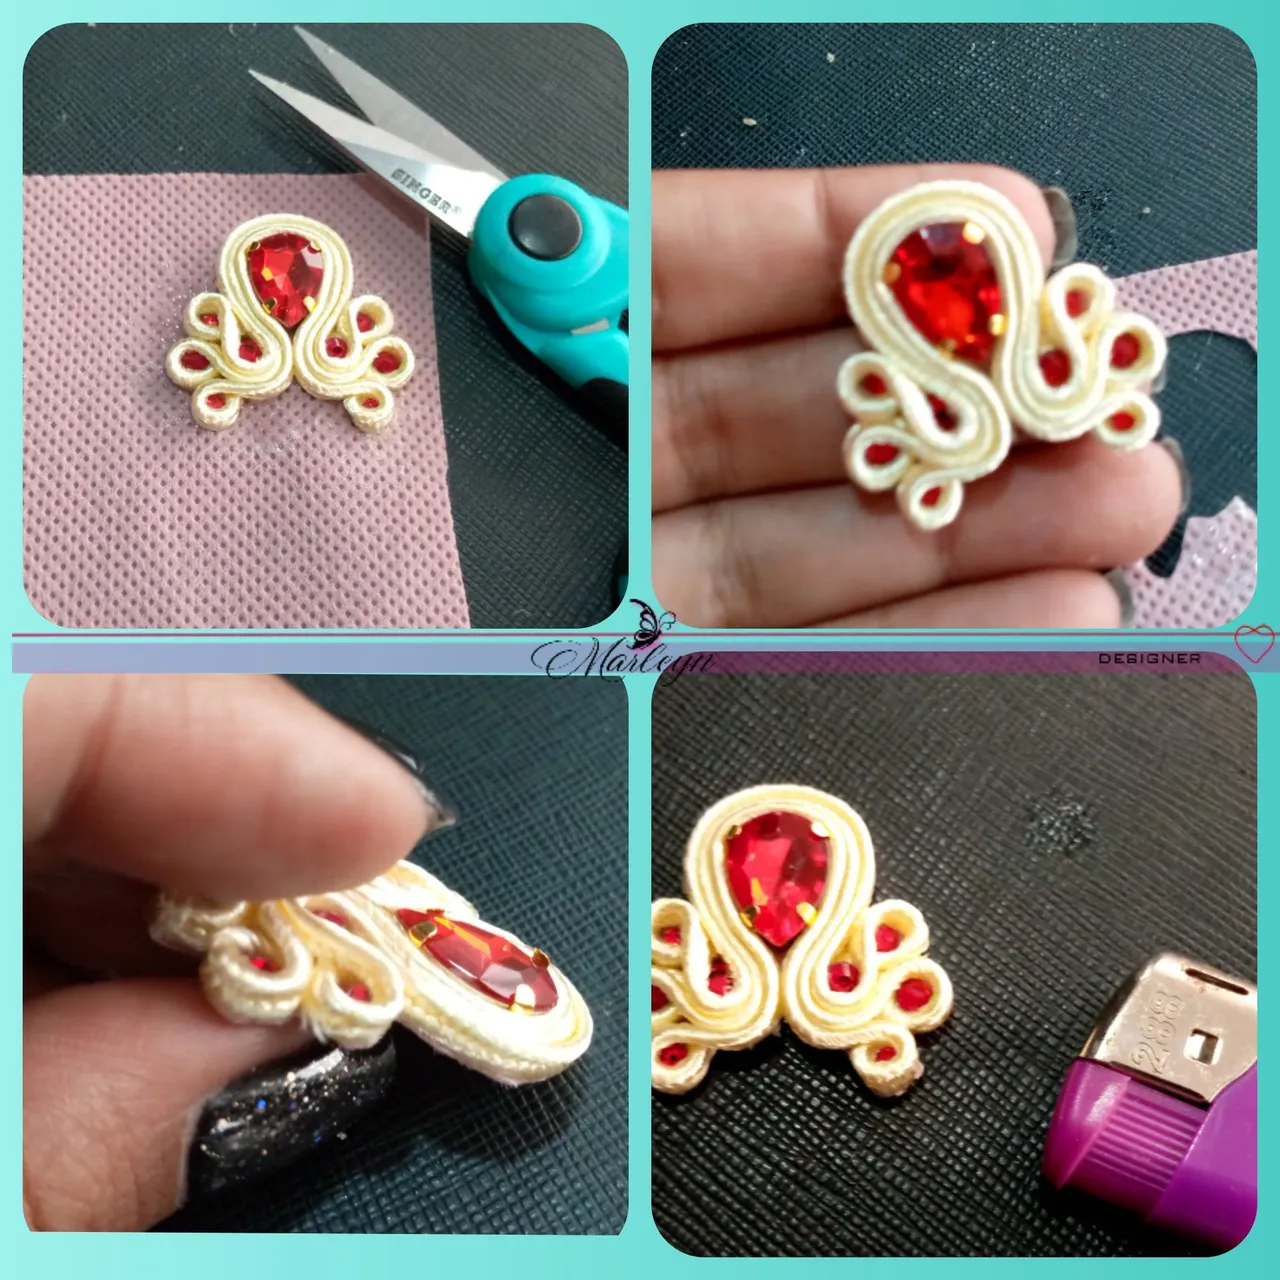
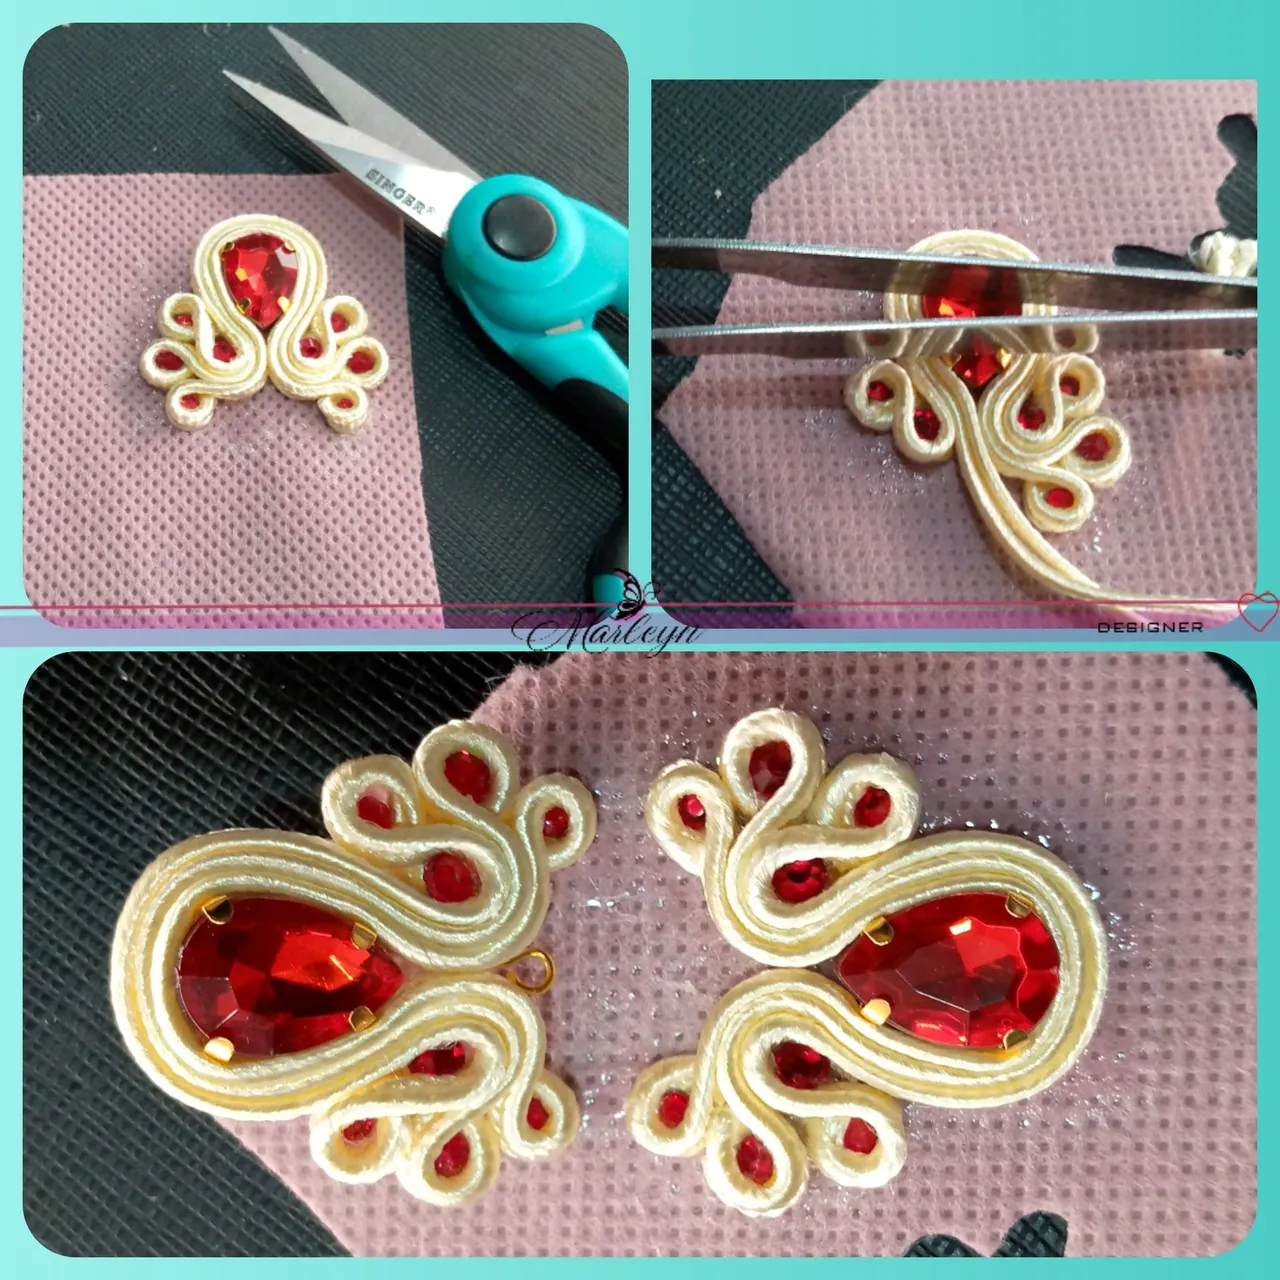
Paso 9: Cortamos la tela POP que esta sobrando, con mucho cuidado a veces sin querer cortamos un poquito los hilos, en ese caso no te preocupes pasa la llama bajita del encendedor con cuidao por toda la pieza de esta manera se repara y sellas los hilos, les dara como un acabado brillante, muy bonito... Debes pasar la llama muy rapido para que no lo quemes, porque a mi me a pasado a veces lo quemo y pierdo la pieza completa.
Step 9: We cut the POP fabric that is left over, very carefully sometimes we inadvertently cut the threads a little, in that case do not worry, pass the low flame of the lighter carefully throughout the piece in this way it is repaired and you seal the threads, it will give them a shiny finish, very nice... You must pass the flame very quickly so you don't burn it, because it has happened to me sometimes I burn it and lose the entire piece.
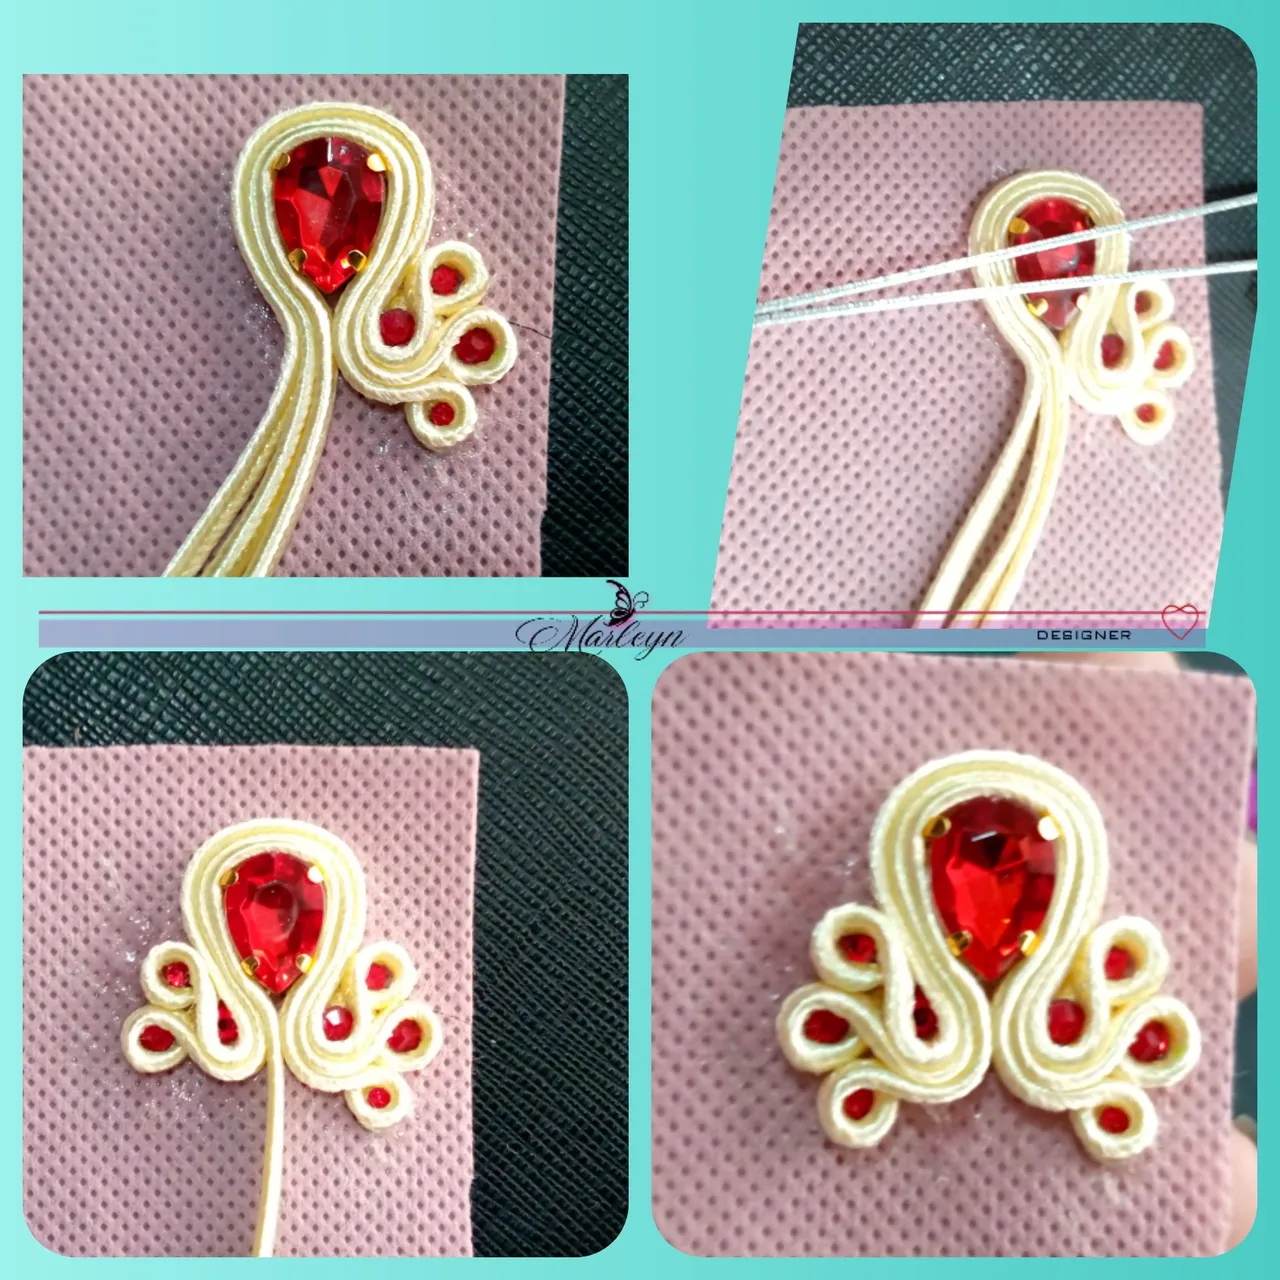
Cuando realices el otro par marca donde debes comenzar. de esta manera los apliques quedaran a la misma altura en ambos lados del zarcillo.
When you make the other pair mark where you should start. in this way the appliqués will be at the same height on both sides of the tendril.
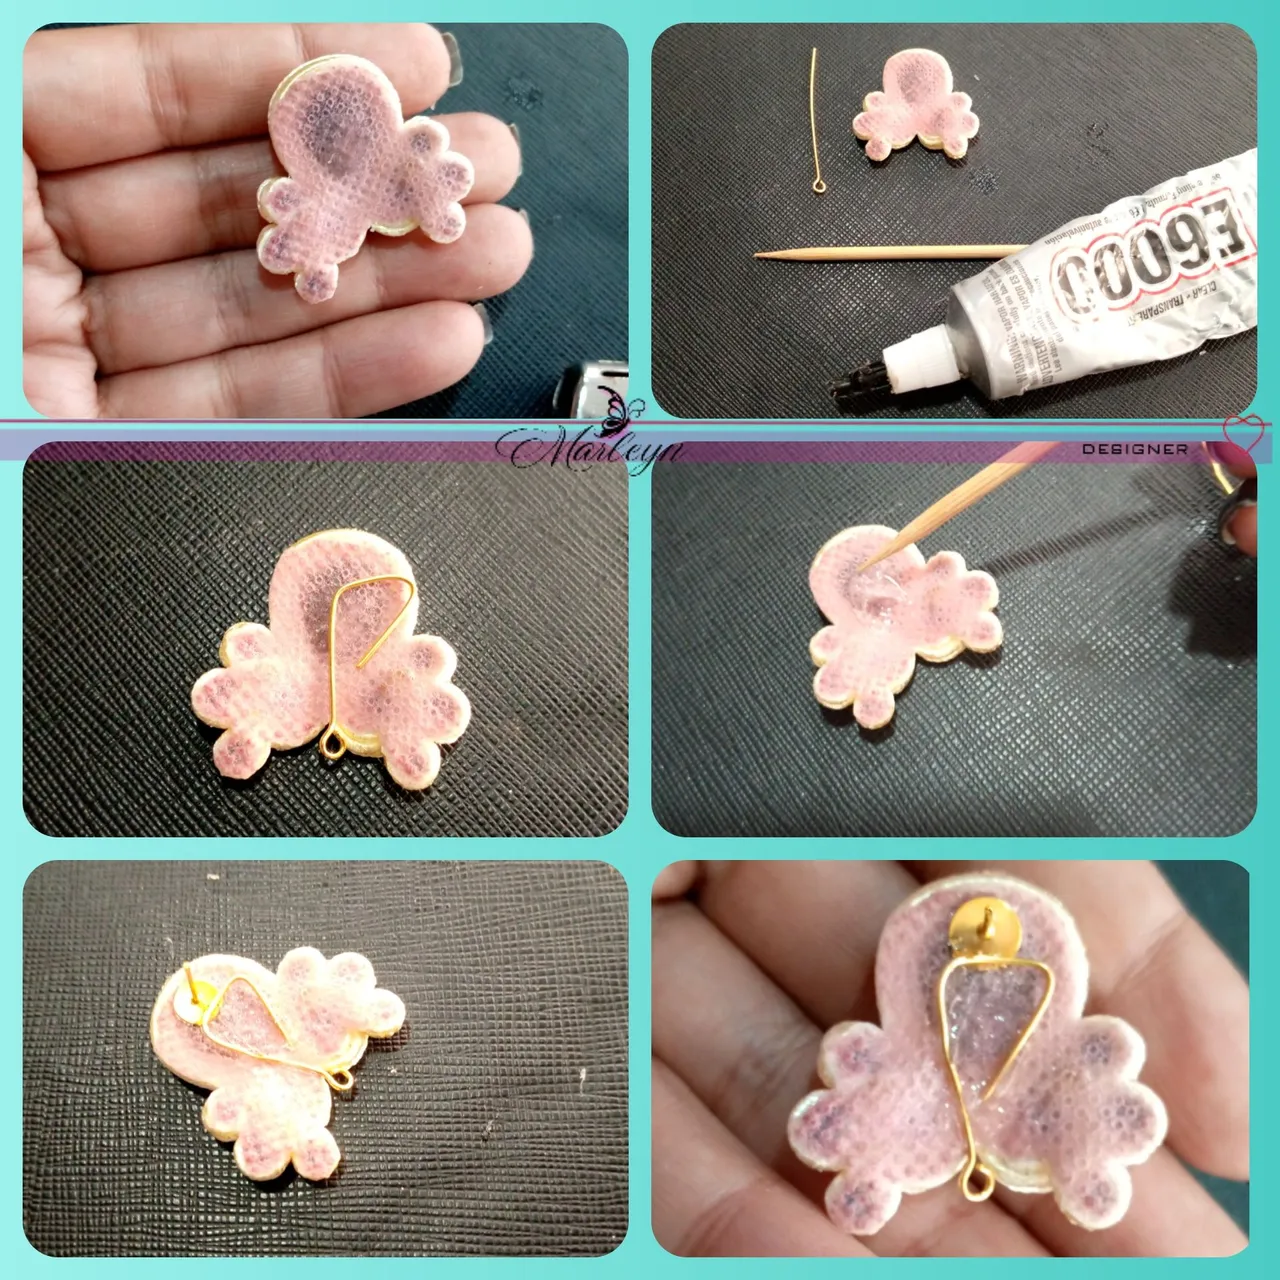
Paso 10: (OPCIONAL) En la parte de atrás de nuestro zarcillo, vamos a colocar pega E6000 o una pega que sea fuerte, con la ayuda de un palito de altura,m o un palito para untar el pegamento por toda la pieza, como te muestro en las imágenes vamos a ir doblando el alfiler hasta que no sobresalga de la pieza y lo fijamos, asi como tambien vamos a colocar la base de zarcillo plana, dejar secar un rato! Puedes aprovechar este tiempo para realizar el otro par.
Step 10: (OPTIONAL) On the back of our earring, we are going to place E6000 glue or a strong glue, with the help of a height stick, m or a stick to spread the glue all over the piece, as you I show in the images we are going to bend the pin until it does not protrude from the piece and we fix it, as well as we are going to place the flat tendril base, let it dry for a while! You can take advantage of this time to make the other pair.
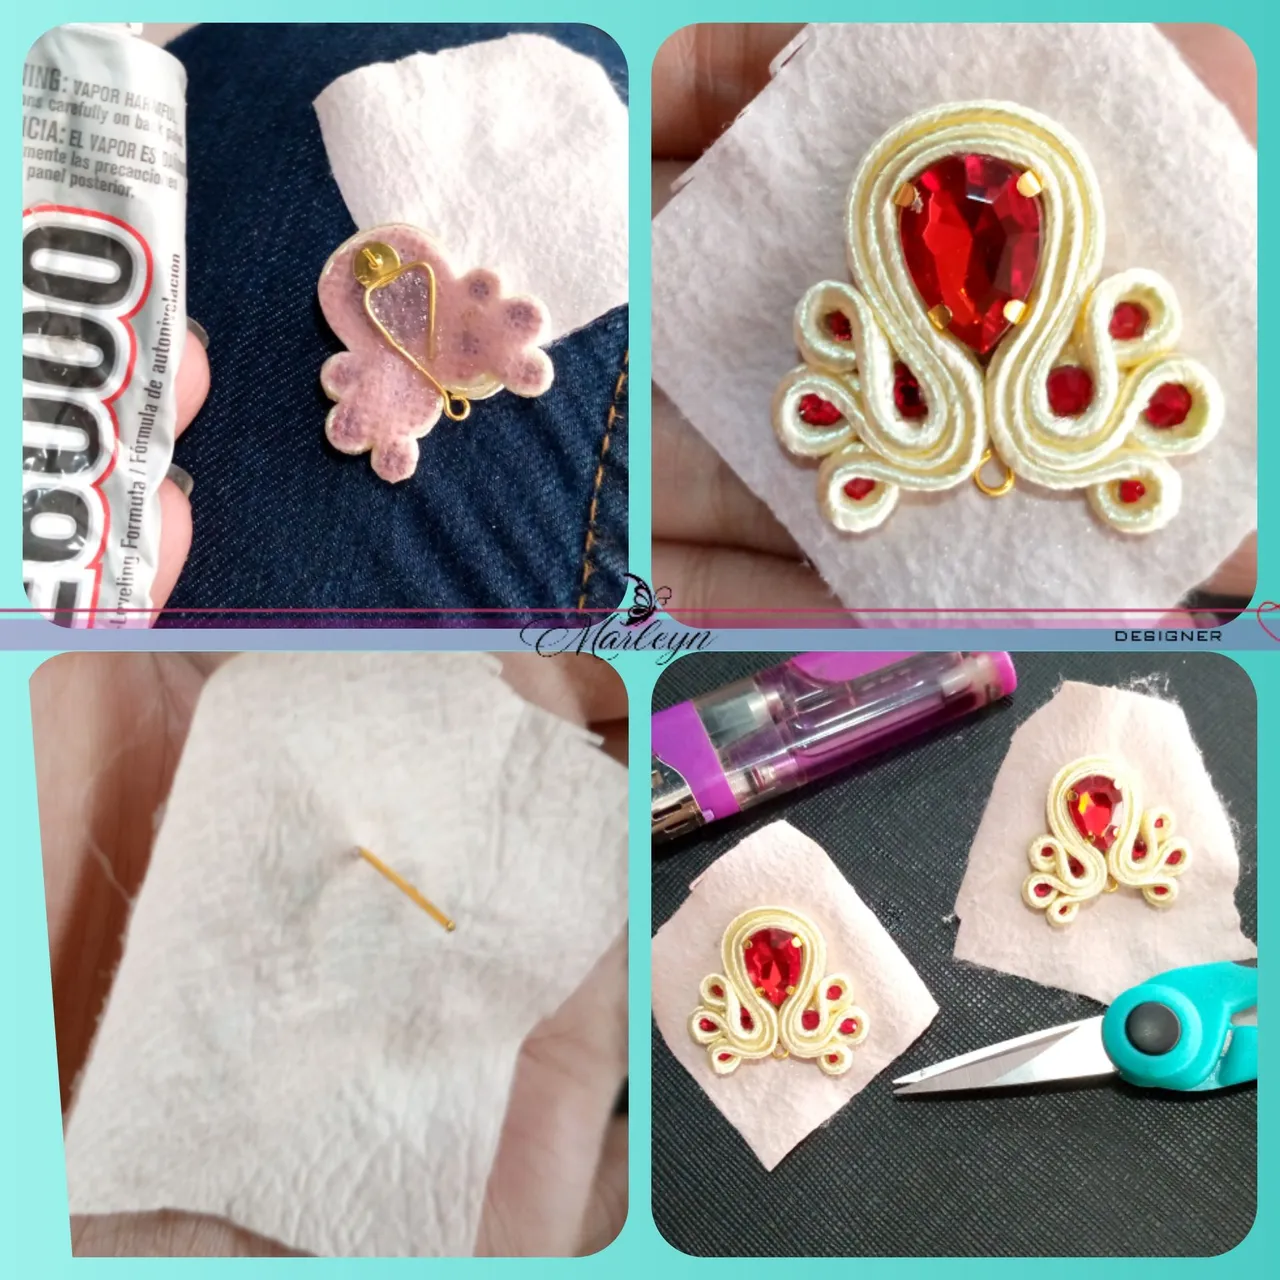
Paso 11: Cuando esta seca la pieza anterior, vamos a pegarla con la pega E600 sobre una tela gruesa o cuero, yo prefiero utilizar cuerina o gamuza dependerá de tu facilidad de adquisición o de tu gusto personal, dejalo secar un poco y corta la tela sobrante! Al terminar pasa el encendedor por toda la ṕieza.
Step 11: When the previous piece is dry, we are going to paste it with the E600 glue on a thick fabric or leather, I prefer to use leather or suede, it will depend on your ease of acquisition or your personal taste, let it dry a bit and cut the fabric spare! When finished, pass the lighter all over the piece.
Paso 12: Este es el final, ahora solo falta colocar una borla en la parte de abajo del alfiler y listo! (esto es opcional si no te gusta las borlas , o los prefieres mas pequeño solo no coloquemos el alfiler de atras).
Step 11: When the previous piece is dry, we are going to paste it with the E600 glue on a thick fabric or leather, I prefer to use leather or suede, it will depend on your ease of acquisition or your personal taste, let it dry a bit and cut the fabric spare! When finished, pass the lighter all over the piece.