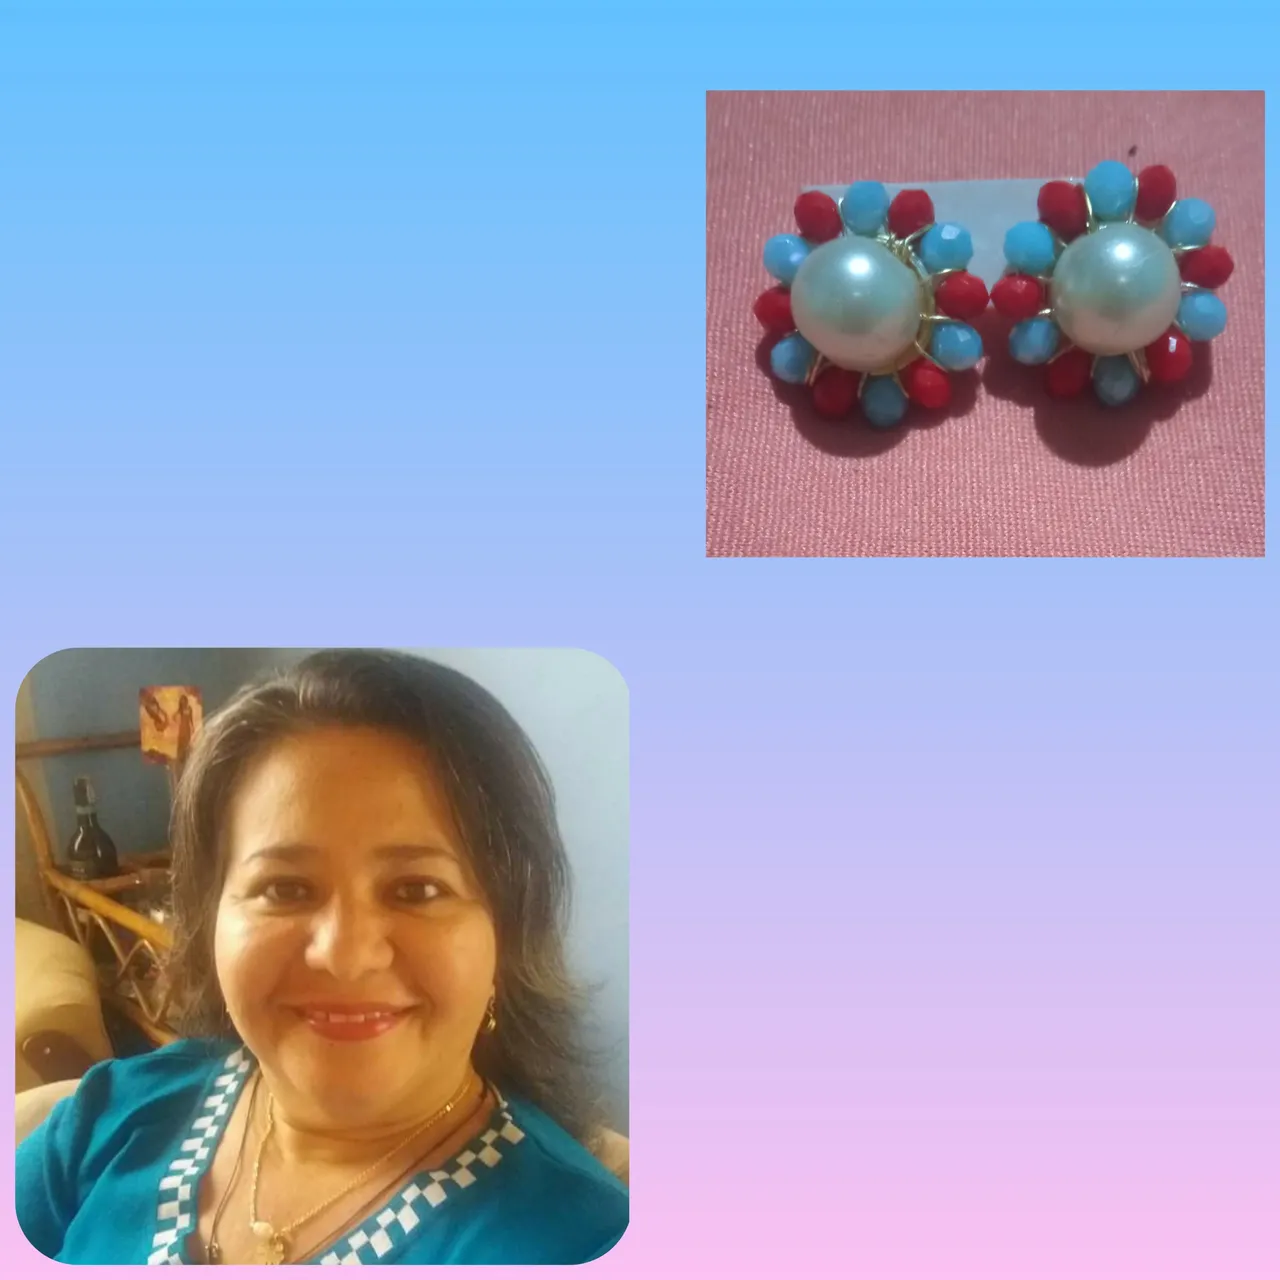
Hola amigos de #hive y en especial a los amigos de #jewelry, deseo estén todos bien, les envío un caluroso y afectivo saludo.. yo todavía sigo al cuido de mi mamá voy ya para 8 meses, muy consternada por la tragedia ocurrida en Irán y Siria,pidiendo a Dios que les de la fortaleza necesaria para superar dicha tragedia, Pero aquí estoy nuevamente por acá para compartir con ustedes mi bello proyecto, el tutorial para realizar unos hermosos aretes tipos topitos elaborados con cristales No 4, perlas acrilicas y alambre tpc,los cuales para mí quedaron muy bonitos , espero les guste. De verdad que me gusta lo que hago , igualmente me encantan los trabajos realizados por los demás integrantes de la comunidad.
Hello friends of #hive and especially the friends of #jewelry, I wish you all are well, I send you a warm and affectionate greeting... I am still taking care of my mother for 8 months now, very shocked by the tragedy that occurred in Iran and Syria, asking God to give them the necessary strength to overcome this tragedy, but here I am again here to share with you my beautiful project, the tutorial to make beautiful mole-type earrings made with No. 4 crystals, acrylic pearls and tpc wire, which for me were very nice, I hope you like it. I really like what I do, I also love the work done by the other members of the community.
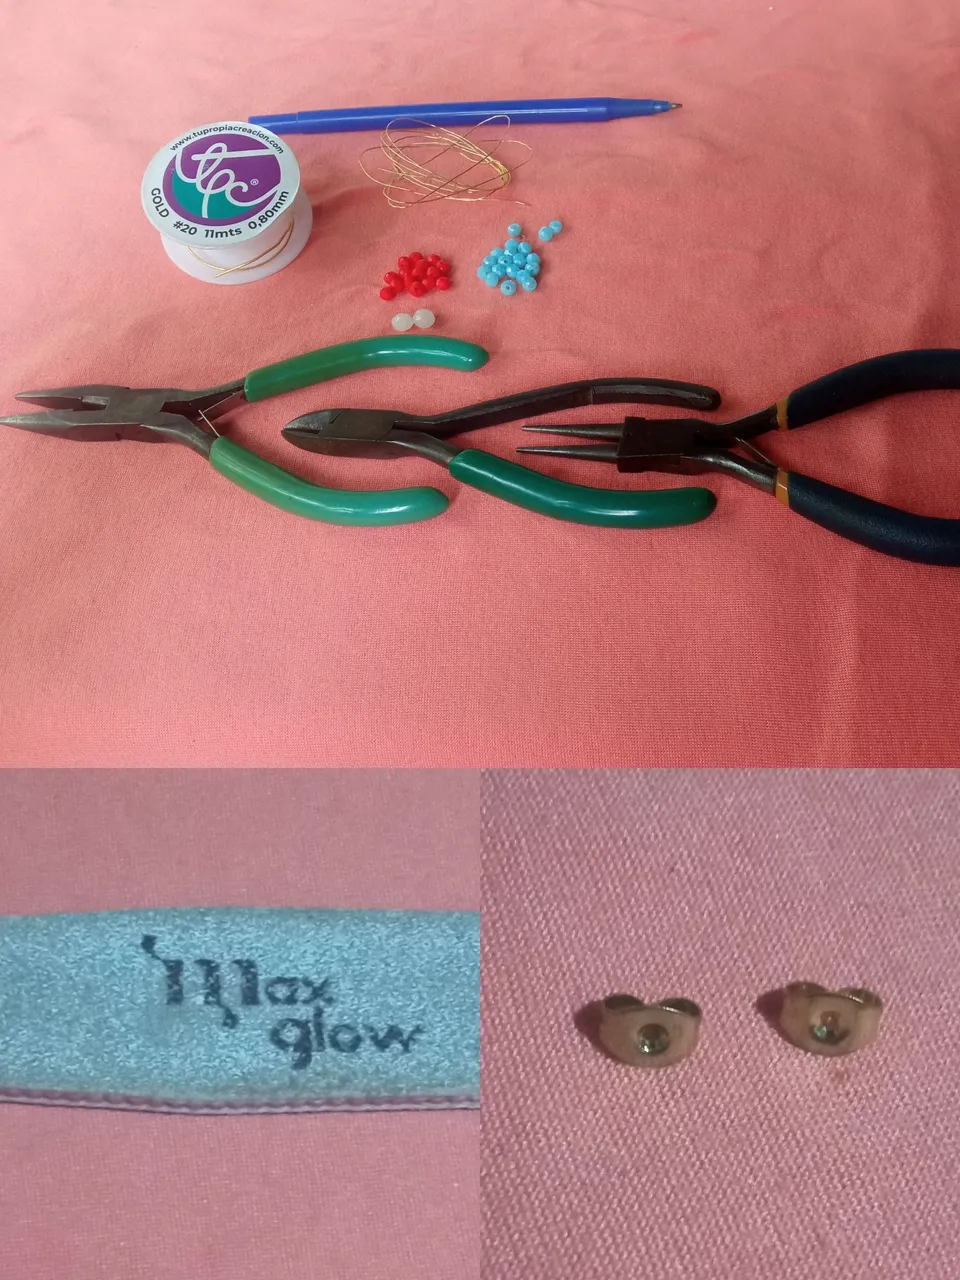
📝 Materiales:
♦️ Alambre tpc No 20.
♦️ Alambre tpc No 26.
♦️ 12 Cristales No 4 rojos.
♦️ 12 Cristales No 4 azúl.
♦️. 2 Perlas acrílicas No 8.
♦️ Pinza punta redonda.
♦️ Pinza punta plana.
♦️ Pinza piqueta.
♦️ 1 Par de tapitas para Zarcillos.
♦️ Lima de uñas.
♦️ 1 Bolígrafo.
📝 Materials:
♦️ Wire tpc No 20.
♦️Tpc wire No 26.
♦️ 12 Crystals No 4 red.
♦️ 12 Crystals No 4 blue.
♦️. 2 acrylic pearls number 8.
♦️ Round tip clamp.
♦️ Flat tip clamp.
♦️ Picket pineapple.
♦️ 1 Pair of caps for Zarcillos. ♦️ Nail file.
♦️ 1 Pen.
Procedímiento:
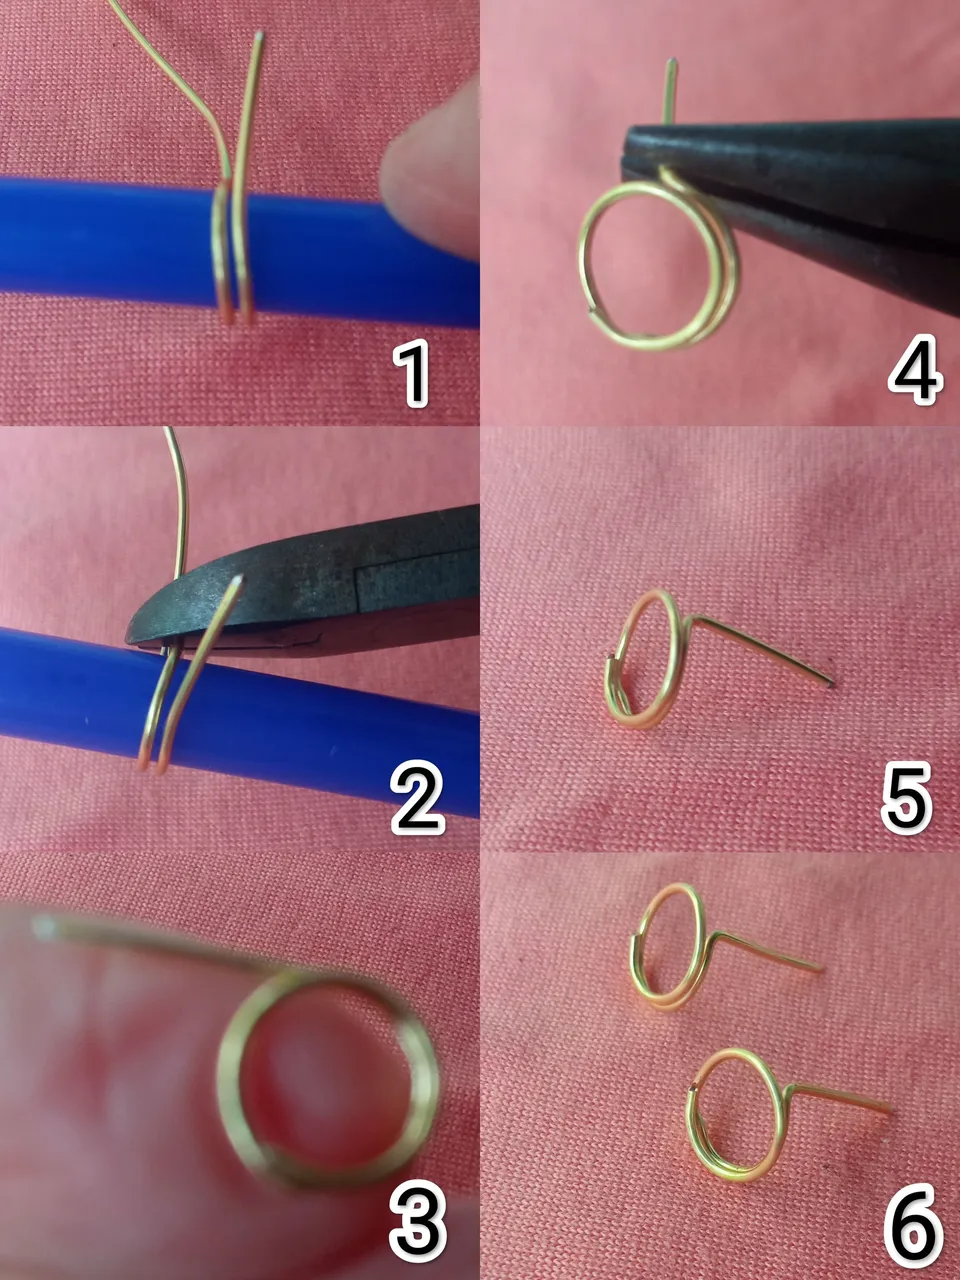
Pasos 1.2.3.4.5.6
Comienzo realizando la base del topito con el alambre tpc No 20, para eso utilizo el bolígrafo ya que no tengo la pinza 6 en 1 que es la que se debería utilizar , lo bueno es que siempre tenemos nuestras herramientas caseras que nos sacan de apuros 🤭🤭🤭 dejo aproximadamente 1cm y desde ahí doy vuelta y media al bolígrafo con el alambre, pico el alambre con la pinza piqueta, luego con la pinza punta plana doblo hacia atrás el centímetro de alambre, para que sea el clavito que va a la oreja y ese mismo procedimiento lo realizo a la segunda base.
Procedure:
Steps 1.2.3.4.5.6
I start by making the base of the mole with the tpc No 20 wire, for that I use the pen since I don't have the 6 in 1 clamp, which is the one that should be used, the good thing is that we always have our homemade tools that get us out of trouble 🤭 🤭🤭 I leave approximately 1cm and from there I turn and a half the pen with the wire, I chop the wire with the pickaxe pliers, then with the flat nose pliers I bend the centimeter of wire back, so that it is the nail that goes to the ear and I do the same procedure to second base.
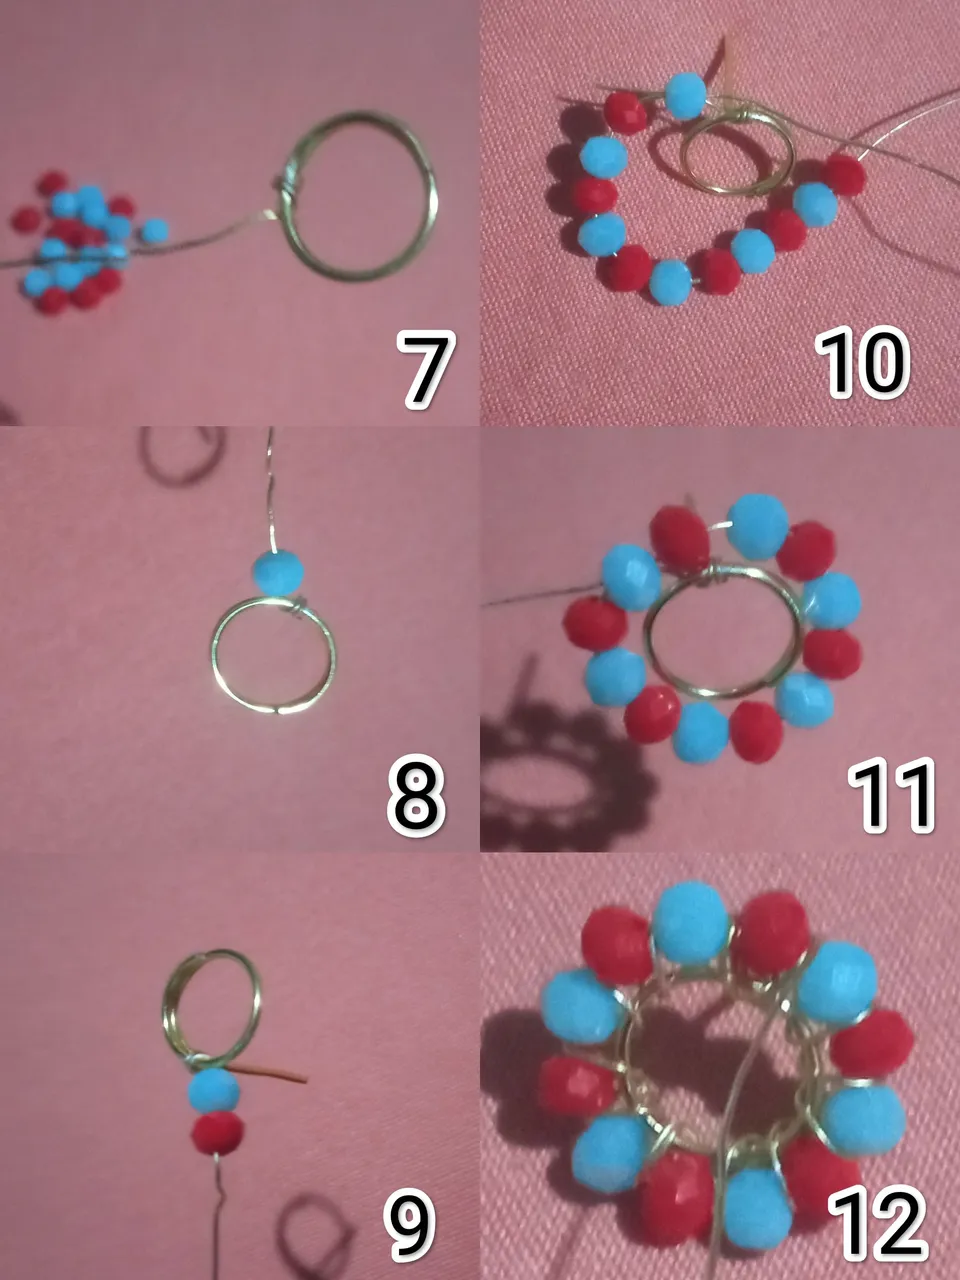
Pasos 7.8.9.10.11.12
Luego que tengo la base del topito elaborada con el alambre tpc No 20, yo estoy usando No 20 pero podemos usar también alambre tpc No 18, empiezo a trabajar con el alambre tpc No 26, doy 3 vueltas más o menos para fijar el alambre, luego introduzco 1 cristal azul luego un cristal rojo en total son 6 cristales azules y 6 rojos, luego introduzco el alambre por el primer cristal azul, tenso el alambre y comienzo a pasarlo entre los cristales para reforzar hasta llegar al principio.
Steps 7.8.9.10.11.12
After I have the base of the mole made with tpc No 20 wire, I am using No 20 but we can also use tpc No 18 wire, I start working with tpc No 26 wire, I give 3 turns more or less to fix the wire, then I introduce 1 blue crystal then a red crystal in total there are 6 blue crystals and 6 red, then I introduce the wire through the first blue crystal, tighten the wire and begin to pass it between the crystals to reinforce until I reach the beginning.
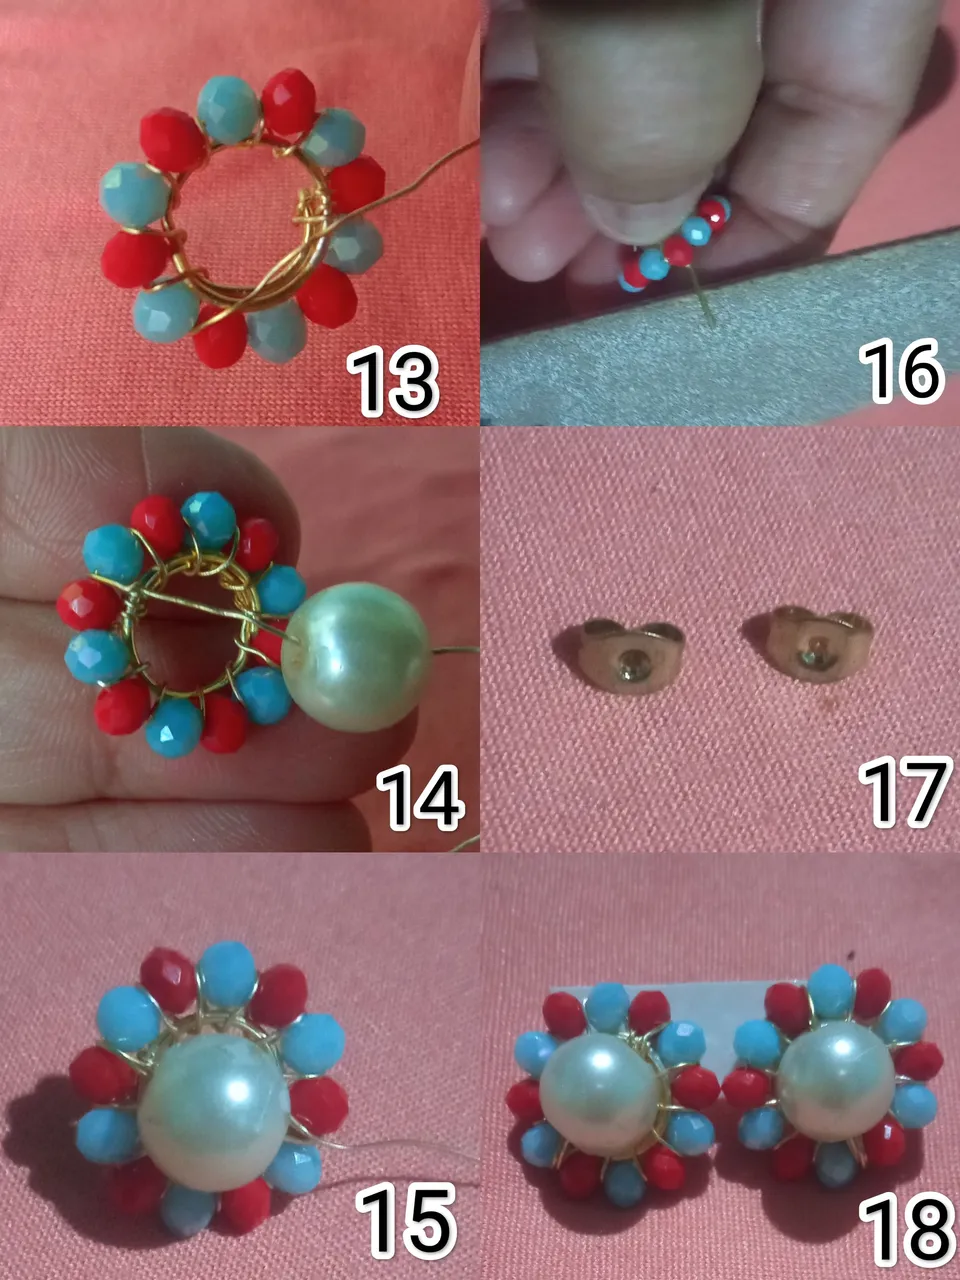
Pasos 13.14.15.16.17.18
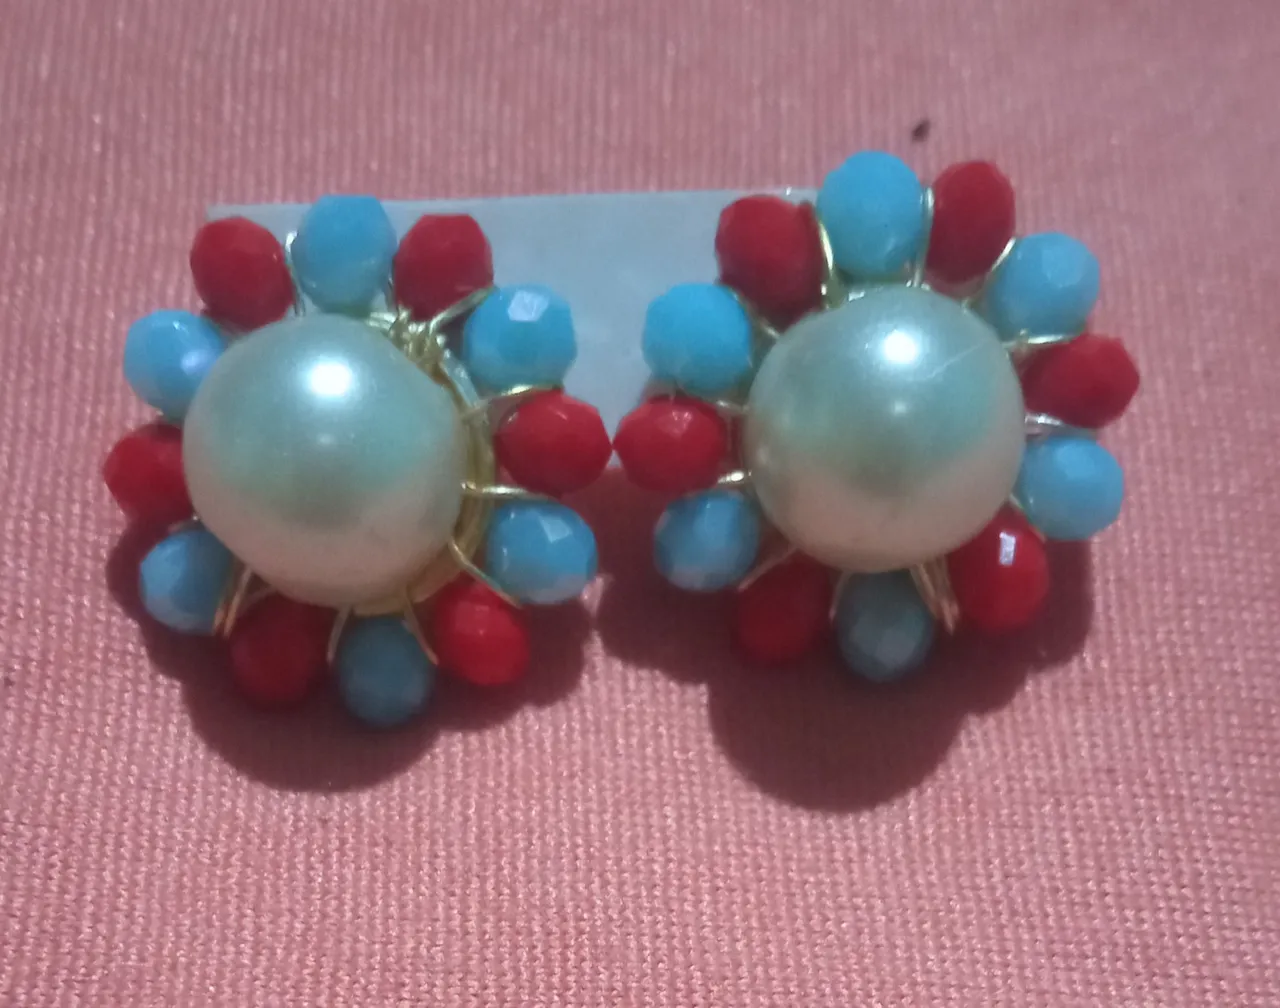
Al llegar al punto de inicio introduzco la perla acrílica mediana y ajusto que quede en el centro, doy varias vueltas a la base al final de la perla para ajustar bien , corto el alambre sobrante, aplano con la Pinza punta plana y empiezo a limar la punta del alambre para evitar que dañe en la parte de atrás de la oreja,coloco el trancadero de metal que es que me gusta usar, pero los hay de gomas también, verifico que todo esté bien ajustado y doy por terminado el proyecto.
Steps 13.14.15.16.17.18
When I reach the starting point, I insert the medium acrylic pearl and adjust it to be in the center, I turn the base at the end of the pearl several times to adjust it well, I cut the excess wire, I flatten it with the flat tip pliers and I begin to file the tip of the wire to prevent it from damaging the back of the ear, I place the metal lock that I like to use, but there are also rubber ones, I verify that everything is well adjusted and I consider the project finished.
Gracias a todos por leer y comentar mi post , para mí siempre es agradable leer sus comentarios y saber que les gusta mis trabajos, todas las fotos son de mi propiedad @lupasbra21 , fueron tomadas y editadas con mi teléfono inteligente Redmi note 9, un saludos para todos y será hasta una nueva oportunidad.
Thank you all for reading and commenting on my post, for me it is always nice to read your comments and know that you like my work, all the photos are my property @lupasbra21, they were taken and edited with my Redmi note 9 smartphone, greetings for everyone and it will be until a new opportunity.