Hello everyone... 💎✨
Hello my dear Hivers and the beloved community of artists of #Jewelry, today I am here to celebrate and honor the first anniversary of my beloved community, with which I have traveled this beautiful path of growth in this first year, since I have almost the same time on this wonderful platform and I have walked hand in hand and with the support of the family of artists who are here.
I want to congratulate the friend @yolimarag, for all the desire and effort she has put into this project to move forward and it has paid off, I wish her the best, that this continues to grow, filled with success and we go forward with you, at least in my case while I have the possibilities I will do it and I'll be here. Thank you for what you have given us, and for the support to so many people. Blessings.
Many thanks also to all the projects @rutablockchain @hispapro and @OCD that have supported this community.
More than participating in the contest I wanted to do something special to give back so many nice things to this much appreciated community of which I feel very proud to be part, and that has led me to challenge myself, improve every day, learn new techniques combined, to offer and give the best of me, making works with love and affection that can inspire you to materialize, of course always being especially for you.
I invite you to join this great community, and if you wish to participate in the first anniversary contest to @somethingnice @aly.squid @antoniarhuiz @brittandjosie and @gaboamc2393.
I tell you that for today I wanted to replicate in the quilling technique, the beautiful new logo that was created by the @hivecreators team for the community, and in the course of the work continued to emerge ideas and why not materialize them, that's what we are for when that muse comes to create, create and create...
Without further ado I leave you the creative process of what I was carrying out. I hope you enjoy it:
Let's get started:😃

Hola a todos... 💎✨
Hola a mis queridos Hivers y a la querida comunidad de artistas de #Jewelry, hoy estoy acá para celebrar y homenajear el primer aniversario de mi querida comunidad, con la cual he recorrido este bello camino de crecimiento en este primer año, ya que casi tengo el mismo tiempo en esta maravillosa plataforma y lo he transitado de la mano y con el apoyo de la familia de artistas que están aquí presentes.
Quiero felicitar a la amiga @yolimarag , por todas las ganas y el esfuerzo que le ha puesto a este proyecto para salir adelante y vaya que ha dado frutos, le deseo lo mejor, que esto siga en crecimiento, llenándose de éxitos y nosotros adelante contigo, por lo menos en mi caso mientras tenga las posibilidades lo hare y aquí estaré. Gracias por lo que nos has dado, y por el apoyo a tantas personas. Bendiciones.
Muchas gracias también a todos los proyectos @rutablockchain @hispapro y @OCD que han apoyado a esta comunidad.
Más que participar en el concurso quise realizar algo especial para retribuir tantas cosas lindas a esta tan apreciada comunidad de la cual me siento muy orgullosa de formar parte, y que me ha llevado a retarme a mí misma, mejorar cada día, aprender nuevas técnicas combinadas, para ofrecer y dar lo mejor de mí, realizando trabajos con amor y cariño que puedan inspirarlos a materializar, por supuesto siendo siempre especialmente para ustedes.
Invito a incorporarse a esta grandiosa comunidad, y si así lo desean participar en el concurso del primer aniversario a @somethingnice @aly.squid, @antoniarhuiz, @brittandjosie y @gaboamc2393 .
Les cuento que para hoy quise replicar en la técnica de quilling, el hermoso nuevo logo que fue creado por el equipo de @hivecreators para la comunidad, y en el trayecto del trabajo siguieron surgiendo ideas y pues porque no materializarlas, para eso estamos para que cuando esa musa llegue crear, crear y crear…
Sin más preámbulos les dejo el proceso creativo de lo que fui llevando a cabo. Esperando lo disfruten:
Comencemos:😃

• Cintas de quilling de 3mm de ancho blancas, negras y doradas.
• Cintas de quilling de 1.5mm de ancho negras.
• Hoja blanca.
• Lápiz.
• Regla.
• Aguja para quilling.
• Trozo de acetato trasparente.
• Cartulina negra.
• Cartulina blanca.
• Cinta plástica.
• Regla con diversas medidas de circunferencia.
• Pega blanca extra fuerte (de carpintería).
• Tijera.
• Base para zarcillos colgantes (anzuelos).
• Argollas medianas de bisutería.
• Cristales cheko negro.
• Pincel.
• Alicate punta fina.
- 3mm wide quilling ribbons in white, black and gold.
- 1.5mm wide black quilling ribbons.
- White sheet.
- Pencil.
- Ruler.
- Quilling needle.
- Piece of transparent acetate.
- Black cardboard.
- White cardboard.
- Plastic tape.
- Ruler with different circumference measurements.
- Extra strong white glue (carpentry glue).
- Scissors.
- Base for hanging tendrils (hooks).
- Medium size costume jewelry earrings.
- Black cheko crystals.
- Brush.
- Fine nose pliers.

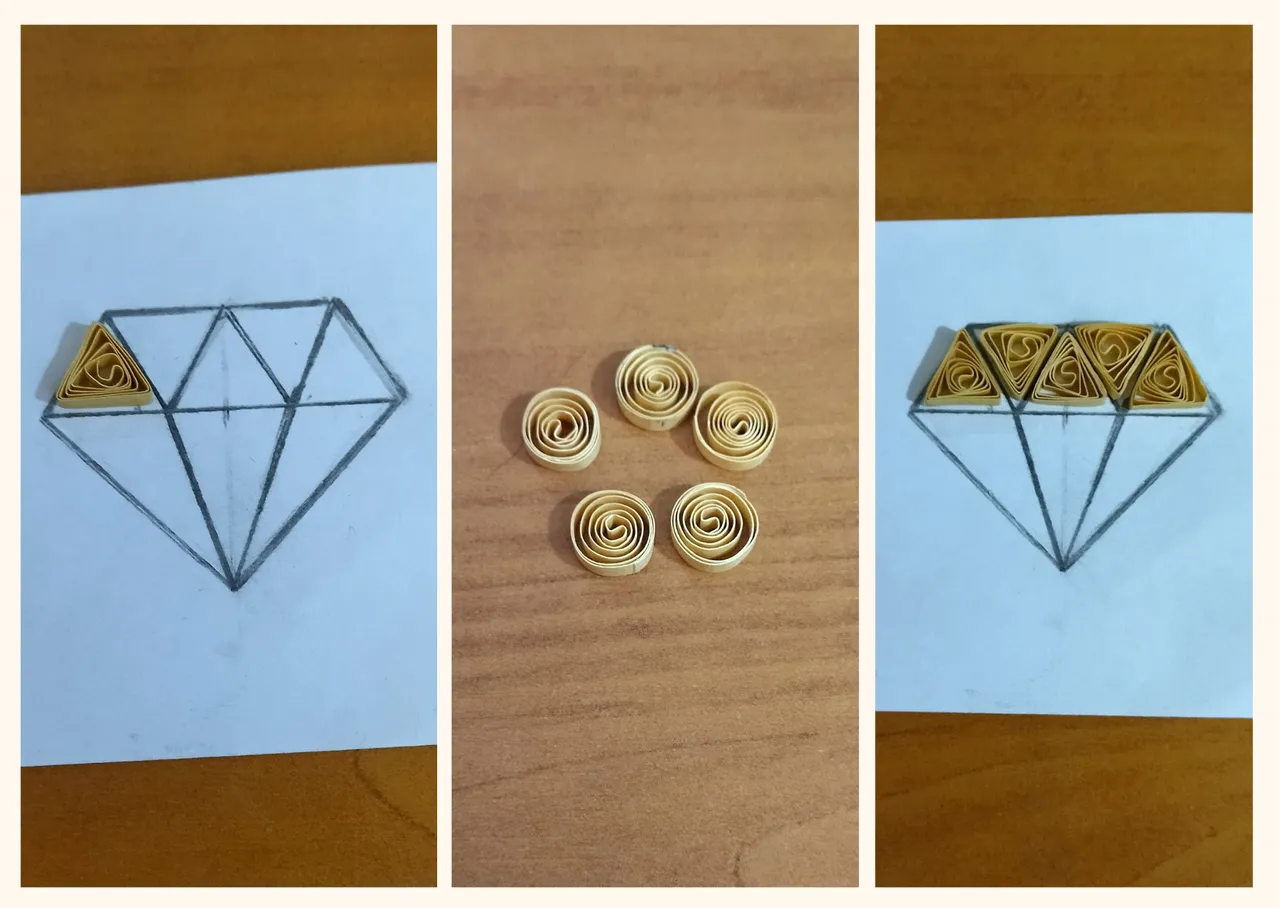
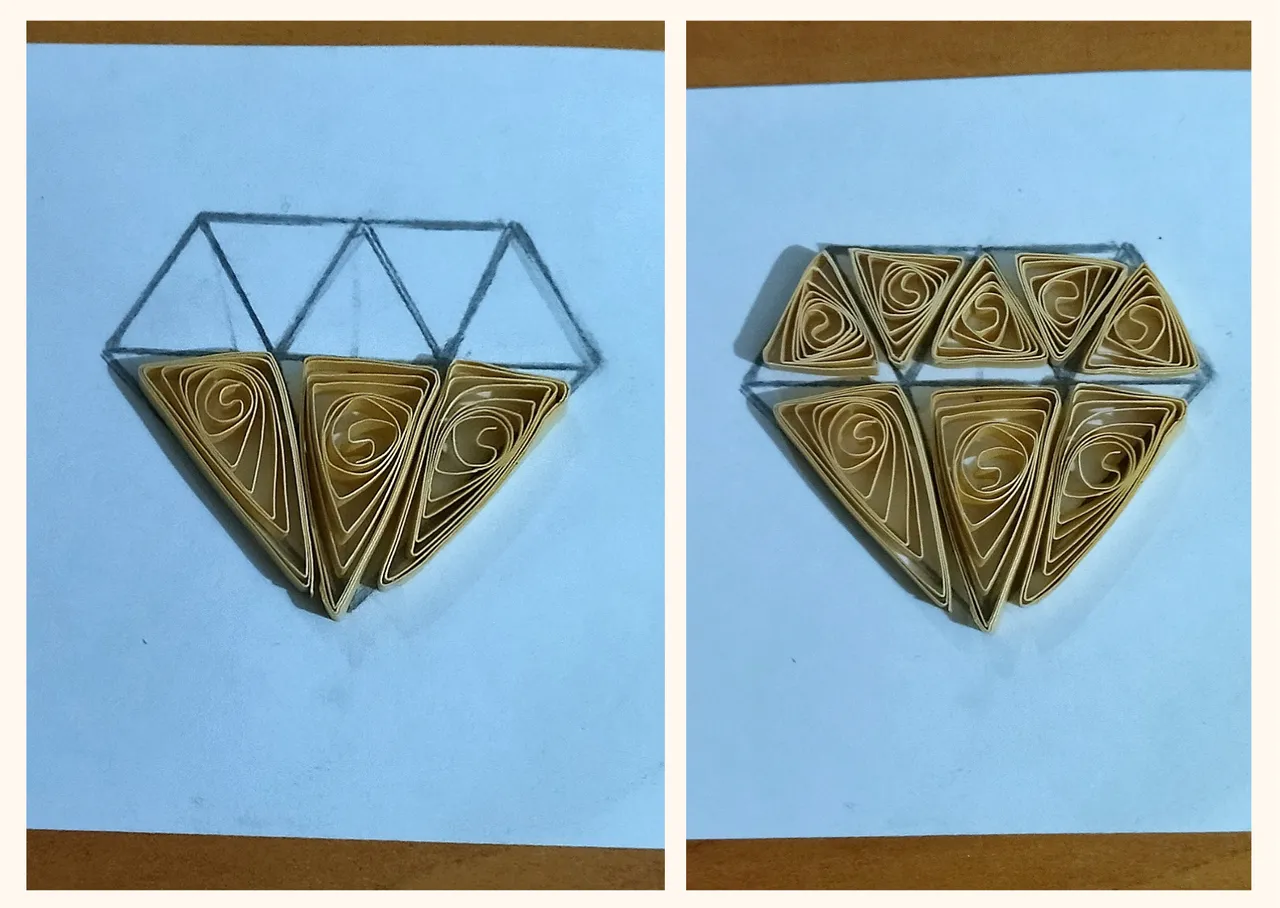
- I wanted to start by making a template on a piece of white paper, I drew with a pencil the diamond that is the logo of our beloved community which I used as a reference for this work, I made all the sections with geometric figures, although the logo does not have all of them since it has a letter, I did this just to have it as a sample and so that everything is of the same size and the right size. Each person will make the size and measure of their preference according to how they want their medallion pendant, but at the same time it also serves as a mold or reference in case you want to make a diamond pendant.
Now we are going to start making the diamond pieces, the ones that are in our mold 💎
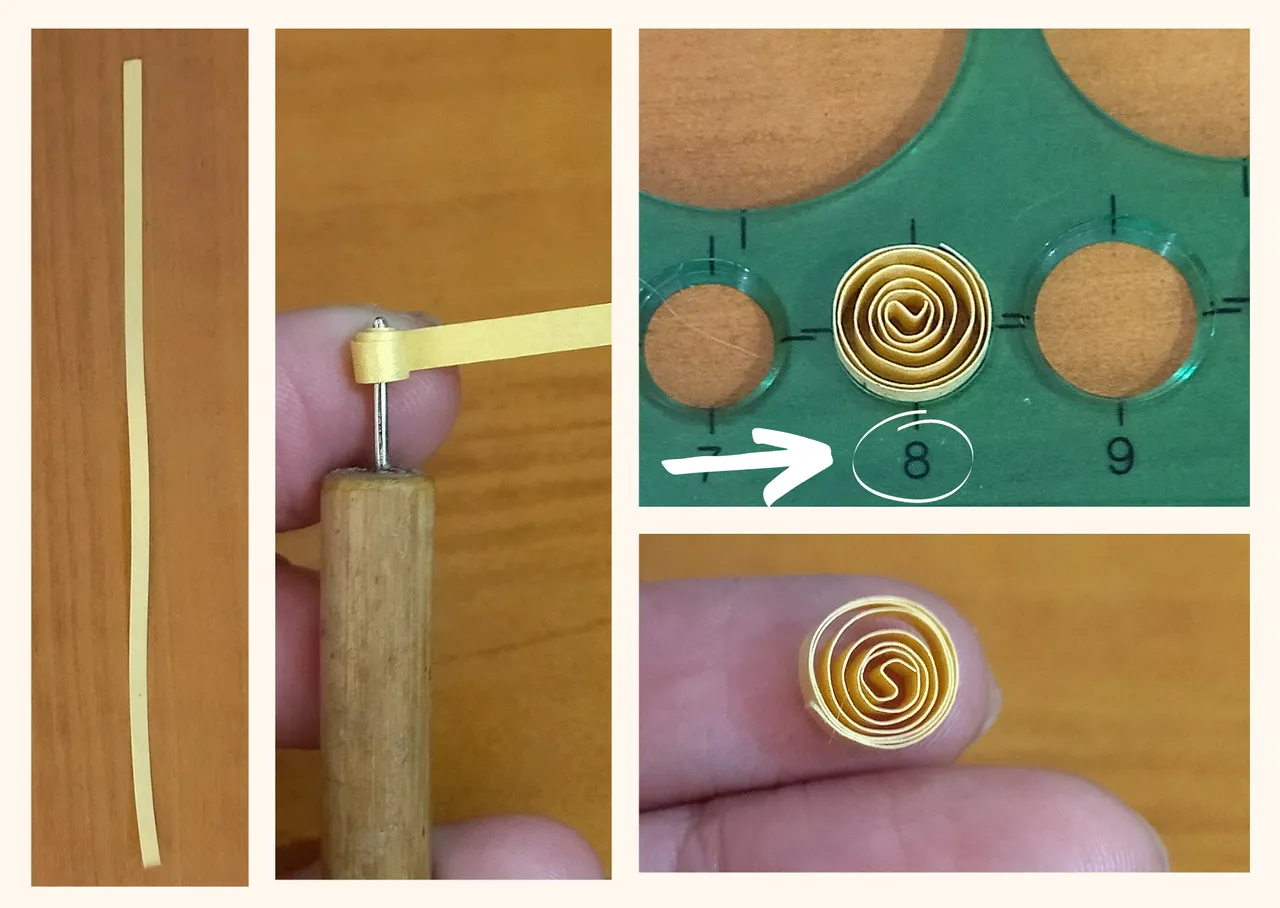
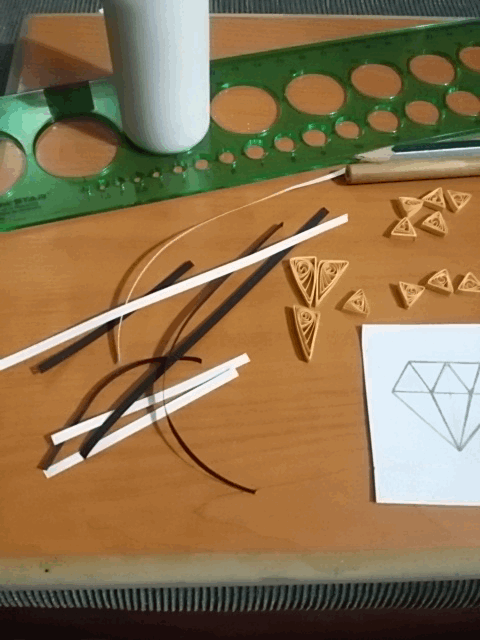
- We take a golden quilling ribbon of 3mm wide x 12cms long, we roll it with the quilling needle, take it out of the needle and put it in the ruler of different circumference measures in the circle number 8, take it out and seal it with a touch of glue, we will obtain an open circle, as this circle we will need 5.
- We are going to shape the circles according to our mold, we will make 5 triangles, (reserve).

• Quise comenzar haciendo una plantilla en trozo de hoja blanca, dibuje con un lápiz el diamante que es logo de nuestra querida comunidad el cual utilice de referencia para este trabajo, realice todas las secciones con figuras geométricas, aunque el logo no las tiene todas ya que lleva una letra, esto lo realice solo para tenerlo de muestra y para que todo quede de la misma medida y del tamaño adecuado. Cada quien lo hará del tamaño, y medida de su preferencia según como deseen que quede su dije medallón, pero a la vez también sirve de molde o referencia en caso de que se quiera hacer un dije de un diamante.
Ahora vamos a comenzar a realizar las piezas del diamante, las que están en nuestro molde 💎
• Tomamos una cinta dorada de quilling de 3mm de ancho x 12cms de largo, enrollamos con la aguja para quilling, sacamos de la aguja y metemos en la regla de diversas medidas de circunferencias en el círculo número 8, sacamos y sellamos con un toque de pega, vamos a obtener un circulo abierto, como este círculo vamos a necesitar 5.
• Vamos a darle forma a los círculos según nuestro molde, realizaremos 5 triángulos, (reservamos).

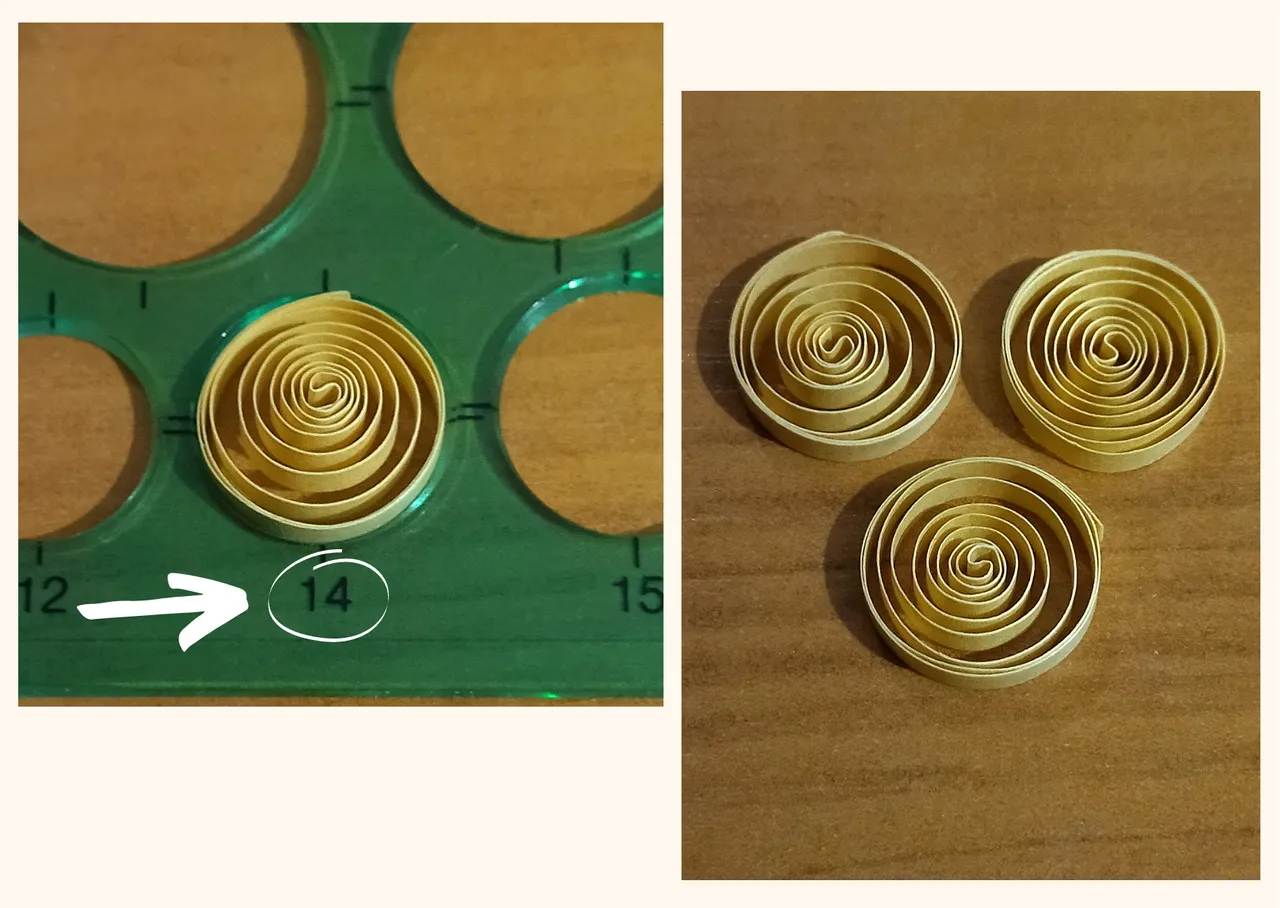
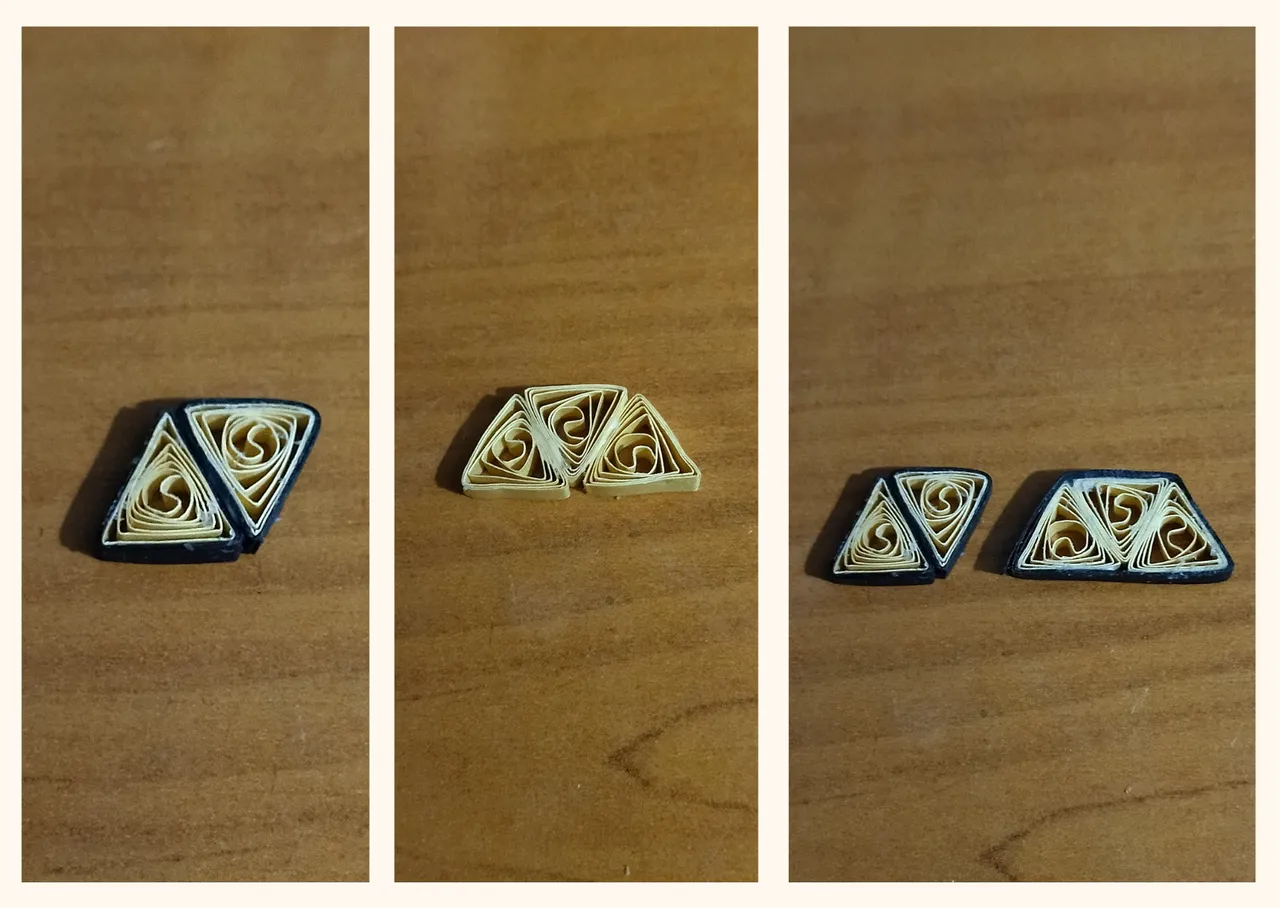
- Let's go with the remaining pieces of our mold, we will take golden ribbon 3mm wide x 24cms long, we will roll with the quilling needle we will measure on the ruler in the circle number 14, we will need 4 circles like this.
- We will shape these 3 circles according to our mold.
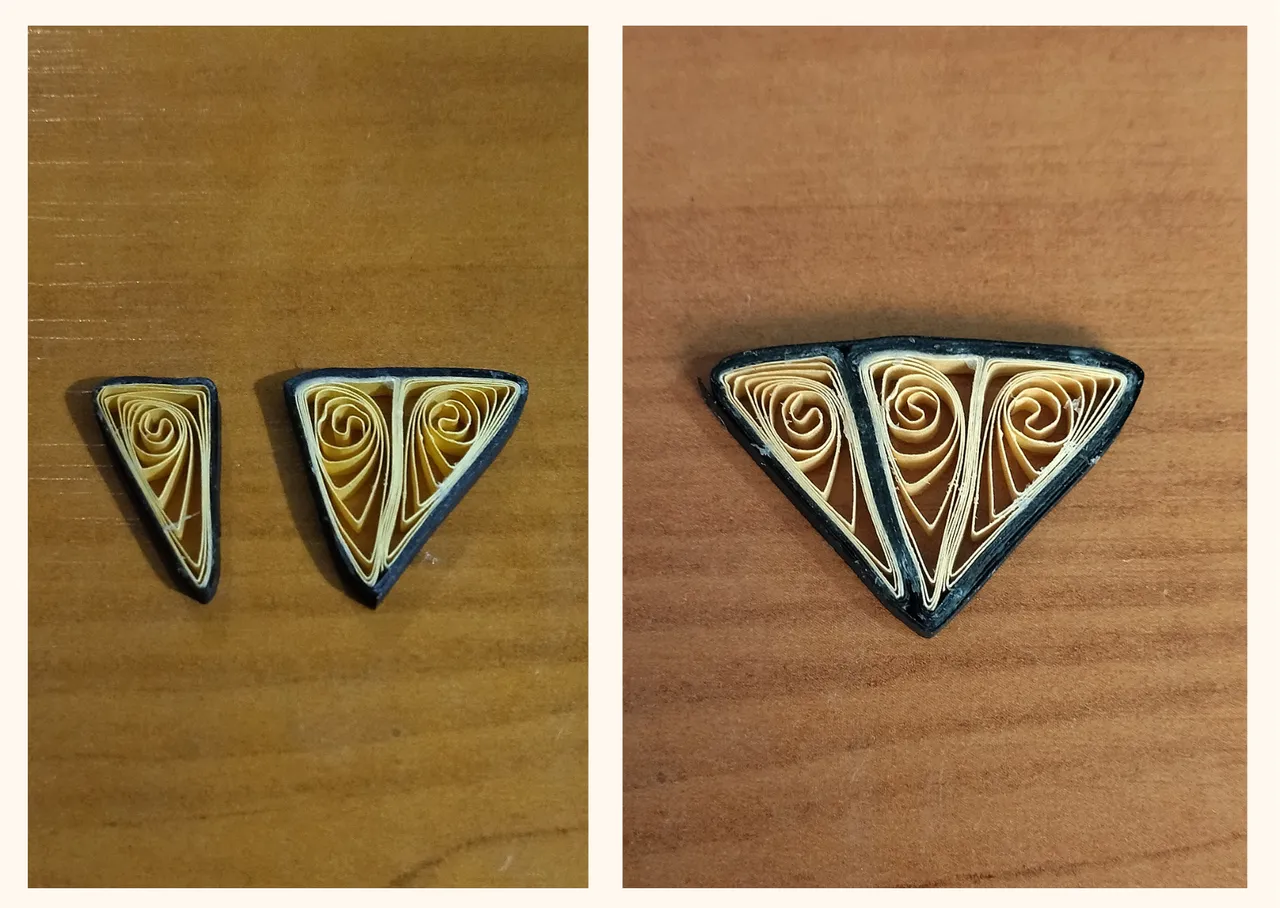
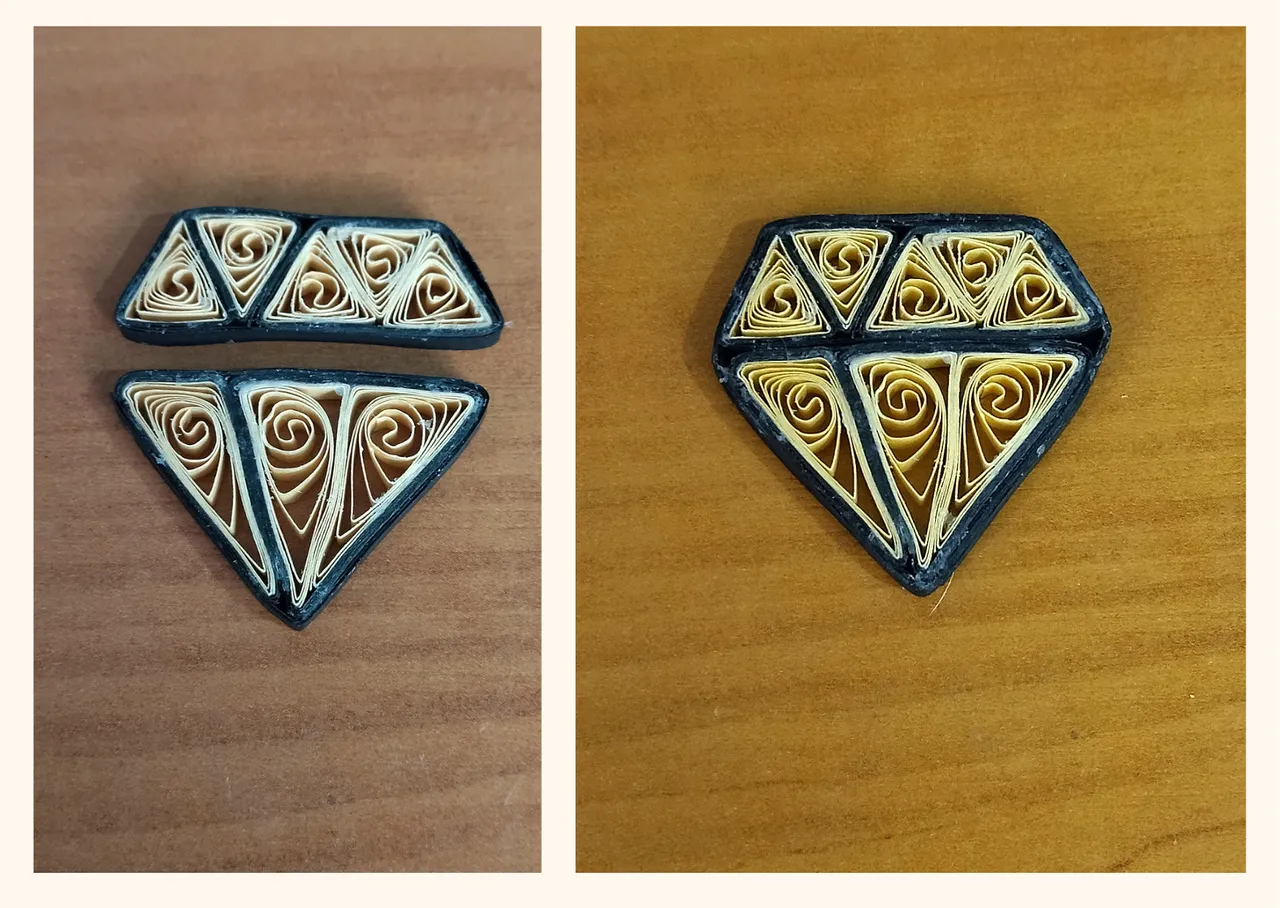
- We have all the figures according to our mold, we are going to take two of the small triangles and we are going to place around them 6cms of black tape of 3mm. These two triangles will be glued together.
- Then we will take the three remaining triangles and we will join them with some extra strong white glue and we will pass around them 18cms of black ribbon.
• Vamos con las piezas restantes de nuestro molde, tomaremos cinta dorada de 3mm de ancho x 24cms de largo, enrollaremos con la aguja para quilling mediremos en la regla en el círculo número 14, necesitaremos 4 círculos como este.
• Vamos a darle forma a estos 3 círculos según nuestro molde.
• Tenemos todas las figuras según nuestro molde, vamos a tomar dos de los triángulos pequeños y vamos a colocarle alrededor 6cms de cinta negra de 3mm. Esos dos triángulos los uniremos con pega.
• Luego tomaremos los tres triángulos restantes y los uniremos con un poco de pega blanca extra fuerte y pasaremos alrededor de ellos 18cms de cinta negra.

- To one of the figures below, specifically the one on the left, we will place 12cms of black tape around it, then we will join the other two, we will also proceed to pass black tape around them, which for these will be 24cms, finally we will join the three pieces.
- We will join the two pieces that resulted, once joined we will pass black tape around them.
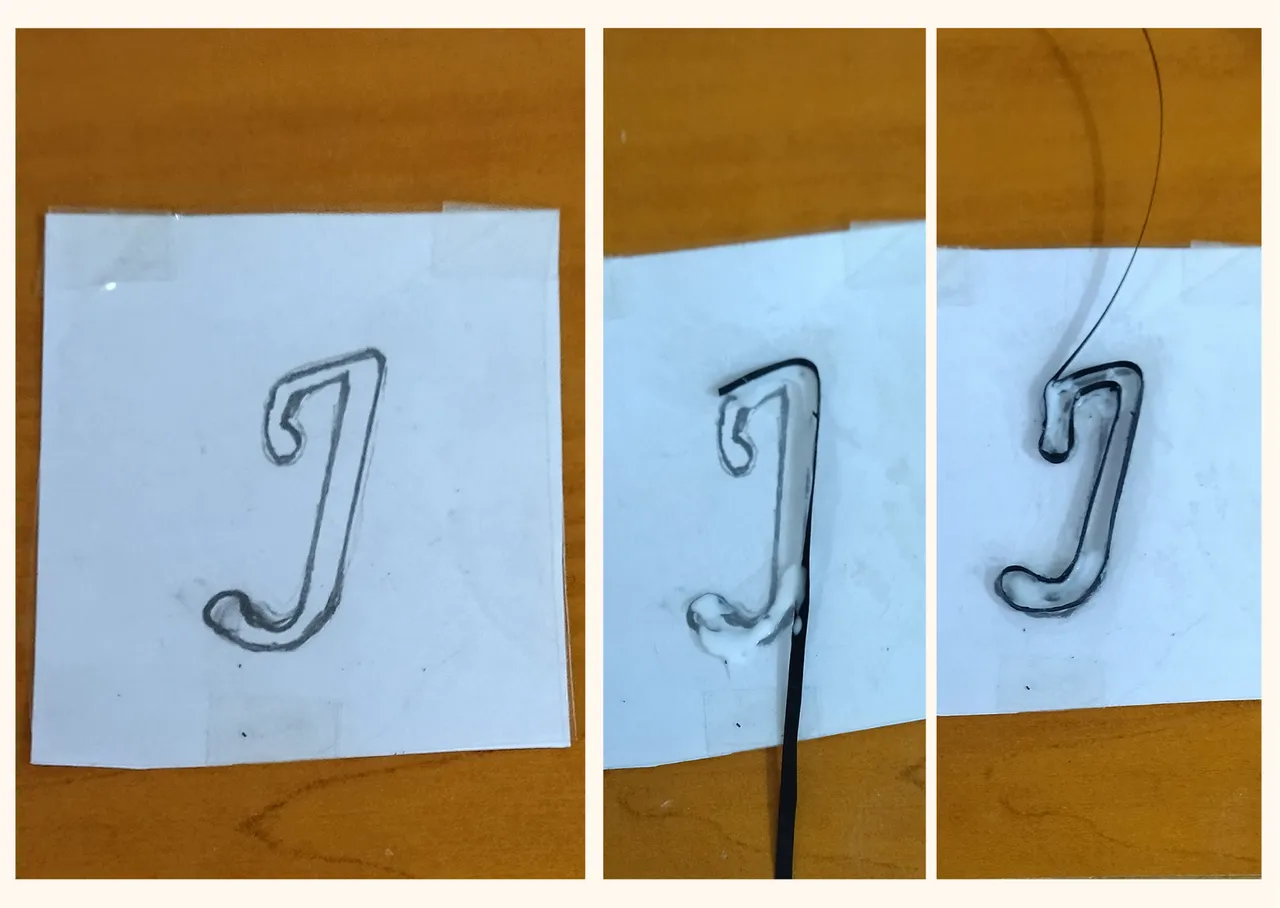
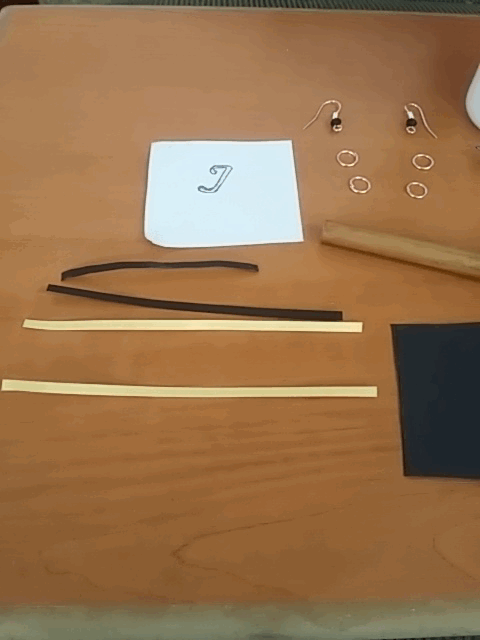
- Let's make the letter, for this also make a mold by drawing the letter J on a piece of paper, then place a small piece of clear acetate held with plastic tape.
- With black tape 1.5mm wide we will proceed to border the letter, then fill it with strips of paper in the shape you want. At the end we remove the mold and cut out the letter from the acetate.
• A una de las figuras de abajo la de la izquierda específicamente, le colocaremos 12cms de cinta negra alrededor, luego uniremos las dos restantes, también procederemos a pasarles cinta negra alrededor que para estas serán 24cms, por ultimo uniremos las tres piezas.
• Uniremos las dos piezas que resultaron, una vez unidas pasaremos cinta negra alrededor.
• Vamos a realizar la letra, para esta realice también un molde dibujando la letra J en un trozo de papel, luego le coloque un trocito de acetato transparente sujetados con cinta plástica.
• Con cinta negra de 1.5mm de ancho vamos a proceder a bordear la letra, luego la rellenamos con tiras de papel en la forma que lo desees. Al finalizar retiramos el molde y recortamos la letra del acetato.
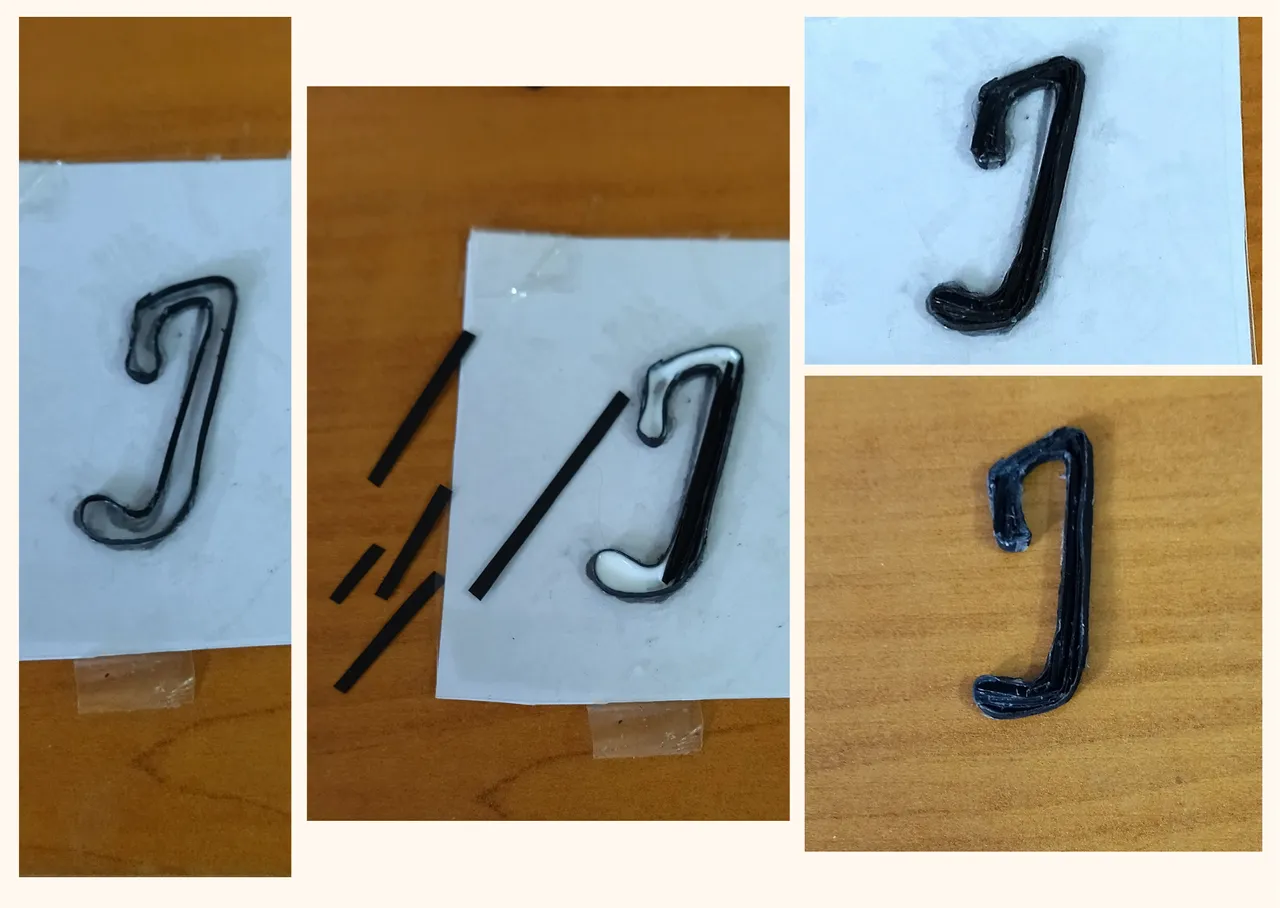
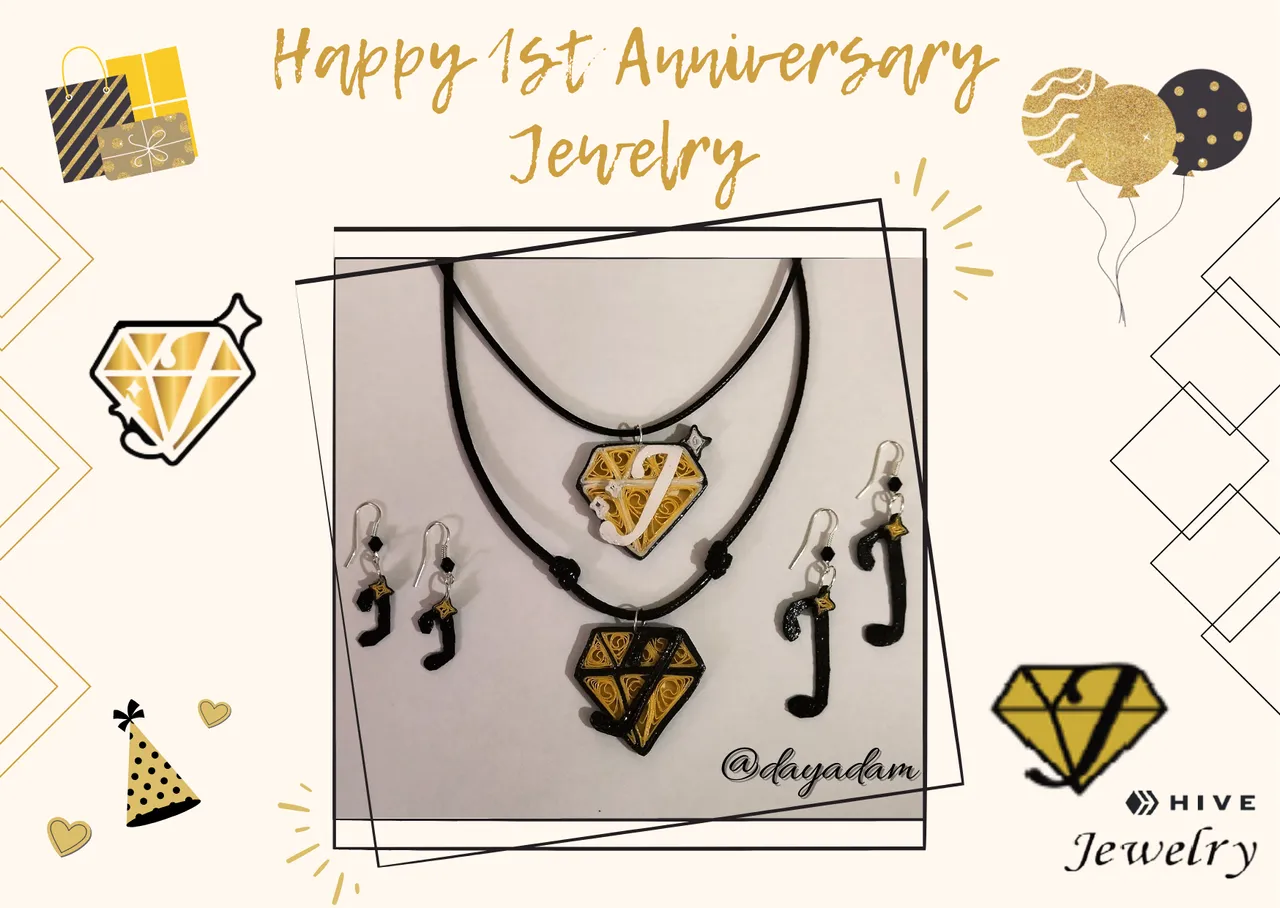
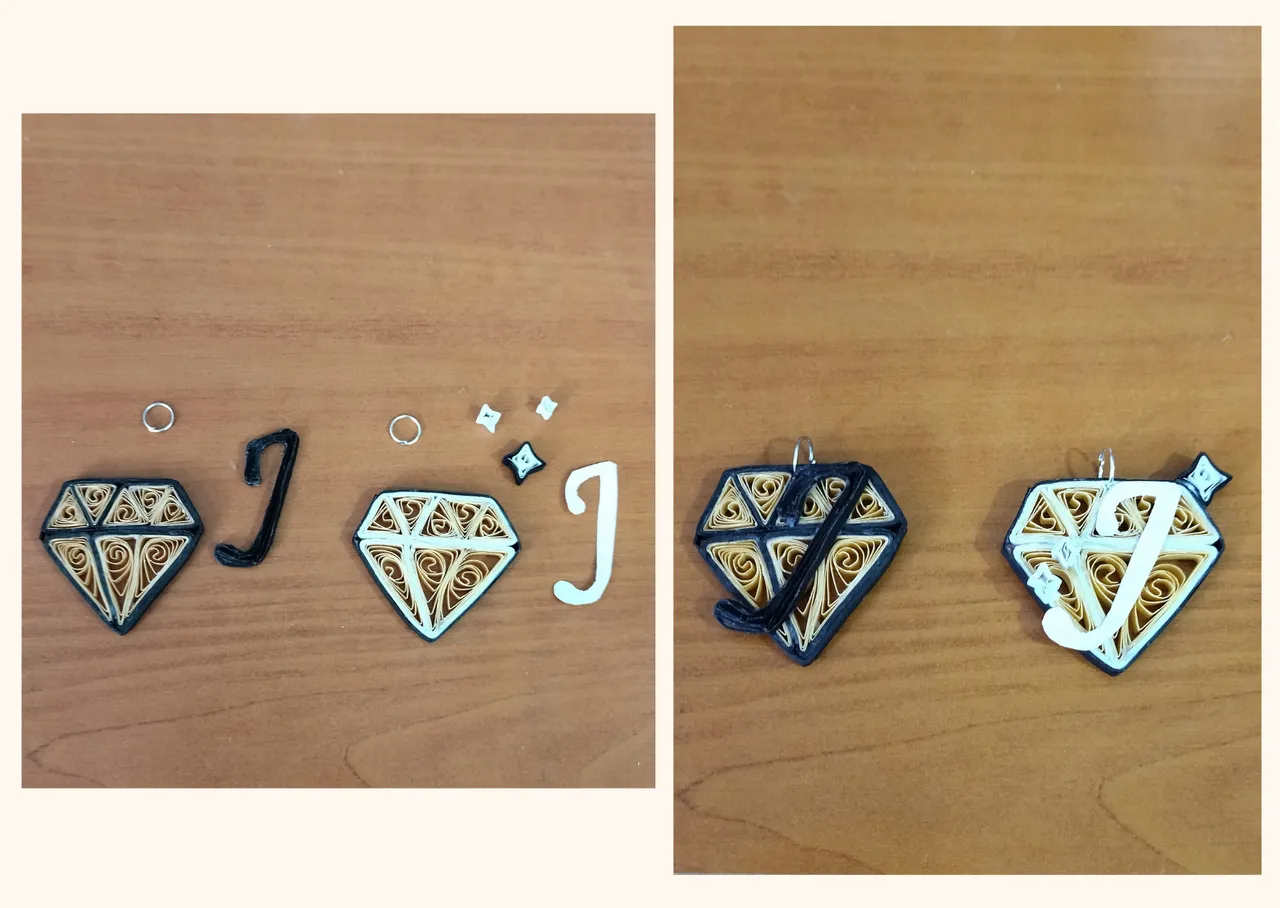
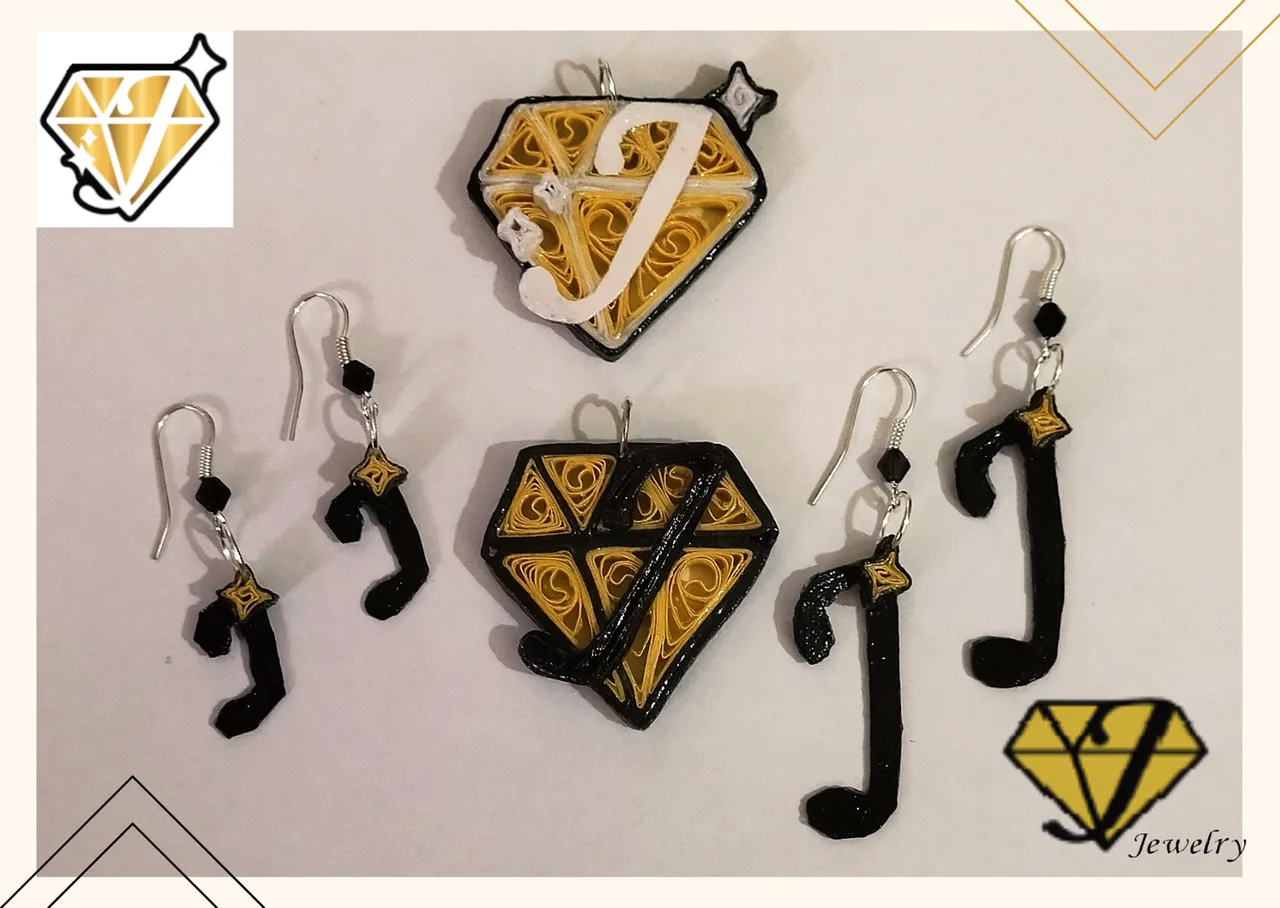
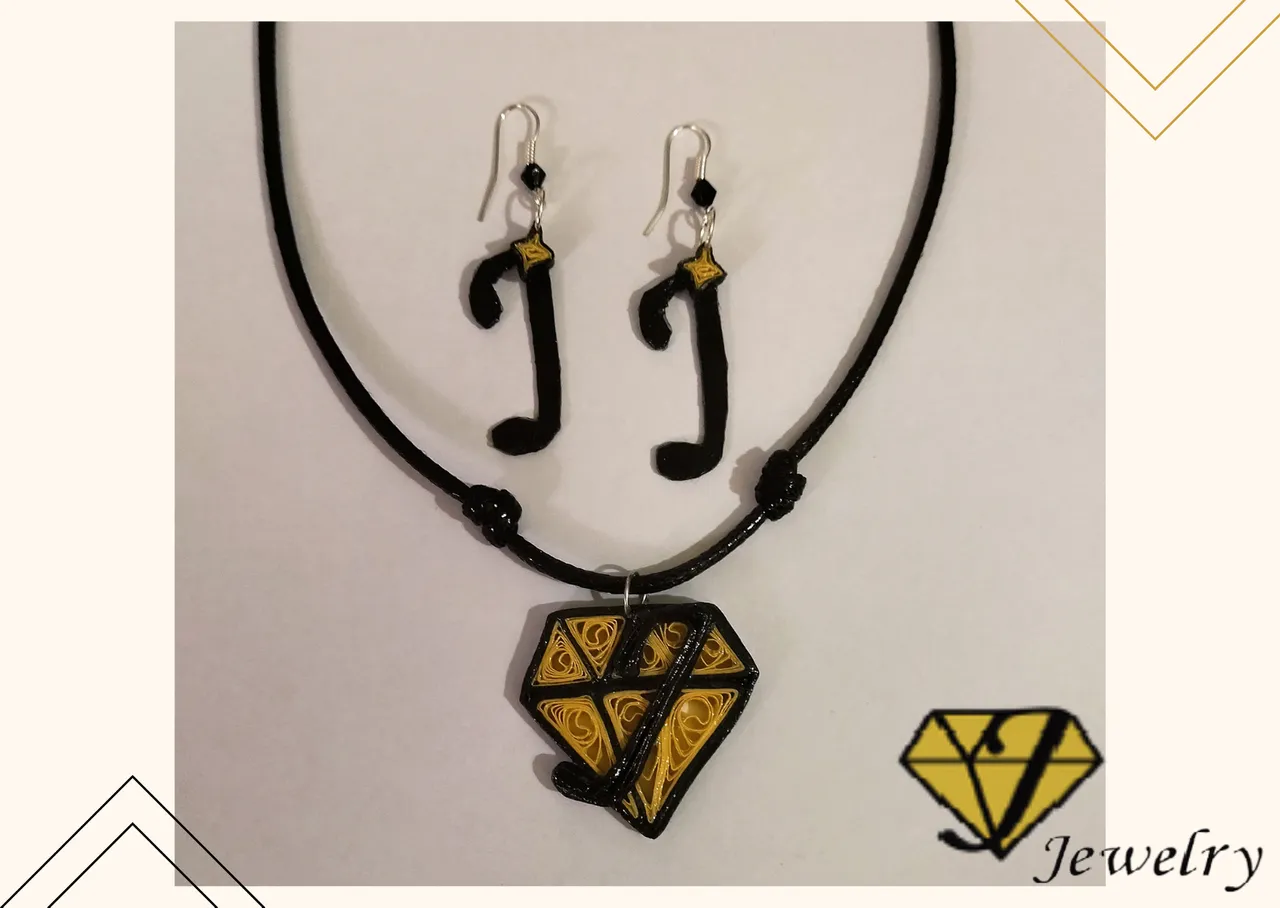
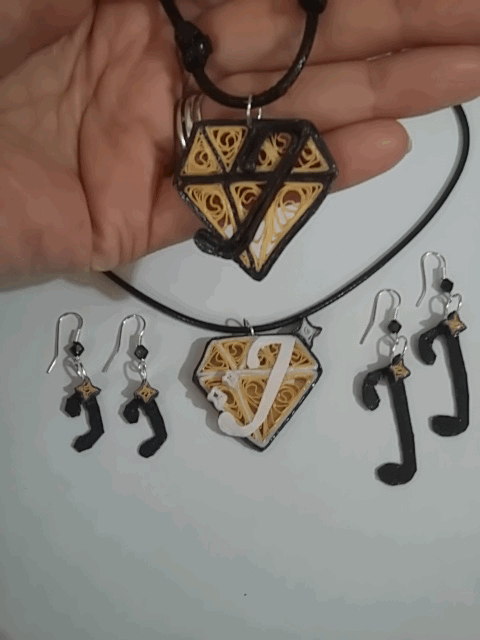
Simultaneously I made another medallion charm with the logo of our beautiful Jewelry community, with the colors of the other new design, for this one I made the stars with 3mm white quilling to give it a 3D effect, and the letter was made by simply cutting the mold on a piece of white cardboard.
- We are going to assemble our two medallion charms by gluing each piece in its place and placing a medium-sized costume jewelry ring.
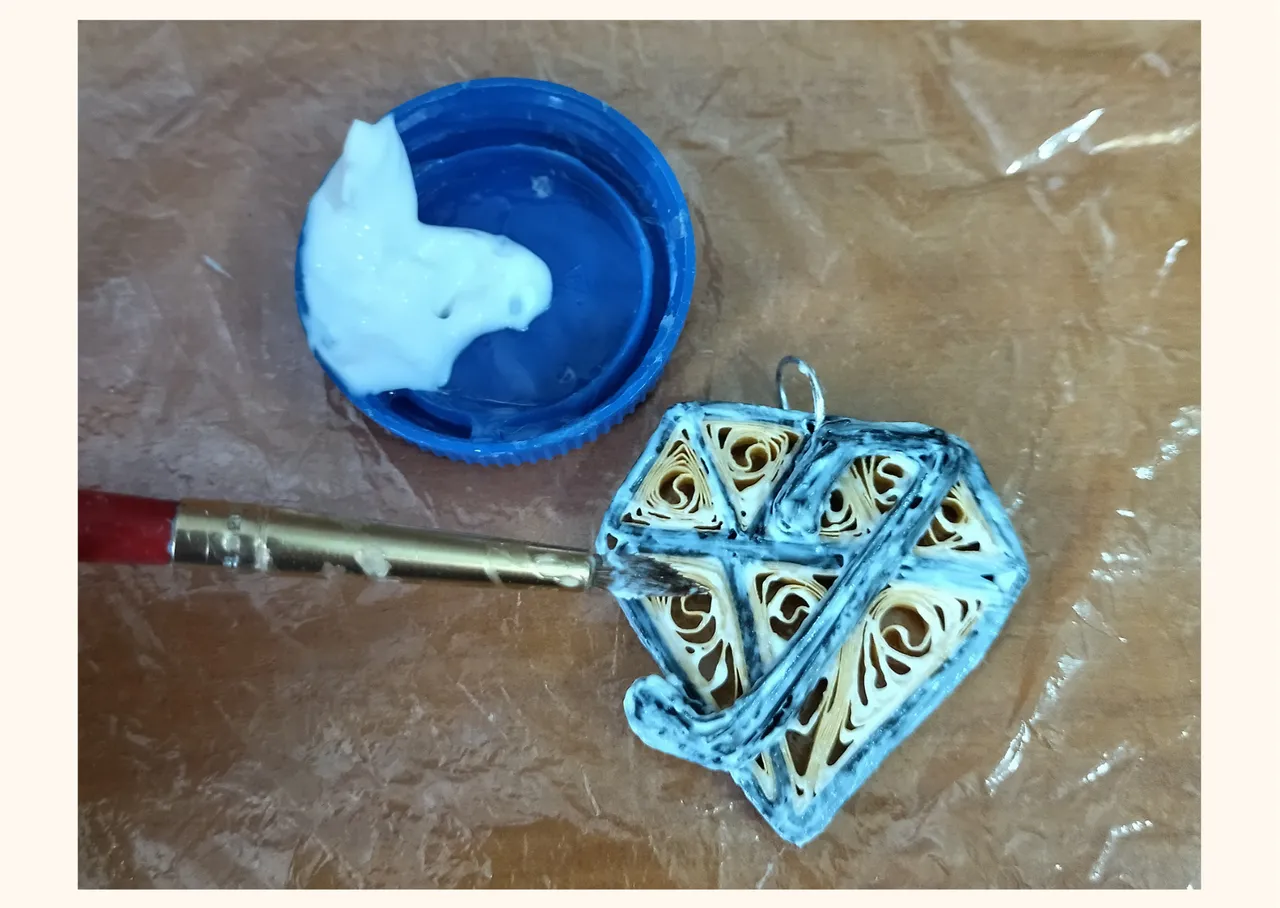
- Finally we apply its liquid protection (plasticized), adding with a brush several layers of extra strong white carpentry glue, letting it dry between one layer and another.
Once completely dry, we have our medallion charms, ready to place them on the necklace of your choice.
En simultaneo realice otro dije medallón con el logo de nuestra bella comunidad de Jewelry, con los colores del otro nuevo diseño, para este elabore las estrellas con quilling blanco de 3mm para darle un efecto en 3D, y la letra la realice simplemente recortando el molde en un trozo de cartulina blanca.
• Vamos a armar nuestros dos dijes medallón pegando cada pieza en su lugar y colocando una argolla de bisutería mediana.
• Por ultimo aplicamos su protección liquida (plastificado), añadiendo con un pincel varias capas de pega blanca extra fuerte de carpintería, dejando secar entre una capa y otra.
Una vez completamente secos, tenemos nuestros dijes tipo medallón, listos para colocarlos en el collar de tu preferencia.

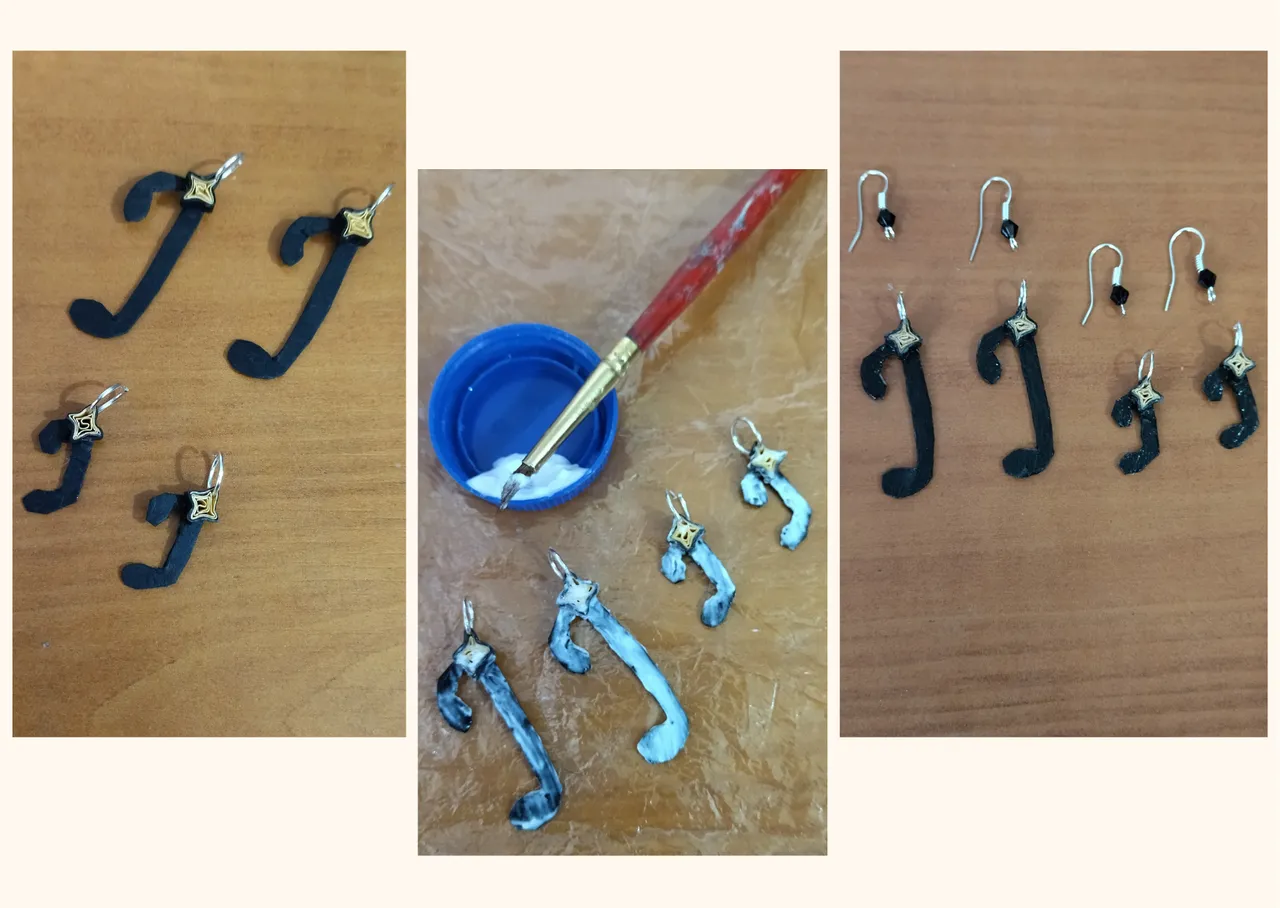
Last minute flash tutorial: As my mind sometimes does not stop spinning with respect to the creation, the night before I had almost everything written and the tutorial prepared, so as not to edit it, I wanted to leave as an extra some simple earrings that came to my mind in the morning to complement the black and gold logo pendant, and they are nothing more than simple earrings in the cardboard and quilling technique, with the initial of the community.
- As I had already elaborated 2 templates with the letter J, one big and one small, I cut them in a piece of black cardboard, I made stars with black and gold quilling ribbons of 3mm wide, I glued this star in a corner above the letters, I put some medium size costume jewelry rings, I applied the liquid protection to the pieces with extra strong white carpentry glue and I placed to finish the hook to which I previously placed two black Czech crystals to give it a showy look. This is how these extra earrings turned out and I hope you like them.
I know that I ended up making several accessories, but the truth is that I do not regret it because it was to pay tribute to this beloved community, it was worth all the days I invested in the development of this post.
Tutorial flash de último minuto: Como mi mente a veces no deja de dar vueltas con respecto a la creación, la noche anterior tenía casi todo escrito y el tutorial elaborado, para no editarlo pues les quise dejar como extra unos pendientes sencillos que se me ocurrieron en la mañana para complementar el dije del logo negro con dorado, y no son más que unos pendientes sencillos en la técnica de cartonaje y quilling, con la inicial de la comunidad.
• Como ya tenía elaboradas 2 plantillas con la letra J, una grande y una pequeña, las recorte en un trozo de cartón negro, elabore estrellas con cintas de quilling negras y doradas de 3mm de ancho, dicha estrella se la pegue en una esquina de arriba a las letras, les coloque unas argollas medianas de bisutería, aplique la protección liquida a las piezas con pega blanca extra fuerte de carpintería y le coloque para finalizar su anzuelo al cual le coloque previamente para dar vistosidad dos cristales checos negros. De esta manera resultaron estos pendientes extras que espero sean de su gusto.
Sé que termine haciendo varios accesorios, pero la verdad no me pesa ya que fue para homenajear a esta querida comunidad, valió la pena todos los días que invertí en la elaboración de este post.


What did you think, did you like it?
I hope you did, I hope you liked my explanation, procedure and photos, I made them with love for you.
"Let out that muse that inspires you, and let your imagination fly".
Thank you all, see you next time. 🐾🐱💕
¿Que les pareció, les gustó?
Espero que sí, que les haya gustado mi explicación, procedimiento y fotos, los hice con mucho cariño por y para ustedes.
"Deja salir esa musa que te inspira, y deja volar tu imaginación".
Gracias a todos, nos vemos en la próxima. 🐾🐱💕
Los invito que apoyen a "La Colmena", dale tu voto ✨
 Vote la-colmena for witness By @ylich
Todas las fotos usadas en este post son de mi autoría y han sido sacadas en mi celular personal un Redmi 9T y editadas Canva Los logos utilizados como inspiración para materializar mi trabajo y que se usaron en diversas fotos de mi post, son propiedad de la comunidad de Jewelry @colmena-189504 Banner y separador hecho por mí en Canva Traducido con la ayuda de DeepL
