Hello everyone... 🍫
Hello to my dear Hiver and dear #jewelry artist community, as always very pleased and excited to be here again, showing you my work made with lots of love and especially for you.
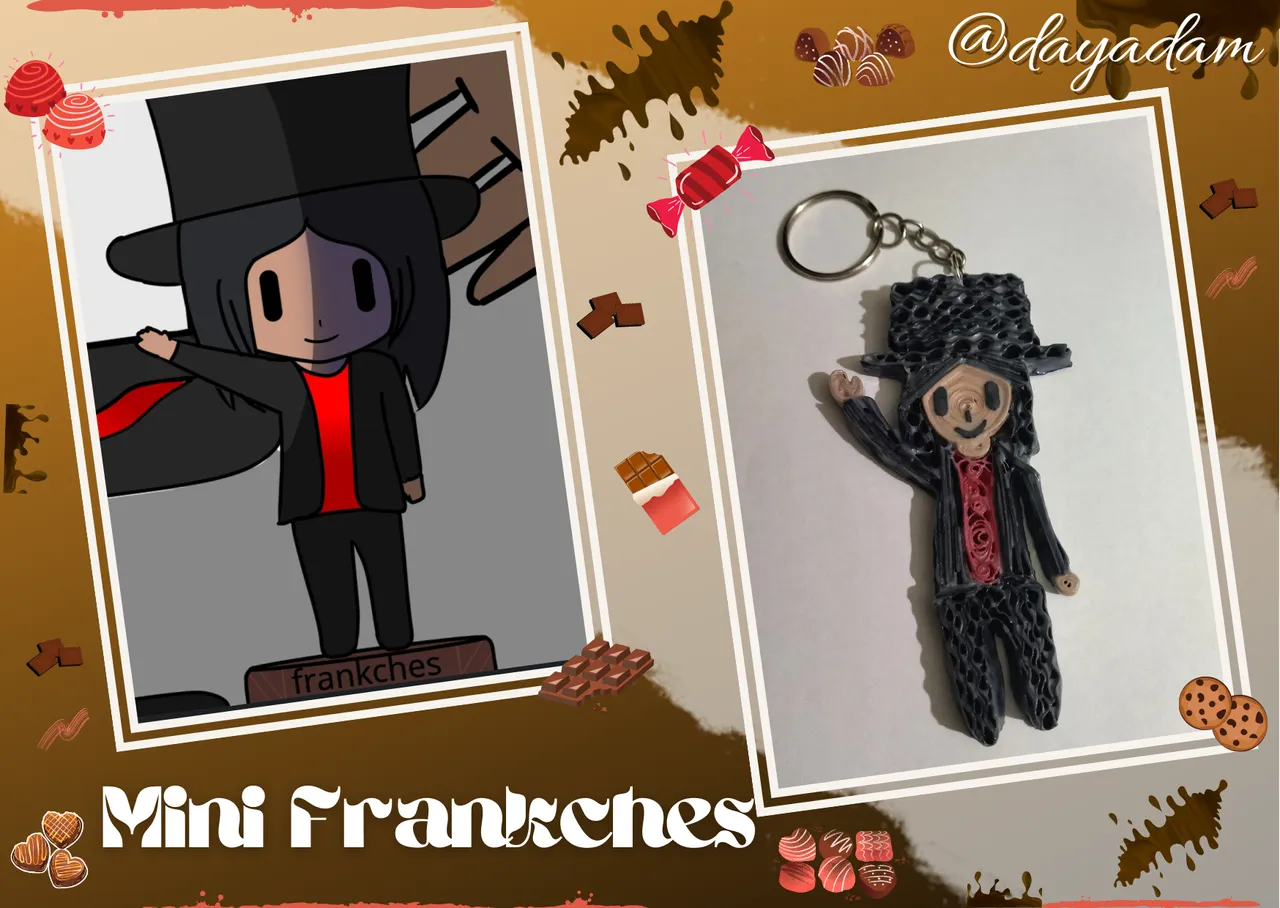
The work that I present today is something special, because it is a small detail for a person for whom I feel for a long time, admiration, affection, respect and a great appreciation, as you can see that cover full of sweets (because we all know that he likes them), is a keychain of the avatar of our friend @Frankches.
I had been working on this keychain for some time, I had it ready weeks ago, every Tuesday I wanted to present it, and due to life things it was delayed until finally today I finally have the opportunity to share it with you, and with the person to whom it is dedicated, who will listen to my words being present.
Talent can be focused in many ways, and it is not only the artistic part, for many things the human being must have talent, I know that what I am going to tell you in these brief words there are many people who will totally agree with me.
Frankches, you are a super talented person in so many aspects, you are a guy with beautiful feelings, you are very detailed (I have seen how you have dedicated a song created by you, or a drawing to a person), you reach out and support those who ask you for help, you make us smile with your witticisms, and in the artistic part not to mention, you are original, you have an overflowing creativity, and an incredible art in your hands, things that you should continue to exploit and give to all of us. Believe me you have a lot of potential and post to do.
I want you to keep in mind that you are a person of great value in our world of Hive, both for the platform and for many of us who belong here, I really want you to always keep this in mind because sometimes you yourself do not want to recognize that precious talent you have for so many things, so today I came to emphasize it, and recommend that you never forget it.
I hope you liked my little detail, and that at some point I can make it reach your hands, it is simply a token of admiration for a person who deserves it, your my dear Franchkes.
I would have a lot more to say, but I don't want to make a book in this publication, and I want other people to tell you (although they have already done it), so without further ado I leave you the creative process of this keychain that I made using the quilling technique.
Let's get started:😃

Hola a Todos...🍫
Hola a mis queridos Hiver y a la querida comunidad de artistas #jewelry, como siempre muy complacida y emocionada de encontrarme por acá nuevamente, mostrándole mi trabajo hecho con mucho amor y especialmente para ustedes.
El trabajo que les presento hoy es algo especial, ya que es un pequeño detalle para una persona por la cual siento desde hace mucho tiempo, admiración, cariño, respeto y un gran aprecio, como podrán ver esa portada llena de dulces (porque todos sabemos que le gustan), es un llaverito del avatar de nuestro amigo @Frankches.
Este llaverito llevaba algún tiempo ejecutándolo, lo tenía listo hace semanas, cada martes quería presentarlo, y por cosas de la vida se vino retrasando hasta que finalmente hoy día al fin tengo la oportunidad de compartirlo con ustedes, y con la persona a la cual va dedicado, que escuchara mis palabras estando presente.
El talento se puede enfocar de muchas maneras, y no solo es la parte artística, para muchas cosas el ser humano debe tener talento, sé que lo que te voy a decir en estas breves palabras hay muchas personas que van a estar totalmente de acuerdo conmigo.
Frankches, eres una súper talentosa persona en tantos aspectos, eres un chico con unos bonitos sentimientos, detallista (he visto como les has dedicado una canción creada por ti, o un dibujo a una persona), tiendes la mano y apoyas al que te pide ayuda, nos sacas una sonrisa con tus ocurrencias, y en la parte artística ni se diga, eres original, tiene una creatividad desbordante, y un arte en tus manos increíble, cosas que debes seguir explotando y regalándonos a todos nosotros. Créeme que tienes muchísimo potencial y post por hacer.
Quiero que tengas presente que eres una persona de gran valor en nuestro mundo de Hive, tanto para la plataforma, como para muchos que pertenecemos acá, de verdad deseo que mantengas siempre presente esto porque es así, a veces tú mismo no quieres reconocer ese preciado talento que tienes para tantas cosas, por ello hoy te lo vine a recalcar, y recomendar que nunca se te olvide.
Espero que mi pequeño detalle, te haya gustado, y que en algún momento pueda hacerlo llegar a tus manos, simplemente es una muestra de admiración hacia una persona que se lo merece, tu mi estimado Franchkes.
Tendría muchísimo más que decir, pero no quiero hacer un libro en esta publicación, y deseo que otras personas te lo digan (aunque ya lo han hecho), entonces sin más preámbulos les dejo el proceso creativo, de este llavero que lleve a cabo en la técnica de quilling.
Comencemos:😃

• Cartulina blanca que tengan sobrante.
• Cartulina negra.
• Lápiz.
• Cintas de quilling, blanco, negro, rojo de 6mm de ancho.
• Pintura al agua, color piel.
• Pinceles.
• Regla.
• Aguja para quilling.
• Aguja punta gruesa.
• Tijera normal y punta fina.
• Pega blanca extra fuerte (de carpintería).
• Alicate punta fina.
• Argolla de bisutería mediana.
• Argolla con cadena para llavero.
- White cardboard that you have leftover.
- Black cardboard.
- Pencil.
- Quilling ribbons, white, black, red, 6mm wide.
- Water-based paint, skin color.
- Paintbrushes.
- Ruler.
- Quilling needle.
- Thick needle.
- Normal scissors and fine point.
- Extra strong white glue (carpentry glue).
- Fine nose pliers.
- Medium size costume jewelry ring.
- Ring with chain for key ring.

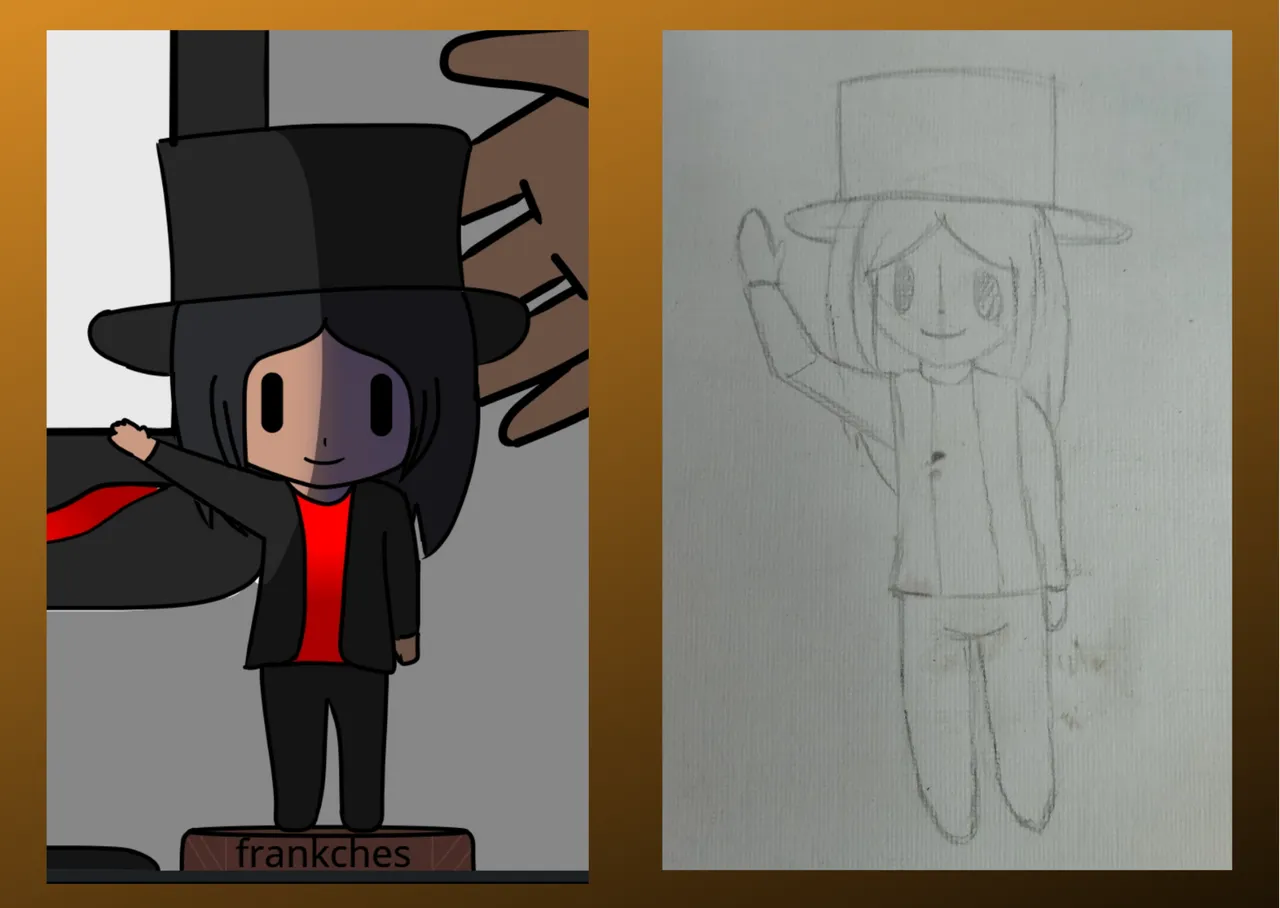
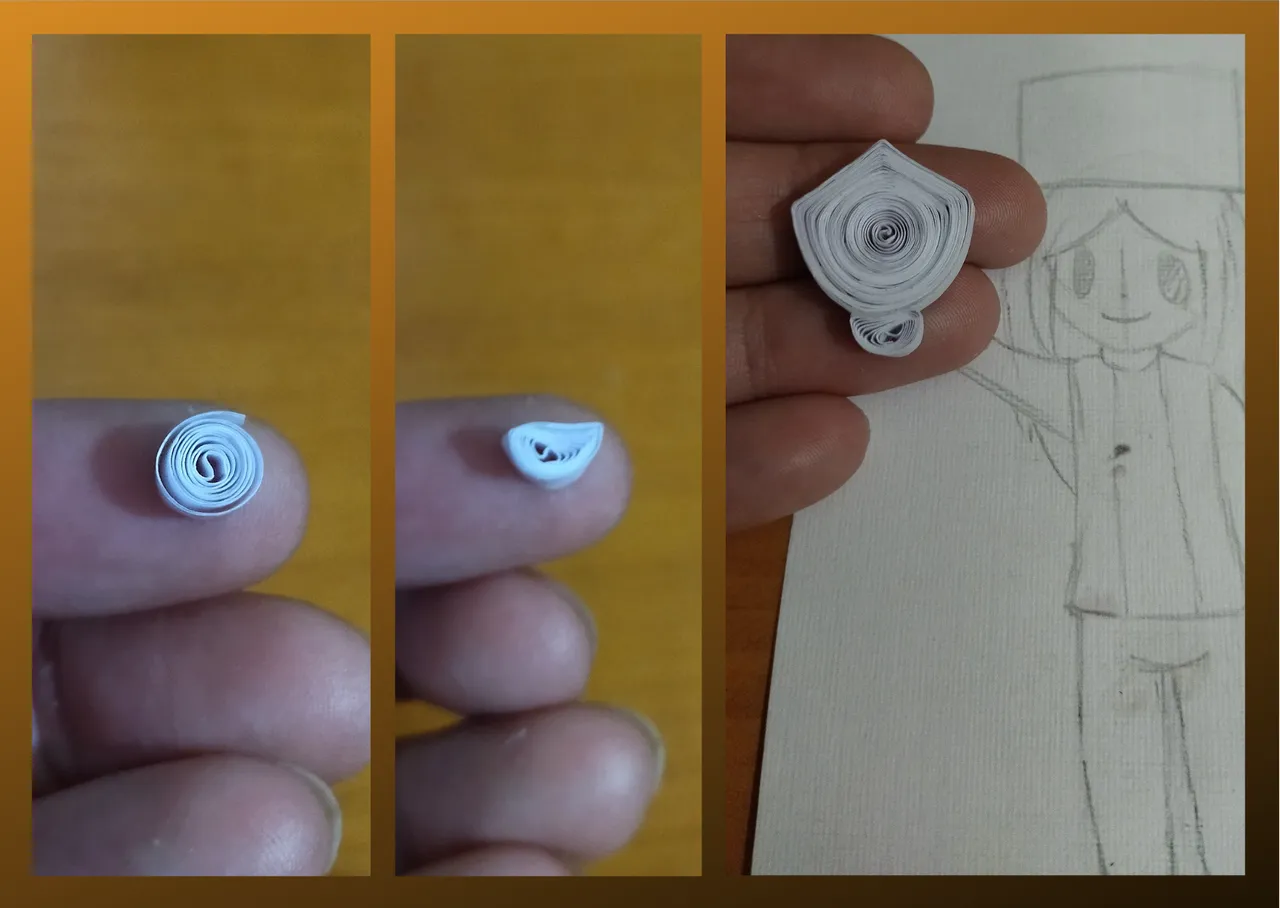
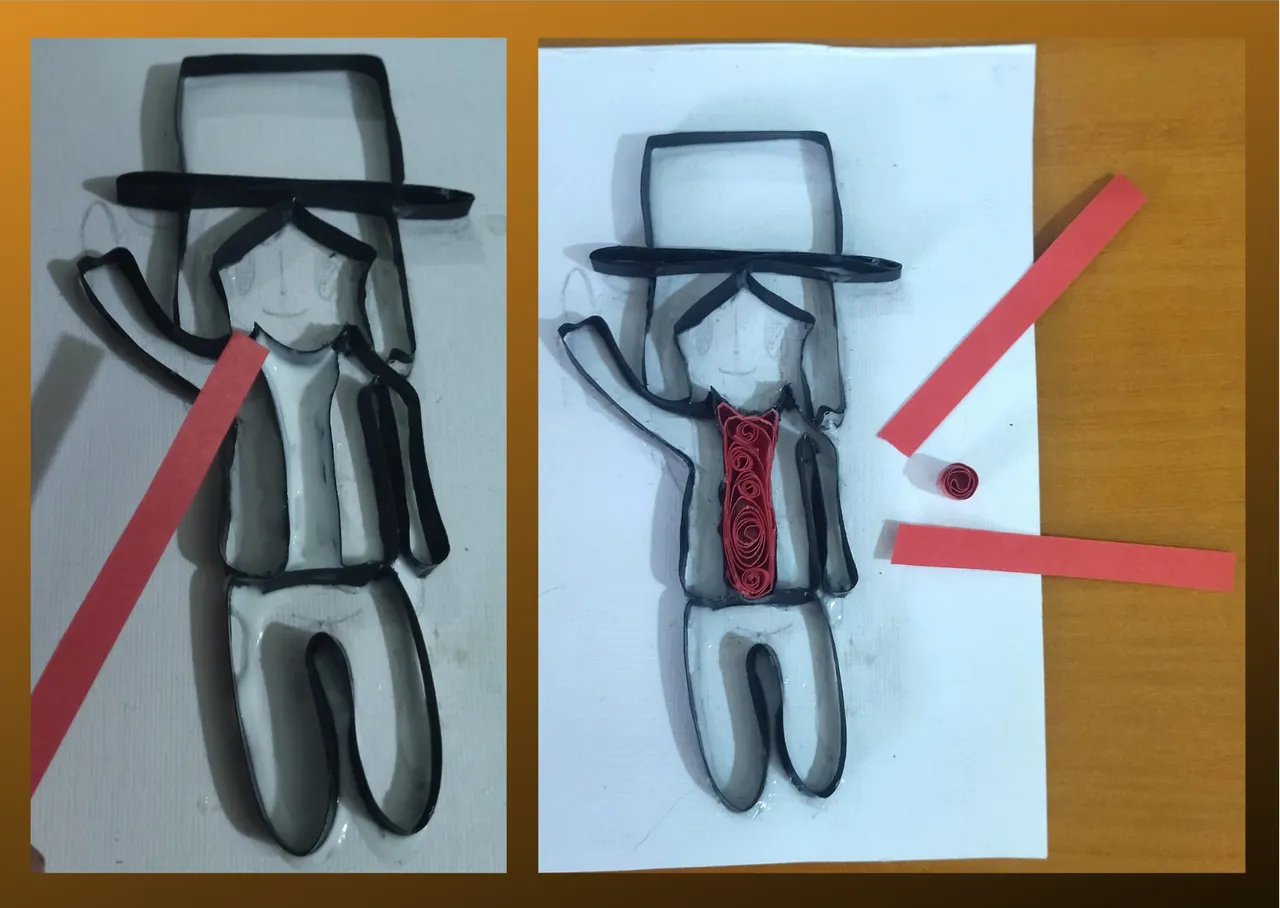
- Let's start by taking a piece of white cardboard, in it my daughter @shinfxx helped me and made the sketch of the mini @ Frankches, which I will use as a mold to make the keychain I want to do, my daughter used as a reference a drawing made by Frankches in one of his post, here I leave the link.
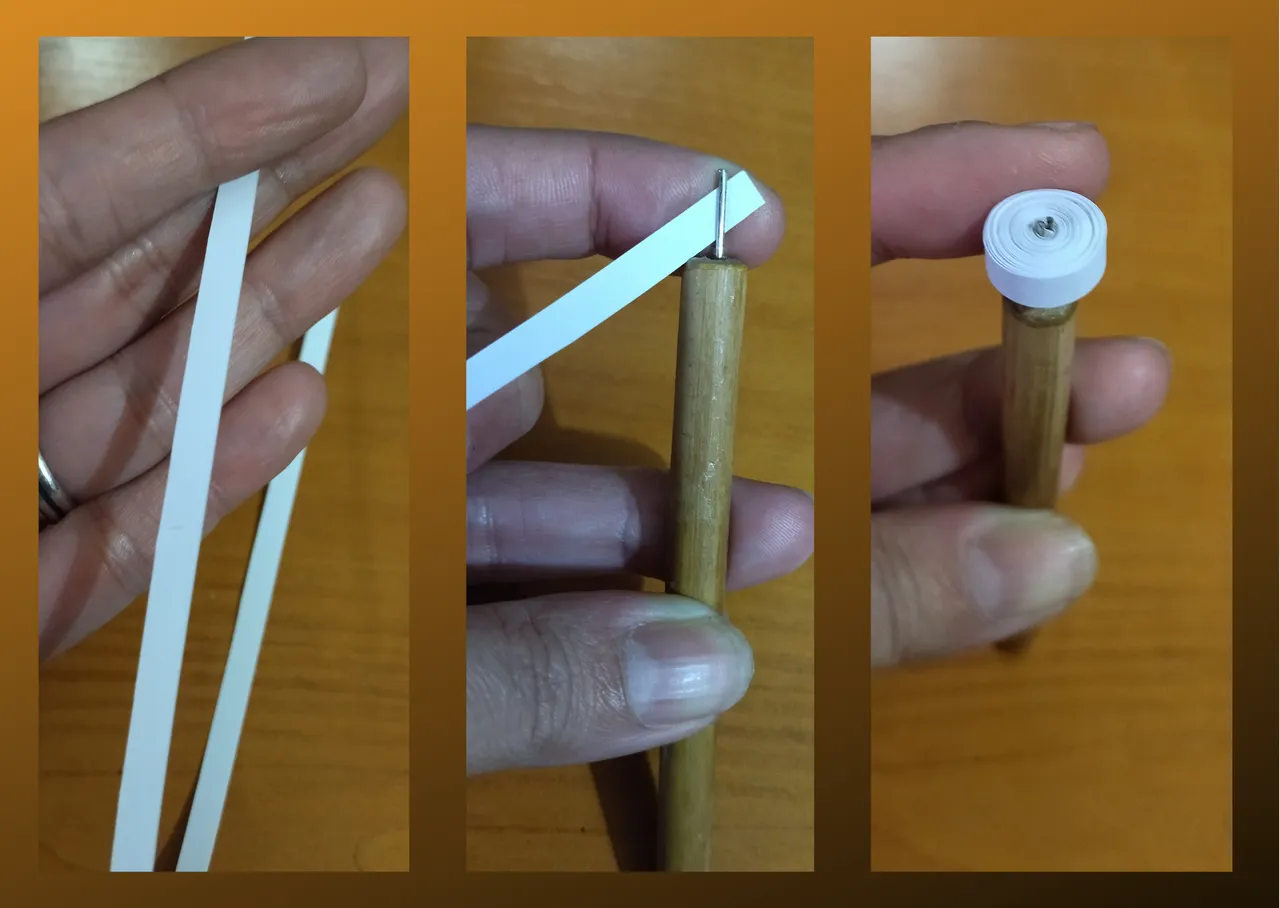
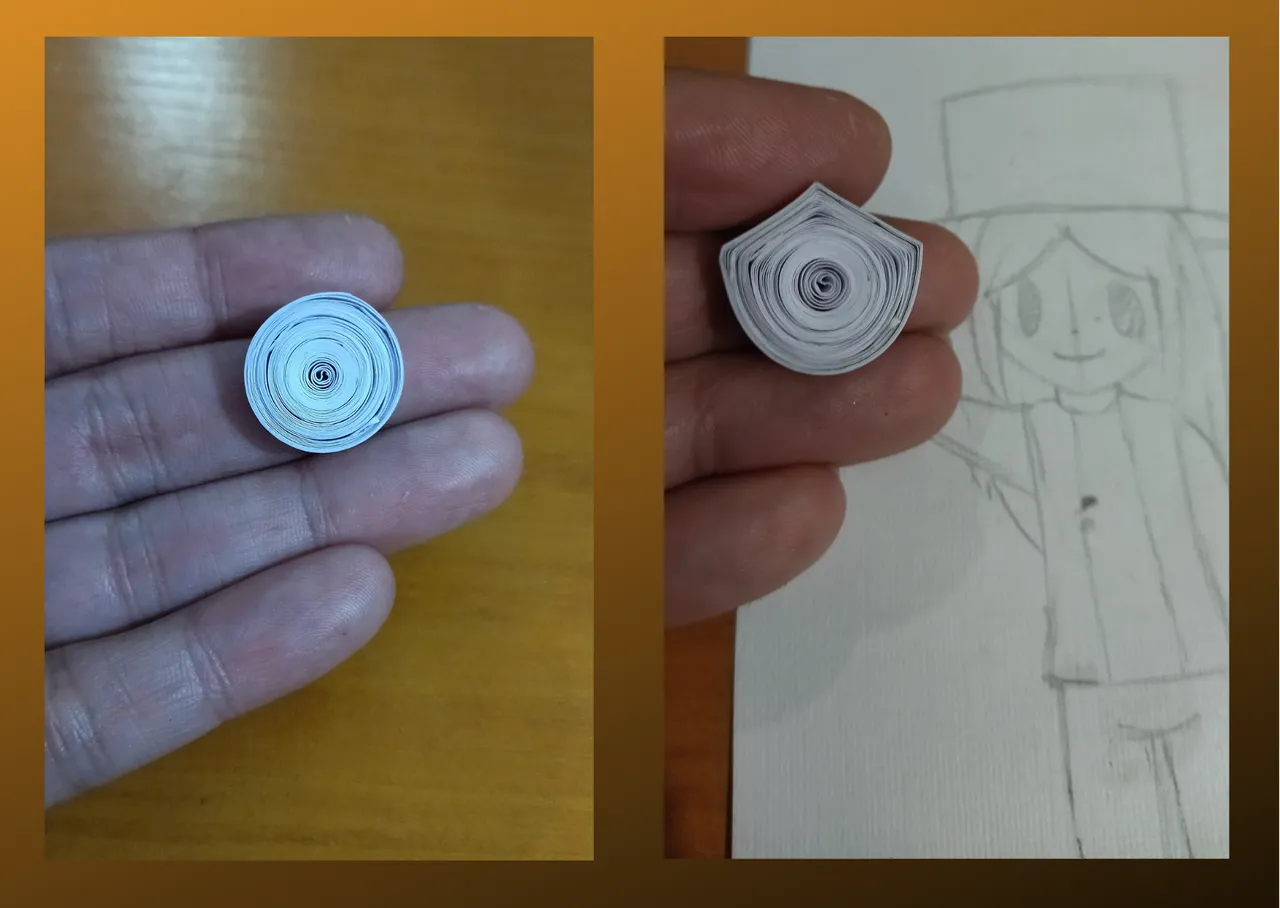
- Once the drawing is done we are going to make some figures to fill in, we start by taking white quilling tape 6mm wide, we roll it with the quilling needle until the end to form an open circle, we will seal it with white glue, we will mold this circle and use it for the face.
- We take another small piece of white ribbon, we roll it with the needle, when we finish the small circle, we will mold it to form the neck, this piece we will join it to the one of the face.
- Let's go with our hands, we will make two figures or circles with the white ribbons, and mold them according to the ones we will need. As I didn't have any skin color ribbon, I chose to use white, once the pieces of the head, neck and hands were ready, I painted them with skin colored water paint and let them dry very well.

• Vamos a comenzar tomando un trozo de cartulina blanca, en ella mi hija @shinfxx me colaboro y realizo el boceto del mini @ Frankches, el cual utilizare como molde para elaborar el llavero que deseo hacer, mi hija utilizo como referencia un dibujito realizado por Frankches en uno de sus post, por acá les dejo el link.
• Hecho el dibujo vamos a realizar unas figuras para rellenar, comenzamos tomando cinta de quilling color blanco de 6mm de ancho, enrollamos con la aguja para quilling hasta el final para formar un circulo abierto, sellaremos con pega blanca, este círculo lo moldearemos y usaremos para la cara.
• Tomamos otro pequeño trozo de cinta blanca enrollamos con la aguja, al terminar el pequeño círculo, moldearemos para formar el cuello, esta pieza la uniremos a la de la cara.
• Vamos con las manos, haremos dos figuras o círculos con las cintas blancas, y moldearemos acorde a las que necesitaremos. Como no tenía cinta de color piel opte por utilizar blanca, una vez lista las piezas de la cabeza, cuello y manos, las pinte con pintura al agua color piel, y deje secar muy bien.

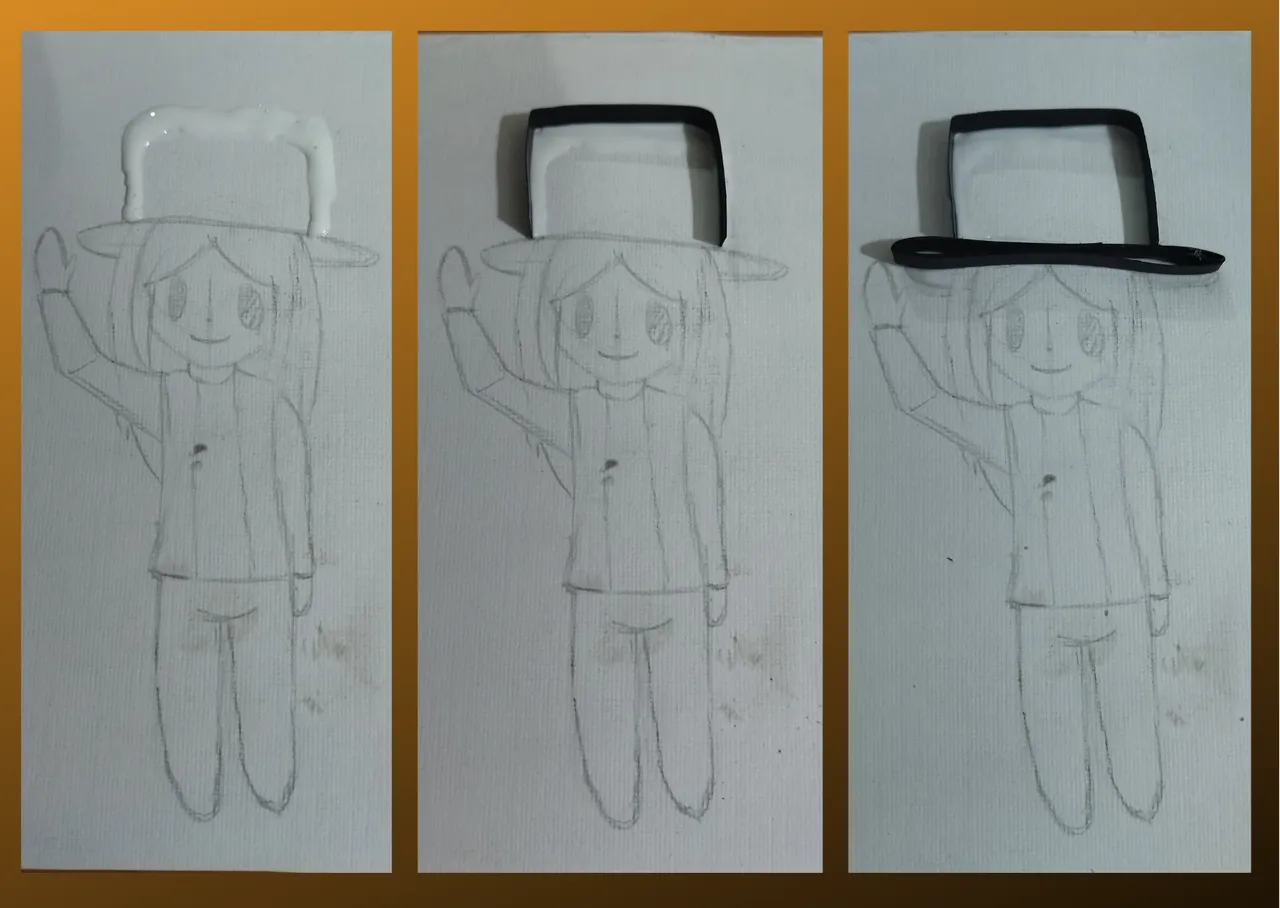
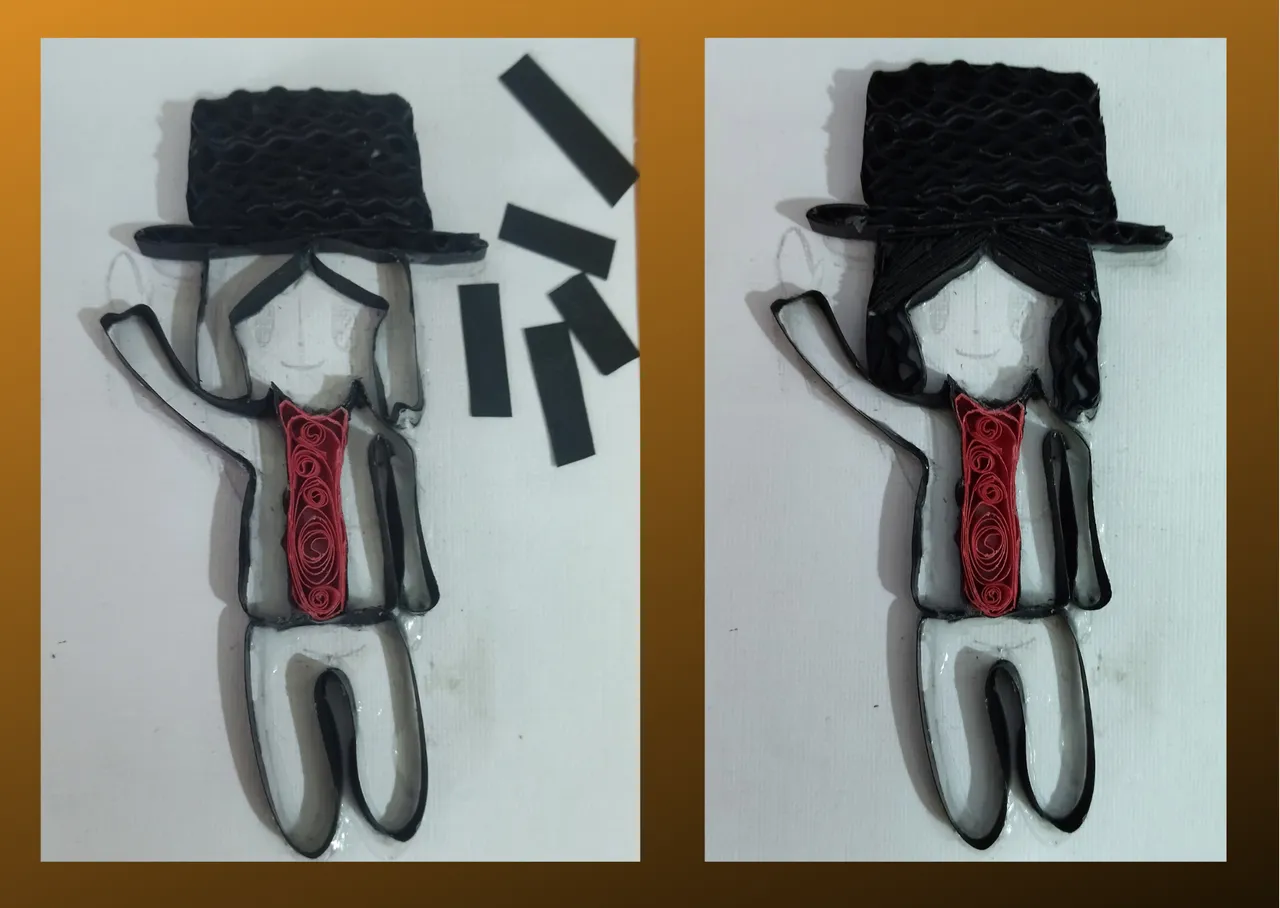
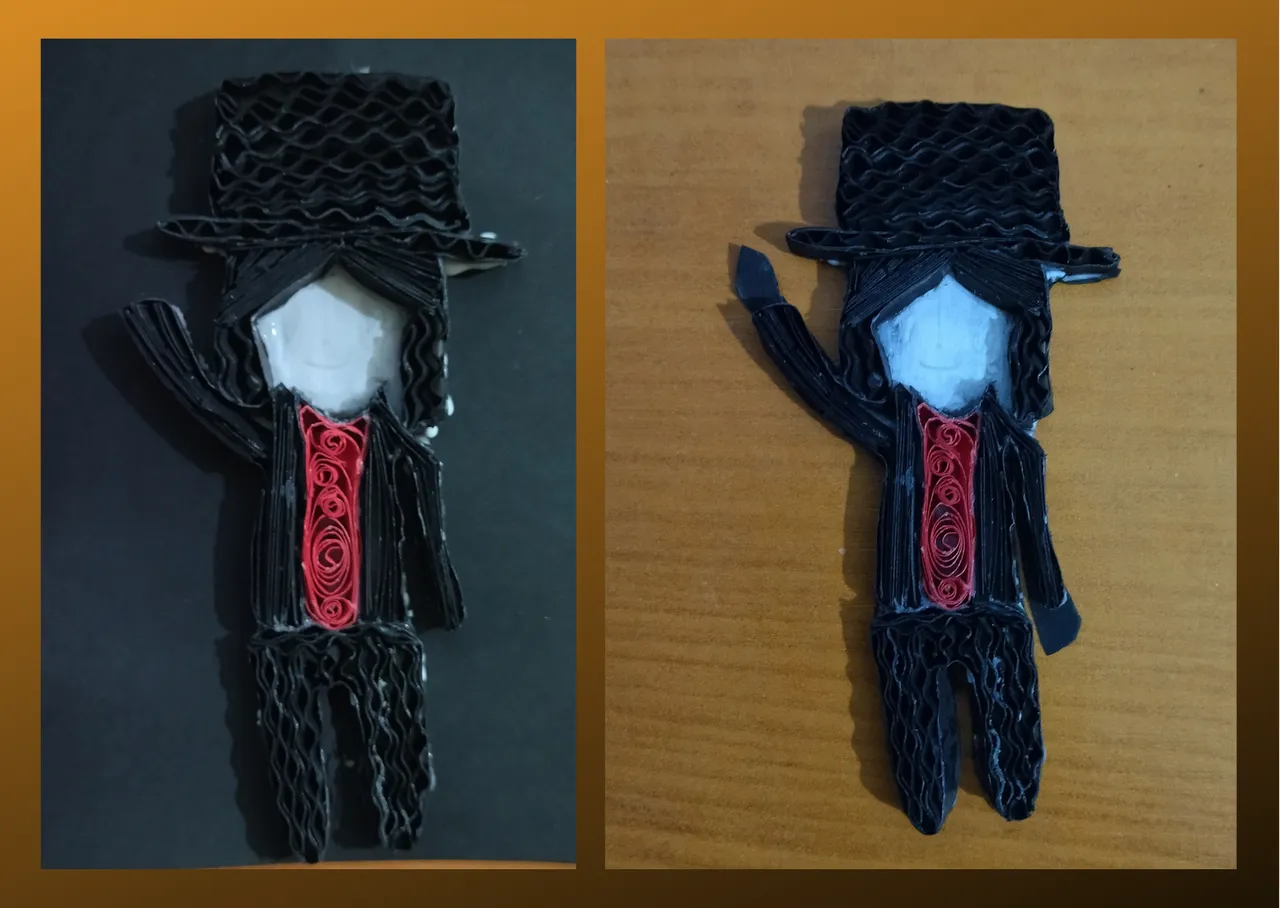
- Now we will proceed to border our mold, I will place 6mm wide black quilling tape around it, with extra strong white glue let it dry a little and then place the tape letting it dry well so that it does not run, we can help us with a fine tip tweezers.
- When the border is finished, I will proceed to fill, I will start with the central part that corresponds to the flannel in red, placing quilling tape 6mm wide, you can mold it to fill the way you want, making various figures or simply fill with ribbons in a linear manner with different sizes, just let your imagination fly.
If you want some ideas on how to fill any mold you want to make, here is a link of a post I made where you will get in more detail, how to make several basic quilling figures.
• Ahora vamos a proceder a bordear nuestro molde, le colocare cinta de quilling color negro de 6mm de ancho alrededor, con pega blanca extrafuerte dejo secar un poco y luego coloco la cinta dejando secar bien para que no se corra, nos podemos ayudar con una pinza punta fina.
• Al terminar el borde, procederé a rellenar, comenzare por la parte central que corresponde a la franela en color rojo, colocando cinta de quilling de 6mm de ancho, puedes moldearla para rellenar de la forma que desees, haciendo diversas figuras o simplemente rellenar con cintas de manera lineal con diferentes tamaños, solo hay que dejar volar la imaginación.
Si quieres algunas ideas de como rellenar cualquier molde que desees realizar, por acá te dejo un link de un post que elabore donde conseguirás con más detalle, como hacer diversas figuras básicas de quilling.
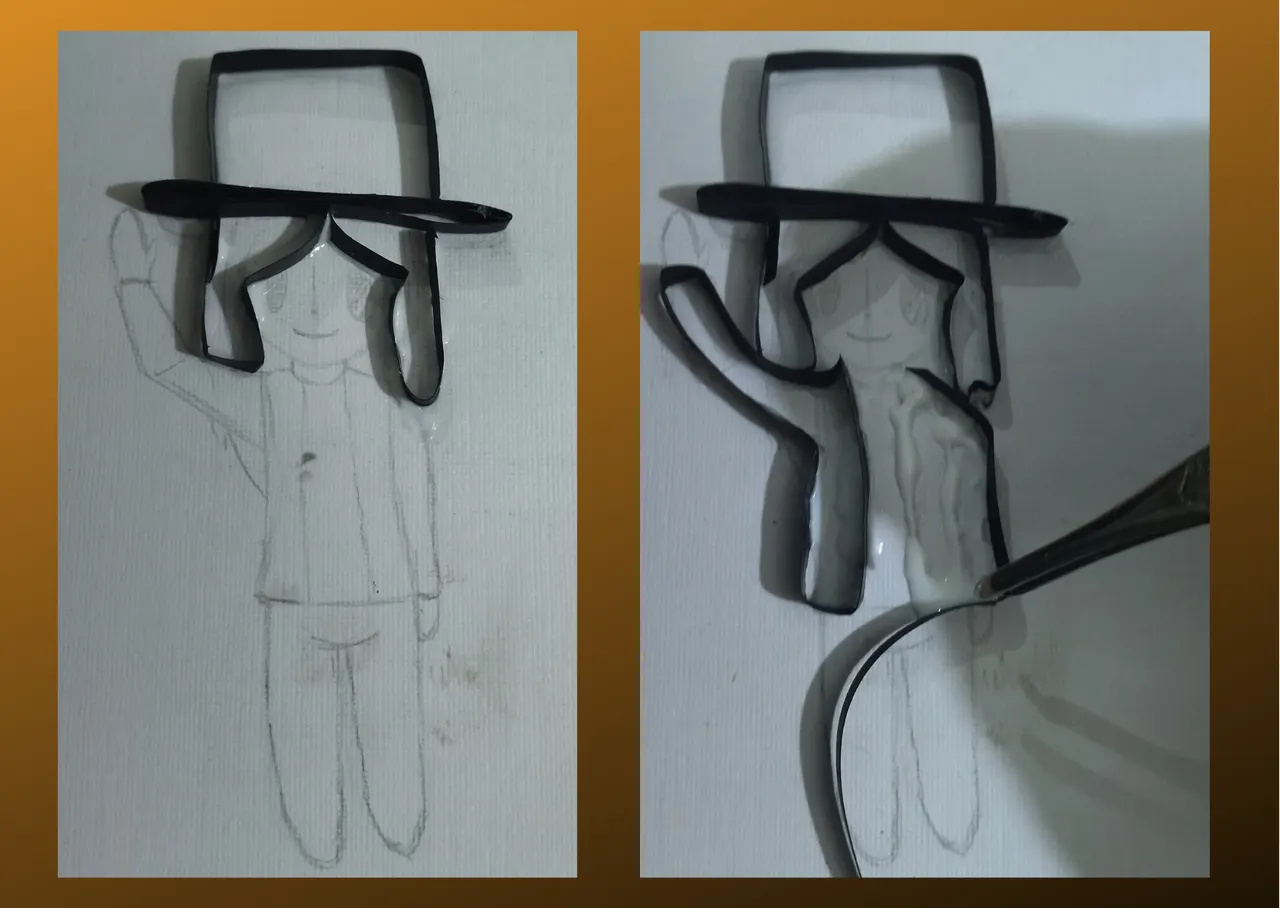
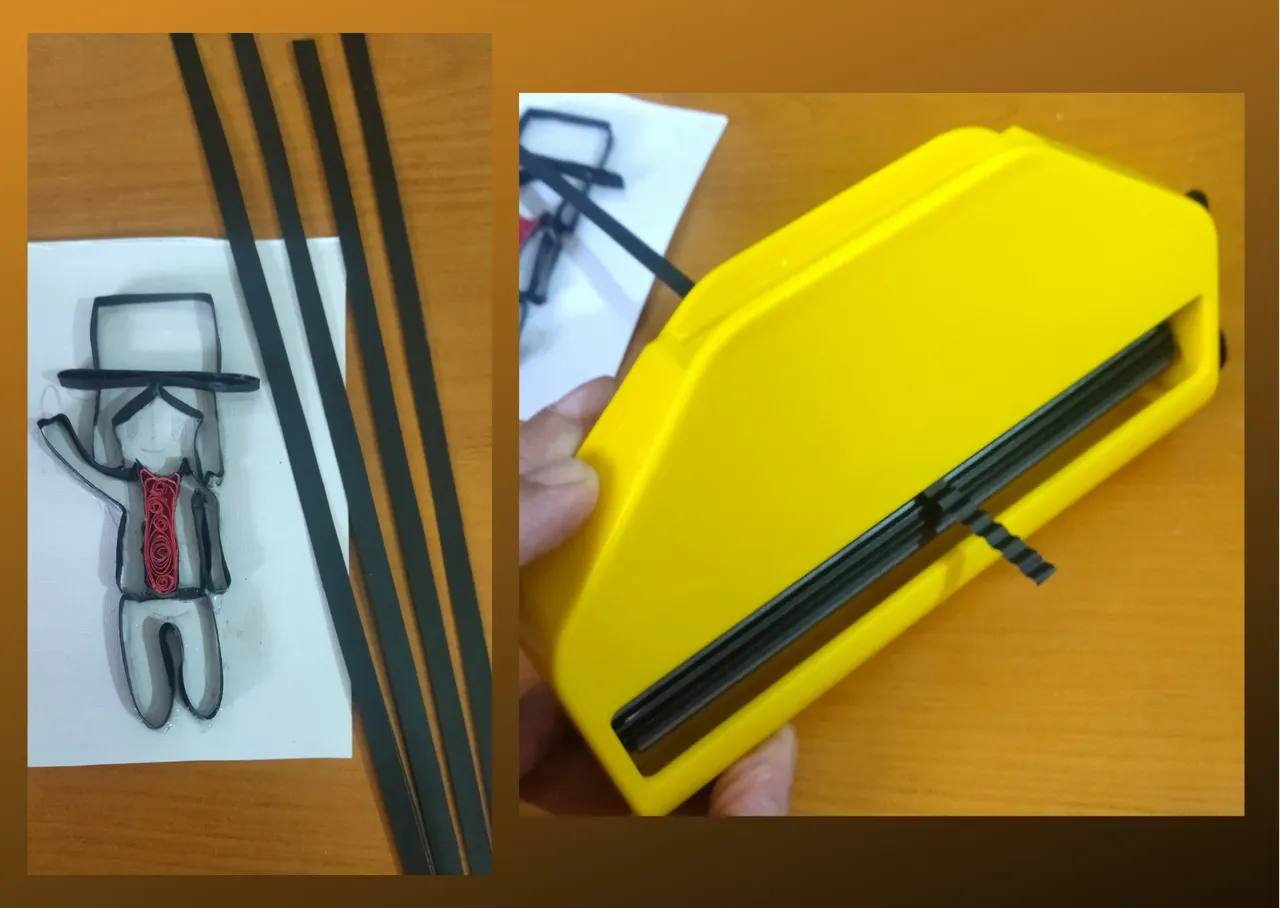
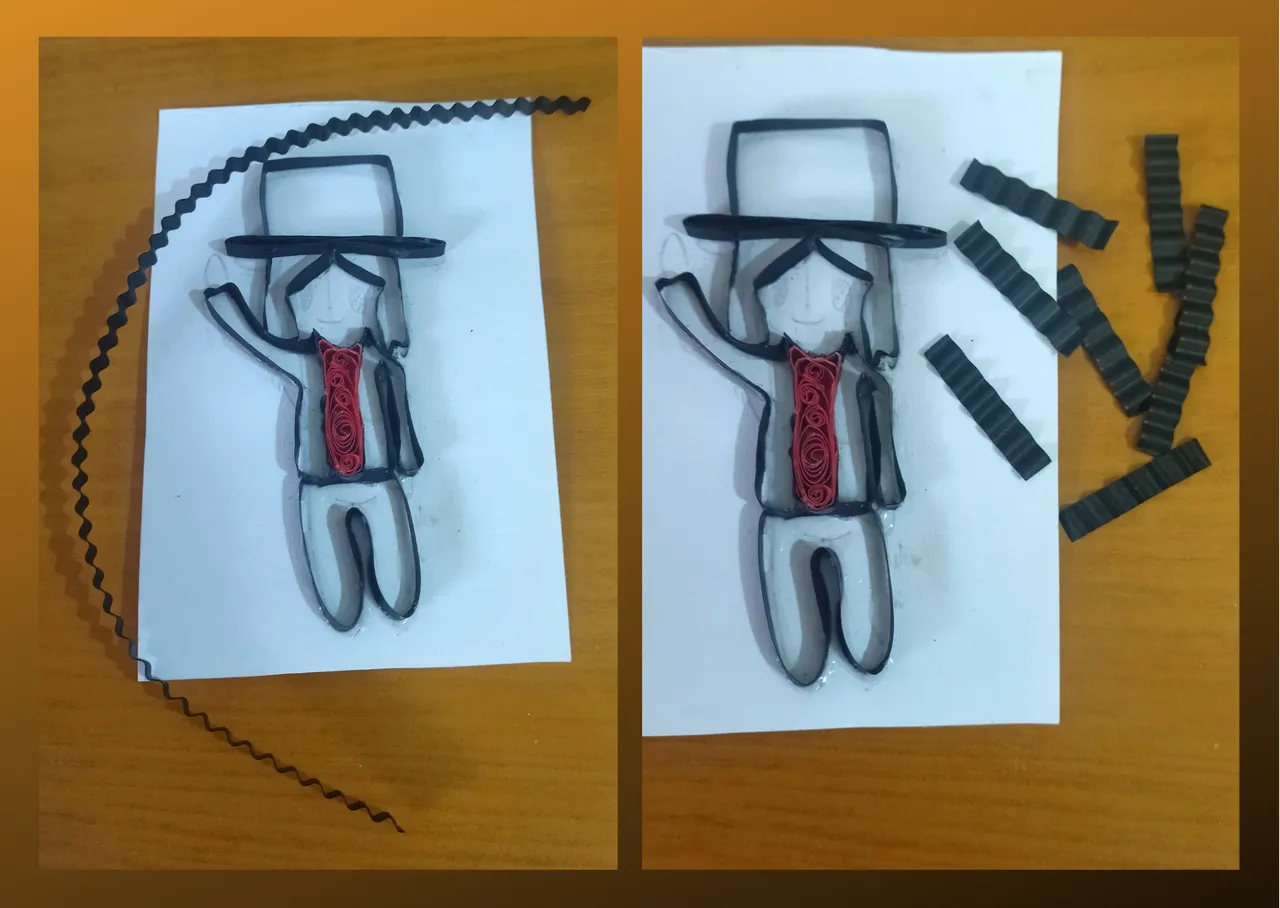
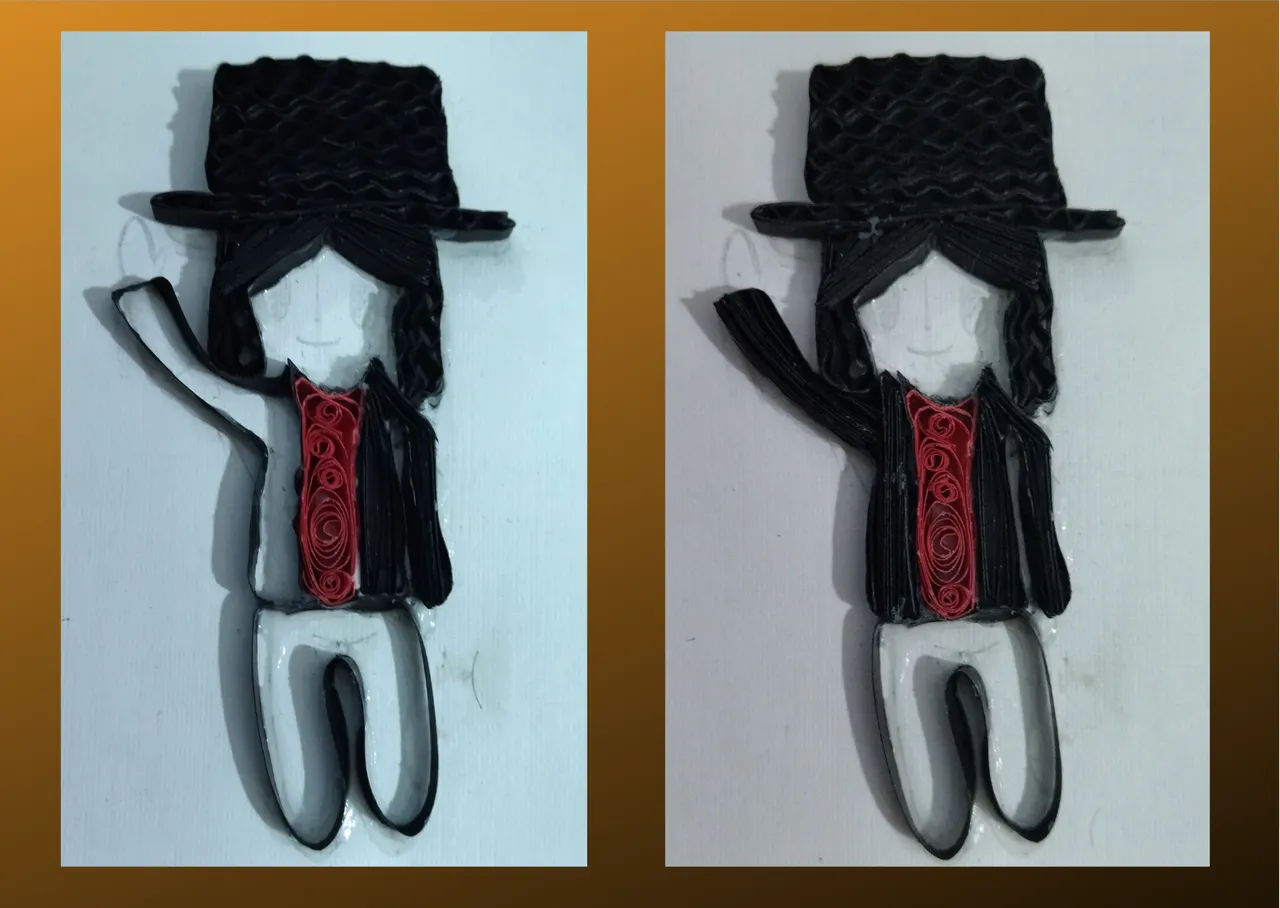
- Now I will proceed to fill the hat, as I have a machine to corrugate ribbons, pass a black ribbon through it and with pieces of this I will decorate the hat, as I said before you can do it as you like.
- To fill the remaining parts like the hair, and clothes I will use pieces of mixed tapes, linear, corrugated, in the process I will decide.
• Ahora voy a proceder a rellenar el sombrero, como cuento con una máquina para corrugar cintas, pase una cinta negra por la misma y con trozos de esta adornare el sombrero, como dije anteriormente puedes hacerlo como gustes.
• Para rellenar las partes restantes como el cabello, y ropa usare trozos de cintas mixtas, lineales, corrugadas, en el proceso voy decidiendo.
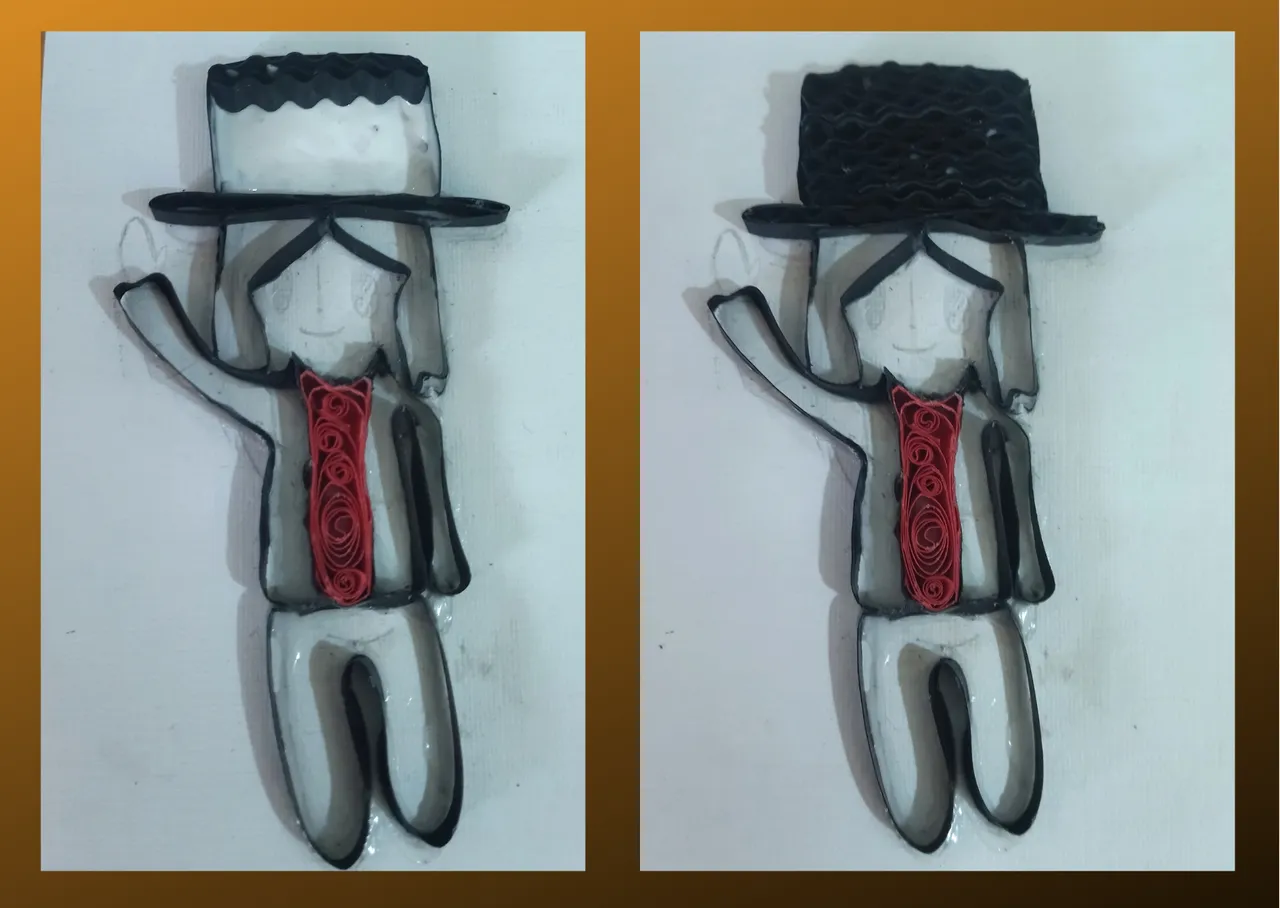
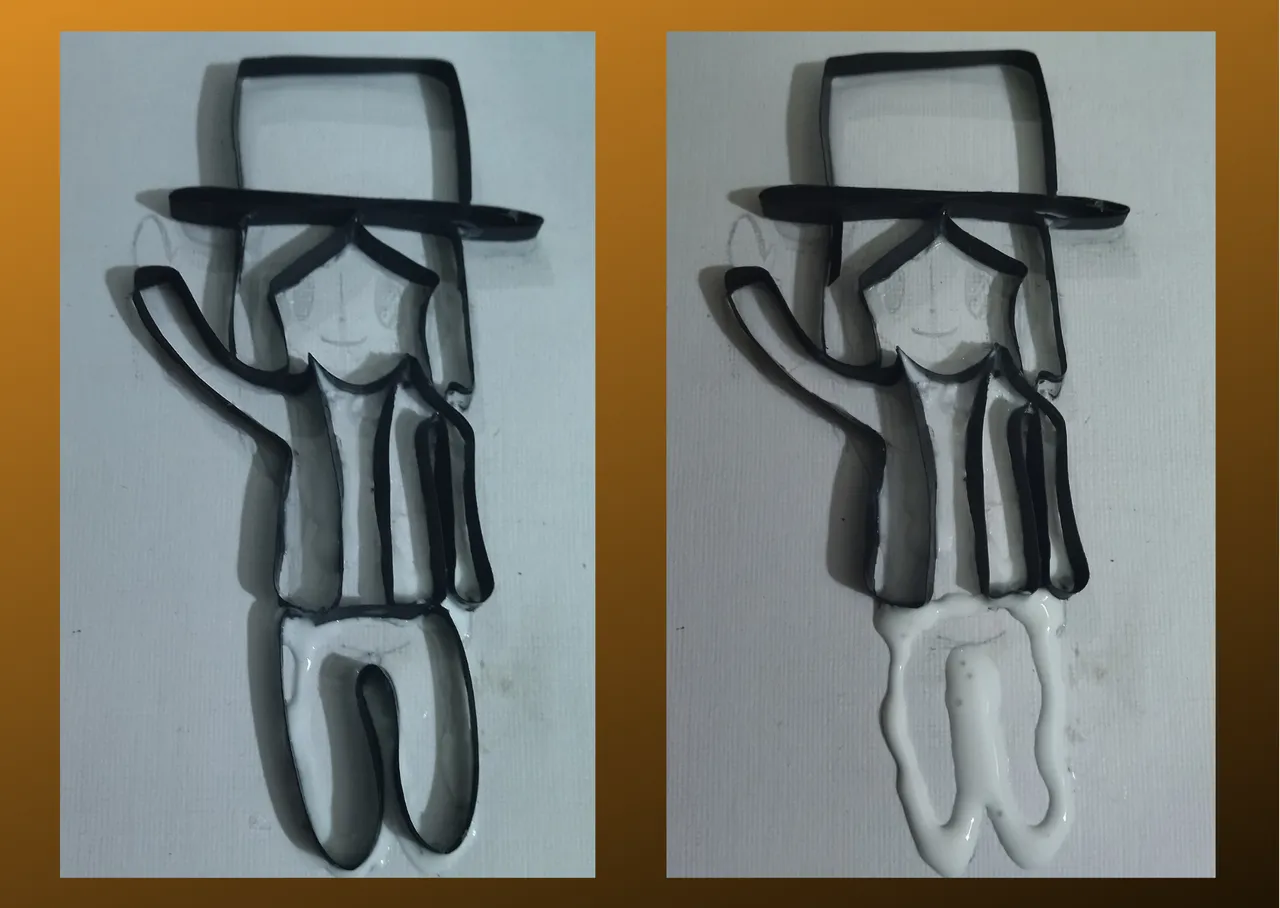
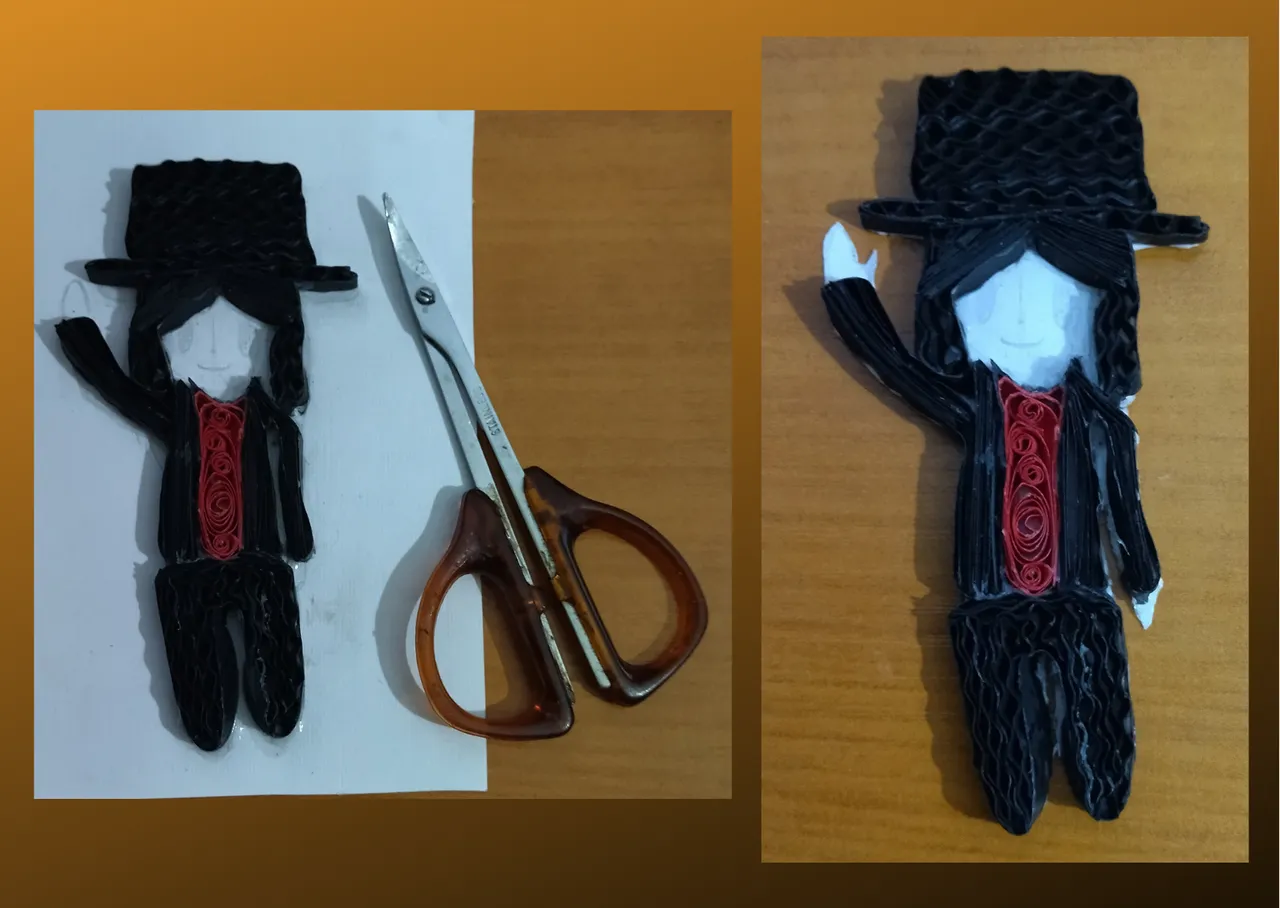
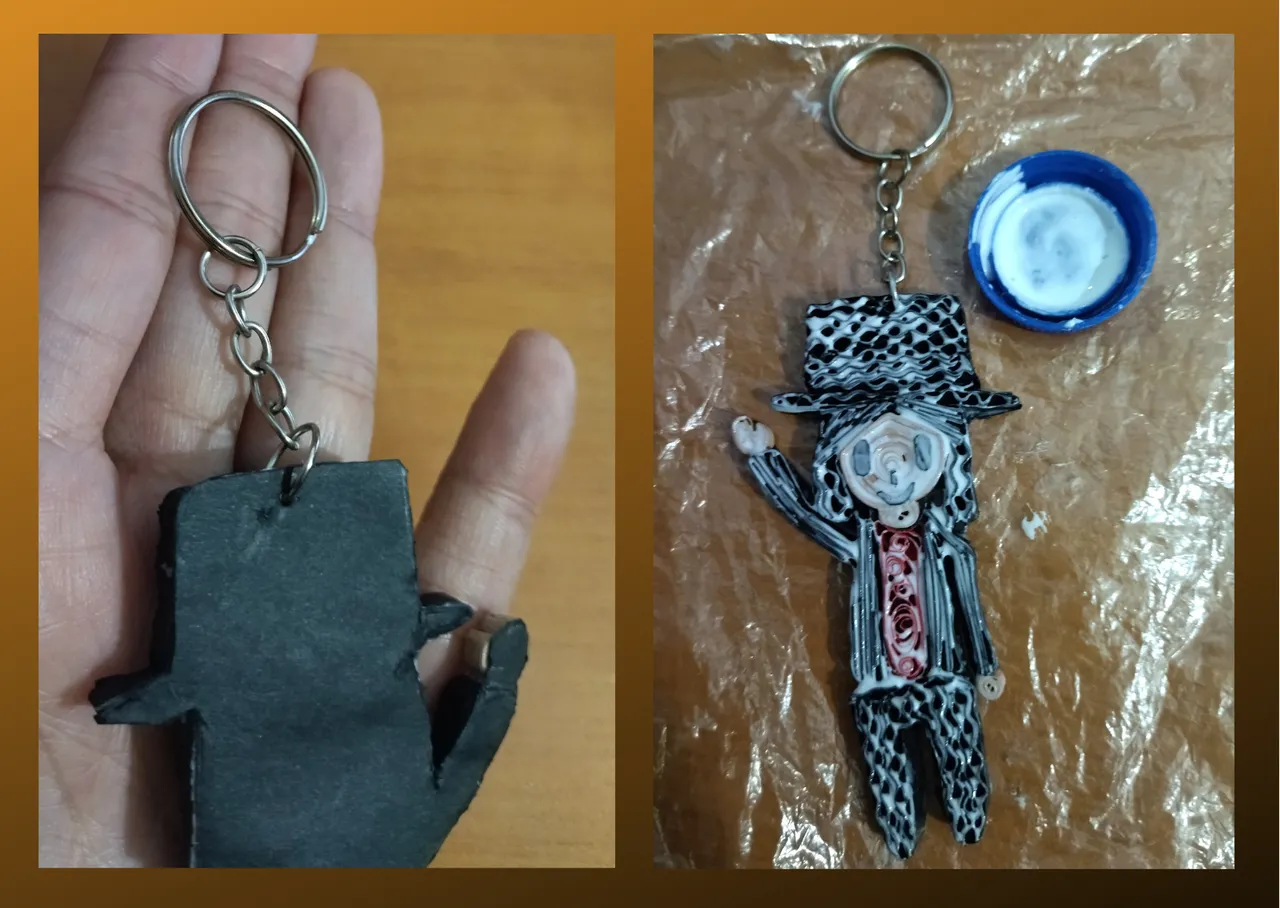
- At this point, before continuing to place the other pieces and details that are missing, I am going to cut the piece with a fine tip scissors, removing all the excess white cardboard.
- We take a piece of black cardboard and we are going to glue the piece we just cut out, trimming the excess again. While I was working I didn't have black cardboard and that's why I made the mold with white, I had planned to paint the back with black water paint, but in the process I got my hands on a piece of black cardboard that my daughter bought for a job, it came in handy, since I also used strips of it to fill the mini Frankches keychain, everything that arrives must be used hahahaha.
- Let's glue the remaining elements that we had reserved, face and hands.
• Llegado a este punto antes de continuar colocando las demás piezas y detalles que faltan, voy a recortar la pieza con una tijera punta fina, retirando todo el exceso de cartulina blanca.
• Tomamos un trozo de cartulina negra y vamos a pegar la pieza que acabamos de recortar, recortaremos nuevamente el excedente. Mientras que trabajaba no contaba con cartulina negra y por eso hice el molde con blanca, tenía pensado al finalizar pintar con pintura al agua negra la parte de atrás, pero en el proceso llego a mis manos un trozo de cartulina negra que compro mi hija para un trabajo, me vino como anillo al dedo, ya que use también tiras de allí para rellenar el llavero mini Frankches, todo lo que llegue hay que utilizarlo jajajaja.
• Vamos a pegar los elementos restantes que teníamos reservados, cara y manos.

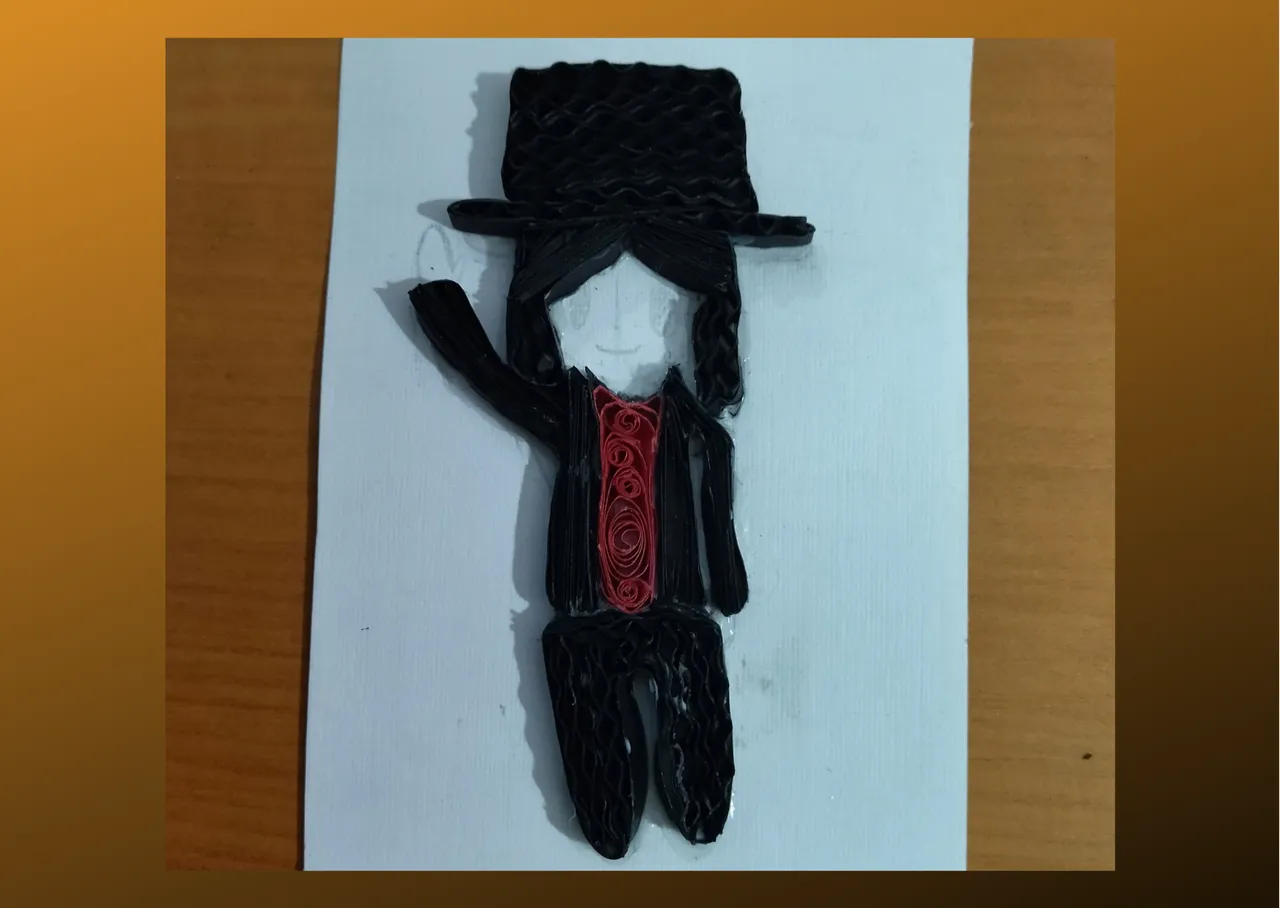
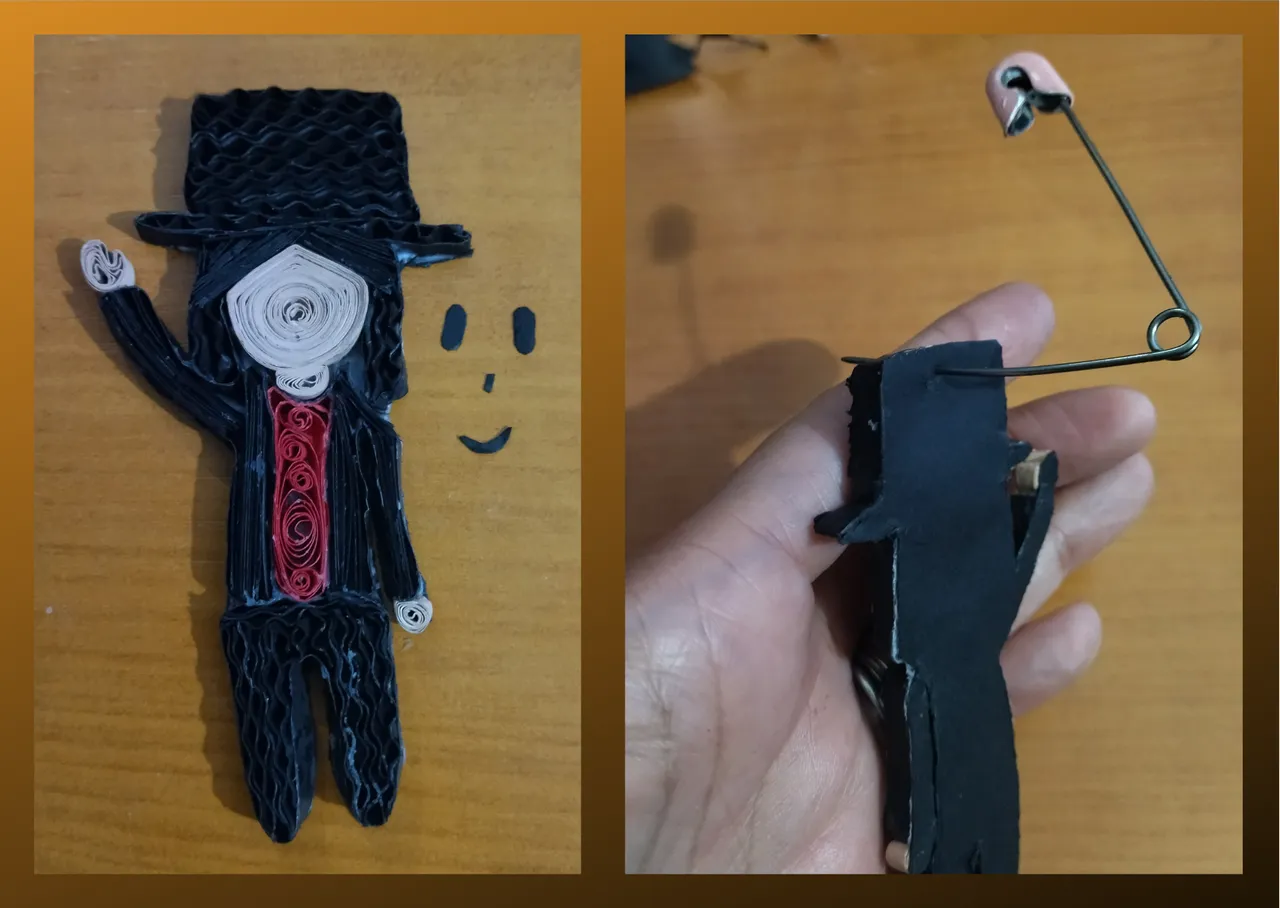
- With a small piece of black cardboard make the eyes, nose and mouth, glue them to the face.
- With a pin or thick needle, make a hole in the top of the hat, there will be the ring of the keychain, I will place it at once.
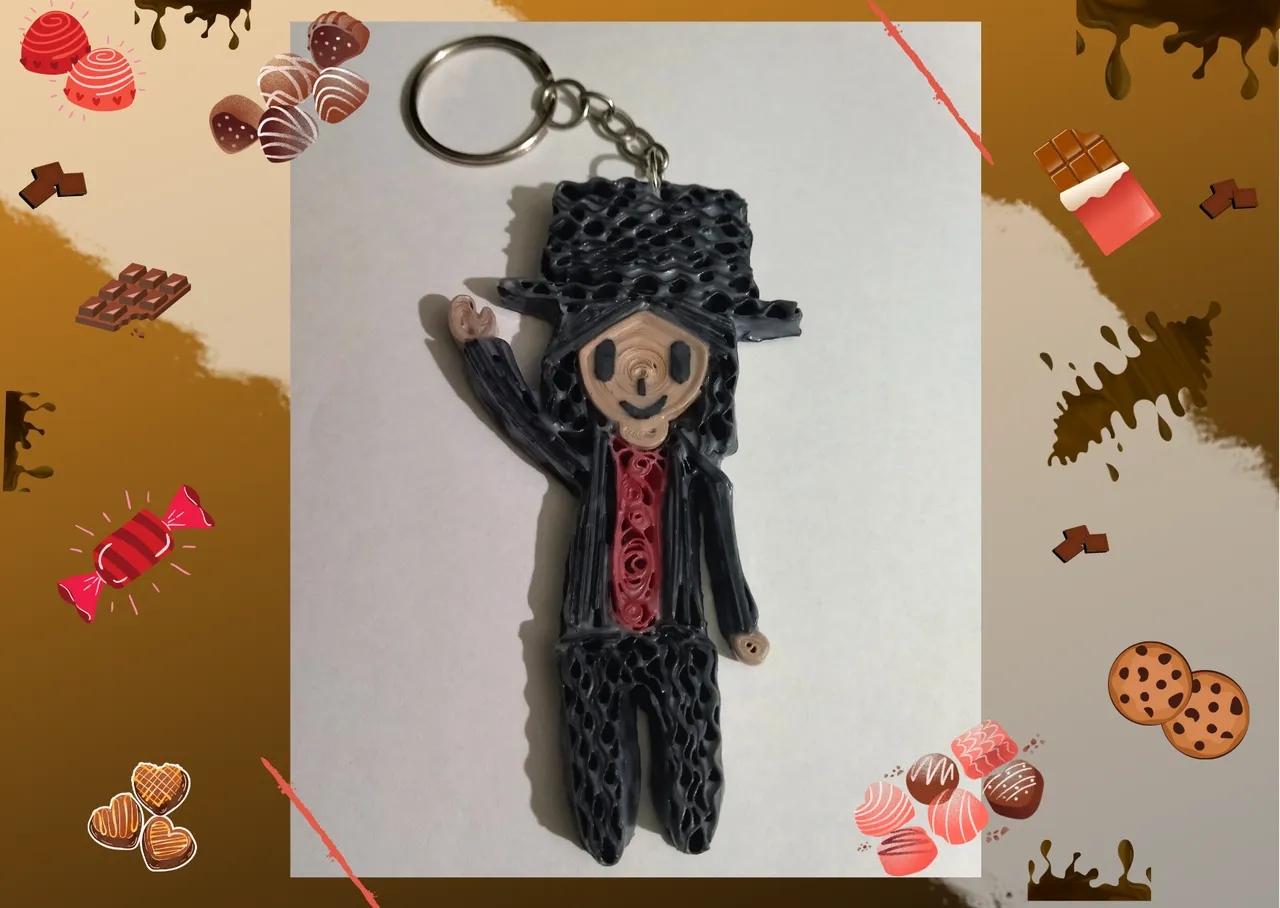
- Finally I will protect the key ring by applying with a brush several layers of extra strong white glue, letting it dry very well between one layer and another.
This way is ready the mini Frankches keychain that with much affection I made for my admired friend Frankches 🍫
• Con un pequeño trozo de cartón negro realice los ojos, nariz y boca, los pegue de la cara.
• Con un alfiler o aguja punta gruesa, realice un agujero en la parte de arriba del sombrero allí ira la argolla del llavero, la colocare de una vez.
• Por ultimo protegeré el llavero aplicando con un pincel varias capas de pega blanca extra fuerte dejando secar muy bien entre una capa y otra.
De esta manera está listo el llavero mini Frankches que con mucho cariño realice para mi admirado amigo Frankches 🍫

What did you think, did you like it?
I hope you did, I hope you liked my explanation, procedure and photos, I made them with love for you.
"Let out that muse that inspires you, and let your imagination fly".
Thank you all, see you next time. 🍫
¿Que les pareció, les gustó?
Espero que sí, que les haya gustado mi explicación, procedimiento y fotos, los hice con mucho cariño por y para ustedes.
"Deja salir esa musa que te inspira, y deja volar tu imaginación".
Gracias a todos, nos vemos en la próxima. 🍫
Los invito que apoyen a "La Colmena", dale tu voto ✨
 Vote la-colmena for witness By @ylich
La mayoría de las fotos usadas en este post son de mi autoría y han sido sacadas en mi celular personal , menos una de las imágenes de portada y del proceso creativo, en las que deje la fuente de donde fue tomada. Mi trabajo fotográfico fue editado en Canva Banner y separador hecho por mí en Canva Traducido con la ayuda de DeepL
