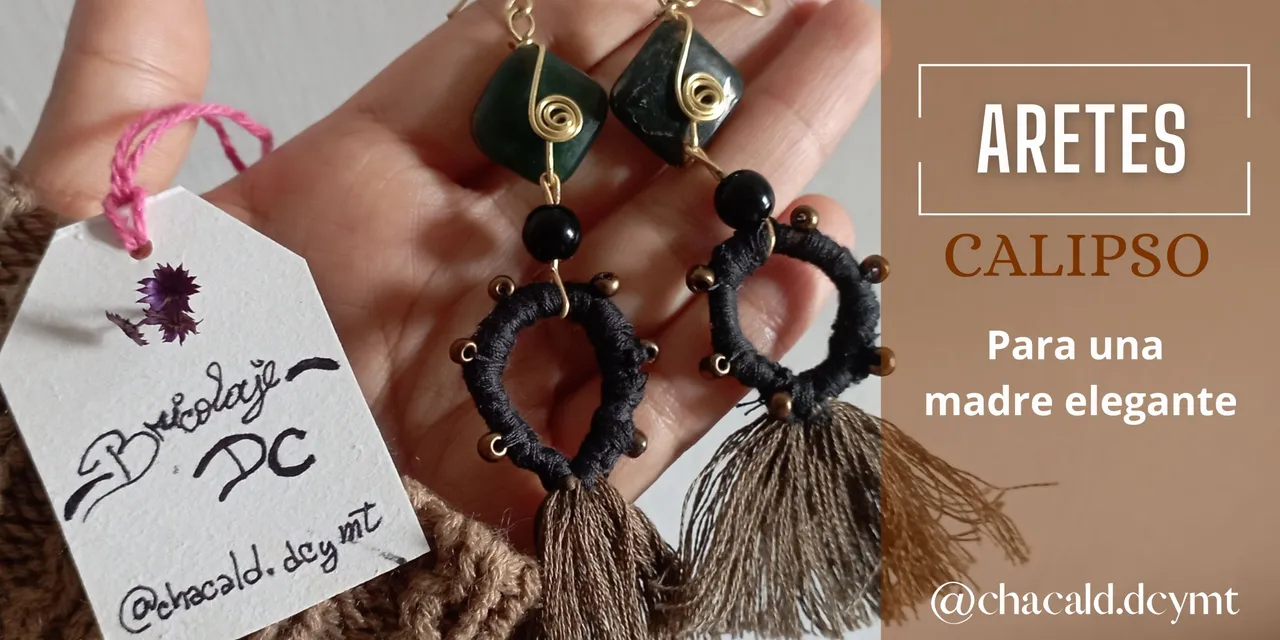
¡Saludos amigos amantes de las artes manuales! Hoy me gustaría compartir con ustedes el proceso de elaboración de un juego de aretes con varios materiales que me encantan: hilo de bordar, alambrismo y piedras. He llamado a este diseño Calipso y es dedicado cariñosamente a una madre muy especial, porque en esta época, además de homenajear a nuestra madre, podemos hacer detalles y regalar a esas madres ejemplares que nos inspiran. Este regalo es para @lileisabel.
Greetings friends who love handmade crafts! Today I would like to share with you the process of making a set of earrings with several materials that I love: embroidery thread, wire wrap and stones. I have called this design Calypso and it is lovingly dedicated to a very special mother, because in this season, in addition to honoring our mother, we can make details and give gifts to those exemplary mothers who inspire us. This gift is for @lileisabel.
En otras oportunidades he trabajado con este hilo de bordar y me encanta el resultado, también es muy fácil de manejar. Acompáñenme y les enseño este sencillo diseño en joyería #DIY.
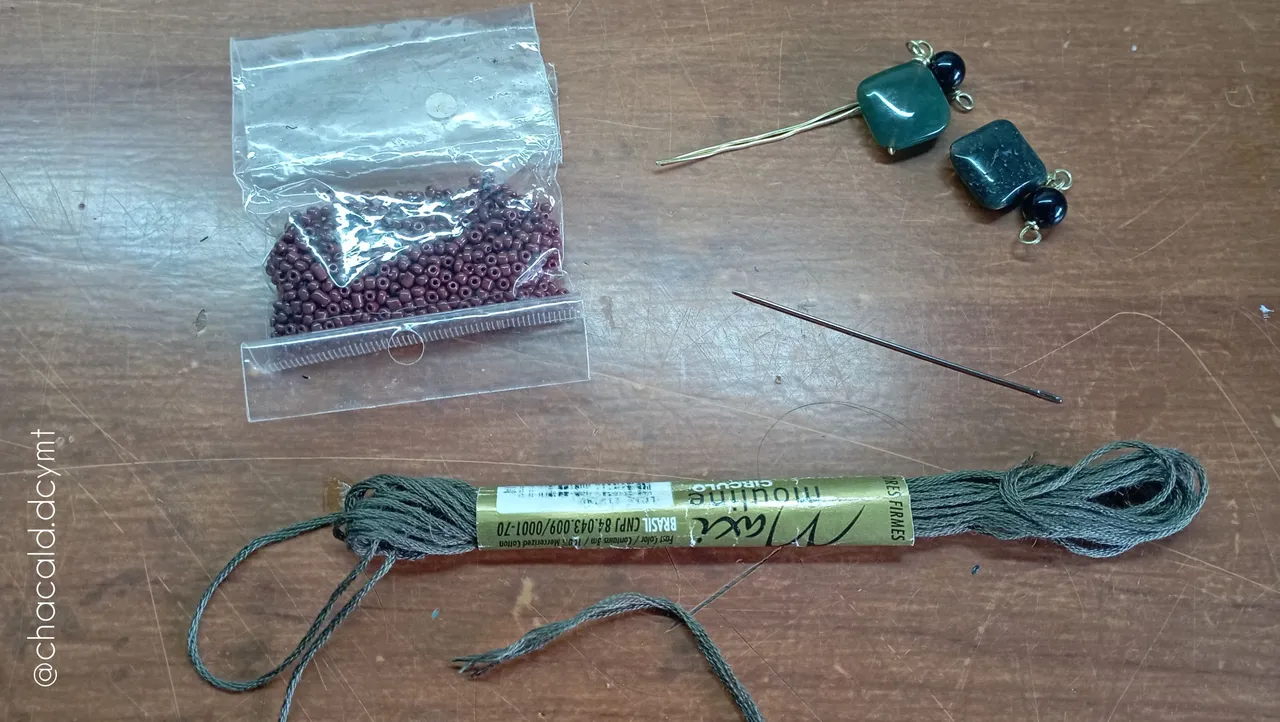
Materiales:
Hilo de bordar
Alambre para bisutería color dorado
2 piedras cuadradas color verde
2 piedras redondas color negro
12 mostacillas grandes color bronce
Hilo de color negro
Tijera
Tenaza
Palito de brocheta
Peine fino
Aguja grande
I have worked with this embroidery thread before and I love the result, it is also very easy to handle. Join me as I show you this simple design in #DIY jewelry.
Materials:
-Embroidery thread
-Gold colored jewelry wire
-2 green square stones
-2 black round stones
-12 large bronze-colored beads
-Black thread
-Scissors
-Pliers
-Skewer stick
-Fine comb
-Large needle
Elaboración:
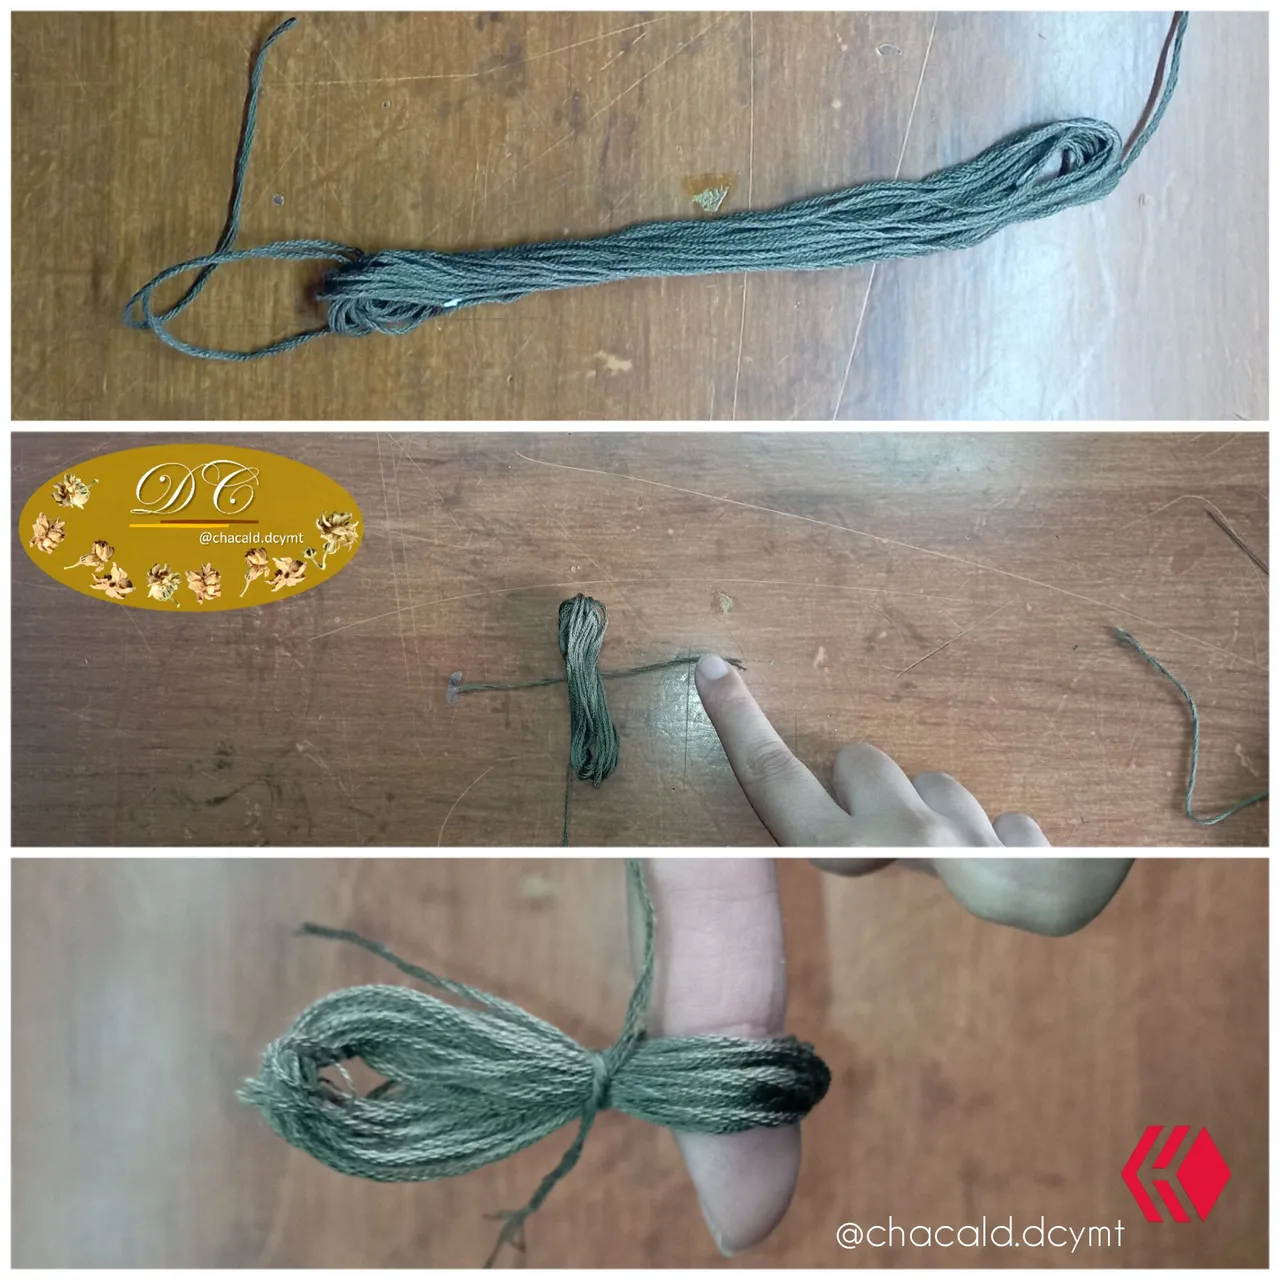
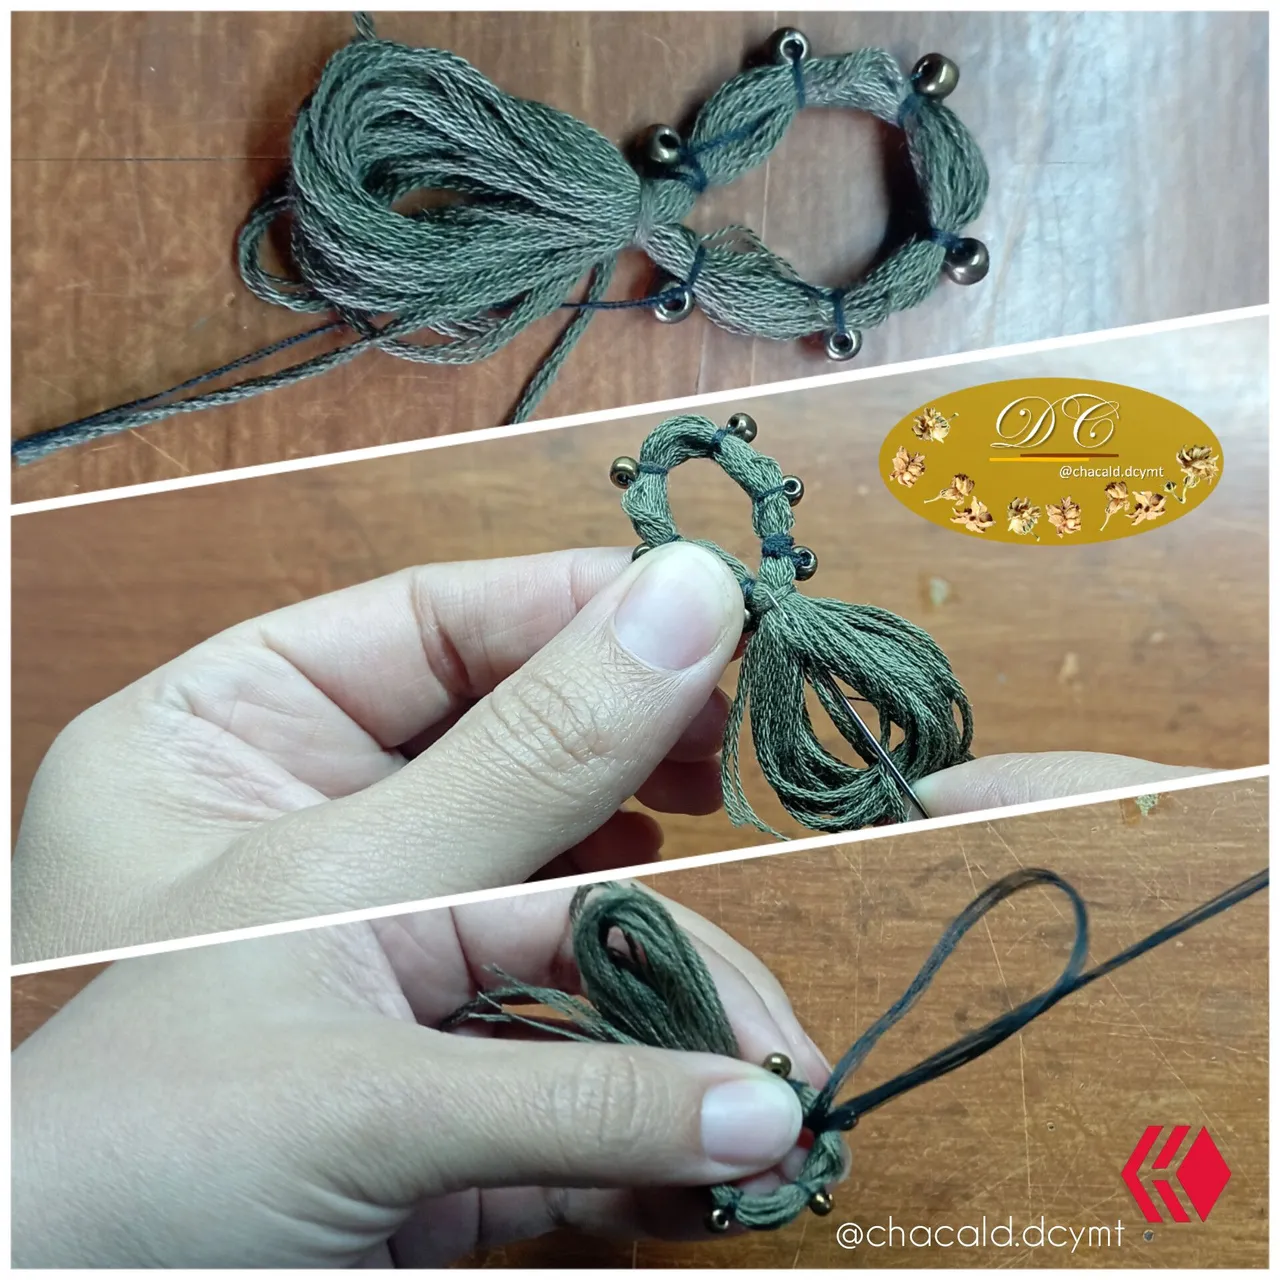
-Primero tomamos la madeja de hilo completa y la cortamos a la mitad, saldrá 1 arete de cada mitad.
-Tomamos los 4 dedos de referencia y enrollamos el hilo. Cortamos un trozo de 6 centímetros y sujetamos dejando el dedo como referencia.
Podemos dejar le sobrante des pues de hacer el nudo para que queden más tupidas las barbas del arete.
Elaboration:
-First take the whole skein of yarn and cut it in half, 1 earring will come out of each half.
-Take the 4 reference fingers and roll up the thread. We cut a piece of 6 centimeters and hold it leaving the finger as a reference.
We can leave the excess after tying the knot so that the beards of the earring are thicker.
-Tomamos la aguja con una hebra doble de hilo negro y vamos a atravesar el círculo. Vamos a fijar 6 mostacillas distribuidas simétricamente por todo el círculo.
-We take the needle with a double strand of black thread and go through the circle. We are going to fix 6 beads symmetrically distributed throughout the circle.
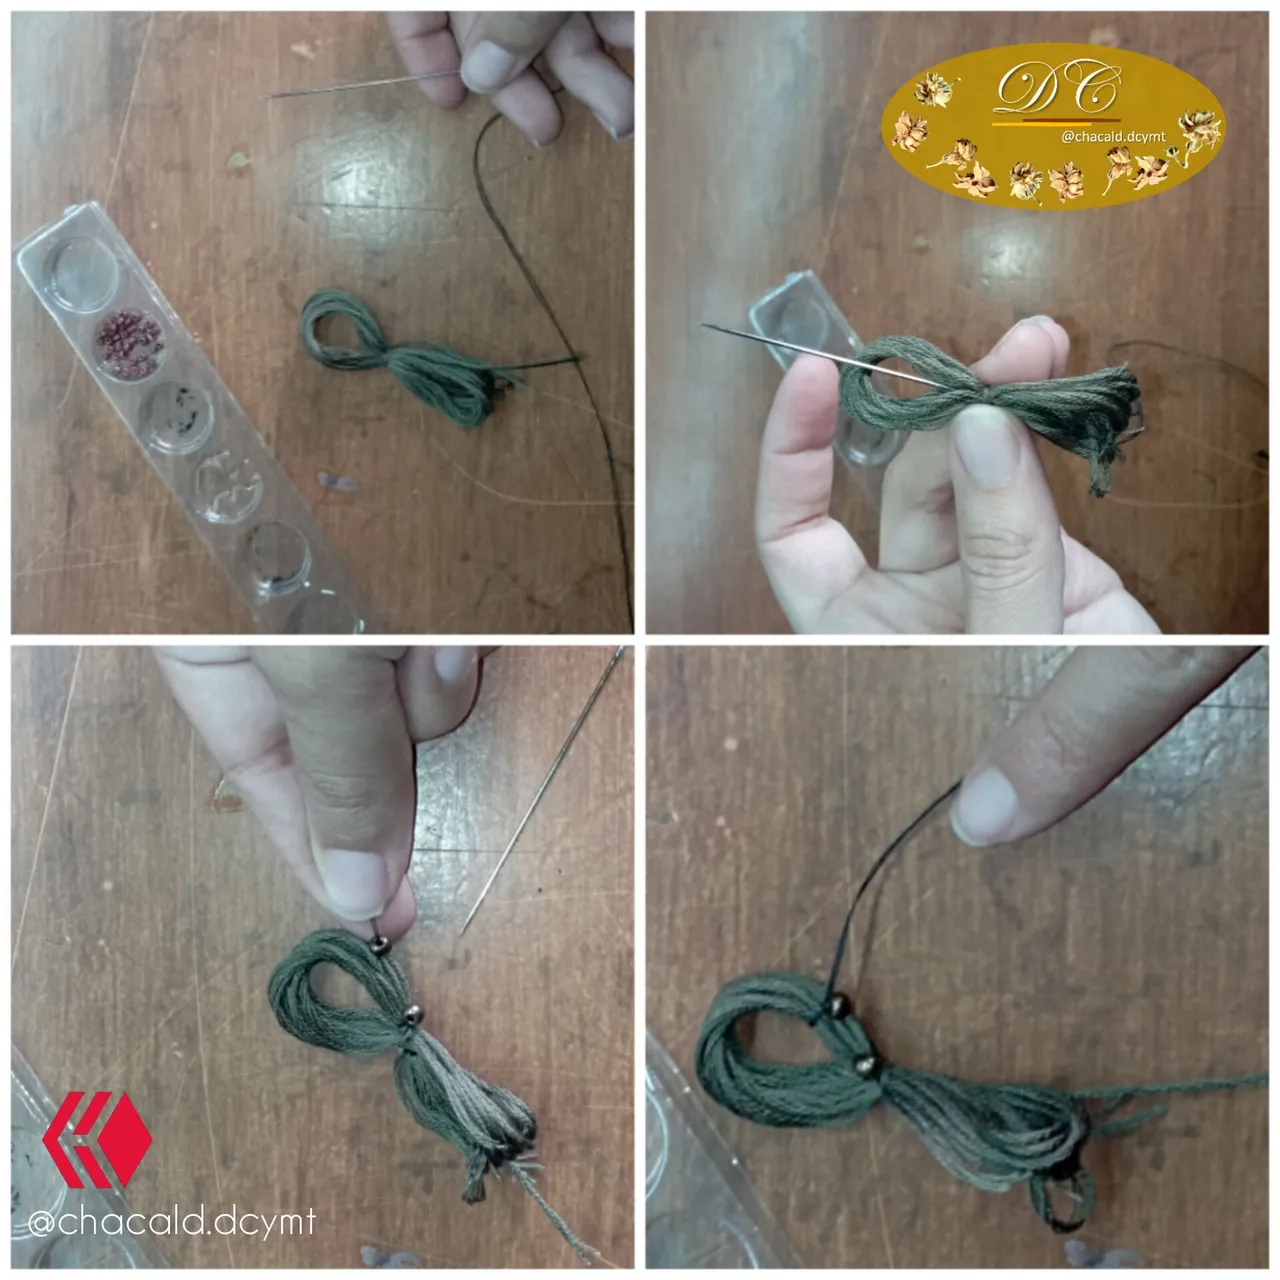
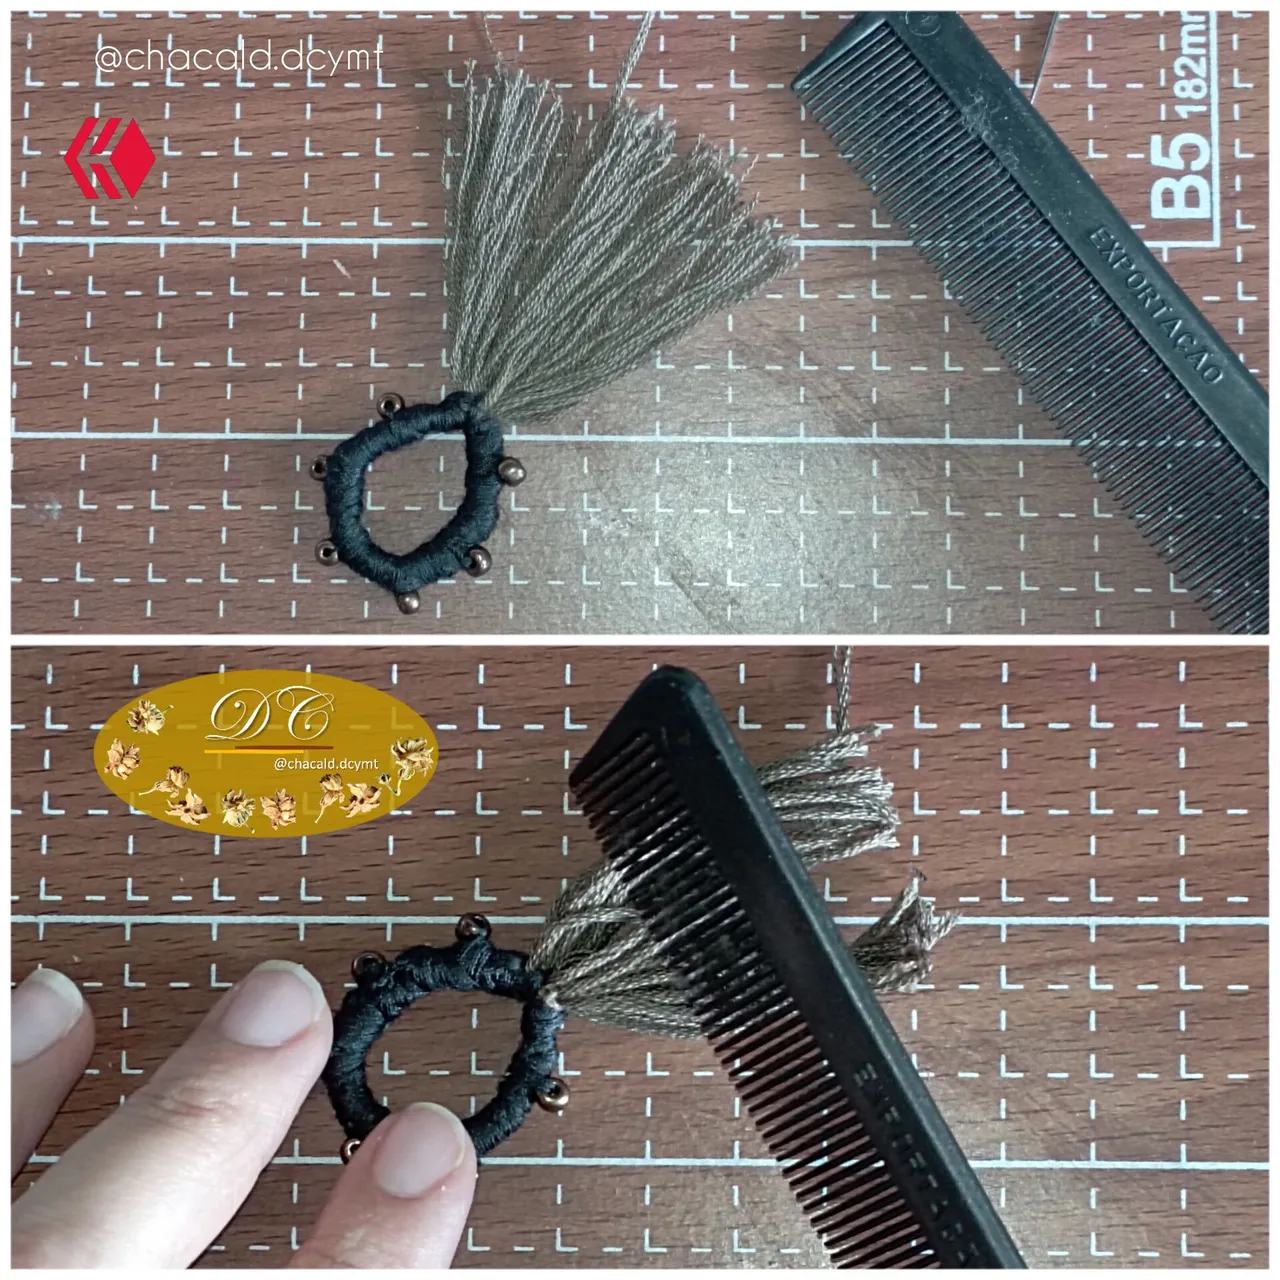
Cuando tenemos las mostacillas distribuidas por círculo, vamos a tomar la aguja y 4 hebras de hilo de color negro. Comenzamos a cubrir el círculo.
Yo utilicé 2 colores de hilo para este diseño, pero se podría hacer todo del mismo color y el resultado en ambos casos es espectacular.
When we have the beads distributed per circle, we will take the needle and 4 strands of black thread. We start to cover the circle.
I used 2 colors of thread for this design, but you could do everything in the same color and the result in both cases is spectacular.
-Cuando quede todo el hilo cubierto, procedemos a cortar el hilo de la parte inferior, así quedaran unas barbas.
-When all the thread is covered, we proceed to cut the thread at the bottom, so there will be some beards.

-Con el peine vamos a desenredar los hilos de las barbas.
-With the comb we are going to untangle the strands of the beards.
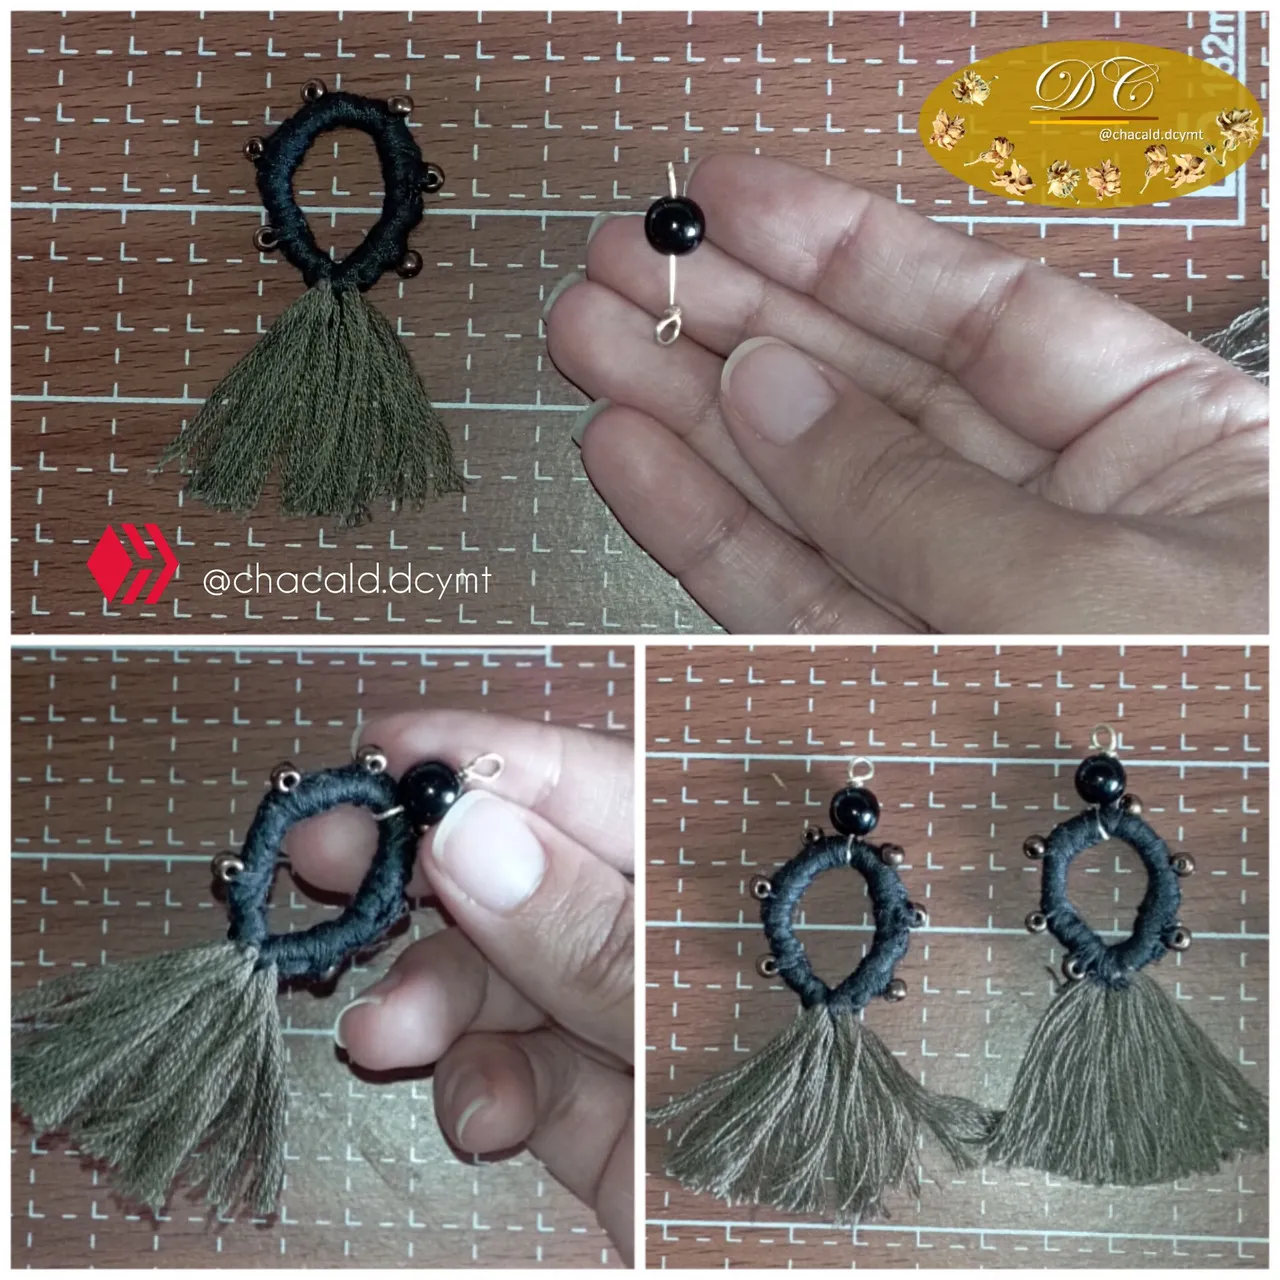
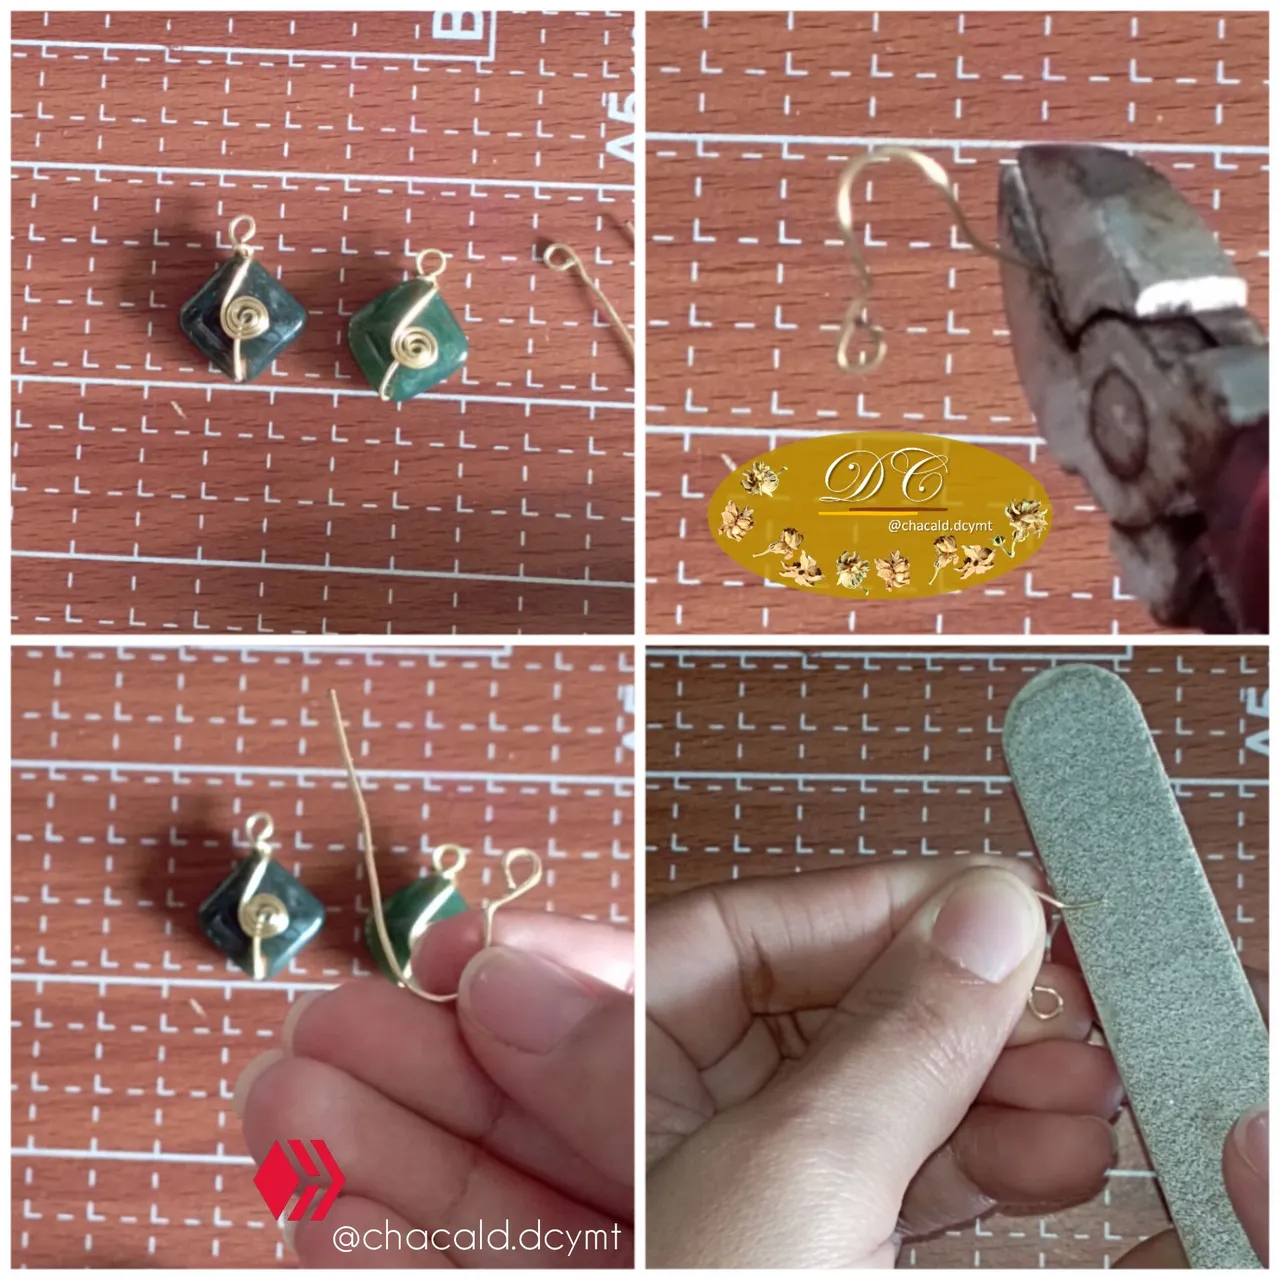
-Con un trozo de alambre, vamos a hacer el enganche de las piedras redondas y a sujetar el arete de hilo.
-With a piece of wire, we will make the hook for the round stones and attach the thread earring.
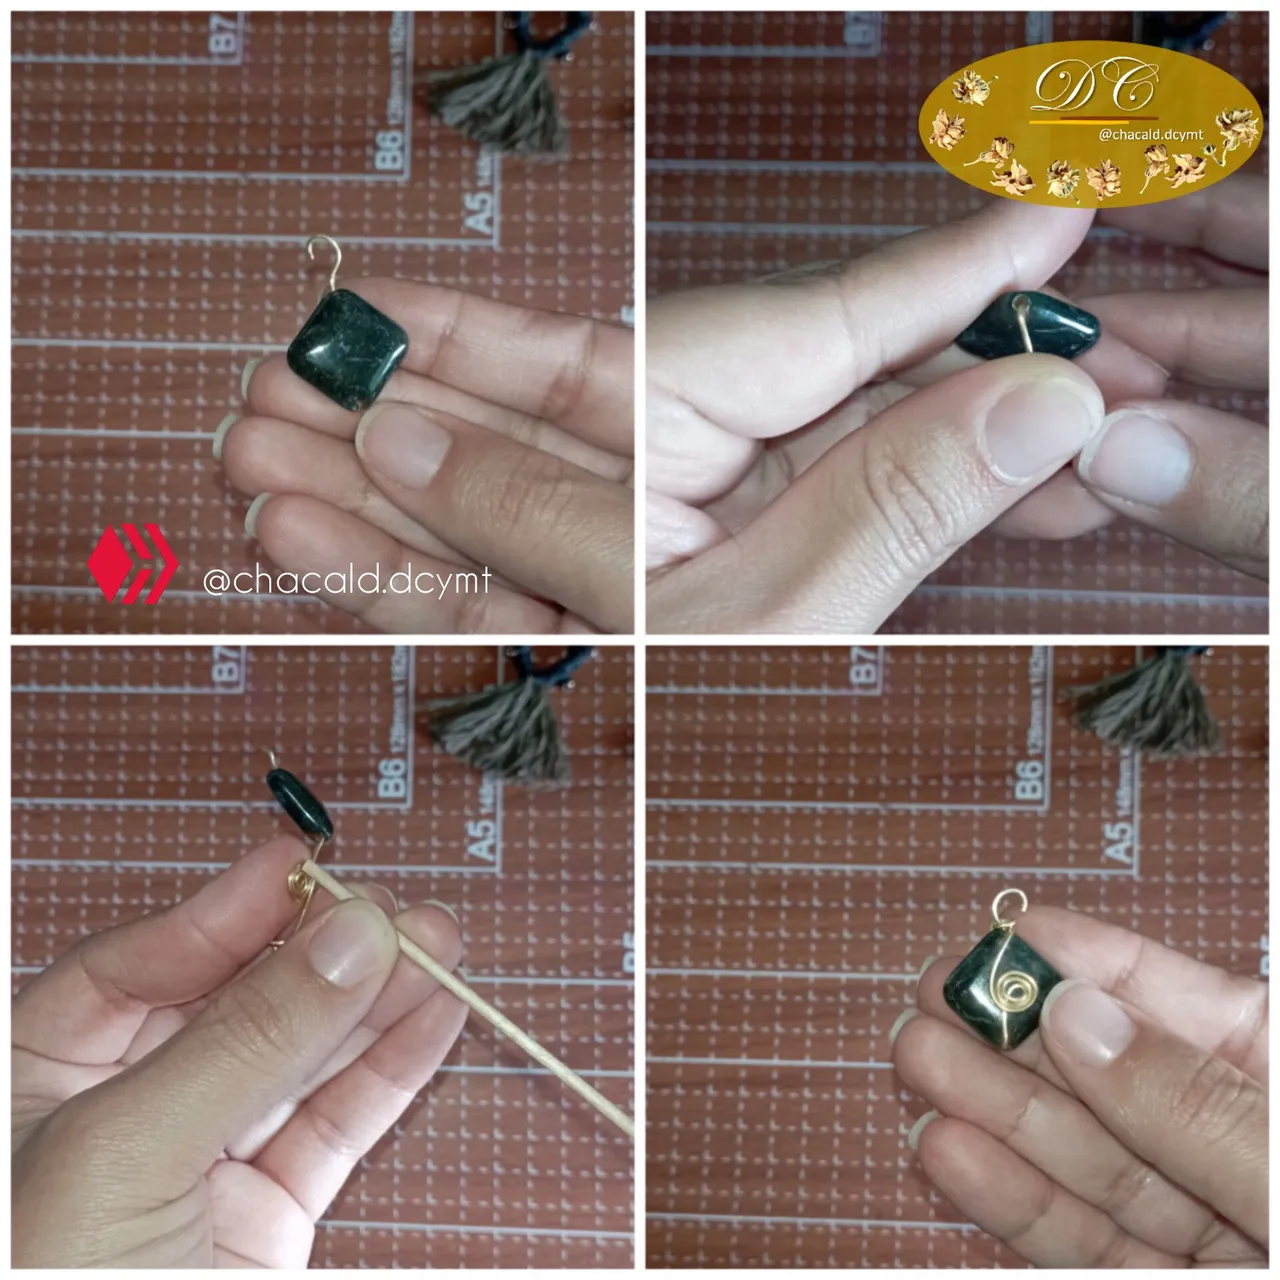
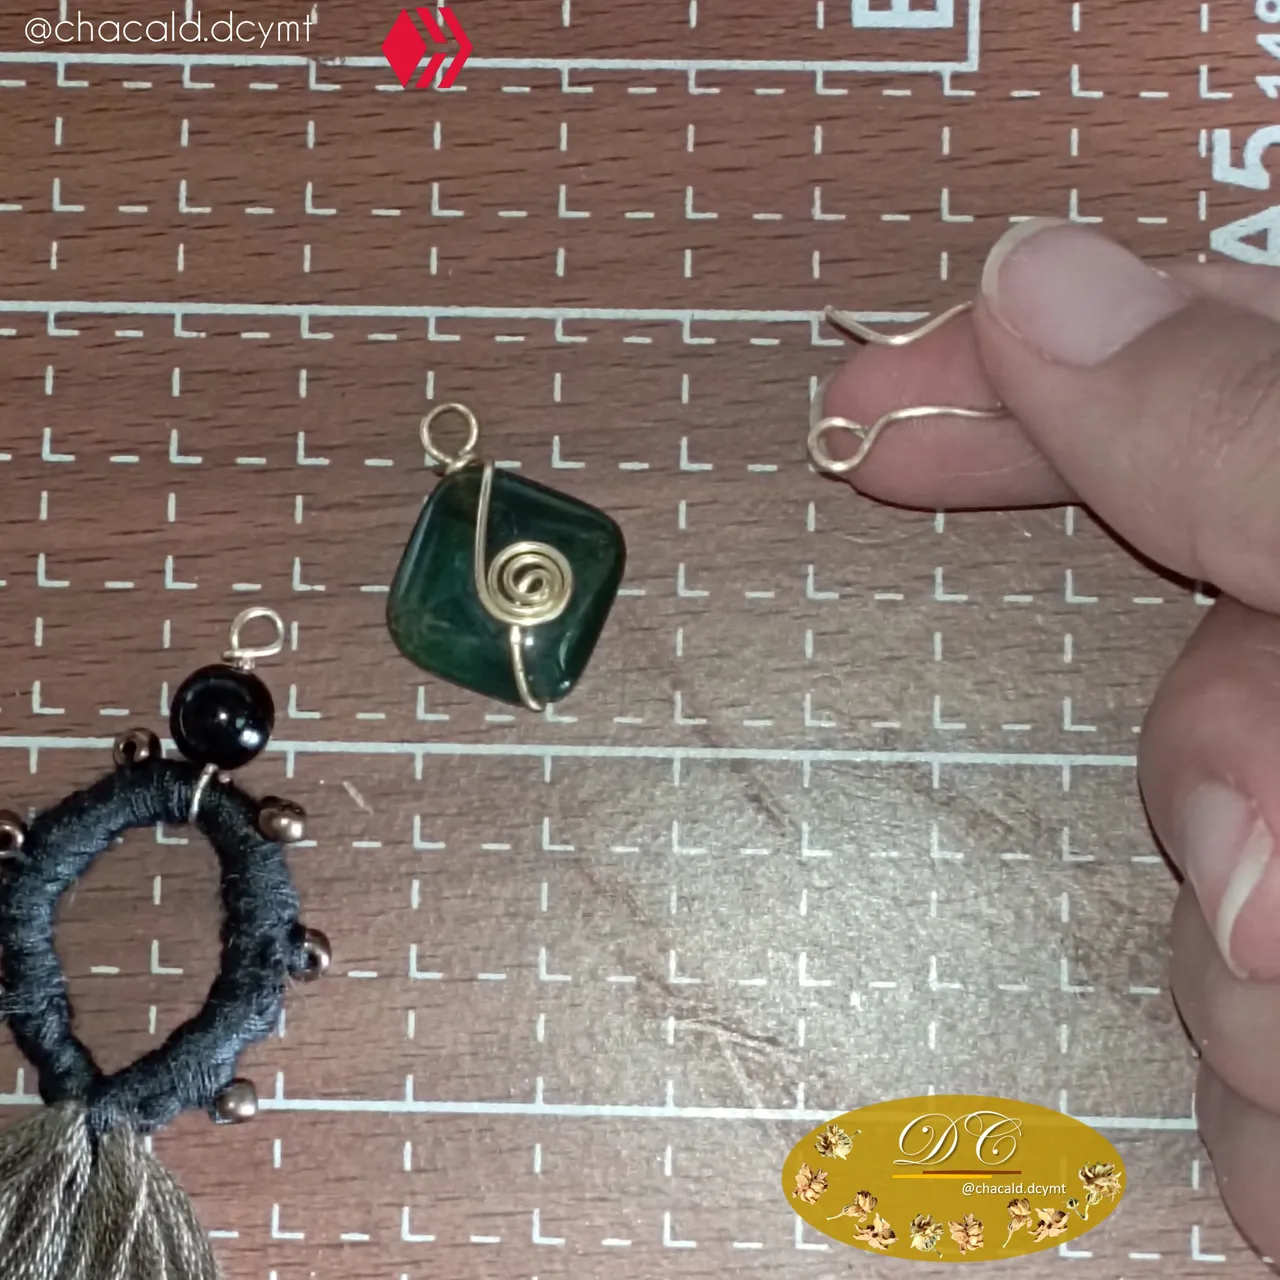
-Para colgar la piedra cuadrada atravesamos con el alambre, de un lado haremos una argolla y del otro lado vamos a tomar el pañito de brochetas y haremos un espiral, aplastamos y vamos a finalizar enganchando en la argolla el espiral y debe quedar de la siguiente manera:
-To hang the square stone we go through it with the wire, on one side we will make a ring and on the other side we will take the skewer cloth and we will make a spiral, flatten it and we will finish by hooking the spiral in the ring and it should look like this:
-Para hacer los anzuelos, tomamos un trozo de alambre y con ayuda de la tenaza vamos a doblar hasta conseguir la forma del anzuelo.
Con una lima para uñas, vamos a quitar los bordes del anzuelo para que no dañe las orejas.
-To make the hooks, we take a piece of wire and with the help of the pliers we are going to bend it until we get the shape of the hook.
With a nail file, we will remove the edges of the hook so that it does not damage the ears.
Enganchamos todas las piezas: el trabajo en hilo, el trabajo con las piedras y el alambre y el anzuelo.
We hooked all the pieces together: the thread work, the work with the stones and the wire and the hook.
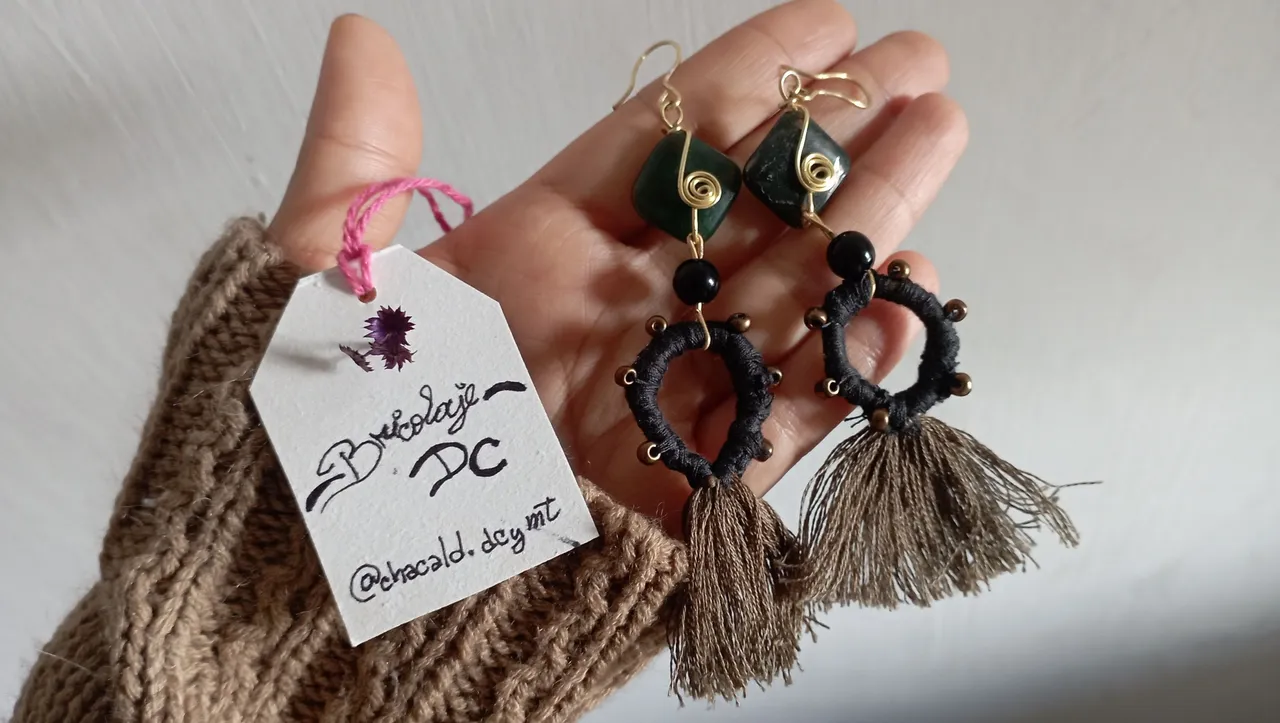
Y listo! Tenemos unos elegantes aretes colgantes para lucir en cualquier ocasión.
And that's it! We have elegant dangle earrings to wear on any occasion.
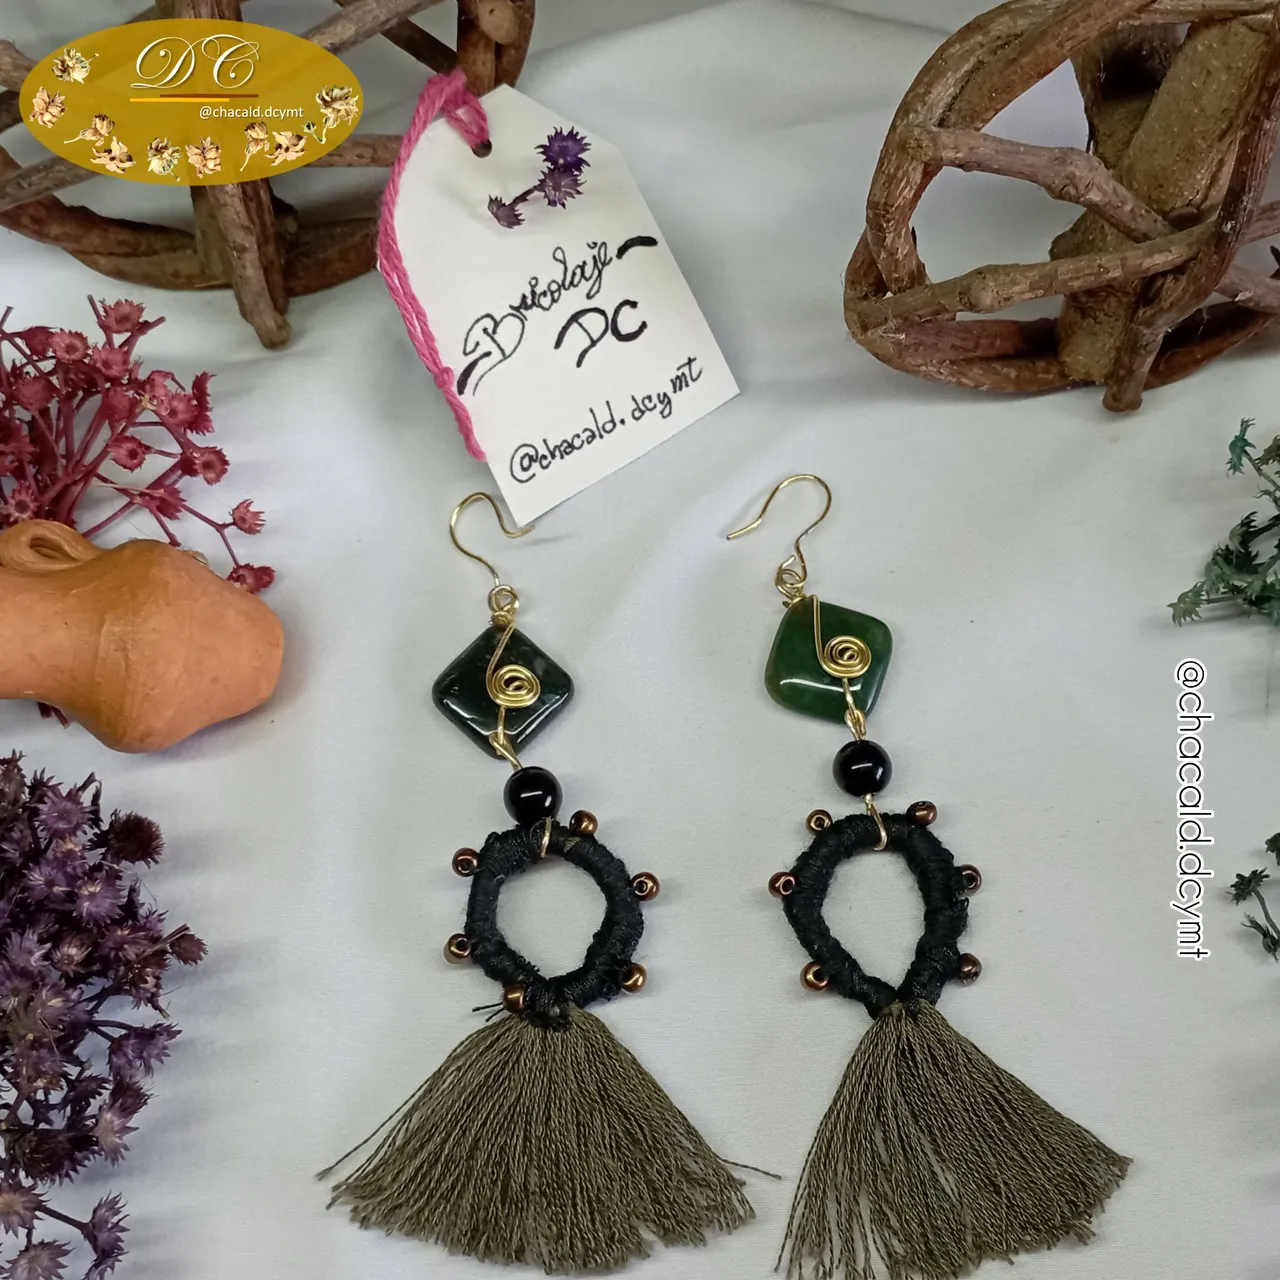
Con el Diseño Calipso hago mi entrada a la Iniciativa "Un Regalo para Mama" a la que me gustaría invitar a participar a @ylaffittep y a @dayadam.
Espero les guste y nos vemos en una próxima oportunidad.
With the Calypso Design I make my entry to the "A Gift for Mom" Initiative to which I would like to invite @ylaffittep and @dayadam to participate.
I hope you like it and I'll see you next time.

Original content by the author.
Resources: App: Canva / Giphy / Inshot
📷 Redmi 10 Smartphone
Translation done with Deepl.com
✿ All Rights Reserved || © @chacald.dcymt 2023 ✿
💌 Discord: chacald.dcymt#3549
Twitter @chacald1
_
Contenido original del autor.
Recursos: App: Canva / Giphy / Inshot
📷 Redmi 10 Smartphone
Traducido con Deepl.com
✿ Todos los Derechos Reservados || © @chacald.dcymt 2023 ✿
💌 Discord: chacald.dcymt#3549
Twitter @chacald1