It's time to make our girls fall in love, beautiful earrings made with wire and jewelry stones
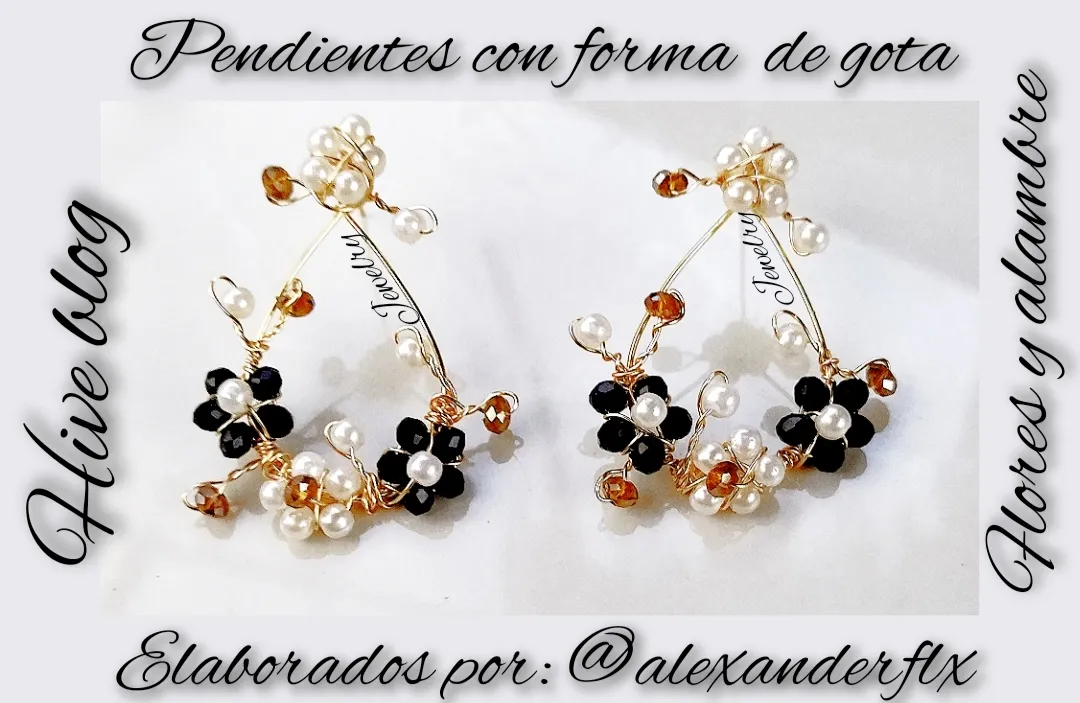
Hola feliz noches para todos espero se encuentren muy bien y tengan una feliz noche, la noche de hoy quiero agradecer a todas esas chicas que le an gustado todos los pendiente que he realizado y me an apoyado espero seguir haciendo bien, la noche de hoy le comparto unos hermosas pendientes con forma de gota estos son un poco más complicado aunque si tenemos un poco de paciencia lograremos hacer lo que queremos, para estos pendientes trate de utilizar bastante piedras como pueden ver son muy elegante de seguro estarán bien para una ocasión especial, bueno sin más que decir pasaremos al paso a paso .
Hello happy night to all I hope you are very well and have a good night, tonight I want to thank all those girls who liked all the earrings I have made and have supported me I hope to continue doing well, the night of Today I share with you some beautiful drop-shaped earrings, these are a little more complicated, although if we have a little patience we will be able to do what we want, for these earrings try to use a lot of stones, as you can see, they are very elegant, they will surely be fine for an occasion special, well without further ado we will go step by step.
What do we need.
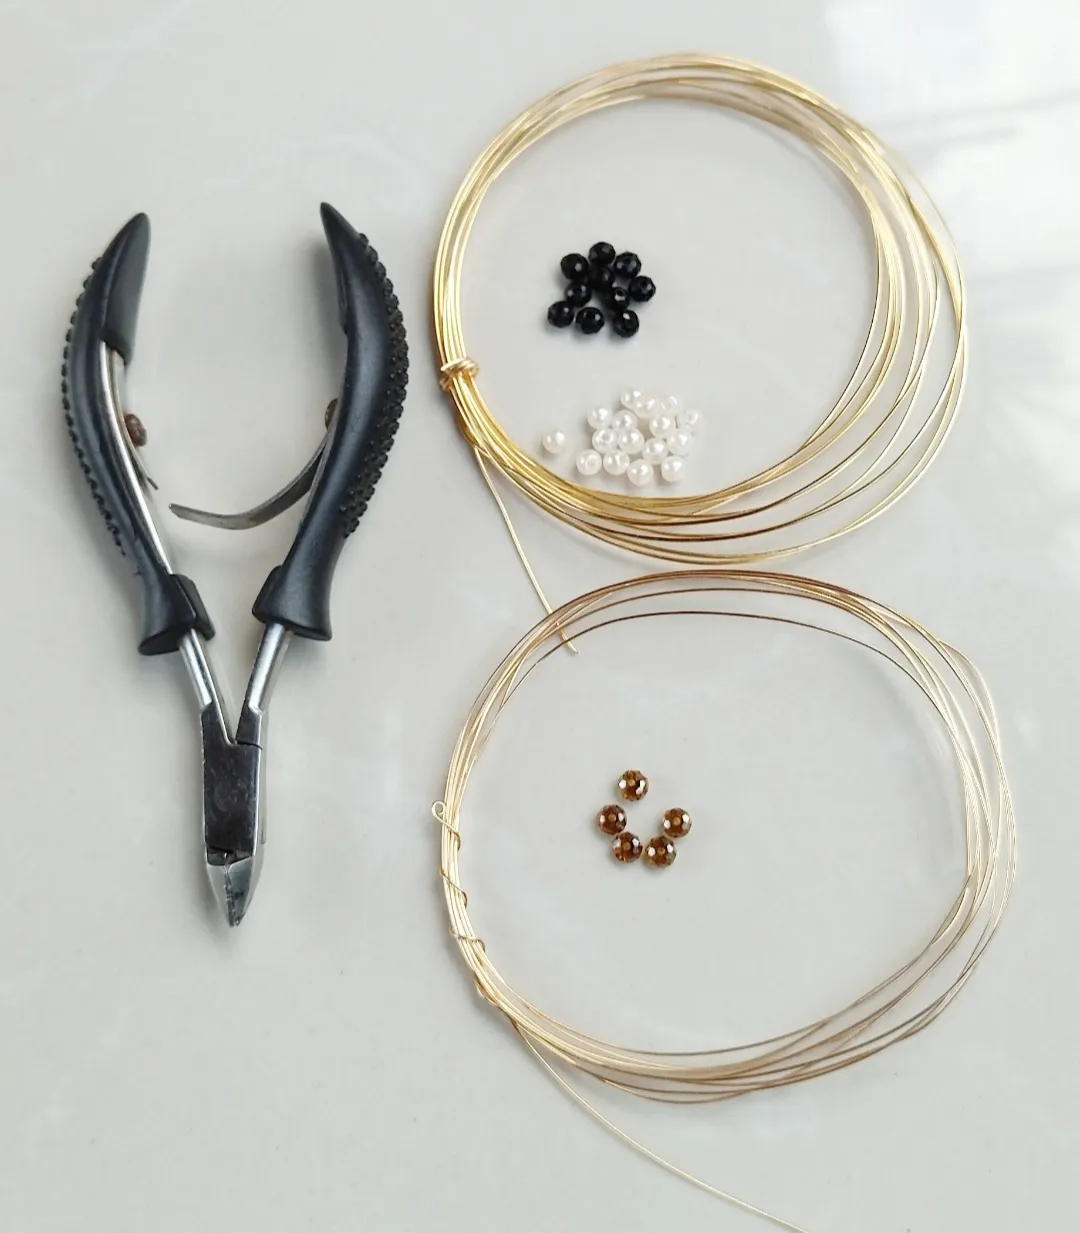
- piedras de bisutería
- alambre para bisutería calibre 22 y calibre 24
- pinzas
jewelry stones
22-gauge and 24-gauge jewelry wire
tweezers
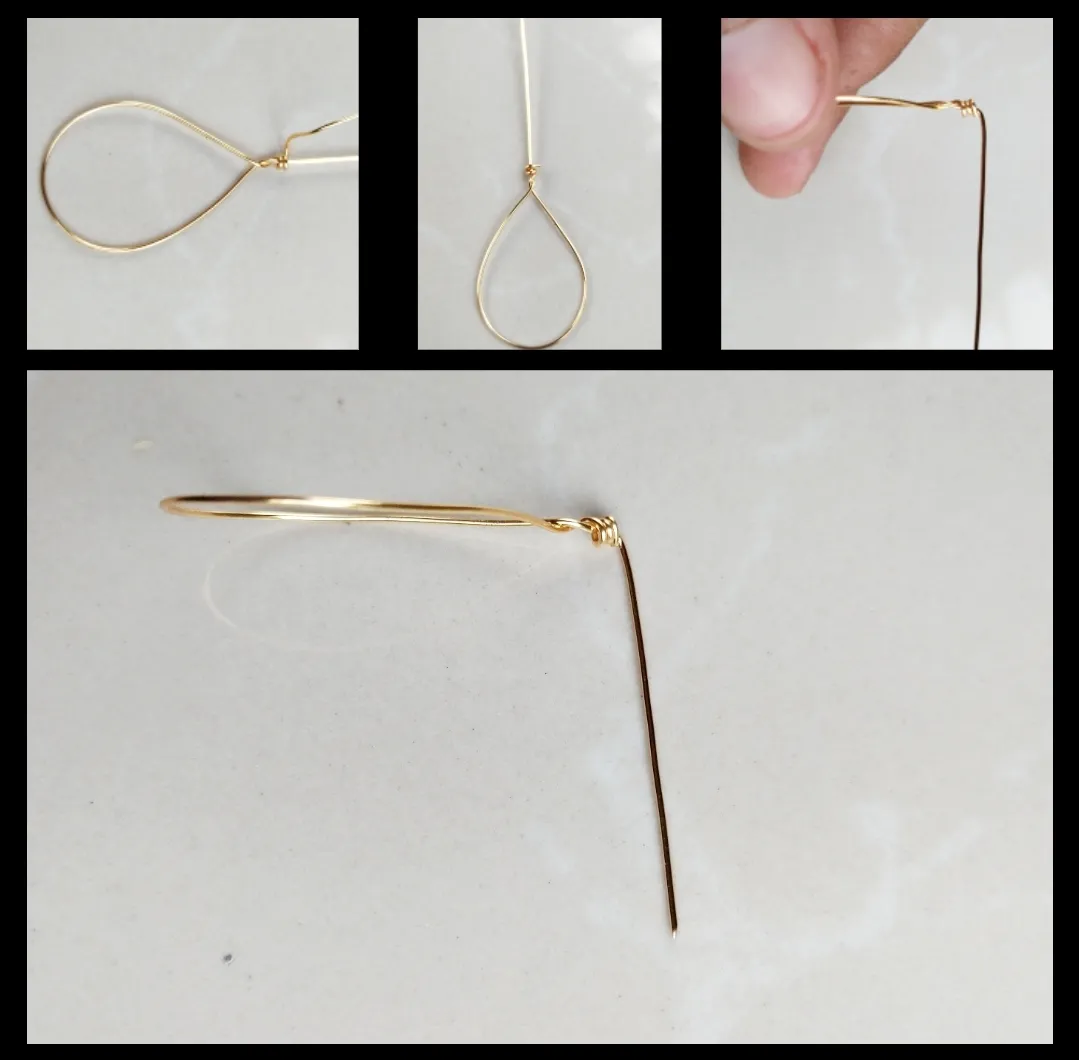
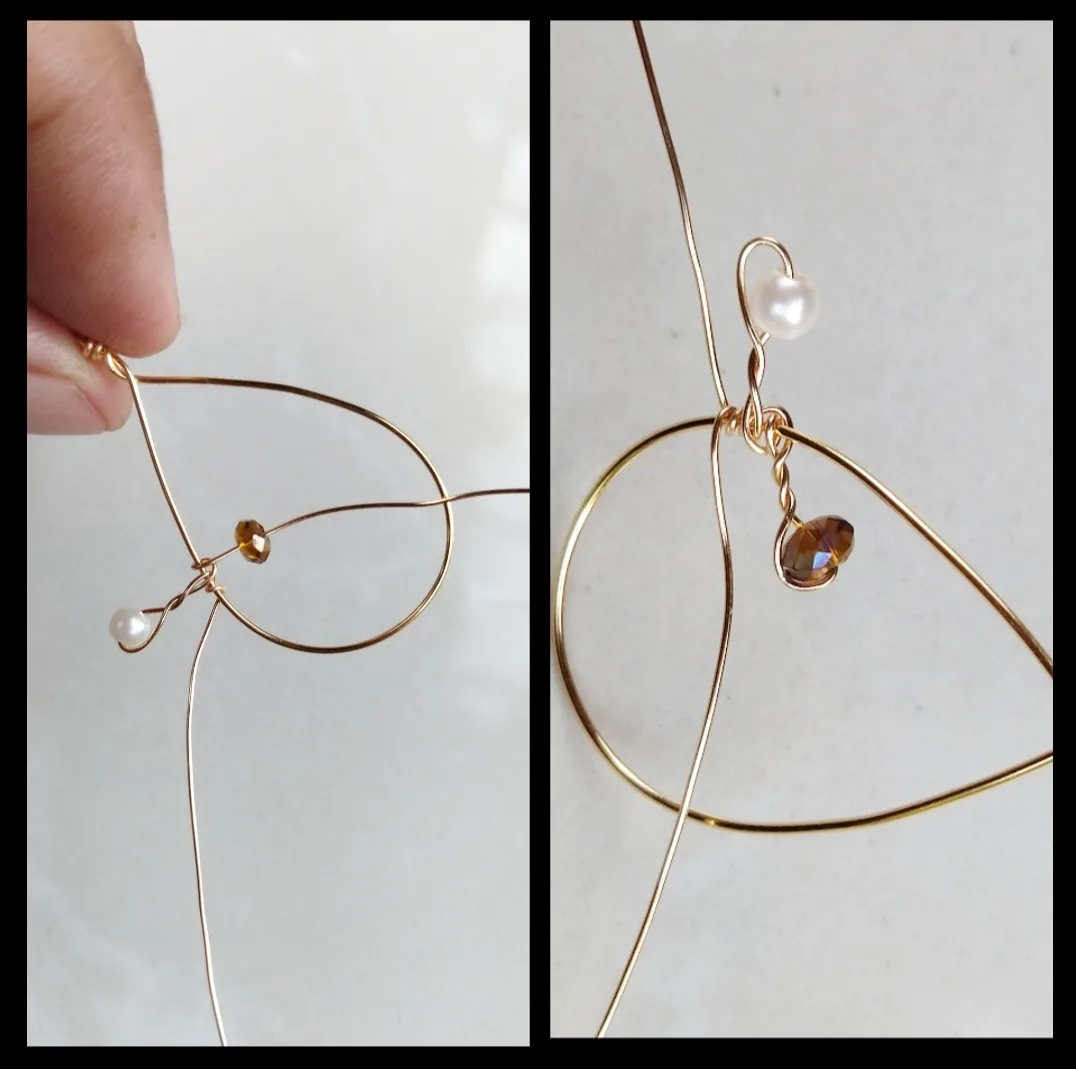
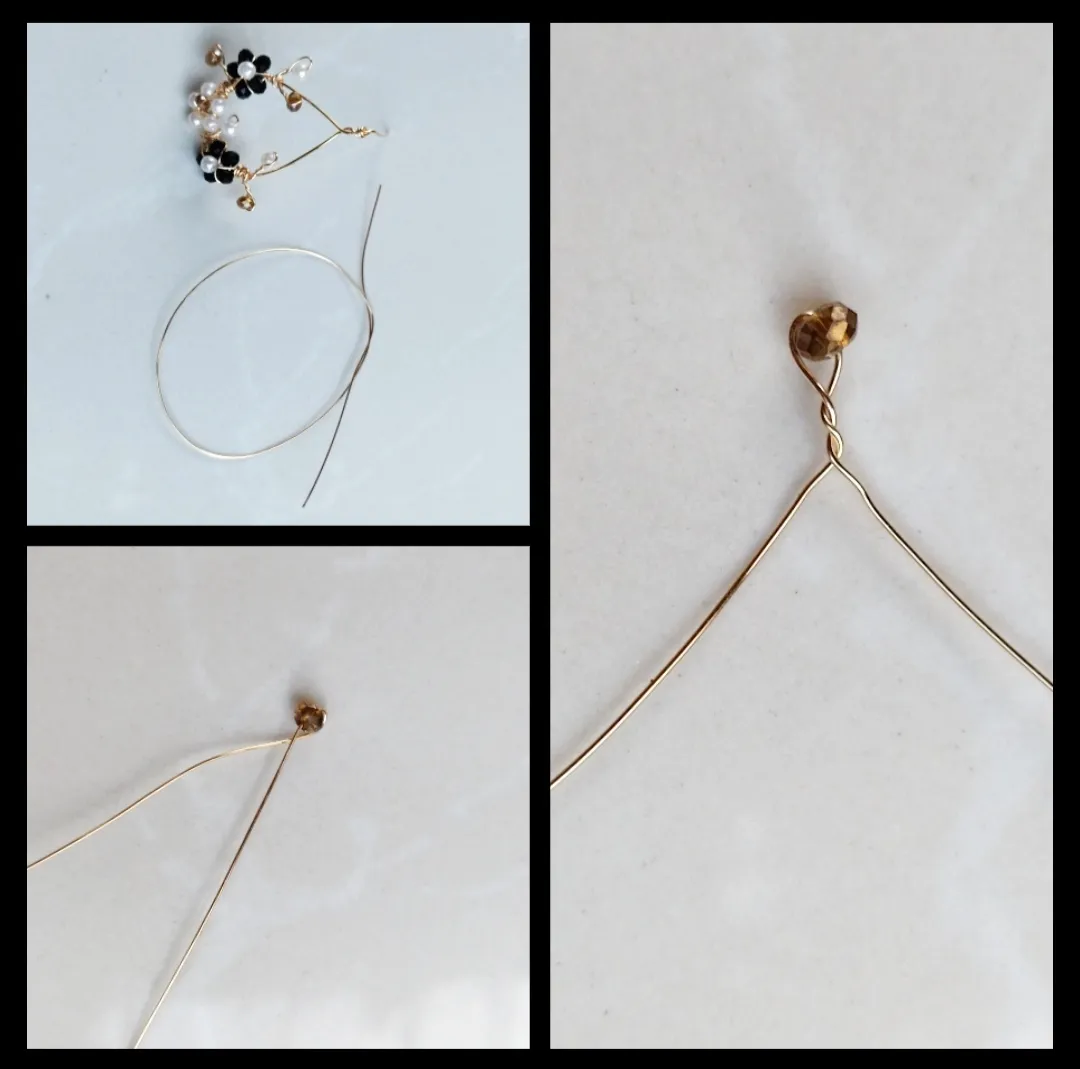
Paso 1:Bueno amigos empezaremos, para este paso cortaremos un trozo de alambre de calibre veintidós corteremos un poco más de diez centímetros con este trozo de alambre aremos una gota luego que tengamos la gota echa doblaremos una de las dos punta hacia arriba la doblaremos justo donde se cruzan los alambre como pueden ver las punta están viendo hacia los lados, luego que doblemos una de las dos puntas tomaremos el otro lado y lo entorcharemos al rededor del que doblamos hacia arriba no debemos dar muchas vueltas cortaremos el exceso del alambre que entorchamos tomaremos la otra punta y la doblaremos hacia atrás así como pueden ver en la foto..
Step 1: Well friends we will start, for this step we will cut a piece of twenty-two gauge wire we will cut a little more than ten centimeters with this piece of wire we will make a drop after we have the drop made we will bend one of the two ends upwards we will bend just where the wires intersect as you can see the ends are facing to the sides, after we bend one of the two ends we will take the other side and we will twist it around the one that we bent upwards we should not go around too many times we will cut the excess of the wire that we twist we will take the other end and bend it back as you can see in the photo.

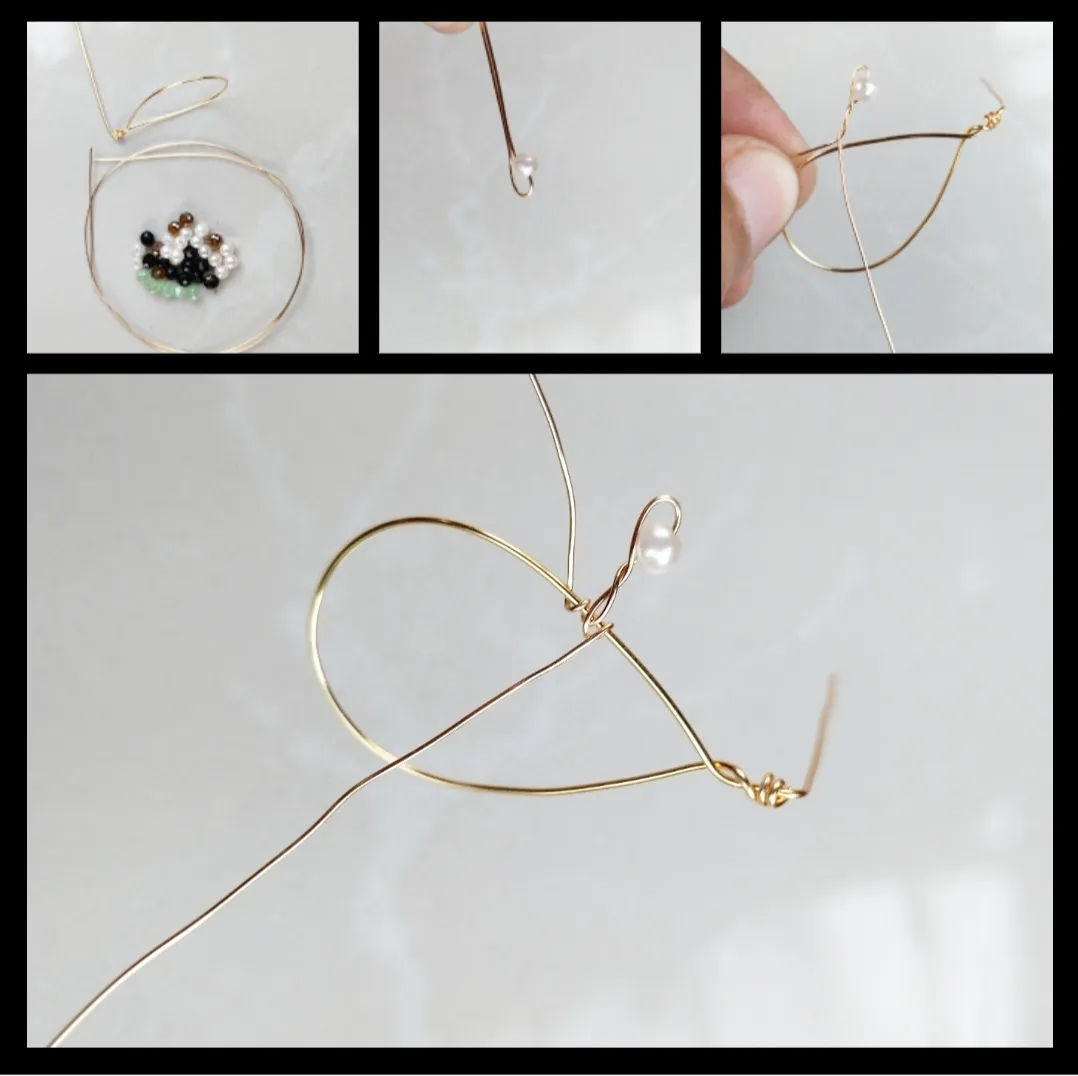
Paso 2: Ya las cosas se entan poniendo un poco complicada para explicarlo espero hacerlo lo mejor posible, para este paso utilizaremos las piedras y el albre calibre veinticuatro , cortaremos un trozo de cuarenta centímetros o si quierenejor un poco más largo que aremos tomaremos una piedra blanquita y la pondremos en medio del alambre y lo doblaremos poniéndolo doble luego entorcharemos un poco el alambre luego separamos los dos albre y trataremos de asegurar eso que hicimos a nuestra base que es la que realizamos en nuestro primer paso como lo aseguramas solo entorcharemos el albre a pieza base y listo así aseguramos luego de asegurarla tomaremos una piedra marrón y aremos lo mismo que hicimos con la blanca la metemos en el alambre y la alejamos un poco de la base luego doblamos el alambre y entorchamos un poco .
Step 2: Now things are getting a bit complicated to explain it, I hope to do my best, for this step we will use the stones and the twenty-four caliber amber, we will cut a piece of forty centimeters or if you want, a little longer than we will we will take a white stone and we will put it in the middle of the wire and we will bend it by making it double then we will twist the wire a little then we will separate the two wires and we will try to secure what we did to our base which is what we did in our first step as we secure it only We will twist the wire to the base piece and that's it, we will secure it after securing it, we will take a brown stone and do the same as we did with the white one, we put it in the wire and move it a little away from the base, then we bend the wire and we twist it a little.
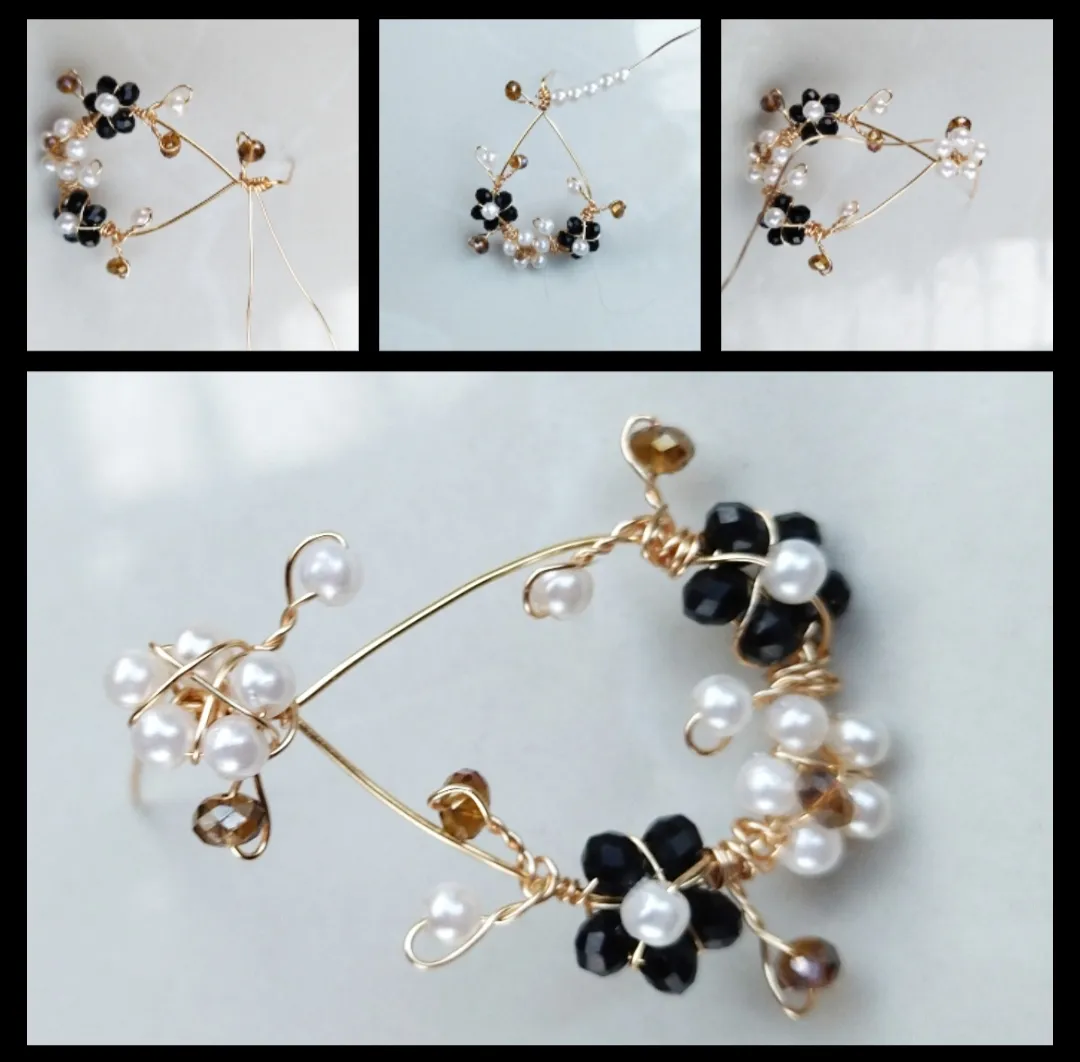
Paso 3: Para este paso le mostrate como hacer la flor lo más fácil posible pero que se vea bien les quiero dar una sugerencia no importa que se vea el albre por todos lados eso es el dibujo que tendrá la prende así se verá mejor, para hacer la flor tomaremos cinco piedras negras y la meteremos en el alambre luego doblaremos haciendo un redondo tratando de que las piedras queden muy juntas luego con el mismo alambre le daremos unas vueltas o cruzar el alambre lo podemos hacer como queramos no hay un patrón solo tenemos que tratar de que el la última cruzada quede el alambre hacia adelante para seguir trabajando y por supuesto en esa última cruzada tomaremos una piedra en este caso yo tomé una blanca y la pondremos en medio de la flor no debemos olvidar darle unas vueltas al rededor de la base que es la gota que hicimos en nuestro primer paso y así utilizando el segundo paso y el tercer paso aremos la parte de abajo de los aretes .
Step 3: For this step, I will show you how to make the flower as easy as possible, but to make it look good, I want to give you a suggestion. better, to make the flower we will take five black stones and we will put them in the wire then we will bend making a round trying that the stones are very close together then with the same wire we will make a few laps or cross the wire we can do it as we want there is no pattern we just have to try that in the last cross the wire is forward to continue working and of course in that last cross we will take a stone in this case I took a white one and we will put it in the middle of the flower we must not forget to give it a few laps around the base that is the drop that we made in our first step and thus using the second step and the third step we will make the bottom part of the earrings.
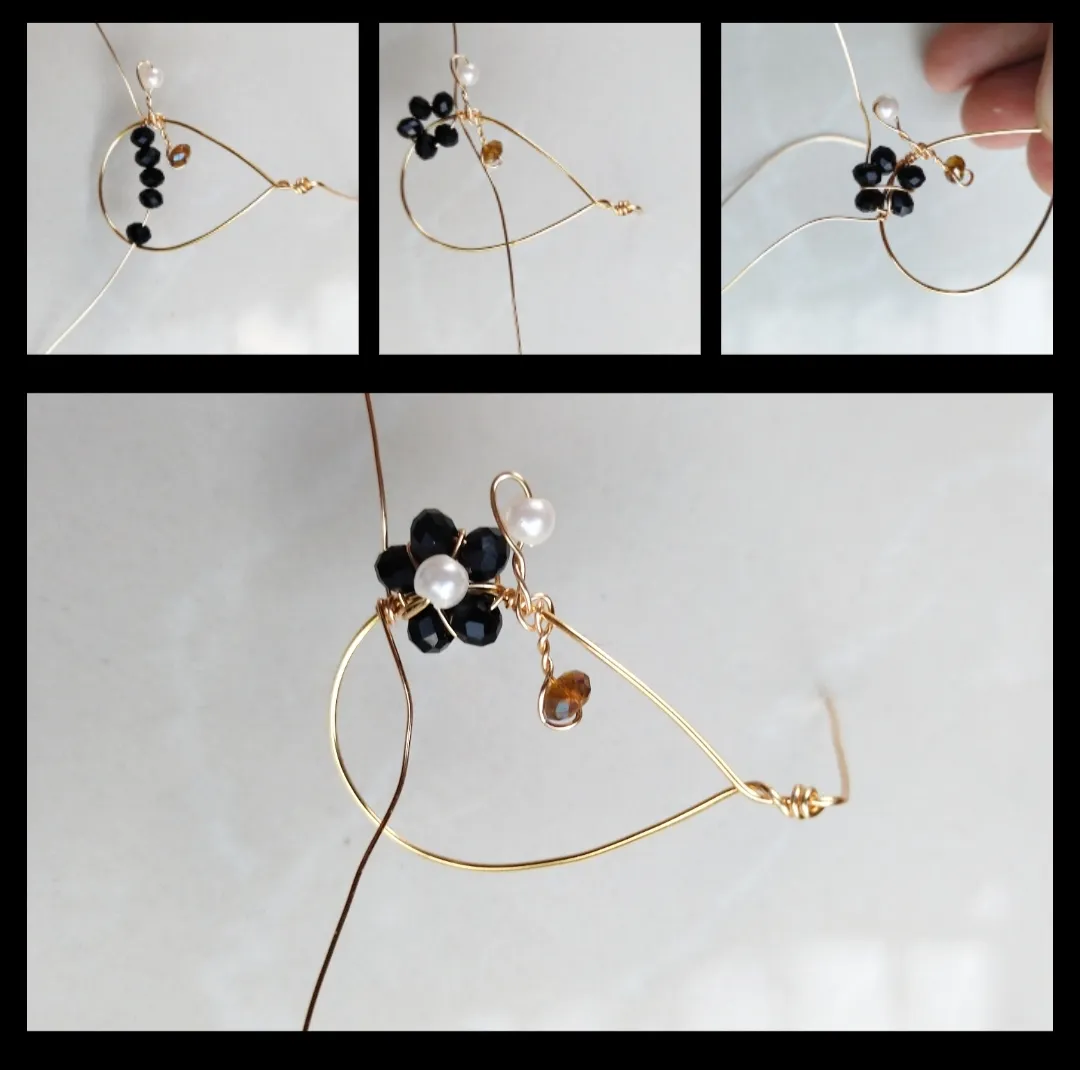
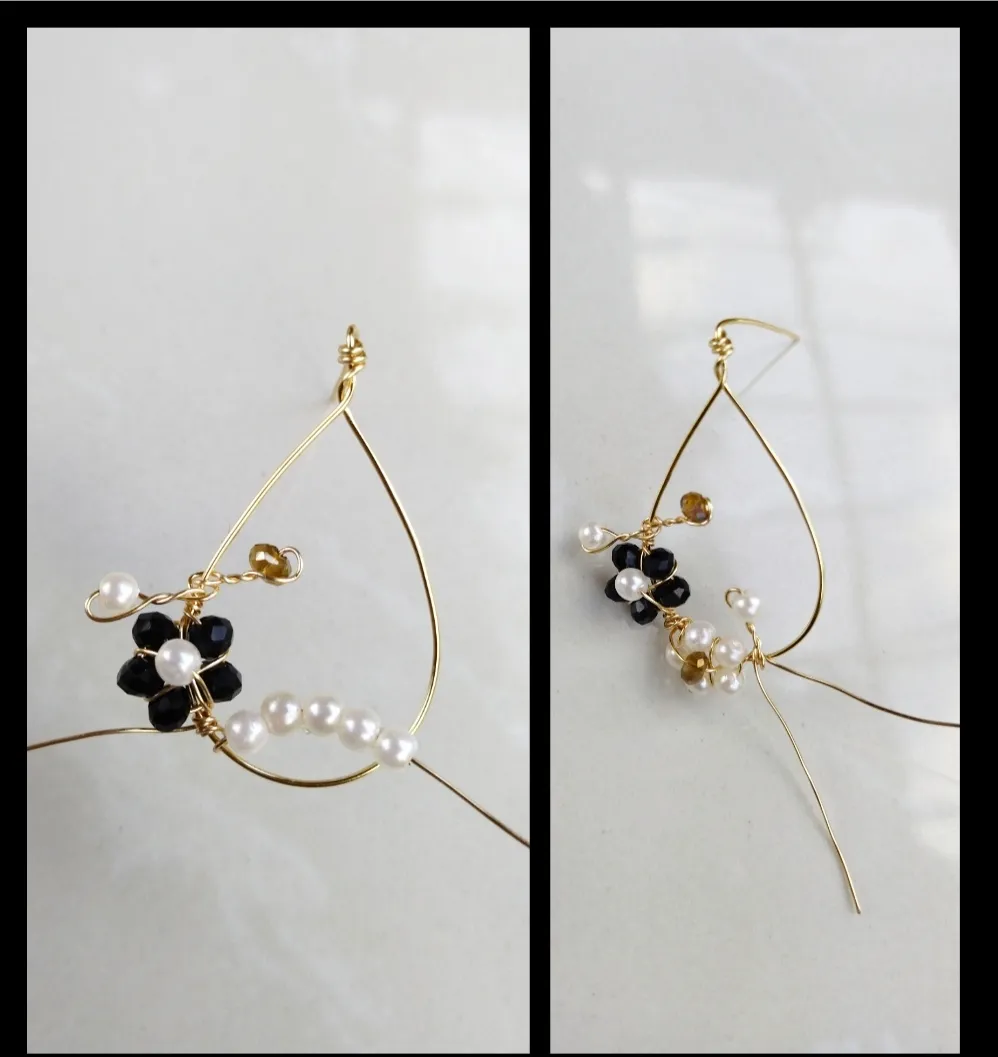
Paso 4:Bueno ya estamos terminando con estos hermosos pendientes, para terminal con ellos cortaremos un trozo de albre de unos veinticinco centímetros le doy esa medida tratando de que no quede el alambre corto, luego de tener el albre tomaremos unas piedras y aremos lo mismo que hicimos en el segundo paso y tercer paso meteremos una piedra doblaremos entorcharemos luego meteremos sinco piedras y aremos un redondo luego aseguraremos muy bien esta pieza en la punta de nuestros pendinte tratemos de apretar muy bien para que no quede flojo y no se suelte en este paso no pondremos una piedra en el medio bueno si no quieren pero será así gusto, espero les allá gustado siempre será un gusto compartir con ustedes y bueno será asta la próxima feliz noche..
Step 4:Well we are now finishing with these beautiful earrings, to finish with them we will cut a piece of wire of about twenty-five centimeters I give it that measurement trying not to leave the wire short, after having the wire we will take some stones and We will do the same thing that we did in the second and third steps, we will insert a stone, we will bend, we will twist, then we will insert five stones and we will make a circle, then we will secure this piece very well at the tip of our earrings, we will try to tighten it very well so that it is not loose and we will not know let go in this step we will not put a stone in the middle well if you do not want but it will be like that, I hope you like it there it will always be a pleasure to share with you and well it will be until next time happy night .
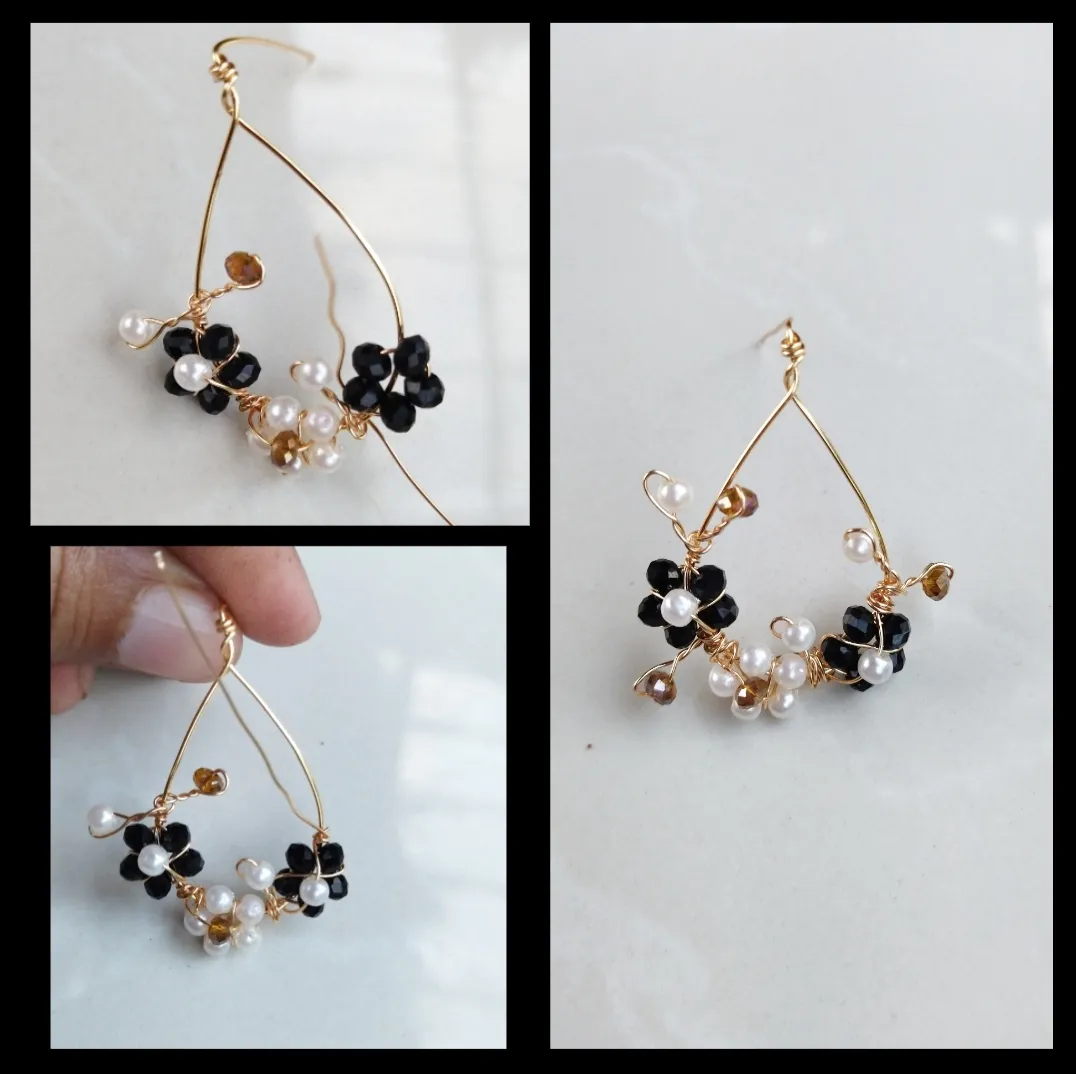
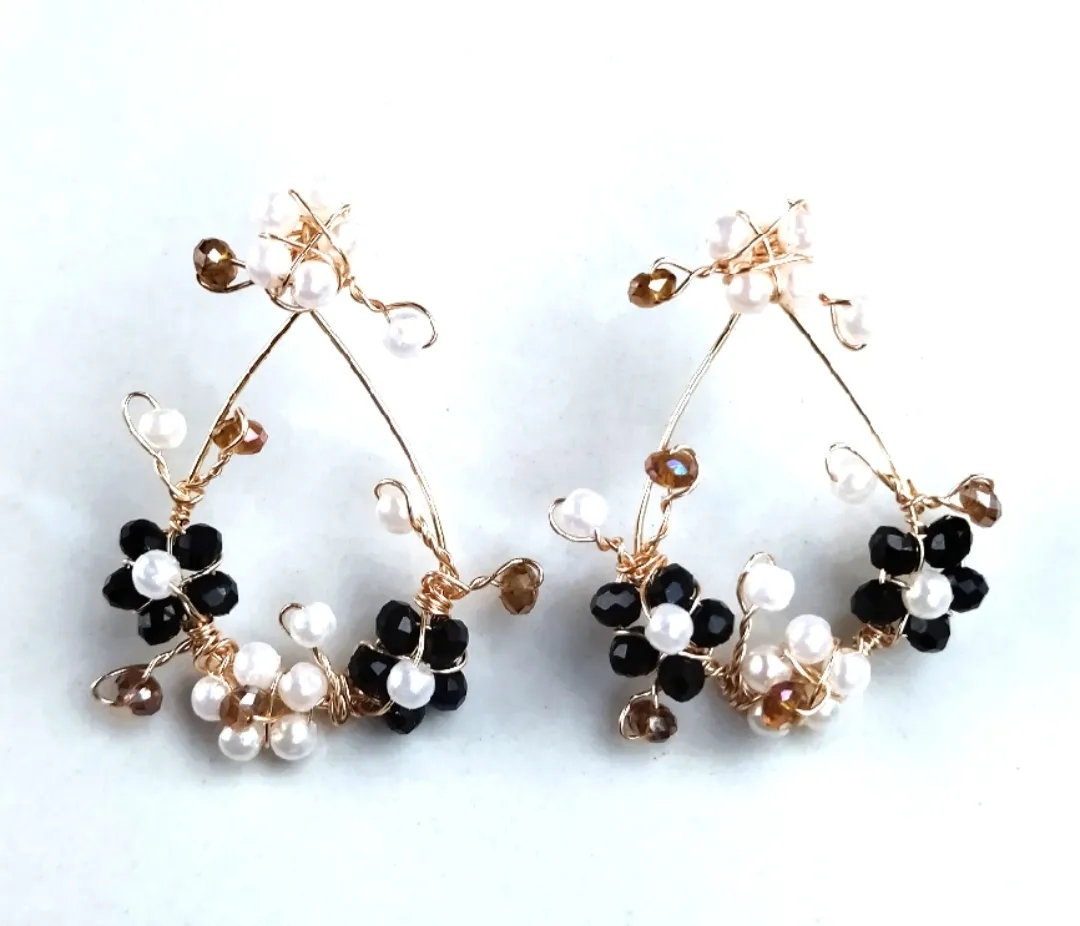
listo nuestros hermosos pendientes , espero que a las damas les guste, fue un gusto compartir con ustedes .
ready our beautiful earrings, I hope the ladies like it, it was a pleasure to share with you.
Todas las Fotos son de mi autoría y fueron tomadas con mi Celular Redmi 9T
All Photos are my authorship and were taken with my Redmi 9T Cellphone