LMAC School - How to cut out a picture part from a photo in Gimp?
Parts that have been cut out of different photos are very often used to create collages.
Depending on the surroundings of the desired image part, there are different tools in Gimp and there are different techniques for cutting out an image part.
I'm going to show you in this post how to do it in different circumstances.
Requirements
You may need the GIMP software to understand this tutorial. GIMP is a free, open source tool for image processing of all kinds. Lots of people say GIMP is the open source Photoshop. I agree with this statement at least for the functionality I personally need.
You can download GIMP here: Click
I created this tutorial for GIMP version 2.10.20 (and higher).
Basics
1. Deleting
Whenever you have made a selection, you can press "Delete" on your keyboard to delete the content between the selection boundaries. (That's what I do in the following GIF examples when you see the background disappears.)

2. Confirming a selection
After you have drawn a selection, you have to confirm it by pressing the "Enter" key on your keyboard. Then you can handle your selection safely with the other tools and functions of GIMP.
3. Inverting a selection
By inverting a selection, you turn it inside out. This means that instead of a selected object or region, its surroundings is then selected. If the surroundings was previously selected, the object or region is then selected. You can invert a selection by pressing ctrl-i on your keyboard or by using the menu point "Select/Invert".
4. Antialiasing
All of the selection tools that I'll talk about in this tutorial have an anti-aliasing option in their property panels. Check this option to create smooth edges with your selection.
5. Feathering edges
Often when you cut out a selection, the edges may look very rough. You can prevent this by activating the "Feather edges" option in the property panel of the respective selection tool.
Feathering is particularly useful for cutting and pasting, if you want the pasted object blends smoothly and unobtrusively with its surroundings.
You can also set a specific radius for feathering in the property panel.
But be aware that feathering prevents exact selections.
6. Alpha channel
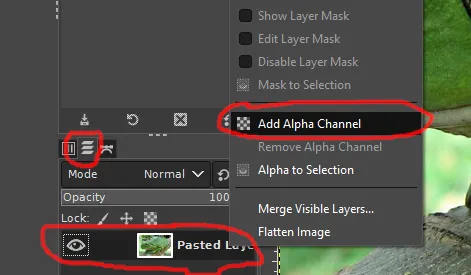
To have a transparent background for your cuts you need to add an alpha channel to the layer that represents the image you want to cut out.
Just right click on the appropriate layer. Then a context menu opens. There you will find the menu item "Add Alpha Channel", which you have to click on.

The "Color to Alpha" function will not work without an Alpha Channel on the respective layer! (See section "Cutting out by just making the surroundings transparent" at the end of this tutorial.)
The tools
All tools listed here can be accessed via the GIMP toolbar.
There are indeed more selection tools in GIMP, as featured in this tutorial. But I've picked the ones that I find useful enough to make parts for collages. For example, there are selection tools for selecting round and box-shaped objects. Because photo collages in LMAC often consist of parts of photos, you will rarely need them. Objects in photos are almost never box-shaped or round.
Therefore, the selection tools that are needed to select and finally cut out irregularly shaped objects are much more interesting.
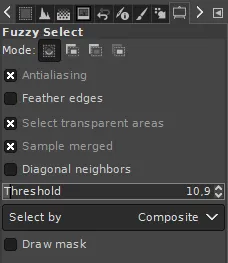
1. The fuzzy select tool
The "fuzzy select tool" is used to select objects or surroundings of homogeneous coloration. So for areas where the colors are relatively similar (in example, different shades of blue / water around the desired object/area). The tool automatically searches for all similar colored pixels in a configurable threshold range of the color under the mouse cursor and adds them to the new selection.
It is available via the magic wand icon on the toolbar or by pressing the "u" key on your keyboard.

The threshold color range can be set in the tool's properties panel. A higher threshold value expands the range in which the tool recognizes pixels as similarly colored. A lower value lowers it.
A left click onto the respective picture area starts the selection tool starting at the point of the mouse click.
If you select the surroundings of the desired image part, you can delete it by pressing the DELETE key on your keyboard. For the case you want to turn this selection into a selection of your desired object, you can invert the selection. You can find the respective command in the Selection-Menu on the top of the GIMP user interface. (Take a look at the "Basics" section.)
Examples

2. The free select tool
With the "free select tool", you can create a hand-drawn selection on an image. This tool is very useful when the surroundings of an object you want to select are chaotic or when there is little color separation from the surroundings.
There are two interesting ways to use this tool. One variation is to use it like a pen. The other variant is to set markings that are automatically linked to one another. In the GIf examples, I show both variants.
It is available via the lasso icon on the toolbar or by pressing the "F" key on your keyboard.

Examples


3. The scissors select tool
The "scissors select tool" helps you to select complex objects with the help of an automatic edge-fitting algorithm. You just have to click around an object along its edges. The edge-fitting algorithm then tries to create the correct selection shape.
Sometimes you have to correct the shape manually. This can be done, by dragging the shape-points a little bit around until the selection shape matches the object shape.
It is available via the scissors icon on the toolbar or by pressing the "i" key on your keyboard.

Examples
4. Cutting out by just making the surroundings transparent
Like the "free selection tool", making the surroundings of an object transparent is also suitable for cutting out an object whenever the respective area is from homogenous coloring.
For example, on a photograph of a clear blue sky with an airplane, the sky around the airplane can often be made transparent.
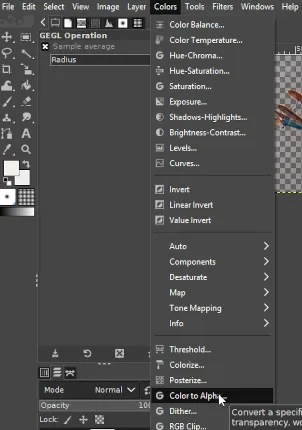
You can access the respective function on the "Color" menu. The name of this function is "Color to alpha".
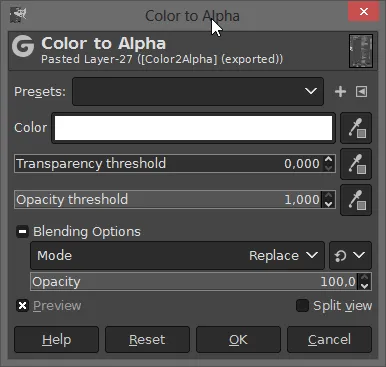
After you have clicked on the "Color to Alpha" function, a dialog window opens in which you can set the color that you want to make transparent.
You can also set threshold values and make other settings there before confirming the function. Play around with these values if you do not like the previewed result. Especially if the non-transparent area is shown too translucent in the preview.
(To see a preview of the values you want to change, activate the "Preview" option in the dialog box.)
Examples
If you have any more questions, don't hesitate to post them in the comment section.
Best regards
QuantumG
PS: You will have noticed that I am not a native English speaker. Therefore, there are probably a few linguistic bumps in my texts. If there are any passages that could trigger accidently a world war or something similar, please let me know so I can change it. :-)
🎨 The LMAC | 🏠 Our Community | 🚂 The LMAC Curation Trail | 🏅 The LMAC Contributor Badge | 🎓 The LMAC School