
Nothing will come of nothing; we must dare mighty things. -William Shakespeare
Hi dear readers, my 25th birthday is in a few days. I am glad and grateful of this milestone that is coming up. I have decided to do a quick faux calligraphy with this quote because it speaks so much to me in a way that I am starting another chapter in my life.
1. The first step is to draft my desired quote using a pencil.
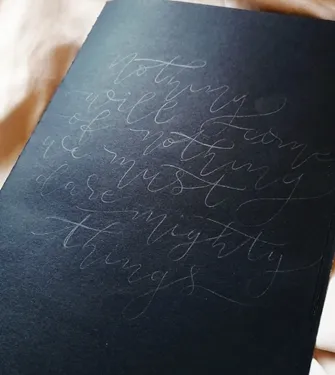
Some calligraphers skip this step and move towards inking. I, sometimes do this too but most of the time, I want to draft it first just to make sure there is enough space between the words and to make sure my words aren’t cut in between because I ran out of paper space. Through drafting first, I commit fewer mistakes and save time.
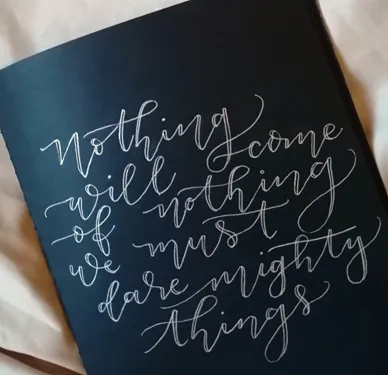
2. For the next step, use the metallic pen and write over your pencil marks. You may do necessary adjustments with the design.


While laying your ink over your pencil marks, you may adjust your writing. There are times that we cannot really follow our draft. The draft will serve as our guide and it’s okay if you do not follow it exactly. You can adjust throughout the entire process.
3. Outline the down strokes. This additional line will be filled later in order to have thicker downstrokes.
Since in calligraphy, the downward strokes are the thicker strokes and for upward, use thin lines. When outlining before filling in, be conscious and take note of the sizing of your outlines so that later, when filling in, you are consistent with the sizing of your thick strokes.
4. Moving on to my favorite part, fill in the outlines and erase the pencil marks. Finally, you have your finished product!
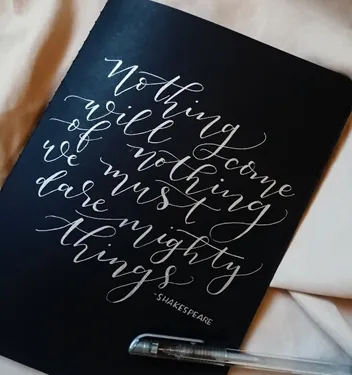
Lovely isn’t it? All you need is a metallic pen and a black paper to create this art work. What are you waiting for? Create your very own now! Here are additional tips for you:
Bonus Tips:
•Test your pen first in a separate black paper. Some black paper will cause the pen ink to write intermittently. Try and test first if the pen is compatible with your paper. Sometimes, writing first on a separate paper will also condition the pen and avoid blots. You don’t want to ruin your work later, better test first.
• Choose a smooth black paper. Sometimes, the problem is not with the pen but with the paper. Make sure you use the good ones. You don’t necessary need to have the expensive ones, just the ones with good quality.
• Have fun. It cannot be avoided to have little mistakes. Forgive yourself, it’s okay, the most important thing is you have fun while making your artwork. Practice will make you better, so try and try and through time, you’ll get better.
Thank you for reading and if you like this artwork and you want to see more of my works, leave a comment below on what I should do next! You can also post a photo of your very own work if you are inspired by mine. Until Next time!