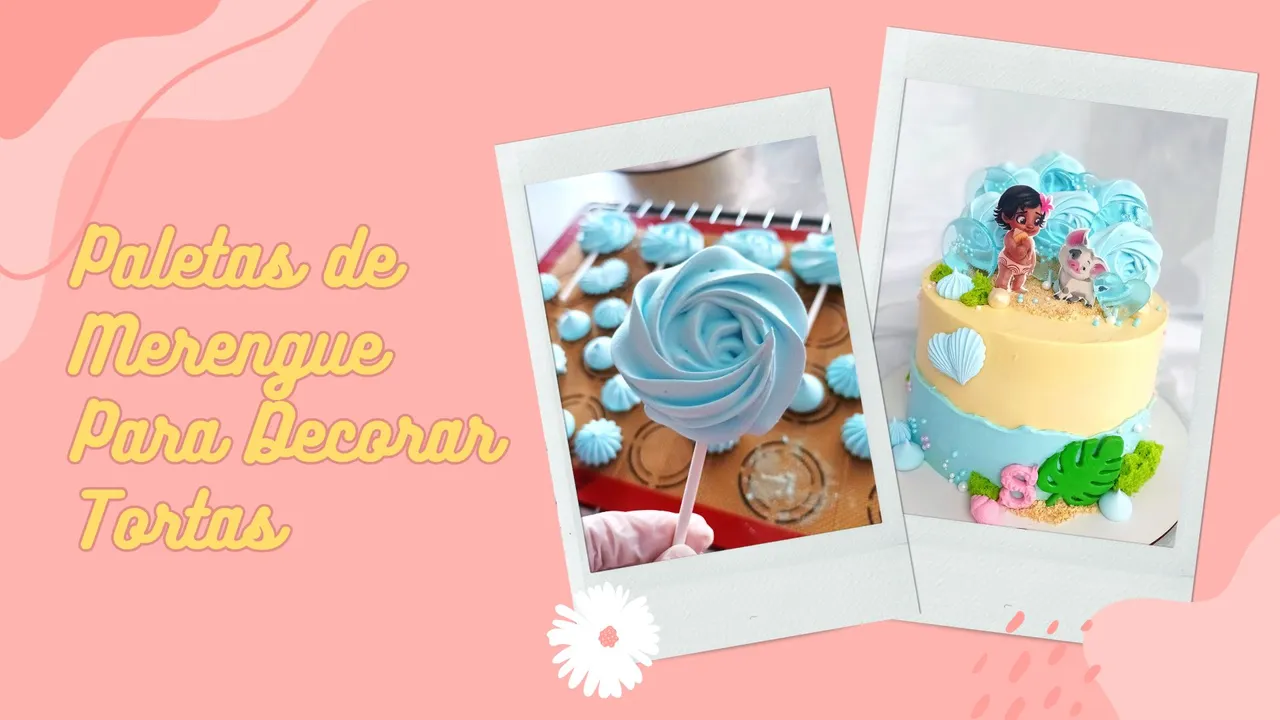
Las dos últimas semanas, he estado bastante ocupada realizando algunas gestiones para unos exámenes médicos que necesito hacerme y además estuve haciendo un curso de Mascotas Coloridas en Acuarelas, pero de estos temas les contaré con más detalle en otras publicaciones. Adicionalmente, tuve mucho trabajo con una torta cuya decoración incluía, paletas de isomalt y Paletas de Merengue y bueno, son de esas decoraciones que no había hecho nunca, sin embargo acepté porque lo vi como una oportunidad de aprendizaje, pues hace tiempo quería hacer este tipo de decoración en mis tortas.
Debo decirle que pensé que sería más difícil hacer las paletas de isomalt, sin embargo me resultó bastante fácil y divertido. En cuanto a las paletas de merengue sí que me preocupaba un poco hacerlas, primero porque era la primera vez que las hacía y segundo porque debían ser más resistentes que los clásicos merengues que todos conocemos, pues se usarían en la decoración de una torta.
En vista de que debía garantizar una decoración que resistiera al clima y a la movilidad, estuve buscando diferentes recetas de paletas de merengues, hasta que me topé con una que me pareció la más adecuada y que además cumplió con su propósito.
¡Si quieres saber cómo se hacen estas Paletas de Merengue, te invito a que te pongas tu delantal y me acompañes a mi Cocina, "Zu cocina"!
Vas a necesitar los siguientes ingredientes:
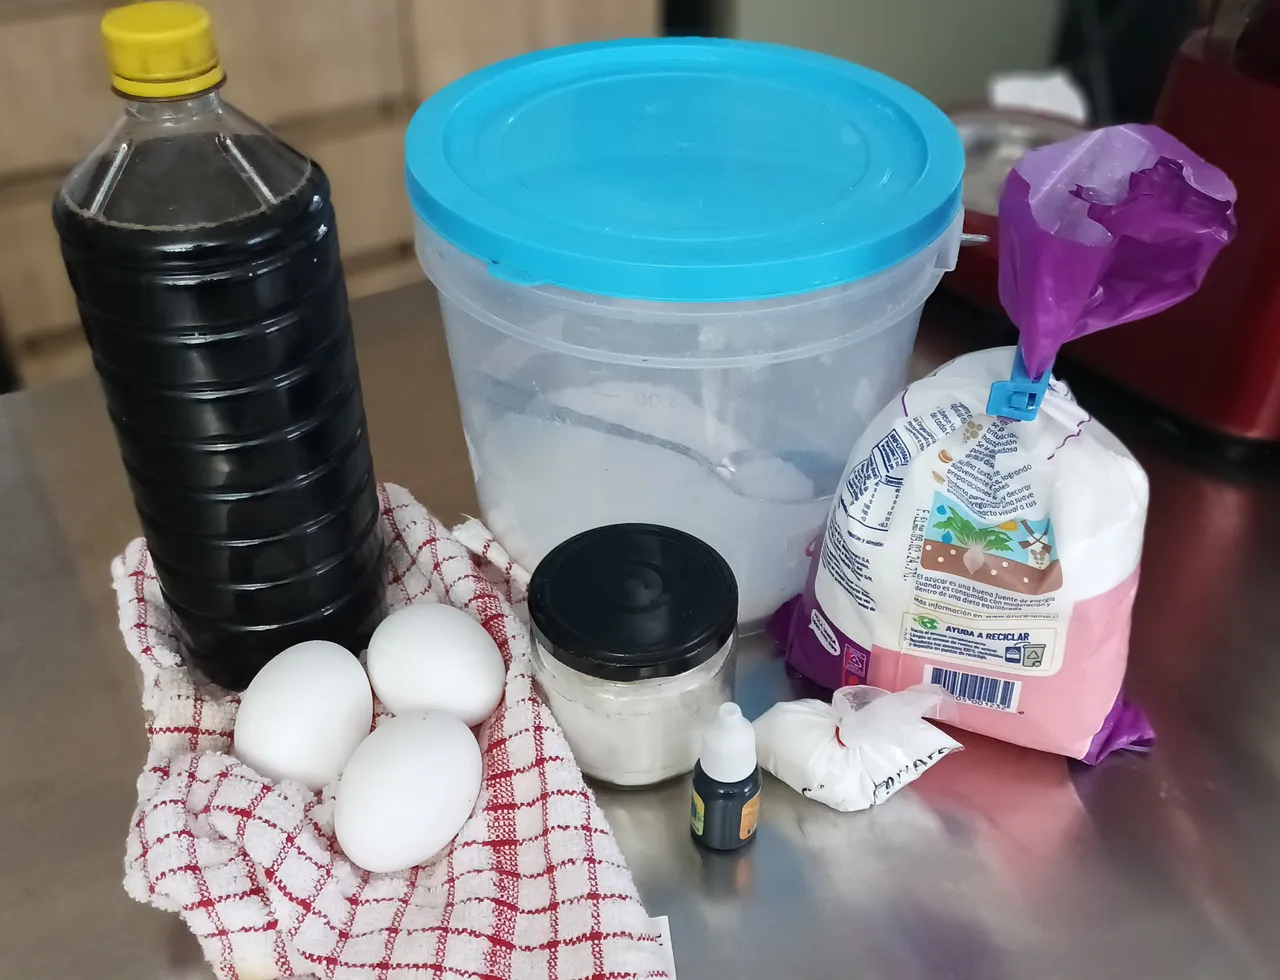
• 104 gms de clara de huevos. Eso equivale a la clara de 3 huevos.
• 208 gms de azúcar refinada.
• ¼ cdita de crémor tártaro. Se puede sustituir por un chorrito de limón o vinagre.
• Pizca de sal.
•1 cdita de esesncia de vainilla
• 25 gms de azúcar glass.
Adicional:
• Termómetro de cocina.
• Colorante en gel comestible.
• Boquillas de estrella grande.
•Papel de cocina o un tapete de silicona.
•Palitos de papel.
Preparación
Limpiar muy bien con vinagre el bowl y el globo o gancho de tu batidora. Esto se hace para eliminar todo rastro de grasa lo que permitirá que nuestro merengue suba mejor.
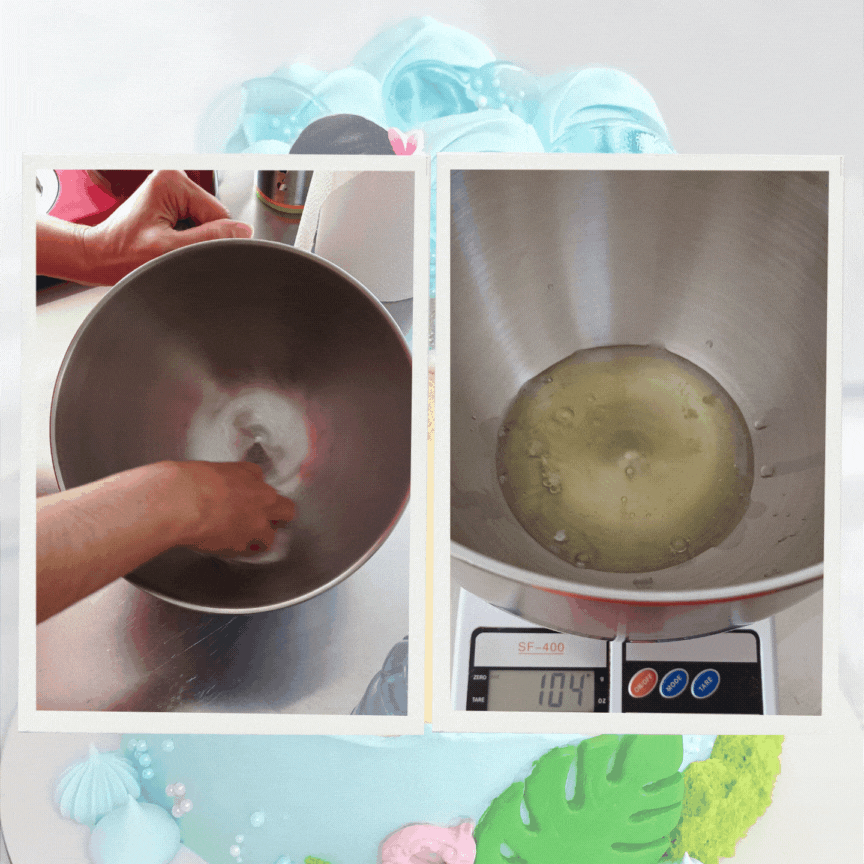
Después de separar las claras de las yemas, agregarlas al bowl junto con el azúcar y la pizca de sal, remover enérgicamente hasta integrar un poco.
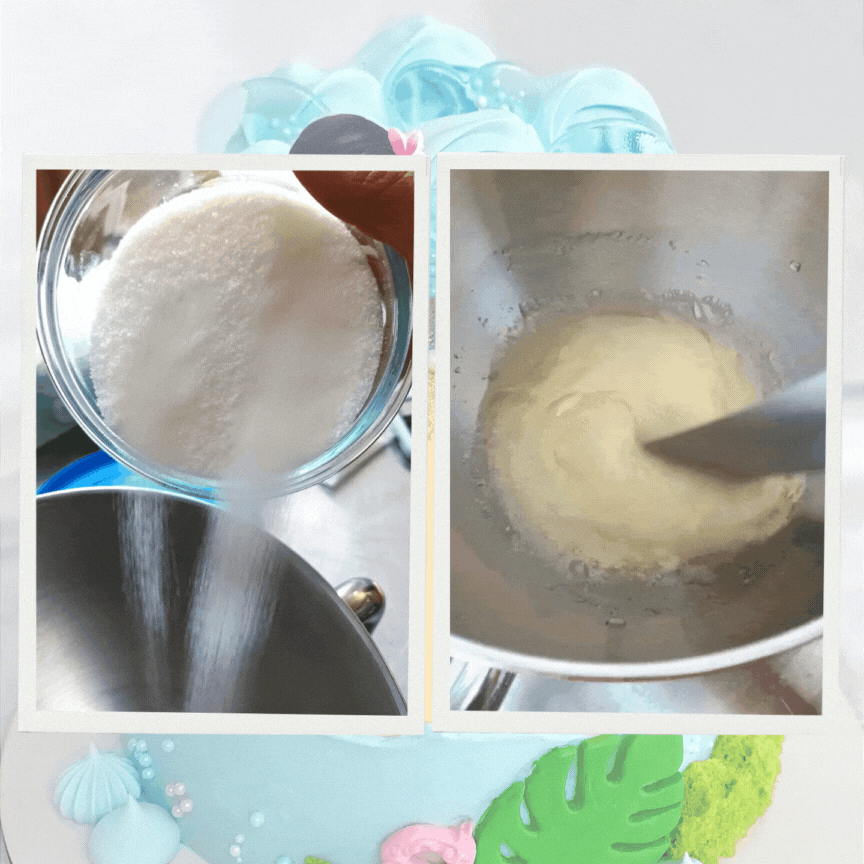
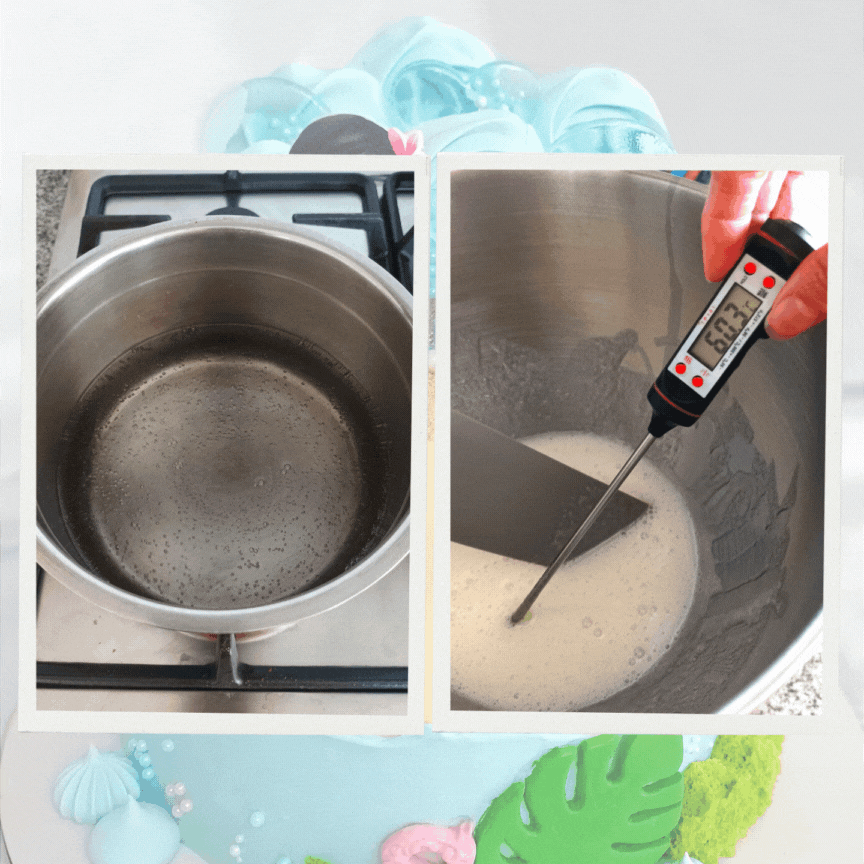
Luego, llevar a baño de maría a fuego medio bajo y sin dejar de revolver. El bowl no debe tocar el agua caliente porque no queremos que las claras se cocinen. Cuando el termómetro llegue a 60 grados centígrados retirar del baño de maría o cuando el azúcar se haya derretido completamente y no sientas rastros de grumos. Esto lo sabrás tocando la mezcla con tus dedos.
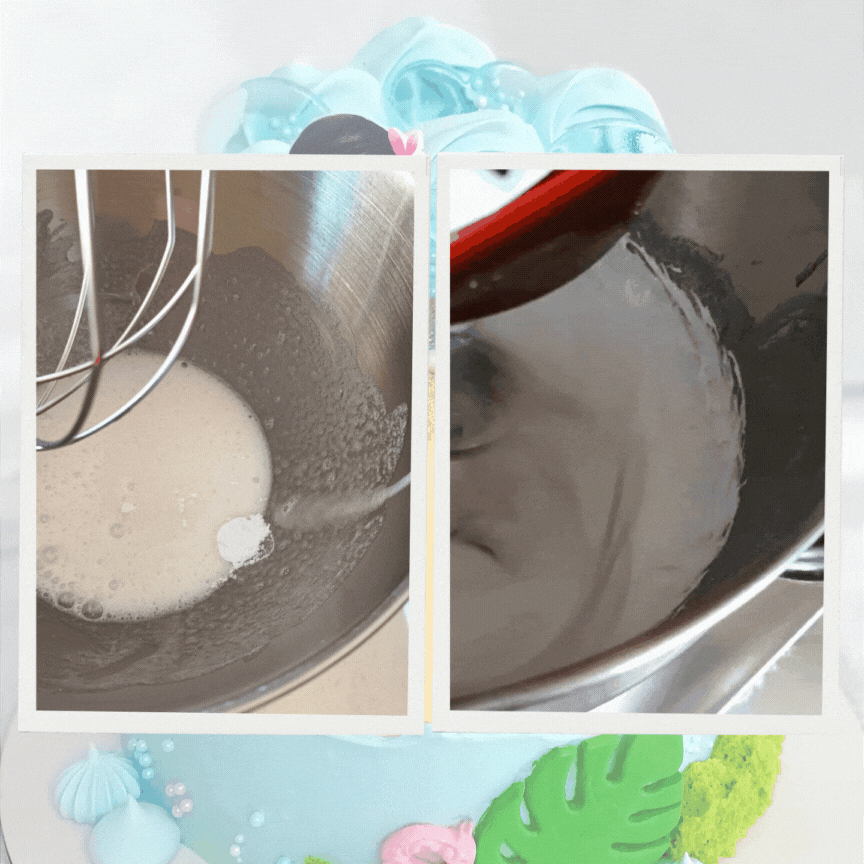
Inmediatamente, colocar el bowl en la batidora, agregar el crémor tártaro y batir durante unos 10 a 15 minutos aproximadamente a la velocidad más alta que tenga tu batidora.
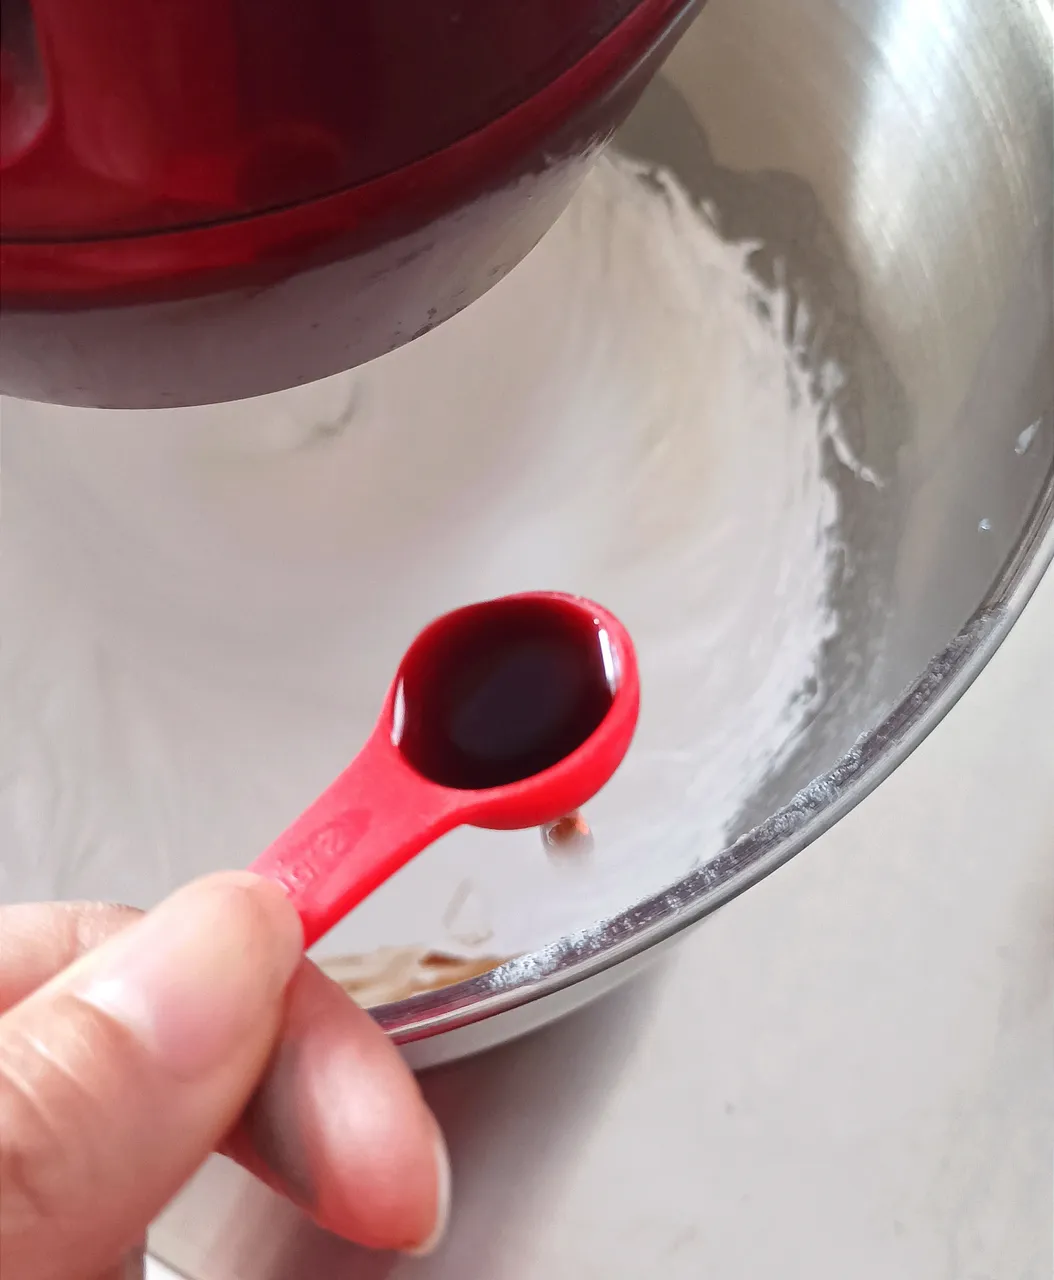
Después que hayan transcurrido 5 minutos, añadir la esencia de vainilla y seguir batiendo.
Pasado los 10 minutos y veas que tu merengue forma picos en forma de gancho, entonces ya está listo para que le agregues el azúcar glass, batir de nuevo por unos pocos segundos hasta que el azúcar glass se incorpore completamente.
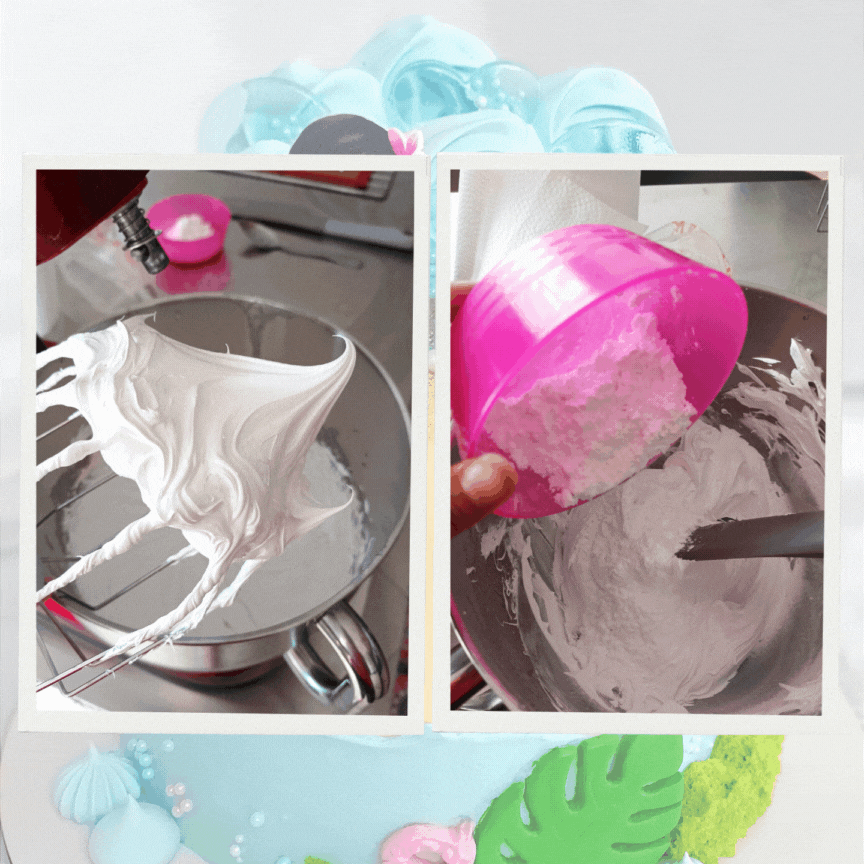
Hecho esto, retirar el bowl de la batidora y agregarle el colorante en gel al merengue y cuando tengas el color deseado, colocar el merengue dentro de una manga pastelera junto con la boquilla.
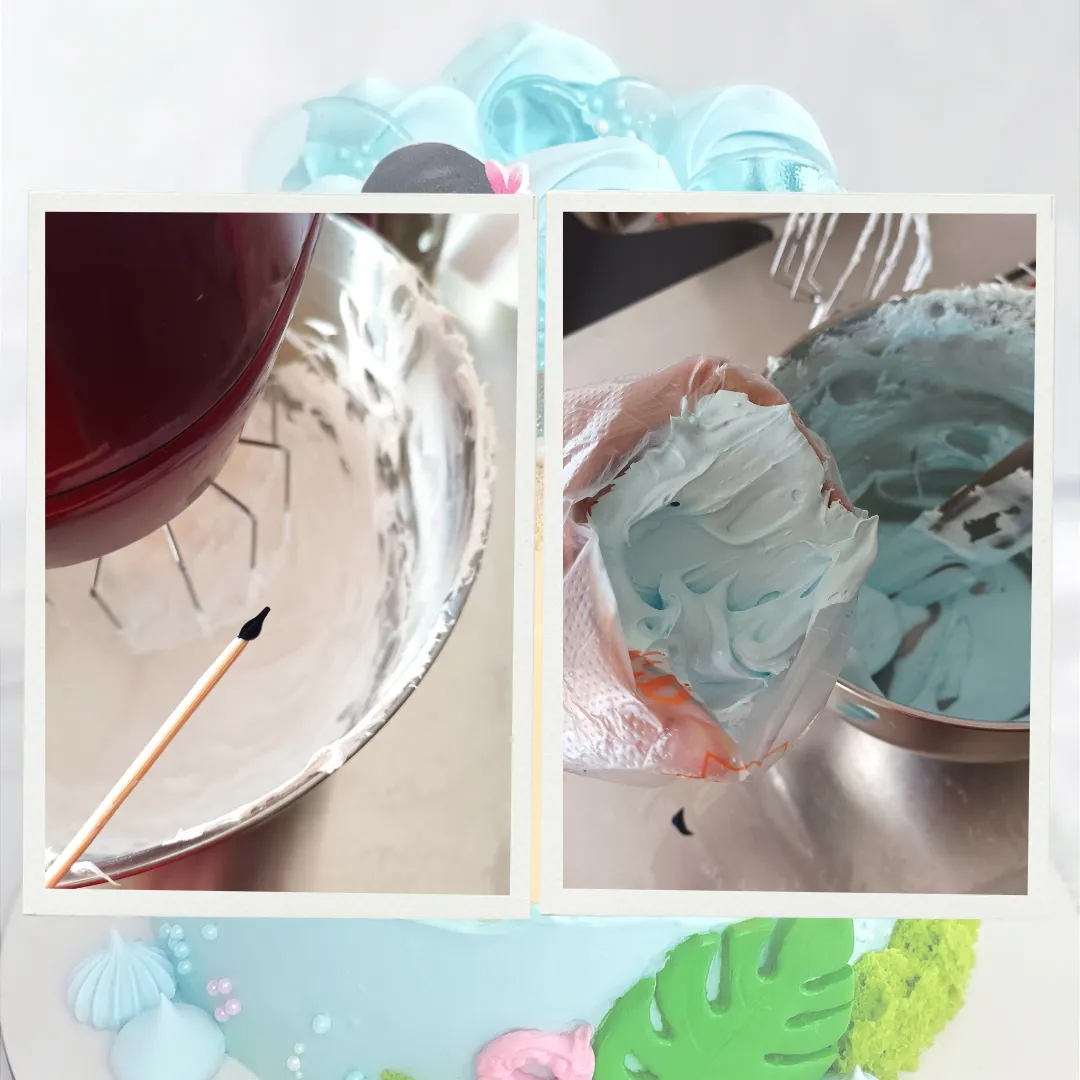
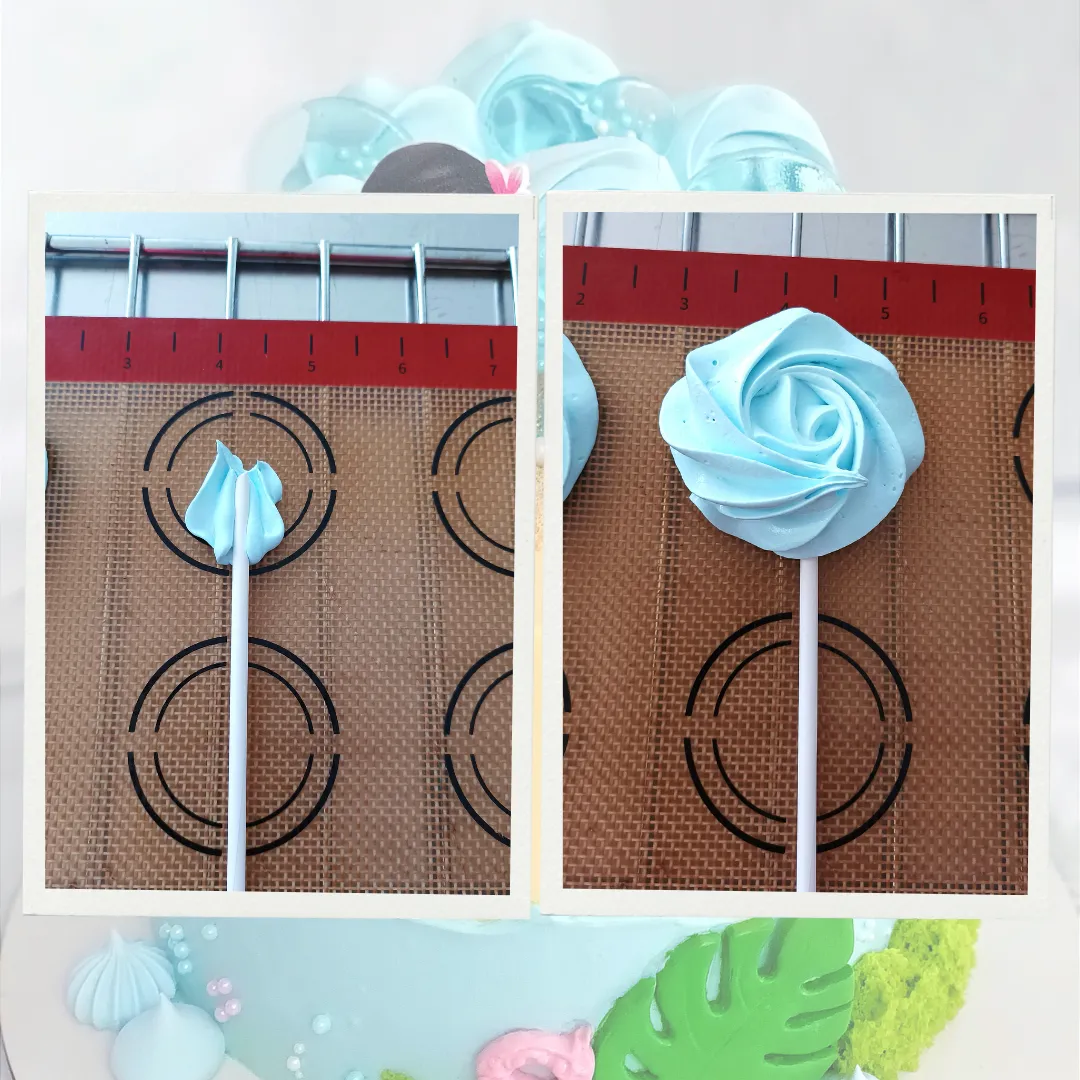
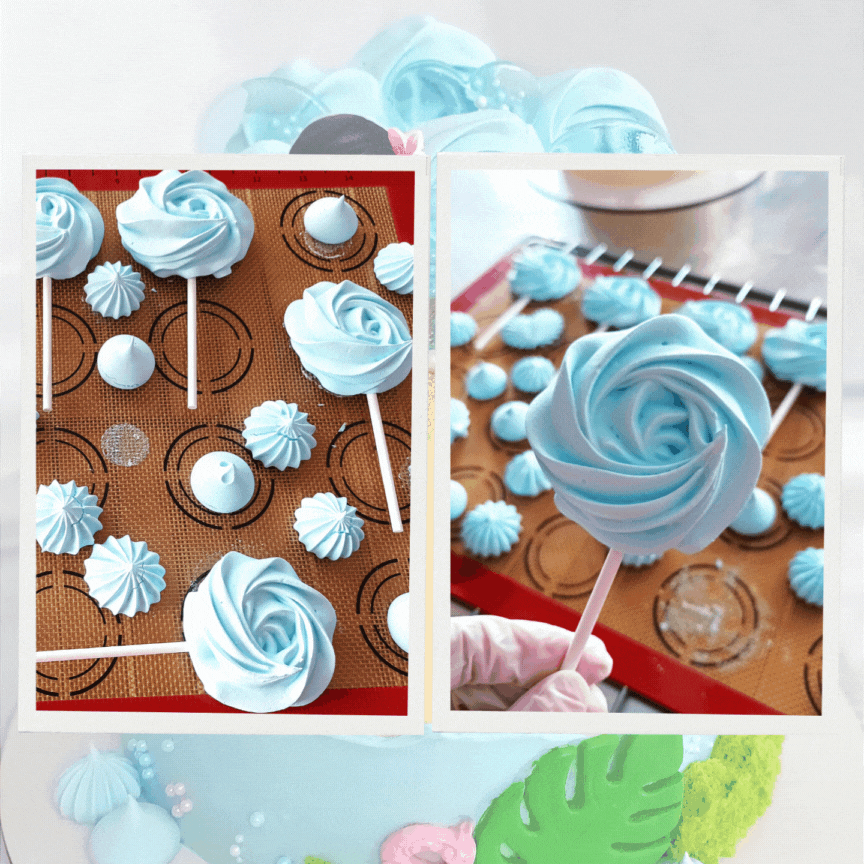
Sobre un papel de cocina o un tapete de silicona, colocar un poquito de merengue para pegar los palitos de papel y sobre el palito de papel ya puedes realizar la forma que más te guste. Como pueden ver yo hice rosetones, pero puedes usar diferentes boquillas para hacer diferentes formas.
Cuando hayas terminado de hacer las paletas, llevar a un horno precalentados a 80 grados centígrados durante 2 horas aproximadamente. Tiempo en el que las paletas de merengue se secaran, pues estos no se cocinan, sino que se secan.
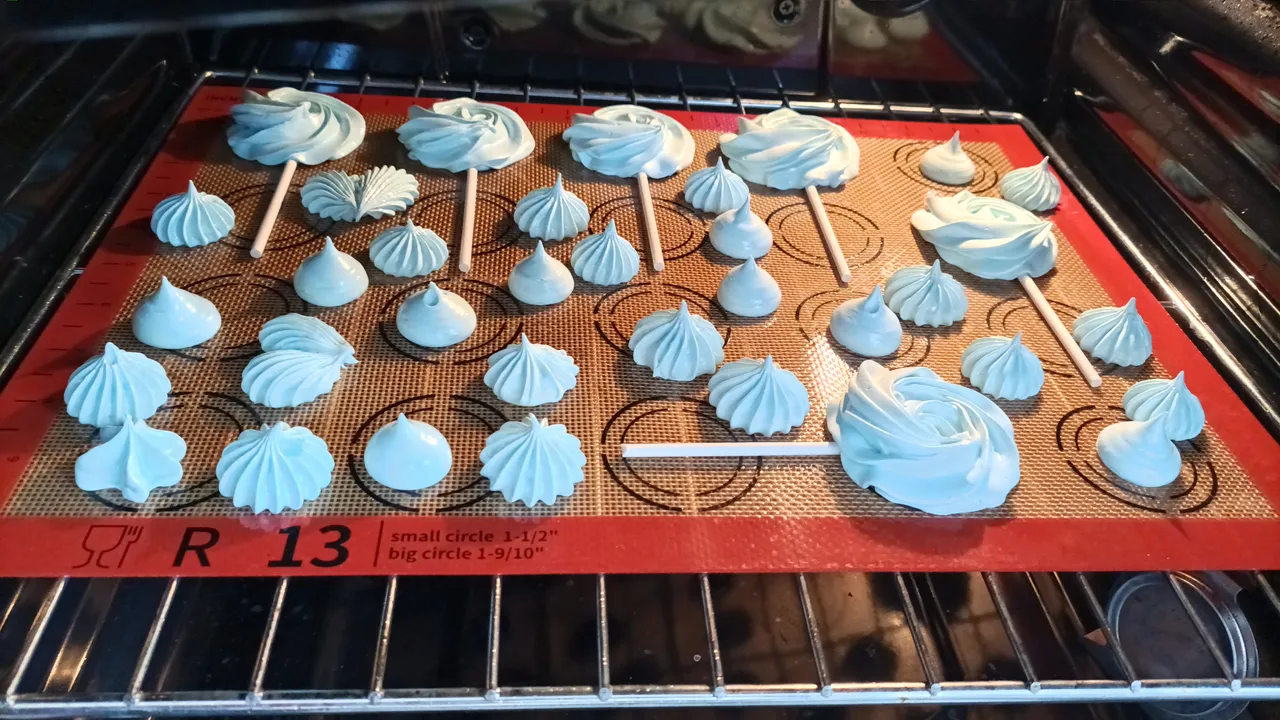
Pasado este tiempo, retirar del horno y dejar que se enfríen a temperatura ambiente.
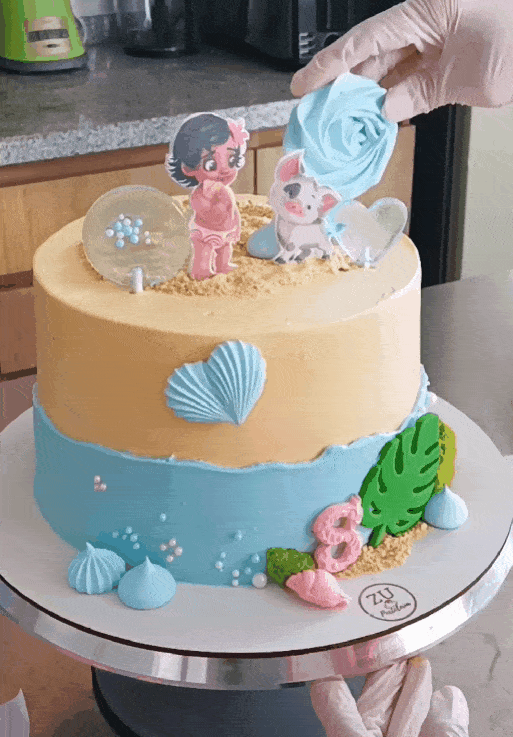
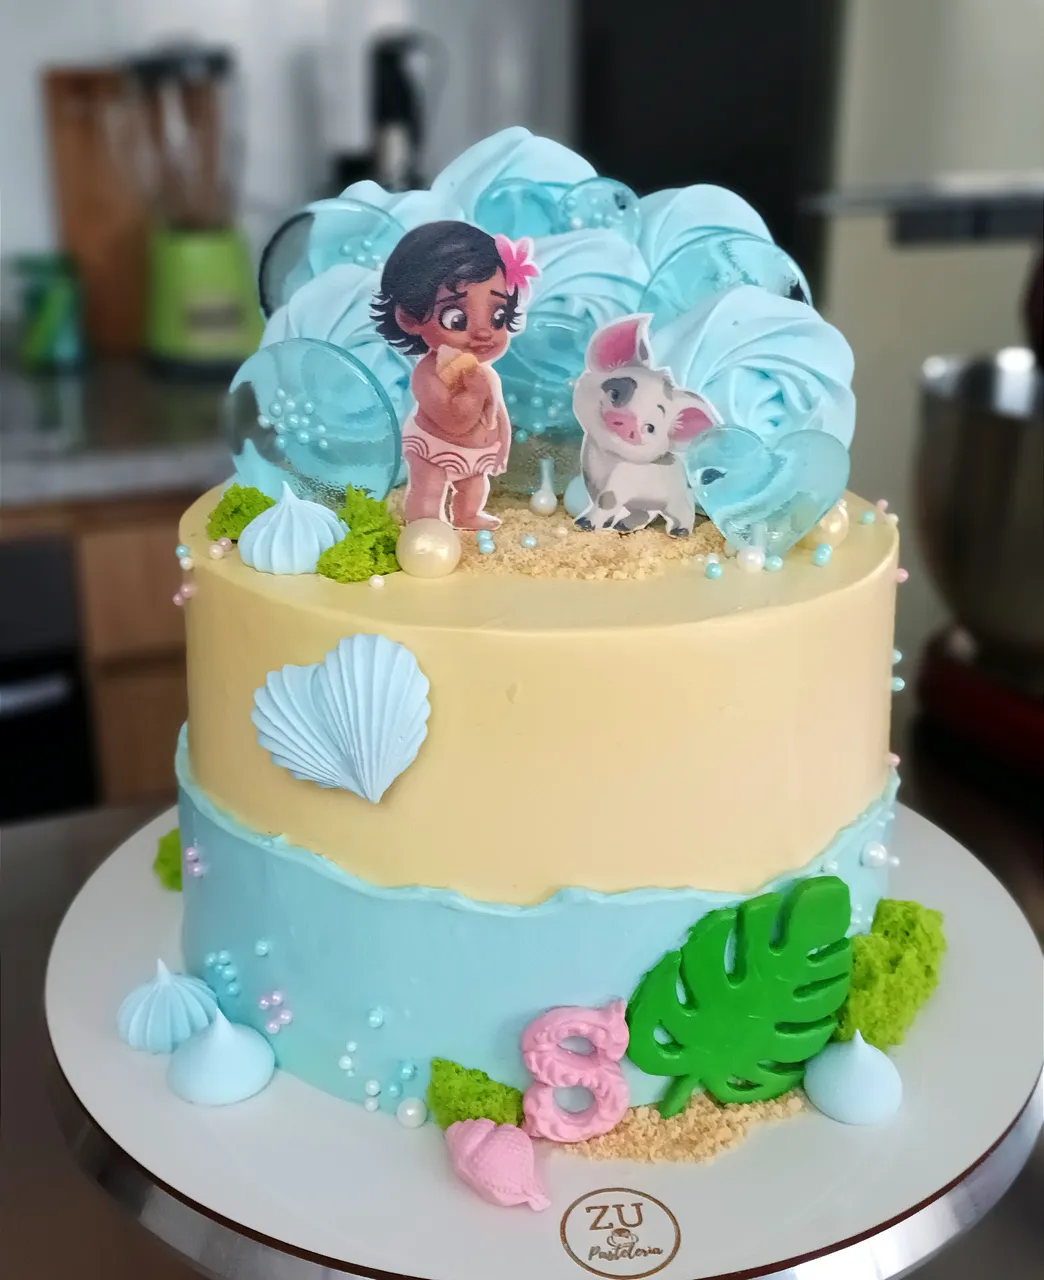
Cuando se hayan enfriado, ya puedes decorar tus tortas con estas hermosas paletas de merengue o las puedes usar para decorar la mesa de cumpleaños o también las puedes meter en una bolsita de celofán para regalarlas o venderlas.
Me encantaron como quedaron estas Paletas de Merengue y lo hermosas que se veía en la torta de Moana. Sin duda estas paletas fueron el complemento perfecto en esta decoración.
¡Espero te haya gustado el resultado tanto como a mí!
Gracias por acompañarme en este proceso y por todo el apoyo.
¡Tu amiga, Zuuu!
También me puedes encontrar en instagram como: @zu_pasteleria, @tayiitos y en RedBubble en mi tienda de ropas y productos.
Todas las fotos y videos de esta publicación fueron realizadas con mi celular Xiaomi Redmi 10.
Recursos: Canva y DeepL Translator.

ENGLISH

The last two weeks, I've been quite busy doing some paperwork for some medical tests I need to take and I was also doing a Colorful Pets in Watercolors* course, but I'll tell you more about these topics in other posts. Additionally, I had a lot of work with a cake whose decoration included, isomalt pops and Merengue Pops* and well, they are one of those decorations that I had never done before, however I accepted because I saw it as a learning opportunity, since I had wanted to do this type of decoration on my cakes for a long time.
I must tell you that I thought it would be more difficult to make the isomalt pops, however it turned out to be quite easy and fun. As for the meringue popsicles, I was a little worried about making them, first because it was the first time I made them and second because they had to be more resistant than the classic meringues we all know, since they would be used in the decoration of a cake.
In view of the fact that I had to guarantee a decoration that would resist the weather and mobility, I was looking for different recipes of meringue popsicles, until I came across one that seemed to me the most suitable and that also fulfilled its purpose.
If you want to know how to make these Meringue Pops, I invite you to put on your apron and join me in my kitchen, "Zu cocina"!
You will need the following ingredients:
• 104 gms of egg whites. That's equivalent to the whites of 3 eggs.
• 208 gms of refined sugar.
• ¼ teaspoon of cream of tartar. If you do not have cream of tartar, you can substitute it with a splash of lemon or vinegar.
Pinch of salt.
• 1 teaspoon vanilla essence.
• 25 gms of powdered sugar.
Additional:
• Cooking thermometer.
• Edible gel food coloring.
• Large star nozzles.
• Cooking paper or silicone mat.
•Paper sticks.
Preparation
Clean very well with vinegar the bowl and the balloon or hook of your mixer. This is done to eliminate all traces of fat which will allow our meringue to rise better.
After separating the egg whites from the yolks, add them to the bowl along with the sugar and the pinch of salt, stir vigorously until they are well integrated.
Then, place in a bain-marie over medium-low heat, stirring constantly. The bowl should not touch the hot water because we do not want the egg whites to cook. When the thermometer reaches 60 degrees Celsius, remove from the water bath or when the sugar has completely melted and you feel no traces of lumps. You will know this by touching the mixture with your fingers.
Immediately place the bowl in the mixer, add the cream of tartar and beat for approximately 10 to 15 minutes at the highest speed your mixer has.
After 5 minutes have elapsed, add the vanilla essence and continue beating.
After 10 minutes and you see that your meringue forms hook-shaped peaks, then it is ready for you to add the powdered sugar, beat again for a few seconds until the powdered sugar is completely incorporated.
Once this is done, remove the bowl from the mixer and add the gel coloring to the meringue and when you have the desired color, place the meringue in a piping bag with the nozzle.
On a paper towel or a silicone mat, place a little bit of meringue to stick the paper sticks and on the paper stick you can make the shape you like. As you can see I made rosettes, but you can use different nozzles to make different shapes.
When you have finished making the pops, take them to a preheated oven at 80 degrees Celsius for about 2 hours.
During this time the meringue pops will dry out, as they are not cooked, but dried.
After this time, remove from the oven and let them cool to room temperature.
When they have cooled, you can decorate your cakes with these beautiful meringue pops or you can use them to decorate the birthday table or you can also put them in a cellophane bag to give them as gifts or sell them.
I loved how these Meringue Pops turned out and how beautiful they looked on Moana's cake. Without a doubt these popsicles were the perfect addition to this decoration.
I hope you liked the result as much as I did!
Thank you for joining me in this process and for all the support.
Your friend, Zuuu!.
You can also find me on instagram as: @zu_pasteleria, @tayiitos and on RedBubble in my clothes and products store.
All photos and videos in this post were taken with my Xiaomi Redmi 10 cell phone.
Resources: Canva and DeepL Translator.