I like seeing the exact code written in Vanilla JavaScript rewritten with the help of a framework. Not many tutorials exists of same code base transformations, so I was excited about this one.

First, I learnt how to split the app into separate components. In vanilla js, everything was put into one script.js file. Here, they were split into an App, a Form, a TodoList and a Todo component. The app.js file contained the states and well as the imports of the other components, and also rendered the Form and the TodoList components.
Now, in the original Js code, the form had an ‘onSubmit’ event listener attached to the submit button. Since react is different, I learnt how to get the same result using hooks. The hook for this was :
const [inputText, setInputText] = useState(" ")
I learnt that the empty quotes simply meant that it would have an empty initial state until we typed something in the input field. Both the inputText and setInputText had to be passed down as props to the Form component via prop drilling. In the actual Form component, they were further destructured. The Form component contained the JSX code with the input and the buttons to handle events. I learnt that to get the value of the input, the inputText that was passed down via props had to be assigned to it.
I learnt that writing event Handlers is the way to go with updating the input field. Something like this:
 const inputTextHandler=(e)=>{
        console.log(e.target.value)
        setInputText(e.target.value)
    }
I learnt that to use this event handler, it would need to be passed as a prop to the onChange event in the input like this:
<input onChange={inputTextHandler}/>
The setInputText would also reset the value of the input to what is gotten in the e.target.value. Similarly, an event handler was attached to the submit button and inside the submit handler, a different hook that was passed as props to be able to create new todos, was set in it.
The hook was
const[todos, setTodos] = useState([])
(I learnt that the todos needed to be stored in an array as they’d have an id, a property to show they were either completed or not and the text entered in the input field.)
I learnt that it was important to spread the todos first to avoid them being overwritten. So, the submitTodoHandler looked like this:
const submitTodoHandler=(e)=>{
        e.preventDefault()

        setTodos([
            ...todos,{text:inputText, completed:false, id:Math.random()*1000}
        ])

        setInputText(" ")
    }
In the TodoList.js file, the todos, setTodos and a new filteredTodos hook which were set in the App. js were passed down as props to this component. Just like we had in the original vanilla js code, a switch statement was written. Here’s a comparison of the code in Vanilla Js and React:
Vanilla JS
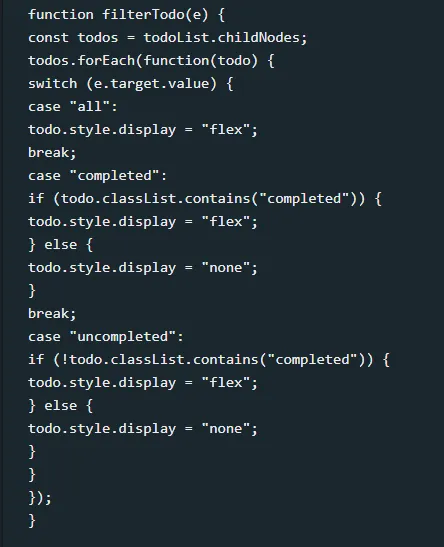
React
const filterHandler=()=>{
    switch(status){
      case 'completed':
      setFilteredTodos(todos.filter(todo=>todo.completed===true));
      break;

      case 'uncompleted':
        setFilteredTodos(todos.filter(todo=>todo.completed===false));
      break;

      default:
        setFilteredTodos(todos)
        break;
    }
  }
I noticed that in vanilla js, we wrote code like todo.classList.contains("completed"), but in react, we could use the dot notation to check for the case. Also, the ‘status’ in the parameter was a hook of it’s own(const[status, setStatus] = useState('all')), whereas in vanilla js, what we used was ‘e.target.value’. In the app.js file, I learnt that it was necessary to pass this filter handler as prop to the TodoList component, as well as the todos and setTodos.
What was then left was to display this filtered list in the TodoList component after mapping through the array:
{filteredTodos.map(todo=>(
             <Todo key={todo.id} todo={todo} text={todo.text} todos={todos} setTodos={setTodos}/>
         ))}
I learnt to think about what essentially a single todo was in a react context. The props necessary for this app were the text, which was gotten from clicking on the submit button, a single todo, gotten from the filtered array from the todoList component, all the todos as well as the setTodos. I learnt that it was in this component that we had to handle the deletion and of figuring out how to identify a completed todo.
To delete a todo, a new deleteHandler was created. Inside of it, we set the todos to display todos that did not have matching ids when the button was clicked. This is done by filtering the todos again like this:
const deleteHandler = () => {
  setTodos(todos.filter((el) => el.id !== todo.id));
};
This was similar for the completehandler which was responsible for toggling the completed state once a map function had been used on it:
const completehandler = () => {
    setTodos(
      todos.map((item) => {
        if (item.id === todo.id) {
          return {
            ...item,
            completed: !item.completed,
          };
        }
        return item;
      })
    );
  };
I learnt it was necessary to return all the items before toggling it, if not they’d be overwritten. All that was left was to assign the handlers as props to the buttons responsible for handling them.
The list < li > element in the todo component that was meant to be toggled needed to be written differently, since the class also needed to be rendered conditionally with a ternary operator.
<li className={`todo-item ${todo.completed ? "completed" : ''}`}>{text}</li>
To summarize, I learnt a lot about prop drilling, how to use hooks and write event handlers, how to set random id’s to elements, to filter out those elements based on a certain id matching, and to toggle classes. You can find this tutorial on Dev Ed's youtube channel here