
[Edit of Image1]
Introduction
Hey it's a me again @drifter1!
Today we continue with the Logic Design series on Verilog to get into how Sequential Logic is defined and implemented.
A circuit is considered to be a sequential circuit when its output is "updated" on specific events (like the positive edge of a clock signal). Common examples of such circuits are the various flip-flops, latches, finite state machines (FSMs) and more. FSMs will be covered in a later article more in-depth as they are very important! Either way, Verilog provides two main procedural blocks that can be used to define such logic, the initial and always block. The later has already been covered in the article on combinational logic, but in this article we will cover how it can be used for sequential logic. After that is out of the way, we will get into the differences between blocking and non-blocking assignments, and how and when each should be used. In order to execute statements in parallel inside of procedural blocks, Verilog provides something known as statement groups.
So, without further ado, let's get straight into it!
Procedural Blocks in Verilog
In Verilog, behavioral modeling is mostly done inside of procedural blocks. There are two types of procedural blocks:
- Initial block : These blocks execute only once and at t = 0.
- Always block : These blocks execute everytime the trigger event(s) occurs.
Initial Block
The basic syntax of the initial block is as follows:
initial begin
    /* statements */
end
So, the initial keyword is followed by statements which are enclosed within the begin and end keywords (similar to the always block, basically).
Example
For example, let's consider a circuit with a clock, reset and data input signal.
Inside of the testbench one might find the following code snippet:
initial begin
    clk = 0;
    rst = 0;
    data_in = 0;
endAs you might have guessed, the initial block can't be synthesized, and so it is mainly used for initialization purposes in testbenches.
Always Block (for Sequential Logic)
The basic syntax of the always block is:
always @ (sensitivity_list) begin
    /* statements */
end
Because these blocks are "always" executed they can and are used to model synthesizable sequential logic.
Sensitivity List
The sensitivity list includes the triggers/events for which the procedural block is executed. After the statements are executed the blocks becomes inactive again, waiting for the next trigger event to occur.
In the case of combinational logic, those triggers where all the input signals that affect the result of the combinational block.
But, its also possible to use the shortened @* to automatically define that all right-hand side signals that are in some assignment statement of the block should be included in the sensitivity list.
As such the following two always blocks define identical combinational logic:
always @ (A, B, C) begin
    O = A & B & C;
end

always @* begin
    O = A & B & C;
end
In the case of sequential logic, the trigger is mostly a clock signal, as the logic is by definition synchronous. Sometimes there might also be an asynchronous reset signal. There are also two categories of sequential elements:
- Level-Sensitive : Trigger at the positive or negative pulse
- Edge-Sensitive : Trigger at the positive or negative edge
The most common type is the positive edge-triggered memory element. Using the keyword posedge before a clock signal, its possible to define that the positive edge of the clock triggers the always block. For a negative edge (for example an asynchronous active-low reset) the keyword negedge is used. A general rule is that "Latches should be avoided in designs!". So, I will not even mention how level-sensitive elements are defined!
Example
For example, supposing that a circuit is positive-edge triggered and with an asynchronous active-low reset. The always block might look something like this:
always @ (posedge clk or negedge rst) begin
if(!rst)
    /* reset circuit */
else
    /* sequential logic */
end
Blocking and Non-Blocking Assignments
Outside of procedural blocks only blocking assignments are used, which means that only the symbol = is used. But, inside of an always block, assignments are split into two categories:
- Blocking (=) : assignment and evaluation is done immediately (mostly used for combinational logic)
- Non-Blocking (<=) : assignment and evaluation is done after the procedural block, allowing for sequential execution (used for sequential logic)
- When describing combinational logic use blocking assignments and put all the inputs in the sensitivity list of the procedural block (or use the
@*shortcut) - When describing sequential logic use non-blocking assignments and put only the clock signal (i.e.
posedge clk) and asynchronous signals (such as reset, enable) in the sensitivity list
Identical and Non-Identical Circuit Descriptions
When there is only one output using either of the two assignments yields the same result. The same is also true if neither of the two outputs is referenced in the logic function of the other output.
As such, the following two descriptions are identical:
always @* begin
    Y = A ^ B;
    Z = B ^ C;
end

always @* begin
    Y <= A ^ B;
    Z <= B ^ C;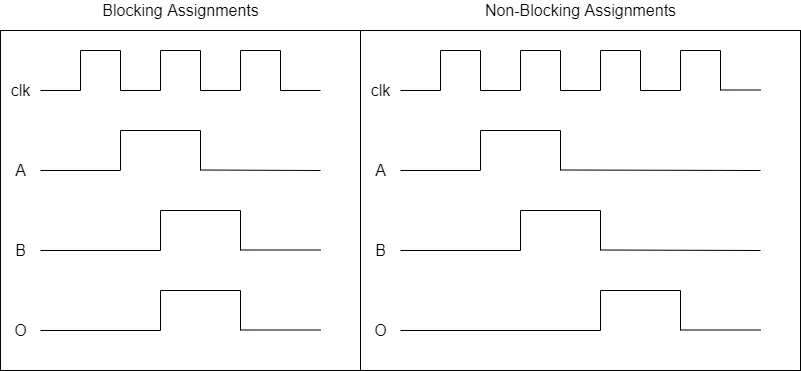
endTo understand the difference better, let's look at the following two sequential logic descriptions now:
always @ (posedge clk) begin
    B = A;
    O = B;
end

always @ (posedge clk) begin
    B <= A;
    O <= B;
end
Let's say that clk = A = B = 0 at first. In the case of the blocking assignment (=) description, if A = 1 and a positive edge event occurs in the clock signal (0 → 1), then both B and O will change to 1 as well, simultaneously. But, in the case of the non-blocking assignment (<=) description, the first positive edge event will change B, whilst O will remain 0, and only change at the next positive edge event into 1. A simple visualization can be found below.
Statement Groups
The begin-end block that has been used up to this point is basically a sequential assignment/statement group. But, Verilog also allows for parallel assignment using the fork-join block:
initial begin
fork
   /* assignments */
join#number) in respect to t = 0, and not to the previous assignment.
For example, the following two descriptions lead to the same behavior:
initial begin
    clk = 0;
    #10; rst = 0;
    #5; enable = 0;
end

initial begin
    clk = 0;
    #10; rst = 0;
    #15; enable = 0;
endSo, when using the begin-end block remember that the individual delays accumulate (each delay is added to the previous delay). And because the statements are evaluated sequentially, the block finishes when the last statement is executed.
On the other hand, for the fork-join block all statements are evaluated in-parallel and so the timing is absolute to the beginning of the group. This also means that the block doesn't finish on the last "written" statement, but on the last statement that completes (statement with the highest delay).
RESOURCES:
References
- http://www.asic-world.com/verilog/veritut.html
- https://www.chipverify.com/verilog/verilog-tutorial
- https://www.javatpoint.com/verilog
Images
Previous articles of the series
- Verilog Introduction → Basic Syntax, Data Types, Operators, Modules
- Combinational Logic in Verilog → Assign Statement, Always Block, Control Blocks, Gate-Level Modeling and Primitives, User-Defined Primitives
- Combinational Logic Examples → One Circuit - Four Implementations, Encoder, Decoder, Multiplexer
Final words | Next up
And this is actually it for today's post!
Next time we will get into full-on Sequential Logic Examples...
See Ya!

Keep on drifting!