Introduction
I've been using a basic server built around a Raspberry Pi 3 with 1GB of RAM for some time now. I introduced it in my previous post titled So many projects, so little time....
Recently, with the announcement of the Raspberry Pi 5, I had the opportunity to purchase a Raspberry Pi 4 with 8GB of RAM at the official price through Digi-Key. My Raspberry Pi 3's limited RAM had become a constraint, especially as it only allowed me to run my Hive auto-voter (which I also presented in the same post). With a multitude of projects in mind, I required a device with more RAM. However, given that my need for pure computing power is relatively low, the Raspberry Pi 5 seemed like overkill.
What is the Raspberry Pi and Nextcloud ?
The Raspberry Pi is a versatile single-board computer that can be used for a variety of purposes. In this article, I will guide you through the process of setting up a personal cloud server using Nextcloud on a Raspberry Pi 4. Nextcloud is an open-source, self-hosted file-sharing and collaboration platform that allows you to store and manage your data securely. This guide is specifically tailored to a Raspberry Pi 4 with the following hardware configuration:
- Raspberry Pi 4 with 8GB RAM
- 250GB SSD drive connected via USB
- 64GB SD card
- Operating System: Raspberry OS (Debian 12.2 64-bit), headless installation
Why Nextcloud on Raspberry Pi 4?
You might wonder why you should use a Raspberry Pi 4 as a personal cloud server. The answer is simple: it's cost-effective and provides full control over your data. You can have your own Dropbox-like solution for sharing files with friends and family while avoiding the limitations and costs associated with commercial cloud services like Google Drive or Dropbox. Additionally, the Raspberry Pi 4 offers ample performance for basic server tasks, and it's a fun project for tech enthusiasts.
Other requirements
I own a domain name registered with Gandi, a reputable French hosting company that I've been using for some time now due to their excellent service. If you also have a domain name, it's essential to set up a dynamic DNS service for your server. Fortunately, my Internet Box comes with built-in DYN-DNS functionality, making this process straightforward.
Once you have a dynamic DNS service in place, the next step is to configure your DNS redirections to point to your DYN-DNS. To achieve this, you can use a CNAME (Canonical Name) record, which is a type of DNS record that creates an alias for a domain name. In simpler terms, it allows you to map your domain name to another domain name, such as your DYN-DNS address.
Setting up the CNAME record should be your initial priority in this process, as it may take some time for the changes to propagate throughout the DNS network.
Installing Apache Web Server
The first step in setting up Nextcloud is to install the Apache web server on your Raspberry Pi 4. This will provide the necessary infrastructure for redirecting calls to your Nextcloud Docker instance. Open a terminal and run the following commands:
# sudo apt-get install apache2

# sudo systemctl start apache2
You can verify the successful installation of Apache by accessing the test page at http://127.0.0.1/.
Enabling HTTPS with Let's Encrypt
To secure your Nextcloud instance with HTTPS, we'll use Let's Encrypt.
Let's Encrypt is a free, automated, and open Certificate Authority (CA) that provides digital security certificates for enabling secure, encrypted communication over the Internet.
Start by enabling SSL support in Apache with the following commands:
# sudo a2enmod SSL

# sudo a2enmod rewrite proxy proxy_http proxy_wstunnel ssl headers http2
Next, you'll need to configure Apache with the appropriate settings for Nextcloud. You can use the provided configuration found at the Nextcloud GitHub repository under nextcloud.conf or any other filename in /etc/apache2/sites-available.
Then, add a symlink to this file in your /etc/apache2/sites-enabled directory.
sudo ln -s /etc/apache2/sites-available/nextcloud.conf /etc/apache2/sites-enabled/nextcloud.conf
This configuration file sets up Apache to serve Nextcloud over HTTPS, redirects HTTP to HTTPS, and enables WebSocket support, which is crucial for Nextcloud.
Obtaining a Let's Encrypt Certificate
Now, it's time to obtain a Let's Encrypt SSL certificate for your domain. First, install the required software:
# sudo apt-get install certbot python3-certbot-apache
Create the certificate by running the following command, making sure to replace "nextcloud.backpageek.eu" with your domain:
# sudo certbot --apache -d nextcloud.backpageek.eu
Check the /etc/apache2/sites-enabled/ directory for symbolic links. Certbot may create a specific configuration file, such as 000-default-le-ssl.conf, which you should remove as it may take precedence over your Nextcloud configuration file.
Finally, restart Apache to apply the changes:
# sudo systemctl restart apache2
Installing Docker and Nextcloud
To run Nextcloud in a Docker container, start by installing Docker with the following commands:
# curl -fsSL https://get.docker.com -o get-docker.sh

# sudo sh get-docker.sh
With Docker installed, pull the Nextcloud Docker image:
# sudo docker pull nextcloud
Now, it's time to launch the Nextcloud Docker container. The following command initializes and runs the container:
# sudo docker run \
--init \
--sig-proxy=false \
--name nextcloud-aio-mastercontainer \
--restart always \
--publish 8080:8080 \
--env APACHE_PORT=11000 \
--env APACHE_IP_BINDING=0.0.0.0 \
--volume nextcloud_aio_mastercontainer:/mnt/docker-aio-config \
--volume /var/run/docker.sock:/var/run/docker.sock:ro \
--env NEXTCLOUD_DATADIR="/mnt/usb/dockers/nextcloud_datadir" \
nextcloud/all-in-one:latest
Note the added line --env NEXTCLOUD_DATADIR="/mnt/usb/dockers/nextcloud_datadir" to specify a large external storage location. Adapt the path according to your configuration. Mine points to my external SSD drive.

Accessing Your Nextcloud Instance
Once the Docker container is running, you can access your Nextcloud instance by going to https://internal.ip.of.your.server:8080. You will be guided through the setup process, including creating an admin account and configuring your data storage location.
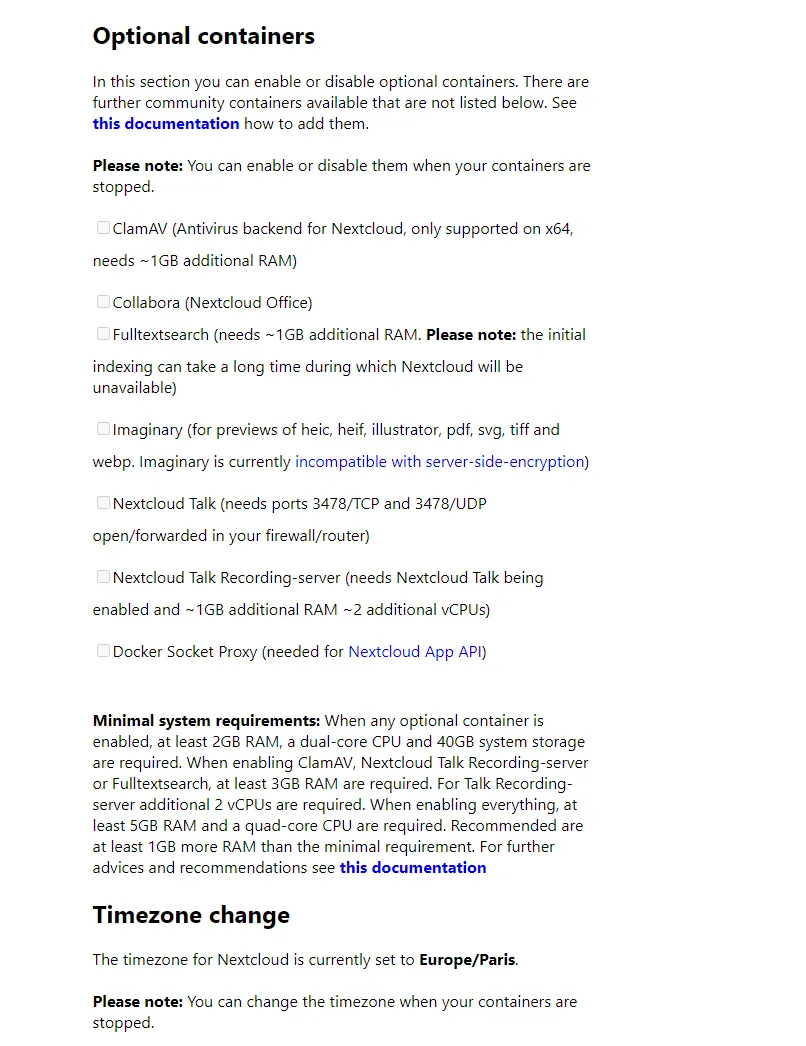
During the setup process, you will encounter prompts to enable various options. In my case, I opted for none as it did necessitate a substantial amount of additional RAM, and I didn't have any immediate need for those features.
Configuring a Mail Server for Nextcloud
To send emails from your Nextcloud instance, you'll need to configure a mail server. In this example, I used a Gmail account with an "App Password" generated from my Google account settings. Here are the settings you need:
- Email Address: Your email address
- Hostname: smtp.gmail.com
- Port: 465
- Username: Your Gmail address
- Password: Your Gmail app-specific password
- Security Protocol: SSL
With these settings, you can send emails directly from your Nextcloud instance.
Conclusion
Setting up Nextcloud on a Raspberry Pi 4 with Apache and Docker can provide you with your very own personal cloud server. It offers control over your data, secure access over HTTPS, and the ability to share files and collaborate with friends and family. By following the steps outlined in this guide, you can enjoy the benefits of a self-hosted cloud solution with your Raspberry Pi 4.
Informations
To craft this post, I took note of each step involved in the process, arranged them in a logical order, and annotated them for clarity. I then enriched it with contextual information. This initial draft was then input into ChatGPT, which generated an article that was nearly ready for publication. I added additional lines and paragraphs, revised the text and incorporated even more information in order to get the current revision.
For the thumbnail image, I used Bing Image Creator with the following prompt : "Thumbnail for article about a self hosted cloud application" and reworked it using Canva.