Now when I say Dummies, I mean myself at one point on my Hive life, but I also mean all of you guys who want to format your Hive posts, or want to learn basic HTML editing and formatting and don't have a clue where to start...
I've been learning JavaScript for the past 6 weeks and, despite the fact that I'm posting about this topic (fairly behind schedule, yesterday I posted about being in 35 hours into JS but that was like a week ago) I already achieved my current JS goal, so now I am taking the time to learn everything there is to know (at least at an adept level) about HTML.
Since Hive can read HTML, I decided to type in here my master class instead of in a regular browser or a random code runner website.
Be advised, this might not be the very best HTML guide out there, but I assure you, everything you need to know about HTML to use on Hive WILL BE HERE.
HTML Tutorial for Hive | The very best guide out there
Choosing a text editor for HTML. Whenever we are writing, we do it on a .html extension file and thus, the web browser opens them directly and shows the webpage as is.
A lot of times it can get confusing or overwhelming to choose what text editor to pick.
All you need is a simple text editor (you could actually do it on a notepad but that's not reccommended), and you want to avoid word processors like microsofot word, google docs etc, but these are too complicated, have too much features and you're practically overkilling it. The simpler the better.
There are some programs designed to write HTML like Adam, brackets, webstorm and much more; these specially designed programs maybe will take the code written and show a preliminar view or things like that (like colored words to help your eyesight).
The thing I reccomend is to just use notepad if you're starting and once you get a grasp of it, maybe download a program that specializes in text edition.
Now, I already downloaded Visual Studio Code to write my Javascript code so I'll limit myself to use that program to write my HTML code (you could actually do it on Hive if you want to and see the preliminar view, although I don't recommend that because Hive.blog won't show some of the features as it is just a blog editing platform and not a website creator platform).
Note, whenever you create an html website, you have to save it as .html so you can open it in a web browser.
First of all, you have to remember these three words, I'll use them fairly frequently on this guide so you better know what they mean:
- Tag - They look like this: <tag>
They are used to specify a region of the HTML document. - Element - It has a <tag> opening and a </tag> closing. It is a complete tag.
- Attribute - An element can have several attributes, they are used to change the value of an element in HTML.

HTML Elements: body head, title
Everything we can see on a website has HTML elements. An element has three parts: an opening tag, content, and closing tag.
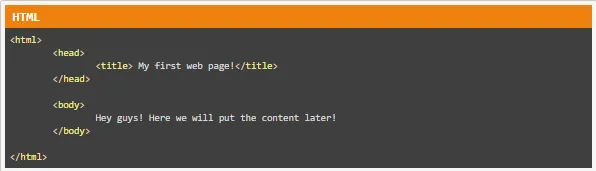
This is how a the elements are ordered, this is for information purposes so we don't really have to add anything.
// This is the document type. We start with opening the tag, and as every tag, we'll close the tag when we want to. // Then we can add container tags. One of the two basic sections. It defines data of the document. We can define things like the title, a description, attributes (like images). We can also import resources into our file, we could actually link this file to other files. This is like the settings or the command center of the file. Certain tags are containers of other tags. Other tags are used to hold content, just like this one.
Notice how I am indenting each tag. Indenting means to leave the correct space... If a tag is inside other tags, we leave some space against the "parent tags", this way visually we'll identify them more easily.
and are child tags of and they are siblings between each other.
<body>
    This is where we'll put the meat and the bones of the file. This is where the content of the webpage goes.
    <p></p> This is a child of <body> and a grandchild of <html>
</body>
All the html content code goes here.
Ending tags use the same name as the tag with a forward slash (/) before the keyword.
By defining these tags, the web browser can parse through them and it will lay out the information there, basically deciphering it and rendering the website.
These are the kind of tags that we can use.
Basic HTML tags
We are telling the web browser what kind of characters we are using on the website. We are using the UTF character set.
We define a meta tag, which is basically a tag that defines information about our file, it is giving us metadata.
This is a meta description tag. We give a description for our website. It is used to display information on the search engines (like a description for the website)
These both are meta tags, and inside these tags we have attributes or properties. We are passing info to the tags, like giving them custom information.
For example, the second meta tag takes two attributes.
| What we write | How it looks |
|---|---|
| <h4>Heading Tag </h4> | Heading Tag |
| <b> Bold Tag </b> | Bold Tag |
| <i> Italic Tag </i> | Italic Tag |
| <blockquote> blockquote </blockquote> | blockquote |
| <q> Some quoted text </q> | Some quoted text |
| <code> Text in code format </code> | Text in code format |
| <del> Crossed text </del> | |
| <pre> Preformatted text </pre> | Preformatted text |
| <sub> Subscript text </sub> | Subscript text |
*We can use h1, h2... h6 to give out header a different size.
<div class = text-justify>
This text will show justified, in my opinion it gives the post a nice looking format. Some people on hive don't like it, personally I do, but hey, the cool thing is we can all do whatever the hell we want.So to justify a text, we need two paragraphs. Don't ask me why, I just know we need em both. Perhaps there is another way, but I don't know it yet, if you do, please let me know and I'll modify this post.
\</div></div>
To align titles, we have three options:
<h2 align="left">Title aligned to the left </h2>
<h2 align="center">Centered title </h2>
<h2 align="right">Title aligned to the right </h2>
</body>
Let's keep learning:
<!DOCTYPE html>
<html>
<head>
<title>A smart and quirky title</title>
</head>
<body>
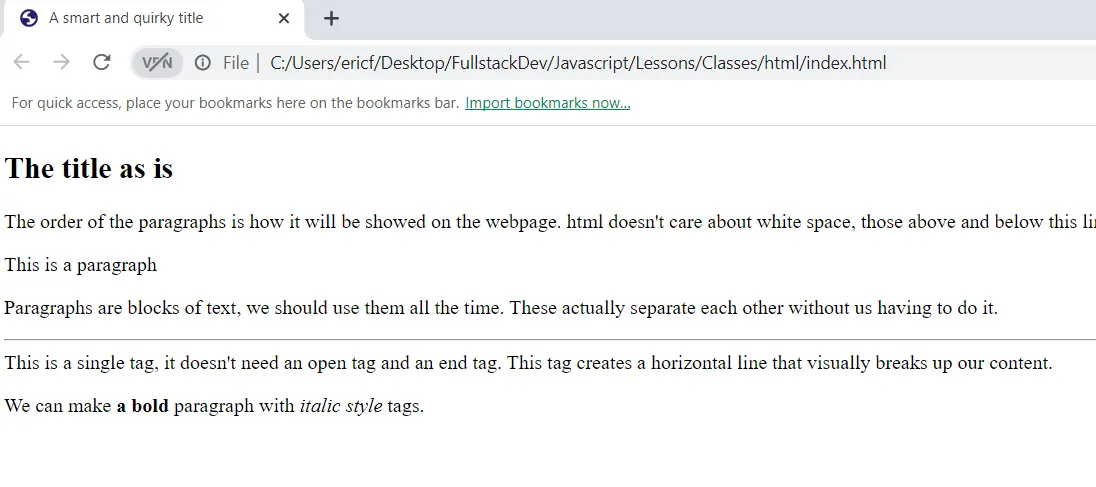
<h2>The title as is</h2>
The order of the paragraphs is how it will be showed on the webpage.
html doesn't care about white space, those above and below this line will not show on the website, we have to tell the browser to create a white space with a <br/>
    <p>This is a paragraph</p>
    <p>Paragraphs are blocks of text, we should use them all the time. These actually separate each other without us having to do it.</p>
    <hr/> This is a single tag, it doesn't need an open tag and an end tag. This tag creates a horizontal line that visually breaks up our content.
    <p>We can make <b>a bold</b> paragraph with <i>italic style</i> tags.</p>
</body>
This is how the web browser will display the code above:
Comments
Comments are little pieces of text that will be ignored by the web browser. You can use them for reminders, so other devs know what the code means or wants to accomplish etc.
Recommendation: Do not use comments willy nilly, the code explains itself, don't write a comment bible. Be clear with your coding, let the code speak for itself, comments are used for parts that do not explain themselves.
Style and color
One of the cool things you can do in HTML is that you can style each individual element, using a style attribute using CSS (Cascading Style Sheet), now this won't be a CSS post but we can outline the basics.
<p style="white; background-color:white"></p>
We pass style attributes to the tags, notice how we finish with a semicolon (;)-->
We can give these attributes to everything that has text on our website (head, body, paragraph, whatever).
The attributes from the child tags will override the parent attributes.
Formatting a page
Using various html tags will help us layout the structure of the website, to give the content some format.
<html>
    <head>
        <title></title>
    </head>
    <body>
        <header>
            <nav>
                Navigation tags go here
            </nav>
        </header>
        <main>
            <article>
                In here we can put an article from our blog
                <section>
                    <header>That's why we have h1, h2, h3 etc, so we can use them with some sort of hierarchy.</header>
                    Sort of like this:
                        h1
                            h2
                                h3
                            h2
                    We can make as many sections as we want. Usually with a header.
                </section>
                <section>
                        <aside>
                            This tag means that the content is on the page and shown to the users, but it is not direclty related to the core content of the website.
                        </aside>
                </section>
            </article>
        </main>
        <footer>

        </footer>
    </body>
</html>
Using the tags won't necessarily change the look or feel website, but using the tags helps to organize the file and the structure tags makes it a lot easier to tell what's going on with the website. Using the tags also helps for search engine optimization (how the website is viewed by search engines and will display it simpler) apart from other things.
Increases the readability and parseability of the file.
Links
A link is one of the most popular elements on html and it links other websites or sites on your website, we can also use them for images and much more.
To create a link we need to use a special tag called "a"
<a href="https://hive.blog"> This directs to Hive</a>
We are giving the link a reference of what to link to. Using https:// is crucial for when we are linking to outside websites to make sure the user stays safe.
We can put any text (instead of "This directs to Hive", for this link, it will show as plain text with a hyperlink. We can use html elements for this text
If we want to make the hyperlink open in a different tab or window, we use an attribute called:
<a href="https://hive.blog" target="_blank" >HIVE</a>
Images
One of the most commong things people want to do when they're building websites is to add images. This is how we do it:
<img src="imageurl" alt="Text to show when NO IMAGE";/>
We can link to a website, a file, to whatever. We use "alt" in case the image can't be found anymore.
<img width="100" height="100" src="myfiles/anomadsoul/images/pic.jpeg"/>
We gave size attributes to the second image, 100 pixels. This size is not absolute, it depends on the image and the website we take it from. We should pay attention to the aspect ratio of the original image.
If we just set width or height, HTML will automatically adjust the aspect ratio for us.
    <a href="some.url">
        <img src="imageurl.jpg"/>
    </a>
We just linked another image within the image so when it's clicked it redirects or opens another image.
Videos and Youtube Iframes
We can put videos from our files or embed a youtube video on our website as follows:
<video src="url" poster="image.url" autoplay loop controls></video>
We give the "controls" attribute so the user can control the video. We can also control the width and height of the video as we do with the images.
The attribute "poster" defines the thumbnail of the video.
The attribute "autoplay" will begin the video once the website is loaded, "loop" will loop the video.
For Youtube:
    <iframe src="youtube link"></iframe>
    This uses the iframe property, which allows you to "peek" into another website.
Lists
HTML allows you to list values and there are a couple of tools to do it:
Unordered list with no particular order:
<ul> These tags are a container for the list.
    <li>Item1</li>
    <li>Item2</li>
    <li><a href="someurl"><a>yada </li>  We can use HTML tags inside the list tags.
</ul>
For the ordered list:
<ol type="A"> We must define the type or ordering depending on the type of items we have.
    <li>Item1</li>
        <ol>
            <li>ItemA of Item1</li> We can also use lists inside lists.
        </ol>
    <li>Item2</li>
    <li>Item2</li>  We can use HTML tags inside the list tags.
</ol>
Then we also have Description lists:
<dl>
    We define a description term instead of an item:
    <dt>HIVE</dt>
    <dd> - Awesome Community</dd>
    <dt>Hive.blog</dt>
    <dd> - Simple and effective Platform</dd>
</dl>
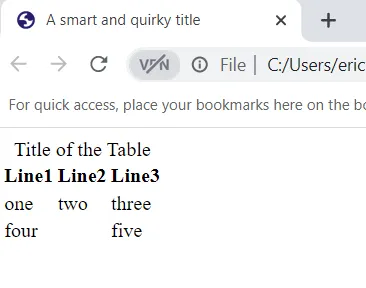
Tables
A table is a way that we can format info to display it for our users.
<body>
    <table>
        <caption>Title of the Table</caption>
        <thead>
            <tr>
                <th>Line1</th>
                <th>Line2</th>
                <th>Line3</th>
            </tr>
        </thead>
        <tbody>
            <tr>
                <td>one</td>
                <td>two</td>
                <td>three</td>
            </tr>
            <tr>
                <td colspan="2">four</td>
                <td>five</td>
            </tr>
        </tbody>
    </table>
</body>
Terms used: "td" is table data, "tr" is table row, "th" is table header.
And we get this on the browser:
Containers
A container in HTML is basically a set of tags that contain other HTML elements. When we write HTML is a good practice to wrap the content with tags. A good practice is to use wrappers or containers when we are styling a website and organize the elements, both visually and for readability.
HTML has two basic ways to display elements (there are many more but we have two main ones): Block (They take the entire width of the page) and Inline (They only take as much space as it needs).
Paragraphs are Block type elements and links are Inline elements.
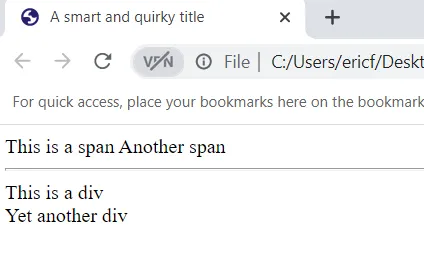
Same as above, Spans are Inline containers and Divs are Block containers.
    <span>This is a span</span>
    <span>Another span</span>
<hr>
    <div>This is a div</div>
    <div>Yet another div</div>
And this is how the above code will look on a web browser:
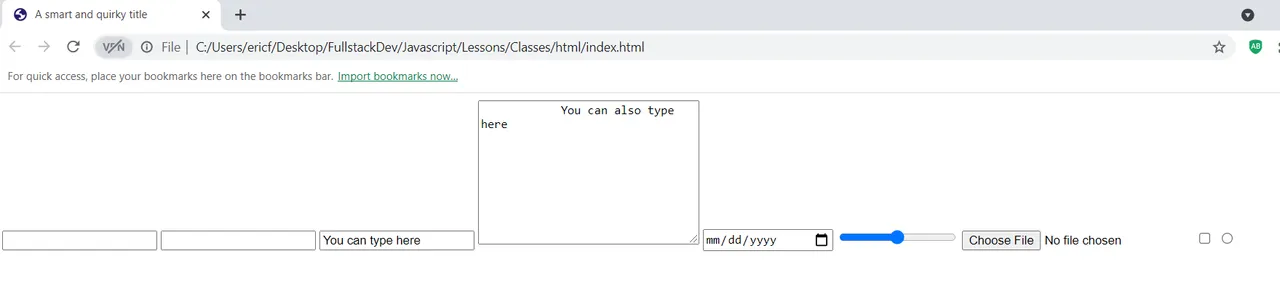
Input tags
They allow us to add elements on our page where the users can input information like text boxes, check boxes etc, anything that users can interact with.
Defining these input tags doesn't mean users can interact with them, for that we need Javascript but, to define them on HTML so later on we can use Javascript to make them work, we do as follows:
<body>
    <input type="text"/>
    <input type="password"/>
    <input type="text"value="You can type here"/>
    <textarea rows="10" cols="30">
        You can also type here
    </textarea>
    <input type="date"/>
    <input type="range"/>
    <input type="file"/>
    <input type="checkbox"/>
    <input type="radio"/>
</body>
Check out how cool the web browser displays all these tags:
That's it, this is not a full HTML guide, not nearly, but it is more than the basics and it is what I learned for this little project of mine called "Becoming a Dev".
I was inspired, so I decided to make a post about this topic even though it is one that most Hive users already know a lot about. I'll continue with my Javascript lessons after this, and obviously I'll keep spamming you with my JS posts.
Hopefully you found this post interesting, informative or at least you read the title and said "Oh, cool, another HTML tutorial", those are handy for newbies.
By the way, I'm using @ecency to write all my coding related posts, you should check it out!