
Today I want to share with you some deep information about this platform for copy trading that makes it accessible and simple in all its complexities.
First of all, copy trading means the ability offered by professional traders, to be able to repeat their trades.
But that is not all, in this How To, you will understand very well why I have dubbed the platform "copy trading for everyone!" immediately after registration, the first page that opens is not the dashboard, but directly the page with the list of all traders and their performance.
A point of clarification: copy trading should be seen as an added value, a diversification of one's basket and an almost constant income that helps to increase one's supply.
This position would be advisable to integrate it into one's PACC and I can confirm that it is can be an excellent entry.
Obviously if you mechanically repeat the trades of professional traders you will hardly learn your portfolio management, but just a little bit of effort and you can go from one side of the situation to the other.
In practice from being a mere copier, one may well become a trader who is imitated.
Not a bad thing!
But let's proceed to touch on this extraordinary, in its simplicity, platform.
On the potential of copy trading, PACC and basket diversification, I will write a dedicated article as the topic needs to be explored further.
Let's get started!
First let's click on this LINK to open the page and be addressed to the Zignaly universe.
First, you will need to register yourself:
Oggi vi voglio parlare di questa piattaforma per il copy trading che lo rende accessibile e semplice in tutte le sue complessità.
Innanzitutto, per copy trading si intende la possibilità offerta da trader professionisti, di poter ripetere le loro operazioni di trading.
Ma non è tutto, in questo How to, capirete benissimo perché ho soprannominato la piattaforma “il copy trading per tutti!” subito dopo la registrazione, la prima pagina che si apre non è la dashboard, ma direttamente la pagina con l’elenco di tutti i trader e le loro performance.
Una puntualizzazione: il copy trading deve essere visto come un valore aggiunto, una diversificazione del proprio paniere e una income pressochè costante che aiuta ad aumentare la propria supply.
Questa posizione sarebbe consigliabile integrarla nel proprio PACC: posso confermare che è un’ottima entrata.
Ovviamente se si ripetono in maniera meccanica le operazioni dei trader professionisti difficilmente si impara la gestione del proprio portafoglio, ma basta un pochino di impegno e si può passare da una parte all’altra della situazione.
In pratica da mero copiatore, si può benissimo diventare un trader che viene imitato.
Non male!
Ma procediamo a toccare con mano questa straordinaria, nella sua semplicità, piattaforma.
Sulle potenzialità del copy trading, del PACC e la diversificazione del paniere, scriverò un articolo dedicato in quanto l’argomento deve essere approfondito.
Iniziamo!
Per prima cosa clicchiamo su questo LINK per aprire la pagina ed essere catapultati nell’universo Zignaly.
Per prima cosa occorre registrarsi:
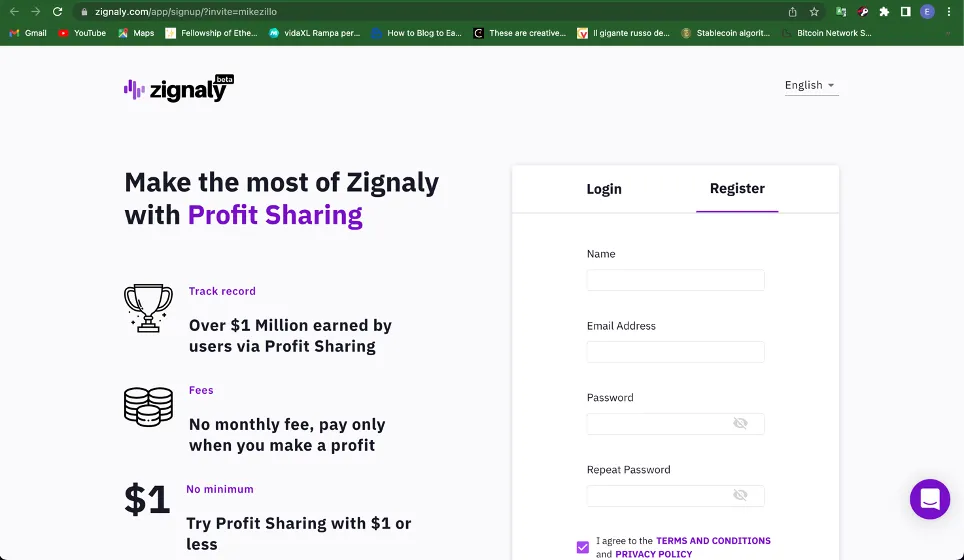
Once the appropriate fields have been filled in, the registration button must be pressed. As soon as you press it, a page opens that requires an activation code, which is sent by email. NOTE: The code is valid for 15 minutes, after which you must repeat the operation.
Una volta compilati gli appositi campi, occorre premere il tasto di registrazione. Appena premuto si apre una pagina che richiede un codice di attivazione che viene inviato tramite mail. NOTA: il codice ha una validità di 15 minuti, dopo dei quali è necessario ripetere l’operazione.

As soon as you enter the last digit of the activation code, the procedure goes on and you enter the Zignaly world.
Contrary to what you might expect, you do not enter the Dashboard, but the "Profit Sharing" page-that is, the page devoted to selecting traders to copy.
Appena si inserisce l’ultima cifra del codice di attivazione, la procedura va avanti e si entra nel mondo Zignaly.
Contrariamente a quello che ci si potrebbe aspettare, non si entra nella Dashboard, ma nella pagina del “Profit Sharing” ovverosia nella pagina dedicata alla selezione dei trader da copiare.

On this page we can select the trader we want, and clicking on it, performance page will open, but let's go step by step:
In questa pagina possiamo selezionare il trader che desideriamo e cliccandoci sopra si apre la pagina delle performance, ma andiamo con ordine e focalizziamo bene la pagina:
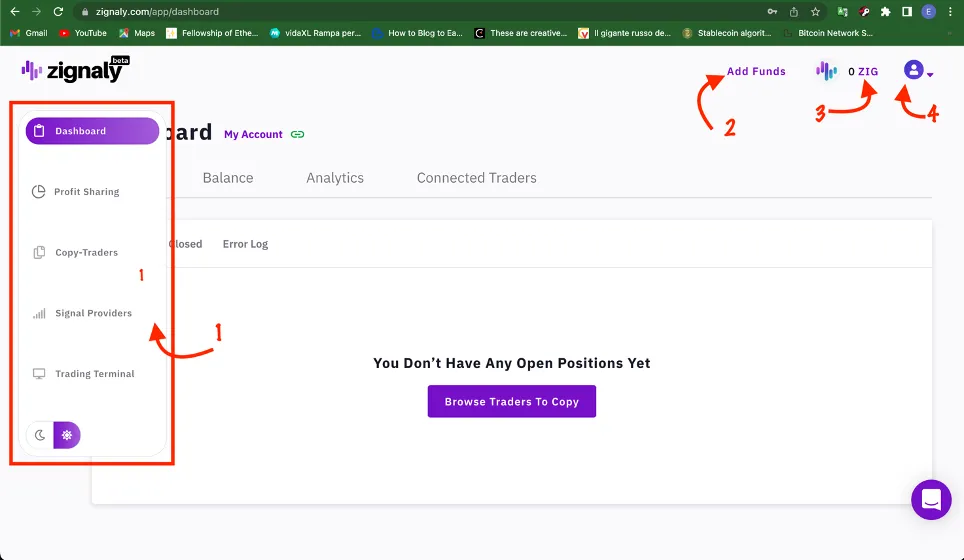
On the left we have a menu that is activated when the pointer is passed (Arrow 1). On the upper right we have 3 separate menus that are related to:
Arrow 2: Fund Accreditation;
Arrow 3: Zignaly Wallet;
Arrow 4: Profile Settings
FUNDS ACCREDITATION
This is the preparatory step to be able to fully utilize the platform and be able to generate profits.
In order to be credited funds, you must be registered HERE!
NOTE: transfer ONLY the funds you can afford to lose! This article is not financial advice but a guide to using the Zignaly platform.
This is the page: we are in the personal account
Sulla sinistra abbiamo un menu che si attiva al passaggio del puntatore (Freccia 1). In alto a destra abbiamo 3 menu distinti che sono relativi a:
Freccia 2: Accreditamento fondi;
Freccia 3: Wallet Zignaly;
Freccia 4: Impostazioni del profilo
ACCREDITAMENTO FONDI
Questa è la fase propedeutica per poter utilizzare appieno la piattaforma e poter generare dei profitti.
Per poter accreditare i fondi, occorre essere registrati QUI!
NOTA: trasferisci SOLO i fondi che puoi permetterti di perdere! Questo articolo non è un consiglio finanziario ma una guida all’uso della piattaforma Zignaly.
Questa è la pagina: siamo nel account personale
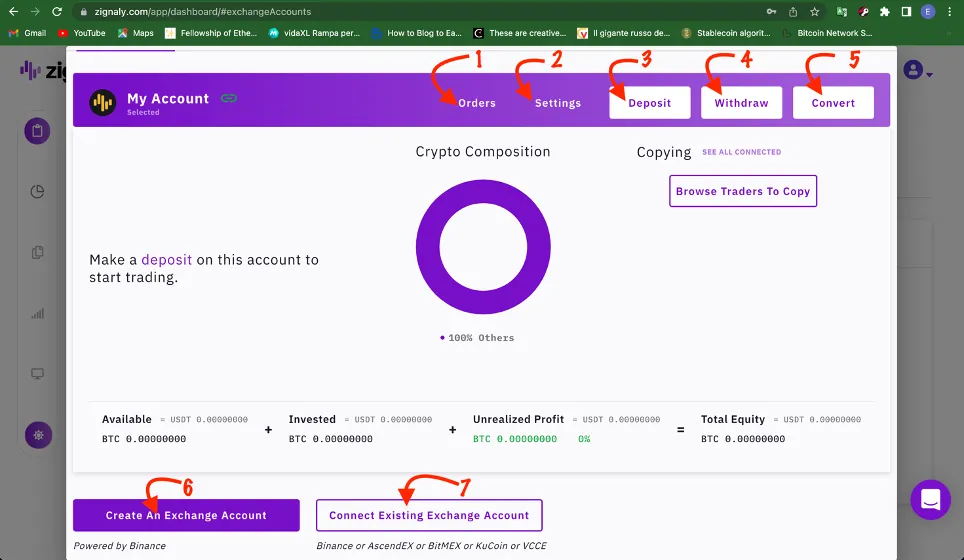
Following the order of the arrows we have the various sections.
Arrow 1: Orders.
This section displays the personal order book.
Seguendo l’ordine delle frecce abbiamo le varie sezioni.
Freccia 1: ordini.
In questa sezione vengono visualizzato l’order book personale.

Arrow 2: Account Settings. In this section we can change some features of our account; including the name. (I called it "Account Copy").
Freccia 2: Impostazioni dell’account. In questa sezione possiamo cambiare alcuni features del nostro conto; tra le quali anche il nome. (io l’ho chiamato “Account Copy”)
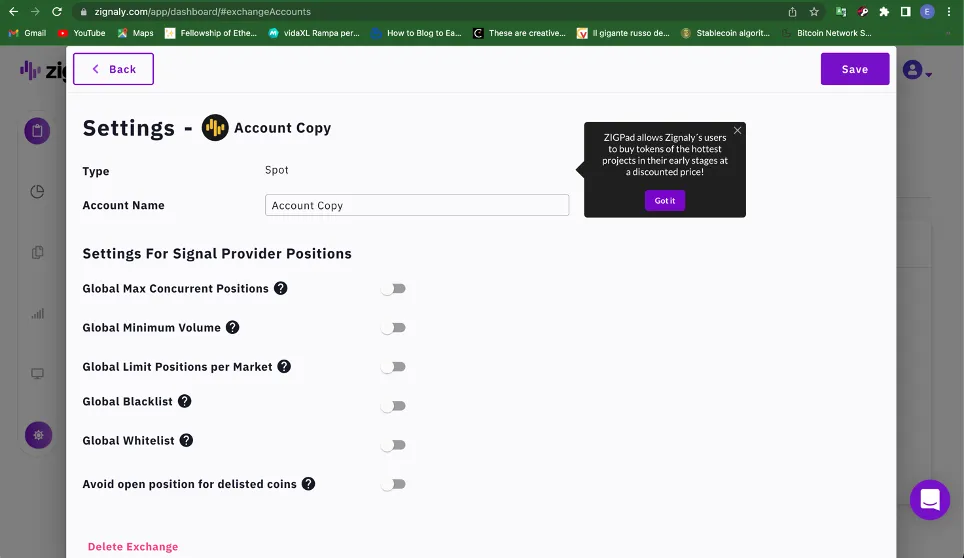
To confirm the changes, click the "save" button and to return to the previous page click the "back" button
Back on our account page we have the numbers 3 to 5 indicating the operations we can do. The same tabs are repeated on the "Deposit" page
Per confermare i cambiamenti cliccare sul bottone “Save” e per tornare alla pagina precedente cliccare il tasto “Back”
Tornati alla pagina del nostro account abbiamo i numeri da 3 a 5 che indicano le operazioni che possiamo fare. Le stesse tab sono ripetute nella pagina “Deposit”
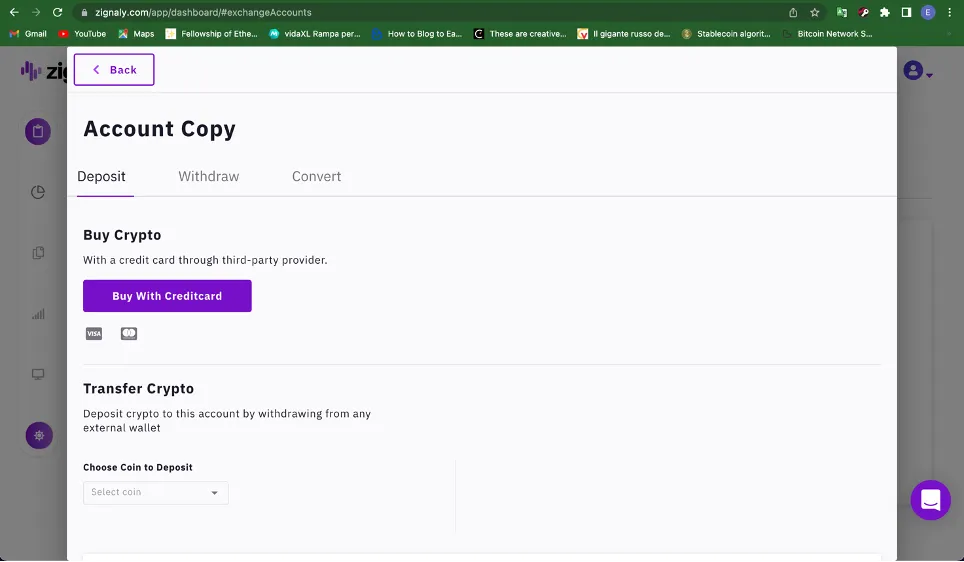
As I wrote just above, below the account name we have the 3 tabs indicating the possibilities: Deposit, Transfer, and Conversion.
Clicking on the "Buy With Creditcard" button will divert you to the Changelly site (a safe provider as also Ledger relies on it for internal swaps).
Come scrivevo poco sopra, sotto al nome dell’account abbiamo le 3 tab che indicano le possibilità: Deposito, Trasferimento, e conversione.
Cliccando sul bottone “Buy With Creditcard” si viene dirottati sul sito Changelly (sito molto sicuro in quanto vi si appoggia anche Ledger live per gli swap interni).

The Withdraw tab is the section for sending tokens from the Zignaly platform to any other proprietary account or wallet.
La tab “Withdraw” è la sezione di invio dei token dalla piattaforma Zignaly a un qualsiasi altro account o wallet di proprietà.
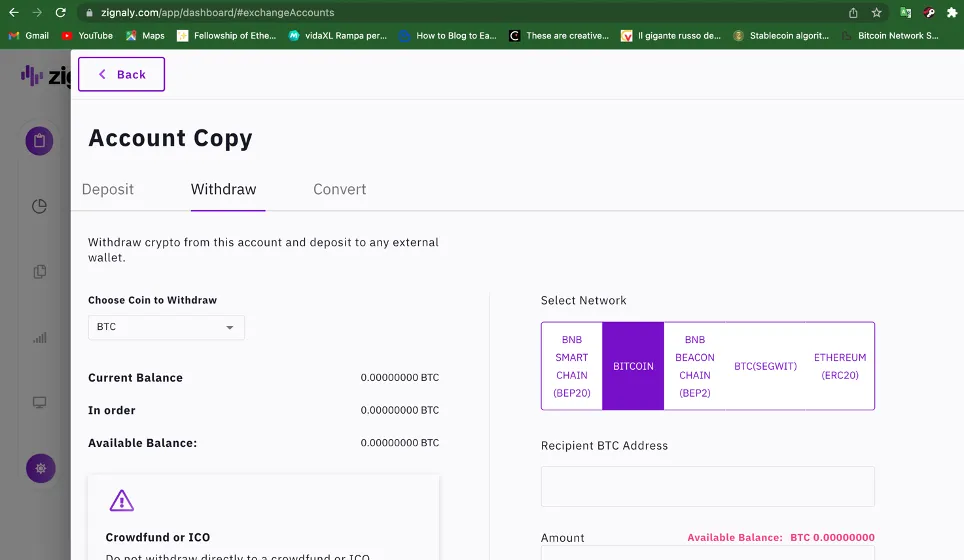
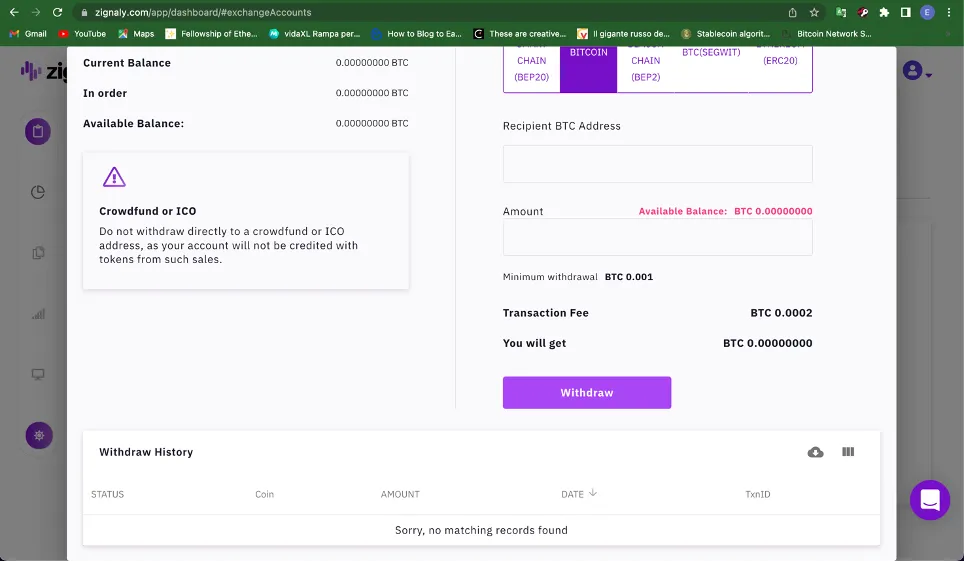
In this screen we have full management of transfers: on the left is the budget and the ability to select the coin. On the right we can select the transfer network according to the selected coin, the address to send the amount to, and select the amount.
Once all fields are filled in we can press the Withdraw button to confirm the operation.
NOTE: Check the network type every time, otherwise the funds are lost forever!!!
Interesting, isn't it? Come on, register and start expanding your PACC
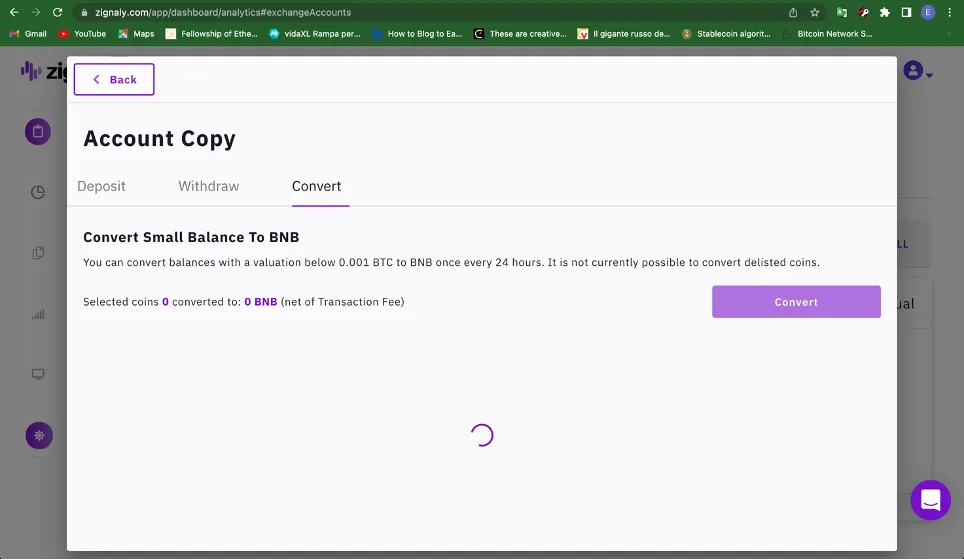
"Convert" tab:
This function is very interesting: along the lines of Binance, the option is given to convert balances close to 0 (or that would be of less than GAS amount) to convert them directly to BNB.
In questa schermata abbiamo la piena gestione dei trasferimenti: sulla sinistra il bilancio e la possibilità di selezionare la moneta. Sulla destra possiamo selezionare la rete di trasferimento in funzione della moneta selezionata, l’indirizzo a cui inviare l’ammontare, e selezionare l’importo.
Una volta riempiti tutti i campi possiamo premere il tasto Withdraw per confermare l’operazione.
NOTA: Verificare tutte le volte il tipo di rete, altrimenti i fondi sono persi per sempre!!!
Interessante, vero? Dai, registrati e inizia ad ampliare il tuo PACC
Tab “Convert”:
Questa funzione è molto interessante: sulla falsa riga di Binance, viene data la possibilità di convertire i saldi prossimi allo 0 (o che sarebbero di importo inferiore al GAS) di convertirli direttamente in BNB.
Let's return to the main page and pick up from the menu on the left, the one marked with arrow 1
Ritorniamo alla pagina principale e riprendiamo dal menu sulla sinistra, quello contrassegnato con la freccia 1
The first menu item is the dashboard, here we can navigate to the 4 tabs there. Note the green symbol indicated by arrow 5: it means that the account is connected.
La prima voce di menu è la dashboard, qui possiamo navigare sulle 4 tab presenti. Da notare il simbolo verde indicato dalla freccia 5: significa che l’account è collegato.
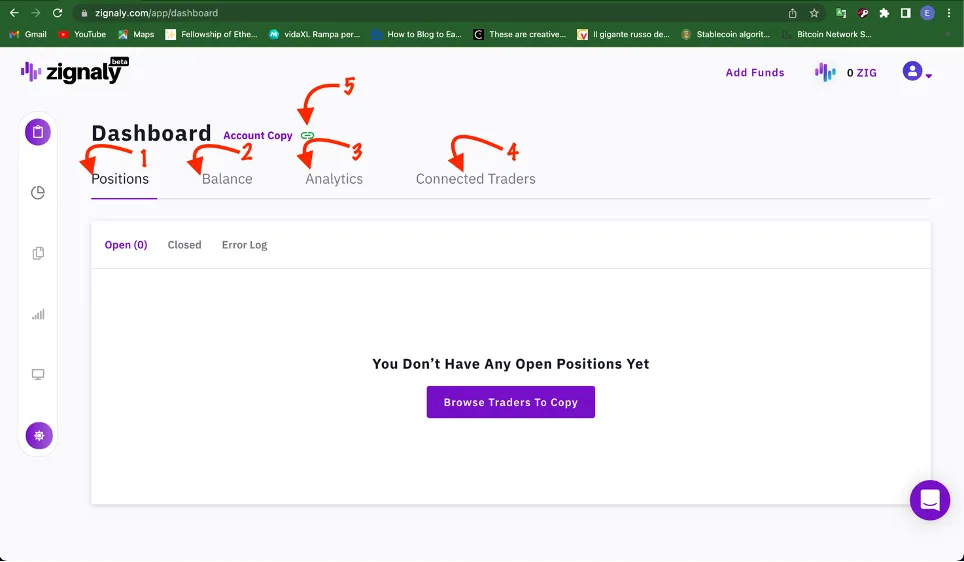
The "Position" tab which is the active one and we can recognize it by the line under the word, lists all the positions we have, in the first line of the box there are the three respective filters: Open, Closed and a summary table of Error Log where all the occurred errors during the setup of the positions are recorded.
The "Balance" tab as the word itself indicates, is an overview of our financial situation.
La tab “Position” che è quella attiva e lo possiamo riconoscere dalla linea sotto alla parola, lista tutte le posizioni che abbiamo, nella prima riga del riquadro ci sono i tre rispettivi filtri: Open, Closed e una tabella riassuntiva di Error Log dove sono riassunti gli errori occorsi durante il setup delle posizioni
La tab “Balance” come indica la parola stessa, è un prospetto della nostra situazione finanziaria.
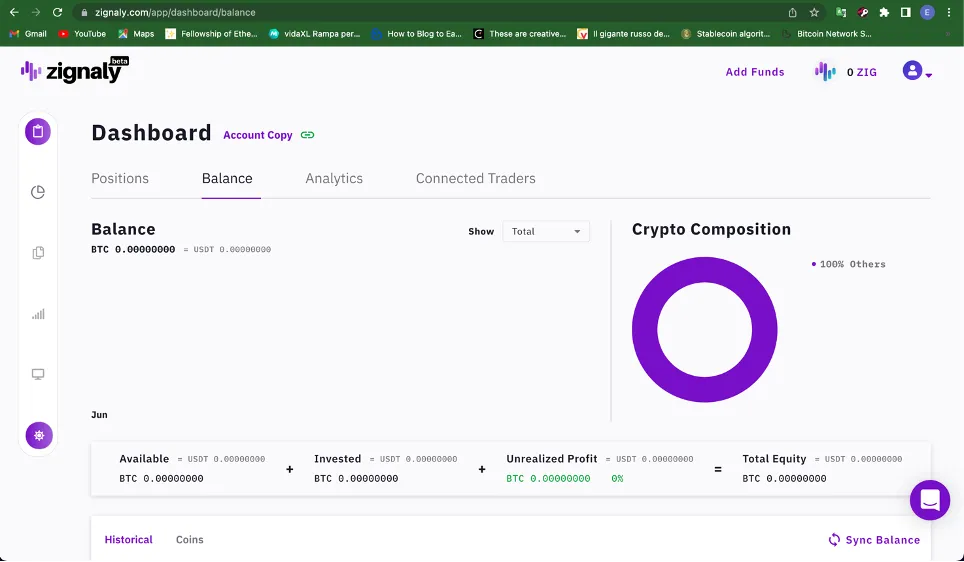
Moving down the screen we come to a table listing all the transactions. On the right (indicated by the arrow) top, we can download the transactions in CSV format (the little cloud) or change the columnar layout.
Scendendo lungo la schermata si giunge ad una tabella con la lista di tutte le operazioni. Sulla destra (indicato dalla freccia) in alto, possiamo scaricare i movimenti in formato CSV (la nuvoletta) oppure modificare l’impaginazione a colonne.

Continuing on we encounter the "Analytics" tab, this tab provides us with a graphical representation of our profits as a function of the trades we have closed.
Proseguendo incontriamo la tab “Analytics”, questa tab ci fornisce la rappresentazione grafica dei nostri profitti in funzione delle operazioni che abbiamo chiuso.
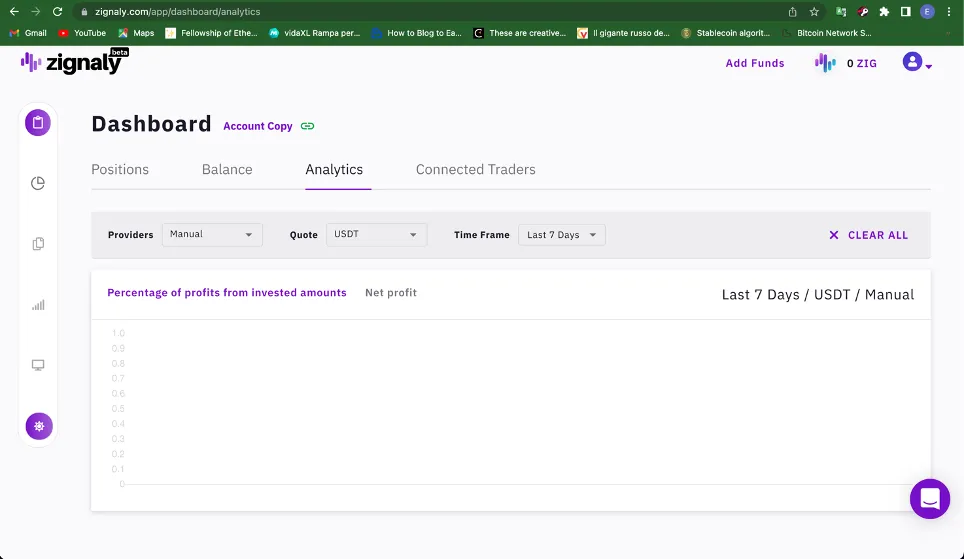
Obviously in the first line the one highlighted in gray, we can filter the data on which we want to do the graphical return. The button on the right “X CLEAR ALL” clears all the filters.
We now come to the last tab, "Connected Traders."
Ovviamente nella prima riga quella evidenziata in grigio, possiamo filtrare i dati sui quali vogliamo fare la restituzione grafica. Il tasto sulla destra “X CLEAR ALL” cancella tutti i filtri.
Giungiamo ora all’ultima tab “Connected Traders”
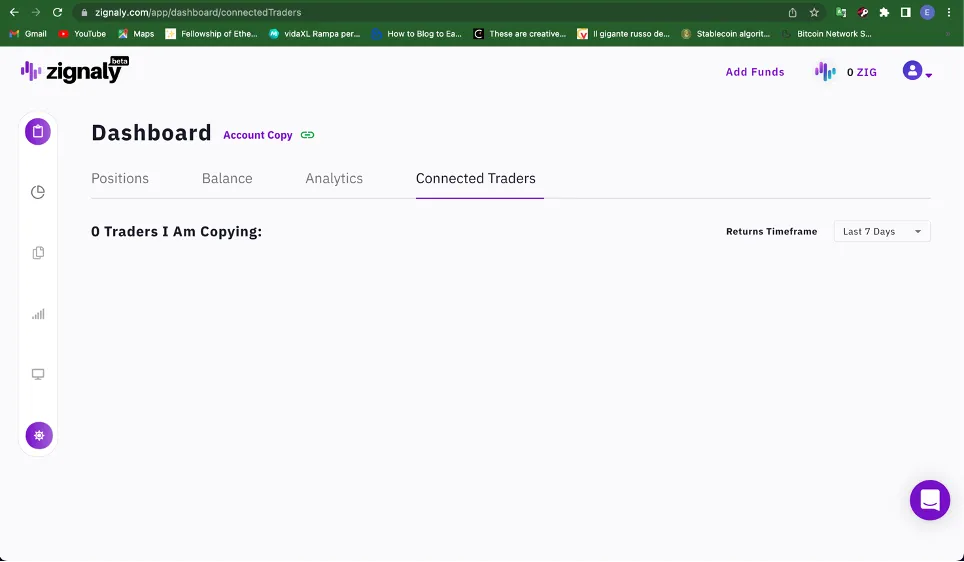
This window lists all the traders we are following, or, rather, copying.
Let's move on to the second item, "Profit Sharing."
In questa finestra sono elencati tutti i traders che stiamo seguendo, o, meglio, copiando.
Passiamo alla seconda voce: “Profit Sharing”:
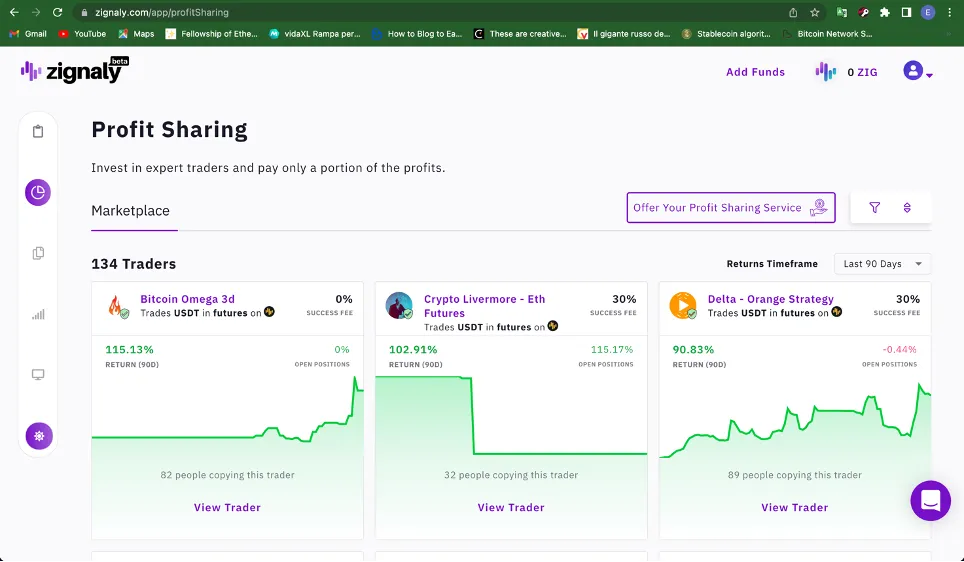
This page collects all traders who are available to copy trades.
Clicking on the "View Trader" button opens the trader's performance in detail:
Questa pagina raccoglie tutti i trader che sono disponibili per copiare le operazioni.
Cliccando sul tasto “View Trader”, si apre in dettaglio la performance del trader:
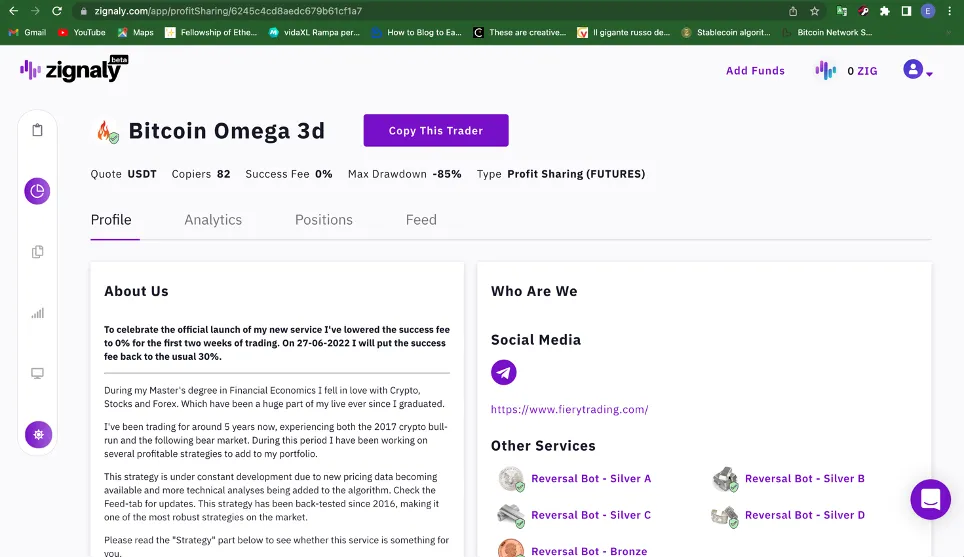
It is basically the "dashboard" of the trader we might be interested in copying; in order to copy him, we just click on the "Copy This Trader" button.
The very interesting aspect of this section is that a portion of profits is given to the trader being copied.
On the right side of the main page is a button that gives the option to join the traders who are copied.
In order to become a trader who offers the ability to replicate your trades, it's super easy click HERE!
The next menu item is "Copy-Traders."
In pratica è la “dashboard” del trader che potrebbe interessarci copiare; per poterlo copiare, ci basta cliccare sul bottone “Copy This Trader”
L’aspetto molto interessante di questa sezione è che una parte di profitti viene data al trader che viene copiato.
Sulla destra della pagina principale c’è un bottone che dà la possibilità di entrare a far parte dei trader che sono copiati.
Per poter diventare un trader che offre la possibilità di replicare le proprie operazioni, è semplicissimo clicca QUI!
La voce di menu successiva è “Copy-Traders”.
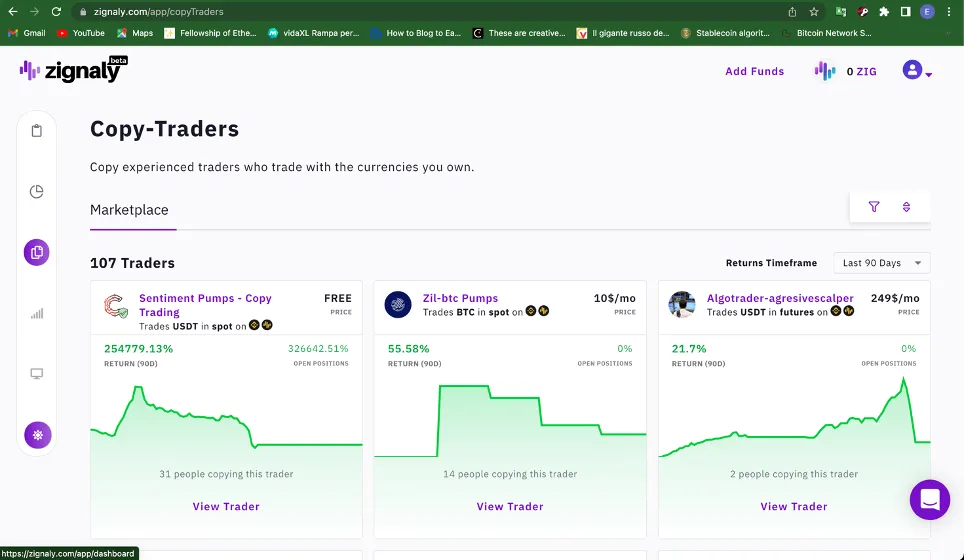
Along the lines of "Profit Sharing," this page lists all traders who give the option of copying their trades. In this case, however, the traders offer the service on a subscription basis. We can see this at the top right of the box.
Clearly if we click on "View Trader," we go into the trader's details and can see which exchanges they trade on and the subscription cost:
Sulla falsariga del “Profit Sharing”, questa pagina elenca tutti i trader che danno la possibilità di copiare le proprie operazioni. In questo caso però i trader offrono il servizio in abbonamento. Lo possiamo vedere in alto a destra del riquadro.
Chiaramente se clicchiamo su “View Trader”, entriamo nei dettagli del trader e possiamo vedere su quali Exchange opera e il costo di abbonamento:

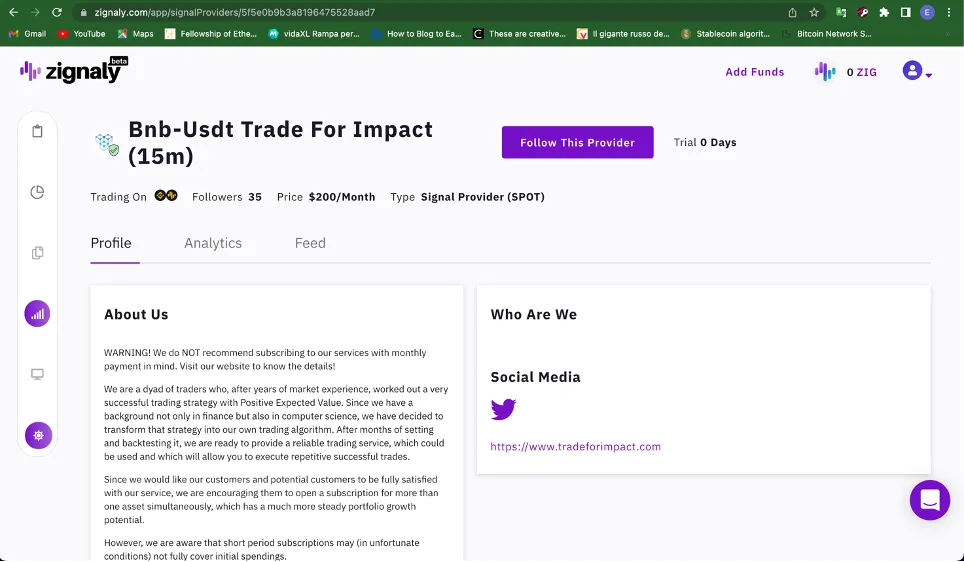
Penultimate entry is "Signal Providers." This section lists all traders who, on a subscription basis, provide signals for their trades.
The construction is identical to "Profit Sharing" and "Copy Traders."
Penultima voce è “Signal Providers”. In questa sezione sono elencati tutti i trader che, in abbonamento, forniscono i segnali per le proprie operazioni di trading.
La costruzione è identica al “Profit Sharing” e “Copy Traders”:

Click on the "View Provider" button to enter the provider's details.
Cliccando sul tasto “View Provider” si entra nei dettagli del provider.
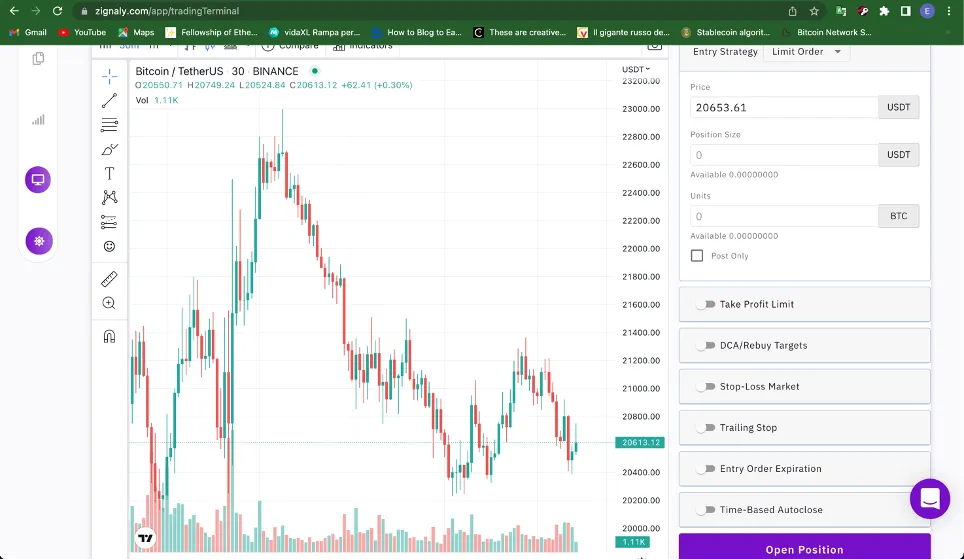
Penultimate menu item is the "Trading Terminal."
Penultima voce di menu è il “Trading Terminal”:
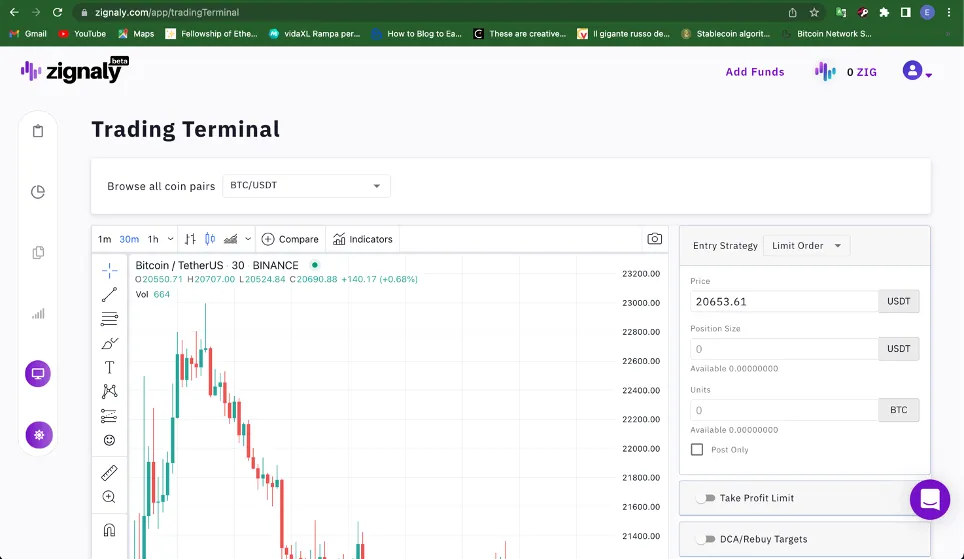
This screen is divided into 2 sections: on the left we have the chart of the trading pair we selected in the box above. In this chart, as on TradingView we can draw lines and use other tools such as Fibonacci.
On the right instead we can set the extremes of our trade: stop loss, take profit, etc.
When we are sure of the settings we can click on the button below "Open Position" and automatically the position is opened and we can see it in the first tab of the dashboard.
Questa schermata è divisa in 2 sezioni: a sinistra abbiamo il grafico della coppia di trading che abbiamo selezionato nel box sopra. In questo grafico, come su TradingView possiamo tracciare linee e utilizzare altri strumenti tipo Fibonacci.
Sulla destra invece possiamo impostare gli estremi della nostra operazione: stop loss, take profit ecc.
Quando siamo sicuri delle impostazioni possiamo cliccare sul pulsante sotto “Open Position” e automaticamente la posizione viene aperta e la possiamo vedere nella prima tab della Dashboard.
Last menu item is the ability to select day/night view.
Surely you have noticed this little icon present in all screens:
Ultima voce di menu’ è la possibilità di selezionare la visualizzazione diurna/notturna.
Sicuramente avrete notato questa iconcina presente in tutte le schermate:

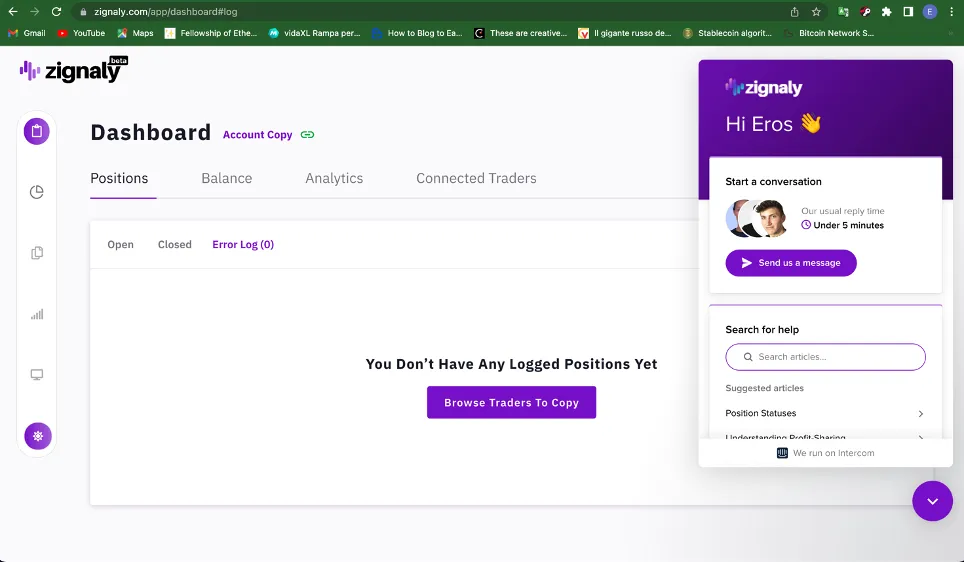
Well we also have online help: it's a chat where we can ask any kind of information and it also gives us the response time.
Really a well-made platform that leaves nothing to chance!
Ebbene abbiamo anche un aiuto in linea: è una chat dove possiamo chiedere qualsiasi tipo di informazione e ci dà anche il tempo di risposta.
Davvero una piattaforma ben fatta che non lascia nulla al caso!
We have come to the end of this How to of Zignaly: it is true that the possibilities offered by the platform are many and easy for everyone to learn.
Here, then, that Zignaly is the copy-trading platform for everyone, and that is why I recommend that you register and start trading.
Remember, though, to use only those funds that you can afford to lose!
See you next week that I talk more in depth about copy trading and Zignaly's philosophy!
See you!!!
Siamo arrivati alla fine di questa How to di Zignaly: è vero che le possibilità offerte dalla piattaforma sono molteplici e di semplice apprendimento per tutti.
Ecco, quindi, che Zignaly è la piattaforma copy-trading per tutti e per questo motivo ti consiglio di registrarti ed iniziare a fare trading.
Ricorda, però di utilizzare solo quei fondi che puoi permetterti di perdere!
Ci vediamo la prossima settimana che vi parlo più approfonditamente del copy trading e della filosofia di Zignaly!
Alla prossima settimana!!!