IT - GUIDA AL LOGIN E ALLA CREAZIONE DI NFT
Buongiorno a tutti!
Questa settimana ho finalmente pubblicato i miei primi lavori su #NFTShowroom e devo dire che la DApp in questione funziona davvero a dovere.
Inizialmente è necessario fare login con il nostro account #HIVE. Se l'intenzione è quella di acquistare e collezionare #NFT questa operazione sarebbe già sufficiente, infatti con il login possiamo già trasferire fondi $SWIPE.HIVE sul nostro wallet ed esplorare la piattaforma in cerca di #artworks da acquistare e collezionare nella nostra galleria.
Se invece come me volete pubblicare i vostri lavori di arte digitale dovrete seguire qualche piccolo passaggio:
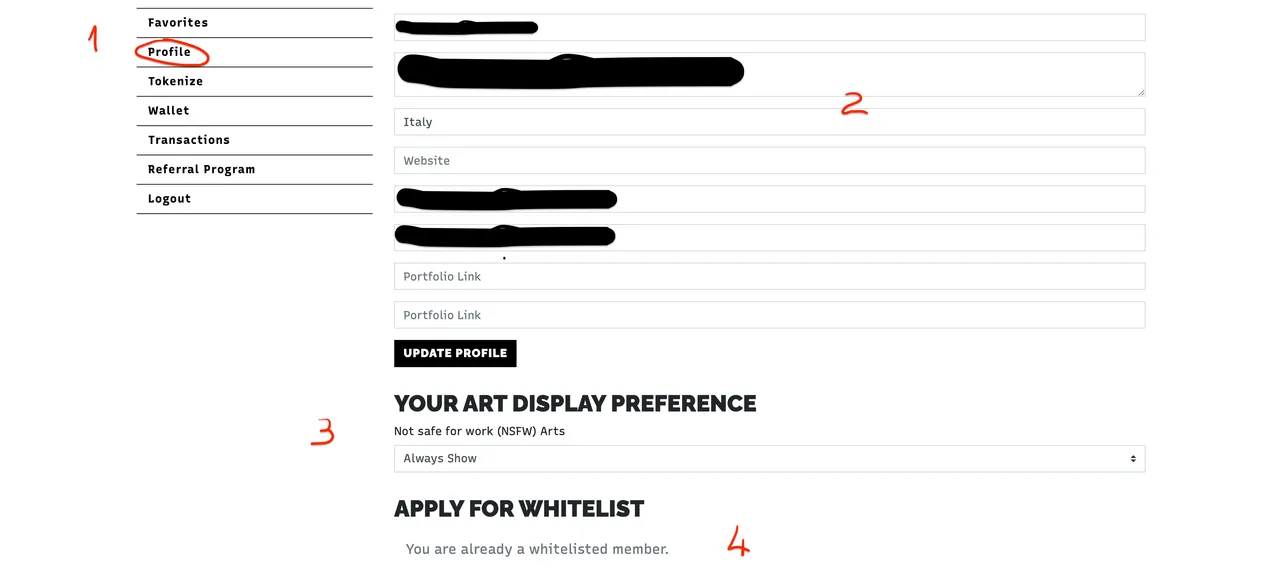
- per prima cosa nella sezione profilo (1) dobbiamo compilare tutti i campi dei quali disponiamo (2), questo aiuterà i curatori a verificare la vostra identità ed abilitarvi alla creazione di NFT.
N.B.
per l'abilitazione viene richiesto un link ad un portfolio dove vedere i nostri lavori, ma non temete. Se come me prima di questa esperienza non avete pubblicato niente potrete essere verificati con i link social di Twitter e Instagram!
nella sezione Art Display Preference (3) possiamo spuntare i nostri lavori come NSFW, o viceversa, a seconda dei contenuti che pensiamo di pubblicare.
Apply For Whitelist (4) - una volta compilata tutta la sezione profilo possiamo fare richiesta ai curatori di inserire il nostro profilo nella whitelist. Da questo momento dobbiamo aspettare di essere contattati dai curatori e essere approvati in qualità di artisti (es. io sono stato contattato sul mio profilo instagram, una volta che rispondiamo al messaggio verremo abilitati. La procedura ha richiesto qualche giorno di attesa.)
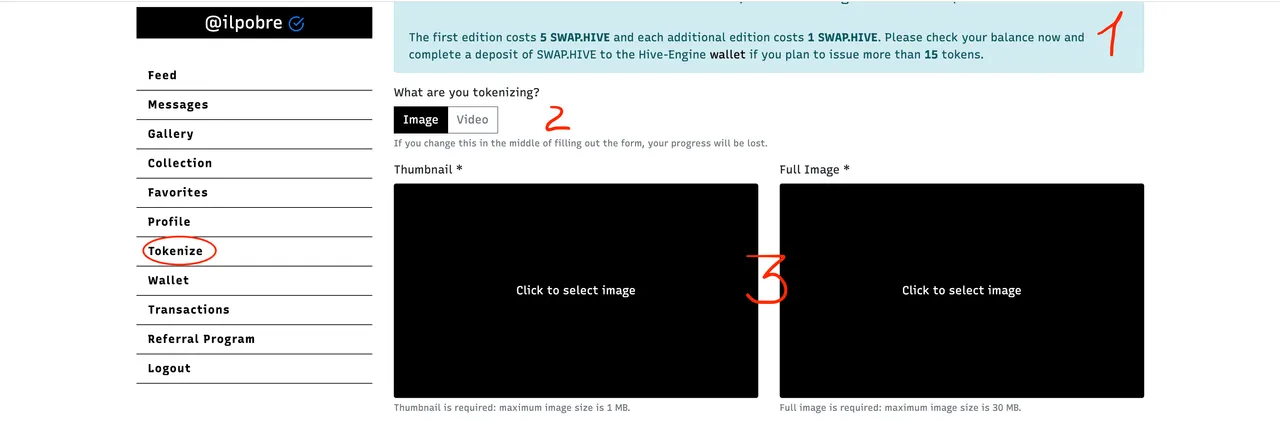
Una volta ricevuta l'abilitazione comparirà nel menù la sezione Tokenize dove possiamo finalmente creare i nostri NFT !
La prima cosa da notare è il costo di pubblicazione dei nostri NFT (1), come ci viene detto ogni prima edizione ha un costo di 5 $SWIPE.HIVE e per ogni copia aggiuntiva che vogliamo realizzare dovremo aggiungere 1 $SWIPE.HIVE .
Possiamo caricare (2) file Immagine fino a 30MB (PNG, JPG, GIF) oppure file Video fino a 100MB ed intrambi i casi un'immagine di copertina che non superi 1MB (3).
Una volta selezionata l'immagine o il video che vogliamo tokenizzare dovremo compilare la scheda descrittiva dell'artwork:
- in primis il nome della collezione (1) della quale farà parte il nostro lavoro;
- il titolo della nostra opera e l'anno di creazione (2);
- la descrizione della nostra opera (3);
- i diritti sull'opera (4), in questa sezione possiamo selezionare se i diritti sull'opera rimarranno privati oppure se l'acquirente avrà libera disponibilità dell'opera anche per fini commerciali;
- i tag (5);
- il numero di edizioni che vogliamo creare di questa opera, come citato in precedenza la creazione di 1 edizione costa 5 $SWIPE.HIVE di base mentre ogni edizione aggiuntiva ci costerà 1 $SWIPE.HIVE;
- la possibilità di selezionare l'avvertenza NSFW per contenuti espliciti;
- nella sezione notes possiamo inserire un messaggio destinato all'acquirente;
- accettare le condizioni d'uso e di copyright (9);
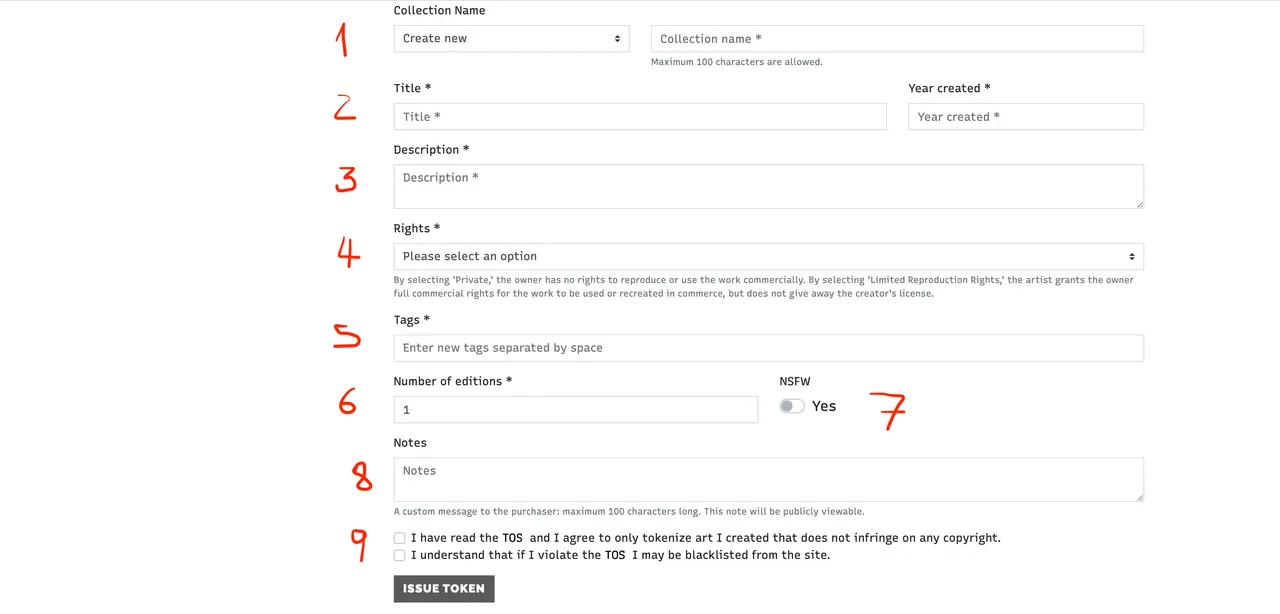
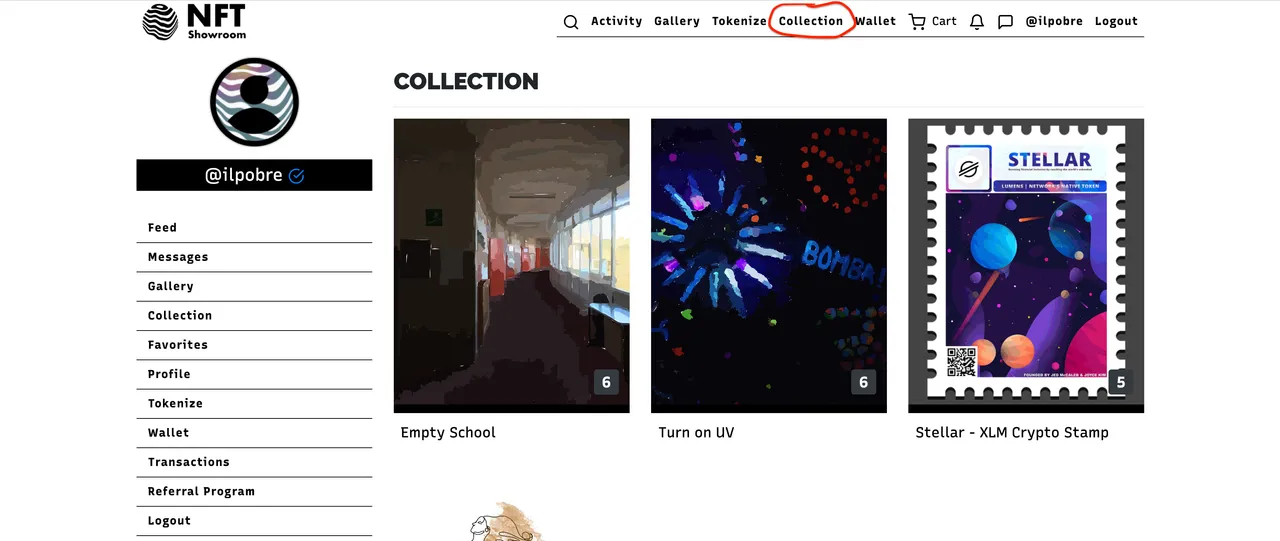
Quindi procediamo dando il comando ISSUE TOKEN ed ecco fatto! Troveremo le nostre opere nella sezione Collection insieme ad eventuali opere acquistate.
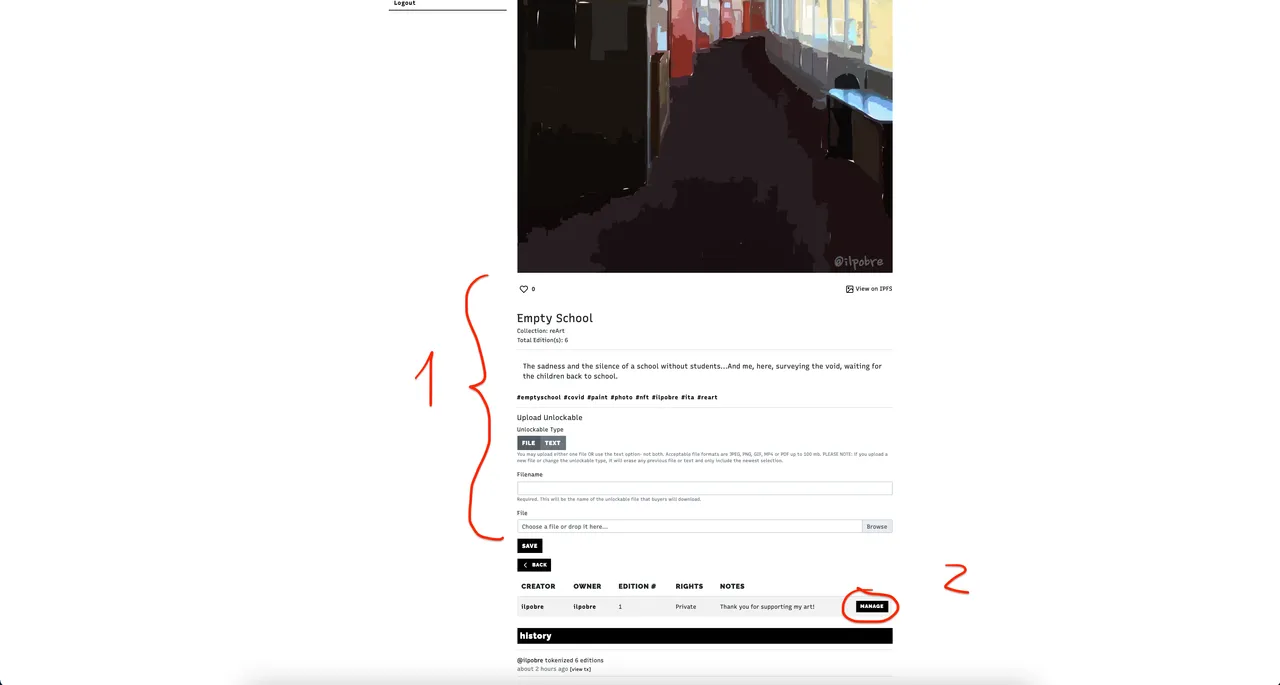
Entriamo ora in uno degli NFT che abbiamo creato per visualizzare la pagina della nostra opera dove potremo vedere un riassunto di tutta la descrizione (1) ed inserire un file o txt unlockable che verrà visualizzato da chi acquisterà la nostra opera. In questa pagina possiamo anche gestire le opere in nostro possesso (2) selezionando la voce manage di fianco alle edizioni in nostro possesso.
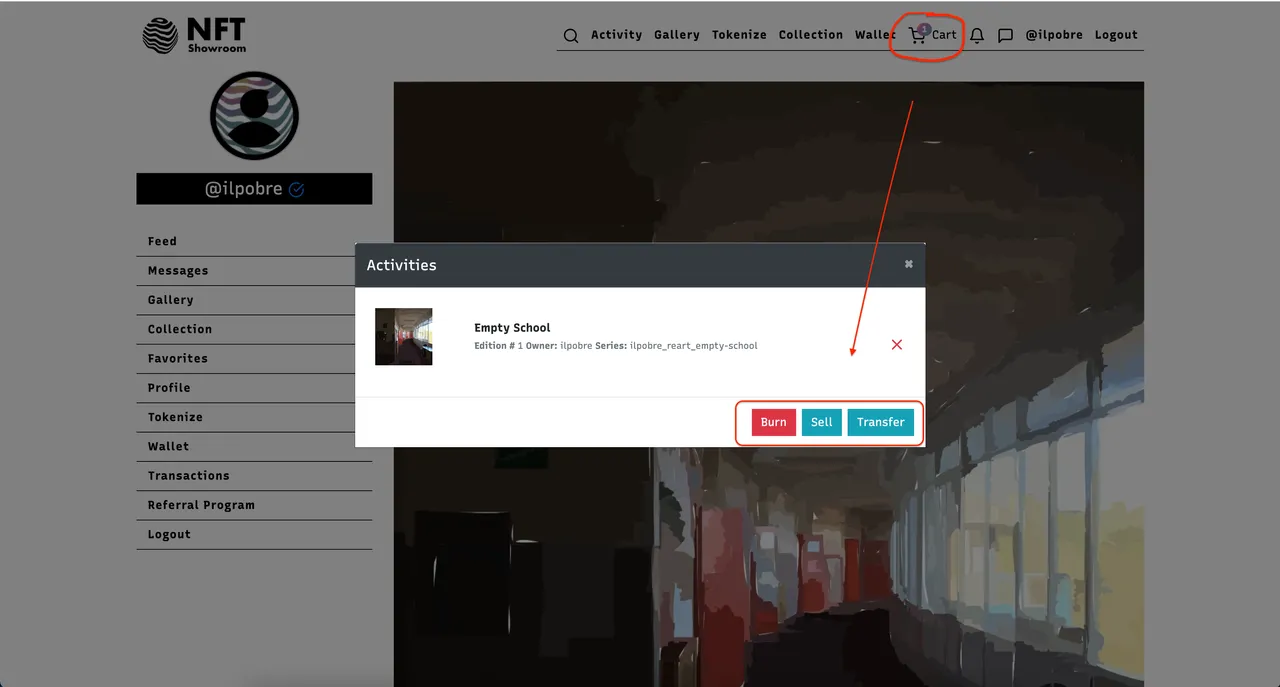
Una volta selezionata la voce manage i token verranno aggiunti al carrello, aprendo quest ultimo potremmo decidere cosa fare dei token selezionati: BURN (ci consente di bruciare il nostro nft), SELL (per vendere il token, selezionando questo comando ci verrà poi chiesto quale sarà il prezzo di vendita) oppure TRANSFER (per trasferire il nostro nft ad un altro utente).
Spero che questa lettura sia stata utile! Vi aspetto su #NFTShowroom !
Se volete potete riportare il mio referral link al momento del primo accesso: https://nftshowroom.com/?r=ilpobre
EN - LOGIN AND NFT CREATION GUIDE
Good morning everyone!
This week I finally posted my first works on #NFTShowroom and I have to say that the DApp in question is working really well.
Initially you need to login with our #HIVE account. If the intention is to buy and collect #NFT this operation would already be sufficient, in fact with the login we can already transfer funds $SWIPE.HIVE on our wallet and explore the platform in search of #artworks to buy and collect in our gallery.
If instead, like me, you want to publish your works of digital art you will have to follow a few small steps:
- first in the profile section (1) we have to fill all the fields we have (2), this will help the curators to verify your identity and enable you to create NFT.
N.B.
*to enable you, a link to a portfolio where you can see our work is required, but fear not. If like me before this experience you have not published anything you can be verified with the social links of Twitter and Instagram!
In the Art Display Preference section (3) we can check off our work as NSFW, or vice versa, depending on what content we plan to post.
Apply For Whitelist (4) - once the entire profile section is filled out we can make request to the curators to whitelist our profile. From this moment we have to wait to be contacted by the curators and to be approved as an artist (exs. I was contacted on my instagram profile, once we answer the message we will be enabled. The process took a few days of waiting))
Once received the authorization will appear in the menu the section Tokenize where we can finally create our NFT !
The first thing to note is the cost of publishing our NFT (1), as we are told each first edition has a cost of 5 $SWIPE.HIVE and for each additional copy we want to make we will have to add 1 $SWIPE.HIVE .
We can upload (2) Image files up to 30MB (PNG, JPG, GIF) or Video files up to 100MB and in both cases a cover image not exceeding 1MB (3).
Once we have selected the image or video we want to tokenize, we will have to fill in the description of the artwork:
- first of all the name of the collection (1) of which our work will be part;
- the title of our work and the year of creation (2);
- the description of our work (3);
- the rights on the work (4), in this section we can select if the rights on the work will remain private or if the buyer will have free availability of the work also for commercial purposes;
- the tags (5);
- the number of editions we want to create of this work, as mentioned above the creation of 1 edition costs 5 $SWIPE.HIVE basic while each additional edition will cost us 1 $SWIPE.HIVE;
- the possibility to select the NSFW warning for explicit content;
- in the notes section we can insert a message intended for the buyer;
- accept the terms of use and copyright (9);
Then we proceed by giving the command ISSUE TOKEN and that's it! We will find our works in the Collection section along with any purchased works.
Let's now enter one of the NFTs we have created to display the page of our work where we can see a summary of the whole description (1) and insert an unlockable file or txt that will be displayed by those who will buy our work. In this page we can also manage the works in our possession (2) by selecting the manage item next to the editions in our possession.
Once selected the manage item the tokens will be added to the trolley, opening the latter we can decide what to do with the selected tokens: BURN (allows us to burn our nft), SELL (to sell the token, selecting this command we will be asked what will be the selling price) or TRANSFER (to transfer our nft to another user).
I hope this read was helpful! I'll be waiting for you on #NFTShowroom !
If you want you can bring back my referral link when you first login: https://nftshowroom.com/?r=ilpobre