UPDATE: I have updated the App so that you don't need your own credentials to use it. Please ignore any reference to getting or using your own HiveSQL credentials in the post. Thank You.
UPDATE-2: I made the github repo to the code private because it was leaking the private credentials. I am just learning how these things work. If you need the code I will be happy to share. To make the github repo public I need to learn how to secure sensitive data first.
UPDATE-3: @geekgirl/update-on-my-experimental-app-hive-librarian
If you followed my previous posts, you probably already know I have been experimenting with HiveSQL and Streamlit in python. Today I decided to attempt to build something more useful and ended up deploying my very first simple App. Let's call it Hive Comments. Because that's all it does, it retrieves the historical comments made by one user to another.
Have you ever had a situation when you tried to remember an information that was shared in the comments sometime in the past? Or perhaps you were/are interested in seeing all the comments or conversations you had with a specific user? Or maybe even a conversations other users had with each other. If so, you may find it interesting to browse through the history of Hive comments among users.
Before I bore you with all the details how to build an App using Streamlit and HiveSQL, feel free to go the following link and try it yourself. I would appreciate any and all feedbacks.
https://hive-user-responses.herokuapp.com
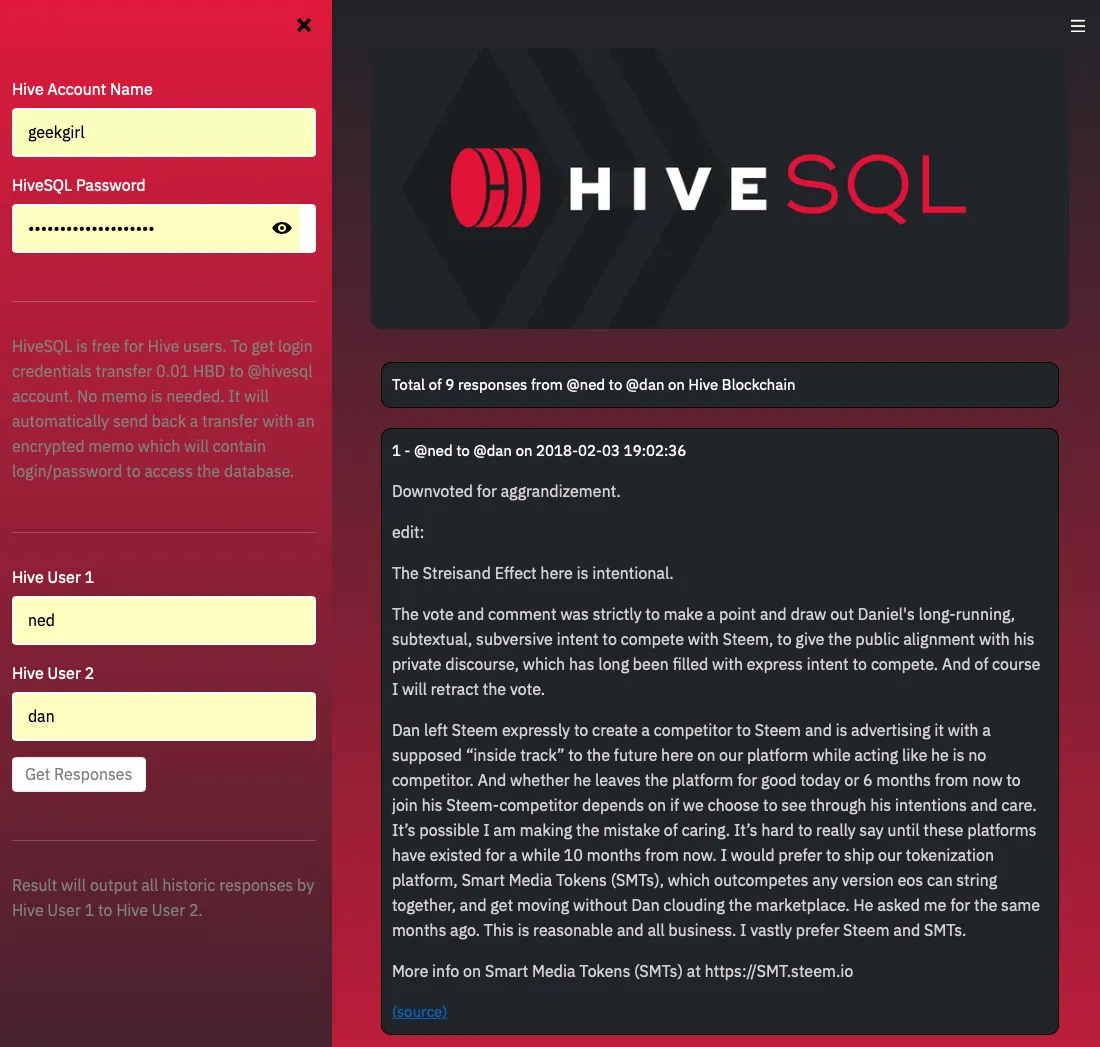
To connect to the HiveSQL database login credentials are required. Since I wasn't sure about the terms of service and because HiveSQL is free for all users I chose to let Hive users use their of login credentials for HiveSQL. If you do not have one, it is easy to get. Simple transfer 0.01 HBD to @hivesql, and it will automatically send a transfer to your account with login and password information. If you don't have 0.01 HBD, I will be happy to send you. Just let me know in the comments.
Once you have the login/password for HiveSQL, just enter your username and password to the top two fields. Next two input fields ask for user-1 and user-1. After you click the Get Responses button, the results will output all the comments made by user-1 to user-2. For context, you can click the (source) and it will take to that comment on hive.blog.
The App itself is not complicated. It only has one simple task as described above. I use Streamlit because it makes making web apps easy and fast. It also makes deploying apps easy as well. I chose to deploy it on Heroku.
Initially I had issues deploying it, because I used pyodbc module which requires specific Microsoft sql driver. Even with pyodbc the App worked fine on the local machine. But problem happened when I tried to deploy it on Heroku.
Then I switched to a different module - pymssql and everything worked fine locally and was able to deploy without any issues. It works almost the same way as pyodbc.
The code itself contains lines to connect to HiveSQL using pymssql which takes an SQL command and returns the results. I store the SQL query in a SQLCommand variable.
Other lines of code use Streamlit functions to output labels, inputs, divs, p, and text on a webpage. Most of them are self-explanatory. To get started with Streamlit, feel free to read my previous post on the topic.
Then, there is also long lines of code that has to do with styling and CSS. With basic CSS knowledge and using Chrome's inspector we can identify and style all the elements displayed on the webpage.
Before deploying the App to Heroku we will need to place all files used and needed to github. First, we need the python files used. In this case, I only had one python file for the App. I also use an image, so I need to include that as well.
After that we need to create three more files with specific information in them. The file names will be:
Procfilerequirements.textsetup.sh
The Procfile will have one line as following:
web: sh setup.sh && streamlit run hive_responses-app.py
Replace the .py filename with a filename of your App.
Inside the requirement.txt we need to place all the modules/dependencies we used in our python script with their version numbers. Like this:
streamlit==0.74.1
pymssql==2.1.5
Pillow==8.1.0
We can get that information with typing the following in the command prompt or terminal
pip freeze or in my case pip3.8 freeze
Last file setup.sh will contain the following.
mkdir -p ~/.streamlit/

echo "\
[server]\n\
port = $PORT\n\
enableCORS = false\n\
headless = true\n\
\n\
" > ~/.streamlit/config.toml
We don't need to make any changes in this file.
Here is the link to my github repository for this App:
https://github.com/librarian-hive/hive-comments
Now that everything is ready in github, we go to Heroku. In Heroku, we need to click New --> Create new app.
First we need to give our new app a name. After that, under Deploy tab and Deployment method we need to choose Github. It will ask for repository name, searches for it and connects to the repository.
Lastly, we click the Deploy Branch at the bottom of the page. It will take few minutes to configure and install everything properly. If everything goes well, at the end it will show a View link to the App. That's it.
Feel free to visit my super boring first app.