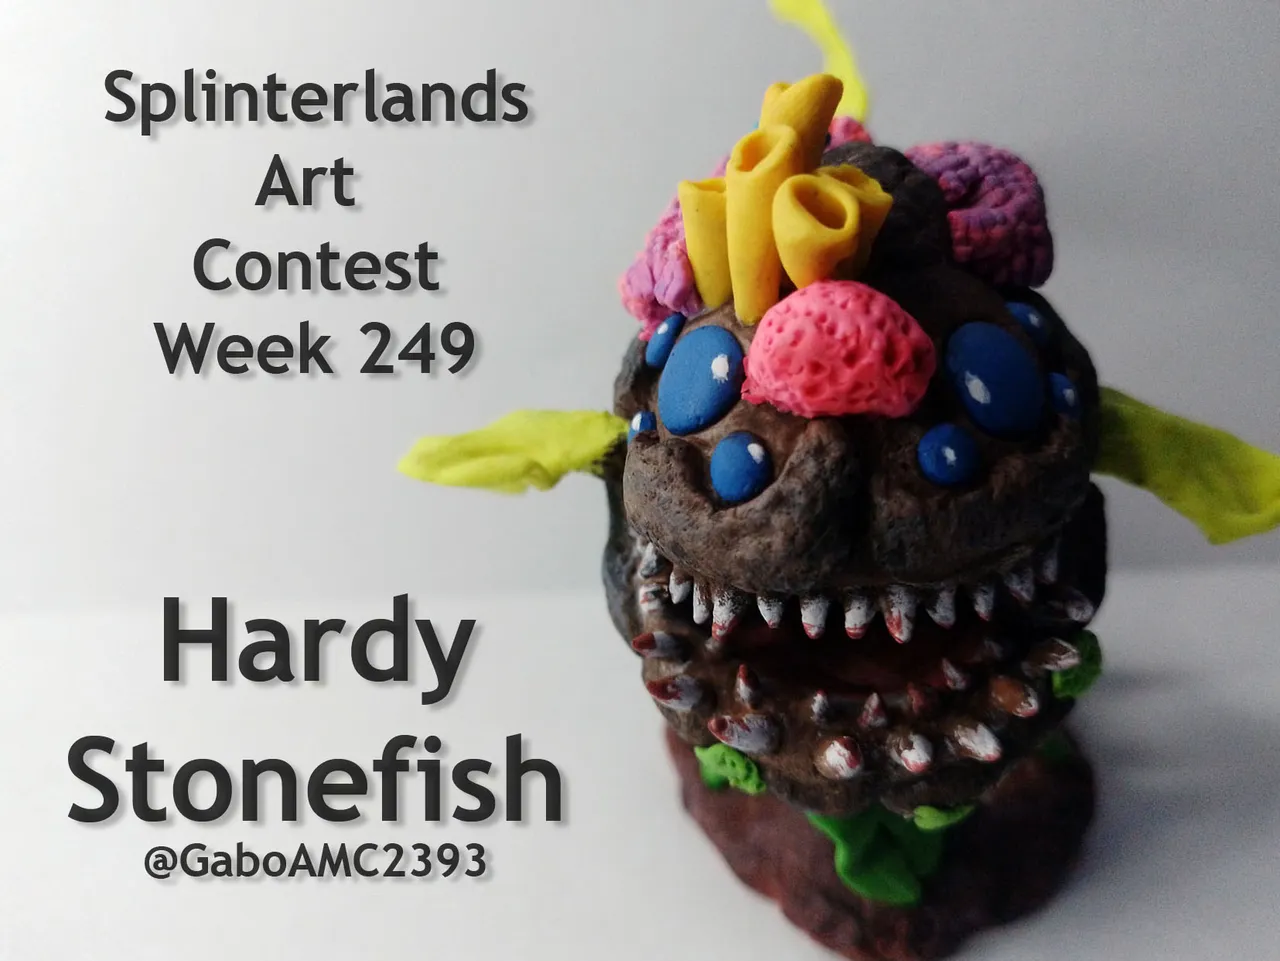

Greetings to all, fellow creatives. Today I would like to share with you one of the most terrifying sculptures I have done here at Hive.
I have often said that fish can be scary, especially when they are fictional fish, and the fish I will show you today is an art inspired by a splinterlands card called Hardy Stonefish.
Saludos a todos, compañeros creativos. Hoy me gustaría compartir con ustedes una de las esculturas más terroríficas que he hecho aquí en Hive.
Con frecuencia he dicho que los peces pueden llegar a ser aterradores, más cuando se trata de peces ficticios y es que el pez que les mostraré hoy es un arte inspirado en una carta de splinterlands llamada Hardy Stonefish
Enlace a la carta:
https://next.splinterlands.com/card-detail/381/regular/7?tab=cards
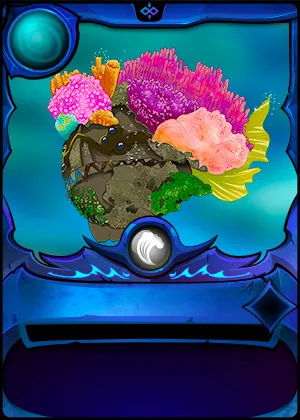
Although the card looks like a more friendly fish, I wanted to make it more terrifying than what you see on the card, because the lore of the card tells the story of a hunter who sought to catch this fish and he was the one who ended up devoured.
Join me in the step by step of this terrifying sculpture.
Aunque la carta parece un pez más simpático, yo quise hacerlo más aterrador de lo que se ve en la carta, pues en el lore de la misma nos cuenta la historia de un cazador que buscaba pescar a este pez y fue él quien terminó devorado.
Acompáñenme pues al paso a paso de esta terrorífica escultura.
Materials
The materials I used for this sculpture were the following:
- Wire
- Paper
- Adhesive tape
- Plasticine
- Paints
- Tweezers
- Paintbrushes
- Sewing and knitting needles.
Step by step
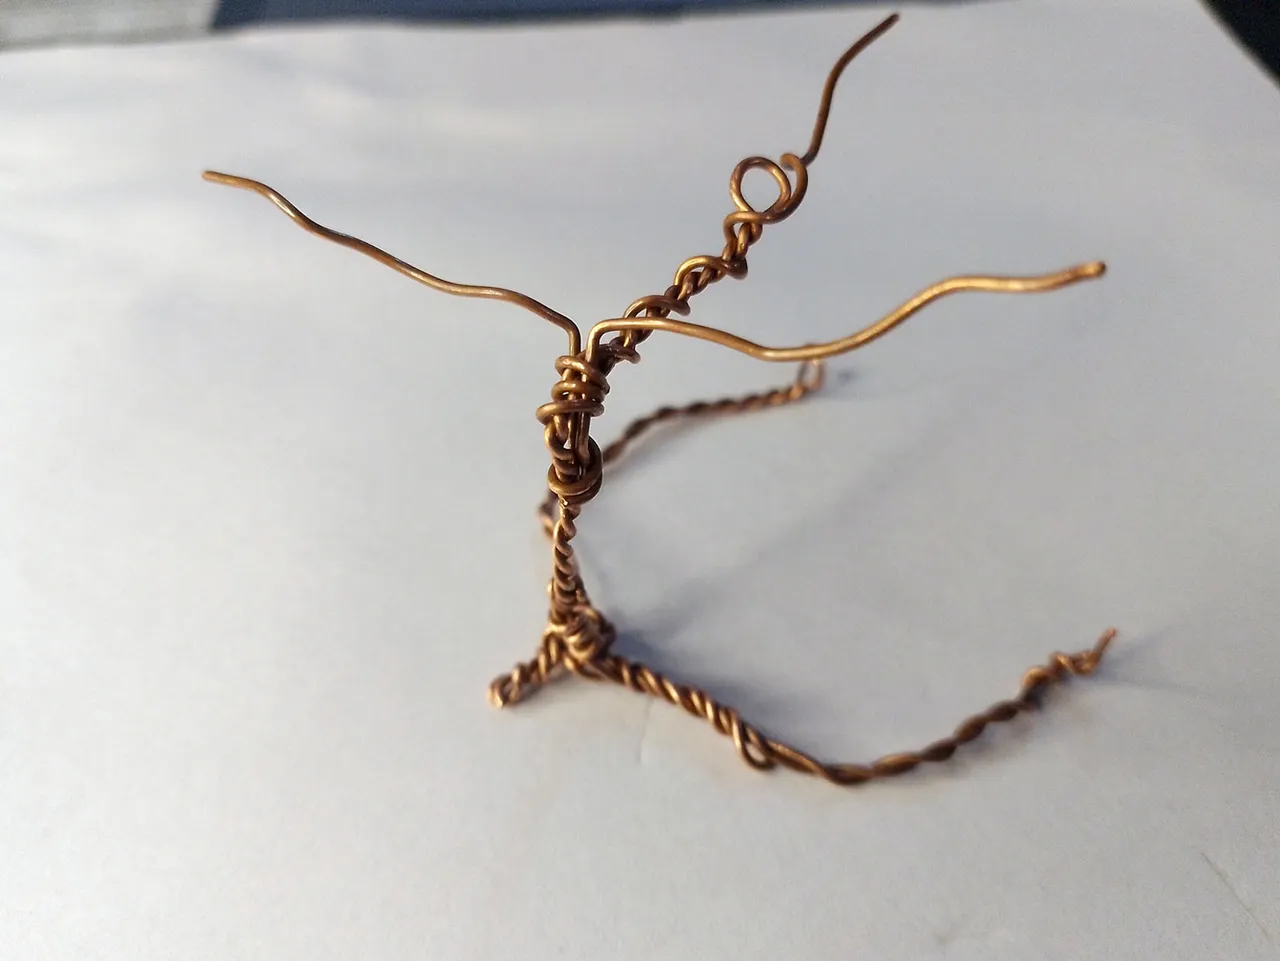
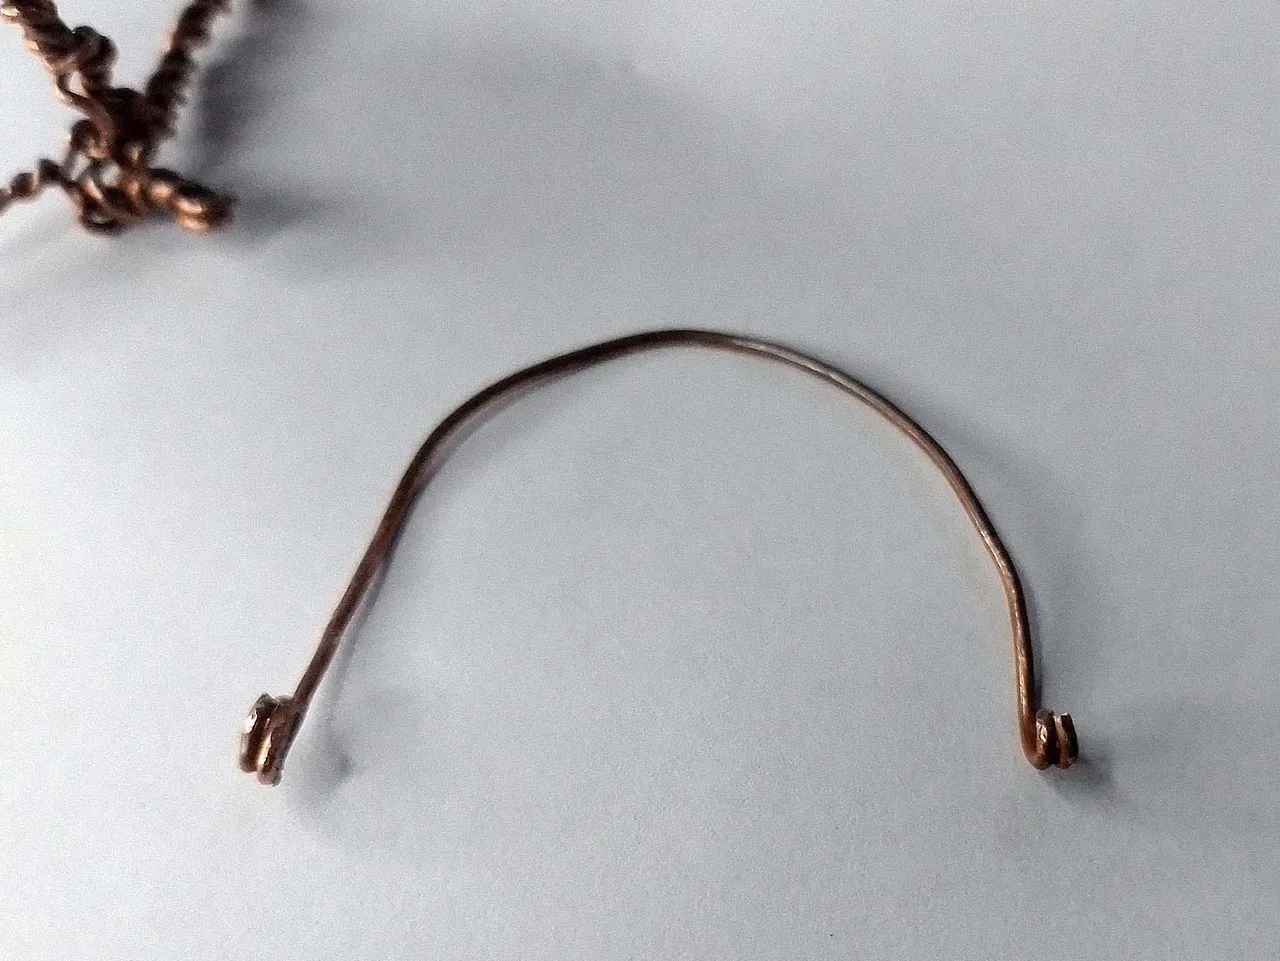
Well, with these materials I started to work. The first thing I did was the skeleton for the piece, in this case made with copper wire.
Materiales
Los materiales que utilicé para esta escultura fueron los siguientes:
- Alambre
- Papel
- Cinta adhesiva
- Plastilina
- Pinturas
- Pinzas
- Pinceles
- Agujas de coser y tejer.
Paso a paso
Pues bien, con estos materiales comencé a trabajar. Lo primero que hice fue el esqueleto para la pieza, en este caso hecho con alambre de cobre.
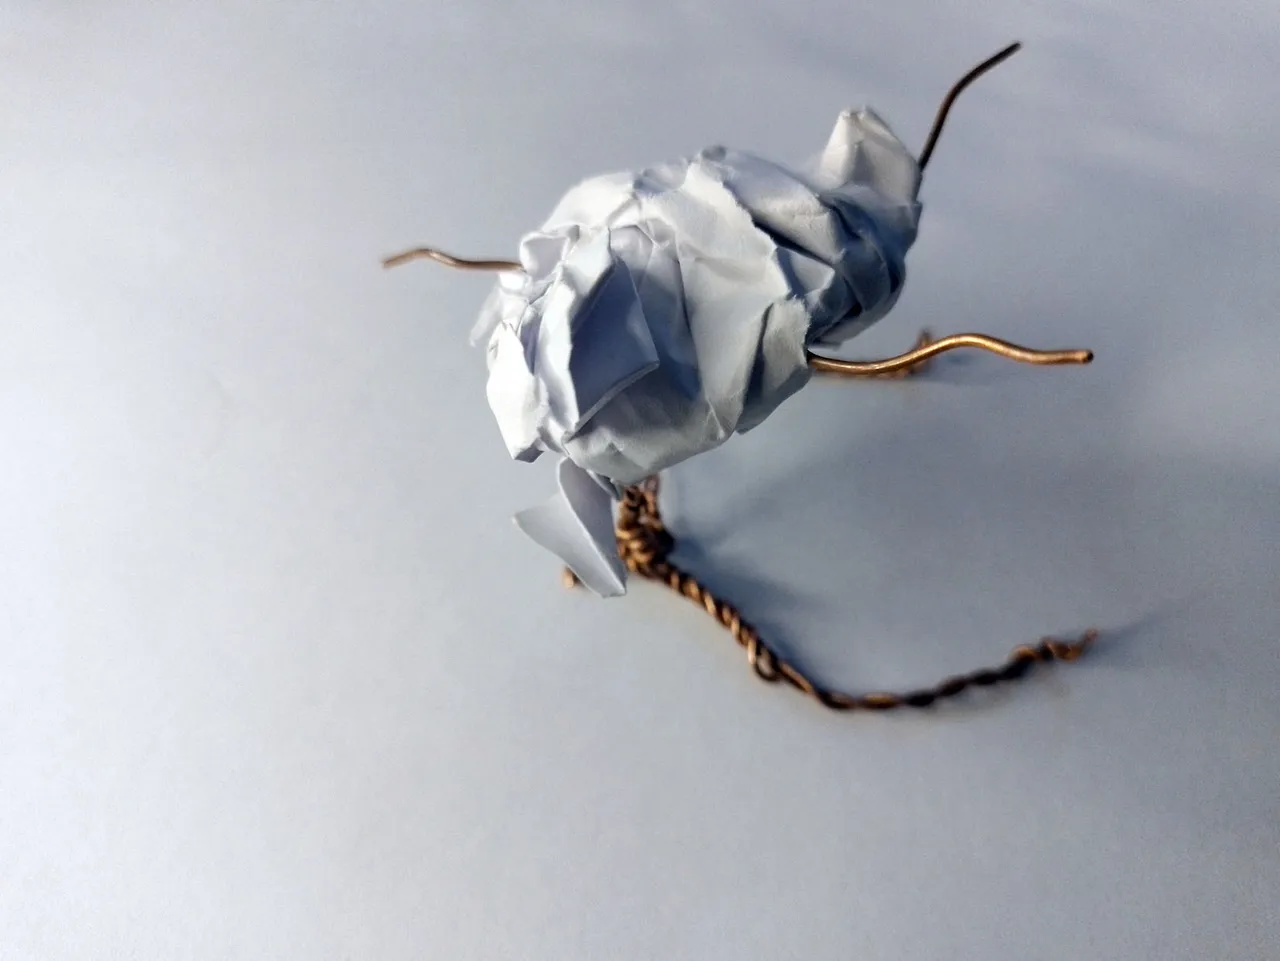
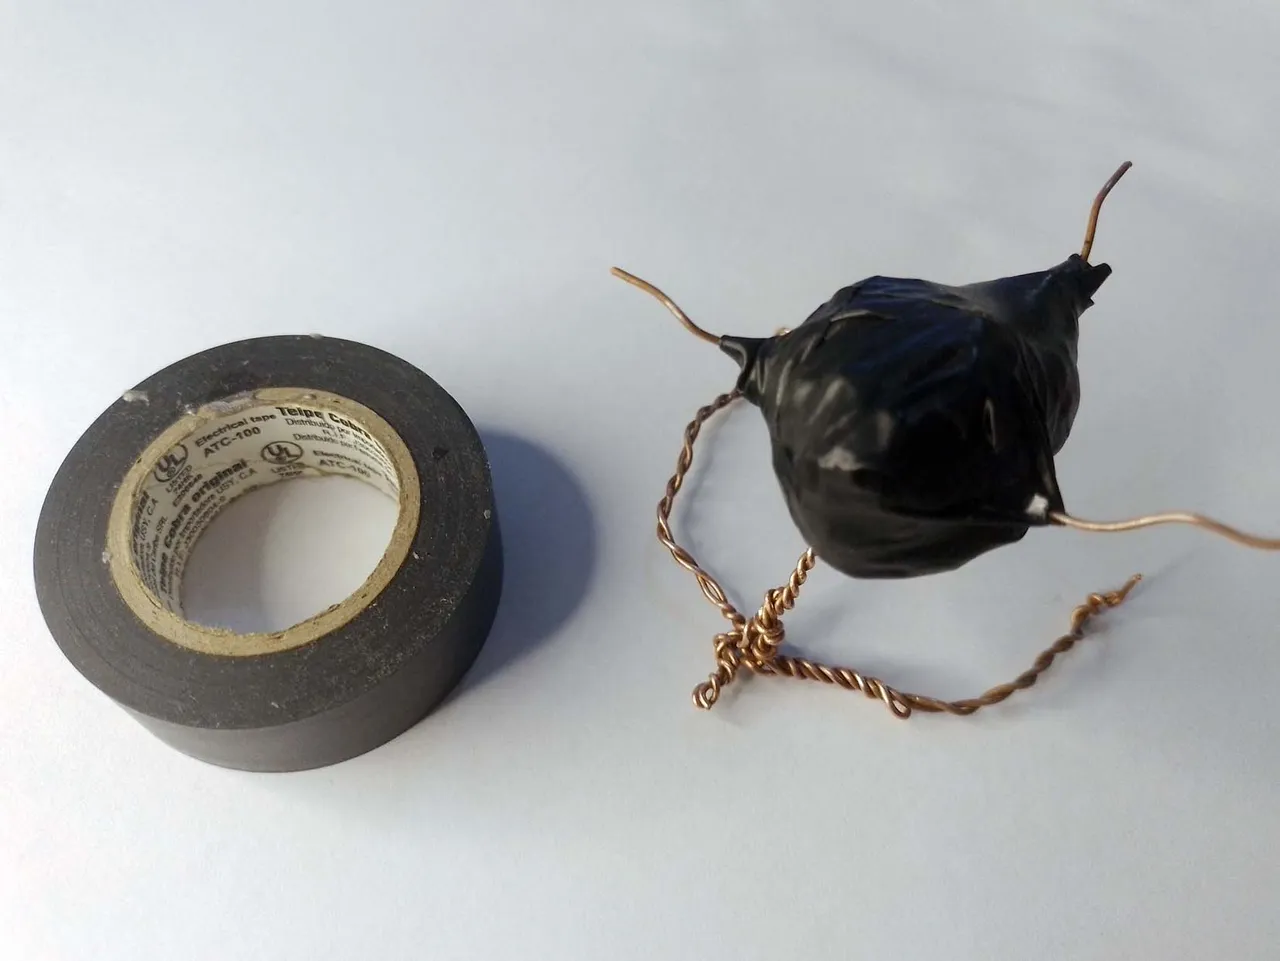
In the images below you can see how I used the paper and tape to fill the skeleton of the figure, to give it volume and not use so much plasticine in such a big sculpture.
En las imágenes de abajo pueden ver cómo utilicé el papel y la cinta para rellenar el esqueleto de la figura, para así darle volumen y no usar tanta plastilina en una escultura tan grande.
 |  |
|---|
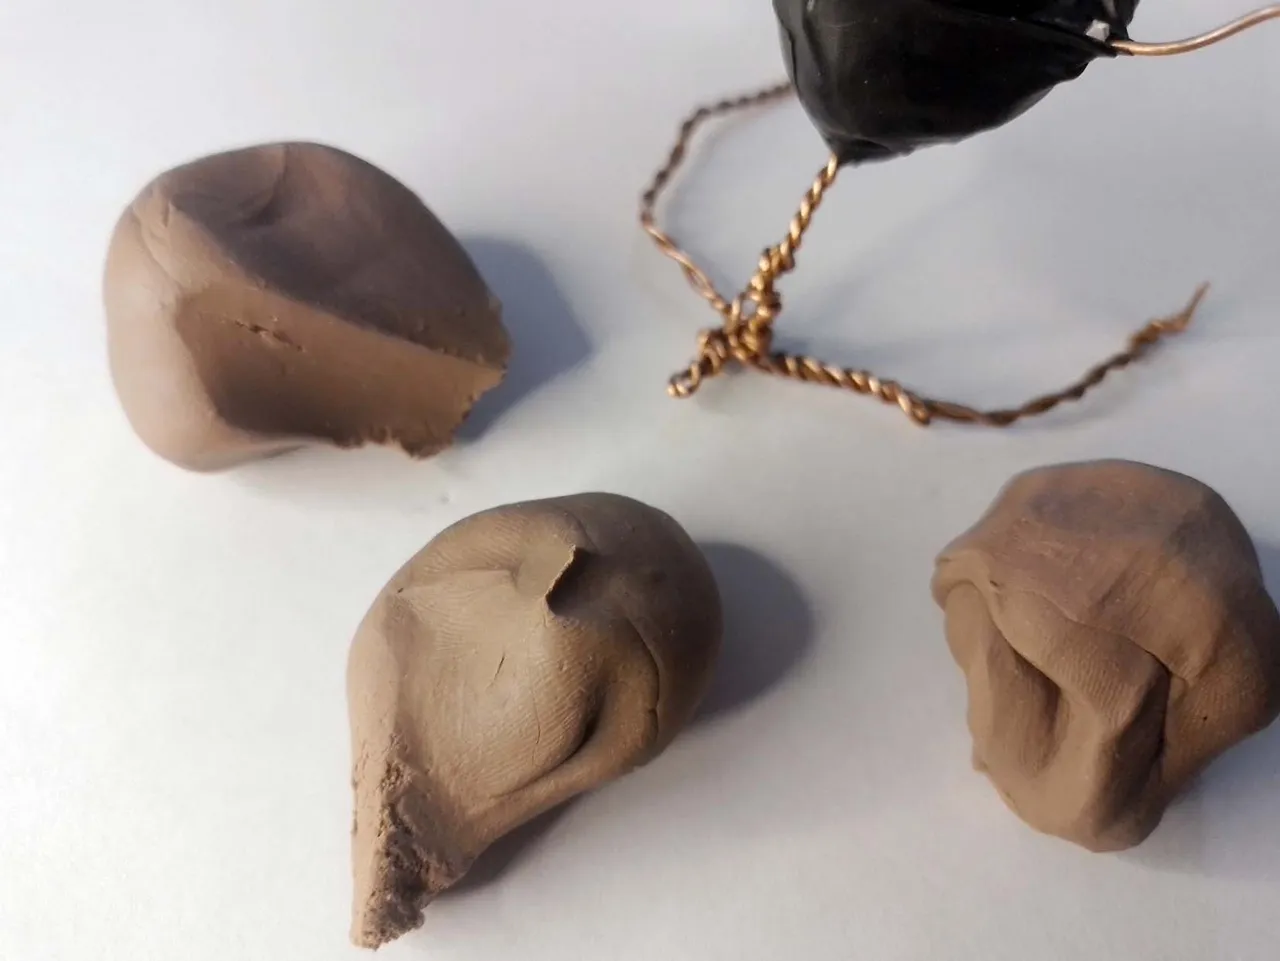
After making this filling I prepared the plasticine, a brown one, the same color of the fish.
I tried to cover the base skeleton trying to give it the same fish shape so as not to do too much molding later.
Después de hacer este relleno preparé la plastilina, una de color marrón, el mismo color del pez.
Traté de cubrir el esqueleto base tratando de darle la misma forma de pez para no hacer demasiado moldeado después.
 |  |
|---|
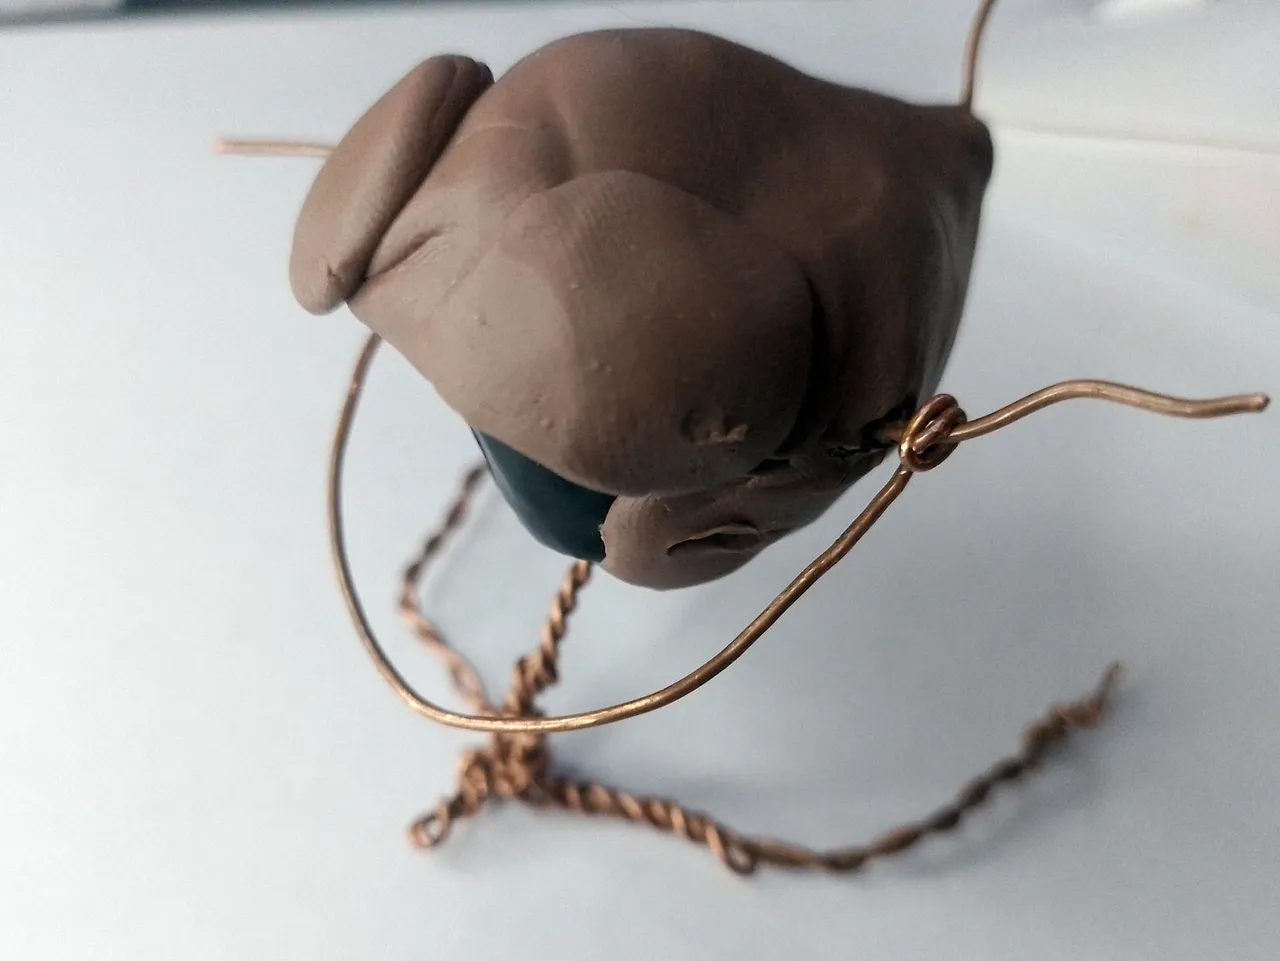
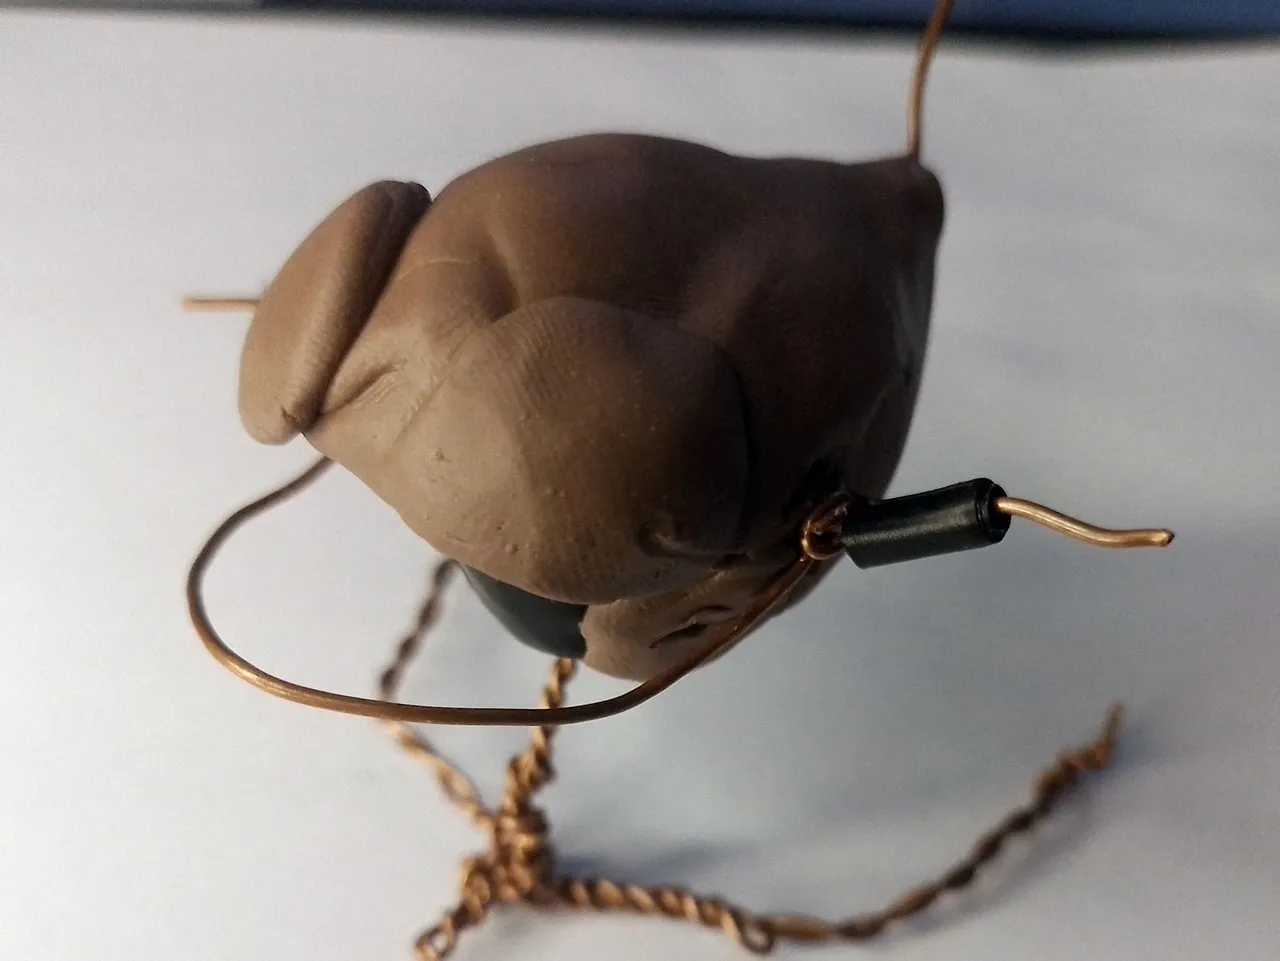
With the same wire I made a sort of jaw on the fish and placed it on the wire support where I am supposed to place the fins of the fish.
This is not with the intention that the fish will move the jaw after I have finished it, no, this is with the intention of being able to open the jaw while I am doing it, to be able to comfortably place the teeth to the figure.
Con el mismo alambre hice una suerte de mandíbula al pez y la coloqué en el soporte de alambre de donde se supone voy a colocar las aletas del pez.
Esto no es con la intención de que el pez mueva la mandíbula después de haberlo terminado, no, esto es con la intención de poder abrir la mandíbula mientras estoy haciéndolo, para poder colocar cómodamente los dientes a la figura.
 |  |
|---|
 |  |
|---|
Here you can see how the figurine looks like after covering the whole skeleton, including the jaw, with plasticine.
Aquí pueden ver cómo va quedando la figurita después de cubrir todo el esqueleto, incluyendo la mandíbula, con plastilina.

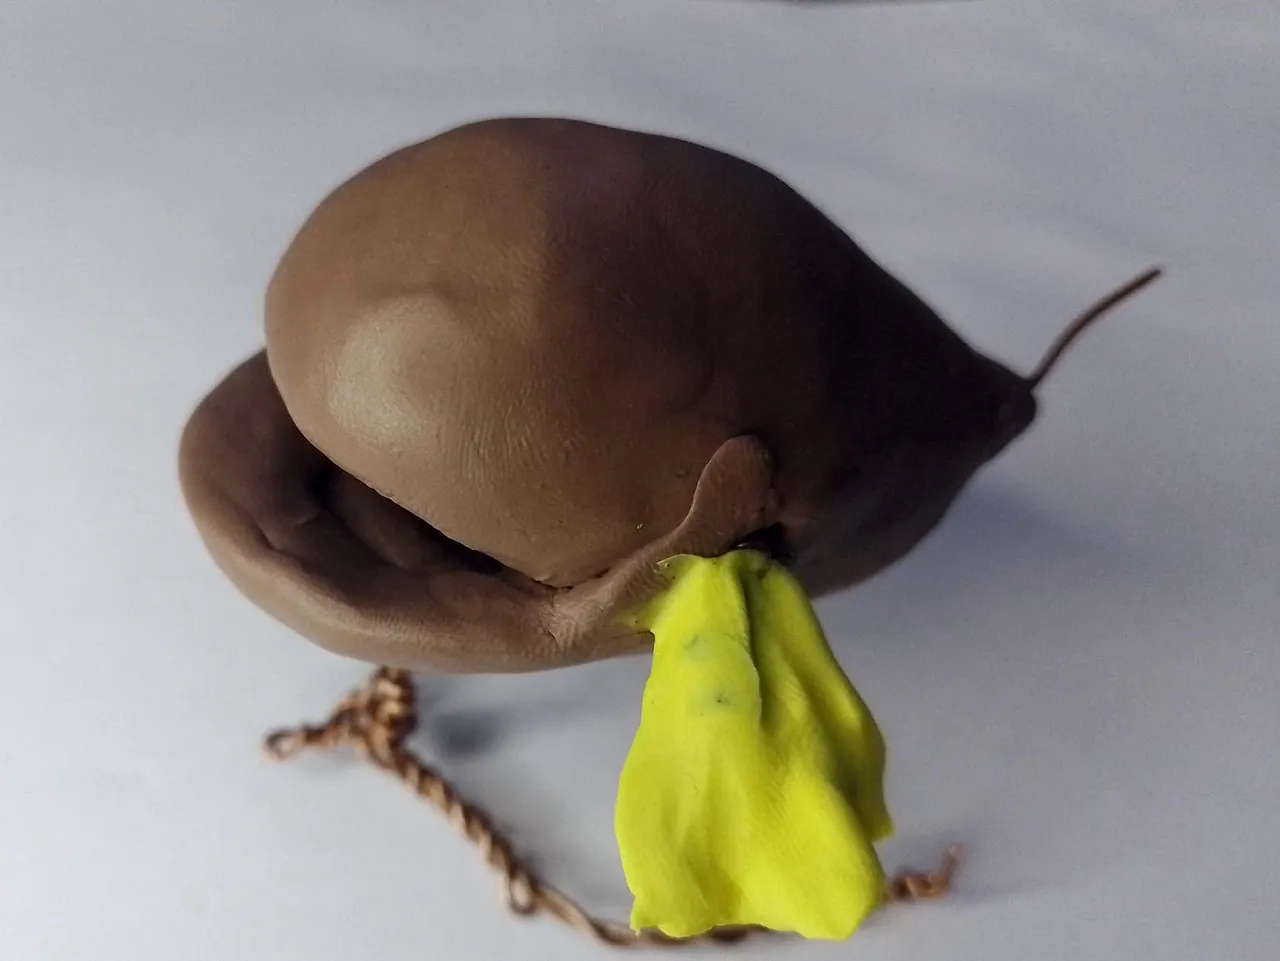
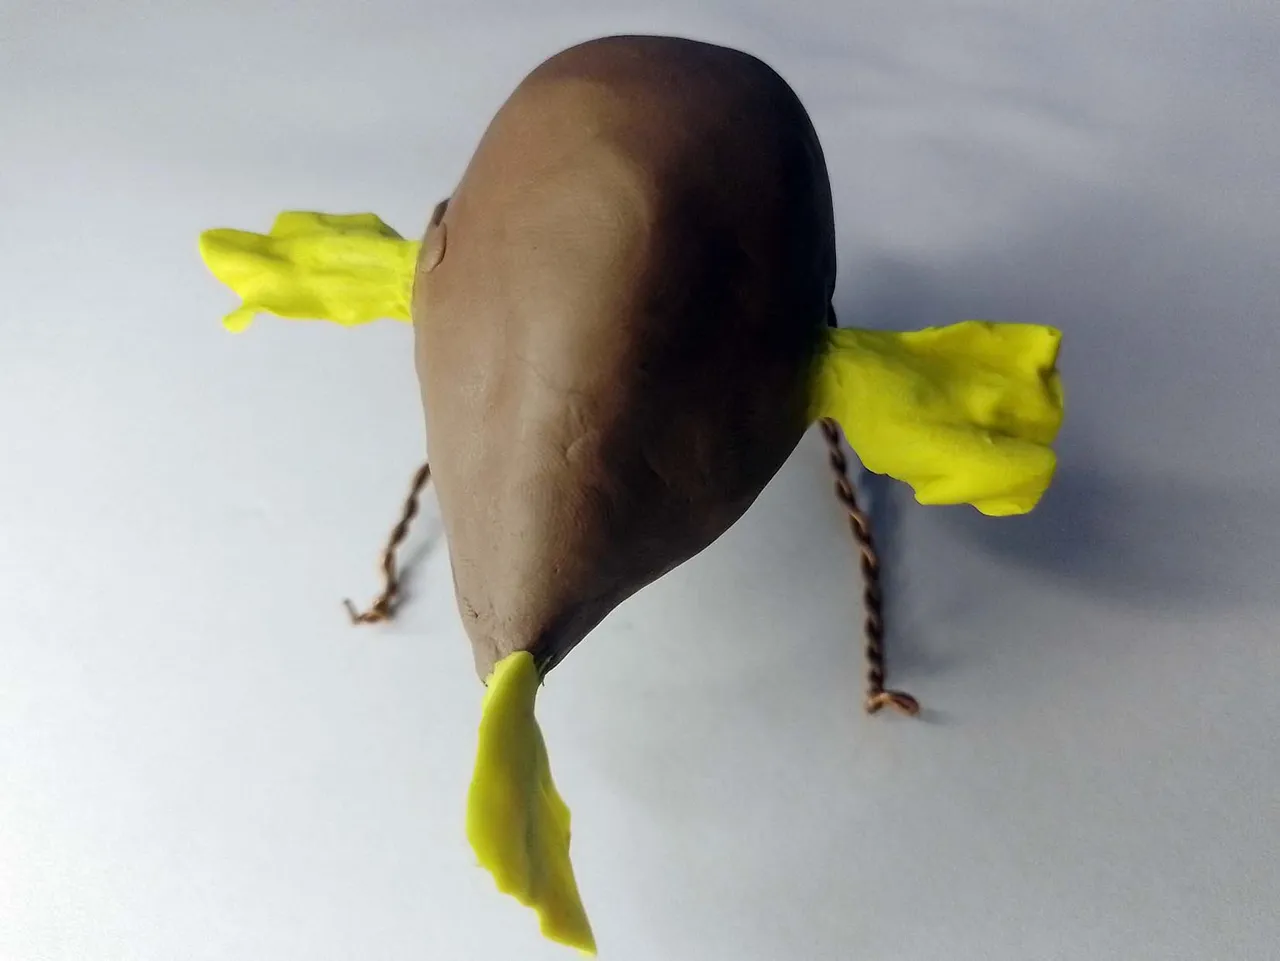
After this process I continued molding the surface of the fish's body to give it a smooth, soft and uniform surface.
At this point I also placed the fins on the fish, the two lateral ones and the only rear one.
Después de este proceso continué moldeando la superficie del cuerpo del pez para darle una superficie lisa, suave y uniforme.
En este punto también le coloqué las aletas al pez, las dos laterales y la única trasera.
 |  |
|---|
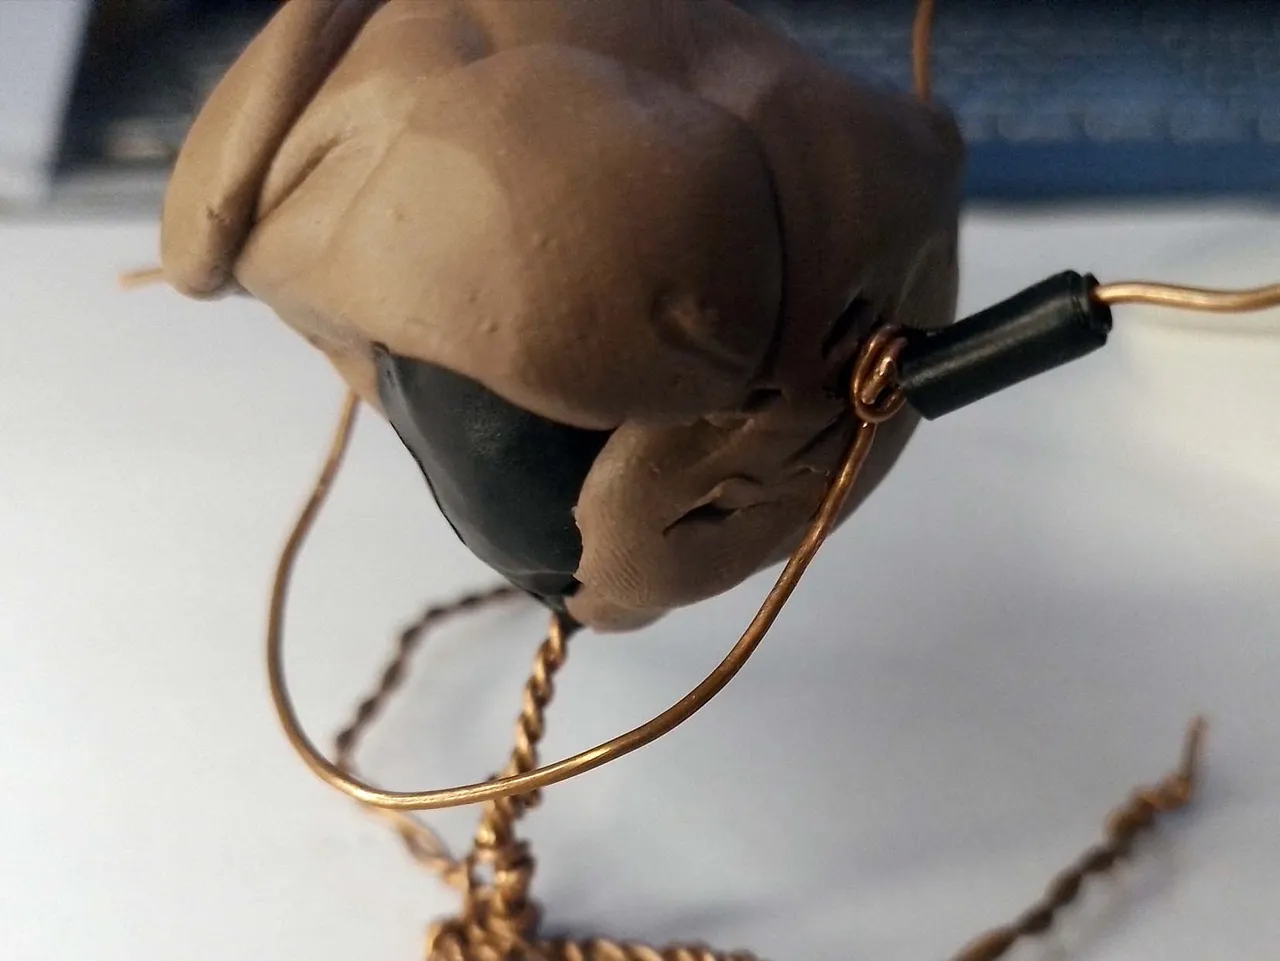
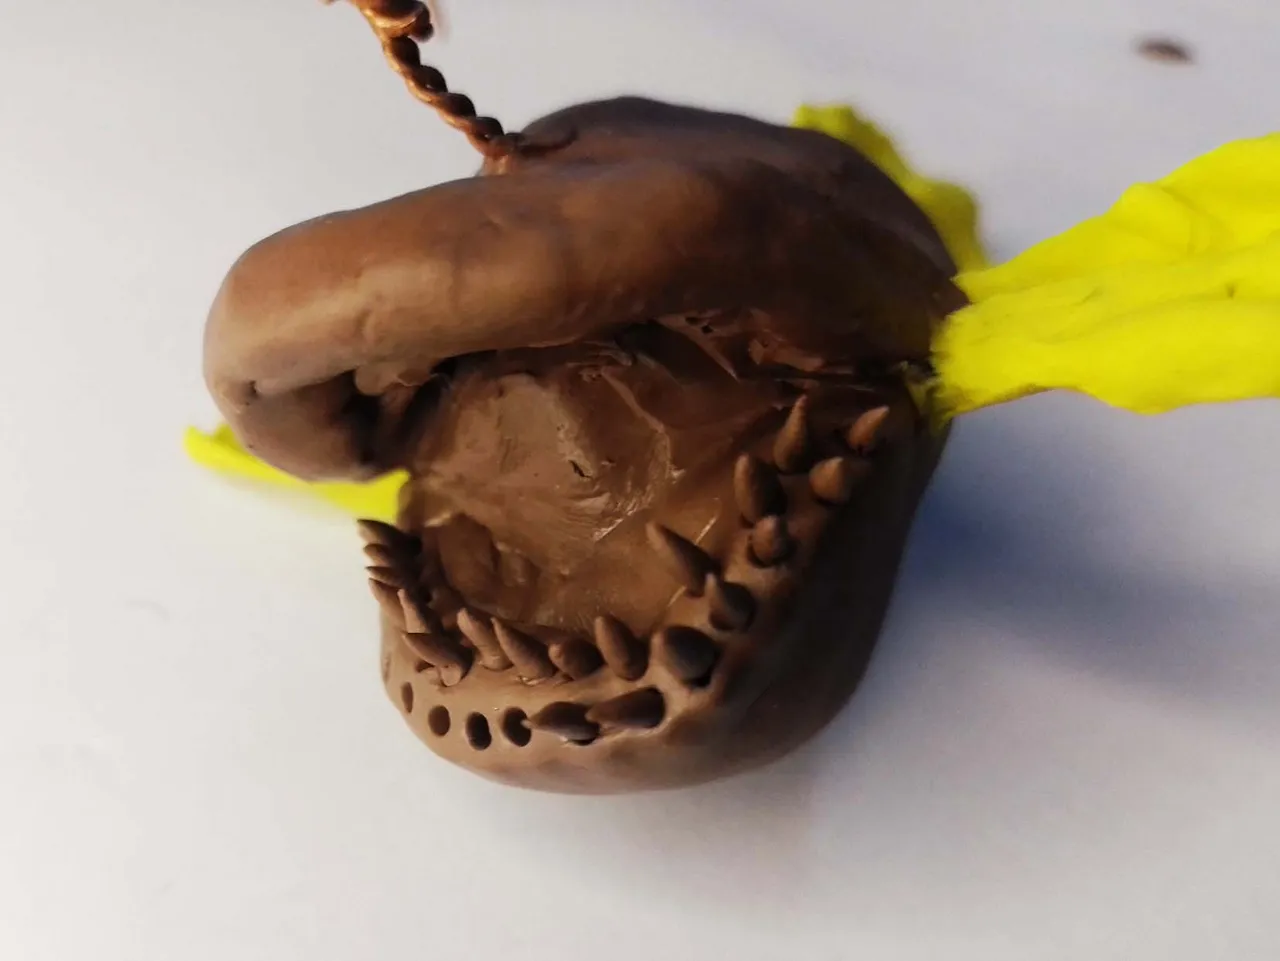
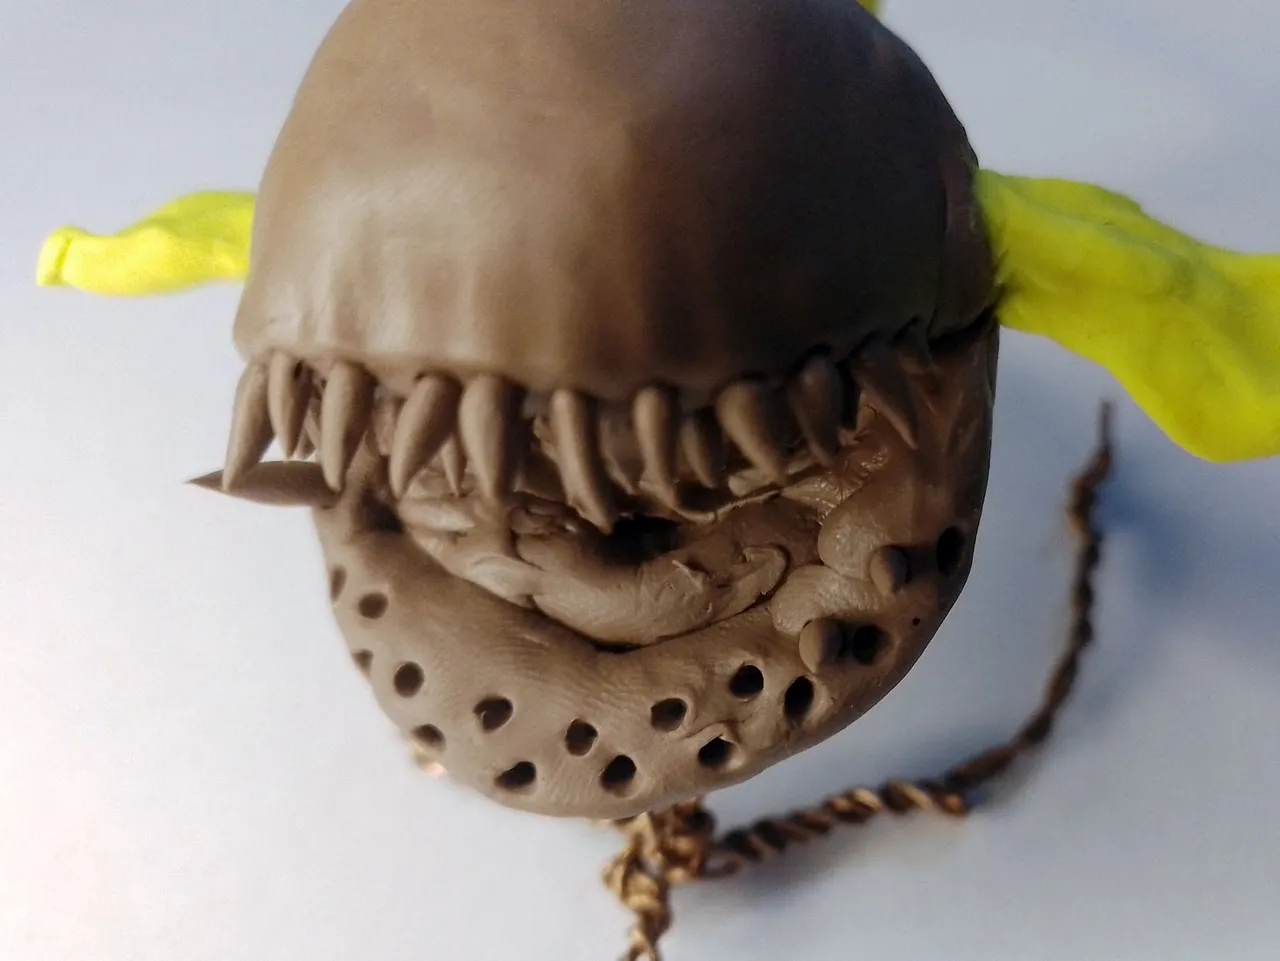
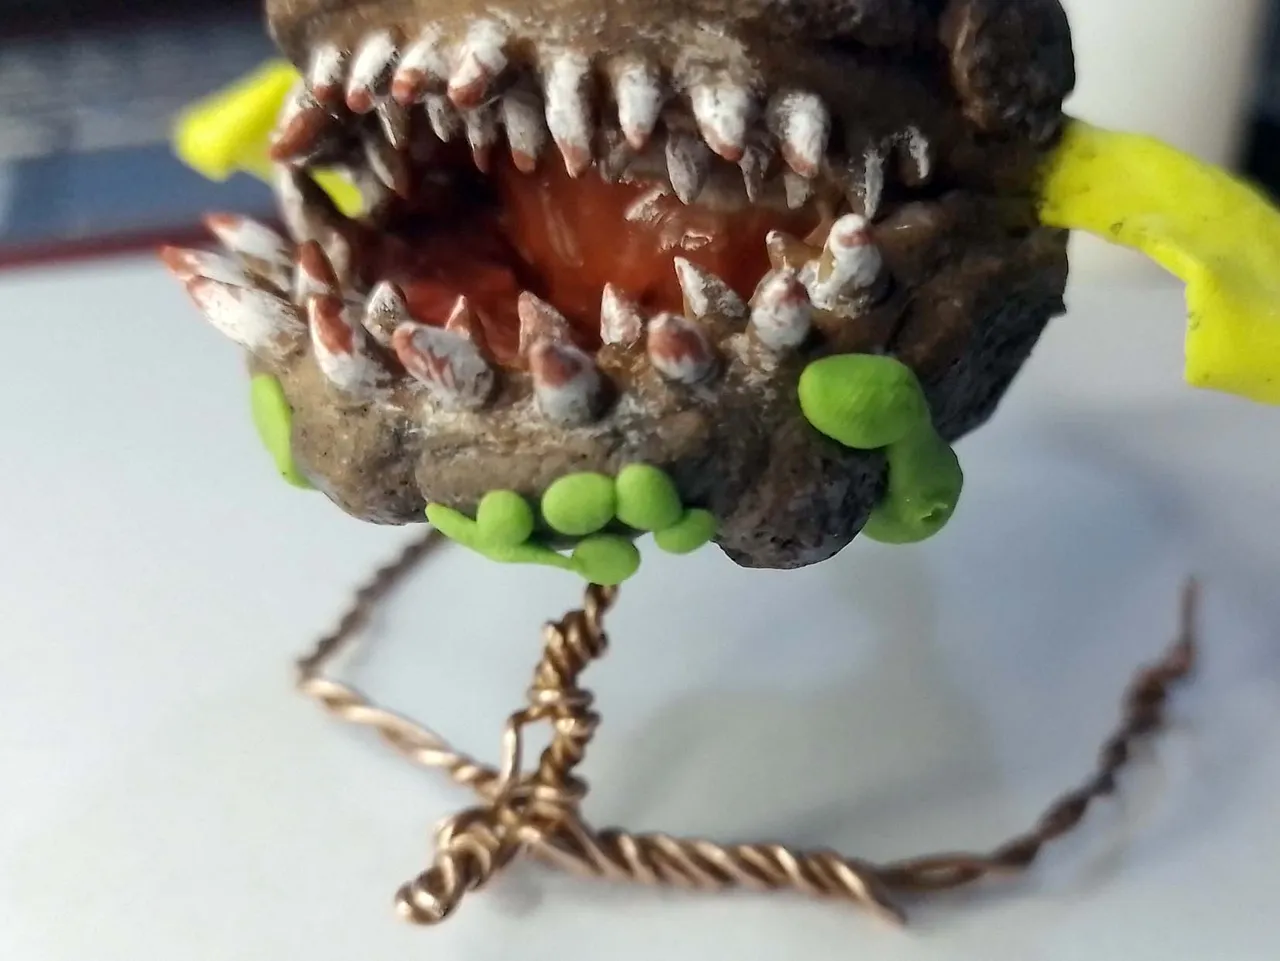
Because I could open the fish's jaw, I was able to place the teeth more comfortably.
I placed all these teeth one by one, making small individual barbs, which I placed in all the holes I made in the fish's mouth.
I placed a lot of teeth both above and below, as seen in the pictures below:
Gracias a que podía abrirle la mandíbula al pez logré colocarle los dientes con mayor comodidad.
Todos estos dientes los coloqué uno por uno, haciendo pequeñas púas individuales, las cuales coloqué en todos los orificios que hice en la boca del pez.
Coloqué un montón de dientes tanto arriba como abajo, tal como se ve en las imágenes de abajo:
 |  |
|---|
 |  |
|---|
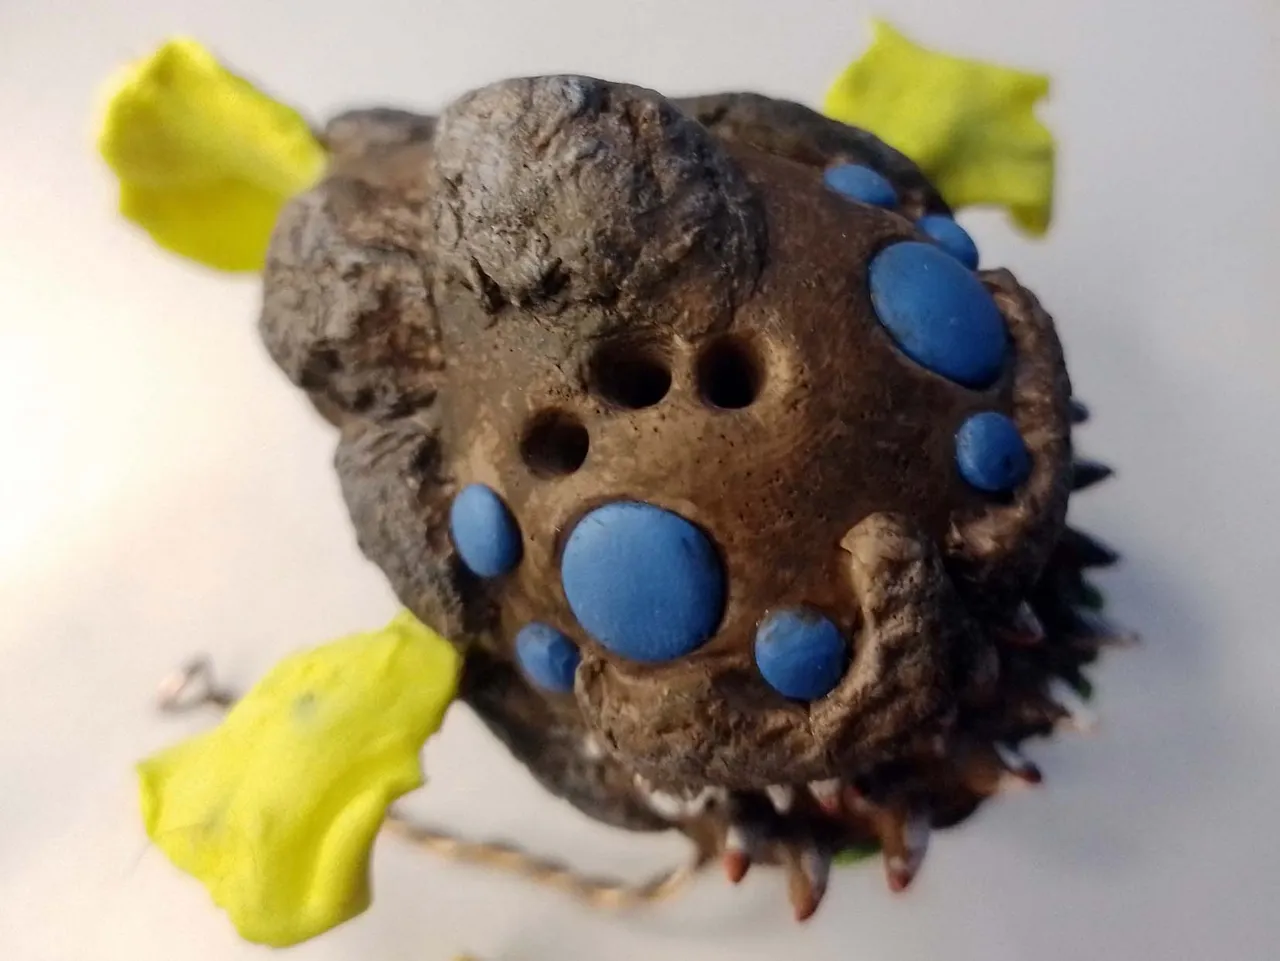
For the eyes of the character I had to make different sized sockets, because I wanted to make a fish with eight eyes, although the one on the card has 6 as I can see.
Para los ojos del personaje le tuve que hacer unas cuencas de distintos tamaños, pues quise hacer un pez de ocho ojos, aunque el de la carta tiene 6 según veo.
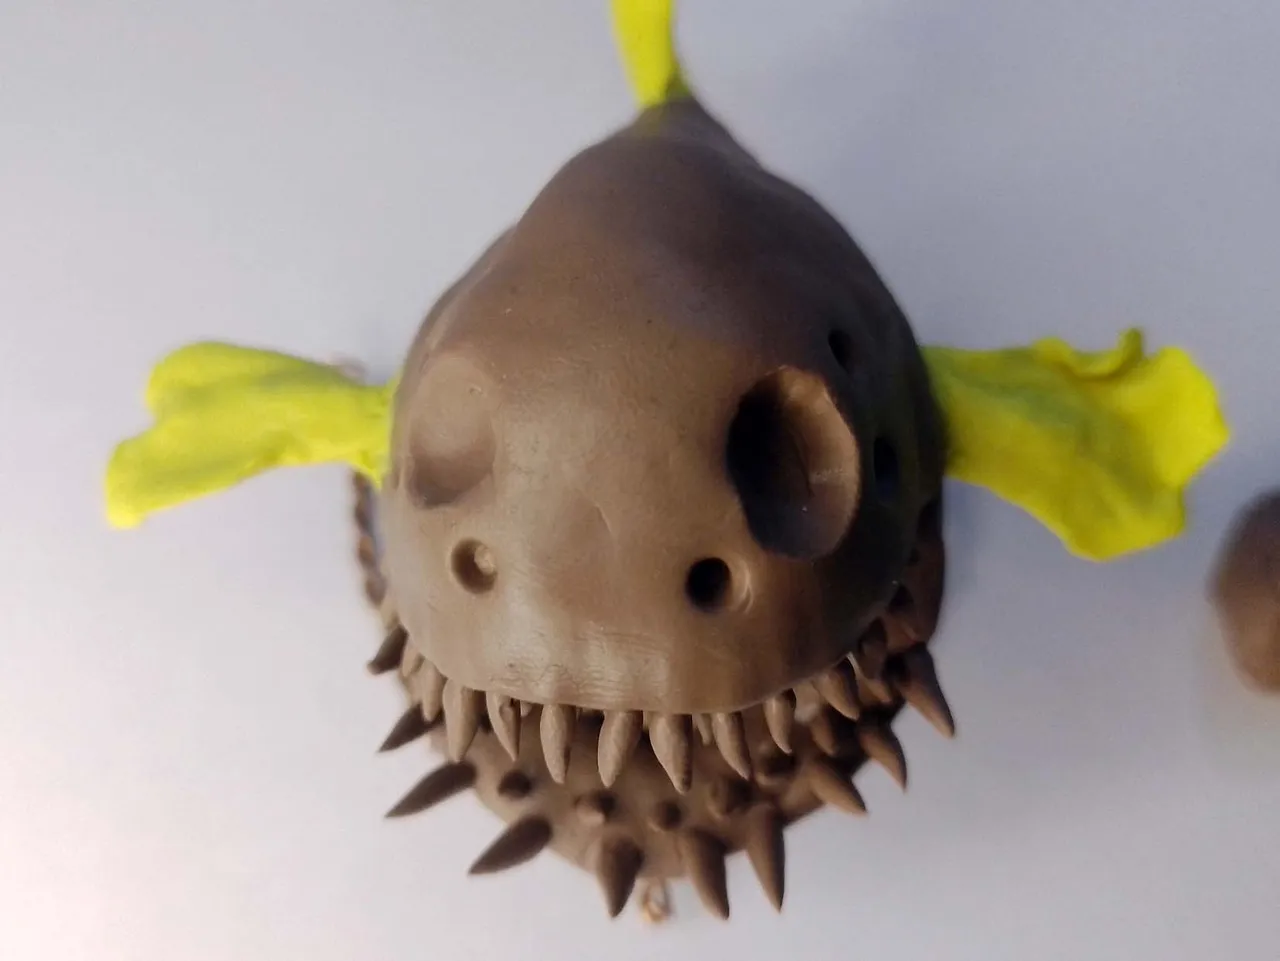
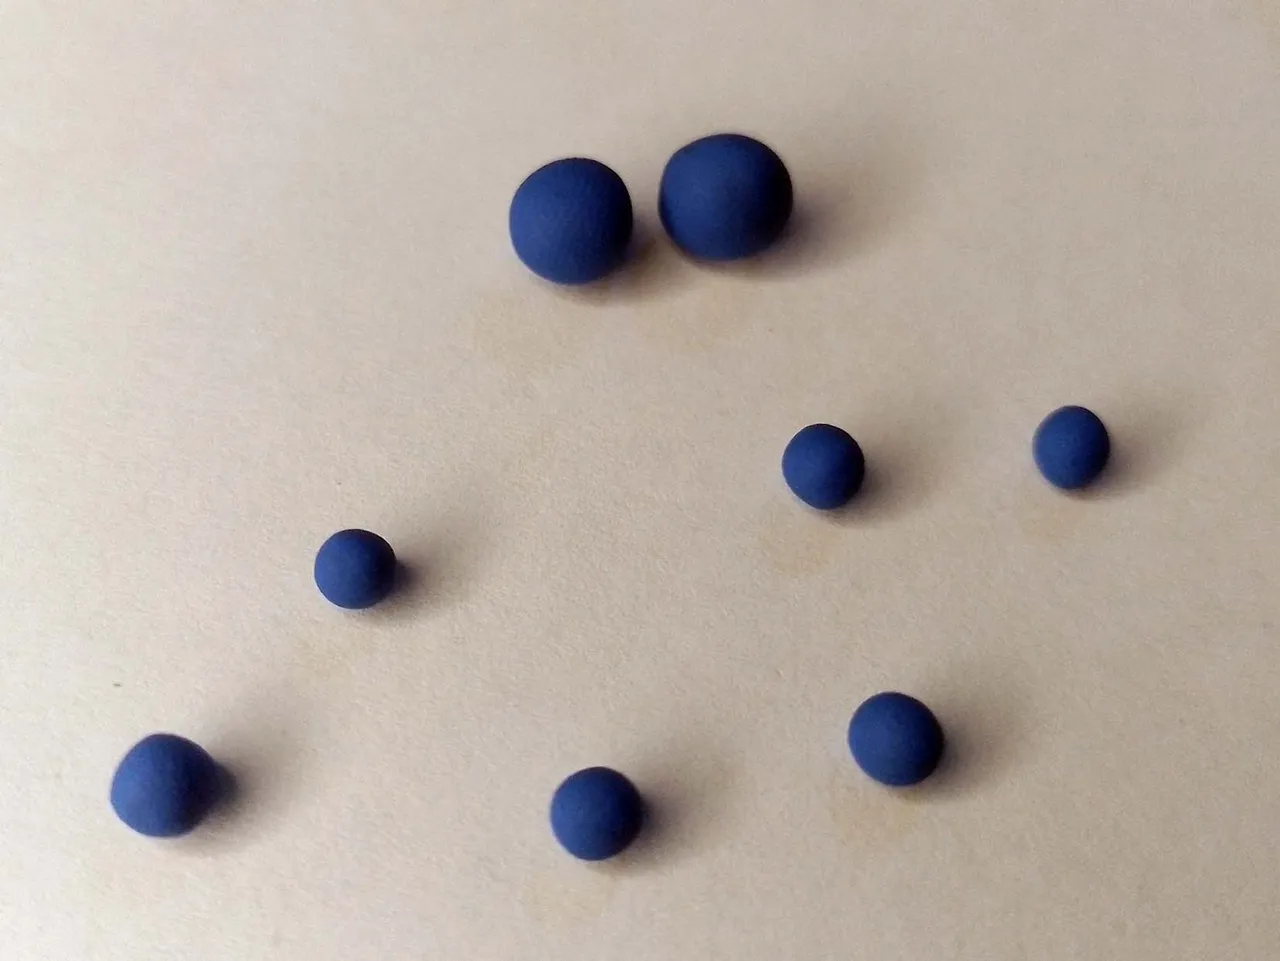
Once I made the sockets I made small spheres of blue plasticine and flattened them a little, to put each eye in its place.
It is worth mentioning that I also added glue to the teeth to make them firmer.
Una vez que hice las cuencas hice pequeñas esferas de plastilina azul y las aplasté un poco, para colocar cada ojo en su lugar.
Cabe destacar que también agregué pegamento a los dientes para darle mayor firmeza.
 |  |
|---|
Below you can see how the sculpture is coming along at this point:
A continuación pueden ver cómo va quedando la escultura en este punto:
The next day, after the sculpture was a little drier, I began to add other pieces to make what characterizes this fish, which are the rocky shapes it has on its body, which is what gives it the name "stonefish".
Al día siguiente, después de que la escultura estuvo un poco más seca, comencé a agregarle otras piezas para hacer lo que caracteriza a este pez, que son las formas rocosas que tiene en su cuerpo, que es lo que le da el nombre de "stonefish".
 |  |
|---|
First I placed all these plates that you see in the images above, then with the same stone I began to gently hit the areas that I wanted to print the rocky texture.
Below you can see how these pieces looked like after printing the texture of the stones.
Primeramente se colocan todas estas placas que ven en las imágenes de arriba, luego con una misma piedra comencé a golpear suavemente las áreas que quería imprimir la textura rocosa.
Abajo pueden ver cómo quedaron estas piezas después de imprimir la textura de las piedras.
 |  |
|---|
And these looked even better after applying some paint to them, using the dry brush technique.
Y quedaron aún mejor después de aplicarles algo de pintura, usando la técnica del pincel en seco.
 |  |
|---|
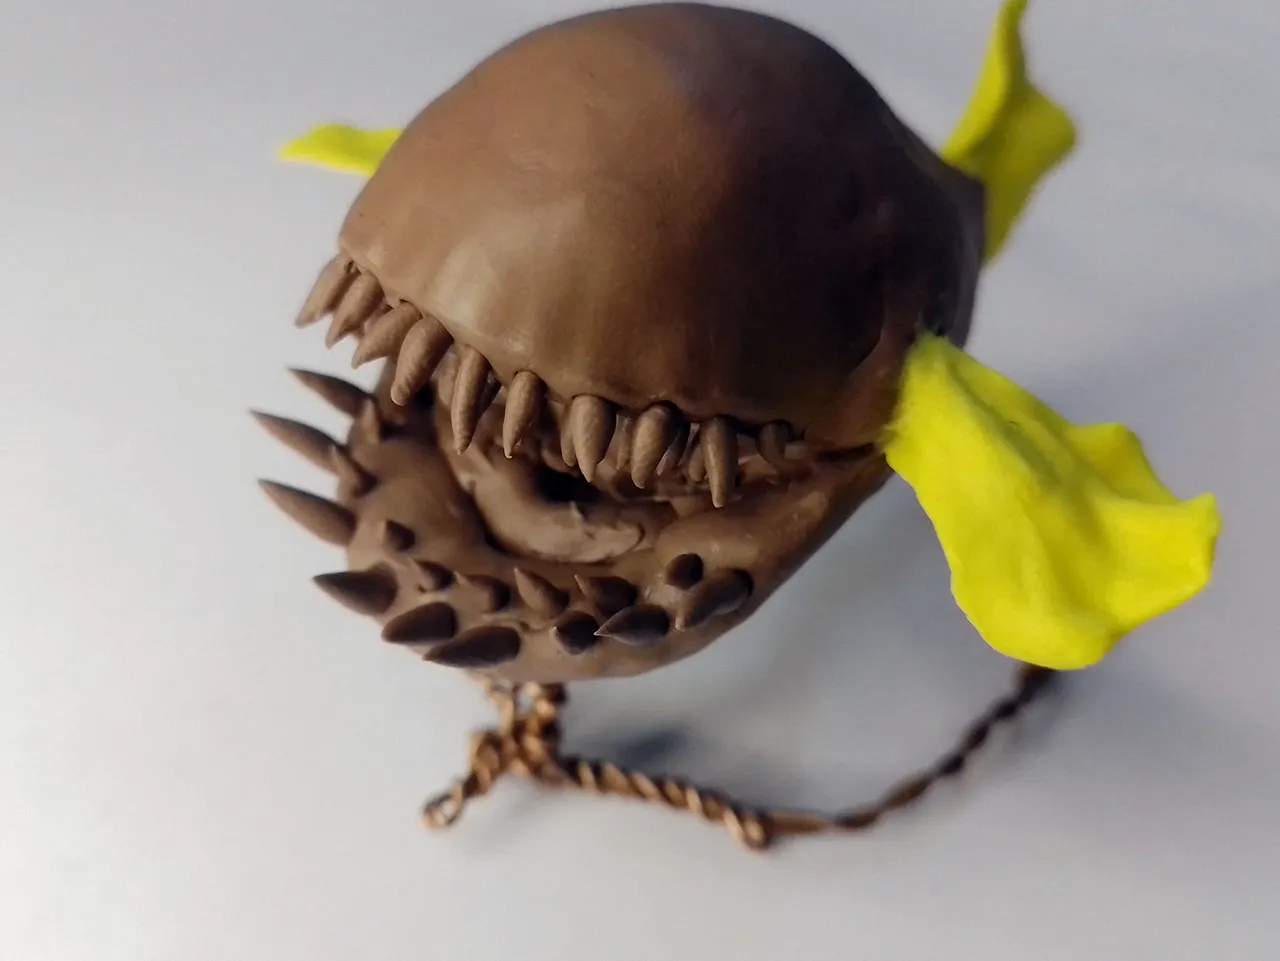
Something I also applied paint on was the mouth.
I wanted to give it a terrifying touch by filling the mouth with blood, with some blood stains between the teeth. The truth is that, in my opinion, this gives the most terrifying touch to the whole sculpture...
Who could have been his victim...?
Algo en lo que también apliqué pintura fue en la boca.
Quise darle un toque terrorífico llenándole la boca de sangre, con algunas manchas de sangre entre los dientes. La verdad esto, en mi opinión, le da el toque más terrorífico a toda la escultura...
¿Quién habrá sido su víctima...?
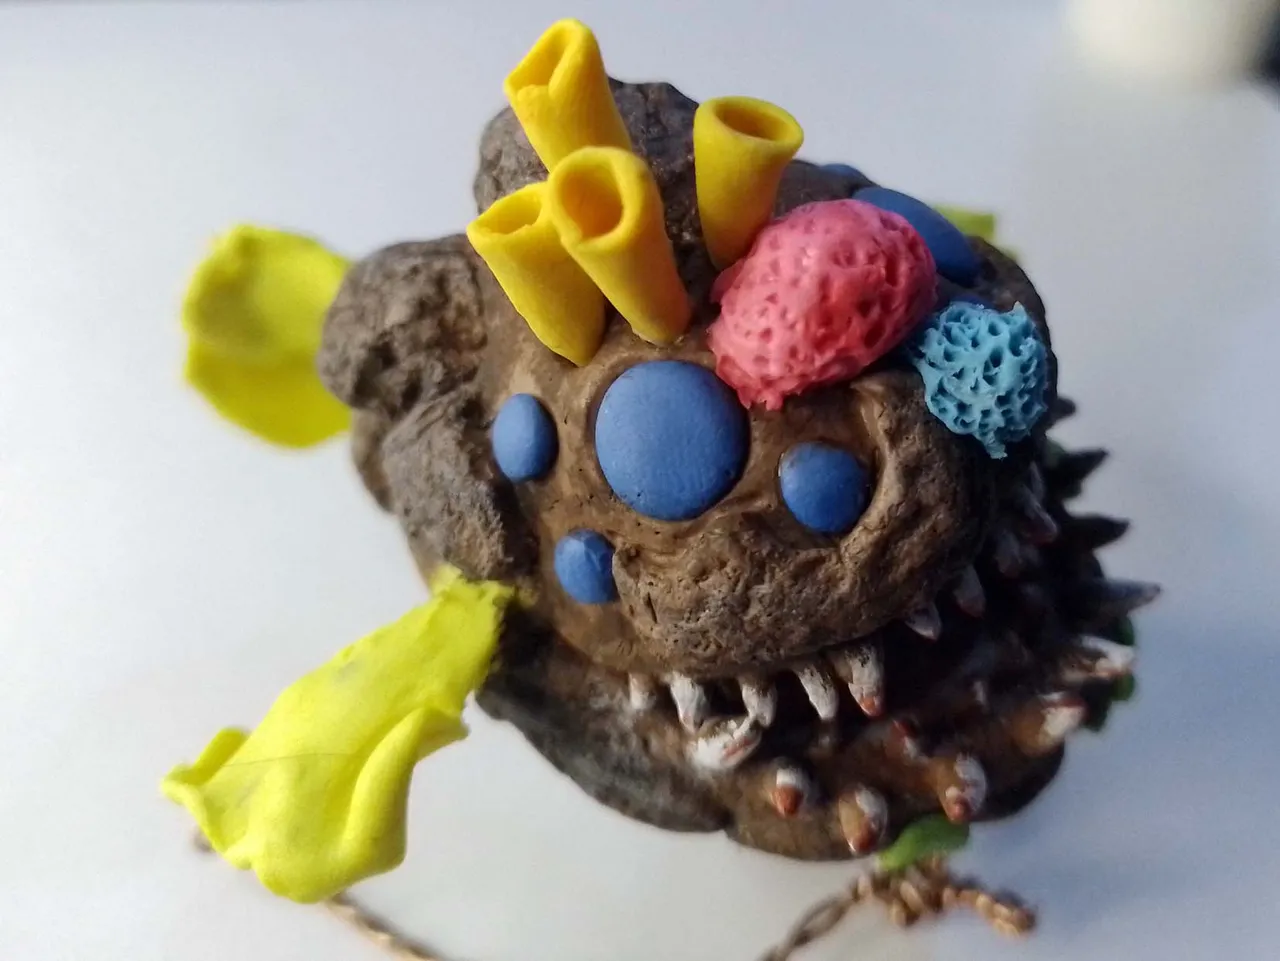
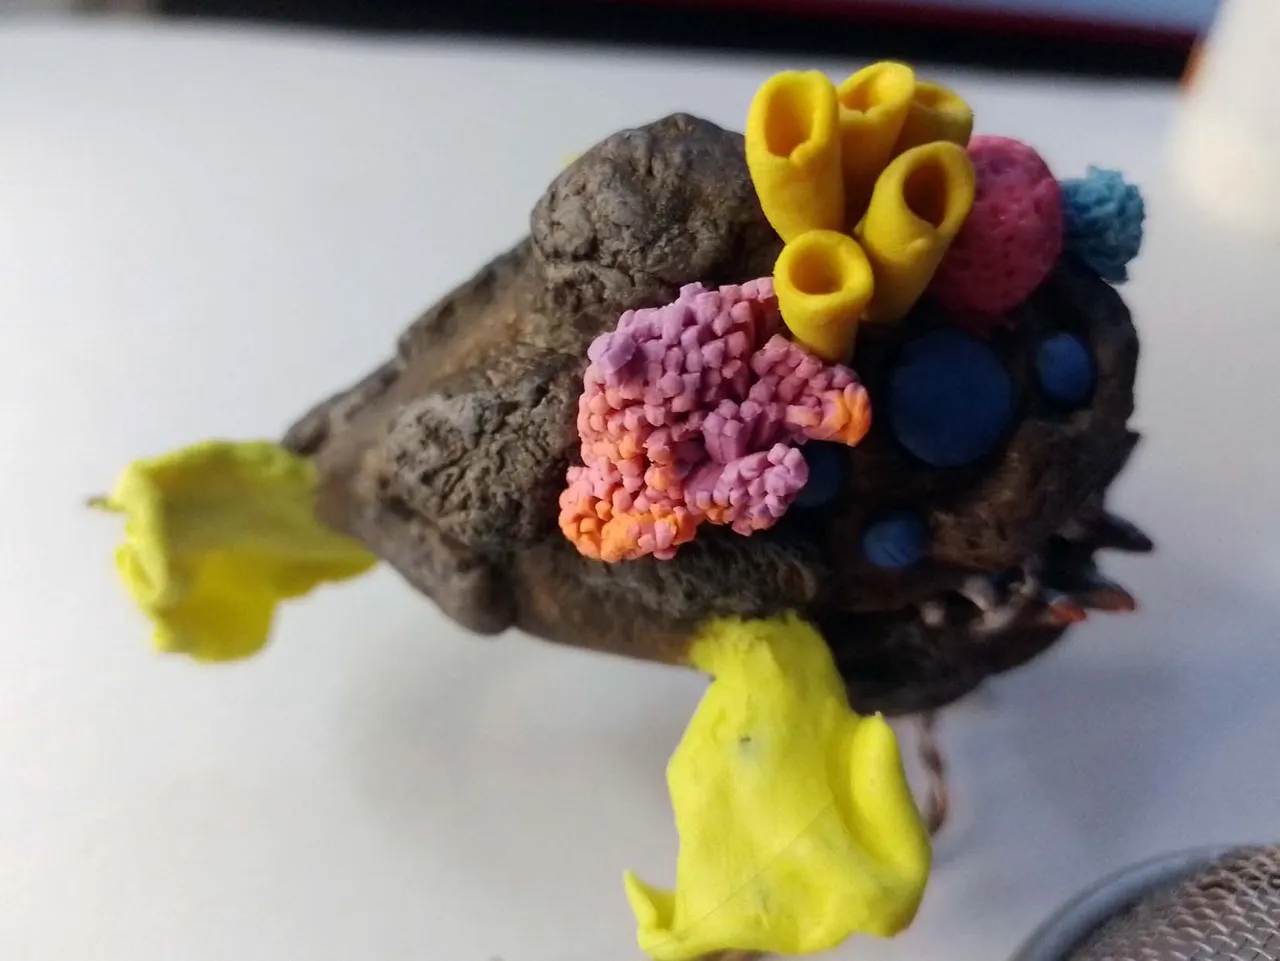
After everything I did, it was the turn to make all the decoration that the fish has, such as algae, corals and so on.
Después de todo lo que hice, era el turno de hacer todo el decorado que tiene el pez, como algas, corales y demás.
In some parts of the body I had to make holes in the body of the fish to fix well the pieces I was making, as colorful as with well-defined shapes, inspired of course by the corals that the fish itself has on the chart.
En algunas partes del cuerpo tuve que hacer agujeros en el cuerpo del pez para fijar bien las piezas que estaba haciendo, tan coloridas como con formas bien definidas, inspiradas desde luego en los corales que tiene el propio pez en la carta.
 |  |
|---|
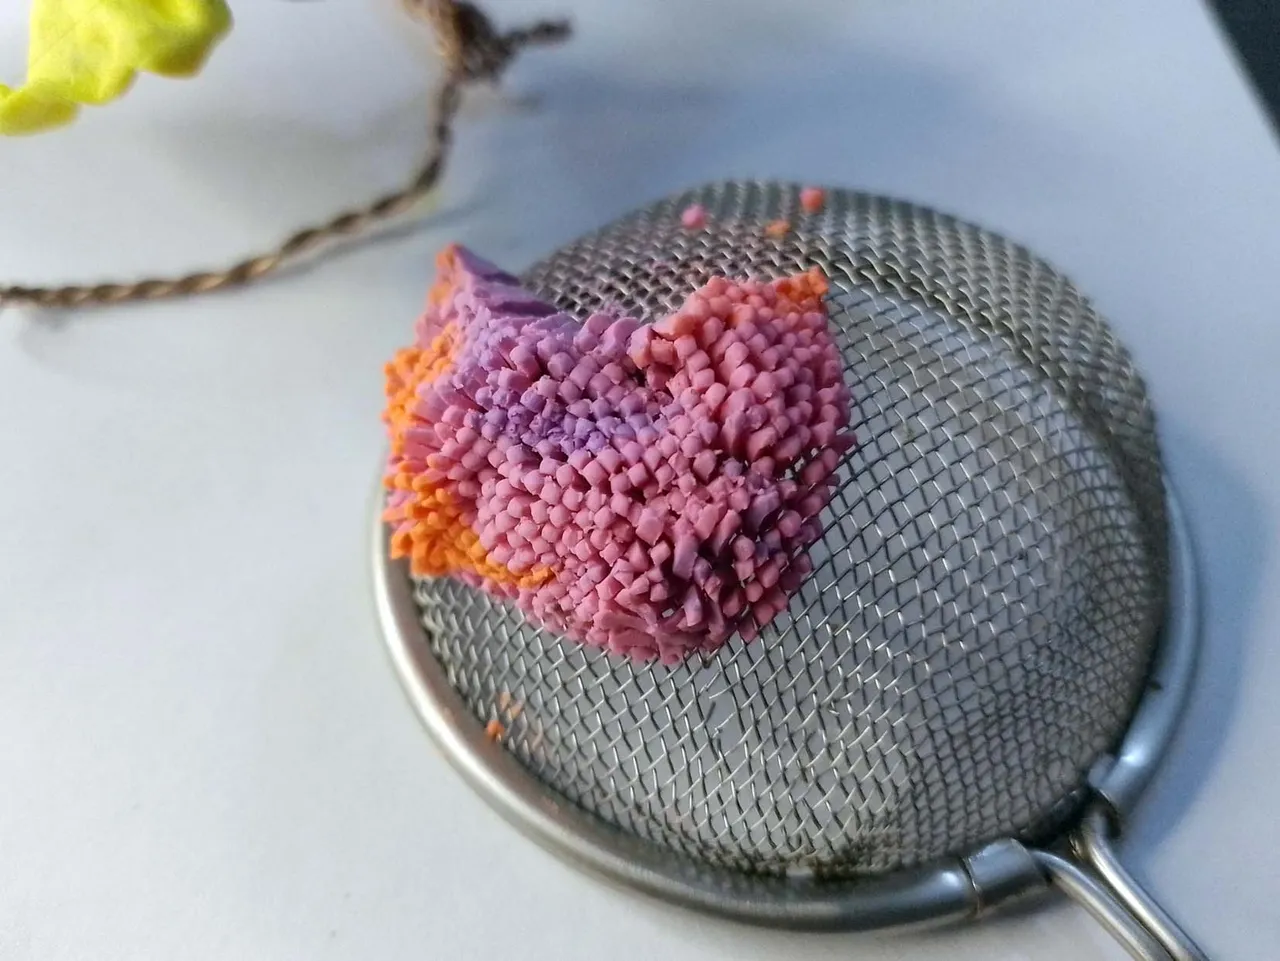
Now, at this point I ran into the inconvenience of how to make these peculiar shapes of the corals, similar to a bunch of little hairs.
I honestly didn't know how to make them, but I had the idea of using a small metal strainer that I have around here. It was just a matter of pushing the plasticine through the strainer and I got these little shapes.
Ahora bien, en este punto me encontré con el inconveniente de cómo hacer estas formas tan peculiares de los corales, parecidas a un montón de pelitos.
Sinceramente no sabía cómo hacerlos, pero tuve la idea de usar un pequeño colador de metal que tengo por aquí. Solo fue cuestión de empujar la plastilina a través del colador y logré estas pequeñas formas.
I placed all these shapes in the empty areas on top of the fish, until I managed to cover almost all the areas, using different colors to give more beauty to the rocky body of the figurine.
Todas estas formas las coloqué en las áreas vacías de la parte superior del pez, hasta que logré cubrir casi todas las áreas, usando distintos colores para darle mayor belleza al rocoso cuerpo de la figurita.
 |  |
|---|
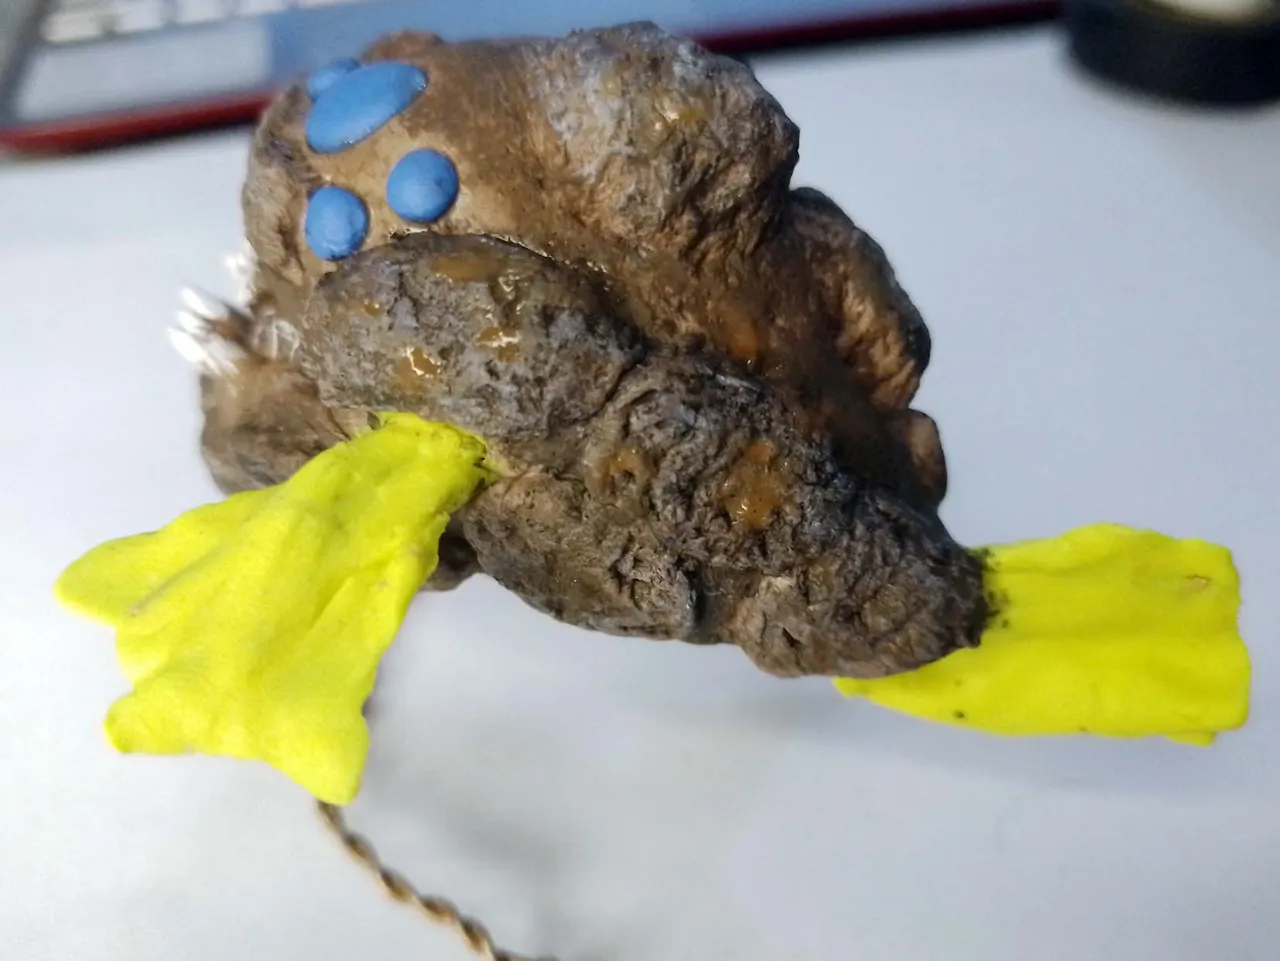
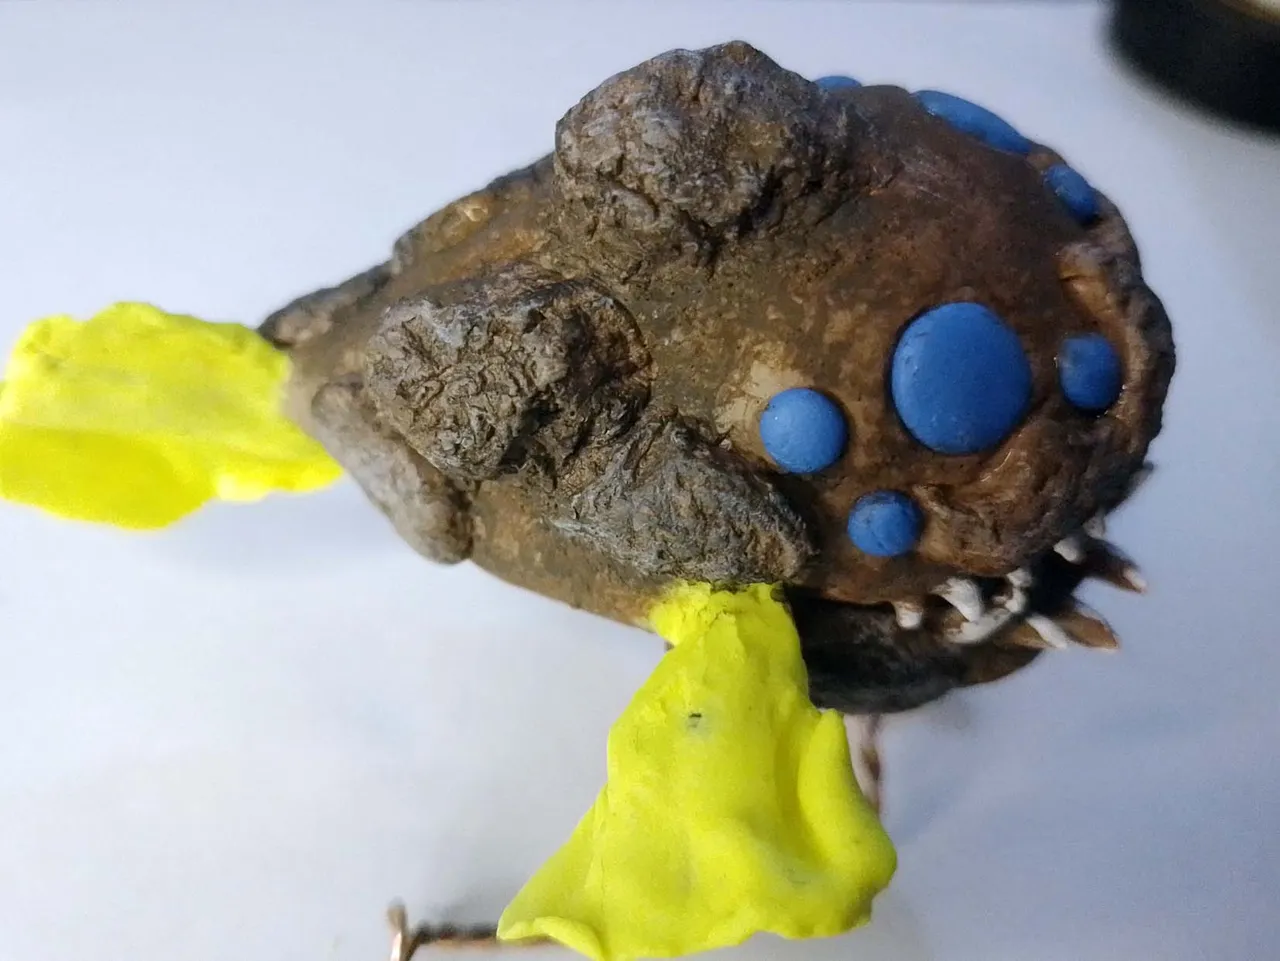
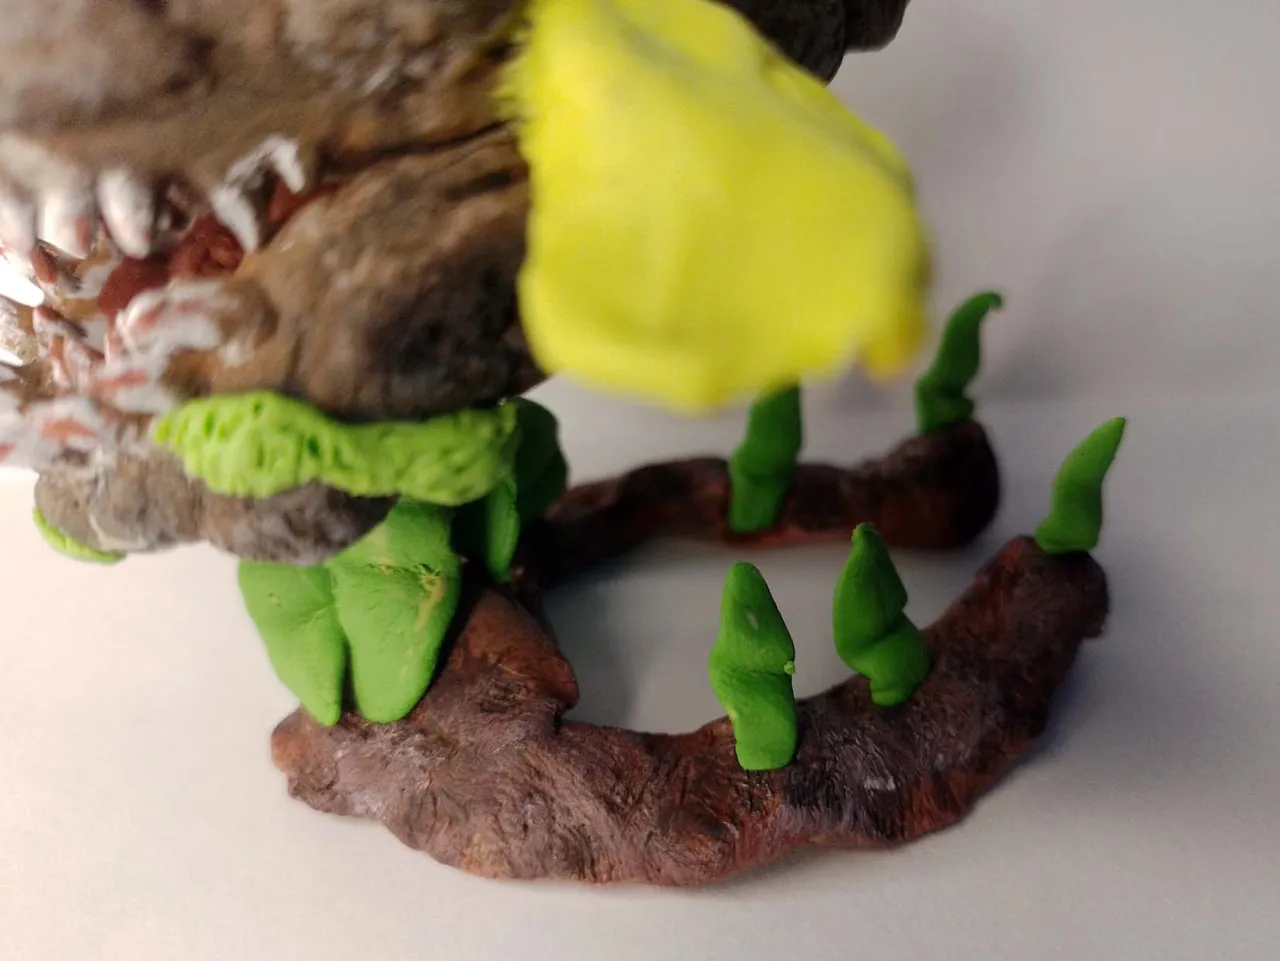
The last thing I did was to create a rocky surface on the wire base, it is just a matter of repeating the same thing I did before with the rocky shapes that the fish has on the body, only on this base.
I also placed some seaweed, to cover supports, as you can see in the image below:
Lo último que hice fue crear una superficie rocosa en la base de alambre, solo es cuestión de repetir lo mismo que hice antes con las formas rocosas que tiene el pez en el cuerpo, solo que en esta base.
También coloqué unas algas, para cubrir soportes, tal como ven en la imagen de abajo:
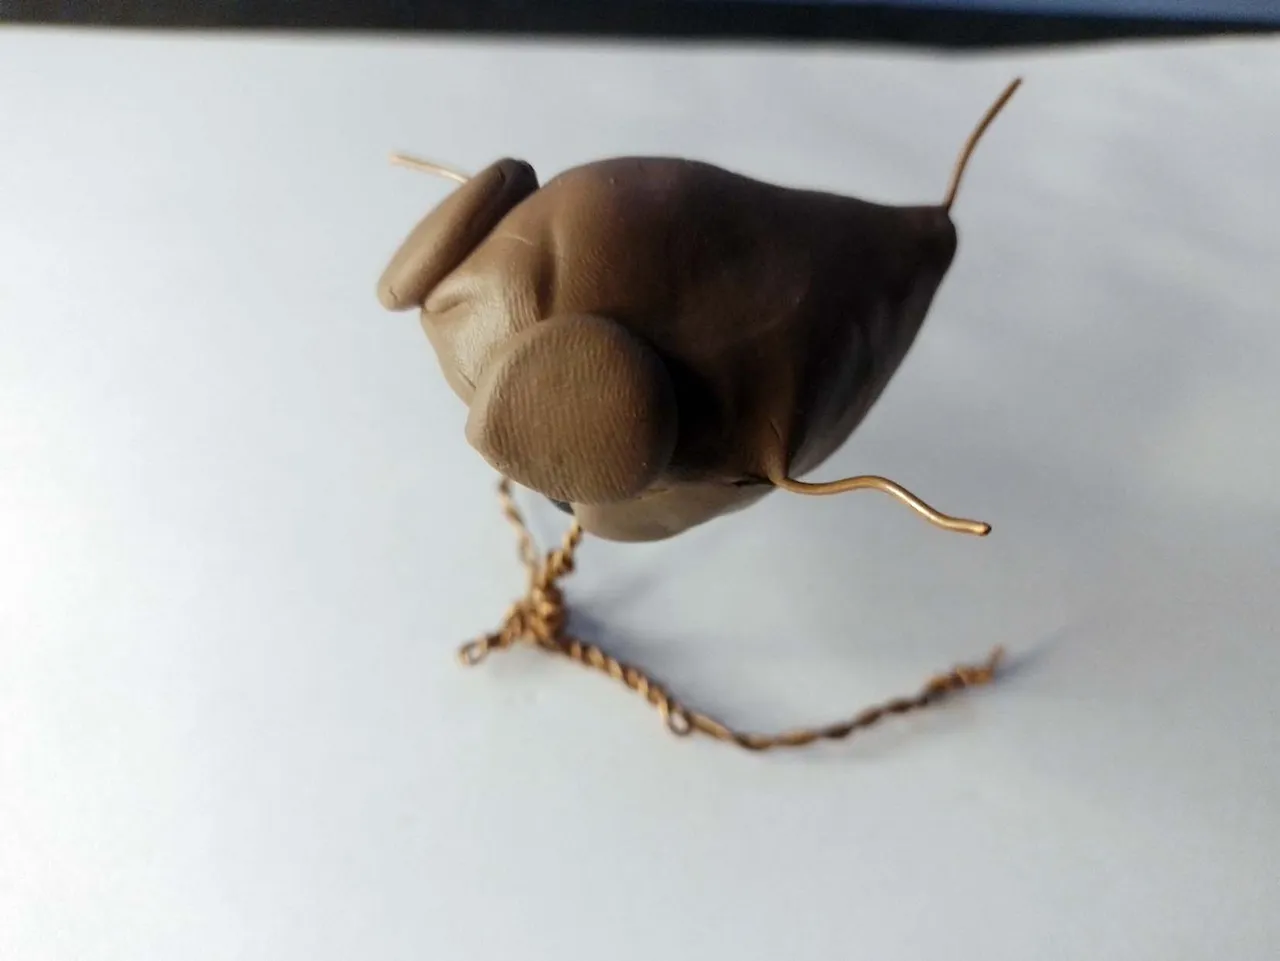
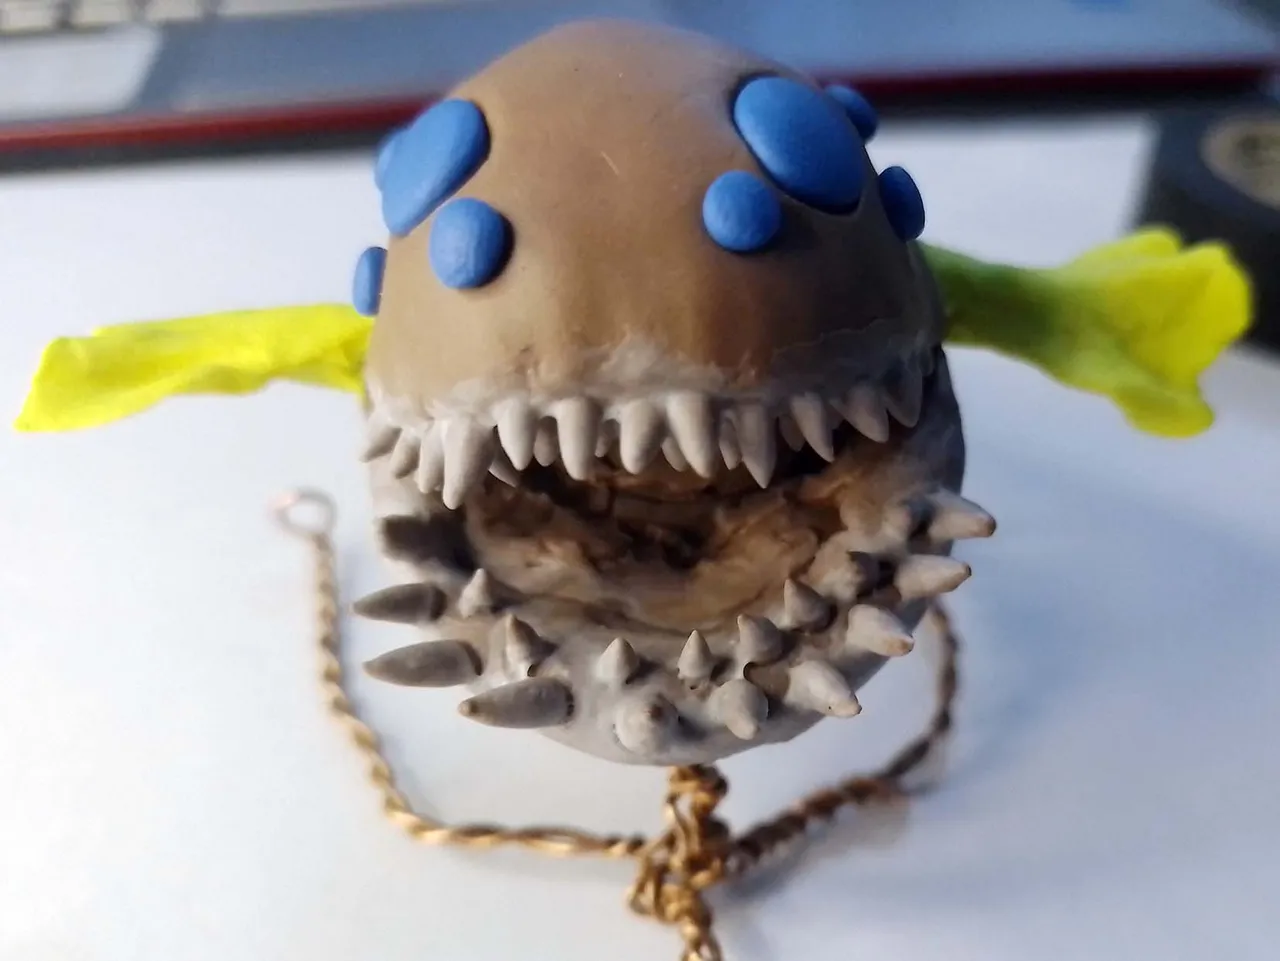
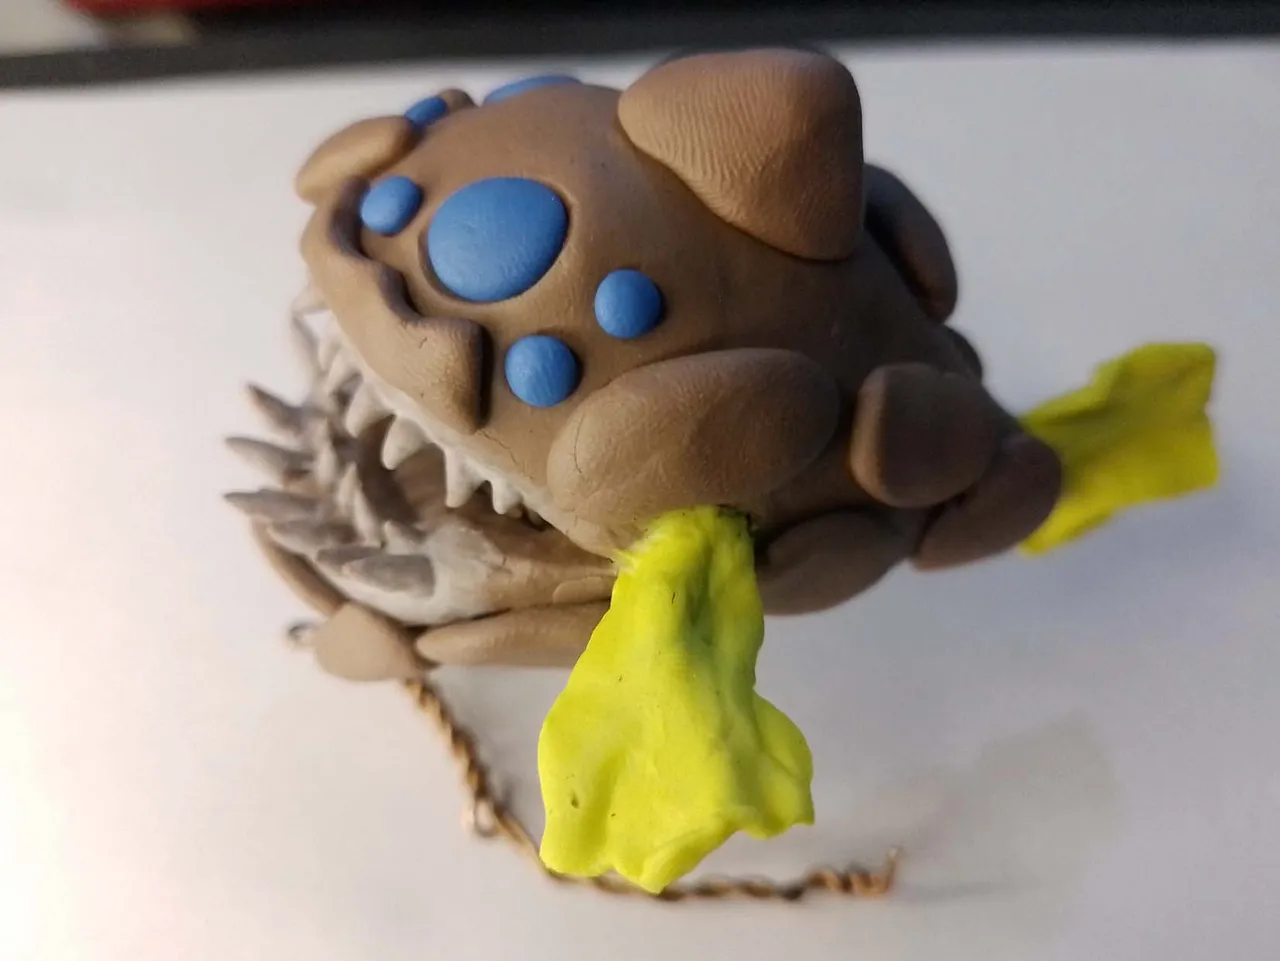
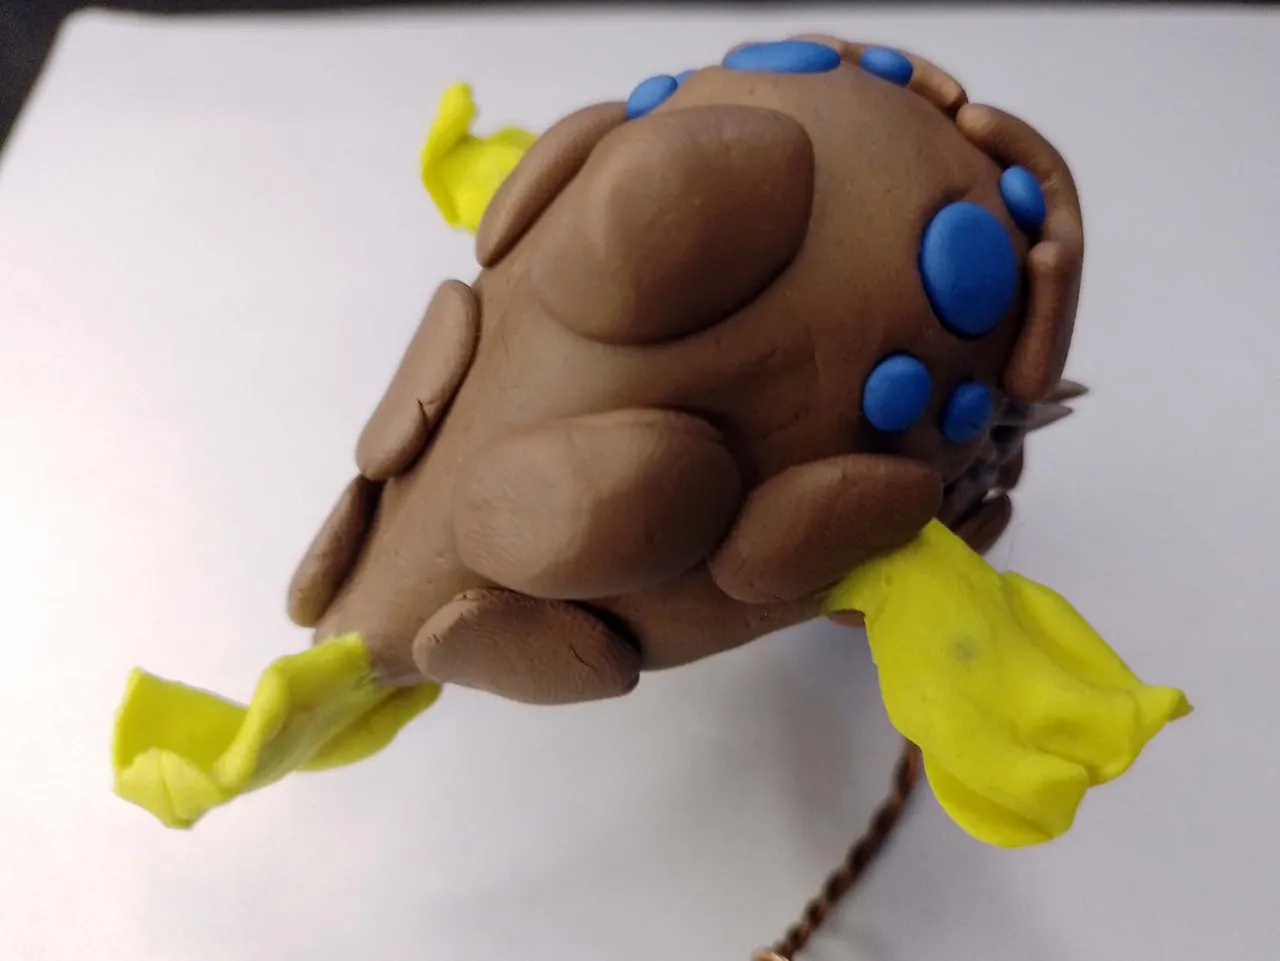
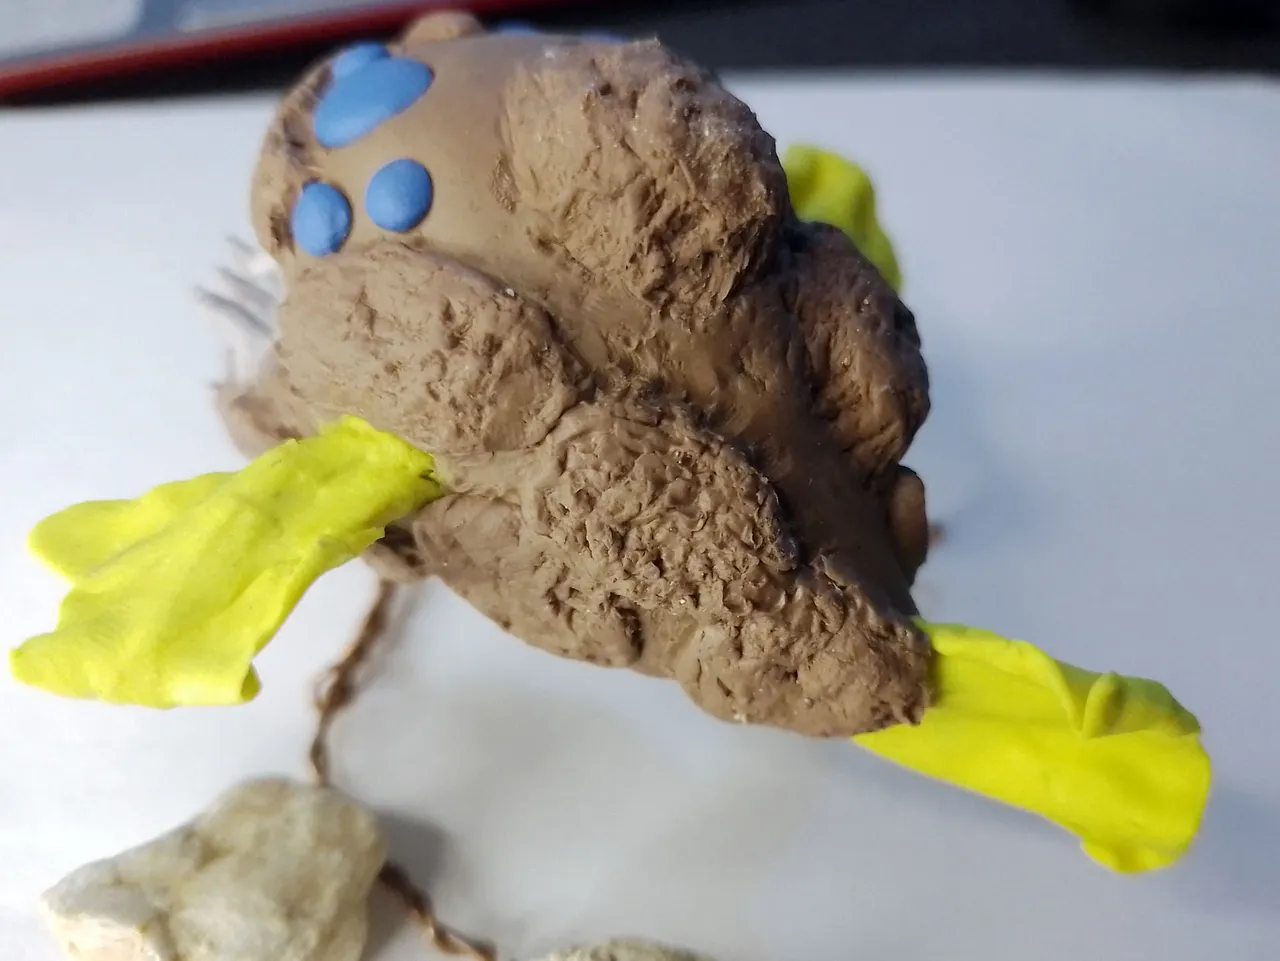
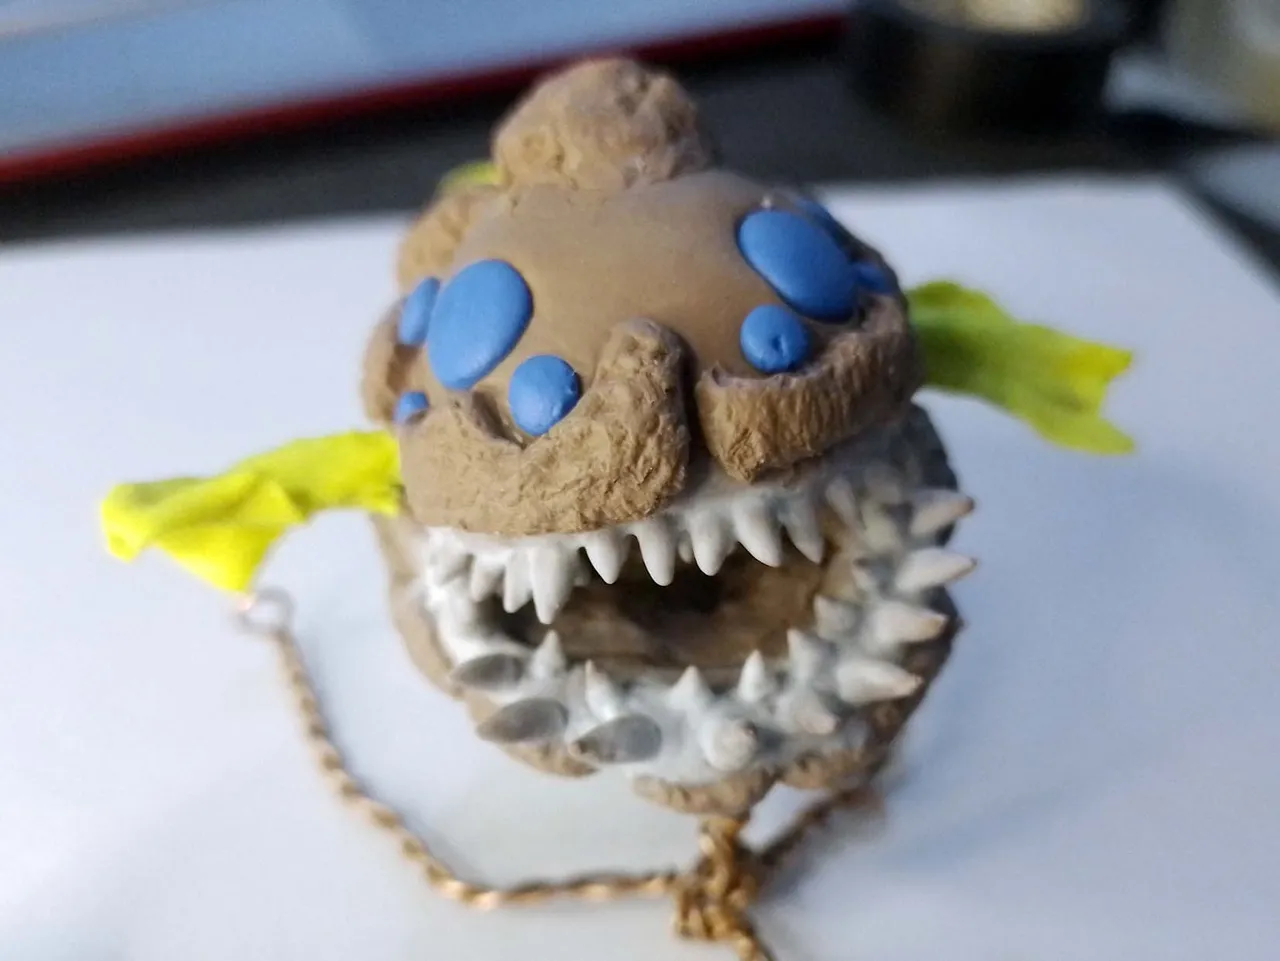
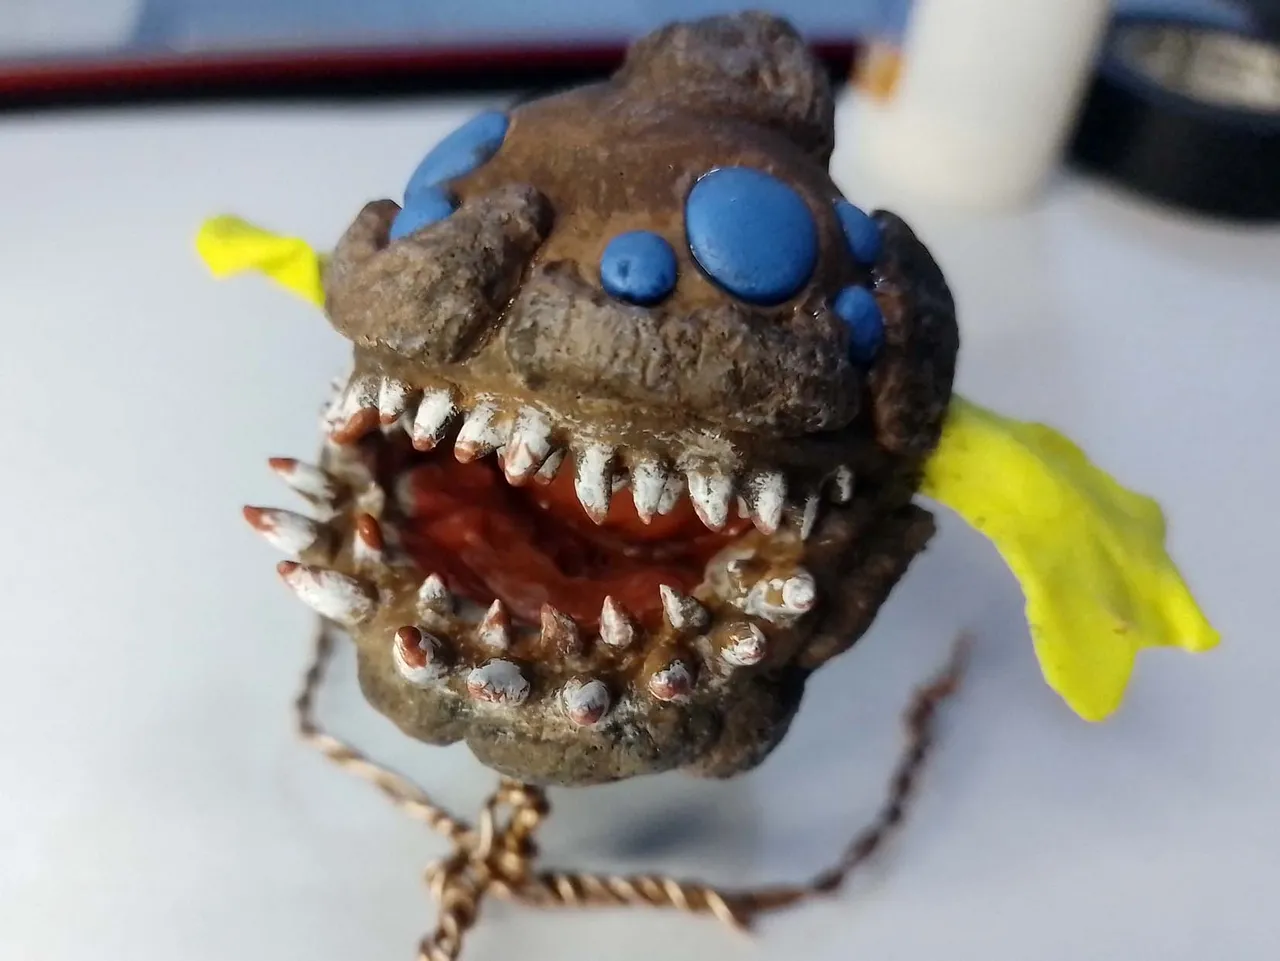
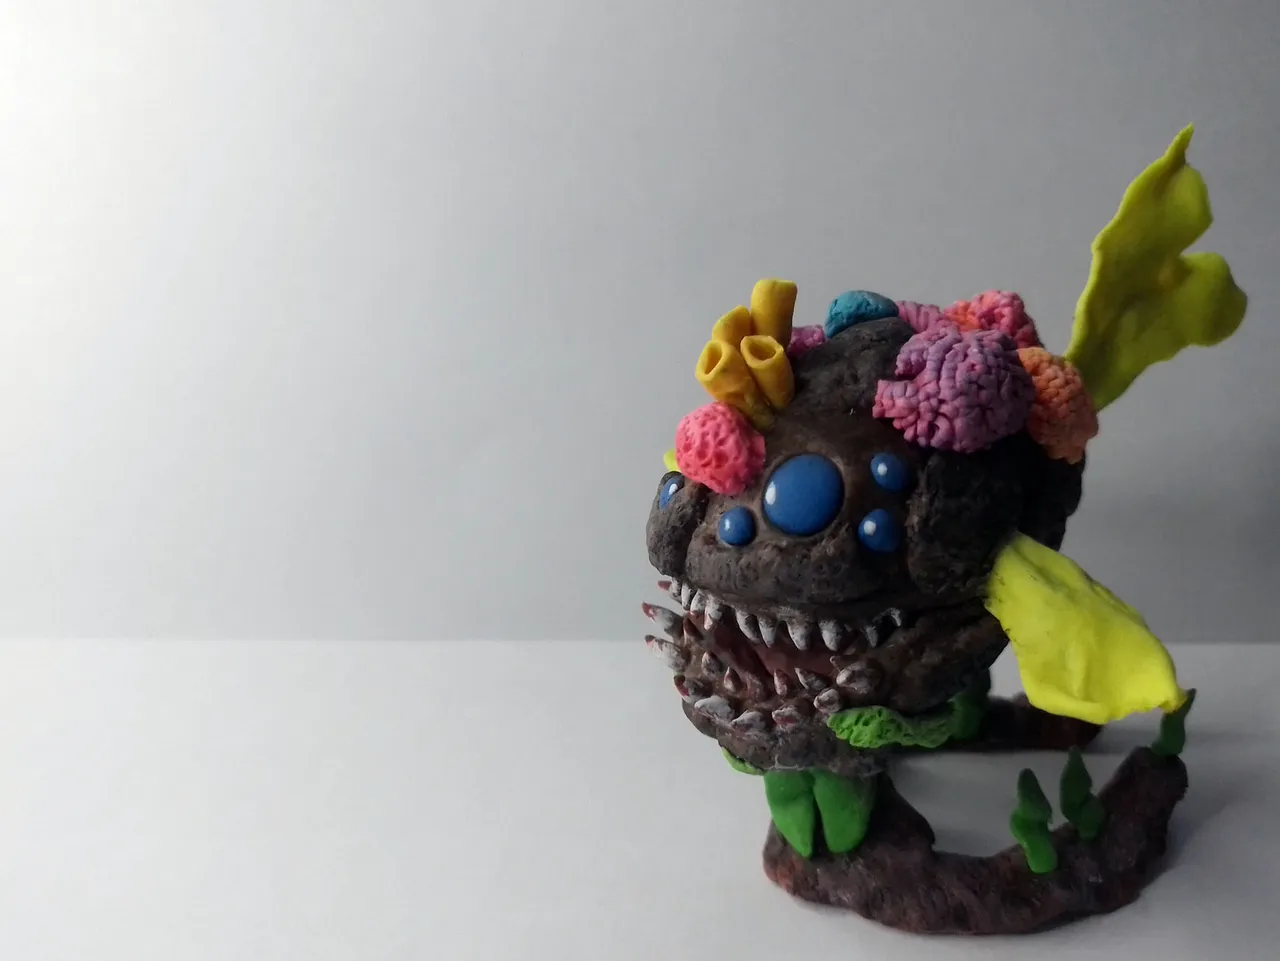
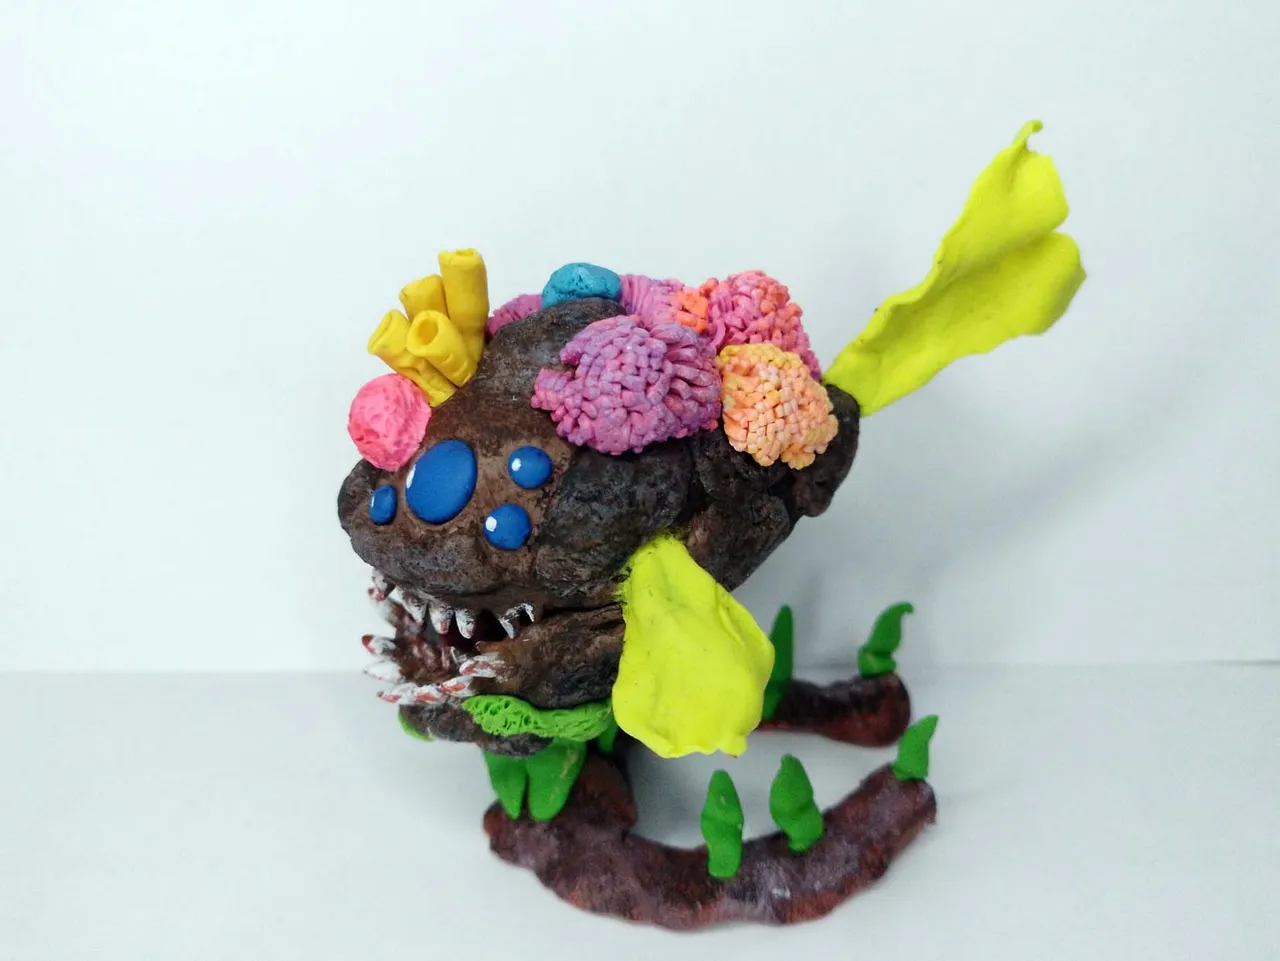
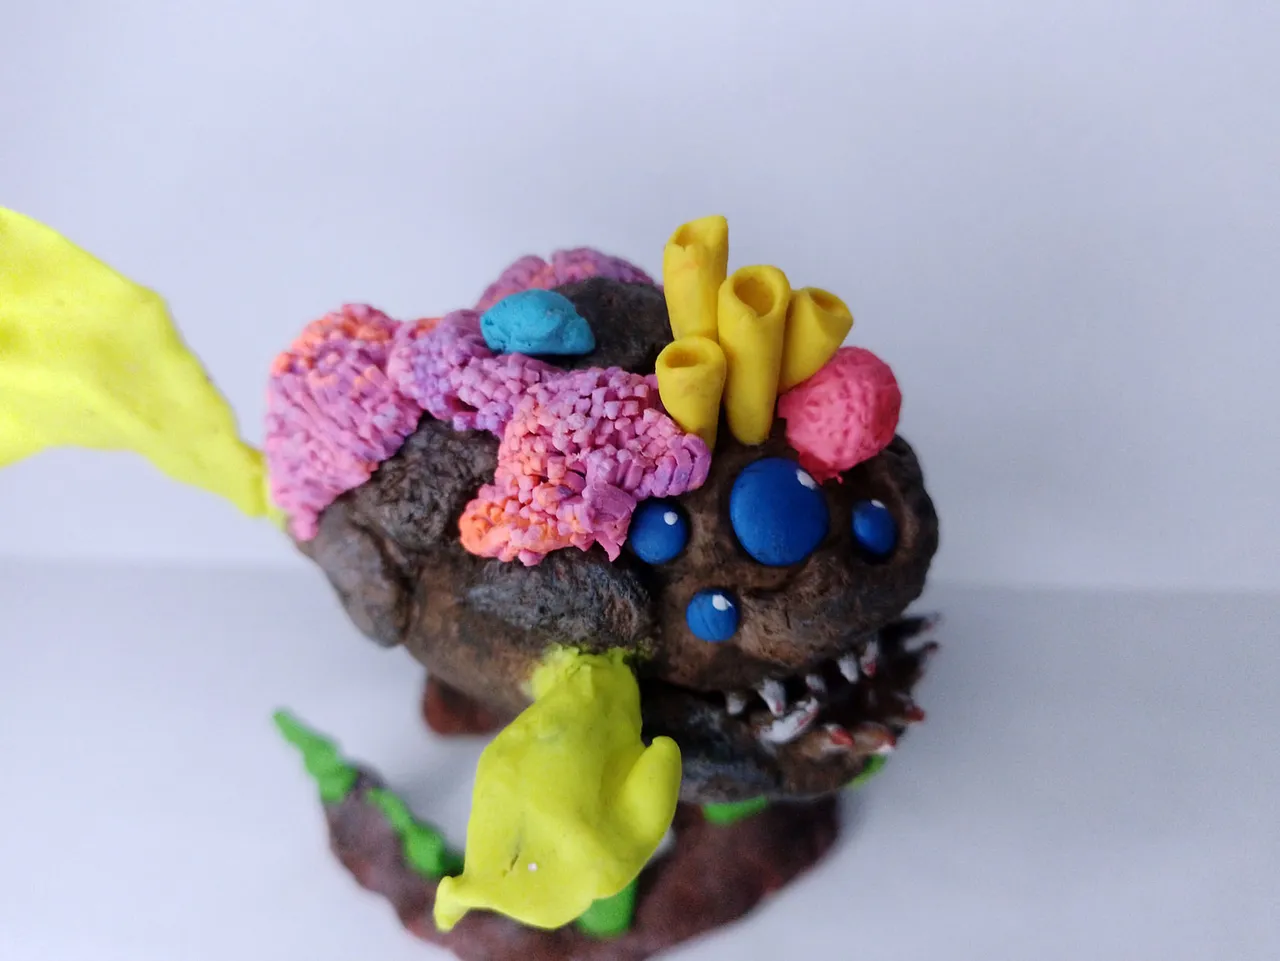
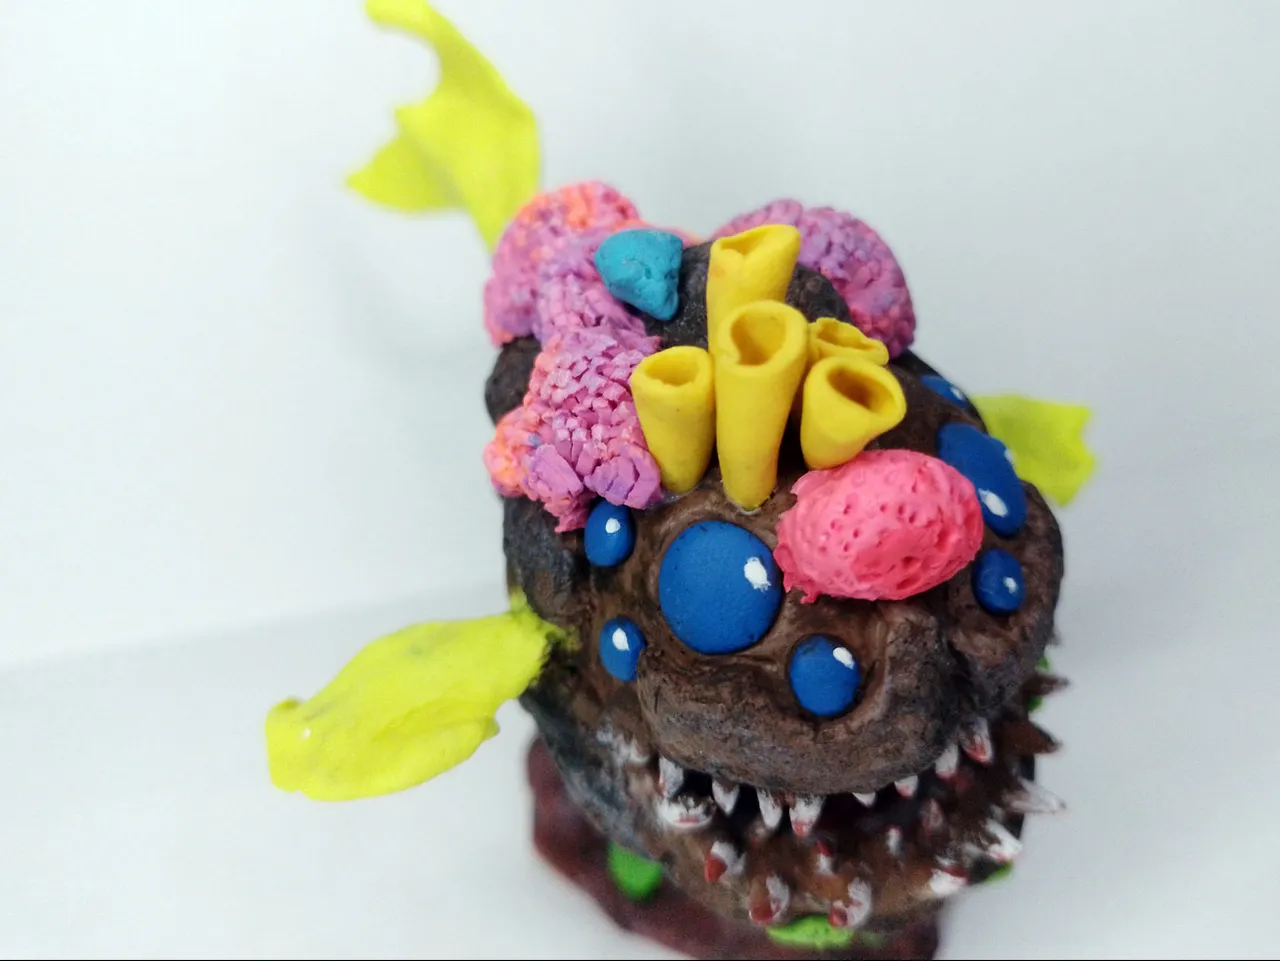
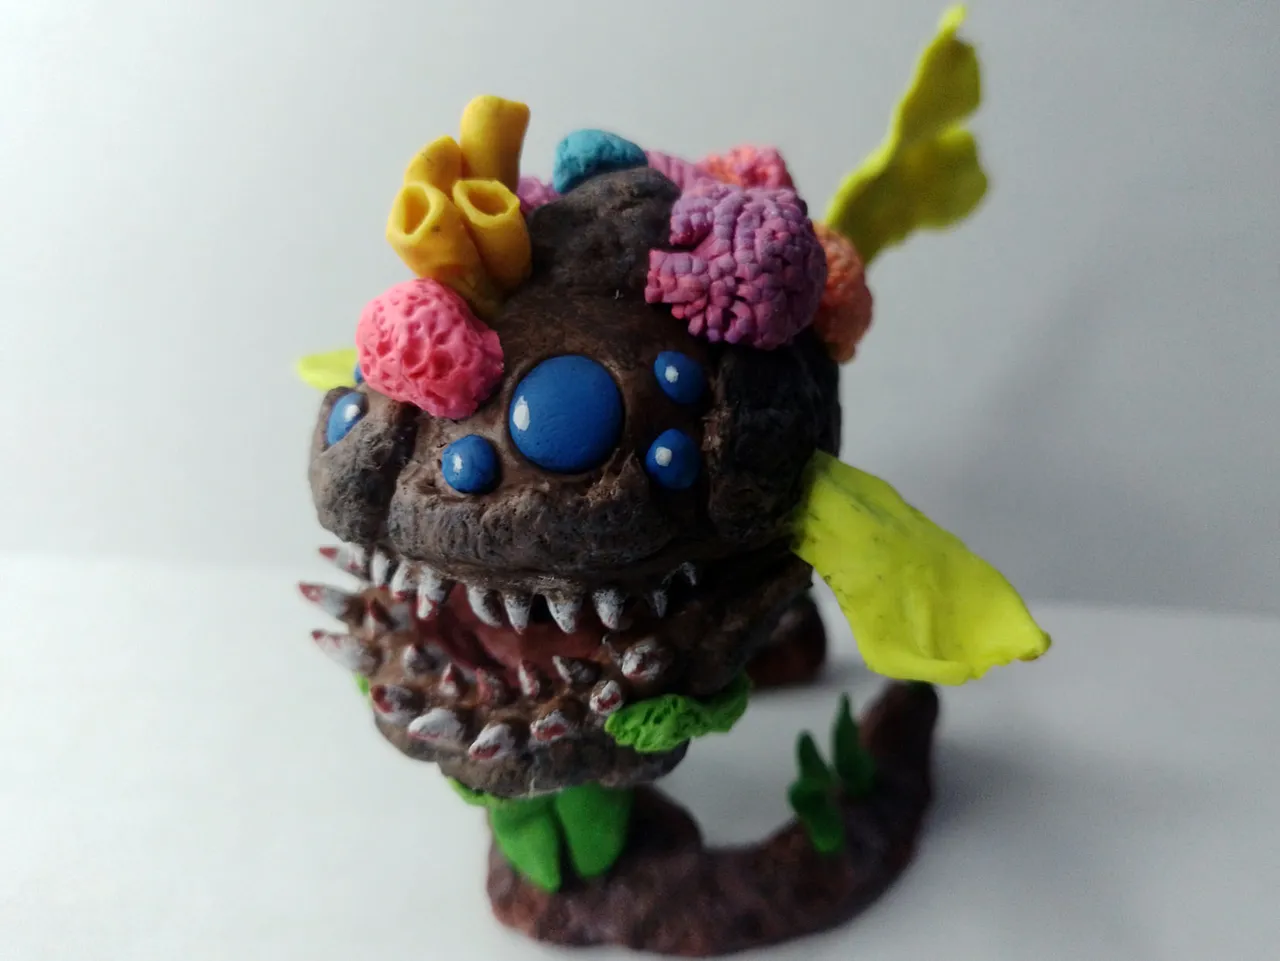
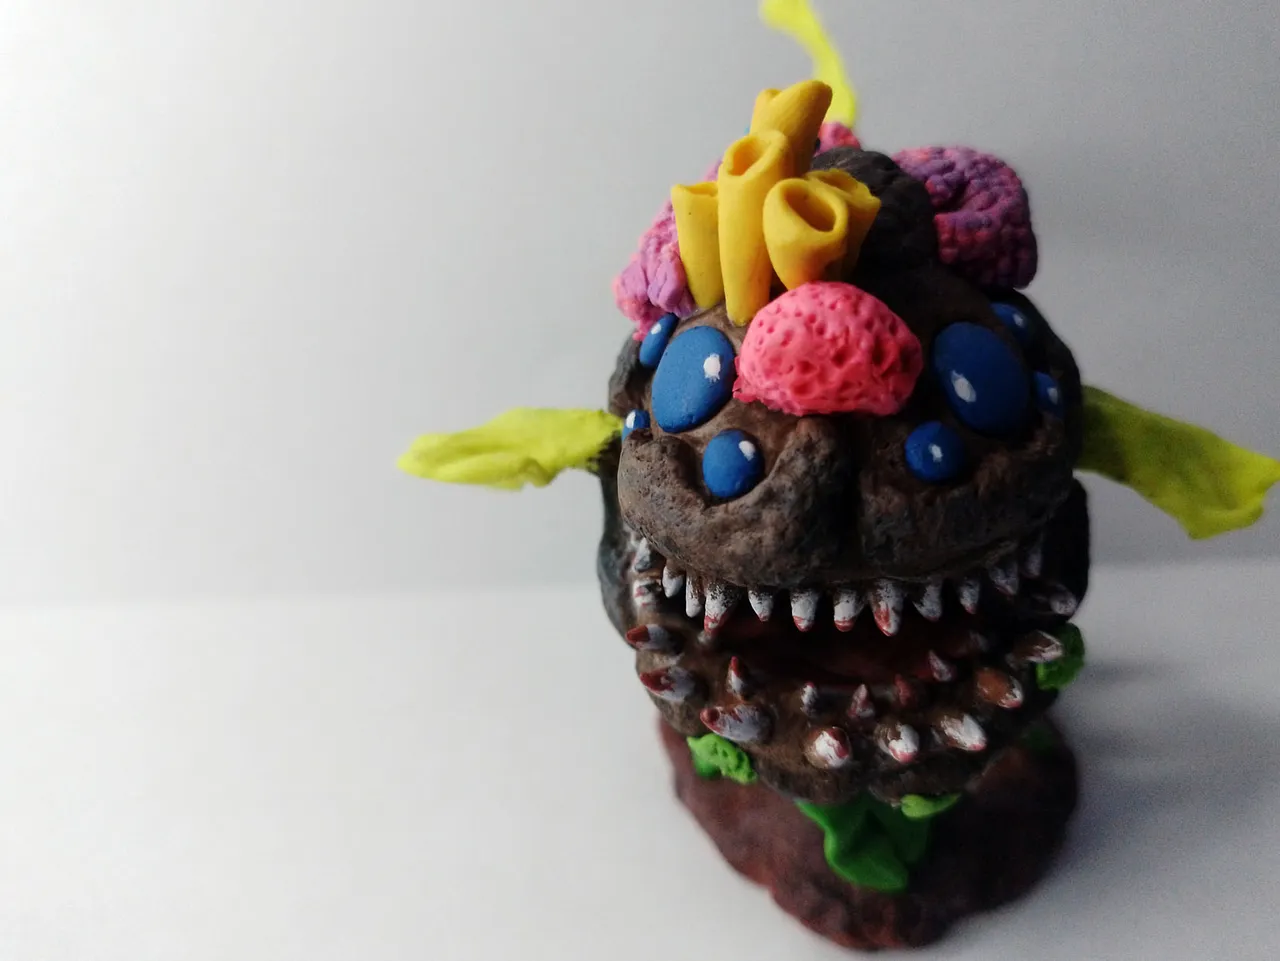
This is how the figurine was finished, below I leave a series of photographs from different angles of the sculpture, I hope you like it:
De esta manera quedó terminada la figurita, a continuación dejo una serie de fotografías de distintos ángulos de la escultura, espero les guste:
Well folks, that's all for now. If you would also like to participate in the contest, I invite you to do so by creating an artwork inspired by splinterlands.
You can read more about the contest at the following link:
@splinterlands/splinterlands-art-contest-week-249
I would like to know your opinions about this figurine, for me it has been a pleasure to have shared it with you so I invite you to leave your thoughts below in the comments, as always I will be happy to read them.
Thank you very much for taking the time to read my publication. With nothing more to add I'll say goodbye then...
See you next time!
Bien amigos, esto ha sido todo por ahora. Si también desean participar en el concurso, los invito a hacerlo creando un arte inspirado en splinterlands.
Pueden leer más sobre el concurso en el siguiente enlace:
@splinterlands/splinterlands-art-contest-week-249
Me gustaría saber sus opiniones acerca de esta figurita, para mi ha sido todo un placer haberla compartido con ustedes así que los invito a dejar sus opiniones abajo en los comentarios, como siempre estaré encantado de leerlos.
Agradezco de corazón que se tomaran el tiempo de leer mi publicación. Sin más que agregar me despido entonces...
¡Hasta la próxima!