English
🎮Why paint a case?...and why not?😜
Hello Hive family and Gamers brothers, today I bring you a different post, as you know I am a collector of game console controllers, my dream is to have a gamer setup with all kinds of different controllers, none is equal to the other, all different, then investigating I saw several models of classic Xbox controllers with different colors, the most prominent were the translucent, there were blue, red, green (which I already have) and white, the latter is the one I most wanted, what happened? Well, to my bad luck in this country you can not find classic Xbox controllers of those models, not even normal plastic, but of another color.

I searched many pages and only appeared in strange pages that the truth did not generate much confidence, did not say price or conditions of the product, what I most wanted was to have a white controller for my Xbox instead of having another boring black controller, I searched many sites and the only way to have one so different is to buy a used one, which may not work at the price of a new Xbox controller, which seems crazy to me the truth.
So among the many Xbox controller casings I have, my mom advised me to paint one on my own, that idea seemed to be excellent, with spray paint? No, no, no, no, no, no, no and no haha🤣, so what did you paint it with? With cold paint (cricket sounds) that's right gentlemen with cold paint, but wait a minute I always have a method to make everything look good.

Then I grabbed one of the casings that I had saved, I decided to use the ugliest one, I used only a brush and a bottle of white cold paint, I separated the controller casing from the electronics of it to avoid any inconvenience, I separated each of the parts of the casing and started painting, I only did it on the outside of the casing, it was not necessary to paint the inside parts, the most important thing was that it looked white on the outside to look like an original Xbox 360 controller haha.🤣
Well let's start painting the controller, without fear we put the brush with the paint on the plastic of the controller, I started at the front where is the logo of the console, very carefully we paint half of the plastic so that the paint does not stain the logo, not to stain our fingers, we paint, paint and paint, we wait about 10 minutes for the paint to dry, then start at the other end, the good thing about the cold paint is that it dries quickly and fits well to the holes in the housing.🎮
After both ends are dry we have to do the same procedure about 3 times (4 to be sure) so that the controller looks legitimately white, otherwise, it will look like a painting made by a child.👶
If you get paint on the logo you can always count on saliva to remove the paint before it dries, or we use alcohol to make the process much easier.

Then we paint what is the top of the housing, where it is used to store memory cars in the control, here I used a small fine tip brush to paint more accurately and not stain my fingers, the word Microsoft I did not paint, I did not see it necessary was better so, the rest just paint what is the roof to the part of the hook where you put the cable and not what is below, I had to throw as 2 capable of paint to look like white plastic, thank goodness it is a small area.

Now we go with the back, in my opinion, the most problematic part because that is where the user puts his hands to play and can always sweat in the process, I started with the middle part, I left the two ends for later to have a little more grip when painting, then the two ends should be painted with a lot of paint with the normal brush because in the area of the triggers the paint falls off very easily compared to other parts of the housing, I used about 5 bales of paint waiting for each one to dry for a loop of 10 minutes.

Ready there are all the parts of the case painted, but there is still something else we must do, we must reinforce the paint so it does not fall off soon, my mom as an artist of great level, used glue with water to create a kind of adhesive that if or if the paint will stick to the case for a long time, this adhesive must be put in all the layers that we paint and we must do the process at least 3 times, the waiting time for each layer to dry lasts about 15 minutes.😩

As you can see in the picture the parts of the casing are like new as if it were factory-made, the best is to paint it with spray paint but at that time I did not have enough money, so I decided to experiment a little and this was the result:🤠
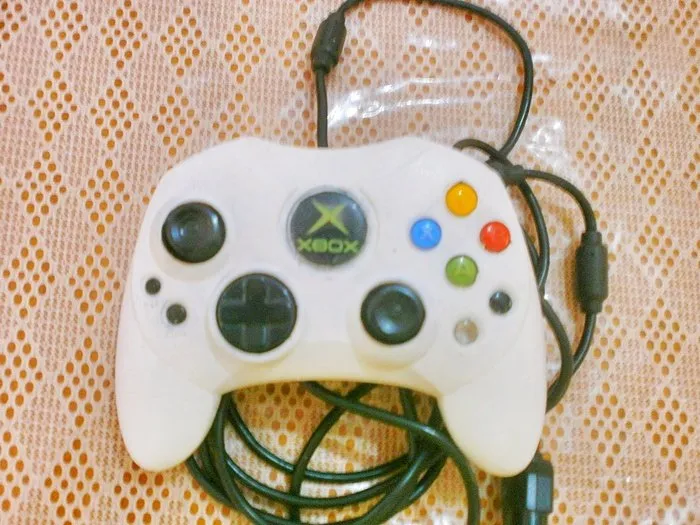
Well family there you have a homemade white classic Xbox controller, I hope you liked it, it's a lot of processes to do this experiment but it was worth it, the controller looks good, we'll see how long the paint resists haha🤑. Maybe later I will do the same with other remotes.
That's all for now, thanks for making it this far, see you next time. :D 🎮⚪️
Thank you very much!!

Translated with www.DeepL.com/Translator

🎮¿Por qué pintar una carcasa?...y ¿Por qué no? 😜
Hola familia de Hive y hermanos Gamers, hoy les traigo un post diferente, como ustedes saben yo soy un coleccionista de mandos de videoconsolas, mi sueño es tener un setup gamer con todo tipo de mandos diferentes, que ninguno sea igual al otro, todos diferentes, entonces investigando pude ver varios modelos de mandos de Xbox clásico con diferentes colores, los más resaltantes eran los translucidos, habían de color azul, color rojo, color verde (que ya tengo) y color blanco, este último es el que más deseaba, ¿Qué pasó? Pues para mi mala suerte en este país no se pueden encontrar mandos de Xbox clásico de esos modelos, ni siquiera de plástico normal, pero de otro color.
Busque bastantes paginas y sólo aparecían en paginas extrañas que la verdad no generaba mucha confianza, no decían precio ni condiciones del producto, lo que más quería yo era tener un mando de color blanco para mi Xbox en vez de tener otro mando aburrido de color negro, busqué por muchos sitios y la única forma de tener uno así de diferente es comprando uno usado, que tal vez no funcione al precio de un mando nuevo de Xbox, cosa que me parece una locura la verdad.
Así que entre las muchas carcasas que tengo de mando de Xbox mi mamá me aconsejo de pintar uno por mi propia cuenta, esa idea me parecía excelente, ¿Con pintura en Spray? No,no,no,no,no y no jaja🤣, entonces ¿con qué lo pintaste? Con pintura al frío (sonidos de grillo) así es señores con pintura al frío, pero esperen un momento que yo siempre tengo un método para que todo se vea bien.
Posteriormente agarré una de las carcasas que tenía guardadas decidí usar la más fea, usé sólo un pincel y un frasco de pintura al frío de color blanco, la carcasa del mando la separé de la electrónica del mismo para no tener inconvenientes, separé cada una de las partes de la carcasa y empecé a pintar, solamente lo hice por las partes de afuera de la carcasa, no era necesario pintar las partes de adentro, lo más importante era que se viera blanco por fuera para que luciera como un mando de Xbox 360 original jaja.🤣
Bueno comencemos a pintar el control, sin miedo ponemos el pincel con la pintura encima del plástico del control, yo empecé por la parte de adelante por donde esta el logo de la consola, con mucho cuidado vamos pintando la mitad del plástico para que la pintura no manche el logo, tampoco para que nos manche los dedos, pintamos, pintamos y pintamos, esperamos como 10 minutos a que la pintura se seque, luego comenzamos por el otro extremo, lo bueno de la pintura al frío es que se seca rápido y se adapta bien al los agujeros de la carcasa.🎮
Después de que se sequen ambos extremos lo que tenemos que hacer el mismo procedimiento como 3 veces (4 para asegurar) para que el mando se vea legítimamente blanco, de lo contrario parecerá como una pintura hecha por un niño.👶
Si cae pintura en el logo siempre pueden contar con la saliva para remover la pintura antes de que se seque, o bien usamos alcohol para que el proceso sea mucho más fácil.
Luego pintamos lo que es la parte de arriba de la carcasa, donde se usa para guardar memory cars en el control, aquí usé un pincel de punta fina pequeño para pintar con más precisión y no mancharme los dedos, la palabra Microsoft no la pinté, no lo vi necesario estaba mejor así, del resto solo pinte lo que es el techo hasta la parte del gancho donde se pone el cable y no lo que está abajo, tuve que echar como 2 capaz de pintura para que se viera como plástico blanco, menos mal que es una zona pequeña.
Ahora vamos con la parte de atrás, en mi opinión la parte más problemática pues ahí es donde el usuario pone sus manos para jugar y siempre puede sudar en el proceso, yo comencé por la parte de en medio, los dos extremos los deje para después para tener un poco más de agarre a la hora de pintar, luego a los dos extremos debemos pintarlos con mucha pintura con el pincel normal, porque en la zona de los gatillos la pintura se cae muy fácilmente a comparación de otras partes de la carcasa, yo usé aproximadamente como 5 pacas de pintura esperando a que cada una se secara por un lazo de 10 minutos.
Listo ahí están todas las piezas de la carcasa pintadas, pero aun hay algo más que debemos hacer, hay que reforzar la pintura para que no se caiga al poco tiempo, mi mamá como es una artista de gran nivel, usó pegamento con agua para crear una especie de adhesivo que si o si pegará la pintura a la carcasa por mucho tiempo, este adhesivo hay que ponerlo en todas las capas que pintamos y debemos hacer el proceso como 3 veces mínimo, el tiempo de espera para que cada capa se seque dura como 15 minutos.😩
Como lo ven en la imagen las partes de la carcasa están como nuevas, como si fuera hecho de fábrica, lo mejor es pintarlo con pintura en Spray pero para ese momento no contaba con el dinero suficiente, así que decidí experimentar un poco y este fue el resultado:🤠
Bueno familia ahí lo tienen un mando de Xbox clásico de color blanco hecho en casa, espero que les haya gustado, es mucho proceso hacer este experimento pero valió la pena, el mando se ve bien, veremos cuanto tiempo resiste la pintura jaja🤑. Quizás más adelante haga los mismo con otros mandos.
Es todo por ahora, gracias por haber llegado hasta acá, nos vemos en la próxima. :D 🎮⚪️
¡¡Muchas Gracias!!
Translated with www.DeepL.com/Translator